Maintaining correct tire inflation pressure is very important since it helps optimize tire performance and fuel economy while over-inflated tires are just as problematic as under-inflated ones.
In fact, driving with under-inflated tires is one of the biggest causes of tire failure, according to the National Highway Traffic Safety Administration.
Besides, under-inflated tires can cause many other problems such as wearing out more rapidly, handling poorly and reducing fuel efficiency.
In addition, over-inflated tires are more susceptible to damage from road irregularities, and this also creates a bumpier ride.
Overfilling your tires is just as dangerous as under-filling them, so it’s important you know what is recommended for your vehicle.
This article will give you everything that you need know about your recommended tire pressure. These include:
Buy Pressure Gauge at Amazon
Recommended tire pressure, where to find it?Since tire pressure is so important to your safety and your car’s overall performance, it is important to know which level of tire pressure is right for your vehicle.
In fact, how much air pressure your tires need depends on several factors, including the type of vehicle, the type of tire and the intended use of the vehicle etc.
Air pressure in tires is measured in pounds per square inch or PSI. You can find your tire pressure both inside your car and on the sidewall of the tire.
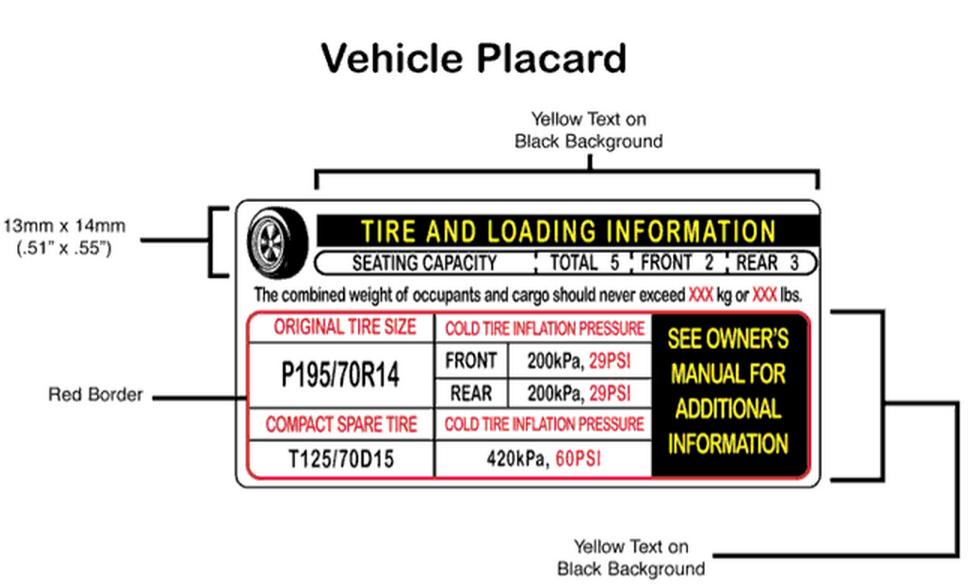
How to find recommended tire pressure inside your carYou could find the manufacturer’s optimum or recommended tire pressure for your car on a sticker in the door jam, or in your owner’s manual. Some car models even place the stickers on the trunk lid, in the console or on the fuel door. For best results, look for a placard on the inside of the driver’s door, like the example in the photo below.
How to find maximum tire pressure on the sidewall of your tiresSomewhere on the sidewall of your tire, just below the big, bold letters of the manufacturer, for example, you might have noticed the words ‘Max. Press. 35 PSI.’ (pounds per square inch).
That number tells you the maximum cold pressure needed for your tire to carry its maximum load.
Most typical tires require about 32 to 35 pounds per square inch (PSI) of air, says Rod Tate, owner of highly rated Colony One Auto Center in Stafford, Texas.
Large trucks require much larger tires with PSIs of 50 to 60. Heavy-duty vehicles can go even higher. For example, tire in the picture below requires 41 pounds per square inch of air.
However, the tire’s maximum pressure is NOT necessarily the most suitable pressure for every vehicle upon which the tire can be used (almost all vehicle manufacturers’ recommended tire inflation pressures are less than the tires’ maximum pressure).
You really should follow the recommended pressure printed somewhere inside your car or in the manual rather than the maximum pressure. In the next section, I will explain why.
Buy Pressure Gauge at Amazon
Why is maximum tire pressure not the best?If you insist on inflating your tires to the max PSI, there will be more likely that two things below will happen
Since tires inflated to the max cannot give as much on the sidewall, you might see superior cornering, but it could be at the risk of your braking threshold. One quick corner and your back end could slide out.
When your tires are inflated too much, the rubber rounds out at the top of the tire when you are driving, and the center will quickly wear out. You will also reduce your traction and you could even cause a blowout.
Therefore, maximum pressure is not the best, rather, recommended pressure is. I need to repeat here that the pressure listed on the sidewall is a maximum pressure only, but not a recommended pressure. Instead, you should use the air pressure recommended in the vehicle’s owner’s manual or tire information placard label.
How to check your tires pressure?Therefore, maximum pressure is not the best, rather, recommended pressure is. I need to repeat here that the pressure listed on the sidewall is a maximum pressure only, but not a recommended pressure. Instead, you should use the air pressure recommended in the vehicle’s owner’s manual or tire information placard label.
After knowing the most appropriate pressure for your car tires, you should check whether your tires have such pressure. In addition, checking the pressure of your tires regularly is one of the most important – and most often overlooked – regular maintenance that you should do to ensure your safety and quality of your driving. Monitoring the amount of air in your tires will let you know if you have a small leak and can help you avoid an unexpected flat tire.
Frequently checking your PSI becomes even more important in the fall and winter, when outside temperatures drop and weather conditions fluctuate causing your tires to lose air more quickly. Generally speaking, your tire will gain or lose one PSI for every 10-degree change in temperature, which means if you have a sudden drop of 30 degrees, you could lose three PSI overnight. If your tires were already low, this could cause tire damage, steering problems or even a flat tire.
Some experts recommend that you should check the air pressure every time you refuel; others say once a month is sufficient.
How to check tire pressure properly? Checking tire pressure is easy. You can do it right at home or at the gas station. Just be sure you check the pressure when your tires are cold, or have not been driven in several hours. This will give you the most accurate reading.
The most important piece of equipment you need is an accurate tire pressure gauge. You can find battery-operated digital gauges, or more traditional stick-type gauge found at most gas stations. A good gauge should not set you back more than $15 – a worthwhile investment for a longer life for your tires.
Buy Pressure Gauge at Amazon
Make sure you have your manufacturer’s PSI handy when you are checking your tire pressure, and then follow these steps:

By checking tire pressure once a month, you will get a good idea how they are performing. If your tires are fairly new and continue to leak air, you should consult your dealer or mechanic. You may have a faulty valve or other damage that is difficult to detect which could unfortunately result in the need to replace the tires completely. But with proactive maintenance, you could catch an issue before it becomes a problem, and just end up needing a small repair.
Often, it is hard to spot an under-inflated tire until it is too late – in other words, it is completely flat. Of course, you could carry a gauge around at all times to measure the pressure, but that is not exactly convenient. Instead, watch for these signs and symptoms of tires that are under-inflated.
When your tires are under-inflated, your ride can be less smooth than usual. You may even find that it takes longer to brake.
When a tire is not inflated properly, it wears down more quickly. If you notice that one or all of your tires are wearing out faster than usual, it may be because they are under-inflated.
Tires that are under-inflated can make your vehicle quiver and shake, which is not a pleasant driving experience. Under-inflation can even cause tires to become misaligned, with comes with it is own variety of problems.
These are all things that you need to know about recommended pressures of your car tires. After reading this article, you will never confuse about the right pressure of your tires and will know how to check it.
Please share your ideas with me if you have other tips for this.
From a safety and cost standpoint, tire maintenance is one of the most important things you can do for your car. The easiest way to care for your tires is both quick and inexpensive: maintain the correct tire pressure.
The recommended pressure for tires varies by the type of car and tire. Because maintaining your tires is so crucial to your safety and your car’s overall performance, it’s important to know what tire pressure is correct for your vehicle.
To learn what your tire pressure should be, look for your manufacturer’s recommendation, which is printed on a label inside your car. Depending on the vehicle, this label may be on the edge of the vehicle’s door, on the doorpost or in the glove box. The label will usually give recommendations for the front and rear tires as well as the spare, and it’s important that you stick to those guidelines. Even after you’ve replaced your tires, the same pressure guidelines on your car’s label apply to new tires of the same size.
Pressure recommendations are based on readings taken from a tire pressure gauge. Check the pressure first thing in the morning or wait at least three hours after driving; this provides sufficient time for them to cool back down.1
Driving on underinflated tires is one of the biggest causes of tire failure, according to the National Highway Traffic Safety Administration. And not having enough air in your tires can lead to other problems. Under-inflated tires wear out more rapidly, handle poorly and reduce fuel efficiency. On the other hand, overinflated tires are more susceptible to damage from road irregularities, and they also result in a bumpier ride. Overfilling your tires is just as dangerous as underfilling them, so it’s important you know what is recommended for your vehicle.
Knowing how to check tire pressure is critical to your safety and to keeping your tires in good working order.
When it comes to choosing a gauge, you typically have 3 options:
Put the pressure gauge into the valve stem, making sure the gauge is evenly and firmly pressed onto the stem. If you’re using a pen-style gauge, read the number on the rod that pops out of the sleeve. Read dial pressure gauges as you would a watch with one hand. With a digital pressure gauge, simply read the number on the screen. 2
Find your tires’ recommended PSI in the owner’s manual or on a sticker just inside the driver’s side door. The proper PSI is crucial to your safety and the car’s longevity. Underinflated tires can overheat and wear unevenly; overinflated tires can blow out.1
Temperature has a direct effect on your air tires’ air pressure, so for an accurate PSI reading, make sure to check tire pressure when tires are cold. If it’s cold outside, then you can assume your tires are losing PSI and you should check even more frequently. This will help to ensure maximum safety. Take your car to a mechanic you trust for a professional assessment.3
If you happen to find yourself without a tire gauge and your car doesn’t have an indicator for low tire pressure, there are several things you can do to figure out whether your tires need to be inflated.
Of course, knowing your recommended PSI isn’t enough. You have to ensure you’re checking your tires regularly. Experts recommend you check air pressure once a month.5 Your car’s tire pressure monitoring system TPMS measures the amount of air in your tires to let you know whether your tires are properly inflated. 1
1
Frequently checking your PSI becomes even more important in the fall and winter, when outside temperatures drop and weather conditions fluctuate causing your tires to lose air more quickly. Generally, your tire will gain or lose 1 PSI for every 10-degree change in temperature, which means if you have a sudden drop of 30 degrees, you could lose 3 PSI overnight. If your tires were already low, this could cause tire damage, steering problems or even a flat tire.3
Knowing and maintaining the right air pressure is important to the safety and longevity of your tires. All it takes is a tire pressure gauge and a few minutes of your time.
Once you have the right tire pressure, make sure you also have the right coverage. Learn more about how Nationwide auto insurance can help protect you and save you money.
Sources:
1 https://www.pirelli.com/tires/en-us/car/driving-and-tire-tips/how-to-read/recommended-tire-pressure, Accessed April 2022.
2 https://www.consumerreports.org/cro/tire-pressure-gauges/buying-guide/index.htm#:~:text=There%20are%20three%20types%20of,of%205%20to%2099%20psi., Accessed April 2022.
3 https://www.firestonecompleteautocare.com/blog/tires/should-i-inflate-tires-cold-weather/, Accessed April 2022.
4 https://rxmechanic.com/how-to-check-tire-pressure-without-gauge/, Accessed February 2022.
I'll start from afar. Last winter I had a chance to make a USB device with a core placed in an FPGA. Of course, I really wanted to check the real throughput of this bus. Indeed, in the controller - there is too much stuff. You can always say that a delay is introduced here, or over there. In the case of FPGAs, I see a block pumping data, so he told me that there is data in it. But I set that everything is processed, and I'm ready to accept a new portion (at the same time, it already accepts data into the second buffer of the same endpoint). Great, we set readiness from the very first cycle and see what happens when USB can “thresh” without stopping.
And it turns out an amazing thing. If a USB 2.0 device is plugged into the “blue” connector (which is USB 3.0), then the speed is one. If in "black" - another. Here's my graph of USB write speed versus data length. USB3 and USB2 is the connector type, the device is always USB 2.0 HS.
I have tried different machines. The result is close. No one could explain this phenomenon to me. Later I found the most probable cause. And the reason is very simple. Here are the USB 2.0 controller properties:
Controllers that control the "blue" connector do not have this. And the difference is just about 20 percent.
From this we conclude that the bandwidth limitations are not always determined by the physical properties of the bus. Sometimes other things are added. Let's move on with this knowledge today.
So. It all started very casually. One program was tested. The process of writing data simultaneously to several disks was checked. The hardware is simple: there is a motherboard with four PCIe slots. All slots are plugged into exactly the same cards with AHCI controllers, each of which supports exclusively PCIe x1.
Each card serves 4 drives.
And here comes the next effect. We take one disk and start writing data to it. We get a speed of 180 to 220 megabytes per second (hereinafter, a megabyte is 1024 * 1024 bytes):
We take the second drive. The write speed to it is from 170 to 190 MB / s:
We write to both at once - we get a speed drawdown:
The total speed is obtained in the region of 290 MB/s. But the surprising thing is that we debugged (it happened) this program on the same drives, but on other channels. And everything was fine there. We quickly poke into those channels (they will go through another card), we get an excellent job:
I must say right away that it is not worth blaming some foreign components for everything. Here everything is written by us, starting from the program itself, ending with the drivers. So the whole data path can be controlled. Uncertainty comes only when the request has gone to the hardware.
After the initial analysis, it turned out that the speed is not limited in the "long" PCIe slots and is limited in the "short". Long ones are where x16 cards can be inserted (although one of them works in x4 mode), and short ones are only for x1 cards.
Everything would be fine, but the controllers in current cards cannot work in a mode other than PCIex1. That is, all controllers must be in absolutely identical conditions, regardless of the length of the slot! An no. Who lives in the "long" - works quickly, who in the "short" - slowly. Good. And fast - how fast? We add the third drive, we write on all three.
In the "short" slots, the limit is still around 290 MB / s:
In the "long" - around 400 MB / s:
I searched the entire Internet.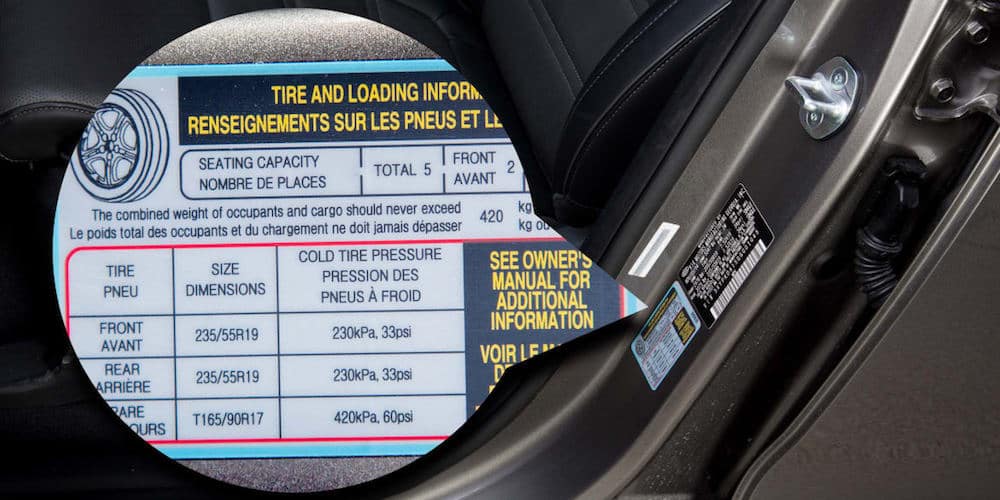 Firstly, after a while, I already laughed at articles that say that the throughput of PCIe gen 1 and gen 2 for x1 is 250 and 500 MB / s. These are "raw" megabytes. Due to the overhead (I use this non-Russian word to denote a service exchange that goes along the same lines as the main data) for gen 2, it turns out exactly 400 megabytes per second of a useful stream. Secondly, I stubbornly could not find anything about the magic number 290 (looking ahead - still not found).
Excellent. We are trying to look at the topology of the inclusion of our controllers. Here it is (013-015 are the suffixes of device names, by which I compared them in order to somehow distinguish between them). Green is fast, red is slow.
We do not even consider the controller "015". It lives in a privileged slot dedicated to the graphics card. But 013 is connected to the same switch as 012 and 014. How is it different?
Separate articles say that different cards may differ in Max Payload parameters. I studied the configuration space of all cards - this parameter is set for everyone in the same, minimally possible value. Moreover, the documentation for the chipset of this motherboard says that there can be no other meaning.
In general, I rummaged through everything in the configuration space - everything is configured identically. But the speed is different! I re-read the documentation for the chipset many times - no bandwidth settings. Priorities - yes, something has been written about them, but the tests are being conducted with a complete absence of load on other channels! That is, it's not about them.
Just in case, I even disabled the interrupt program. The load on the processor has increased to insane values, because now it constantly stupidly reads the ready bit, but the speed readings have not changed. So this subsystem cannot be blamed for problems either.
We tried to change the motherboard to exactly the same.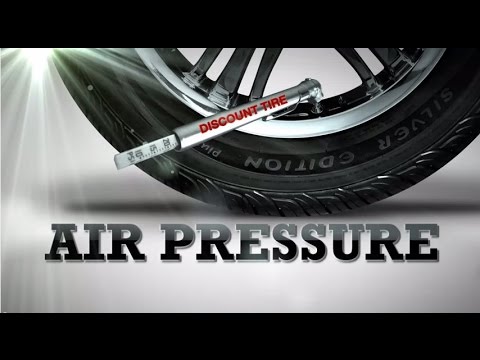 No changes. We tried to replace the processor (there were reasons to believe that it was acting up). Also, no change in speed (but the old processor really messed up). We installed a newer generation motherboard - everything just flies on all slots. Moreover, the maximum speed is no longer 400, but 418 megabytes per second, even in "long", even in "short" slots:
But there are no miracles here. With the usual movement of the hand (I've already got used to it these days), we read the configuration space and see that the Max Payload parameter is set not to 128, but to 256 bytes.
Larger packet size - fewer packets. Less overhead for their transfer - more useful data has time to run in the same time. That's right.
I will not give an exact answer to the question from the title, with reference to the documents. But my thought went along the following path: let's say that the flow limit is set inside the chipset. It cannot be programmed, it is set tightly, but it is there. For example, it is equal to 290 megabytes per second for each diff. couple. More - it is already cut somewhere inside the chipset on its internal mechanisms. Therefore, nothing is cut in the "long" slot (where cards up to x4 can be inserted) inside the chipset for our card, and we hit the physical limit of the x1 bus. In the "short" connector, we run into this limitation.
In fact, it is not easy to check this, but very simple. We stick in the 013th slot not an AHCI, but a SAS controller, which serves 8 drives at once and can work in PCIe modes up to x4. We connect 4 smart SSD drives to it. We look at the recording speed - even the soul rejoices:
Now we add those 4 disks that appeared in the first tests. The speed of the SSD predictably sank:
We calculate the total speed passing through the SAS controller, we get 1175 megabytes per second. Divide by 4 (so many lines go to the "long" slot), we get . .. Drumroll ... 293 megabytes per second. I have seen this number somewhere!
So, within the framework of this project, it was proved that the problem is not in our program or driver, but in strange chipset limitations, which are probably "hardwired" tightly. A methodology was developed for selecting motherboards that can be used in the project. In general, we draw the following conclusions.
 With a Max Payload of 128 bytes, PCIe gen2 actually produces about 400 megabytes per second. In newer generations of PCIe, everything should be a little better, since there physical encoding is not 8b / 10b, but more economical, but so far not a single disk controller has been found on which one could test this in practice.
 Hello friends. In this publication, we will consider the following question: how to find out if the motherboard supports NVMe. Those. whether this high-speed SSD data transfer technology is implemented in the BIOS of your PC or laptop. You will need this information if you want to install a PCI-E SSD in your computer, in particular, a modern one with a PCI-E 3.0 x4 or even PCI-E 4.0 x4 interface. Such drives on the PCI-E 3.0 x4 interface can read data at a maximum speed of 3500 Mb / s, write - at a speed of 3300 Mb / s. And on the PCI-E 4.0 x4 interface, they can read at a maximum speed of 7000 Mb / s, write - at a speed of 5000 Mb / s. But they need a compatible PC to do so, which includes a compatible M.2 slot and NVMe BIOS support. So how do you find out about the availability of the latter?
Friends, NVMe SSDs are drives that are connected to the PC or laptop motherboard only through the M.2 slot, to which the PCI-E bus is connected. The native implementation of such slots in PC motherboards and laptops began in 2015. If you have a PC motherboard or laptop older than 2015, you a priori cannot have either an M.2 PCI slot or an implementation of NVMe technology in the BIOS. And if you want to get a modern NVMe SSD, the first thing you need to know is if you have an M.2 slot in your computer. See the site's article "How to find out if there is M.2 on the computer." In this article, we touch on the topic of NVMe superficially, but here below we will consider the topic in more detail.
So, if you have a PC motherboard or laptop older than 2015, do not look for an M.2 PCI-E slot in it, but in some cases this does not mean that you need to put an end to the idea of working with a high-speed NVMe SSD. In some cases, you will be able to connect an NVMe SSD via a PCI-E-M.2 adapter adapter. And, perhaps, if your PC motherboard or laptop is not very old, the manufacturer has implemented an update for their BIOS that includes NVMe support. As a last resort, you can resort to modifying the BIOS and updating it with a modified firmware that comes with an adapter adapter, or is available on the network on specific resources. Of course, all this is a risky business, we look at the nuances of connecting an NVMe SSD through an adapter adapter here.
Here is what, friends, it is important to understand in the context of the question, how to find out if the motherboard supports NVMe:
M.2 slot on computers and drives are M.2 SATA and M.2 PCI-E, but with NVMe only M.2 PCI-E slots and drives work. If you have an M.2 SATA slot in your computer, you don't need NVMe.
There are M.2 PCI-E slots with M key, these work with four PCI-E x4 lanes. And there are M.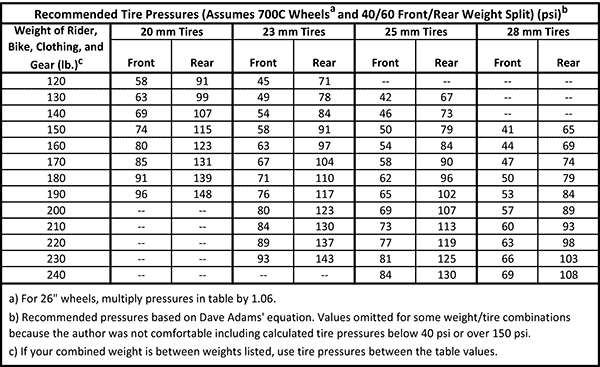 2 PCI-E slots with key B, these only work with two PCI-E x2 lanes. If you have an M key slot, then your computer has NVMe support for sure. If with key B - NVMe support may or may not be. If there is no NVMe support, you can install an NGFF AHCI drive in your M.2 PCI-E slot with key B.
M.2 PCI-E drives come with support for different generations (versions) of PCI-E and different lanes. There were PCI-E 2.0 drives with two and four lines - x2 and x4, these did not always have NVMe support and worked with AHCI, but now you can’t find them on sale (at least in bulk). There are PCI-E 3.0 drives with two and four lines - x2 and x4. And there are PCI-E 4.0 drives with only four lines - x4. So PCI-E 3.0 x4 and PCI-E 4.0 x4 drives are almost always NVMe drives. However, PCI-E 3.0 x2 drives may not be NVMe-enabled, but AHCI-enabled. And PCI-E drives without NVMe are called NGFF AHCI, and, accordingly, they do not need NVMe support on the computer.
The easiest way to find out if your motherboard supports NVMe is to look at the BIOS settings. If there is support, there will be an option in the advanced BIOS settings that is responsible for the NVMe configuration.
In this parameter, when connecting NVMe drives, they will be listed as devices connected via an NVMe controller.
An alternative way to find out if a motherboard supports NVMe is to go to its specifications page on the manufacturer's website. If there is information about NVMe, it will be indicated in the general or detailed specifications.
However, PC motherboard manufacturers don't always talk about NVMe support. The fact is that for modern PC motherboards, NVMe support is already a standard, and if the motherboard has an M.2 slot with PCI-E 3.0 x4 and PCI-E 4.0 x4 interfaces, then NVMe support is a matter of course. Nevertheless, you can go to the motherboard specification support section and see a list of supported M.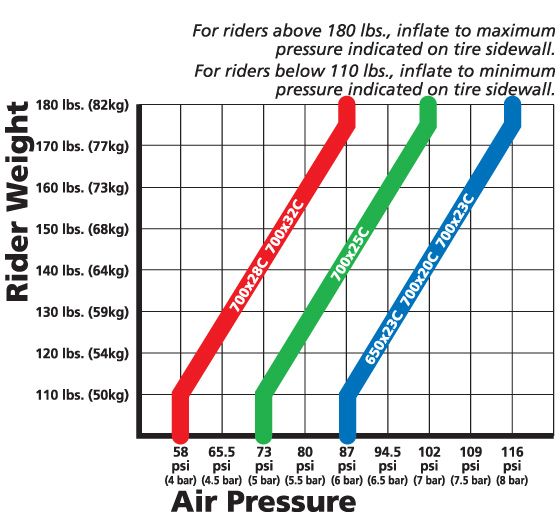 2 drives, such as, for example, for the latest Gigabyte motherboard.
Another example is the latest Asus motherboard, on its specifications page there is no indication of NVMe support among the characteristics, but the presence of M.2 slots with PCI-E 3.0 x4 and 4.0 x4 indirectly indicates this.
For more confidence, we can go to the motherboard support section and, again, see compatible devices of information. Among them are NVMe drives.
Notebook specification pages, alas, do not always provide detailed information about the device. But the presence of NVMe support can be indicated by data on the configuration of information drives, which refers to their type - NVMe PCI-E.
If there is no mention of NVMe in the laptop specification at all, you can write to the support of the manufacturer or seller of the device with a request to obtain information whether your laptop model supports NVMe, and what other options NVMe drives support.