It’s no secret that proper maintenance is essential if you want to keep your vehicle running in tip-top shape. We’re all familiar with scheduling oil changes or replacing windshield wipers, but another very common problem drivers have is a poor seal along the wheel rim.
The good news is that this repair is easy to do without taking your vehicle to a shop. Here’s a complete guide on how to seal a tire on a rim correctly and give your vehicle the power it needs.
So, what exactly does it mean when the seal on a rim is improperly sealed? It’s quite common. A poor seal can result in a slow leak along your rim. It can take up to months to discover, depending on how severe the leak is.
It’s a common result of accidentally striking a curb or another object since this can also break the seal of the rim itself, otherwise known as the tire bead.
Before you begin the process of sealing your tire along the rim, you’ll need to be familiar with where exactly the tire seal is to ensure you’re looking in the right place.
The tire seal, also known as a tire bead, refers to the edge of the tire that sits on the edge of the wheel. Wheels for vehicles have a small groove design where the tire bead rests.
If it is not inflated properly, the air pressure can keep the tire bead in this space. In turn, it can cause damage, most commonly leading to a leak along the rim.
Consider checking: How To Seal Tire Bead
Depending on the leak along the rim, you may not even notice the damage for some time. You can drive your vehicle normally if the leak is small enough, but that doesn’t mean you should ignore the damage.
Slow leaks lead to low pressure, which then affects the safety of your vehicle and the gas mileage.
It’s easier to learn how to seal a tire on a rim than you think! Here is a step-by-step guide you can follow without taking your vehicle to a shop. You’ll know the basics of how to seal a tire on a rim in no time.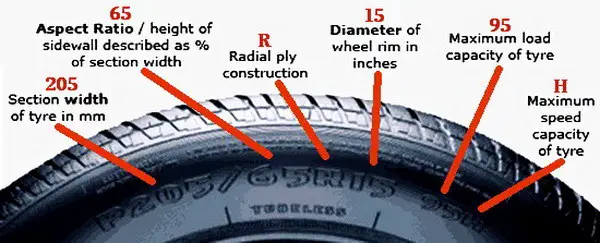
First, remove the tire from the vehicle and lay it flat on the ground. This will make finding the leak much easier since you don’t need to navigate the vehicle to find damage.
Spray a mix of soapy water on the area along the rim you suspect is leaking. When doing this, make sure to focus on the area between the tire and the rim.
Bubbles should appear anywhere there is a leak. If you spray around the entire rim and still see no bubbles, then the leak may be elsewhere in your tire.
Next, clean the tire bead. During this step, you need to eliminate all dirt, rust, or other debris. This will allow you to clearly see any damage that needs to be addressed.
Now, move on to cleaning the rim. To ensure you clean this area thoroughly, use a wire brush. To clean this portion, simply brush it with a focus on any parts that are particularly dirty or rusty.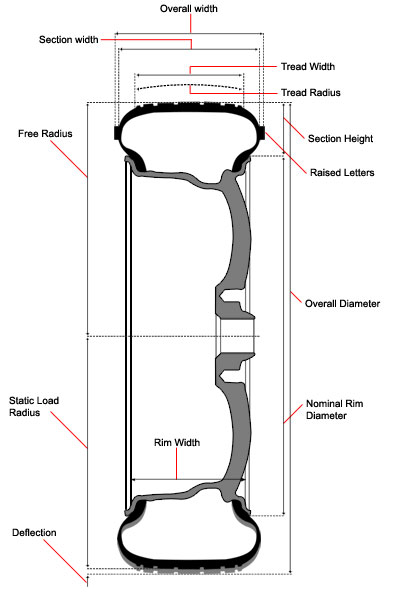 This mostly happens in the area where it is in contact with the tire and the area in which you’re most likely to have a leak.
If you find a crack in the wheel itself, it means you need to replace the entire wheel.
Consider checking: How To Repair Tire
If your wheel is free of cracks and fully cleaned, you can move on to sealing the rim. To do so, you’ll need a bead sealer, preferably a thin coat. This is easy to find at any local auto parts store.
Simply use the brush that came with the bead sealer to apply a thin layer over the area where the seal contacts the rim. Ensure to apply this throughout the entire area, not just the area you expect you have a leak.
Once the bead sealer is dry, you can attach your tire to your vehicle and test it. Inflate to the pressure you prefer, then spray again with the soapy mixture from the first step. If no bubbles appear, then you’ve successfully sealed a tire on a rim!
If you can still see that the leak is there, it’s possible the issue could be a bent rim. In this case, you’ll need to bring your vehicle to an auto service station.
Consider checking: How Much Sealant Per Tire
See, that was pretty easy! All you need to seal a tire along the rim properly is some soapy water, a good wire brush, and a bead sealer. Once you go through this process once, it will be easy to remember and do it again.
Did you find this blog helpful? Then consider checking other recommended readings:
How To Fix A Tire Rim Leak
How To Use Rubber Cement On Tire
How Do You Plug A Tire
How Do You Patch A Tire
How Do Tires Get Dry Rot
How To Fix Dry Rotted Tires
How Much Is It To Repair A Tire
How To Fix Flat Spots On Tires
How Much Does It Cost To Patch A Tire
How Close To The Sidewall Can You Patch A Tire
How To Fix Hole In Tire
How Long Does A Tire Patch Last
How To Use Slime Tire
How To Use A Tire Plug Kit
How To Vulcanize A Tire
How To Fill Tires With Foam
By Keith Dooley Updated March 07, 2022
Riding mowers are a matter of convenience for some homeowners and a necessity for others when cutting large areas of grass. The tires on a riding mower are designed to be durable, but due to normal use, there may be times when a tire loses air pressure. When this happens, the tire may separate from the rim. Sealing a mower tire to the rim requires a few basic steps and can be accomplished at home.
Park the riding mower on a flat and level area, leave the transmission in gear and set the parking brake. Put on gloves to protect your hands while working.
Pull the plastic cap off the axle with the flat tire. Remove the snap ring with snap ring pliers, and then pull the ring and washer off the axle. Place a tire jack under the front of the mower. Home Depot points out that the jack must be under the frame and not the motor. Raise the mower so the flat tire is off the ground and pull the wheel and tire off the axle.
Inspect the tire for damage such as a slit or puncture that could prevent proper inflation.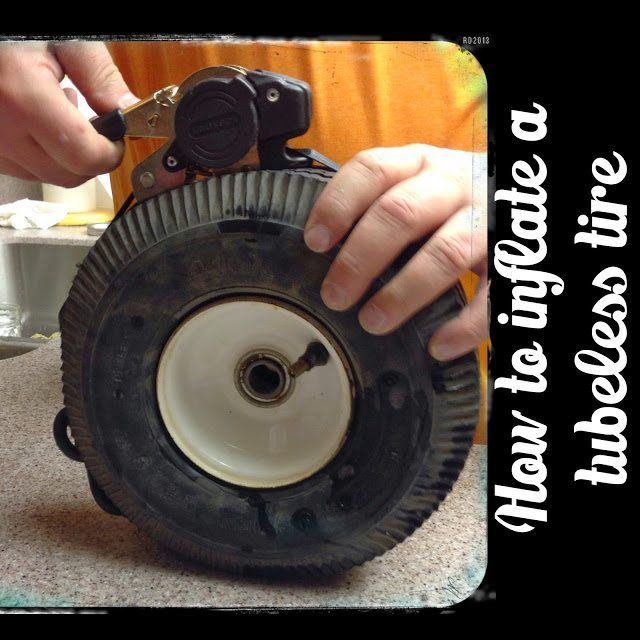 Remove a damaged tire from the rim by prying the tire over the rim with blade screwdrivers. Obtain a suitable replacement tire if necessary from a mower repair shop or hardware store.
Install the replacement tire onto the wheel by working the tire over the rim with the blade screwdrivers. Apply tire seal along the edge of the rim where the tire will seat.
Place a ratchet strap around the tire and pull down until snug, instructs Random Knowledge Guy. Apply enough pressure to the tire with the strap to force the sides of the tire down firmly against the wheel. Use a tire pump to inflate the tire partially and force the sides of the tire to seat against the rim.
Loosen the ratchet strap a little and add more air. Continue to loosen the strap and add air until you are sure the tire is securely seated on the wheel. Remove the strap, and then fill the tire completely with air. Use a tire pressure gauge to check the pressure. Refer to the manufacturer's recommended tire pressure; it is usually listed on the side of the tire.
Place the wheel and tire assembly back on the mower axle. Install the washer and snap ring, and then replace the plastic cap on the axle. Lower the mower with the jack to use the mower.
Gloves
Tire jack
Snap ring pliers
Blade screwdrivers
Replacement tire
Tire seal
Ratchet strap
Air pump
References
Writer Bio
Keith Dooley has done work in the field of landscaping and design for more than 10 years. He has implemented his own designs, as well as pulled from techniques learned through studies, creating many landscapes for others to enjoy. He has also maintained lawns, athletic fields, town parks, large gardens and game fields.
To learn how to seal a puncture in a tubeless tire, it is worth considering that there are several ways to perform this procedure. Most often, tire repairs are performed using a tourniquet, a fungus patch, and special sprays that tighten the puncture site and stop air leakage. nine0005
If you want to learn how to seal a tubeless tire at home with a repair harness, you should follow the instructions:
The machine must be put on the parking brake, and a chock can be used to fix the position of the transport. Next, the car is jacked up and the wheel removed.
You need to carefully inspect the surface of the wheel to find the puncture site. Damage could occur as a result of piercing the wheel with a nail, self-tapping screw or glass shard. In this case, the head of the nail or the edge of the glass will indicate the cut. The foreign object must be removed with pliers. If the puncture site is not visible, you can pour water on the tire, which will cause the air that comes out of the hole to attract attention with a hiss. The puncture site must be cleaned of dirt and marked with chalk or a marker. nine0005
Next, you need to take an awl with a screw tip and apply special glue to it. After that, the awl is immersed in the puncture hole and several reciprocating movements are made. The tool should not be removed from the hole.
Then, a repair harness (a strip of raw rubber) is installed in an awl with a needle hole. From two parts there should be identical strips, on which a thin layer of glue is applied. To perform a short-term repair of a large damage, you can apply two rubber strips at once. nine0005
The first awl is removed from the puncture, and a tool with a tourniquet is placed in its place. Outside the tire, the edges of the strip remain (1-1.5 cm long). Next, the awl is pulled out of the hole after the tourniquet passes through. A strip of rubber that has folded in half will remain at the puncture site, and its ends should be cut off.
Having learned how to properly seal a tubeless tire with a tourniquet yourself, and after completing this procedure, you need to inflate the tire to the optimum pressure, after which the wheel can be returned to its place. This method is considered relevant if you need to seal a tire tread puncture, and the hole diameter is up to 10 mm. As for side cuts, the elimination of such a problem should be entrusted to professional specialists working in a car repair shop. nine0005
If you are looking for an option on how to seal a tubeless tire with a repair kit yourself, you can perform this procedure using a patch fungus. For this method, you will need to remove the wheel and tire from the disk. You also need to purchase patches in the form of fungi, sandpaper and glue. The repair procedure is as follows:
It is necessary to clean the puncture site, rinse it and remove dirt, as well as foreign objects that damaged the tire. nine0005
Next, the puncture site is cleaned from the inside to give it a roughness. For this task, you can use sandpaper or a drill with a special nozzle.
At the next stage of work, a fungus of the required diameter and size is selected (patches can be purchased at auto parts stores), based on the size of the puncture.
Then the patch must be allowed to dry, after which the wheel can be assembled.
If you are looking for an answer to the question of how to seal Michelin tubeless tires or tires from another brand, you can use the easiest and most effective way. You can use a spare in a can. Sealant allows you to quickly seal the wheel. To apply it, you need to unscrew the nipple (this action is not always required). The contents of the vial must be squeezed into the opening of the nipple and returned to its place. Within 10 minutes after inflating the tire, you can continue on your way. nine0005
To see how to seal a tubeless tire in a video, you can watch a YouTube video with detailed video instructions: https://www.youtube.com/watch?v=PpnKzfpkeoQ.
Based on the method of repair, certain tools and fixtures will be selected. To repair a tire with a tourniquet, you will need a repair tourniquet, two awls (one of them with an eyelet) and glue. When using a patch fungus, you will need a patch, sandpaper (or a drill), and glue. Among other things, repairs can be carried out with tire sealant. Also, when repairing tires, it is worth using a portable compressor (for inflating tires), a repair kit, a jack, pliers, a wheel wrench, a knife and anti-recoil fixing auto devices. nine0005
When choosing a repair method, take into account the degree of damage to the tire and follow the instructions so that the work is done as efficiently as possible and the wheel returns to its previous operational state.
Another season of changing shoes is coming. And you may remember that on one of the tires after the last winter/summer there is a jamb - a small bump. I don’t want to run to the store for the sake of one new tire. We understand. Or maybe it looks even better if repaired? nine0005
Yes, not every wheel that meets with a nail, rebar sticking out of the ground or a sharp stone on the road is considered damaged. Everything, of course, depends on the scale of the damage and its location on the tire itself. Some are easily repaired, while others are simply impossible to do - the tire can only be sent to the trash.
Bump or bulge, commonly referred to by drivers as a bump or bulge, is the most common tire sidewall defect. It appears due to a collision with an obstacle or after falling into a pit, more often at high speed. The threads of the sidewall carcass are easily damaged by impact, and the tire at this point can no longer hold the load and air pressure - swelling appears. A small bump sooner or later turns into a big one, and driving with such a defect is dangerous - the wheel can shoot at any moment. At high speed, this is fraught with loss of control, departure from the road and a rollover. nine0005
The quality of roads in Kazakhstan contributes to the appearance of bulges on tires
Some types of bulges are repairable, although this is a temporary measure. Not a single patch can restore the factory rigidity. Ideally, change the tire.
Special cord patches can extend the life of a tire with a herniation, even if the swelling has appeared on the tread. The sidewall is a different story. If the swelling appeared at a distance of more than 40 mm from the side, it can be repaired. If not, then the wheel needs to be replaced. Blisters on low profile tires are most often non-repairable. nine0005
For maximum safety when riding with a repaired bump, insert the tube. This is an inexpensive and reliable solution. On our market, you can find cameras made in China and Russia, the latter are slightly more expensive, but also of better quality.
The elimination of a side cut is a serious operation, therefore, as in the case of a bump, you will have to go to the professionals. We need cord patches, fortunately in our time they are of different sizes and with a different number of layers. And if you do it wisely, then you can't do without special tools and vulcanization. nine0005
A cut, by the way, cannot be healed in all cases. If the gap is in the shoulder area of the tire, it is unlikely that anyone will undertake to repair it, since no guarantees can be given here. However, our Kulibins take on even the most difficult cases, cutting out parts of the sidewalls from the tires and even weaving the cord on their own.
Tire overhaul. We would not put such a wheel on ourselves
Low profile tires can be repaired, but more difficult. A tear in the sidewall is easier to seal on tires with a medium or high profile. nine0005
Sometimes a cut is confused with a pluck. This is when the outer layer of the sidewall caught on something sharp, a tear formed, but the frame itself remained intact. There is nothing wrong with that, although the drivers at the tire fitting company successfully repair the cut, for which they take it accordingly.
If a piece of rubber remains on the sidewall, then glue it with ordinary superglue (101st). If it came off, then it is better to cover it with raw rubber and vulcanize. Leaving the pluck bare is not recommended, because the tire carcass, often consisting of a metal cord, will quickly corrode. nine0005
In Europe, defective or used tires are perforated before being sent to the scrapyard to prevent their resale and possible operation. But they don’t know that we have such holes on the sidewall patched once or twice
Cuts and hernias are not the only possible damage to the side of the tire. You can also spoil the side ring, in the process of changing shoes, for example. If it’s for garlic, then such a tire is already dangerous. Sooner or later, the tire pressure and the load in motion will start to squeeze the rubber off the rim - a wheel explosion can occur. nine0005
This ailment is repaired if the wire ring - the base - is intact. There are no special technologies and materials to correct this particular problem, but most often craftsmen use a two-component composition for chemical (also called cold) vulcanization. After mixing, the mass is pressed into a fat-free damage. Compound manufacturers recommend waiting 72 hours before mounting a tire. Of course, our masters do not pay attention to this condition - they put the tire right away. And it’s good if the wheel is flat because of this at night in the parking lot, and not on the road. nine0005
If the side ring tears are barely noticeable, but the wheel still deflates, then you can use a special liquid - a bead seal designed to seal a tubeless tire.
These seals have been used in motorsport for some time. In particular, in the American Formula D Drift Series, drivers used compounds to keep the tire on the rim even with minimal tire pressure. Now they are banned.
Pay attention to the left rear wheel of the Nissan Silvia S13. Due to too low pressure, it was literally taken off the disk under load
Every schoolchild has faced this problem when patching the inner tube of his bike after hitting something sharp. Repairing a car tire puncture with your own hands will also not be difficult even on the road. But for this you will need a pump (or compressor) and a universal tire repair kit with harnesses. All this is sold at any car market or gas station.
Repairing a tire on the shoulder with harnesses
The process is simple. If we are talking about the front wheels, then in most cases the wheel can not even be removed, it is enough to turn the steering wheel in the right direction, find the puncture site and carry out repairs. First, the hole is cleaned with a helical awl from the set. The tourniquet itself is smeared with glue and tucked into the eye of the awl, after which it is inserted into the tire hole. With a sharp movement, the tool is removed, and the tourniquet remains in place and clogs the hole. The tails are cut with a knife, but not at the root, it is recommended to leave about 20 mm. The tire is inflated and checked. nine0005
Sometimes a nail or self-tapping screw clogs the hole by itself, remaining in it. If you see a hat in a tread, do not rush to pull it out. While the pressure is holding, move to vulcanize. And sometimes they drive with a screw in a tire for weeks.
Repair of a puncture at a tire shop
Punctures are also repaired with harnesses at a specialized service, although among professionals such repairs are not considered long-term. After a few months, the flagella dry out and can let air through. There are more advanced methods like cold and hot vulcanization. The latter is more reliable. In this case, the hole is sealed with an elastic plaster, and the funnel from a foreign object is filled with a special compound. After that, a vulcanizer is put on the tire, it heats up the rubber and solders it. nine0005
In addition to the plaster, the puncture is also repaired with special cord fungi. Craftsmen process the puncture site: drill it and treat the surface with a tool to roughen it. Then the repair area is lubricated with glue (it is also called cement) and a fungus is introduced. This is done from the inside of the tire. The cap of the fungus is rolled, and the excess legs are simply cut off from the outside.
Puncture repair with sealant
With the advent of tubeless wheels, and later run flat tires, many automakers began to abandon spare wheels. Instead, repair kits with compressors are supplied with the machines. A repair kit is essentially a bottle of pressurized sealant. Later, such spray cans began to appear on the shelves of ordinary car dealerships. nine0005
This method has not taken root in the CIS, because the condition of the roads makes it necessary to have at least a stowaway in the kit, but it can also be considered as a method of repair on the road.
Jack up the car and pump sealant through the nipple into the damaged wheel. Next, you should spin the wheel, then pump it up, lower the car and drive a few hundred meters. If the tire tightness has not been restored, repeat the procedure.
For commercial vehicles, cutting the tread with a special device (regrower) is a common thing. Moreover, such tire retreading is provided by the factory (marked REGROOVABLE on the sidewall) to increase the service life. But there are entrepreneurs who undertake to deepen the grooves in tires for passenger cars. But they are not intended for such an operation. Often used tires for sale are “refreshed” in this way. Be careful!
What is the danger?
The worst case is that a retreaded tire will shoot out on the road, because when deepening the grooves, the master can damage the undertread layer. Such a tire will not be able to hold pressure at some point. There will be a boom! In the best case, the tire will indeed last a little longer, but is the game worth the candle? We think it's not worth it.
How is cutting made?
A regrower is used to cut the tread. Roughly speaking, this is a large soldering iron with interchangeable tips of various shapes. It goes through rubber like a knife through butter. nine0005
If the tire is for passenger cars, then it is worth taking on a regrower only in one case - when part of the tread pattern was welded with “new” rubber during repair. This is where threading comes in handy in order to restore the grooves and symmetry of the tread.
Vehicle operation is prohibited if:
— tires have a residual tread height of less than 1.6 mm; nine0197
- tires have punctures, cuts, ruptures that expose the cord, as well as delamination of the carcass, delamination of the tread and sidewall;
- tires in size or load capacity do not match the car model;
- tires of various sizes, designs (radial, diagonal, chamber, tubeless), models, with different tread patterns, winter and summer, studded and non-studded, new and restored, are installed on one axle of the car; nine0197
— Tires retreaded according to the second repair class are installed on the front axle.
What is a second class repair?
This is the case when the carcass of the tire is restored after serious damage. A side cut (or tear) is a serious damage to the tire carcass.