Getting trash and rubbish inside tires happens quite a lot, especially with vehicle owners having many off-road trips. To be more specific, the trash will make its way onto and into the tire. And this is the reason why we need to break a tire bead.
Tire bead is the innermost diameter of the tire that connects with the wheel rim. Most people think that breaking a tire bead is common knowledge for every driver. However, not that many car owners know how to break a tire bead. As long as the bead stays intact, there is no gap to form between the rim and the outer edge of the tire. Basically, there is no way to fix the tire from the inside, which is another reason to learn how to break a tire bead. In this article, our car experts will tell you what tool you need to break the tire, as well as how to do it.
Bead BreakersBefore getting to know how to break a tire bead, it is essential to acknowledge your best tool. Bead breaker is the car tool with the purpose of separating tires from their rims. Different types of bead breakers have different ways of using. So let’s jump right into answering the question “how to break a bead on a tire“:
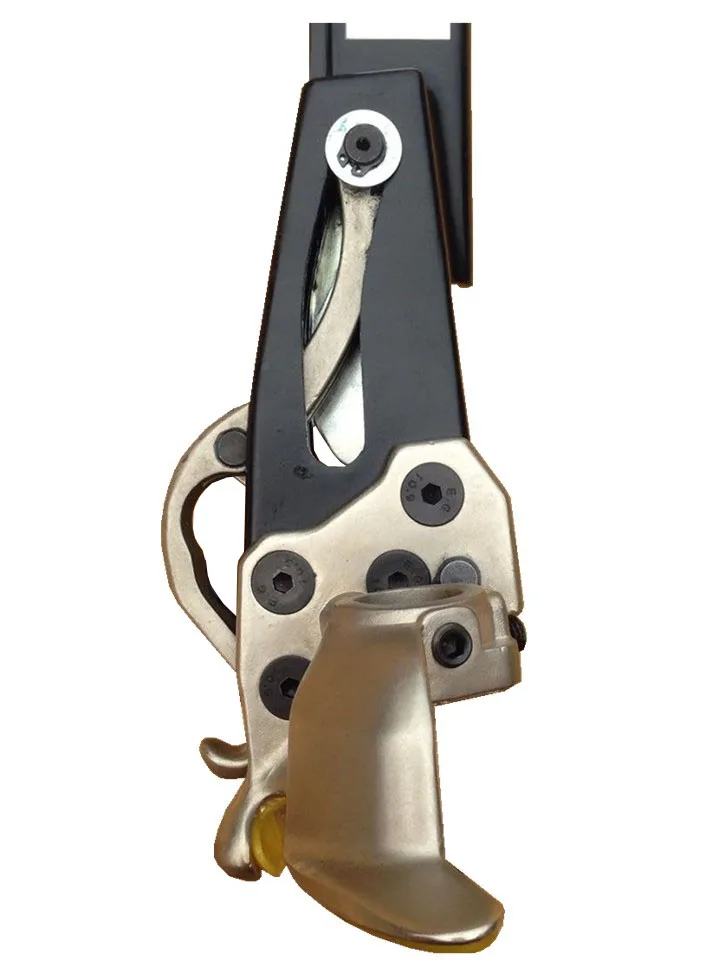
This bead breaker uses a plier-type tool in order to apply force between the bead and the rim’s lip. The tool has a spike to perform this task. To be more precise, this spike imposes a force on the bead and the sidewall of the tire to separate them. Therefore, it weakens and removes their connection. This plier type mechanism is amazingly effective and can get the job done very fast. However, it has its disadvantages. The spike is like a double-edge knife that might leave scratches on the surface and on the wheels themselves. Not to mention, this plier type mechanism is very heavy and big, which requires your full body weight in order to get the results.
Shoe and Lever MechanismJust like the name said, the shoe and lever mechanism has a shoe-shaped tool which can apply pressure on the sidewall of the tire.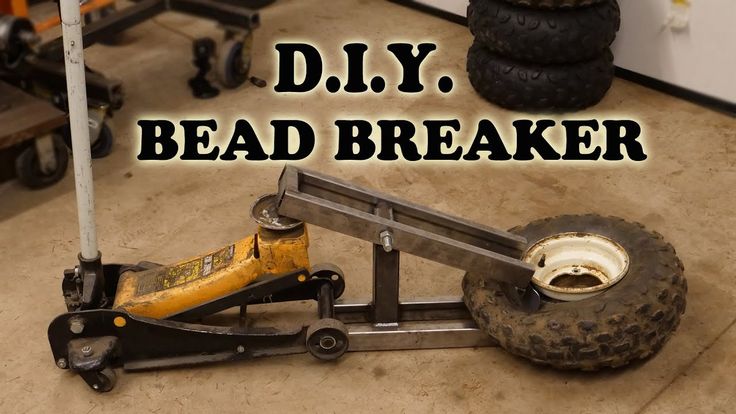 In order to break the connection between the bead and the rim, car owners must push the sidewall. This is, without a doubt, the most popular bead breaker among all, since it works amazingly well on motorcycle tires, new passenger vehicle tires, as well as trailers’ tires. The benefits of this bead breakers are quite a lot: First of all, it is very low cost, so anyone can purchase one for their vehicle. Second of all, the way to use it is quite simple and easy to follow. Last of all, it is made for passenger cars’ tires.
On the other hand, it does not work very well with old and hard-to-change tires. Since the shoe and lever mechanism is also large and bulky, this breaker can only be used on some particular types of tires.
Clamp and Ram MechanismLast but not least, the quickest and most efficient break beads of all time: Clamp and Ram Mechanism. If the first two mechanisms cannot solve the problem with difficult-to-replace tires, this bead breaker can deal with all of them. In order to make it work, this machine uses a pointed foot tool with the purpose of exploiting the space between the bead and the rim’s lip. Not to mention, this bead breaker also has a padded clamp. The part can go inside the sidewall with little effort. Long story short, not only this machine works with all types of tires with minimal human effort, it also causes no harm to the sidewall or to the tires. However, it is quite costly.
Knowing that you are already familiar with all the tools, let’s answer the question of “How to break a Tire Bead?”. In order to perform this task, car owners need to follow these steps:
Step 1: Prepare the ToolNo warrior goes barehand into the war. Here is the tool list that you need:
In order to start breaking tire bead, car owners need to be taken off the valve core to release air pressure out.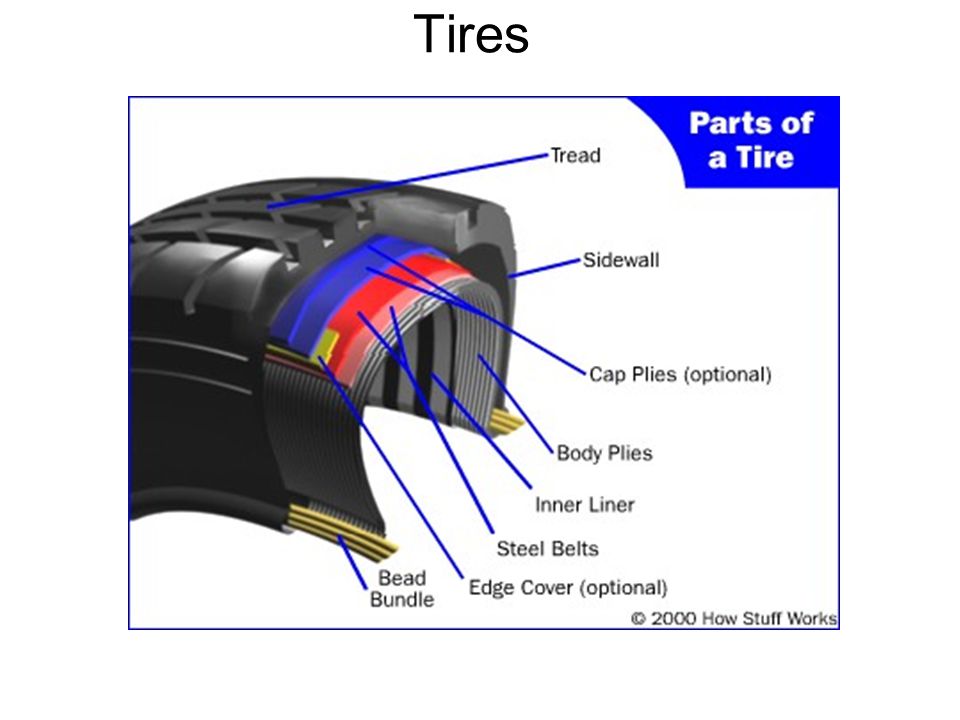 This step needs to perform before and during the first stages.
When the valve core is removed, car owners need to put the wheel under the brace. By performing this, the air will be pushed out and we can easily take the wheel off the rim. Just remember to wait until all the air pressure is lost in order to remove the wheel. A little tip to check the tire is to press your hands against the tire’s surface.
Step 3: Place Tire on a SurfaceIn this step, car owners need to lay the tire on a hard surface. After that, you should position the breaker bar between the rim and tire. Before proceeding to the following step, it is suggested to check if the tapered edge of the breaker bar is aimed toward the tire, not the rim.
Also, a solid surface is the necessary factor in this step, since it is capable of handling the pressure you are going to apply on.
SEE MORE
Inner Tire Wear: Causes And Fixes
Must Have Tools For Garage: A Comprehensive List
The next step of “How to break a tire bead” is to slide the breaker bar between the rim and the tire. It is essential to check if the pointed edge of the breaker bar points away from the tire’s rim. The reason for this is that the edge is highly sharp and might create scratches inside. For that reason, car owners might want to aim the bar to the tire, not the rim.
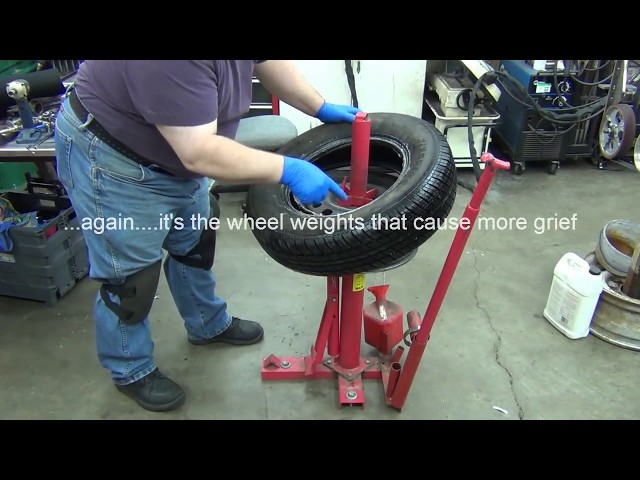
When the breaker is already steadying in the distance between the rim and the tire, it is time to hit it with a hammer with the purpose of breaking tire bead. Wait, we are not telling you to destroy the tire! The purpose of doing this is to drive the breaker inside. So keep hitting it and pushing the breaker bar toward the ground until the bead is broken and we can tell by a small pop sound.
Just take time with this, breaking a tire bead is no joke (Photo Source: bendpak)Step 6: Rotate Around the Tire’s InsideLast step of how to break a tire bead is to remove the tire of the rim. Car owners are recommended to rotate the breaker around the tire’s inside while continuing hammering from above.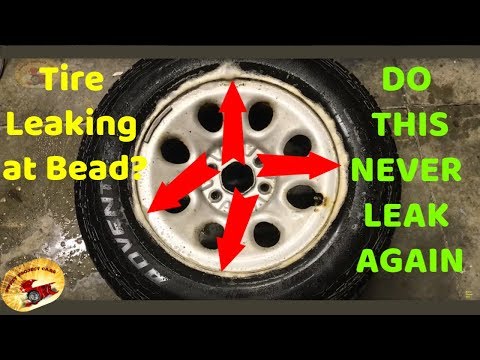 Keep doing that until the tire is off the rim, then turn around and do the same with the opposite side of the tire.
Many people might be wondering, why do drivers need to learn how to break a tire bead? One of the reasons is that the process is simple to follow, even with beginning car owners. All drivers need is thirty minutes and this instruction. Another reason that it provides a great help in cleaning up debris and dirt inside the tire. By breaking the bead, vehicle owners can remove the rubbish inside and reduce the future problems. The last reason is to save the cost of paying a car repairman, since you can remove the tire from its rim by yourself.
by Katebo
king of cars #2 image by Micah Jared from Fotolia.com
The low profile tire is made to be lower to the ground and closer to the wheel for performance and cosmetic reasons. If you have low profile tires on your car, you might find that you are constantly filling them with air.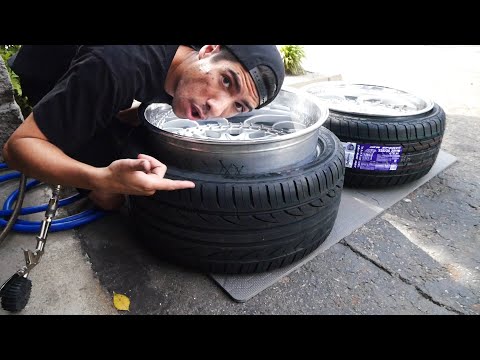 You might not know that you have damaged the tire by hitting a pothole or damaged the rim when you hit a curb. When you have a low profile tire on your car, you have to be careful to avoid potholes and other items in the road because there is not much air in the tire to cushion an impact. Trauma to a tire from potholes and other impacts can cause leaks and damage it beyond repair.
Inflate your tire to the maximum pressure with the air compressor. The recommended pressure is indicated on the sidewall of the tire.
Put your tire into the water tank to look for leaks. When a tire is leaking, you will see bubbles in the water rising to the top. In many cases the low profile tire will leak from the bead area. The bead area is where the tire and the rim meet. Once you have found out the type of leak you are dealing with, you will be able to determine if the tire can be fixed. In some cases you might find that you have a cracked rim or a tire that has been damaged beyond repair.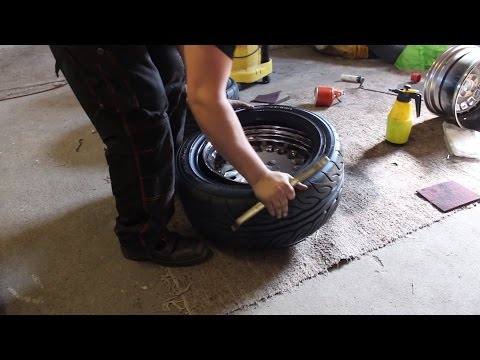 If at this point you see that your tire is leaking from the bead area, move on to the next step.
Remove the valve core from the valve stem by inserting the valve core tool into the stem and turning it to the left.
Identify the bead breaker tool on the tire machine. You will usually find the bead breaker on the right side of the rim clamp tire machine. The bead breaker is made of metal and is curved. You control it with a pedal at the base of the machine.
Position the tire and rim in the bead breaker by rolling it to the point where the head of the bead breaker sits between the tire and the rim. Press the bead breaker function pedal and break the bead. Break the bead on the back side of the tire in the same fashion as you did the front bead.
Inspect the bead areas for anything that could be lodged in between the tire and the rim. Many times you will find corrosion and flakes of metal from the rim. Use the wire brush to clean the bead areas as well as possible.
Unscrew the top of the can of bead sealer, which is a liquid rubber. You will find an application brush attached to the top. Liberally brush the bead sealer inside of the front and back bead, without missing a spot.
Inflate the tire with the air compressor and install the valve core with the valve core tool. Place the tire and rim back into the tank to make sure the tire is sealed.
References
Tips
Things You'll Need
Writer Bio
Katie B. Marsh is a self-published author, article writer, screenwriter, and inventor. After graduating from South Coast College of Court Reporting, she worked as a congressional and freelance court reporter for eight years. She began her writing career in 2005. Her content may be found on amazon.com, booksforsharing.com, and ezinearticles.com. She completed her first screenplay in October 2009.
Looking closely at the pros and cons of low-profile rubber, it is worth noting that recently its purchase has become massive. More and more motorists give preference to her, and with the advent of the summer season, such tires diverge from store shelves at high speed. What is it that attracts people who have cars to them? To find out, you need to delve into the topic of their main characteristics. The pros and cons of low profile tires, as well as their comparison with conventional rubber, we will consider in this article. But first, let's say a few words about the history of their occurrence.
Today's low-profile tires originated in the Michelin factory. It happened in 1937. At that time, the quality of the roads basically did not correspond to such tires, therefore they were not popular among motorists, but they were mainly used by race car drivers. Massive recognition of low profile tires came after forty years, in 1977. It was in this year that the production of new tires for racing cars began. Those tires became the prototype of all modern low-profile rubber produced. Now almost every company has a line of low profile tires.
Currently, by current standards, if the height to width ratio of a tire is 70% or more, then it is considered a low profile tire. Tire sizes are usually marked with three numbers through a fraction (For example: 235/45 / R17). The first number indicates the width of the profile, and the second its height. The third characteristic is the inner diameter. It is generally accepted that the series (it is also the profile height) of the tire we are considering should be less than 55. The difference between low-profile tires and ordinary tires also lies in the set speed index: T - up to 190, H - 210, V - 240, W - for sports cars - above 240 km / h. Mostly small cars are fitted with tires with the first index. The appearance of such tires in a technical aspect can be correlated with an increase in the speed of vehicles. For higher speeds, it was required: better grip with the road surface, more durable braking system. But the criteria for brake discs are limited by the diameter of the wheel rim. In order to increase the diameter, it is necessary to replace the tire, otherwise there simply will not be a satisfactory amount of air. By reducing the profile, it became possible to increase the width, which resulted in a larger area for contact with the road.
There are quite a few advantages. Otherwise, such tires would not have caused such attention from motorists around the world. Firstly, low-profile tires make it possible to allow an increase in car handling at high speeds. For example, when passing a turn, we will not notice the buildup of the body of a car, which is typical when operating a different type of tires. In fact, the buildup itself is a consequence of a change in the shape of the rubber under fairly large loads. And with low-profile it turns out quite differently: the stability of the car on the road increases and, proportionally, the probability of finding itself out of turn decreases. The admissibility of performing maneuvers on the road at sufficiently high speeds also increases many times over. Due to the installation of such rubber, it is possible to achieve excellent sensitivity to road irregularities, to be able to correct the trajectory of subsequent movement. In the case of using light alloy wheels in conjunction with low-profile tires, the mass of the wheels is reduced, which has a good effect on acceleration and maneuverability, and also helps to respond faster when braking.
What can be taken as the disadvantages of such an improvement? Cons, of course, there are, as in fact, any creation of human hands. Most experts associate the main inconvenience with the small height of the tire, compared to the usual one. After all, the lower the rubber, the smaller the layer of air, the gasket necessary to protect the car. Undoubtedly, passengers and the driver himself will feel all the errors of coverage in their own skin. Therefore, it is not recommended to install such tires when systematically driving through pits and bumps. And in view of the fact that in Russia such roads are not uncommon, but rather the majority, think for yourself, it is up to you to decide: all errors will give feedback to the steering wheel. This reduces both the comfort of control and the speed of reaction. The life of the suspension and running gear set by the manufacturer, as well as the auto body itself, is reduced. And the service life, respectively and proportionally, is reduced.
There is one more important disadvantage: due to the increase in width and degree of contact with the road, maneuvers at low speed become more difficult. In the absence of power steering, the steering wheel turns quite hard. Consequently, experts do not recommend installing low-profile tires on cars without such a device. And in the end - a disappointing nuance: the monitored tires can remember their location during long-term parking. Therefore, if the machine has been idle for a long time without movement (especially in cold weather), when the movement starts, steering tremor and vibration may occur. However, after that, the tires warm up and everything returns to normal, so, in principle, it's okay.
Now that you've looked at the pros and cons of low profile tyres, you can make the right decision on your own whether to buy one or not.
Back to articles Previous Next
 ru
ru 1
How can you tell if a summer tire is excessively worn?
Tire shops use a special feeler gauge, but most tires have a built-in wear indicator, most often in the form of a protrusion on the "bottom" of the longitudinal grooves. Its height is standard 1.6 mm, which is equal to the minimum allowable tread depth according to traffic rules. If the running surface of the tire is equal to the indicator, it's time to renew the rubber. There are more complex indicators that reflect the gradual wear of the wheel.
With a shallow tread depth, the efficiency of water removal from the contact patch drops sharply (risk of aquaplaning increases), in addition, the tire may lose structural strength.
Share
2
Why do tires wear unevenly?
Main causes: knocked-down wheel alignment or incorrect pressure. For example, over-inflated wheels wear out in the center of the tread, while poorly inflated wheels wear out along the periphery. The required tire pressure is indicated in the instructions for the car and on the plates riveted to its body, but on average it is 2+ bar. At the same time, the optimal pressure depends on the load of the car, so before going to the sea with the whole family, tires can be inflated closer to the upper pressure limit.
There is also a more exotic wear pattern, when it is uneven around the circumference, which in advanced cases leads to bald spots at specific points of the tire. The masters explain that there are two main reasons - a local imbalance that cannot be balanced by standard means, or damage to the metal cord, for example, during a strong blow. In the latter case, in the place of the “injury”, the wear may increase, and in any case such a tire is written off.
Share
3
Can wheels and tires other than factory ones be fitted to the car?
Most models allow the installation of discs of other sizes, but not all - the list of sizes is in the instructions for the car.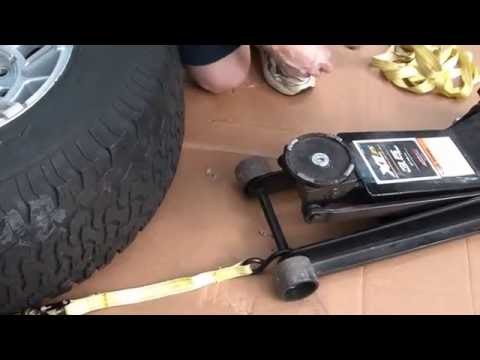
When choosing a disc, it is important to pay attention not only to its diameter, width, fasteners, but also to the often forgotten parameter - offset. It is indicated after the letters ET in millimeters, it can be either positive or negative. Say, in the marking of the disk 7.5J x16 H2 5/112 ET 35 d 66.6, the overhang is 35 mm. Offset misalignment will result in off-design load on the wheel bearings and may void the suspension warranty on a new vehicle.
Photo: Cepheus
Share
4
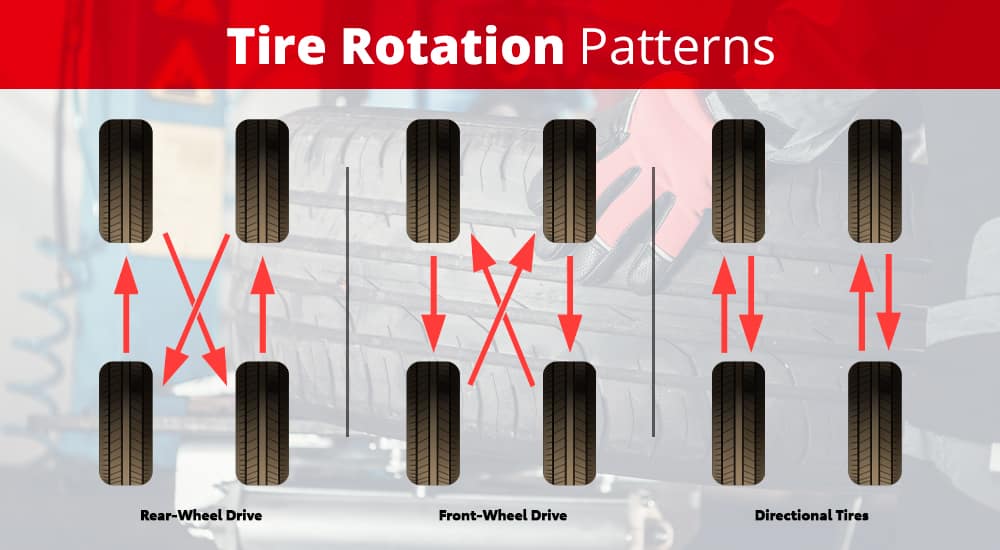
How to install directional and asymmetric tires?
They are often confused, but the principles for installing such rubber are different. Directional tires are marked with the direction of rotation, which must be observed. For asymmetric tires, the main thing is to consider the outer (outside) side.
Share
5
How to store winter tires
Tires without rims are best stored upright, turning them a fraction of a turn a couple of times a month.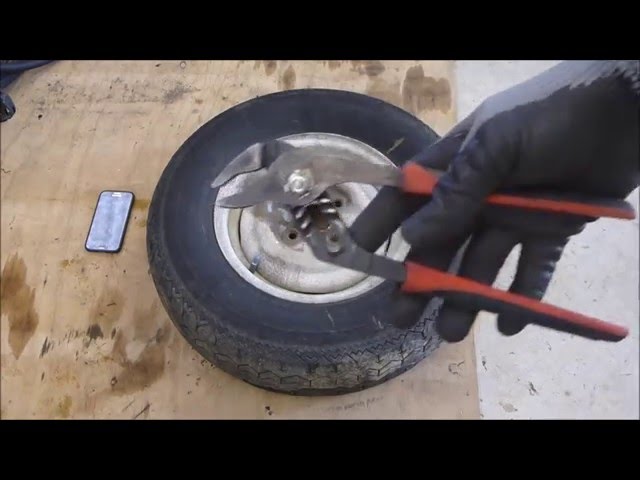 Tires on rims can be stored horizontally, but vertical position and regular rotations are preferable anyway.
The reason is that the rubber thrown for half a year becomes caked and deformed.
“Of course, when we pump up the wheel, the tire straightens out, but sometimes not completely,” says Denis Chugunov, a tire fitting specialist. - If you balance a wheel with a deformed rubber, while driving it will finally collapse and an imbalance will occur. It happens that the rubber is so "curved" after storage that you have to use power techniques, for example, a special device - a booster, which delivers high pressure to the wheels in a shock manner.
A wheel lying on its side is deformed
Photo: Leonid Menshenin / 74.RU
Share
6
Why sign tires?
When dismantling tires, it is advisable to sign them in order to know exactly which axle and which side they were on.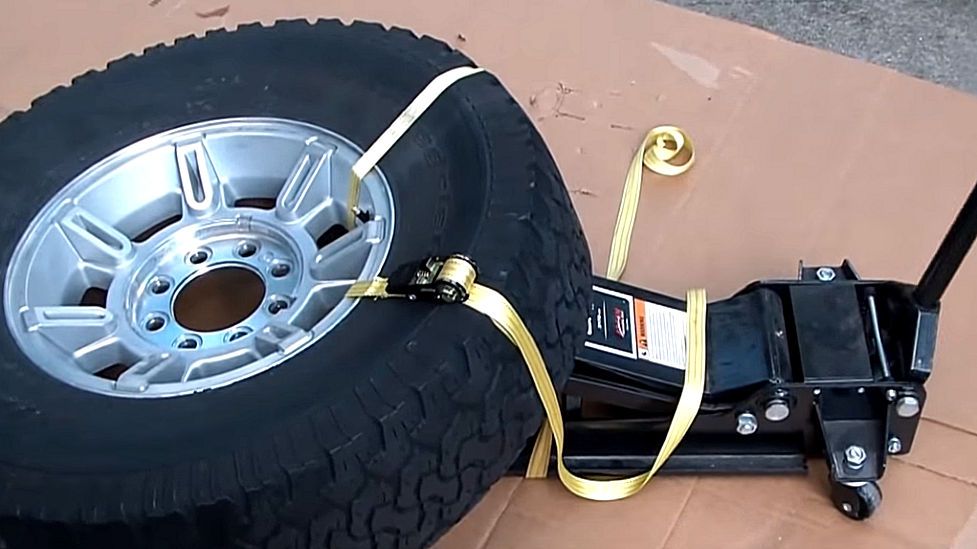 As a rule, in modern front-wheel drive cars, the front tires wear out faster, in addition, uneven wear is possible across the tread width, so regular replacement of the axles and sides on which the rubber is installed helps to eliminate accelerated abrasion of one pair of wheels.
Share
7
Is it possible to keep winter tires for the summer?
Since the beginning of 2015, the Technical Regulations of the Customs Union have prohibited the use of studded tires in the summer months, but there is no penalty yet. Tires with studs removed are allowed to be used without restrictions: as a rule, they provide good grip when driving on mud, but on asphalt they are inferior to summer ones in any case.
Winter non-studded tires wear out at an accelerated rate in summer, and a soft compound can “float” in the heat, sharply reducing grip. Therefore, the summer use of Velcro is acceptable only temporarily.
Share
8
Does it make sense to fill tires with nitrogen?
- Nitrogen seeps through micropores less and, unlike oxygen in the air, does not provoke rubber aging and corrosion of metal parts.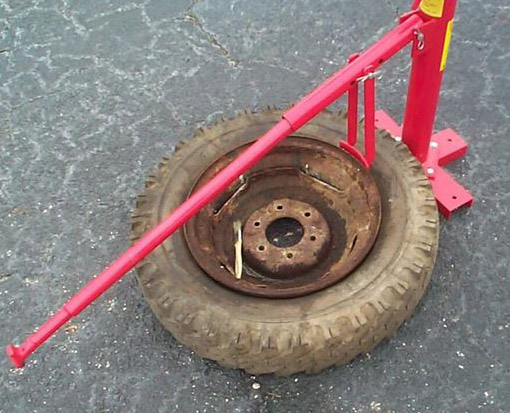 In addition, it reduces the risk of overheating,” explains Denis Chugunov. “However, for ordinary cars, filling tires with nitrogen is, by and large, meaningless: our tires simply do not live long enough to feel the effect of nitrogen. We offer this service to those who wish, but do not impose.
Share
9
Do I need to do balancing if the tires are stored on rims?
Balancing is done at every wheel change in any case. During storage, tires can deform, lose weight, or change balance due to stones trapped in the tread. By the way, it is harmless to clean them before the procedure.
Share
10
Is regular beading bad for tires?
With sufficient qualification of the craftsmen, it is not harmful, but there are precedents when inexperienced installers break the inner rim of the rubber that adjoins the disk. And if minor defects are removable, then when the inner edge is broken, the tire ceases to be centered on the disk.