Text: Étienne Jeanson
ATVs and UTVs are pretty expensive. Maintaining your vehicle is very important if you want it to perform well and last for years. Fortunately, ATV and UTV maintenance comes down to a few simple steps that any DIY enthusiast with basic tools can accomplish.
Here are our top seven ATV / UTV maintenance tips:
Check / change the engine oilLet’s start with the obvious: it is necessary to change the engine oil regularly and change it according to the manufacturer’s recommendations. Changing the oil and filter more frequently is essential in ATVs and UTVs used for heavy work or aggressive riding.
These tasks exert additional stress on the vehicles, increasing the heat generated by the engine. And the heat causes oils formulated for everyday use to lose their viscosity (become more liquid). The more liquid oil loses its wear protection properties. The intense heat also causes sludge and deposits to build up, which reduces performance.
Sludge can obstruct oil passage and deprive the engine of lubrication, and deposits can cause loss of power due to gummed piston rings.
Changing the oil is the best defense against engine wear and loss of power. Also, we recommend the use of first quality synthetic oil. Synthetic oils do not contain the impurities found in conventional lubricants, so they perform better and last longer. Synthetic base oils resist intense heat much better and maintain better protection than traditional products.
Don’t be fooled by the price: synthetic oil should be viewed as an investment to increase your vehicle’s performance. You don’t hesitate for a second to spend a few hundred dollars on mag wheels or a more powerful winch. The extra few dollars spent on better oil are well worth it and will improve the performance and life of your vehicle.
Change the differential fluidThe same goes for the front and rear differentials. The added weight and stress of hard work and performance driving strain the gears significantly. The lubricant covers the gear teeth while the vehicle is in motion, protecting against metal-to-metal contact and wear. Combined with intense heat, the added stress can break down the fluid barrier and push lubricant out of the gears, causing wear.
Change the differential fluid according to the manufacturer’s recommendations. And, like motor oil, go for a first quality synthetic oil. It provides better protective film under intense pressure to protect gears and bearings under the most demanding conditions and thus increases the life of your vehicle.
Anyone who’s ever changed the differential fluid on their vehicle knows that it can be a real headache: hard-to-reach filler holes, gear lube spilled all over the place, etc. Amsoil’s Easy-Pack pouches reduce the mess, inconvenience, and frustration when changing gear lubricant, making ATV / UTV maintenance much easier.
AUPTPK ATV-UTV Powertrain Fluid Easy PackAmsoil’s Synthetic Transmission and Differential Fluid for ATV / UTV
Traditionally, do-it-yourselfers used a gear pump to perform this task, which meant buying one more tool. Besides, much of the gear lubricant was wasted inside the pump and caused a mess during storage.
Amsoil’s Easy-Pack is a flexible pouch designed to allow access to fill holes in tight spaces and around obstacles, where tapered rigid bottles often seen in the gear lubricant market cannot go.
Check / change the air filterA combustion engine needs three things to run well: gasoline, ignition, and air. Most of us forget about the air just because we don’t have to pay for it (yet !)
A dirty or clogged air filter will reduce airflow, decrease performance, and even cause the engine to suffocate literally. Here’s an example to illustrate: get outside and run around your house. If you are in good shape, it shouldn’t be too difficult. Now run around your home while breathing through a straw. Reducing the airflow in your lungs makes it much harder, right?
The same principle applies to your engine. A dirty air filter reduces air circulation and decreases engine performance. It also allows dust and sand to be sucked into the motor, which will cause premature wear.
Check the manufacturer’s recommendations on how often to change the air filter. Check regularly and replace it if it is really dirty.
Pro Tip: Ensure the air filter is well in place and properly installed. Otherwise, the engine will absorb dirt, which acts like sandpaper against the cylinders, rings, bearings, and other critical parts.
Finally, consider using a pre-filter to extend the life of your air filter. A pre-filter is basically a mesh bag that attaches over the air filter. It catches large contaminants and prevents them from getting lodged in the air filter, thus extending its life.
Stabilize the gasolineGasoline can decompose within 30 days. When this happens, varnish forms inside the carburetor, obstructing the small gas passages. Eventually, the varnish will prevent the proper circulation of gasoline, and starting your vehicle will be difficult.
For best performance, add a gasoline stabilizer at each fill. If you know you will empty your tank quickly, such as during a full-day ride, you may omit this step. But many off-road enthusiasts ride a full tank for months.
I use my ATV primarily to haul firewood around my property, which means it works intermittently. It’s not uncommon to ride with a gasoline fill for months. The stabilizer prevents oxidation that occurs when gasoline is left standing for long periods. It prevents varnish build-up, keeps the carburetor clean, and allows gasoline to flow freely.
Pro Tip: Most types of gasoline contain ethanol, which can corrode carburetor components and damage rubber seals and fuel hoses. For best performance, use ethanol-free fuel with a 91 octane rating. If you are using 87-octane gasoline that contains ethanol, add a specific treatment to prevent ethanol-related problems, such as Amsoil Quickshot.
Wash your machine regularlyThat’s true; it is normal for your ATV / UTV to get dirty. But it shouldn’t stay dirty. Wash it regularly to remove mud and grime, especially after a messy (and fun) ride.
Dried mud and dirt will trap moisture, which can accelerate rust formation on metal components. Mud, leaves, and other debris packed against the radiator can reduce its efficiency, causing the engine to overheat. Dirt can also build up around the engine and differentials, reducing heat transfer, raising the temperature, and accelerating lubricant oxidation and breakdown.
With care, use a pressure washer on your vehicle if possible. Also, use a product as a base coat to make cleaning easier. It provides a layer of protection against mud, dirt, and snow, making cleaning with a garden hose easier.
Pro Tip: After cleaning, run your vehicle so that the heat from the engine will dry out any water that may enter the exhaust or areas around the spark plug and ignition coil caps.
Check the level and condition of the engine coolantHere’s another overlooked ATV / UTV maintenance practice. What complicates the situation is that the coolant reservoir is often hidden in a hard-to-reach place.
Check the coolant level in the radiator. Inspect the condition of the fluid. If it contains sludge or mud, it’s time to change it. Delaying its replacement can cause the sludge to clog the narrow passages of the coolant in the engine and prevent optimal cooling. It can cause the engine to overheat. Engine parts expand when overheated, which can lead to more friction and premature wear.
While you change the coolant, check the cooling hoses for abrasions, cracks, or wear. Replace them as needed before they break.
Inspect tires, CV joint boots, etc.Finally, walk around your vehicle once a month and check the following points:
• Tire pressure and condition
• CV axle boots for cracks and leaks
• Brakes condition
• Vehicle’s lighting system
• The brake fluid level
This inspection can prevent major and costly problems.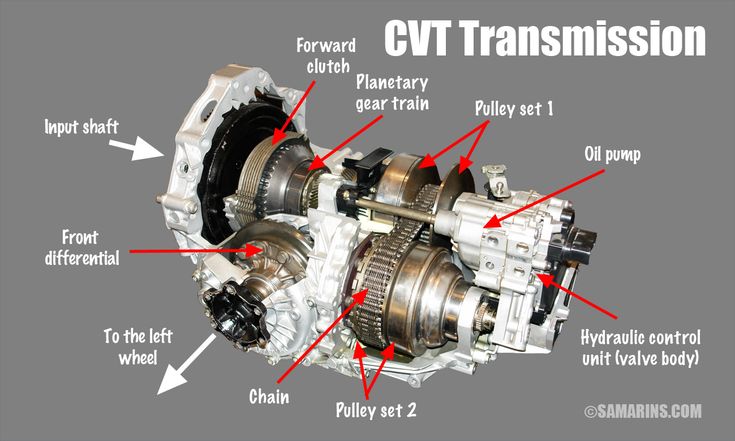 It is also good to lubricate the pivot and connection points with a good spray lubricant, such as Amsoil MP. It is a simple way to keep your vehicle running smoothly over the long haul journeys and long term.
Posted by Jefferson Bryant Know How
Changing your engine oil and topping off fluids is a common procedure that many DIYers take care of in their driveway. These simple tasks are part of owning a car, but there is another service that you need to be mindful not to forget – servicing your rear differential. This is most commonly an issue for trucks, which are rear-wheel drive (or 4-wheel drive), but there are plenty of cars on the road with rear differentials too. Knowing when and how to service your rear axle is important and far too often overlooked.
The rear axle housing supports the axles and differential carrier, which transfer the power from the engine to the rear wheels. There are not very many moving parts, but they are all critical. Every rear end contains two wheel bearings, two differential bearings, two pinion bearings, three seals, a set of gears, two axles, and the differential itself. All of these items must have proper lubrication. If any of these fail, you have a major problem on your hands. Over time, the lubrication, known as gear oil, breaks down, losing its viscosity and protection.
The typical change interval for differential oil is between 100k, and 150k miles for normal, low stress use. As soon as you hook a boat or trailer to your car or truck, that change interval drops drastically. In fact, a vehicle that regularly pulls a trailer should get fresh gear oil in the axle ever 30k miles. That is five times more often than normal. That goes to show you how stressful pulling a trailer is on the rear axle. For cars that don’t pull trailers, hard driving and high speeds result in similar problems. Heat is the biggest factor here, as differentials do not have pumps or coolers, they rely solely on the oil sloshing around.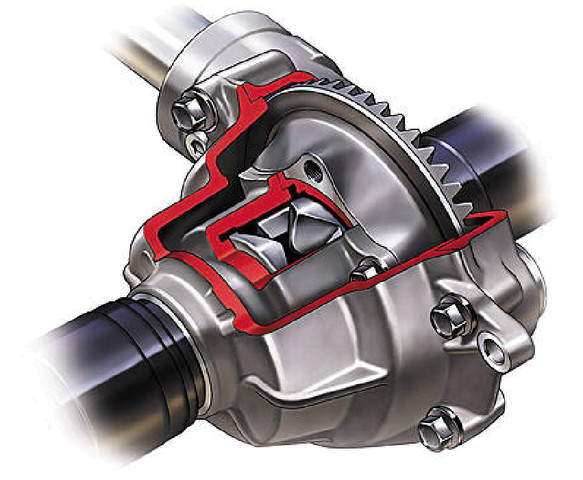 As the oil thins out, it may slosh more, but the protection barrier isn’t there. This means more metal on metal contact and faster wear. The kicker is that you will never know you have a problem until it is too late.
Using synthetic gear oil is one way to increase the life of your rear axle. Synthetic oil is less susceptible to heat breakdown and loss of viscosity. It is still a good idea to follow the proper change intervals, but you are less likely to have damage with synthetic oils. There are a couple of important caveats when it comes to gear oil, however, as the type of differential you have requires different oil. The main thing to know is whether or not you have a clutch-style differential. Open carriers, the most common on older RWD vehicles, do not have any sort of positive traction device.
If your rear wheels rotate opposite of each other with the tires off the ground, then you have an open carrier. This does not necessarily work for newer vehicles, particularly truck built from the mid-1990s on up. These trucks often have what a mechanical locking differential (nicknamed “gov lock” by some), which acts like an open carrier until there is sufficient wheel slip to activate the swing-arm locker, which engages the clutch-style limited slip differential. So you may think it is an open carrier, but it isn’t. The reason this is important to know is that clutch-style LSDs (Limited Slip Differentials) require a special additive in the gear oil to protect the clutches. Some gear oils already have this mixed in, but most do not, you have to add it.
Changing the fluid is a very simple process, but it is a little more involved than an oil change. Most vehicles require the rear differential cover be removed, though some do have an actual drain plug. You need the following to perform this project.
Sockets and 3/8” ratchet
Drain pan
Gasket scraper
Gasket and/or silicone gasket maker
Gear oil
LSD additive if required
If you are working on a truck, you likely do not need to lift the vehicle, however if you are working on a car, you need to raise the vehicle so that you can access the rear axle cover. Make sure that you support the vehicle with a pair of jacks stands and not just a jack. This is very important. Don’t take the risk. Place the drain pan under the diff cover and remove all of the bolts. Don’t worry about leaks, the cover will be stuck in place. If your housing has a drain plug, you can use it instead of removing the cover.
Using a pry bar, flat blade screwdriver or a gasket scraper, carefully pry open the bottom of the cover. You may want to leave one top bolt lightly threaded in place so the cover doesn’t drop. Drain all of the fluid, watching for sparkles. If you have a lot of glitter in your oil, there is already damage, and you will need to have a rebuild. Unlike engine oil or transmission fluid, there is no smell test for gear oil. This is the nastiest smelling stuff on the earth when it is new, and it is even worse when used. Try to wear old clothes, as it stains and will stink for eternity.
Once the fluid is drained, fully remove the cover and clean the cover and inside of the housing with brake cleaner and a rag. You want to get as much of the old stuff out as possible. A small amount of glitter may be visible and for the first change, this is normal. If there is a lot, then you may need to have your rear axle checked out by an expert at your local NAPA AutoCare Service Center.
Most, but not all, covers have a magnet inside to catch shavings and other metal bits. We had a couple of big chunks on the magnet, which we determined to be slivers of spider gear teeth. There were only two, and the differential is operational, so we made a note and moved on. Eventually, this rear will need a rebuild.Use the scraper or a razor blade to remove all of the old gasket material from the cover. Clean it again with brake cleaner.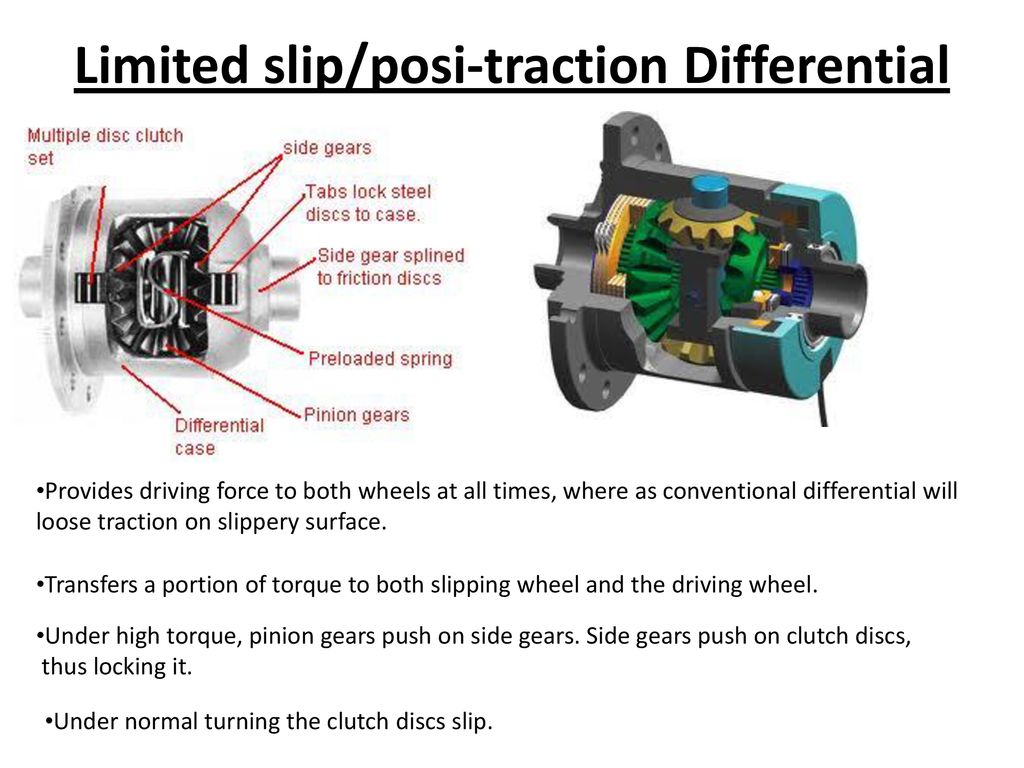 If there is not a factory-installed magnet inside the cover, get one and put it on inside of the cover.
If using a gasket, place a few dabs of silicone gasket maker on the cover and then place the gasket on the cover. If you are just using gasket maker, place a nice 1/4” bead all the way around the cover, being sure to go around the inside edge of the bolt holes.
Around the bolt holes, make a U around the inside of the hole to ensure a leak-free seal.
Carefully place the cover back onto the housing and reinstall the bolts in a criss-cross fashion, first hand-tight, then a little tighter, and then torque to the factory torque specs, which is typically 30 ft lbs.
Install the cover and tighten the bolts in a criss-cross fashion to the required spec.On most housings, the filler hole is on the side of the center section, about half way up. This is almost always a 3/8” square drive plug, meaning you use the ratchet without a socket. Sometimes you need an extension to reach it. Remove the plug.
Filling the housing can be a bit of a pain, as it is tough to fit a bottle in the port. If you can, just stick the nozzle in the hole and squeeze the bottle until it is empty and move on to the next. You will end up with some left over in the bottle. After two bottles, combine the remaining fluid into one bottle. Most housings require 2.5-3 one-quart bottles of gear oil. If you can’t make the bottle fit, attach a piece of hose to the end, stick it in the port and hold the bottle outside of the car.
Nip the tip of the gear oil bottle like shown. This is the best way to get the fluid into the differential. If you do not have the room for a bottle under the, run a hose out the car and then have a helper squeeze the bottle while you watch the hose in the fill hole.
We had plenty of room under this 1998 Suburban, so we just stuck the bottle straight into the differential housing.
When the fluid trickles out of the port, it is full. Replace the plug.
When the fluid trickles out, you are full. You can always put your finger in the hole to make sure the fluid is at or just a hair below the edge of the fill hole. Replace the plug when done.That is all there is to servicing your rear end housing. It is fairly simple and you can do the job in your driveway. Make sure you clean up the tools and work area. Pour the old fluid into the empty bottles and dispose of properly. If you have any concerns about your vehicle, discuss it with your local NAPA AutoCare Service Center.
Check out all the drivetrain parts available on NAPA Online or trust one of our 17,000 NAPA AutoCare locations for routine maintenance and repairs. For more information on how to service your differential, chat with a knowledgeable expert at your local NAPA AUTO PARTS store.
Photo courtesy of Wikimedia Commons.
Categories
Know How
Tags
axle, differential, drivetrain, fluid maintenance, fluids, front differential, limited-slip differential, rear axle, rear differential, ring & pinion
A life-long gearhead, Jefferson Bryant spends more time in the shop than anywhere else. His career began in the car audio industry as a shop manager, eventually working his way into a position at Rockford Fosgate as a product designer. In 2003, he began writing tech articles for magazines, and has been working as an automotive journalist ever since. His work has been featured in Car Craft, Hot Rod, Rod & Custom, Truckin’, Mopar Muscle, and many more. Jefferson has also written 4 books and produced countless videos. Jefferson operates Red Dirt Rodz, his personal garage studio, where all of his magazine articles and tech videos are produced.
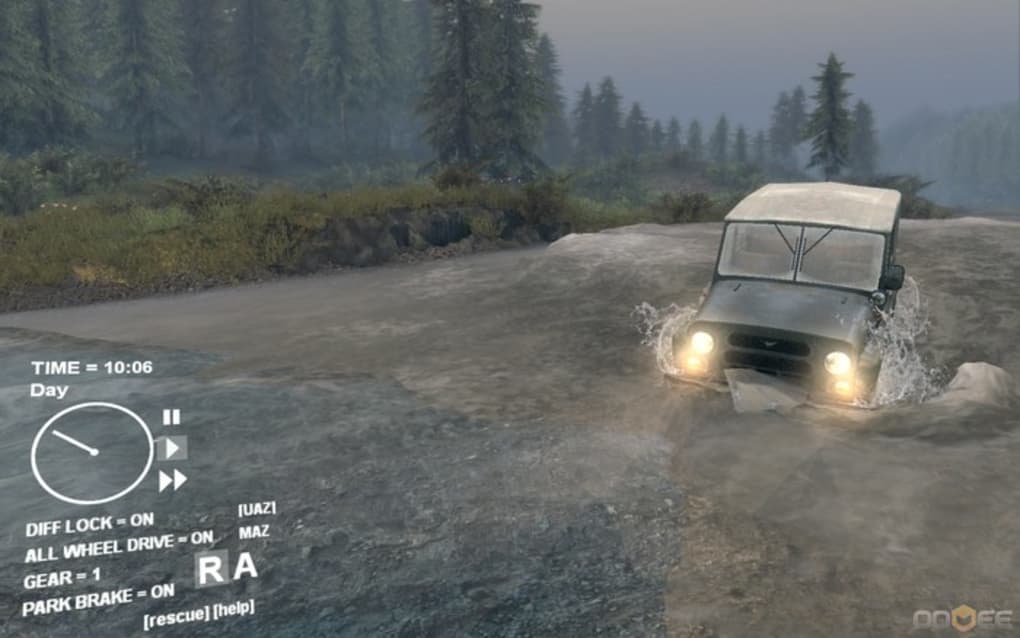
Do-it-yourself maintenance of the CFMOTO ATV is very simple. No need to take it to the service, any maintenance operations can be carried out independently.
After 6 years of operation of my CFMOTO CF500-A ATV, a sudden breakdown occurred: the front brake lever “failed”. Accordingly, my main brakes are gone. The second brake circuit was still working, but its efficiency itself is much lower. Therefore, I didn’t even ride much, not wanting to risk with a faulty brake system.
Continue reading →
The fuel line on the CFMOTO CF500-A (and similar) consists of three fuel hoses, which, according to the service manual, must be replaced every two years. I found out about this quite by accident after 4 years of operation, after carefully reading the manual. Well, this procedure is simple, now we will carry out the replacement.
Continue reading →
The ATV cooling pump is designed to circulate coolant between the engine and the radiator. According to the statistics of CFMOTO owners, this is a rather capricious element, and many ATVs have a pump leaking. This is expressed in a constant green puddle on the left footboard and a decrease in the level of antifreeze in the expansion tank.
Continue reading →
The actual exhaust part of the ATV muffler is the spark arrestor. It is designed to prevent burning soot particles from flying out, because it is unsafe. The design of the spark arrester is very simple: it is a pipe with a fine mesh, which is designed to trap burning particles.
Read more →
I quite often met such a question in forums and groups that the winch stops working for ATV owners. For example, it works for unwinding (turns on), but not for winding. This is usually caused by some problem with the winch relay (solenoid). So I had a problem when the winch is reeled in, but not unwound (there is no reaction at all when the OUT mode is turned on). I disassembled the relay for troubleshooting ... and it turned out somehow incomprehensible and illogical, but I can’t help but share my experience.
Continue reading →
CFMOTO ATVs have one fairly common problem: leakage from the junction of the pump and the coolant pipe. More precisely, the problem there can take two options: either it flows from the pump even on a standing ATV, or it digs, and only when traveling (when the engine is running).
Continue reading →
I don't have much time for trips now, so I mainly service the ATV and prepare it for the winter. I decided to thoroughly rinse the radiator, otherwise, suddenly, its cells clogged in 2 years? Then it would be possible to remove the front bumper, grille, fill the mesh with chemicals and rinse thoroughly. However, shining a flashlight from the inside, I saw that my radiator was in excellent condition.
Continue reading →
My ATV has already covered 3,700 km, during which I switched on the differential lock several times not in advance, but due to the fact of getting stuck. This is a very wrong action, which sooner or later leads to licking of the differential splines, after which the lock will not work. I decided to revise the gearbox before winter, at the same time inspect the weakest point - the differential satellites and their axis.
Continue reading →
I haven't ridden enough this year, since last autumn I've driven only 1000 km. Therefore, it so happened that I managed to ride on the “winter” 5W-40 oil, including in the summer. And here again, autumn is on the nose. So I'll flood it again, because before winter I still won't run into much. We'll figure it out next year.
Continue reading →
Two years ago I installed a T-MAX ATW-3000 winch on an ATV, greased the gears, and haven't touched it since. I just used it and didn't have any problems. However, during the last run 2 weeks ago, switching to manual unwinding began to jam. In this regard, I decided to remove the winch, disassemble, clean and lubricate everything that needs service. Finally, it's about time!
Continue reading →
1 2 3 … 5 Continue →
03/07/2018 #Differential center
Differential center: all axles - the right torque In the transmission of multi-axle and all-wheel drive vehicles, a mechanism is used to distribute torque between the drive axles - the center differential. All about this mechanism, its purpose, design, principle of operation, as well as repair and maintenance, read in the article.
Center differential - a transmission unit for wheeled vehicles with two or more drive axles; a mechanism that divides the torque coming from the cardan shaft into two independent streams, which are then fed to the gearboxes of the leading axles.
During the movement of cars and wheeled vehicles with several driving axles, situations arise that require the wheels of different axles to rotate at different speeds. For example, in all-wheel drive vehicles, the wheels of the front, intermediate (for multi-axle vehicles) and rear axles have an unequal angular velocity when cornering and maneuvering, when driving on sloped roads and on uneven road surfaces, etc. If all drive axles were rigidly connected, then in such situations some wheels would slip or, on the contrary, slip, which would significantly impair the efficiency of torque conversion and, in general, would negatively affect the movement of the vehicle. To prevent such problems, an additional mechanism is introduced into the transmission of cars and machines with several drive axles - a center differential.
The center differential of three-axle vehicles is usually located on the intermediate axle
The center differential performs several functions:
This mechanism takes its name from the Latin differentia - difference or difference. In the process of operation, the differential divides the incoming torque stream in two, and the moments in each of the streams can differ significantly from each other (up to the point that the entire incoming stream is supplied to one axis, and nothing to the second axis), however, the sum of the moments in them always equal to the incoming moment (or almost equal, since part of the moment is lost in the differential itself due to friction forces).
Center differentials are used in all cars and machines with two or more driving axles. However, the location of this mechanism may differ depending on the wheel formula and the characteristics of the vehicle transmission:
Center differentials, regardless of location, ensure the normal operation of the vehicle in all road conditions. Malfunctions or the development of a differential resource negatively affect the performance of the car, therefore, should be eliminated as soon as possible. But before you repair or completely replace this mechanism, you need to understand its design and operation.
Manual transmission diagrams
Various vehicles use center differentials based on planetary gears. In the general case, the unit consists of a housing (usually composed of two cups), inside which there is a cross with satellites (bevel gears) connected to two side gears (drive axle gears). The housing is connected by a flange to the cardan shaft, from which the entire mechanism receives rotation. The gears are connected by means of shafts to the drive gears of the main gears of their axles. This entire structure can be placed in its own crankcase mounted on the crankcase of the intermediate drive axle, or in the transfer case housing.
The center differential functions as follows. With a uniform movement of the car on a road with a smooth and hard surface, the torque from the cardan shaft is transmitted to the differential housing and the cross with satellites fixed in it. Since the satellites engage with the side gears, both of them also come into rotation and transmit torque to their bridges. If, for any reason, the wheels of one of the axles begin to slow down, the side gear associated with this axle slows down its rotation - the satellites begin to roll along this gear, which leads to an acceleration of the rotation of the second side gear. As a result, the wheels of the second axle acquire an angular velocity increased relative to the wheels of the first axle - this is how the difference in axle loads is compensated.
Center differentials may have some design differences and features. First of all, all differentials are divided into two groups according to the characteristics of the distribution of torque between two streams:
At the same time, almost all center differentials have a locking mechanism that ensures forced operation of the unit in a symmetrical torque distribution mode. This is necessary to overcome difficult sections of roads, when the wheels of one axle can come off the road surface (when overcoming holes) or lose traction with it (for example, slip on ice or in mud). In such situations, all the torque goes to the wheels of this axle, and the wheels that have normal traction do not rotate at all - the car simply cannot continue to move. The locking mechanism forcibly distributes torque between the axles equally, preventing the wheels from rotating at different speeds - this allows you to overcome difficult road sections.
Interlock can be of two types:
Truck center differential design
In the first case, the differential is blocked by the driver using a special mechanism, in the second case, the unit is self-locking when certain conditions occur, which are discussed below.
The manual locking mechanism is usually made in the form of a gear clutch, which is located on the teeth of one of the shafts and can engage with the unit body (with one of its bowls). When moving, the clutch rigidly connects the shaft and the differential case - in this case, these parts rotate at the same speed, and each of the axles receives half the total torque. The control of the blocking mechanism in trucks most often has a pneumatic drive: the gear clutch is moved using a fork controlled by a rod of a pneumatic chamber built into the differential housing. The air supply to the chamber is carried out by a special valve controlled by a corresponding switch in the vehicle cabin. In SUVs and other vehicles without a pneumatic system, the control of the locking mechanism can be mechanical (using a system of levers and cables) or electromechanical (using an electric motor).
Self-locking differentials may have locking mechanisms that monitor the difference in torque or the difference in angular speeds of the axle drive axles. As such mechanisms, viscous, friction or cam clutches, as well as additional planetary or worm gears (in Torsen-type differentials) and various auxiliary elements can be used. All these devices allow some difference in torque on the bridges, above which they are blocked. We will not consider the device and operation of self-locking differentials here - today there are many implementations of these mechanisms, you can learn more about them in the relevant sources.
The center differential experiences significant loads during the operation of the car, so over time its parts wear out and can be destroyed. In order to ensure the normal operation of the transmission, this unit must be regularly checked, serviced and repaired. Usually, during routine maintenance, the differential is disassembled and subjected to troubleshooting, all worn parts (gears with worn or chipped teeth, oil seals, bearings, parts with cracks, etc.) are replaced with new ones. In case of serious damage, the mechanism changes completely.
To extend the life of the differential, it is necessary to regularly change the oil in it, clean the breathers, and check the operation of the locking mechanism drive. All these works are carried out in accordance with the instructions for maintenance and repair of the vehicle.
With regular maintenance and proper operation of the center differential, the car will feel confident even in the most difficult road conditions.
#Generator bar
Alternator bar: fixing and adjusting the car's alternator
09/14/2022 | Articles about spare parts
In cars, tractors, buses and other equipment, electric generators are mounted to the engine by means of a bracket and a tension bar that provides belt tension adjustment. About the generator strips, their existing types and designs, as well as the selection and replacement of these parts - read the article.
#Compressor adapter
Compressor adapter: secure pneumatic connections
08/31/2022 | Articles on spare parts
Even a simple pneumatic system contains several connecting parts - fittings, or adapters for the compressor. About what an adapter for a compressor is, what types it is, why it is necessary and how it works, as well as the correct selection of fittings for a particular system - read the article. 06/22/2022 | Articles about spare parts
The undercarriage of many Japanese Nissan vehicles is equipped with a split-type anti-roll bar connected to the suspension parts by two separate struts (rods). All about Nissan stabilizer struts, their types and design, as well as selection and repair - read in this article.
#Drive V-belt
Drive V-belt: reliable drive of aggregates and equipment
06/15/2022 | Articles about spare parts
Gears based on rubber V-belts are widely used to drive engine units and in transmissions of various equipment.