The seat on your ATV will take a beating over time. With the constant pressure of the rider, rain, sun, and other elements, your seat will wear out, fade, crack, and tear eventually. Luckily, it’s not to difficult to repair or reupholster at ATV seat.
But first you have to decide, do you want to reupholster the seat altogether or find a quick fix that won’t cost you much time or money. This is up to you, but for things like a small tear, I find it easier and cheaper to just stitch it up and put a nice seat cover over it. If your seat is just falling apart with big tears, cracking, fading, or could use some new padding, I would go with reupholstering.
This quick method will work in a pinch and I usually do this for small tears and splits in the seat fabric. But this method will also work for more beat up seats if you don’t want to spend the time or money reupholstering.
You simply stitch up the tear and get a decent seat cover to put over the seat. If you get a good seat cover, you won’t even be able to tell the seat ever had a tear in it. I usually use strong dental floss to stitch the seat with. I know it sounds weird, but any strong thread will work just fine.
Some people, instead of stitching the tear, will actually just put some duck tape over the damaged area. It works just fine for the most part, and since you’re covering it up anyways, why not.
You can find some pretty cheap ATV Seat Covers on Amazon to cover your stitch job. There are universal options out there that work great. But for the best fit, look for a replacement for your specific make and model. Keep in mind, an exact replacement will cost more than a universal seat cover.
If your ATV seat is just to far gone for a quick easy fix, your only other option might be to just reupholster the whole seat. It usually costs more time and money than a stitch and cover, but it’s really not too bad and can get your seat back to looking brand new.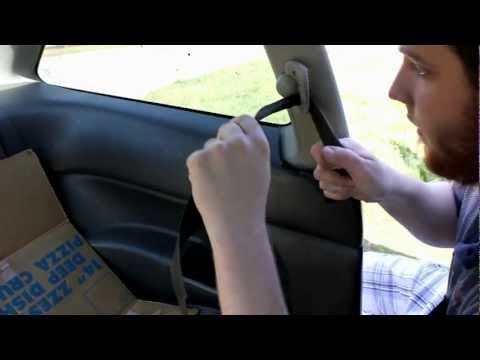
I’ve done this a few times myself for quads and motorcycle seats and you only need a few common tools to get the job done. Here’s a list of the tools required, this might vary a bit depending on what’s needed to remove your seat from the machine:
To start, remove the seat from your ATV. You will either use a screw driver or socket wrench to remove the bolts holding the seat to the quad. On some machine you won’t need either because there is a latch at the back of the seat you can pull to pop the seat off.
If you flip the seat over, you will notice staples holding the upholstery to the seat frame.The seat frame is usually a plastic piece holding the foam or seat cushioning. Remove these staples with a pair of pliers. I’ve noticed needle nose pliers work best for gripping the staples.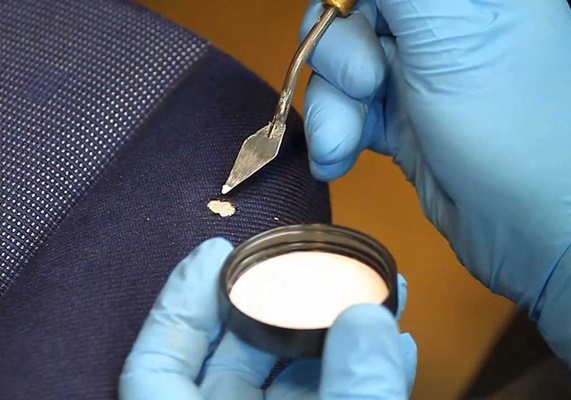
This step is optional, it’s up to you if you want to remove the seat cushioning material and replace it or not. If just the seat was damaged but your seat was still comfortable, you may not need to do this step.
Cut away the seat foam from the plastic seat frame with a knife or cutting blade. A sheet-rock razor blade works good for this step. The foam will most likely be glued to the plastic frame, so this part can be a bit of a pain.
This step is only required if you did step 3. Cut a new piece of foam or seat cushion for your seat. I find it easiest to place the seat frame on the foam and trace where you will cut with a marker or pencil.
Here is Standard Piece Of Seat Foam found on Amazon to give you an idea. You may need to cut its shape to match your old seat foam.
This step is only needed if you’ve done steps 3 and 4. Glue the seat foam back onto the plastic seat frame. I’ve found cement glue or contact cement works good for this step.
Measure and cut the new piece of seat fabric you are using to reupholster the seat with. Again, I use the seat frame with the foam on it to trace the fabric before I cut it. Or you could use the old piece of seat fabric to trace with for an exact match.
Keep in mind, the fabric needs to wrap around to the underside of the seat frame to be stapled back down.
Here’s a link to a good piece of Wear-Resistant Seat Cover Leather to give you an idea of what you want for a seat fabric.
Wrap the new seat cover around the seat and foam and staple the fabric to the plastic seat frame, like it was originally. This part can be tough to get the staples to hold. I found it best to use a high powered staple gun like one run by an air compressor to avoid problems.
I’ve done it with a standard spring driven staple gun before and it worked just fine, eventually. I spent a lot of time messing with the staples that wouldn’t make it all the way into the plastic seat frame though.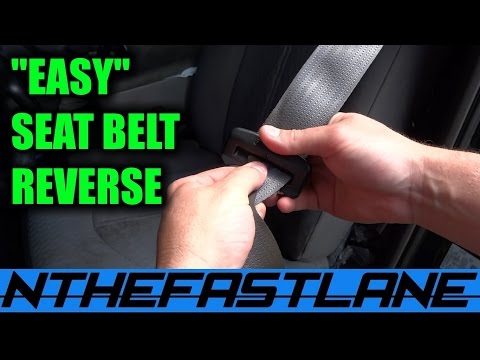 The air powered staple gun works like a charm.
Now that you’ve reupholstered your seat or did a quick stitch and cover fix, how do you keep your seat protected? You don’t want to be reupholstering the seat over and over and the seat will wear out again over time.
One popular option is to get a seat protector or seat cover that is easily changed out. The seat protectors even add extra cushion for a more comfortable ride. Here is a good option I found for you on Amazon, the MadDog GearComfort Ride Seat Protector.
This will also help cover up existing rips and tears if you decide not to reupholster or stitch and cover. I recommend fixing the seat either way, but this can work if you just don’t care all that much about fixing your ATV seat.
There are a few options when it comes to ATV seat repair, from quick fixes, to reupholstering, to cover up jobs. Choose the option that works best for you. Reupholstering can get your quads seat looking brand new again. But A cover job or a quick stitch and fix will be cheap and less time consuming.
Either way, it’s a good idea to get a seat protector if you’re someone who likes to keep their machine looking new. To check out some other gear I’ve tried and tested for you, visit the Recommended Gear Section of this site.
Sharing is caring!
Your ATV seat might beat over anytime from now, do you know how to reform an ATV seat? Since it is exposed to different elements like the rider’s pressure, sun, and rain, the seat will eventually crack, fade, or wear out. You should not worry if this ever happens because ATV seat repair is never that difficult.
However, before carrying out the ATV seat repair process, you have to decide whether you want a quick fix that will take you less money and time, or you went to reupholster the seat together. This decision solely relies on you, but I find it cheaper and easier to put a seat cover and stitching it up.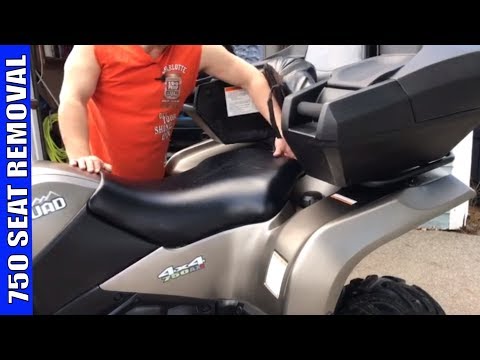 Reupholstering would work if the seat is cracking, fading, or has big tears.
This procedure typically works for splits and tears on the seat fabric. However, if you don’t want to spend money on reupholstering, you can also use this method. You stitch the tear and find a decent seat cover to put on the seat.
If you choose a good seat cover, it will be tough to tell the seat had a tear. You can get dental floss, which will help in stitching the seat. If that sounds weird, you can use any other strong thread. Some people prefer adding duct tape on the damaged area instead of stitching it. This will also work fine, and since your aim is to fiver it up, why not?
If you find it difficult to get an ATV seat cover material, you can visit Amazon and find cheap and pretty covers. While there are replacement options out there that can work great, it would be nice to look for a specific replacement. Notably, exact replacements are more expensive than universal seat covers.
Read More – ATV Tire Repairing Guide
Your seat might be damaged beyond a quick, easy fix, and your remaining option might be reupholstering the whole seat. Besides costing you much time and money, it’s worth it since your seat will look brand new. To carry out this process, you might need several tools like:
Stage 1 – Remove the seat from your ATV then use a socket wrench or screwdriver to remove the bolts holding the seat with the quad. Some machines won’t need either as they have a patch at the back of the seat, pulled to pop the seat off.
Stage 2 – After flipping over the seat, you will realize that staples hold the upholstery to the seat frame. On most occasions, the seat frame is made of a plastic piece that cushions the seat or holds the foam. To recover the ATV seat, remove the staples using needle-nose pliers.
Stage 3 – This is an optional stage. This decision of whether you want to remove the seat cushioning and replace it depends on you. If your seat was damaged but is still comfortable, you might not want to carry out this stage. Using a cutting blade or knife, cut the seat from the plastic seat frame. A sheet-rock razor balder would work best for this step. Since the foam might be glued to the plastic frame, this might be a little complex.
Stage 4 – Carry out this stage if you carried out the previous stage. For recovering ATV seat, cut a seat cushion or new foam piece for your seat. Placing the seat frame on the foam and tracing where you will cut with a pencil or marker makes it easy. Amazon has the standard piece of seat foam, and you might want to purchase from them.
Stage 5 – You could carry out this stage if you carried out stages 3 and 4. Use contact cent or contact glue to glue the seat foam on the plastic seat frame.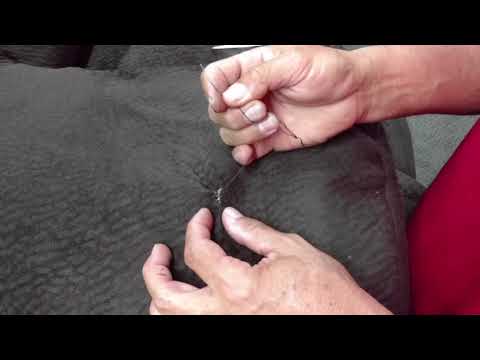
Stage 6 – After measuring, cut the new fabric piece of seat fabric you will use to reupholster the seat with. During ATV seat repair, using the seat frame with the foam to trace the fabric makes it more accessible. Alternatively, you can use the old piece of seat fabric to trace with an exact look.
Stage 7 – After wrapping the new seat cover around the foam and seat, staple the fabric to the plastic seat similarly to its original look. Finding staples to hold might be difficult, but you can use a powered staple gun to ease the process and avoid problems.
Since you have done a cover fix and quick stitch or reupholstered your seat, what will you always do to keep your seat protected? You would not want to reupholster and stitch the seat every other time. The first option is to purchase a seat cover or seat protector, which can be easily changed. The seat protectors also give you a more comfortable ride by adding an extra cushion. Seat covers can also work if you did not repair your seat, but it would be best if you did anyway.
Here are some suggested video which you can watch to learn more in details –
Video Credit – GBhow2s
Video Credit – Caleb Rowell
Repairing ATV seats leaves one with very few options like covering up jobs, reupholstering, or quick fixes. It would help if you always went for the possibility that works best for you. Reupholstering makes your seat look brand new once more. A cover job is, or quick stitch consumes less time and is cheap. Either way, go for whatever sails your boat.
Ripping a motorcycle seat is easier than you think. Sometimes tears appear due to wear of the material, in which case the constriction is just around the corner and repair will only be a temporary solution. The top reasons why the integrity of the seat cover is violated are:
- Well, tore and tore, - someone will say.
The fact is that if the integrity of the cover is not restored, the gap will increase. And then the stages of destruction of the seat will follow:
At the end of the process, you can simply lose the seat, although there was a chance to get off with a little blood.
First of all, not paying attention to this is the first offense, the consequences of which have already been described above.
Secondly, seal the gap with an ordinary adhesive or compound that does not have elasticity.
The fact is that the seat is constantly deformed. We sit on it, fidget on it, get up .. all this affects the tension of the cover. The material on the seats has an elastic gap. The cover stretches, otherwise, it would burst like an overvoltage balloon.
If you use regular instant glue or super duper glue, which is aimed at holding static objects, such as gluing a broken vase or a wooden shelf together, then it will not hold any patch on the seat. Guess why? Such glue will crack over time or fall off quite quickly, because it is not designed for frequent deformation.
Thirdly, it is somewhat useless to sew without waterproofing the seam. All motorcycle seats are necessarily processed along the seam from the inside (I don’t know individuals who would glue from the outside). This is done for the same reason that you were scared above. If water seeps through the seams into the seat, the process of rotting will begin and a mold farm will open.
If you are closer to the "cut and sew" method of the course, and the gap is of modest size, then you should sew up with especially strong threads and very frequent stitches. The seam should still be processed so that moisture does not get through it. Choose moisture resistant glue or something close to it. But the sewing method has another obvious disadvantage: the stitches, when the surface is deformed, will begin to spoil the edges of the previous gap, especially since the holes made by the needles on their own are not as good as machine processing.
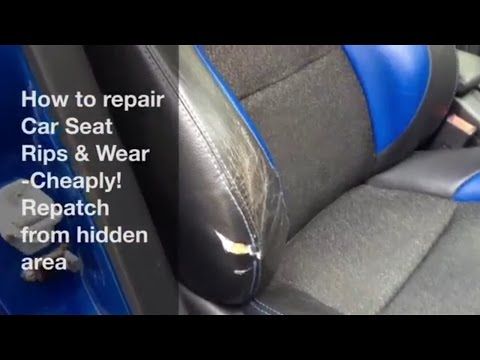
Patch is the most common way to repair a seat. The main mistake is that the patch is placed on top of the gap, where it does not always fulfill its purpose. It is most correct to put the patch from the inside first. To do this, take a piece of leatherette, which is larger in size than the gap. The material is inserted through the hole, straightened there, glued to the cover.
Back to the issue of glue. Shoe or professional leather glue is the best choice because it has an elastic gap that will tolerate deformation of the surface of the case. And then, it’s not for nothing that engineers developed so many variants of glue with certain characteristics.
The patch material is selected from leatherette, such as vinyl leatherette, polyester leather or bielastic. It is not recommended to take genuine leather for seat covers, because it is much more capricious. Its porous structure is too subject to the influence of the external environment.
After patching from the inside, the outer patch is glued, which is completely glued. In this way, the place of the break is strengthened twice and the deformation of the cover will not affect the edges too much.
If the damage to the seat is too great, the seat is usually reupholstered.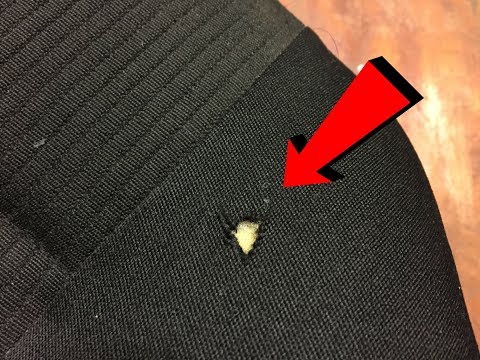 Many take furniture foam rubber, but it does not fit. Now is the time when it is easy to find the right density foam rubber for the seats of cars and motorcycles on the market. Therefore, if you plan to repair the seat yourself, it is wiser to look for high-density foam rubber.
Tears and cuts on the seat can occur after a fall - if something touches the upholstery.
A torn seat or even one hole significantly worsens the look of the motorcycle, worsens its properties - you can’t leave it in the rain, moisture penetrates under the upholstery and then you have to sit on a “wet sponge”, then it dries for a very long time and mold and smell will appear.
Old seat upholstery on enduro and motocross motorcycles turns the seat into an ice slide - you slide on it even in motorcycle pants, not to mention ordinary jeans, the seat becomes hard, “dubes”. It adds neither handling nor comfort.
The design of the seats from world /Japanese/ manufacturers is simple - plastic lodgment, profiled sponge backing, artificial leather fixed with stapler brackets.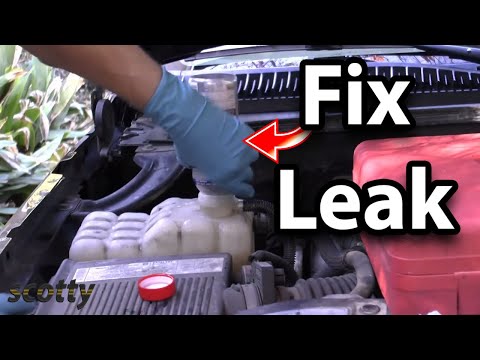
That is, nothing that we could not reproduce at home.
You need to cut off a piece of upholstery and go to the nearest construction market or shop. It is better to choose artificial leather of the “automotive” class, since its characteristics are most suitable for sitting. In any case, you should pay attention to the following parameters and compare with the old upholstery:
-colour
-strength
-stretch
Furniture upholstery may be less durable and stretch less, and this may interfere with the upholstery.
The amount of upholstery can be calculated by knowing the standard width of the faux leather, but it must be taken into account that the faux leather stretches in one direction and poorly in the other. You need to look carefully at the wrong side of the old upholstery and understand in which direction the stretching occurs. As a rule, the stretching of the upholstery on the seat goes along the width, on the canvas, the stretching goes along the length. Thus, the upholstery is laid across the sheet and 0.5 meters of artificial leather is enough.
It is necessary to cut the workpiece very conditionally - you can simply cut out a rectangle with a large allowance or use the entire purchased piece with a width of 0.5 meters.
It is necessary to prepare a good powerful stapler and staples of several sizes, you can focus on the length of the old staples.
It is desirable to find reinforced furniture brackets - they are thicker and wider, cut off with sharp ends, less thick ones may not penetrate the plastic of the lodgment and will constantly bend and will have to be replaced.
Before tensioning the faux leather, it makes sense to heat it up - put it on the battery in expanded form or warm the surface with a hairdryer. Warm artificial leather is more plastic - it stretches more easily, and when it cools down, it stretches more tightly, removing wrinkles.
First you need to fix both ends of the workpiece along the length while creating a slight stretch in advance.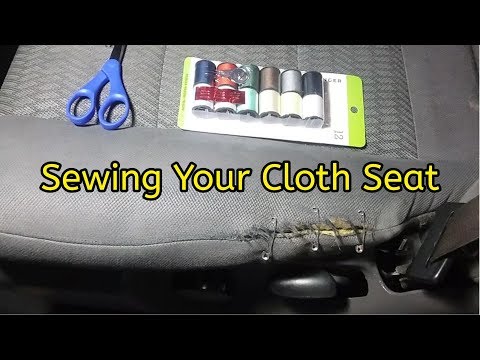
Next, you need to tighten where there will be the greatest tension. As a rule, you need to start pulling across. Initially, it is necessary to fix the upholstery with staples as far as possible from the place where it will be fixed permanently. Pre-stretching is done with several staples, temporarily and as far from the edge as possible - in this case, they can be easily removed and corrected and there will be no holes left on the workpiece. Otherwise, the edges of the workpiece may be torn and then these holes will remain, and if fastened far, then the holes will then be cut off with an allowance.
Pull, tighten sequentially from the place of initial fastening in both directions simultaneously.
And the word “pull” is literally here, in some places you have to make very great physical efforts and you can’t use any tool - damage the skin, you can only pull with your hands. It works well if you pull while stroking the surface of the seat with your hand, so you can pull it evenly and see the result, removing slack and wrinkles.