Systems: Electrical
Commonly Located: The ignition coil is generally located on the upper portion of the frame, near the top of the engine. It can commonly be found above the radiator.
Physical Description: The ignition coil is normally a squarish shape with one to three smaller wires leading into the wiring harness and one larger wire leading to the spark plug. While some ignition coils have a removable spark plug wire, most do not. The wire leading to the spark plug is covered by a thick rubber boot. The spark plug wire boot is usually a separate piece that can be replaced independent of the ignition coil.
Function: When the engine is at top dead center, the pickup coil signals the ignition coil to send a high voltage pulse to the spark plug. The spark plug wire boot ensures that none of this energy escapes on it's way to the spark plug. This high voltage pulse is what causes the spark that ignites the air and fuel mixture in the cylinder.
Maintenance Costs: The ATV ignition coil is a common wear item; therefore, it is not recommended to purchase a used coil as a replacement. Fortunately, the ignition coil is relatively inexpensive.
Filed in: Anatomy of an ATV
Share: Previous article A Look at The BEST ATV Service ManualOriginal price $ 159.99 - Original price $ 159.99
Original price
$ 159.99
$ 159.99 - $ 159.99
Current price $ 159.99
| /
Original price $ 129. 99 - Original price $ 159.99
Original price
$ 129.99 - $ 159.99
$ 129.99 - $ 159.99
Current price $ 129.99
| /
Original price $ 40.00 - Original price $ 40.00
Original price
$ 40.00
$ 40.00 - $ 40.00
Current price $ 40.00
| /
View all ODES UTV Performance mods
ODES UTVS best sellers See more
Original price $ 7.99 - Original price $ 7.99
Original price
$ 7.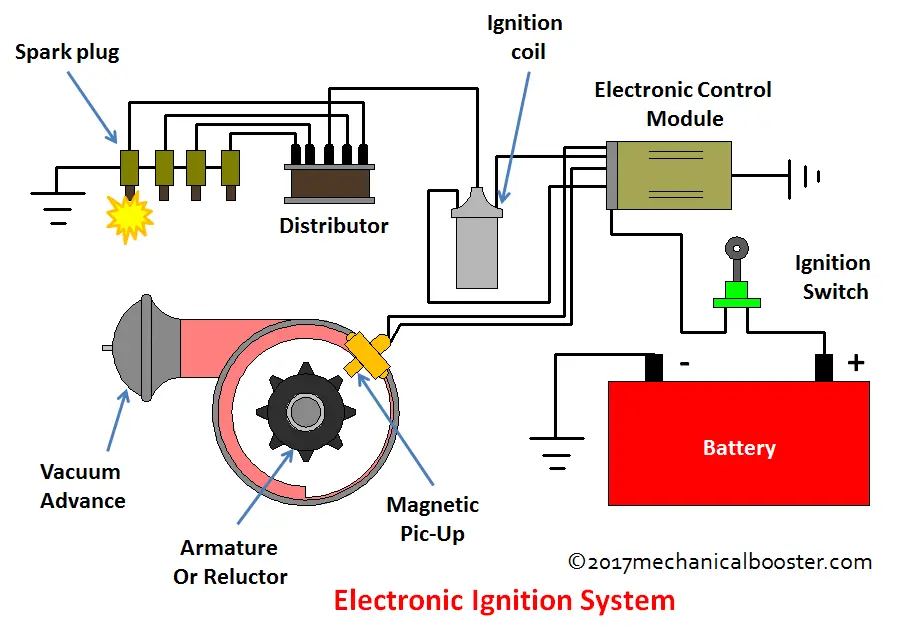 99
99
$ 7.99 - $ 7.99
Current price $ 7.99
| /
Original price $ 38.49 - Original price $ 55.99
Original price
$ 38.49 - $ 55.99
$ 38.49 - $ 55.99
Current price $ 38.49
| /
Original price $ 49.99 - Original price $ 52.99
Original price
$ 49.99 - $ 52.99
$ 49.99 - $ 52.99
Current price $ 49. 99
99
| /
Original price $ 29.99 - Original price $ 29.99
Original price
$ 29.99
$ 29.99 - $ 29.99
Current price $ 29.99
| /
Original price $ 18.99 - Original price $ 18.99
Original price
$ 18.99
$ 18.99 - $ 18.99
Current price $ 18.99
| /
Sold out
Original price $ 159. 99 - Original price $ 159.99
Original price
$ 159.99
$ 159.99 - $ 159.99
Current price $ 159.99
| /
Original price $ 129.99 - Original price $ 159.99
Original price
$ 129.99 - $ 159.99
$ 129.99 - $ 159.99
Current price $ 129.99
| /
October 8, 2022
Read nowSeptember 16, 2022
Read nowAugust 30, 2022
Read now+
Quick View
$ 24.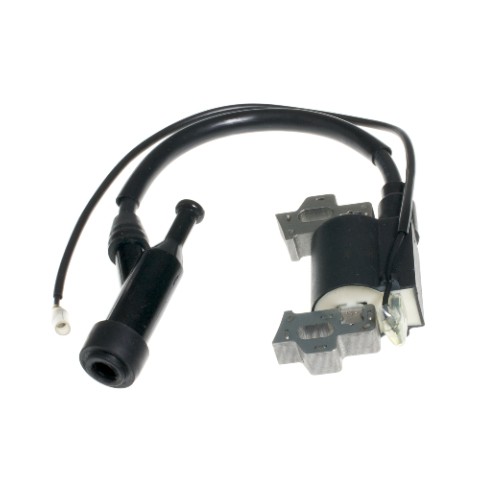 30
30
+
Quick View
$ 27.00
+
Quick View
$ 40.50
+
Quick View
$ 12.00
+
Quick View
$ 27.00
+
Quick View
$ 40.50
+
Quick View
$ 27.00
+
Quick View
$ 11.25
+
Quick View
$ 45.00
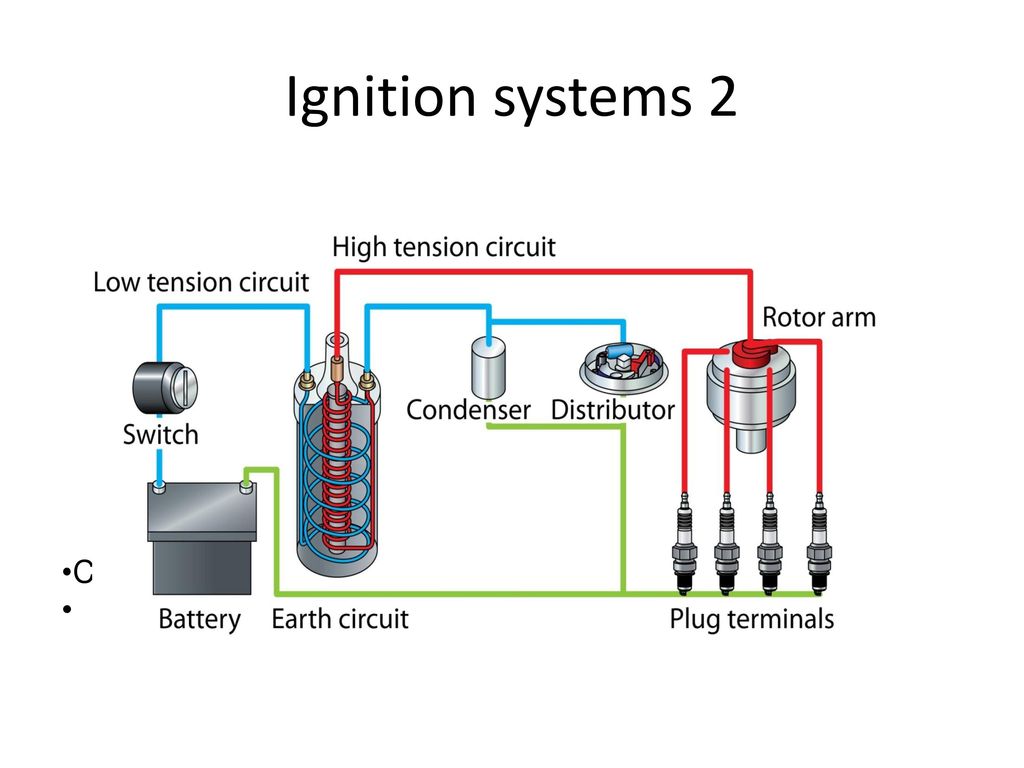
Your ATV ignition coil is a square shaped box that contains one to three wires. These lead into a wiring harness.![]() There is one larger wire that leads to the spark plug.
There is one larger wire that leads to the spark plug.
The ignition coil may have a removable spark plug wire, but many of them do not have this. The wire that leads to the spark plug is covered by a thick rubber cover and is separated by a piece of plastic. You can replace it separately from the ignition coil itself.
The purpose of your ATV ignition coil is to pick up on the high voltage pulse that is sent to the spark plug. The cover around the ignition coil ensures that no energy escapes along the way. This pulse is what triggers the air and fuel mixture in the cylinder and essentially begins the combustion process for your ATV.
The ignition system is responsible for delivering the spark to the flammable fuel that triggers the small explosion we know as the combustion process.
Your ATV ignition coil is a common maintenance item that will usually need to be replaced at some point. They are inexpensive so it’s not recommended that you purchase a used quad ignition coil.
It’s important to understand that while it might be a small and inexpensive part, a 4 wheeler ignition coil is an important piece of equipment. If your ignition coil is failing, the engine cannot do its job. That issue can become a significant safety and performance hazard if you ignore it.
Here are some signs it might be time to replace your ATV ignition coil.
If you sense a strong fuel smell and your ATV is spitting out a lot of black smoke, it means your engine is misfiring. That means it’s releasing unused fuel through the exhaust.
When this happens, it’s usually due to worn or damaged ignition coils. Keep in mind that this is a safety hazard and not something you want to ignore.
If you’re finding that you need to replace the fuel in your ATV more often, this could be because your ignition coil is using more fuel to complete the same combustion process. This happens due to the misfiring.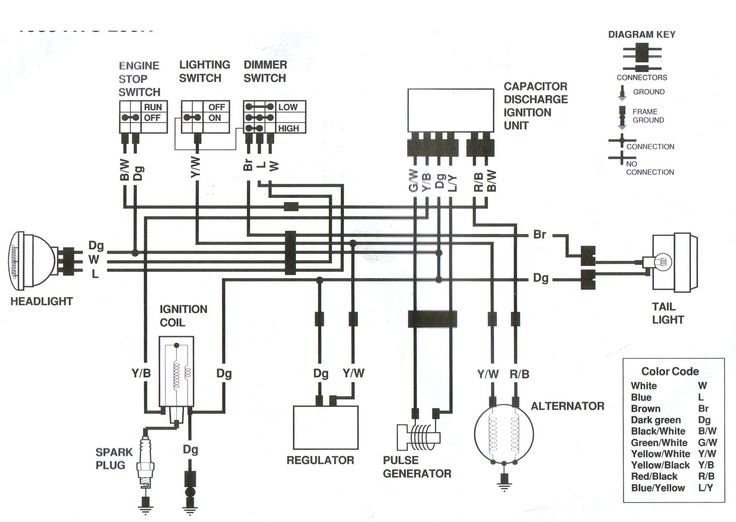 Because more attempts are required, more fuel is being used.
If you’re noticing that your ATV is stalling more often, it means that your ignition coil has stopped working. This is also true if you’re having a hard time getting it started. It’s because your spark plug isn’t receiving enough power from the battery. The ignition coil isn’t creating enough of an explosion to get everything going.
We have a number of 125cc ignition coils for 2-stroke engines and more available right here. If you’re looking for a new ignition coil for your ATV, look no further. Reach out to us if you have any questions or can’t find what you’re looking for!
ATTENTION!!! DO NOT SWITCH ON THE IGNITION WITHOUT THE HIGH WIRE, THE PLUG, OR IF THE PLUG IS NOT TWISTED INTO ITS PLACE OR IS NOT RELIABLELY EARTHED TO THE ENGINE BODY!!!
THE COIL WILL COME WITH A PROBABILITY OF MORE THAN 50 PERCENT!!!
IN THIS COIL, THERE IS A BREAKDOWN INSIDE THE COIL AND THE INTERTURN SHORT CAN APPEAR!!! THE PRESENCE OF THE INTERTURN CLOSURE OFTEN DOES NOT INTERFERE TO WORK AND THE SPARK IS PRESENT, BUT NOT FOR LONG - AT THE END OF THE END THE COIL DIES AT ALL.
To connect the ignition control unit (BUZ) to the ATV's on-board network (only connector 1 is used), disconnect the standard CDI unit from its connector (on some models, the standard unit is not disconnected, see clarifications in the descriptions) or disconnect the DPK connector, disconnect the BB wire of the standard ignition coil from the spark plug, to the “signal” wire (most often it is a blue or white-blue wire) of the DPK, connect the input of the BUZ (blue wire) ,)
the DPK wire (let's call it "-" DPK) (most often green) is connected to ground (sometimes it is connected to ground only in the CDI unit, sometimes directly in the generator itself, if not, we connect it to the "-" battery, the yellow wire of the BUZ to + Battery after the ignition switch (most often it is a black wire), white wire to the “-” terminal of the ignition coil, Terminal “+” of the ignition coil through a 15 amp fuse to + battery, BB wire to the coil and spark plug.
Everything, you can start. As wound up, you should adjust the speed of the twentieth.
To return to the standard ignition system: disconnect connector 1 BUZ, the standard CDI unit into its place in its socket, the BB wire from the standard coil to the spark plug.
Connector number 2 is optional, add. functions are activated by shorting the desired wire to MASS !!! If they are not needed, insert a chip into the connector anyway so that WATER does not get in !!! it is necessary !!!
There are a few things to pay attention to when installing and starting up the system. Here is a list of what caused the ignition to work poorly on different quadrics:
 You don’t have to think much about this issue, if the engine starts but it immediately starts to sausage straight from idle - change the wires on the coil in places.
  ..)
..) ATTENTION!!! DO NOT SWITCH ON THE IGNITION WITHOUT THE HIGH WIRE, THE PLUG, OR IF THE PLUG IS NOT TWISTED INTO ITS PLACE OR IS NOT RELIABLELY EARTHED TO THE ENGINE BODY!!!
THE COIL WILL COME WITH A PROBABILITY OF MORE THAN 50 PERCENT!!! THIS IS ESPECIALLY RELATED TO "DRY" COILS OF THE TYPE FROM "VOLGA", "OKI" OR "MATIZ".
IN THIS COIL, THERE IS A BREAKDOWN INSIDE THE COIL AND THE INTERTURN SHORT CAN APPEAR!!! THE PRESENCE OF INTERTURN SHORT ON SIMPLE SYSTEMS WITHOUT PROTECTION AGAINST SHORT CLOCK DOES NOT INTERFERE TO WORK AND THE SPARK IS PRESENT, BUT NOT FOR LONG - AT THE END OF THE END THE COIL DIES AT ALL. MY SYSTEM HAS BUILT-IN SHORT PROTECTION AND WILL NOT WORK WITH PUNCHED COILS!!!
To connect the ignition control unit (BUZ) to the ATV's on-board network (only connector 1 is used), disconnect the standard CDI unit from its connector (or disconnect the DPK connector) and disconnect the BB wire of the standard ignition coil from the spark plug to the "signal" wire ( most often it is a blue or white-blue wire) DPK connect the BUZ input (blue wire), make sure that the second DPK wire (most often green) is connected to ground (sometimes it is connected to ground only in the CDI unit, sometimes directly in the generator)
Black wire BUZ to ground, the second black wire to the "-" DPK, yellow wire BUZ to + battery (battery) after the ignition switch (it is convenient to connect it to the "+" terminal of the cigarette lighter), white wire to the terminal of the ignition coil, Terminal " + "ignition coils through a 15 amp fuse !!! on + battery, BB wire to the coil and spark plug. Increase the gap on the electrodes of the candle to 1 mm (If you are not sure that you can correctly increase the gap so that the contact surfaces of the candle remain strictly parallel, then you will have to learn how to do it :). Securely fix the ignition coil and BUZ on the quadra frame (the unit is fastened with self-tapping screws or M4 screws through the holes that are accessible when the cover is removed).
We strongly recommend that the block body be securely connected (electrically) to the quadra frame, if the body is attached to plastic - with an additional thick wire (to the wire terminal, terminal for the block mounting screw) connect it to the "-" battery or frame!
If this is not done, then in most cases nothing terrible will happen and everything will work fine anyway :o)
Everything, you can start it. As wound up, you should reduce the speed of the twentieth - most likely they will increase to 2000 - 2500 rpm.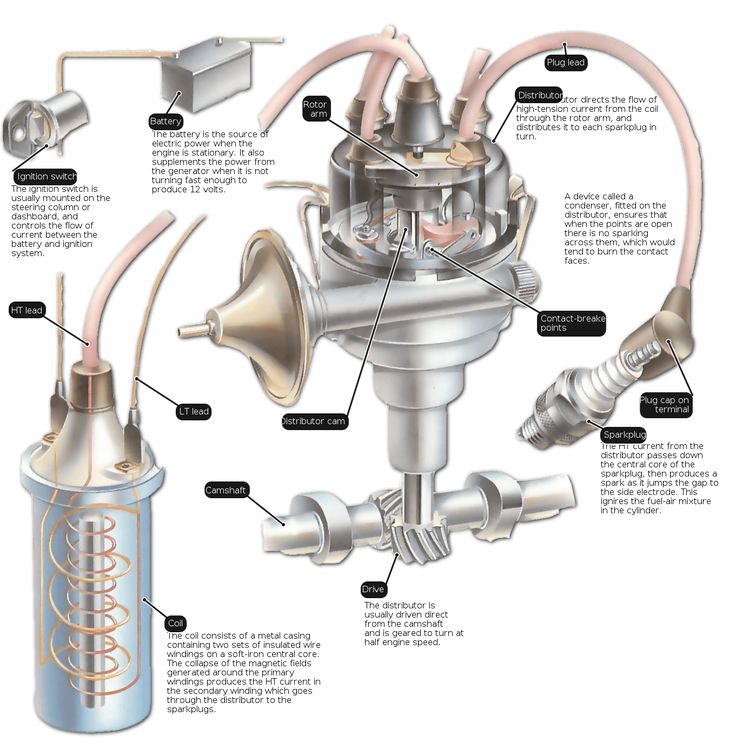
To return to the standard ignition system: disconnect the connector 1 BUZ, the standard CDI unit back into its place, the BB wire from the standard coil to the spark plug.
Connector number 2 is up to you :o)
There are a few points to pay attention to when installing and starting the system. Here is a list of what caused the ignition to work poorly on different quadrics:
 (Better just buy a new NGK spark plug)
  (once they forgot to connect the second wire from the induction sensor to ground - naturally, nothing worked and the blue LED did not light up ... not in all quadrics it is shorted to ground directly in the generator ...)