Tires are two of the most important parts of a mountain bike, connecting bike and ground. Far from being simply round rubber with knobs, there are many variables to know and consider. Tire width, tread pattern, rubber compounds, and tire casings can be instrumental in how your bike handles. Knowing what is what starts with understanding the meaning behind the labels on any MTB tire.
As an example, I chose a “Maxxis Minion DHR” for two simple reasons: Maxxis mountain bike tires are the most popular and I had one laying around. While some of the acronyms are going to be brand-specific, all tire brands are basically working with the same sort of variables which means that you can apply what you learn here to whatever tire brand you want to use.
In the volume of tire markings, there are a lot of legally required labels mixed with proprietary brand names and marketing trademarks, and even some useless information. With that in mind, how do you read mountain bike tire sizes?
Let’s start with the only standardized and the most important label first: the confusing-looking number salad. There is a lot of information in this short set of numbers and letters. This label is always the same format, using the same units no matter the brand. It’s mandatory for tires to have their dimensions on them, similar to what you know from car tires. As far as labels on an MTB tire go, the dimensions label is the single most important one.
If you ever wondered how you know what size your mountain bike tires are, this label is what you need to find on your tire.
You locate the label, now what do the numbers on your mountain bike tire mean? Since it’s always written in the same format, you can apply these principles to any tire. This is how you read mountain bike tire sizes, regardless of brand.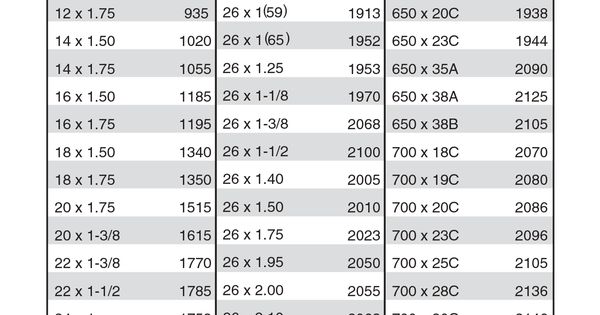
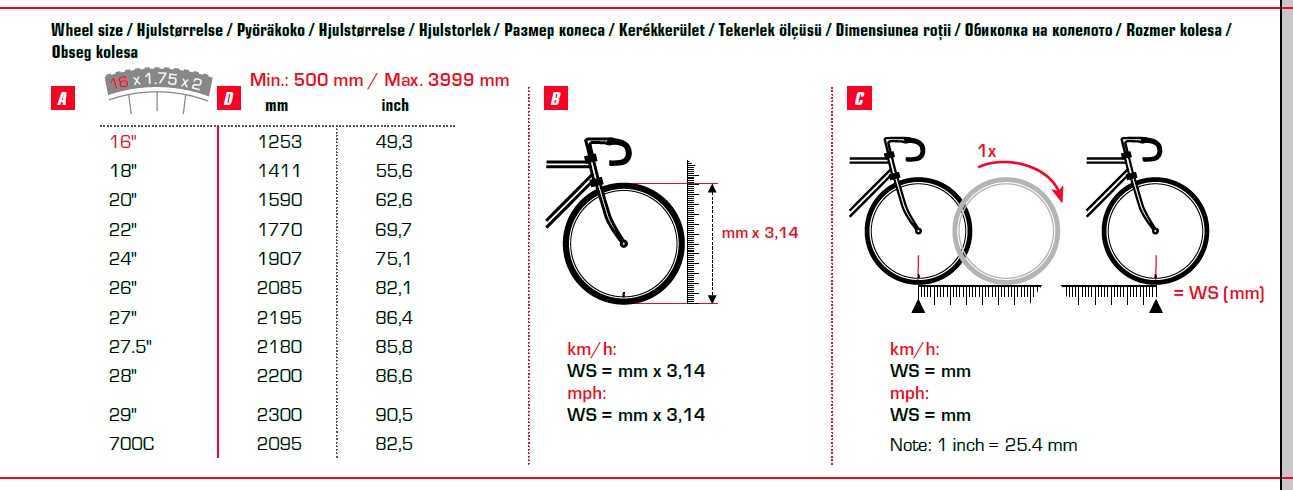
Let’s talk about these letters and numbers in the first row: 27.5 x 2.4 WT. I think you already know what 27.5 stands for. It’s the outer tire diameter in inches. That means it’s a 27,5-inch tire in diameter. The standard mountain bike tire diameters are 26″, 27.5″, and 29″.
This is all you really need to know. But in reality, it’s more complicated. That 27.5-inch number – well it’s sort of pulled out of thin air. It’s roughly the outside diameter of the tire when it’s mounted. Of course, the overall diameter is also depending on the rim width and tread pattern. If you want to be really precise about it there’s this other number that you’re going to look at – it’s 584 in my case. It’s written in small letters real close to the bead. Those are 584 mm, which is referring to the bead seat diameter. That’s the literal inside diameter, measured from the tire’s bead.
Let’s look at that next number: 2. 5 This is the tire’s width in inches. Which should mean that the tire is 2.5 inches wide, right? Of course not, it’s never that simple. With a profile more like the one of a balloon, what part here is actually measured: the widest part or the part actually having contact with the ground.
2.5″ is roughly how wide the tread width is. For a tire laid flat on the ground, it would be straightforward. But firstly, some brands actually measure this differently. And secondly, it also will vary slightly depending on the rim width.
Tire on a rim (profile)Similar to the diameter, there’s another number. So, if you go back to that 584 number you’ll see 61. Again in Millimeters, these 61 mm are the literal width of the tire at the widest part when it’s mounted on the correct rim width.
In order to read MTB tire sizes, all you really need to know are the numbers in the first row. There are standardized tire diameter and width, which are the most important and informative measurements of an MTB tire.
But if you’re a turbo nerd and really wanna know the real fine details of things, well 584 mm x 61 mm is the tires actual size.
There is no one single standard MTB tire size, however, 27.5″ and 29″ are the most common wheel diameters overall. The standard tire width varies depending on the mountain bike discipline. Cross Country tires are usually the narrowest ones at 2.0″, while Downhill tires tend to be the widest at 2.5″ on average.
Right now the industry trends towards 29″ for Cross Country, Trail / Enduro, and even Downhill wheels. 27.5″ wheels are still very common on Downhill bikes, and lesser so on Enduro bikes. 26″ wheels are not dead yet but are not nearly used as frequently as in the early 2010s when they were the standard. It’s even become quite difficult to find 26″ rims and tires. Some kids’ bikes still come in 26″.
As far as common tire widths go, there are many more viable options. Depending on the type of riding, there are preferable ranges for tire widths.
For Cross Country and Marathon bikes, you’ll want the small profile of a narrow tire. Usually widths from 1.9″ to 2.25″ are used here.
A range from 2.25″ up to 2.5″ is common for Trail, All-Mountain, and Enduro. Here you’ll find many variations in tread patterns, casings, and compounds.
For Downhill 2.5″ is probably the most common width as a compromise between traction and rolling speed, but a range between 2.4″ to 2.6″ is used regularly
These tire measurements are no indication of the actual size of the bike, only the wheels. The bike size is defined by the frame size, not wheel size. Being a 27.5″, a 29″ or a 26″ bike tells you nothing about the bike’s size or geometry. That being said, small frames or kids’ bikes come with smaller wheels as big ones likely don’t fit.
On average, the most common mountain bike tire dimensions currently are 29×2. 0 for Cross Country, 29×2.4 for Trail & Enduro, and 27.5×2.5 or 29×2.5 for Downhill (or both for a mixed-wheel “mullet” bike).
A 2.6″ tire width is by far not the end of the road. There are in fact bike tires available at double that width! For more on plus-sized tires, click here. This is the quick version:
Anything from a 2.8″ to a 3.0″ tire width is considered a plus-sized mountain bike tire. These widths sit between the ranges for Trail / Enduro and Fat Bike tires, combining traction and comfort with higher rolling resistance. Since most bike frames don’t fit tires this wide, they are quite uncommon.
But wait! There’s more: Fat bike tires are from 3.7″ up to 5.0″ which is just massive. They look ridiculous for an MTB, more like dirt bike tires than mountain bike ones. Here’s what they are and why you would use them.
Right next to the tire size we have two lonely letters: W and T.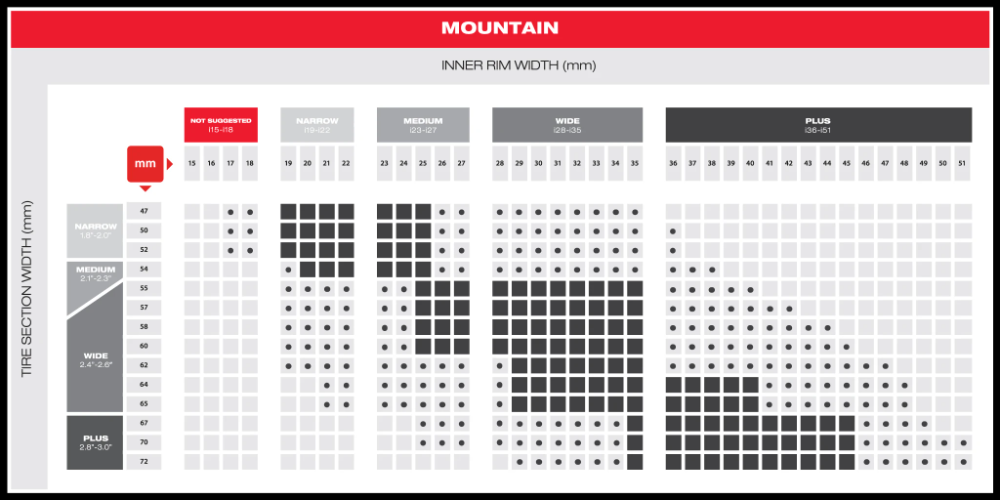
The label “WT” on an MTB tire tells us the optimal rim width the tire has to be mounted to, which is around 30 mm or wider. This simply means the tire can assume the correct shape and the tire profile, including side knobs, is in the right place.
Mounting a tire marked with WT on a skinny rim results in an incorrect shape and poor (or even dangerous) performance. As is illustrated as “the lightbulb”, this leads to weaker structure and poor, unpredictable handling. The sidewalls sticking this far out are also prone to slices and punctures.
WT actually stands for “wide trail” not “wide tire”, as it has nothing to do with the tire’s width, but the required rim width. This may not make much sense anymore as this indication goes way back to when mountain bikes were using skinny rims instead of the wide purpose-built offroad we are used to now.
Image credit: Stans NoTubes WiderightSo, when smart engineers finally came up with wider rims, other engineers had to come up with tires to match those rims.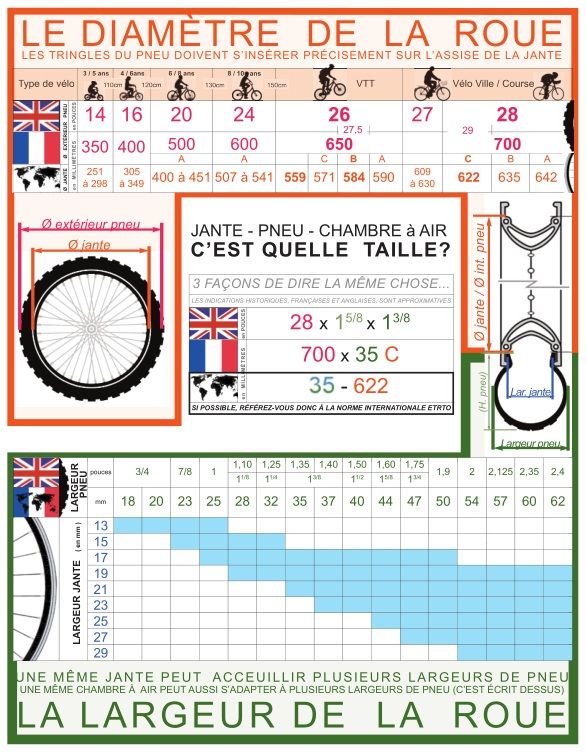 A wider rim by itself only spreads the tire’s bead apart (refer to “the bell” in the illustration), which creates a flatter top section to the tire. With any of the wrong configurations between tire width and rim width, the tread pattern’s logs are not where they should be for the tire to work as intended and handling, durability and – most importantly – predictability is suffering.
There is more to this discussion. If you want to know more, here is a deep dive into tire sizes.
The tire model name in itself is an informative piece of labeling on an MTB tire. While the branding isn’t standardized or directly comparable, it gives you a clear indication about the tread pattern – the part of the tire actually in contact with the dirt. While the model name is always tied to a specific tread profile, the casings, rubber compounds, and dimensions for that model can still vary.
So, “Minion DHR II” is the model name in my example. It’s one of the most popular Downhill tires used. In this case, the name even includes an acronym suggesting the intended use: DHR stands for Downhill Rear, and DHF for – you guessed it – Downhill Front. Easy enough, right?
There is more to it. While the Minion is indeed designed for gravity mountain biking, it’s not only applicable for full-on downhill bike park use. There are Trail and Enduro versions bearing the same name for those looking for a lighter-weight option.
In fact, the model name of a mountain bike tire says very little about the type of riding it’s best used for. It’s not much more than the name of the tread pattern, responsible for rolling resistance or grip. The durability and handling are dictated by the casing and rubber compounds respectively.
So, while the DHR is a rear-specific tire, you won’t get in trouble for using the DHR on the front and the back. A lot of riders, including me, do exactly that. You will, however, get more flats than you’d like if you use the wrong casing for downhill or riding in rocky terrain.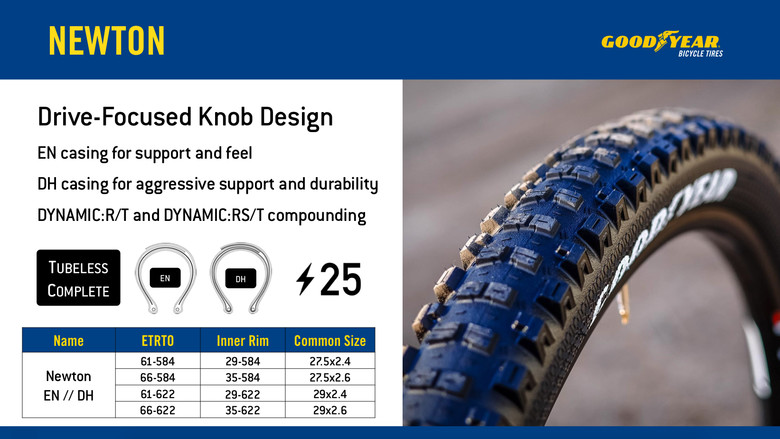 This is why the DHR in the picture is currently on the move from my downhill rig to my enduro bike. I’ll get more into casings later on.
Finding the right tread pattern depends on the kind of terrain but in the end, comes down to personal preference. On the most basic level, tread patterns of MTB tires are designed to strike a specific balance of rolling resistance. The capacity to dig into the dirt is what generates traction by high resistance. Low rolling resistance on the other hand allows tires to roll faster by keeping friction and grip low.
Rolling resistance and grip exist on the same scale of rolling resistance, but are the extremes opposite of each other.
Tread patterns designed for mud riding are arguably the grippiest tires while creating the most rolling resistance with their sharp edges and high knobes. This is a main reason why it requires more energy to ride a mountain bike on asphalt compared to a trekking bike.
Based on rolling resistance and grip there are three major categories to choose from: Cross Country (XC), Trail and Enduro, and Downhill. The distinction is of course not as black and white, but rather overlapping. While DH tires like the Maxxis Minions can make perfect sense on an Enduro bike, I would not suggest putting those wider, grippy tires on for a big XC ride.
As you can see in the graph, XC tread patterns are the fastest rolling but with a low amount of grip. Trail and Enduro are the intermediate tires here, striking a balance between rolling efficiency uphill and traction downhill. And on the far right end, Downhill tires are the burliest providing maximum grip at the cost of efficiency.
With casing options, it’s quite similar as they too are dictated by the intended use like the tread patterns. XC tires are only available in lightweight casing options, while enduro and definitely DH casings need additional protection from higher forces and sharp surfaces. Many of the Enduro and DH tires feature the same tread pattern (model name), but casings and rubber compounds change to suit the riding style and terrain.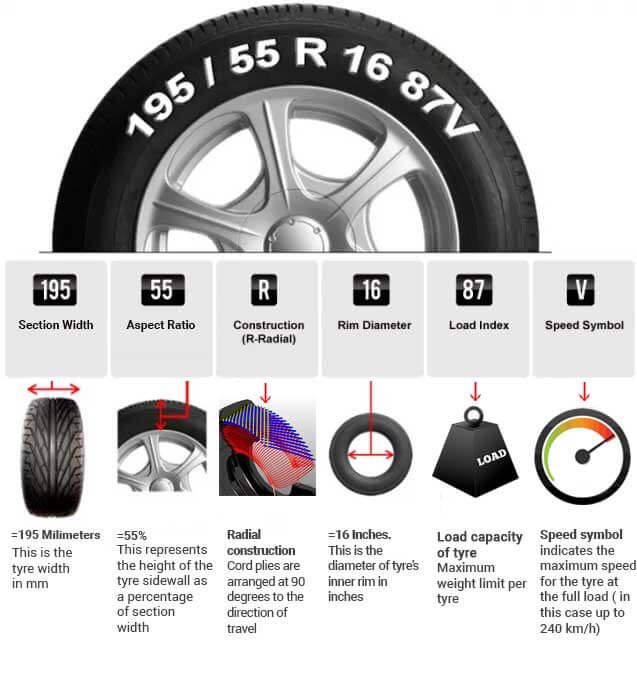
Obviously, we are only scratching the surface here. Tire profiles are the bread and butter of mountain biking. This is why I went headfirst into tread patterns here.
P.S.I. in this context isn’t a new acronym specific to the actual make-up or dimensions of an MTB tire. It stands for exactly what you think it would in this context: pound-force per square inch. In other words, psi is a measurement unit for air pressure like “bar”.
So why is it then that Maxxis tells us to run 50 psi in our mountain bike tires? That seems kind of excessive, don’t you think? And you would be right.
The psi number on an MTB tire is by no means a guideline of how much pressure to pump it up to. Rather, it’s indicating industry safety margins and legal requirements. Those psi numbers have nothing to do with the tire pressure that you should be running.
If you look on the side of your tire you’ll see a psi number in multiple places. One is below the dimensions, here it says 50 psi. In another spot, more difficult to make out, it says 35 to 50 psi. Whatever the number is, it doesn’t tell you as a rider anything useful or informative. It just has to be on there legally.
I mentioned casings a couple of times now. What exactly is it and what’s its purpose?
A tire casing is the main rubber body of the tire, not including the tread of the tire. It’s what makes up most of the actual tire, connecting the rim to the tread profile. The tire casing acts as the fundamental support structure of the tire, giving it simultaneously stability and flexibility.
I explain the ins and outs of MTB casings in detail here, but now let’s talk about this 60 or 120 TPI lettering here.
This label is common across all tire brands and what it’s referring to is the tire’s casing which is a nylon fabric that the rubber is actually molded to.
This cloth is what gives the tire its shape and what TPI means is threads per square inch. In other words: How many threads are in one square inch of the cloth. In the case of this Minion is 120 threads per inch, which sounds like a lot of threads and it is. Some other TPI numbers, that you might see are 60 threads per inch which is half the amount. 60 TPI casings are usually found in less expensive tires. Low TPI makes them heavier and the cloth is stiffer, so they’re less able to conform to the ground at low pressures. That stiffness also comes with increased toughness, so generally speaking, a 60 TPI tire is more puncture resistant.
Here’s the side note: Most tire brands base that TPI number off a single-ply tire casing, meaning it’s just one ply of the cloth. Some others actually fold that cloth over itself to create a dual-ply casing, doubling their claimed TPI number.
In our example case, it’s this little square that says EXO Protection, which refers to the added flat-resistant protection the Maxxis builds into the tire casing when is being manufactured.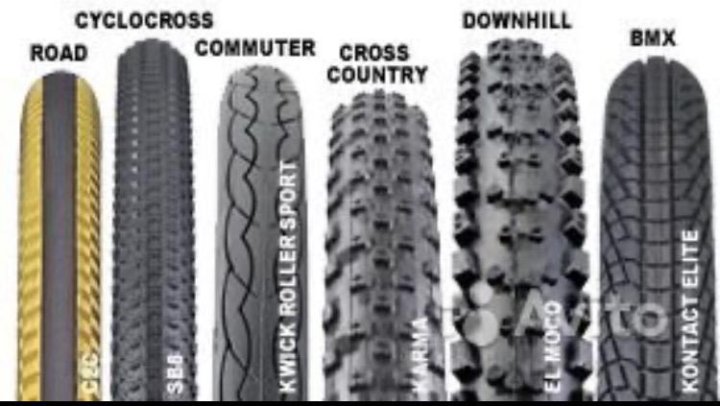
Again, all the tire brands are doing something like this and calling it something strong-sounding like: MaxxShield, Kevlar Composite, Silkshield, MaxxProtect for Maxxis, or Raceguard, Double Defense, Dualguard for Schwalbe, or Hardshell, DuraSkin for Continental. You get the idea.
There is no shortage of marketing slang, but the principles are the same. Every tire manufacturer is putting some sort of inserts either in the sidewall of the tire or some sort of casing protection all the way across the top to keep you from tearing holes in your really expensive mountain bike tire by riding through those points rocks.
Image credit: MaxxisThe flat-protection part is in fact not a part of the casing itself. It’s actually inserted in areas in need of extra protection. That’s done by weaving it in between layers, starting down at the tire’s bead and going up to just below the side knobs.
Manufacturers put protection in the sidewalls because when you’re riding your tires squishes together, pushing the sidewall further out, making it prone to hit rocks and roots on the trail. That’s the EXO part, colored green in the picture.
As you can see, it doesn’t protect the top of the tire, only the sidewalls. For additional protection you would need on hard-hitting downhill tires, there’s more armor available. In our case that would be EXO+, which comes in with the regular EXO layer in addition to their “silk shield” technology.
This thinner protective layer runs from the bead on one sidewall all the way up, under the tread, and down to the bead on the other side. Again, that’s another layer woven into the tire casing combined with the sidewall protection.
So while one layer of protection (EXO) only protects the sidewalls, another casing insert (silk shield) covers the entire casing bead to bead to give provide better protection along the top of the tire.
How do you know what compound your tires are? This label informs you of what sort of compound construction is used to create the tread (or profile) of the tire. In our Maxxis case, it’s this little three with a big C next to it.
The number 3 refers to the amount of three and the C to compound, so that means this tire is made using three different rubber compounds of varying firmness. This is a common technique in the tire industry. Pretty much every reputable tire brand is combining different types of rubber together to create tires of different characteristics for weight, grip, durability, and reliability.
And every single manufacturer uses their own naming scheme, which can get quite confusing. That’s why I picked out the most popular brands to explain their compounds in their own articles. For more information, check out the explanations for Maxxis MTB tire rubber compounds and Schwalbe Addix MTB tire rubber compounds.
For a complete list of all the MTB rubber compounds of the major MTB tire brands right now, check out this article.
Accordingly, there are a couple of tire compound numbers varying in complexity. For mountain bike tires you can choose between single compounds (1C), dual compounds (2C), and triple compounds (3C). There is in fact even a quadruple compound (4C), that is currently only made by Vittoria.
Let’s stick to 3C for now. This means there are three compounds, but not which ones. There are different kinds of 3C or triple compounds, depending on the firmness of the rubbers used. This particular one is labeled “MaxxTerra“, which is a name branded by Maxxis. There’s also “MaxxGrip” and “MaxxSpeed”. Most brands have their own nomenclature for their compound variations, so it’s a little annoying to navigate through, but in the end, they basically all name the same things differently.
The tire compounds all fall on a spectrum between grip and durability – from soft to firm.
To stick with our example, MaxxTerra basically means that Maxxis put firm rubber on the bottom for support, medium rubber along the middle (that provides traction but also doesn’t wear out so fast), and then some softer, slower rebounding rubber on the side (that’s where your cornering grip comes from).
The idea here is to put the grippy compound where it meets the ground, the longer-lasting compound in the middle, and then the hard compound at the bottom for support.
There’s also MaxxSpeed and MaxxGrip, which are named appropriately. With those, you can pretty much figure out what they’re doing by looking at the names. For MaxxSpeed that would be faster rolling so it has overall firmer, durable rubber compounds but it still has soft rubber on the side knobs. And MaxxGrip is all about traction by being softer overall. It’s what you want if you don’t care how long your tire lasts.
And finally, we have this big TR logo right here and below it says tubeless-ready. So that kind of gives the meaning away. There’s a similarly telling name every brand uses (TLR, TLE and so on), so you’ll easily spot it.
As with most labels, this one too tells us more than you would expect at first glance. TR informs you about two different things:
First, the set of rubber compounds used for the tire is compatible with some of the nasty stuff that’s in some tire sealants out there.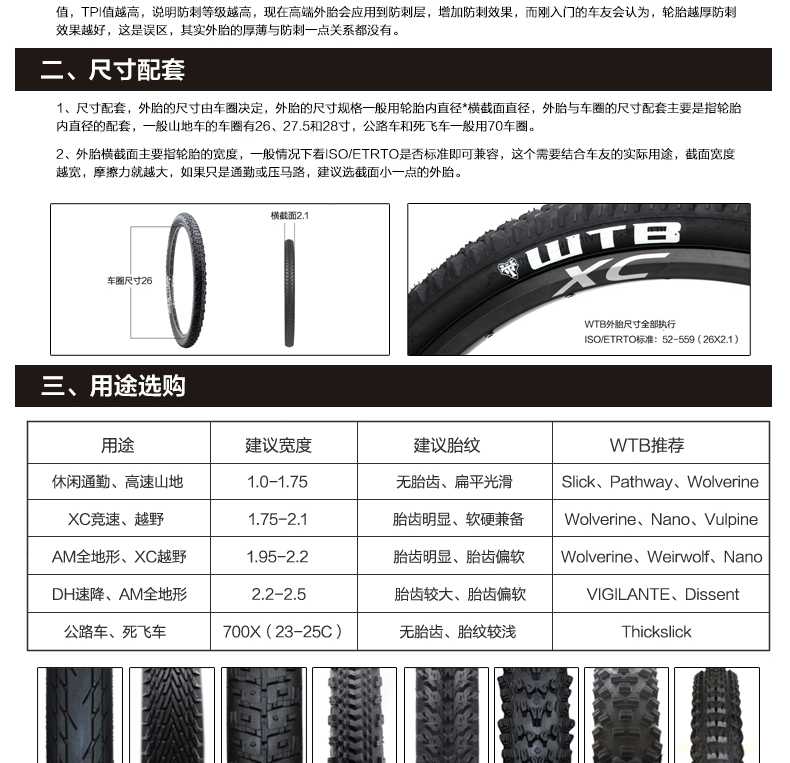 So, this isn’t going to degrade the rubber, that the tire’s made from.
Secondly, it tells us that the tire’s bead (the part pushing against the rim) is shaped in a way so that it locks securely to the rim. This is necessary for the tire and rim to actually be airtight and securely lock the tire in place, especially under heavy braking. You would not want to have the tire rotating, while the rim is not.
These two factors are why you want tubeless-ready tires instead of trying to make your non-tubeless tires tubeless. It won’t work and can even result in a nasty crash when the tire leaves the rim. Don’t ask why I know …
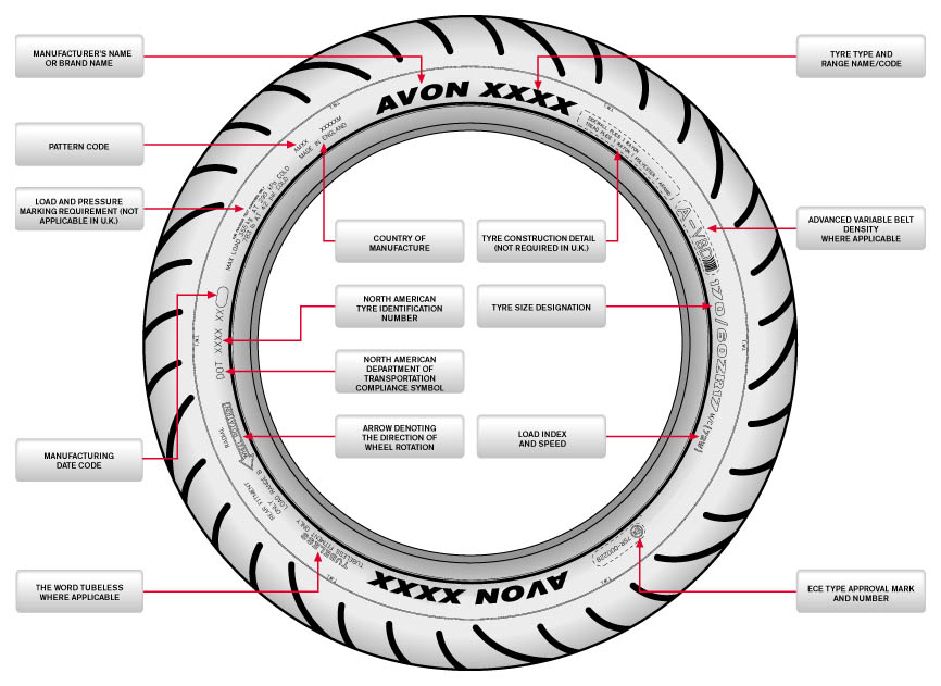
Often a bit hidden and out of view is another critical marking. As the name suggests it indicates the direction the tire is supposed to be mounted in order to rotate in the correct orientation. This is important because an MTB tire is supposed to offer the best rolling resistance while riding, with the best braking performance for any given profile.
Having it face the wrong direction will net you the worst of both worlds: high rolling resistance with weak resistance under braking. For more details on tread patterns, I would refer you back up to the corresponding passages.
On most tires, you can actually clearly see based on the tread pattern how it’s supposed to roll and interact with the ground. In any case, you got the label to fall back on.
If you’re new to cycling, you’d be forgiven if for assuming that all mountain bike tires are basically the same: They’re the knobby ones, right? Yes… But mountain bike tires can vary hugely in their size, materials, durability, and, depending on those knobs, the type of terrain and riding style they’re designed to handle.
A properly chosen mountain bike tire can make a ride more comfortable, safer, and give you more traction on the trail. It can shave grams off of your total bike weight, or it can make you less prone to flat tires. Tires are quite literally the base of the bike -its connection to the ground- so the tires you use make a big difference to your ride quality.
Here’s what you need to know to understand how MTB tires work, the differences in construction and type, and how to choose the best mountain bike tire for your bike and riding style…
Tires are generally marketed for four types of mountain bikes and styles of riding:
Cross-country / XC / Marathon: If you’re all about speed and climbing, and you’re a bit of a weight weenie or planning to race, cross-country mountain bike tires are for you. They’re thinner and lighter than the other options, and will roll faster. They generally have smaller, lower, and/or fewer knobs, and distinct front- and rear-specific tires are common.
While lighter means faster, the weight savings come at the expense of protection. XC tires have fewer layers of puncture and cut protection, so they may not be the best choice for gnarly trails, though burlier tires for cross country bikes are available. (We’ll explain all the layers and construction a little further down)
Trail / All-Mountain / Enduro: For most people, this is what they mean when they say “Mountain Biking”. Moving up in travel, you have Trail bikes (120-140mm), All Mountain (140-170mm), and Enduro (160-180mm). The tires get bigger, tougher, and more aggressive as you move up that ladder, too.
Here, knobs are taller and start to get supporting trusses to hold up to higher speed, more aggressive cornering. Tire size and volume increase to offer more traction and support, and they add more protective layers to the casing. Some tires get dual rubber compounds to put more grip on the sides.
c. Ryan Finlay for CanyonDownhill / DH / Gravity: If you’ve ever been to a lift-served bike park, you know what downhill bikes look like. They’re burly, have massive suspension, and DH tires are built extra tough to withstand serious drops, huge obstacles, and hard hits.
Plus / Fat Bikes: These bikes are designed for wider tire clearance. Fat bikes are typically ridden in snow (or occasionally sand, like on beaches) because their massive volume provides great flotation in soft surfaces.
“Plus” bikes sit between fat and trail-sized tires, and had a brief period of popularity with 2.8″ to 3.0″ tires because the added width boosted comfort and traction. But the category has mostly gone away, and most regular mountain bikes and suspension forks won’t fit tires this wide.
An MTB tire size is typically expressed as wheel diameter x tire width (like 29 x 2.4).
Generally, mountain bike tires come in three diameters – 26″, 27.5″ and 29″. There are also smaller ones for children’s bikes, ranging from 12 to 24 inches in diameter.
The second number is the width and can range from 1.9″ for ultralight race bikes (and kids’ bikes) to 5″ for fat bikes.
While the 26, 27.5 or 29-inch measurement is based on your wheel size, the tire width is determined in part by how much clearance you have between your fork or rear triangle and your tire, and by your personal preference. You’ll have a range of widths to choose from, depending on what you’re looking for in a tire. In general:
Another major consideration is matching your tire width to the correct rim width. We have a full technical article on which widths work together to help you stay within the safe ranges.
Downhill is simple…if you’re riding at a downhill bike park, you need DH tires. The difference between trail/enduro tires and cross-country tires is a bit more subtle.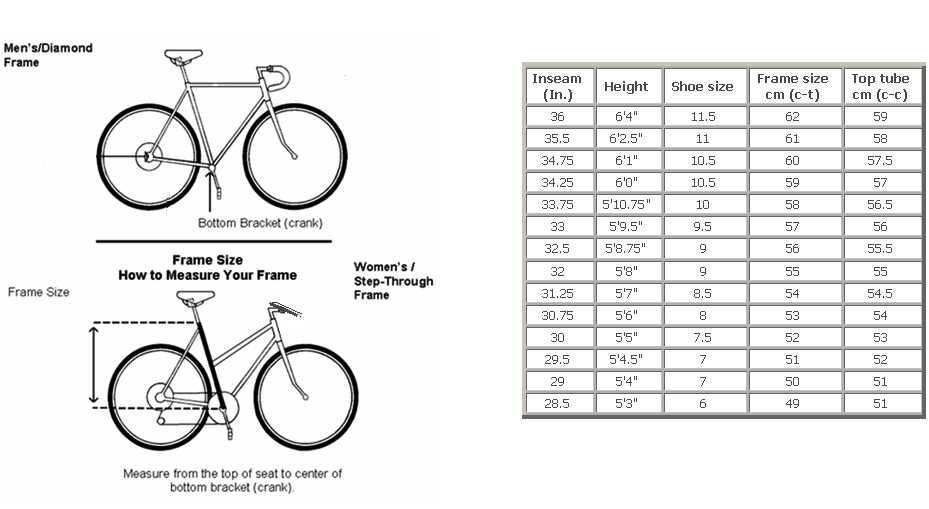
From there, a good starting point is checking the size of tire that comes stock on your bike, then determining what type of tire and features best match your terrain and riding style. Just because you have a “trail” bike with 140mm of travel doesn’t mean you can’t put a more aggressive “enduro” tire on it if that’s what’ll work best for you…or vice versa.
But what features do you need? For that, let’s look at tire construction…
The simple answer is “rubber.” But it’s a bit more complicated than that. We have a deep dive on tire construction right here, but here’s the quick version:
RUBBER: Every brand has their own unique rubber compounds designed to excel in different ways, and many disclose the durometer (aka “firmness”) of the rubber. Lower durometer numbers (40-60) are softer and have better the grip, but they’ll roll slower and wear out faster. Harder rubber (higher durometer, usually 60-72) provides lower rolling resistance so you can go faster, but won’t grip as well.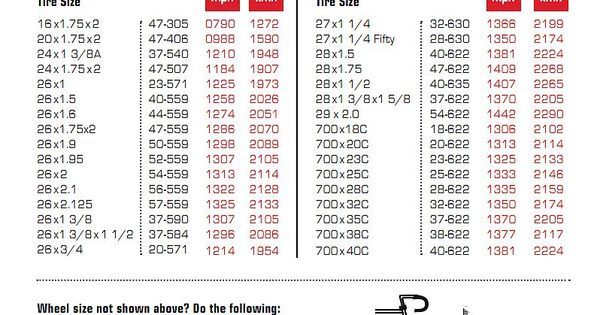
Higher end tires usually get dual compounds, putting a softer rubber on the side knobs for better cornering, and firmer rubber in the middle for faster rolling and better braking.
CASING: Every tire has a casing that the rubber is applied to. It’s usually a woven nylon fabric. Cheaper tires have lower TPI casings, but most “performance” tires start at 60tpi and this is a great baseline because it’s both flexible and sturdy. More aggressive tires sometimes use two 60tpi casing layers to add more support and cut protection. The tradeoff is they’re less supple and can have a firm-feeling ride, although they’re also better able to handle lower tire pressures without getting squirmy.
Lighter-weight “race” tires can get 120tpi casings, which use thinner fibers to increase the thread count. They are very flexible and help the tire deform to match the terrain, so they feel amazing, but they’re expensive and not nearly as cut resistant.
REINFORCEMENTS: In addition to the casings, some tires add reinforcements to further prevent sidewall cuts, punctures, and pinch flats.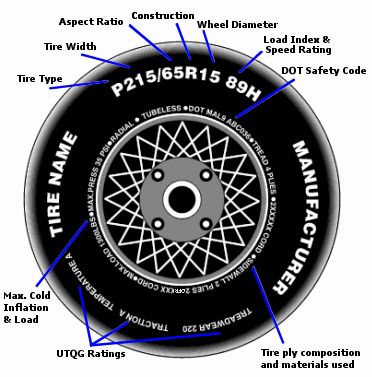 Look for a Kevlar or Aramid layer under the tread (puncture protection) or on the sidewall (cut resistance), or both.
An “Apex” layer is a small foam or rubber wedge layered between the casings by the tire’s bead. It adds a bit of sidewall support, but its main purpose is add a cushion between the sidewall and the rim to prevent snakebite punctures when you hit a sharp edge really hard.
All of these technologies work great, but they all add weight and cost. Knobbier, more aggressive tires pedal slowly and can really sap your energy on the climbs and flats. So, only buy as much tire as you really need.
You may notice that some tires in your local bike shop are sold neatly folded up in a cardboard wrap, while others are open to full size.
Cheaper tires use rigid wire beads because they’re easier to manufacturer and cost less. Some downhill tires still use wire beads because weight doesn’t matter as much and they’re a bit less likely to come off the rim, but mostly you’ll want to upgrade to…
Folding bead tires use Kevlar beads, which are much lighter.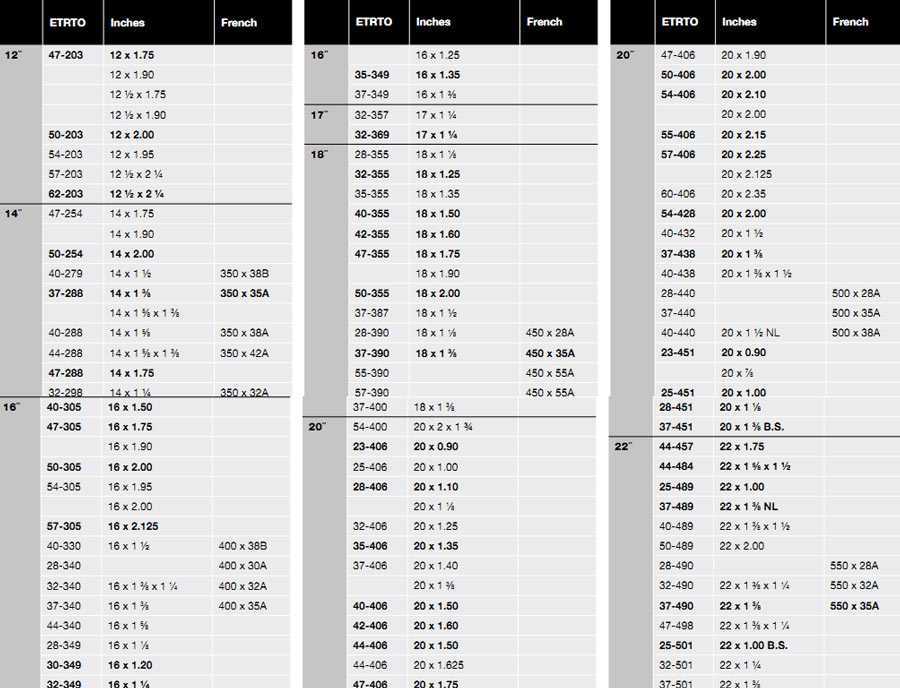 Kevlar won’t stretch, so it’s unlikely to come off the rim (never say never, but it’s basically a non-issue), and these are easier to mount on modern tubeless-ready rims.
Those knobs on the tire—also known as lugs—provide traction. We did a deep dive on MTB tire knobs here, but for a quick reference, here are the basics:
Most lugs are designed to roll in a certain direction, which is usually indicated on the tire. Mount them backward and you’ll end up adding resistance to your ride rather than improving your traction. And some tires, like the Ritchey Trail series above, are front- and rear-wheel specific.
Absolutely! A lot of top pro racers will opt for more traction in the front and a faster-rolling tire in the rear. For example, Canyon MTB Racing’s Emily Batty is a fan of the Schwalbe Racing Ray tire in the front and the Racing Ralph in the rear. The front-wheel-designed Racing Ray in the front offers an aggressive XC tread developed for optimal steering precision with its lug design, while the Racing Ralph in the rear rolls faster. (This combination is also a favorite of Bikerumor staffers.)
A lot of mountain bikes and wheelsets are sold as tubeless-compatible, though many may not come actually set up with tubeless tires. As the name implies, tubeless tires don’t require tubes and instead use tape around the wheel’s inner rim to seal off the spoke holes. Sealant is poured into the tire and the tire is seated, usually using an air compressor or a bike pump with a “booster” chamber in order to add enough air quickly to get the tires to ‘sit’ on the rim of the wheel.
The sealant does exactly what you’d assume it would: Keeps the air sealed into your tire, even if you get a small puncture or you hit an obstacle hard and pinch your tire. This means you can run lower pressures for better comfort and traction, and you save the weight of the tube, too. However, they are harder to deal with if things do go awry and can be messy, so if you’re not much of a mechanic, you may want to stick to regular tubes while you build your skills.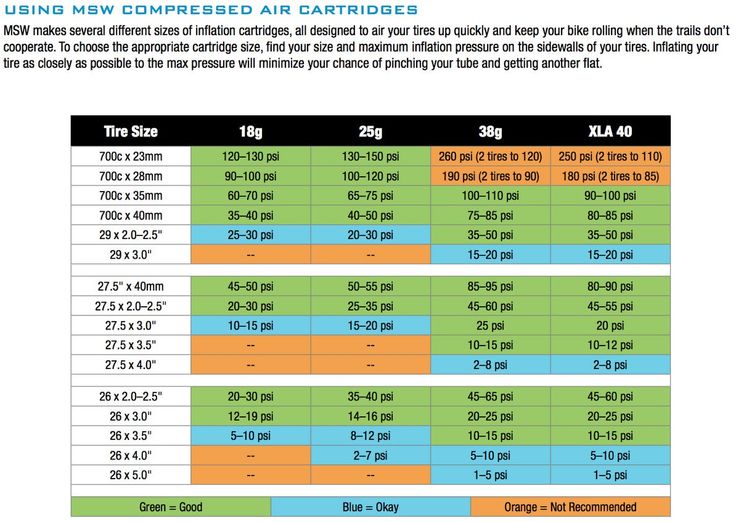
You can attempt to turn any mountain bike tire into a tubeless setup, but we wouldn’t recommend it unless both your tire and rim are labeled as ‘Tubeless Compatible’ or ‘Tubeless Ready’.
Fortunately, almost every modern mountain bike tire (especially ones you’d be upgrading to) are now tubeless-ready. And most modern mountain bike wheels use tubeless-ready rims, all of which are manufactured to meet size and diameter standards to ensure a safe, secure fit. As long as you’re buying a reputable, major brand of wheel/rim and tire, tubeless setup is easy and reliable, and will improve your ride quality.
In addition to putting tires into the XC, trail or downhill categories, brands often categorize their tires by the conditions that the lugs are optimized for. As you look for a tire, think about the terrain you typically ride, and whether you prefer comfort or speed.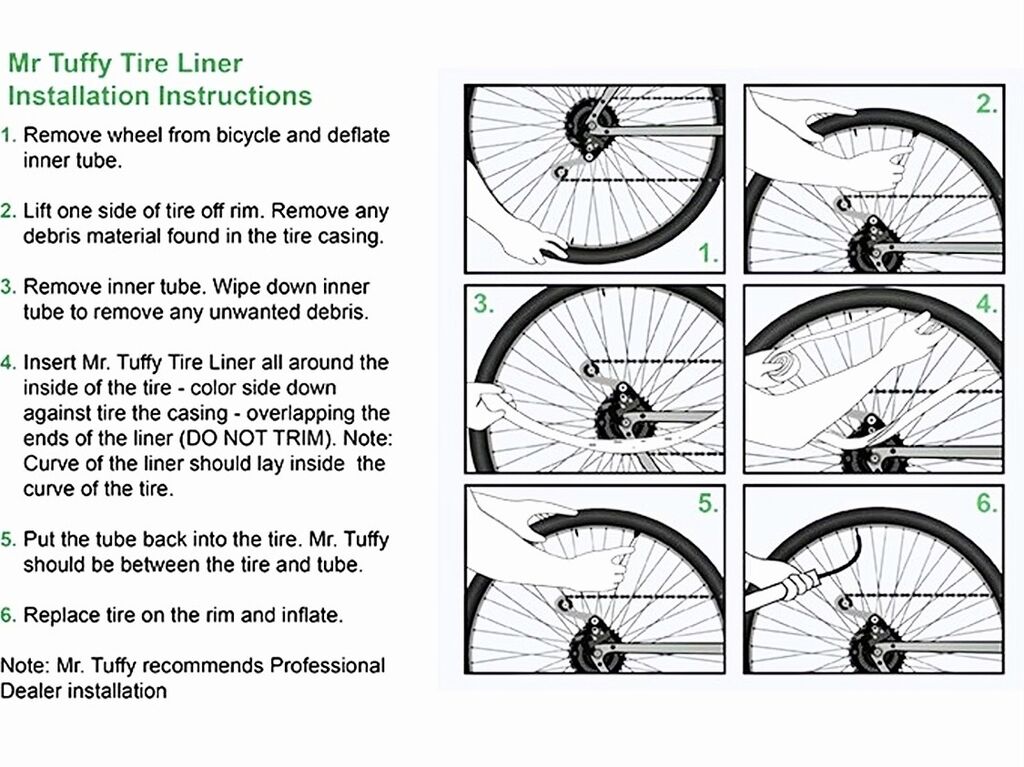
There’s a huge range of pricing when it comes to mountain bike tires. A decent tire can be as inexpensive as $30 per tire, but can easily climb up to over $100 per tire.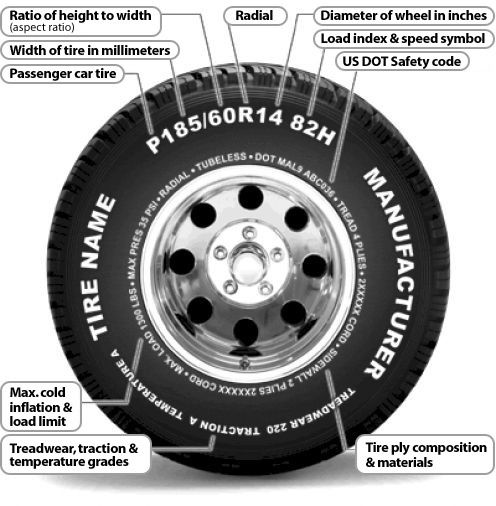 The sweet spot is right around $50-70/tire when it comes to cost versus value for most riders.
So, which type and brand should you buy? We’re adding MTB cross country, enduro, and downhill tire buyer’s guides, here’s what’s live now:
What questions do you have about MTB tires? Leave ’em in the comments and we’ll answer them!
Feature image © Pirelli
Edited: 01/10/2021
All bicycle tires have some numbers and not everyone knows what they mean. However, this applies not only to them, but also to the inscriptions on the wheels of balance bikes, scooters, baby and wheelchairs. Let's try to understand this simple question.
Everything is simple and clear. Any self-respecting manufacturer will write their name on the tire.
By the way. Some information about the labeling of manufacturers of Soviet bicycle tires.
In the USSR, there were many tire factories that produced products for all types of wheeled vehicles: automobile, motorcycle, bicycle, etc. Moreover, many of them continue to work even now, having changed owners and forms of ownership.
Tires were marked with trademarks or letters.
This tire marking applies not only to bicycle tires, but also to automobile, motorcycle and other tires produced in the USSR.
Appears on all tires, even those without manufacturer's name.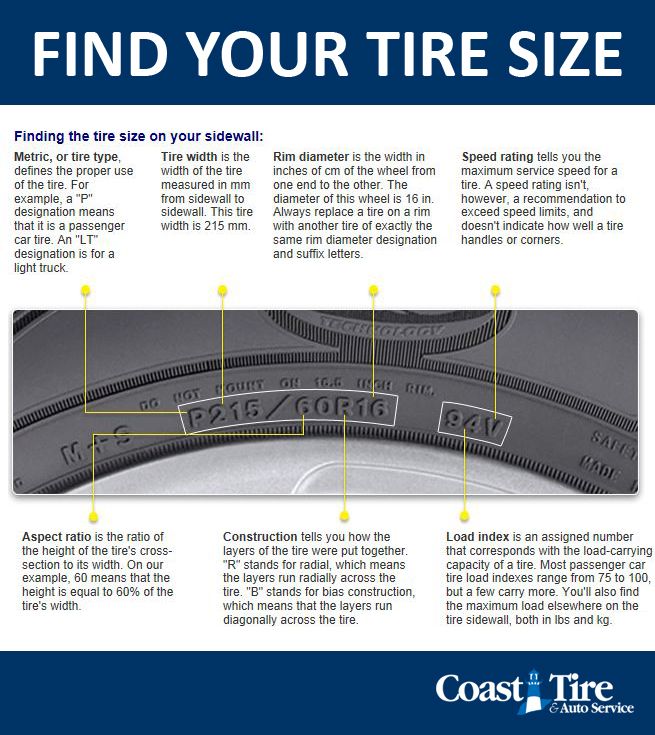 Specify either in millimeters or inches.
Tire size is usually indicated by or in accordance with the standard of the European Tire and Rim Technical Organization (ETRTO).
In this case, the smaller number is the width of the tire, and the larger one is its diameter, i.e. in the figure, a tire with a width of 52 mm and with an inner diameter of 559 mm.
In inches: 2.00" wide and outer 26" diameter.
Inch markings have a drawback: they are not 100% accurate. For example, bike tire diameters of 559mm, 571mm and 590mm would be referred to as 26”. Bike tires that have diameters of 622mm and 635mm will be 28-inch.
Sometimes, like this picture, the tire says it can fit between 1.95" and 2.1" widths, suitable for rims that can fit 1.95" to 2" tires, 1 inch, and, accordingly, choose a bike tube of the same size.
You can get a general idea of what the numbers in the different size labels mean by looking at the "Tire Marking" chart shown here.
The basic and most accurate designation of dimensions is the dimensions according to the ISO system (ETRTO). It is marked in blue on the diagram.
In it, the numbers indicate the dimensions in millimeters. The first digit is the width of the rubber, and the second is its inner diameter . It is also with a bore diameter of rims.
Inch and oldest marking type. Shown in black on the diagram.
There are two types.
First type: Two digits, eg 28 x 1 3/8. Where 28 is the tire size in inches by outer diameter , and 1 3/8 is its width, in this example: one whole and three eighths of an inch.
This is the most common bicycle tire size designation.
Second type: three digits. For example, 28 x 1 5/8 x 1 3/8. Here the numbers mean respectively: 28 is the outer diameter in inches, 1 5/8 is the height of the bike tire in inches (one whole and five eighths of an inch), 1 3/8 is the width of the bike tire in inches.
There is also a French marking (crimson in the diagram). It is less common in our country, but on rubber produced in Europe this is a fairly common type.
An example of a French tire label is 700 x 35C. Here the outer diameter of the tire is 700 mm and its width is 35 mm. The letter on the end indicates the inner diameter of the tire. In this case, C is 622 mm.
For more information about size marking types and their interchangeability of , see the article "Bicycle Tires: Sizes, Marking Types and Interchangeability".
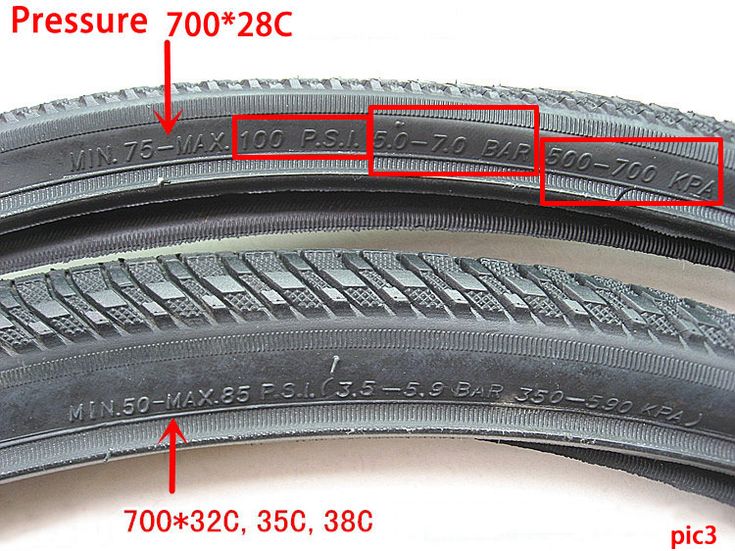
In general, there is a separate article on the pressure in bicycle tires on our website, and here we only note that inscriptions of this type mean the minimum and maximum pressure for which this tire is designed.
The inscription in English " Inflate to min ..... max " literally translates as "Inflate to ..." ("Inflate to", "Pressure from . .. to ...").
For example, the figure below indicates that the pressure should be from 36 to 60 PSI (250 to 420 kPa) or 2.5 atmospheres to 4.2 atmospheres, respectively.
Let's explain what BAR (atmosphere), PSI and kPa are.
The relationship between BAR, PSI and Pa is as follows: 1 Bar = 100,000 Pa (100 kPa) = 14. 504 Psi.
View the conversion table from BAR to PSI here.
So, when inflating a tire, you need to understand that the pressure in it should not be lower than the minimum and higher than the maximum. It is worth noting here that it is better to leave a small margin of 0.2-0.5 atmospheres without inflating the tire to the maximum value so that it does not burst, especially in hot weather.
Remember that pressure is not held by chamber , namely tire .
If the word COLD (cold) is written after the indication of the minimum and maximum pressure in the tire, this means that you need to measure the pressure in a cold tire.
Bicycle tires are most often symmetrical. Such slopes can be installed on either side.
But there are also specialized tires with a non-symmetrical tread pattern. They should only be installed as indicated on the tire itself. The responsible manufacturer will definitely indicate with arrows how to install it correctly. Usually these are English words:
The photographs below show such tires with indication of the direction of rotation of the wheel when mounted on a bicycle.
or
In the following illustration, the tire can be mounted on the front wheel as well as the rear, but with regard to the direction of rotation of the wheel. Those. when installing a tire on the rear wheel, look at the arrow Rear (rear) and set it in such a way that the rear wheel spins in the direction of the Rear arrow. When installing the same tire on the front wheel, pay attention to the arrow Front (front, front side). The tire mounted on the front wheel rotates in the direction of the Front arrow.
If the tire is designed for the front wheel only or only for the rear wheel, then the corresponding inscription is made on it. As, for example, in the photo below, which shows a tire designed only for installation on the front wheel. It also indicates in which direction the wheel should rotate.
I would like to dwell on one more point.
If the manufacturer has clearly indicated how to install asymmetrical tires on wheels, everything is simple and clear. But sometimes a situation arises when there is no such inscription on a unidirectional tire. How to act in this situation?
First of all, make sure that the tread pattern on the tire clearly looks like the English letter “V”. When installing such a tire on a wheel, follow the rule: if you install it on the rear wheel, it should leave a trace of the form: “>>>>>>>”, and the front one, on the contrary, of the form: “<<<<<<<<”. This is a picture if you imagine that the bike is traveling from left to right.
Why is that? The rear wheel is more responsible for traction, ensuring the bike's cross-country ability. Therefore, it seems to rest on the road with two legs of the letter "V" and creates a better grip with it.
The front wheel is responsible for the bike's maneuverability and braking. Therefore, when braking, the front wheel already rests on the road with two legs of the letter “V”.
This is especially important when driving on dirt roads, earth, sand. When driving only on asphalt, this will not matter much.
If the tire is labeled Front Only , it is designed for front wheel mounting only.
This is due to the fact that these tires are made from a very soft material with low stiffness, which provides better control of the bike while driving, but less wear resistance of the tire. On the rear wheel, it will be erased much faster.
Usually such tires are used in extreme disciplines - downhill, etc.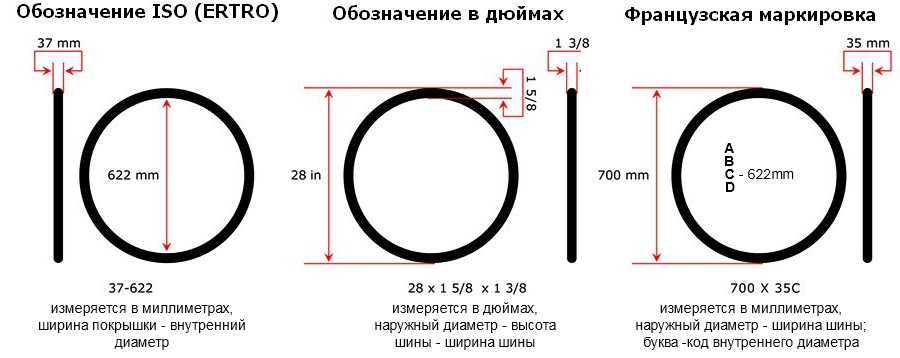
The question is often asked: "How to determine the date when the tire was made?". Conscientious manufacturers indicate on the tires the date (year and month) of the tire release.
The manufacturing date of tire is defined as a four-digit number, the first two digits of which cannot exceed 52. Why? In this number, the first two digits indicate the week of the year the tire was produced (there are 52 of them in a year), and the last two - the last two digits of the year of production.
Most often, these numbers are in an oval, as in the photo:
We have considered the main types of inscriptions that manufacturers most often write on their tires.
But some of them also write additional information or explanations.
For example, any additional information about the manufacturer, the address of their website, where you can read about him and the tires produced, the possibility of using in the cold season, and indeed everything else that they see fit.
Lettering Nylon (nylon) means that the tire cord is reinforced with nylon threads. Read more about this in the article "Which tire to choose for a bike."
For example, in the figure below, the tire says that the tread (Tread) consists of Polyester, reinforced with steel threads (Sleel) and nylon (Nylon), and the sidewall (Sidewall) is reinforced with polyester.
If the tire can be used in cold season , it will have " W ", " Winter ", " All seasons 3" or a snowflake painted on it.
Most often, these words ("Winter" or "all seasons") are also present in the tire name itself.
The main rubber on winter tires should be studded, soft and not tan in the cold.
For more information on how to increase tire grip on winter roads, see the article "How to increase bike grip on snow in winter".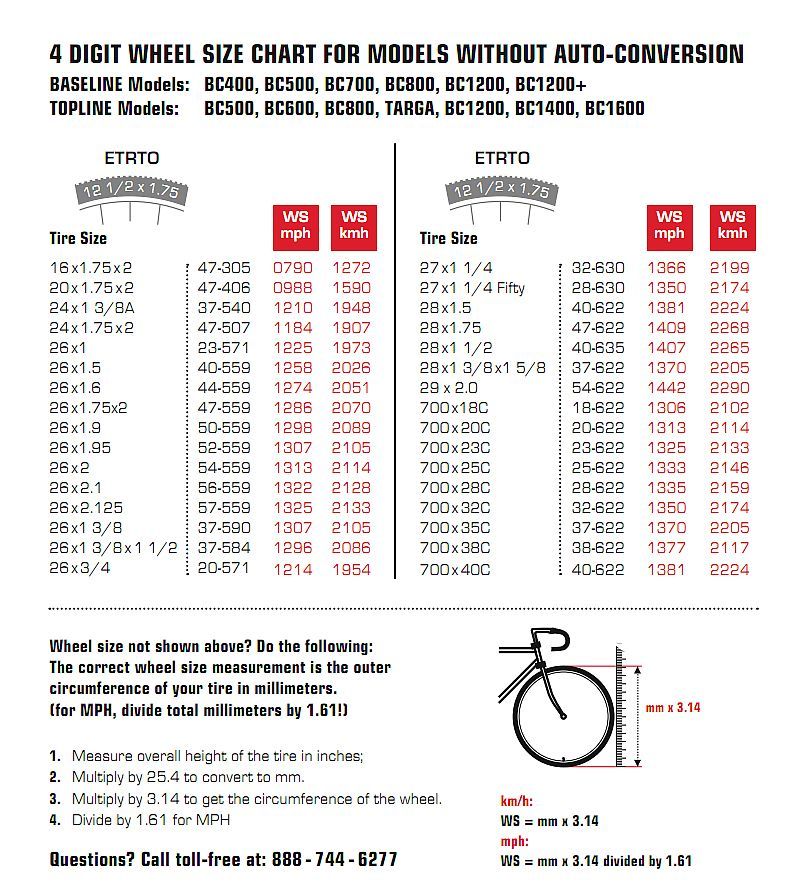
Sometimes a tire is indicated on its maximum load capacity in kg (or pounds - LBS). For example, the tire in the photo below holds 125 kg or 275 English pounds. Of course, if the pressure on it is 150 kg, the tire will not immediately burst, but the risk of damage to it will be significant.
The maximum load is indicated at the maximum allowable tire pressure.
Most of all this applies to tires from a well-known manufacturer like SCHWALBE , but also suitable for others
COMPOUND - the tire is made of a compound: a mixture of rubber with various polymers and monomers.
| Lettering | Description |
| 23S | Marathon 23S is a special compound containing silicon (Silica) that provides good rolling and long tire life |
| Allround | Marathon Compound - Durable, longer mileage, excellent wet grip and low rolling resistance |
| DPC (Dual Ply Casing) | Double layer nylon weave for added protection |
| Dual Compound | The tire consists of two components for better "behavior" of the tire.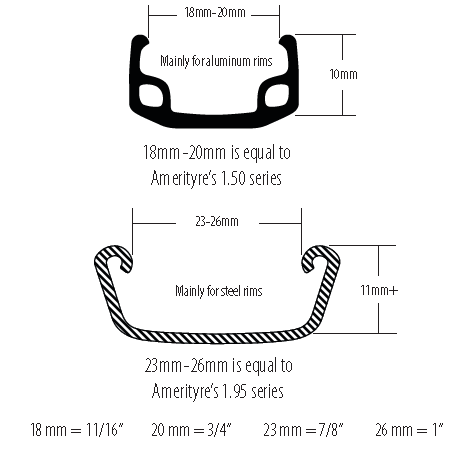 The center part of the tire in contact with the road is stiff for better wear resistance, while the sidewalls are made of a soft compound for better grip The center part of the tire in contact with the road is stiff for better wear resistance, while the sidewalls are made of a soft compound for better grip |
| DFC/DRC | Dual Front Compound / Dual Rear Compound - specially designed and optimized for Stelvio Evolution front and rear wheels. |
| ENDUR | Endurance - Abrasion resistant compound for maximum mileage for the Marathon XR | tire
| Gooey | Gooey Gluey - Extremely durable, soft material for better control on hard and loose trails (Muddy Mary) |
| Heavy Duty | The tire has a reinforced sidewall. Used in DownHill and FreeRide tires. Withstands heavy loads. |
| Hard Compound | Rigid material for soft marshy surfaces |
| Off-Camber Grip | Specially embossed side tread blocks improve wheel lean behavior. |
| ORC | Offroad Racing Compound is a compound for fast off-road tires. Optimal qualities for better off-road control |
| QC | Qualifier Compound - special compound guarantees low rolling resistance (Stelvio Light) |
| Light, LiteSkin | Lightweight tyre. Give it to those who fight for every gram of weight. These tires have worse puncture resistance! |
| L.S.T. | The inner edge of the tire has the property of preventing slippage on the rim when braking. |
| MGC | Maximum Grip Compound has very good grip on slippery and wet roads. |
| Magic | Compound for ultimate wet grip and rolling resistance |
| SBC | Schwalbe Basic Compound. Quality material for universal use in various conditions |
| Silica | Compound with a special silicon filler that significantly changes the properties of rubber, reducing rolling resistance |
| SPC (Single Ply Casing) | One layer of nylon fiber, covered with rubber, which is braided over the cord. Single-layer weaving allows the tire to "lick" tracks with different terrain and reduces the weight of the tire. Single-layer weaving allows the tire to "lick" tracks with different terrain and reduces the weight of the tire. |
| Soft Compound | Extra soft compound for better grip on hard surfaces |
| SGC | SpeedGrip - multi-level dual compound for optimum performance (SuperMoto) |
| SnakeSkin | Special additional tire sidewall protection reduces the chance of scoring. |
| T45 | Special blend for road tubing, used in Montello tubing |
| Triple Compound | Three-layer compound. Allows you to optimally combine different characteristics in one tire (Nobby Nic, Racing Ralph, Furious Fred) |
| Wide-Gapp | Large stud spacing tread provides excellent self-cleaning performance and improved traction. |
| DGC (scooter) | Durable Silica Compound provides good rolling and long tire life |
| DSC (scooter) | Durable Silica-Grip Compound has very good grip in various conditions |
| FOC (scooter) | Front Only Compound - rubber compound (Soft) optimized for the front wheel of the scooter |
| S1A (scooter) | Winter Compound is a winter compound designed for slippery and icy roads |
Tire stiffness is indicated by a two-digit number with an "a" at the end.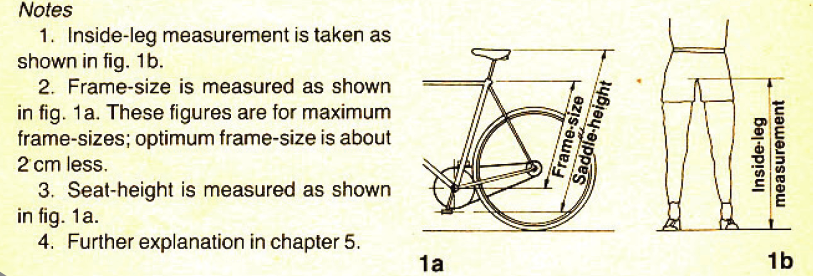
For example: 40a, 42a, 57a/62a, 60a, 62a, 70a, . The higher the number, the harder the material.
They write this very rarely, but sometimes it happens. More often this parameter is indicated on the company label, packaging, or at least on the manufacturer's website.
This also includes the inscription ST or SUPER TACKY (English: super sticky), indicating that this is a very soft, usually with a stiffness of 42a, tire.
If the letters 3С are present on the rubber, this means that 3 types of compound were used in the production of the tire.
In general, there is a separate article on the stiffness of the compound on our website and you can read more about it in it.
Tires for MTB tires made with Addix were divided into 4 groups. And to simplify the differences, they began to be marked with a label on the side and a colored strip on the tread.
Each group has different properties for different disciplines.
Addix Speed (red) - XC RACE
Rolls well and allows you to reach maximum speed. Has the best rolling resistance. Ideal for cross country racing. Grip is 15% higher, durability is 25%.
Addix Speedgrip (blue) - XC / AM / TRAIL
Good road holding. Versatile compound for rough terrain, long distances, small obstacles and climbs. Strength increased by 62%, grip by 35%.
Addix Soft (orange) - ENDURO / DOWNHILL
Designed for steep descents and climbs, overcoming serious obstacles. It has excellent rolling and cushioning, incl. at low temperatures. Durability increased by 49%.
Addix Ultrasoft (purple) - ENDURO / DOWNHILL
Designed for extreme descents and the toughest conditions with maximum cushioning. Significantly improved low-temperature properties, grip and shock absorption. Suitable for year round use.
Red and blue are suitable for cross-country, orange and purple for freeride, downhill.
the density of the weave of the carcass of the tire or the number of cord threads per 1 inch.
EPI is more commonly used in Europe, and TPI is a more international designation, adopted throughout the world, but in essence they are the same thing.
 ) have a high TPI value - they have a dense carcass and a lot of rubber. But for this type of tires, weight does not matter. Here safety and reliability are paramount.
 Higher TPI tires are stronger, harder to puncture and hold more pressure.
There are tires with a reflective layer applied to the side surface, which may be indicated by the corresponding inscription.
Commonly written: Reflex
Decals Tubeless0083 means the tire can be used without a tube.
Rubber markings like Anti-flat , Anti-puncture, Puncture protection, Puncture resistance, Flatless, means that the puncture protection layer is included in this tire.
The EXO Protection lettering on the bicycle tire indicates that an additional layer of Kevlar is woven into the sidewall of the tire, resistant to cuts and wear.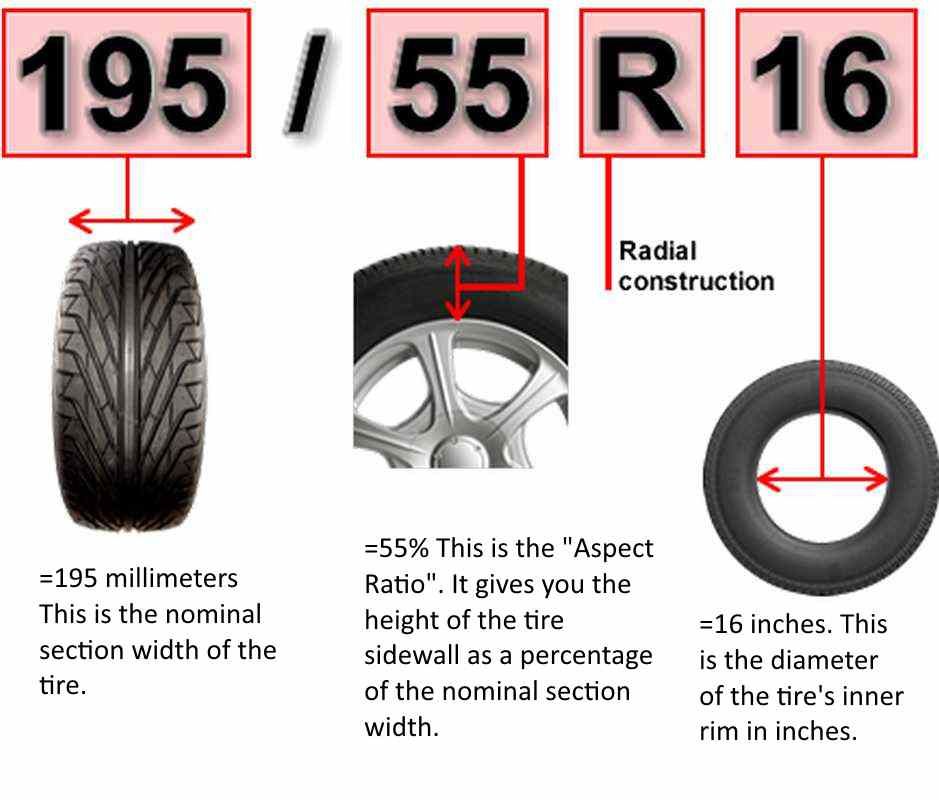
These tires are particularly well suited for rocky mountain trails, where there is a high chance of bead cuts.
Usually written on MAXXIS tires.
Contents
When buying a bicycle, one should not forget about such an important requirement for vehicles as the reliability of its components. In order to competently select and replace tires for bicycle wheels, it is important that the decoding of the marking of bicycle tires is not a mystery for the owner of a bicycle.
Inner tube dimensions directly depend on the size of the wheels, and they, in turn, depend on the type of bicycle. Before choosing one or another indicator for a reference point, it is necessary to remember that:
It is not so difficult to comprehend the wisdom of modern bicycle marking, but half a century ago, different countries of the world could not agree among themselves and reduce the height and width of bicycle chambers to the same denominator.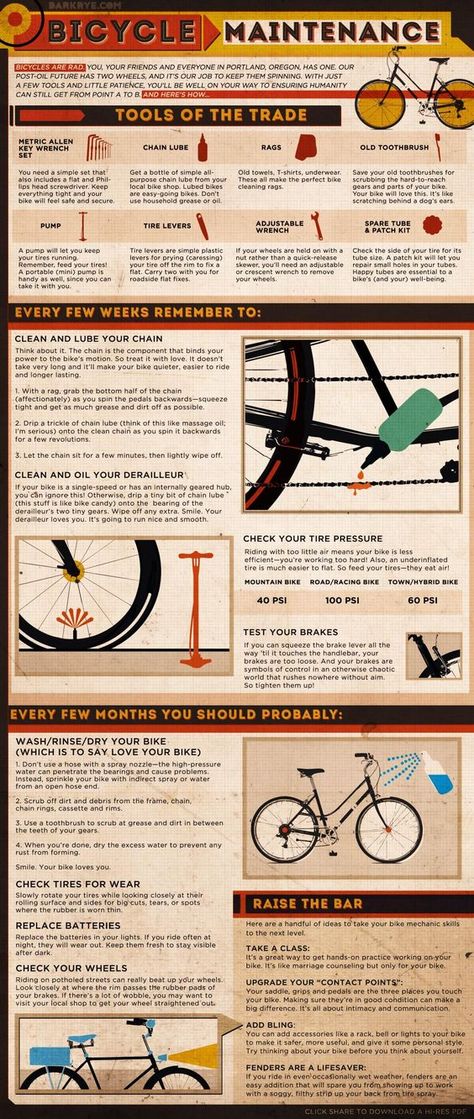 Sometimes tires were marked the same way, which fit on the same rims. For example, a size 26 rim had to fit a 25mm wide tube that actually had a wheel with an outside diameter of 24 7/8. Some manufacturers deliberately indicated too approximate sizes in order to increase the number of forced sales, to beat competitors. Today, the question of deciphering numerical encodings is available to the vast majority of cyclists.
The tires on the wheels of most modern bicycles have a European label using the ETRTO classification. This abbreviation stands for European Tire and Rim Technical Organization.
In this classification, as a rule, the following types of markings are used:

Interestingly, on Soviet-made bicycles, the double marking indicators are “rearranged”: first, the inner diameter of the tire (also known as the fit size of the rims) is listed, then the chamber width follows.
At present, the marking, which has become widespread in Europe, is recognized as the most clear and easy to use among all existing ones. Despite this, in France and the UK it is customary to label bicycle tires in their own way.
This marking, like the previous one, consists of two values written through a multiplication sign or a fraction. If the tires are marked, for example, as 28 x 1.4, the first number will correspond to the outside diameter of the tire, and the second to its intended width in inches.
This type of marker application has a significant drawback: it has approximate indicators, which makes it difficult to select bicycle tires with the same marker for different types of bicycles.
In France, the label might look like this: 700 x 35C. There it is customary to mark the product according to the outer diameter, width and inner diameter, where 700 is an approximate indicator of the outer diameter, and the letter is the inner diameter. The lower the index, the closer the letter is to the beginning of the alphabet.
Accordingly, A is the smallest and D is the largest size. In the marking of the presented sample, the letter "C" indicates an external diameter of 622 mm. Unlike other markings, the French scoring system is not used on all bikes. For example, such a designation is never applied to mountain bikes.
Summing up and returning to strict numbers, we must decide what marking to call the tire seller in your particular case.
To do this, you must first determine the bore diameter.
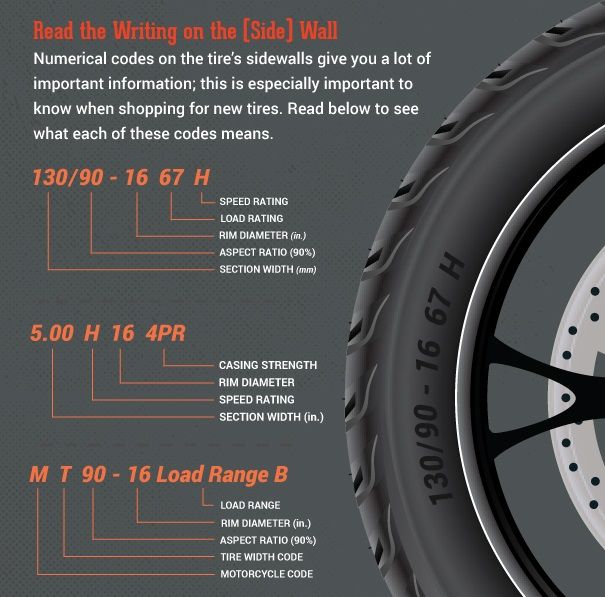
When choosing the width of the chambers, you can use the correspondence tables available on specialized technical sites or advice from a trusted seller. It is important to remember that it is preferable to choose a tire with a width that is 1.5-2 times the inner width of the rim.
Otherwise, some difficulties may arise:
In fact, everyone can choose the right size and decipher the labeling of bicycle tires. So keep in mind 2-3 dimensions specific to your bike to name them as soon as it becomes necessary to replace the tube. Well, if you don’t rely on memory, save the bike tire “for a sample” and go straight with it to buy a new one.