If your ATVs front end alignment is off, you may notice the ATV pulling to the side while riding, or a shaking and wobbling feeling in the handle bars while on the trail.
That’s not the only effect you’ll notice either, your tires will wear unevenly and need to be replaced sooner if you’re out of alignment. Not to worry, a front end alignment is a pretty easy task you can do yourself at home with some basic hand tools.
When you buy a brand new quad, the manufacturer recommends you do a front end alignment after the first 30 days. Then, every 3 months after that. To me, that seems a bit extreme. I do mine once a year with my yearly maintenance before I take it out for the season.
You will also want to do an alignment any time you swap out your tie rods, or do any work on the machine involving those parts. Here are the steps you take to do an alignment, I go into more detail on each of these steps below.
First you want to make sure your quad is on a level surface. You don’t need to spend a ton of time on this getting it perfect. But try to get the machine as level as possible, it makes the whole job easier.
If you have a flat spot in a garage or drive way, that would work best. But you could always jack up one side of the machine if you’re on a really uneven area. The quad won’t need to move for you to do the alignment.
As part of this step, make sure your tire pressure is set to spec or to what you normally ride with it set to. The most important factor is that the tire pressure is the same from side to side. Front and back doesn’t need to match, and usually shouldn’t. But make sure the left front tire matches the right front tire at least.
This step isn’t absolutely necessary, but it sure makes everything a lot easier knowing the handle bars aren’t able to move and mess with any of your measurements. If you have someone that won’t mind sitting there holding the handle bars straight that would work.
In fact, having someone sitting on the machine is better because the measurements will more closely match the conditions you have when someone is riding the machine.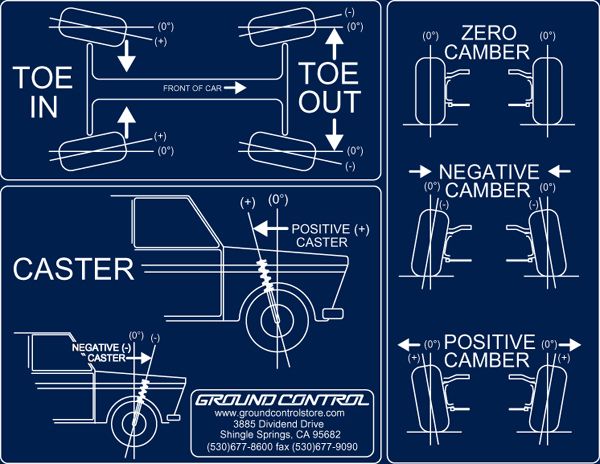 But if it’s just you doing this job, you’ll have to find another way to secure the handle bars.
I usually just get a ratchet strap and wrap the two hooks on each side of the handle bars and through the grab bar on the back to keep the handle bars from moving at all. It’s really a simple step that will save you some headache later on. Don’t strap it down to tight or you could cause other damage, just enough to hold her steady.
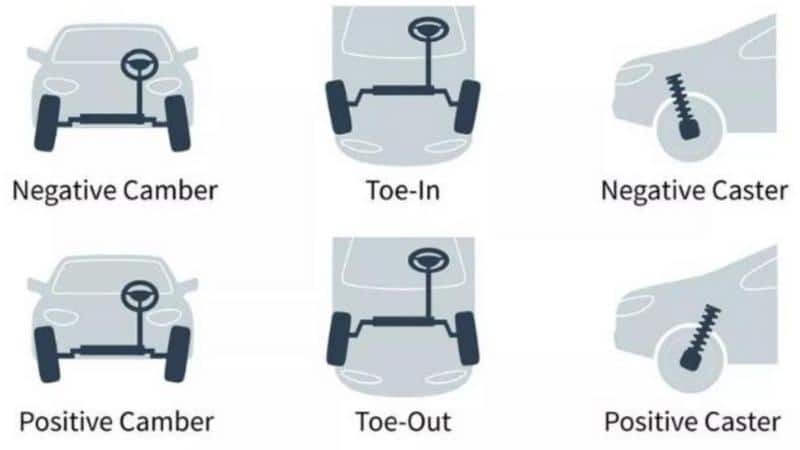
The camber of your front tires is often overlooked. But since we’re doing an alignment, this is the best time check the camber is on point. You’ll want to take a level and place it against the side of the tire vertically. Try to be as close to center near the axle as you can.
Rest the level against the bottom of the tire on the outside of the tire and get the bubble into the center of the level. Now measure the gap between the top of the level and the top part of the tire. You should get somewhere between 0.2 and 0.8 inches distance.
Not all ATVs and UTVs are rated to have the same camber. Check your service manual for the exact measurements, but about 1/8 inch to 3/4 inch is a pretty common standard to go by. If you’re not within those measurements, you should adjust your camber.
To adjust your camber, take the cotter pin out of the castle nut of your ball joint where it connects to the upper A-Arm and loosen the castle nut. Now with the correct size wrench, adjust the ball joint by screwing it in or out to get your camber within the recommended range.
Some A-Arm assemblies require that remove the ball joint from the spindle it sits in order to adjust. Once you’re done with the adjustment tighten back up the castle nut and put back the cotter pin.
If you want to think of the camber as the vertical alignment, then think of the toe as your horizontal alignment. First determine weather your machine calls for a toe-in or toe-out alignment by checking your service manual. Most quads require a 1/4 inch toe-in alignment.
There are two popular methods for actually getting the toe-in toe-out measurements. I prefer method two because it’s easier to see if only one tire is out of alignment or if both are.
Method 1 is quicker and a pretty straight forward way to get your measurements. You’ll simply measure the distance between the middle point on both your front tires, front and back at axle height.
The distance measurement between the center of the front of the tires will be measurement A and the distance between the center of the back of the tires will be measurement B. You will take your measurements and subtract measurement A from measurement B to find your toe-in. If the measurement is negative, you have a toe-out situation.
I found it easiest to measure the front of the tires, then put a piece of tape or something to mark where you measured. Then rotate the tires 180 degrees by rolling the quad to get the back side measurements.
To find out which wheel is out of alignment, maybe both are, maybe just one is. Take a long 2×4 or something long and straight that won’t bend. And hold it flush with rear tires and along-side the front tires.
Measure the distance the from the 2×4 to the front tires. The distance should be the same from right tire to left tire. If it’s off then you will want to get the adjustments done to the tie rods to get these to match.
For a toe-in alignment you will want the front of the tires measurement away from the 2×4 to be higher than the back of the front tire by about 1/8 inch. Remember that the standard toe-in measurement is about 1/4 inch? Well, that’s both front tires combined.
If you find that you need to make adjustments to your toe, that is all done with the tie rods. Start by loosening the lock nut on the tie rod ends. You will want to use two wrenches to do this part.
One wrench to hold the tie rod in place and the other to loosen the tie rod end lock nut. If you don’t use two wrenches you could cause damage to your machine.
Once the tie rod ends lock nut is loosened up, you will be able to adjust the tie rods. Make the adjustments to the tie rod by spinning clockwise or counter clockwise to get your correct toe measurement.
You will most likely need to adjust the tie rod, and take another measurement, repeating until the toe is where you need it to be.
After you’ve got your toe-in or toe-out where you want it, you can tighten the tie rod end nuts back up and you’re good to go. It’s a good idea to take another measurement after you’ve tightened them up just in case it shifted a little bit when tightening.
There you have it, an ATV front end alignment. If you’re alignment is still off after doing this, you may have a bent tie rod or A-Arm. If you notice, the handle bars still wobble or shake, you may just need to Balance The Tires or maybe even Replace The Wheel Hub Bearings.
Sharing is caring!
Submitted by lpseocampaign on Tue, 04/13/2021 - 16:19
When you’re driving your ATV for a while, you will notice that things shift and wear down. This causes small changes to your vehicle and can alter how it handles. A common change to an ATV is the alignment of its wheels shifting over time. They slowly change and wiggle out of place as you drive, which causes negative changes to your ATV’s handling. To help you deal with this, all you need to do is realign your wheels. You will need to follow a complete guide to ATV alignment like this one.
It’s important that you’re on the lookout for any changes to your ATV’s handling; they may indicate problems. However, when it comes to ATV alignment specifically, there are certain things you should be aware of. The major tell is if your ATV starts to drift to one side as you drive—this is due to a bad alignment. Another common symptom of a bad alignment is the handlebars wobbling as you drive. If you notice these things happening, you might need to check your alignment. However, before your check your alignment, there are a few other things you should investigate that cause the same problems. Please note that even if you’re using four-wheeler ATV tracks, wheel alignment is still very important to avoid these problems.

 By using a level and a measuring stick, make sure the camber is within the manual’s parameters. It’s important to check the manual since every ATV has a different requirement for this distance. Adjusting the camber usually means that you have to remove or loosen the castle nut near the ball joint and adjust the ball joint directly.
  However, if the measurements aren’t the same or they do not fit inside the recommendation, you’ll have to do an alignment.
If you need to do an alignment, you will have to work on the tie rod to adjust the wheels. Find the lock nut on the end of the tie rod and loosen it. Repeat for the other end. Hold the tie rod in place and use a wrench as you loosen the lock nuts to prevent damage to the vehicle.
Once the tie rods are no longer locked in, you can adjust them by spinning them clockwise and counterclockwise to the desired distance. You may need to check the measurements a few times as you do this to make sure you’re getting to the right distance.
After you have adjusted the tie rods to the proper distance, you will need to lock them up again. Locate the lock nut at the ends of the tie rods and tighten them. Once again, you should hold the tie rods still as you tighten the lock nuts to prevent damage to the rods. After you finish the adjustments and lock it down, take another measurement of the wheels to make sure it is correct.
Now that you have aligned your tires, you should check your tires and their pressure. While it’s unlikely that anything happened during your maintenance, a quick inspection won’t hurt. Just inspect them for any damage that may have occurred and then check the tire pressure. Make sure that the front and back tires match each other. You can check the manual for the exact amounts that your ATV’s tires should be.
Hopefully, this advice will function as a complete guide ATV alignment for you. If you follow this guide, you should be able to handle any alignment problems you come across.
So, in a rut, the steering wheel rips out of your hands, when driving straight the ATV goes to the right or left, you notice uneven tire wear or you see that one or both wheels sharply go to the side with the steering wheel set straight - all these are clear signs that that it's time for toe and camber adjustment .
It should be noted that on some ATVs only the convergence is regulated, and the camber is set by the manufacturer.
Getting rid of the problem.
There are many ways, we will try to talk about the most obvious and intuitive.
Which nuts to turn?
#1 Loosen nuts; No. 2 Toe adjustment (turn the tie rod itself with a wrench; No. 3 camber adjustment;
Attention! You do not need to hang the ATV, adjust it on a flat surface without holes and hills, set the steering wheel straight.
Visually we try to evaluate the wheels in front, look at the eye, it will immediately become clear which wheel goes to the side more and which one less. Sometimes adjusting by eye is enough, if we want everything according to science, then we move on.
Method 1
On the rim, on the very edge from the inside, on both sides of each wheel, near the shoulder, we make marks with a marker so that the marks are parallel to the ground.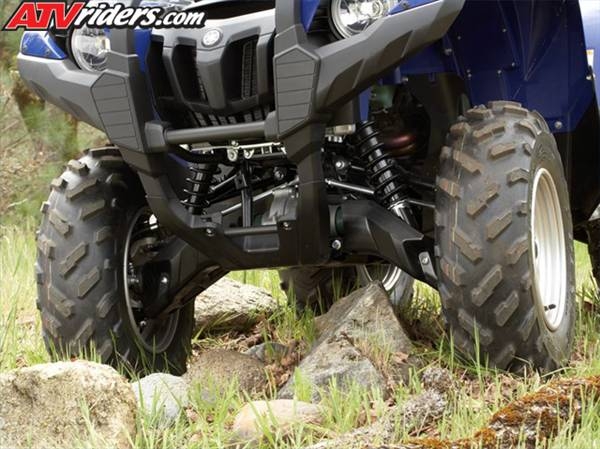
With the help of a simple ruler, we set the convergence, we rest the ruler against the marks and measure the front and back along the marks.
A ruler is a pipe inserted into a pipe of a larger diameter, at its ends there are L-shaped stops (curved so that the bottom of the ATV does not interfere), with which we will rest against the marks.
For convenience, we fasten the tape measure onto the ruler and look at the numbers, the shiny bolt is the lock, rested on the marks in front and fixed it, looked at the numbers and repeated the procedure on the back of the wheels.
We loosen the locking nuts on the steering rods, turn the rods in one direction or another, twisted and measured a bit, realized that it was a little or a lot, we turn further. Wheel alignment is measured between the edges of the rim. The wheels should be as in the figure below, the difference between A and B should be 0-3mm (less in front and more in the back). Universal convergence is made 0 mm.
After we lock the nuts and try to drive, perhaps the steering wheel will be a little crooked, and the quad will drive smoothly. We loosen the lock nuts again and turn the rods for the same number of revolutions, thereby aligning the steering wheel, but without touching the convergence.
Nothing needs to be adjusted on the rear suspension.
Method 2
1. Set the steering wheel to straight ahead.
2. Place the stands in front of the ATV perpendicular to the rear wheels as shown.
3. Stretch the elastic band around the ATV legs so that it just touches the rear wheels lightly.
4. Measure the distance between the tensioned tape and the front and rear points on the front wheel rim. The distance to the far point on the rim should be 2 - 3 mm greater than the distance to the near point on the same rim.
You yourself could see for yourself that there is nothing complicated in adjusting the toe and camber on an ATV, and you yourself are quite capable of doing it without resorting to the services of a car service. So we put the saved money in our pocket and happy and satisfied we go for a ride.
"Carburet setting...
Wheel chains... "
Camber adjustment problems on an ATV are a very common problem on this type of motorcycle. And even cool ATVs "get sick" with a similar problem. This malfunction is diagnosed by the following features:
● when turning, the steering wheel of the motorbike breaks out of the hands;
● When driving in a straight line, the ATV will turn to the right or left;
● rubber on wheels wears unevenly;
● The wheels lean noticeably to the side when the steering wheel is level.
You can adjust the camber with your own hands, or by contacting the services of professionals from a motorcycle service. In some models of ATVs, you can only change the toe with your own hands, and the camber is set during the manufacture of the vehicle, and does not change in the future.
If you want to forget about wheel alignment problems, then you have three options:
● unscrew the nuts a little to loosen them;
● adjust toe;
● Adjust the camber.
It is not necessary to hang the ATV for this work, it is best to place it on a flat surface with the handlebars straight. Usually, the need for camber adjustment can be identified purely visually by determining which of the front wheels of the motorcycle deviates to the side.
If it was not possible to correct the situation by eye, then you can try to loosen the nuts. This is done as follows:
● Use a marker to mark the wheel rims with two marks parallel to the ground;
● using a ruler, determine the amount of toe-in front and rear from the marks;
● loosen the nuts on the tie rods with a wrench;
● tighten the rods to the optimum toe-in values;
● Toe-in is measured between the edges of the ATV's rims and should be between zero and three millimeters.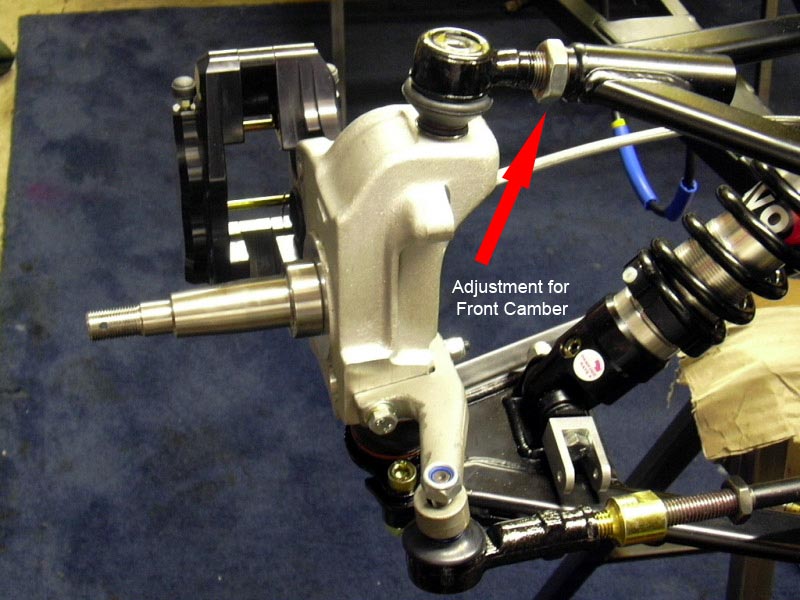
Now you need to check if the adjustment has been made correctly. For this purpose, you need to fasten the nuts, and try to drive a quad bike a little. Sometimes it happens that the motorbike moves smoothly, but the steering wheel looks to the side. To fix this, you need to loosen the nuts again, and scroll the corresponding number of turns of the thrust, trying to give the steering wheel a level position.
If the above method does not suit you, there is an alternative. To adjust the camber on an ATV, follow these steps:
● set the vehicle's steering wheel straight;
● place the racks in front of the motorbike in a perpendicular position relative to the rear wheels;
● Wrap the ATV with elastic so that it barely touches the rear wheels;
● measure the distance from the tape to the rear and front marks on the rims. The difference between the measured distances should not exceed three millimeters.
Adjusting the camber of an ATV is not the most difficult task, and therefore every motorist can cope with it if desired.