If you're used to having your spare tire on your trunk, it can be quite a daunting task to remove the spare tire under a truck. But don't worry. We got you covered. We've asked automotive experts how this procedure is done so that you can get started on changing your flat tire and be back on the road in a jiffy.
Follow these steps to remove the spare tire from your truck:
Hang on so we can elaborate on the given instructions so you can remove your spare tire from your truck with no hassle. We'll also share with you how to do this task when you don't have your tire removal kit. We'll also have a short discussion on how long you can expect your spare tire to last and how far you can drive using your spare tire.
Before you continue reading, let us say we hope you find the links here useful. If you purchase something through a link on this page, we may get a commission, so thank you!
Unlike regular vehicles that conveniently have their spare tires in their trunks, pickup trucks have theirs underneath the truck bed. This is actually a genius move by manufacturers so that the spare tire won't take up valuable space on the bed of the truck. However, it makes removing the spare tire more challenging.
Don't worry because there's an efficient way of removing the spare tire without breaking your back or endangering your life. Just follow these steps. You can also watch this YouTube video for the demonstration.
 Attach the handle on the groove near the top.
Easy, right? You don't have to go under your truck after all!
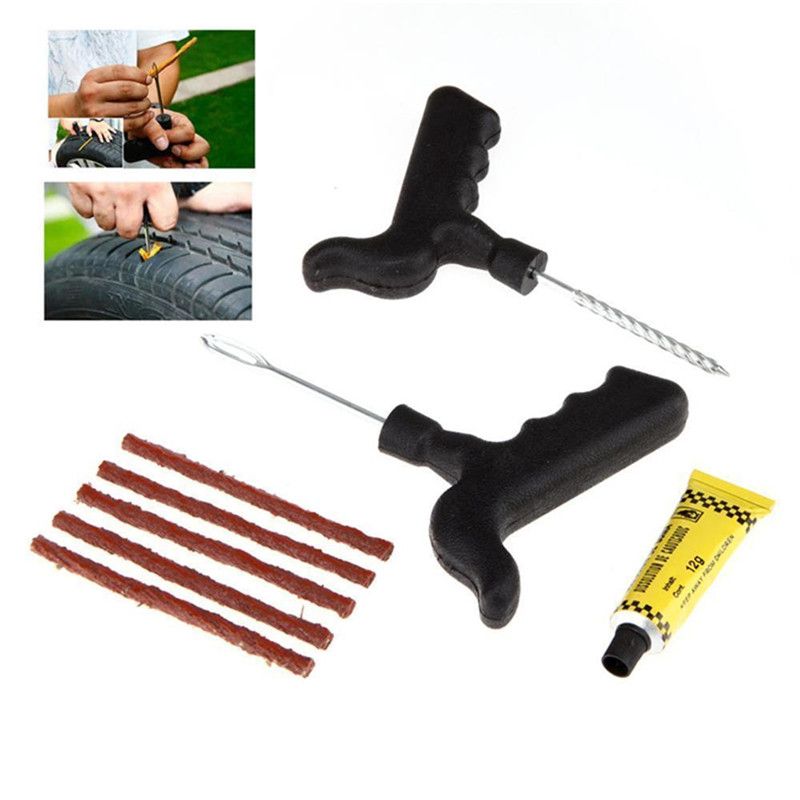
Brand new vehicles come with a set of factory jack kits or tire removal kits to aid you in getting the spare tire off the truck. You need to familiarize yourself with these tools, so you'll know what they are used for.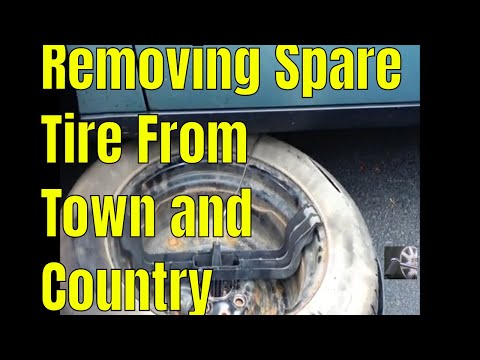
The tool that you use to lower the spare tire is called the jack handle. As mentioned above, this is a long piece of tool that you need to assemble so that you can connect it with the vehicle's tire-lowering mechanism. You turn the handle counterclockwise to unfasten the tire until it reaches the ground and you can remove it from the cable and tire holder.
If you don't have this in your tool kit, it's best to buy one as soon as possible. You never know when you're going to need it. Always be prepared for what can happen on the road.
Check out this spare tire jack handle on Amazon.
In case you have a tire blowout and you don't have a jack handle with you, there are other ways for you to remove the spare under your truck. But it would still involve other tools that hopefully you've got in your tool kit.
What you need:
Steps to lower the tire:
 Make sure your car is parked properly on flat ground.
What you need:
Steps to lower the tire:

These are just two ways for you to remove the spare tire without a jack handle. Basically, you can improvise with the tools that you've got to see which one will work best for you.
The lifespan of your spare tire will depend on its tire type. There are usually three types of spare tires: a donut, run-flat, and a matching spare tire.
A donut is also known as a space-saver or compact spare tire. This is smaller and lighter than a regular tire. In recent years, manufacturers began using donut spare tires on their vehicles to reduce cost and save valuable space since a full-sized tire takes up so much room.
Since they are more lightweight, they help improve the fuel economy and power consumption of your vehicle. However, this type of tire is made of weaker materials than traditional tires. They have a shallower tread depth which makes them more vulnerable on the road.
As such, a donut spare tire is just meant to be a temporary replacement for your worn-out tire. It has to be replaced immediately before you get yourself into trouble while using it.
A run-flat spare tire is more commonly found on newer vehicles. It is also called a zero-pressure tire. It is more durable than a donut tire. It is made of tougher materials that's why it can resist deflation even when it has been punctured.
But still, this is a temporary fix for your vehicle. You're better off having it replaced right away.
This is the most durable among the different spare tire types. It may not be made by the same manufacturer as your regular tires, but it is at par when it comes to performance on the road. As such, you can use it for a longer time after replacing your flat tire with this spare.
Again, the distance and speed at which you drive using a spare tire would depend on the type of tire that you have.
Donut tires are not designed to be driven for long distances. You have to maintain a speed of 50 mph or less. This means that you cannot use this on the highway.
Since donut tires are smaller than your other tires, they have to work harder to keep up with the rest. This makes them more susceptible to damages on the road.
With a run-flat tire, you can go beyond 50 mph since it has better endurance on the road. You can drive up to 100 miles with it. This will give you more allowance to find an able auto repair shop.
Lastly, a matching spare tire can be driven similar to a regular tire. You can go at the maximum allowable speed on the road and there's no limit on the distance.
Take note though that spare tires have different speed ratings so it's best to check yours. Don't go beyond the recommended speed to avoid damaging other components of your vehicle such as the transmission. It's bad enough that you had a flat tire, you don't need the added expense of additional repairs or part replacement.
Make sure you always have your tire removal kit with you so you can take off your spare tire under your vehicle without any hassle. With the right tools, this task doesn't have to be a chore.
Check out these articles for some related reading:
Does Firestone Patch Tires For Free?
20 Types Of Tires You Should Know
Whether you’re going on a road trip or making a quick stop at the community center, it’s crucial that your car has a functional spare tire at all times.
It’s equally important that you’re able to get the tire down from under the vehicle when you need it. Some cars come with specialized tools to lower the spare tire and quickly make the change.
However, if the tool is unavailable for some reason, you can still bring down the tire and be back on the road in no time. Let’s take a look at how to get a spare tire down without the tool.
Removing a spare tire without the factory tool is easy when you follow these steps:
Removing a spare tire without a tool might appear daunting at first. However, with the right equipment and process, it’s not too difficult a task.
There are two methods to lowering a spare tire on a Ford truck. Each method uses different tools. As such, your choice will depend on the equipment you have to hand.
This method involves pulling out the key from the spare tire drop assembly and using stock spare tire tools to lower the tire.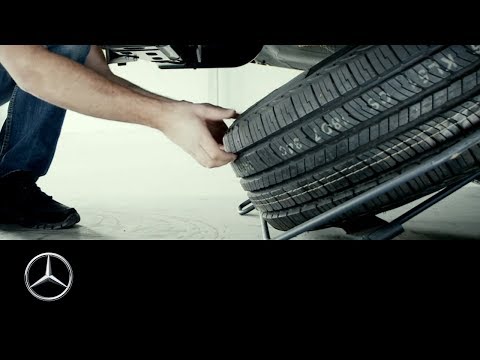
To make up for the lack of the factory key, you will need some standard tools like joint pliers, small pieces of wood and an optional helping hand.
After you’ve collected the tools, follow the steps below to remove the spare tire.
As you already know, the tire hangs from the truck’s underside toward the vehicle’s rear. As such, you will need to go under to gain access.
Before you get under the truck, remember that safety comes first. Therefore, ensure that you park the vehicle properly, on a surface that’s as flat as possible, with all brakes engaged. These precautions are to prevent the vehicle from moving while you work under it.
Locate the guide tube under the vehicle. This is a long, black, plastic pipe near the tire. Twist the tube back and forth while pulling it in the direction of the vehicle’s rear to reveal the drop mechanism for the spare tire.
Still under the truck, move to the passenger side and pull down the tire on this side, putting the wood in the gap between the top of the tire and the truck bed frame.
At this point, you may need that optional helping hand to put in the wood while you hold the tire down.
The reason for putting in the wood is to give you easy access to the drop mechanism without having to move the tire away from the truck bed continually.
Put your hand through the space created by the wood and feel for the key to the spare tire drop mechanism. The key roughly resembles a wheel lug nut, and when you find it, pull it out using the jack or working pliers.
Sometimes, just pulling the key may not be enough, and you may need to wriggle the pliers as you pull.
With the key out, the hole left behind is almost identical to the jack crank. Thus you can use the stock tire tools to lower and remove the spare tire. Insert the jack crank into the hole and turn counterclockwise to lower the tire.
The second method differs considerably from the first. Accordingly, you need a different set of tools, including:
With the tools above, you can bring down the spare tire by following the steps below.
Attach the 14mm socket to the extender. You don’t need to use a high-quality socket, as any low-end one will do. It’s also best to use an extender long enough to reach from the bumper to the spare tire. Aim for an extender that’s around 60–70cm long.
Insert the socket into the hole located on the left (or right, in some trucks) of the license plate. The hole leads directly to the key.
Use a hammer to strike the extender when you feel the socket touching the key. Hitting the extender pushes the socket over the key, providing a better grip.
Four to five blows from the hammer should be enough. Additionally, do not apply too much force to the hammer to prevent damage to the drop assembly. You don’t necessarily have to use a hammer; any object large and tough enough can serve.
With the socket firmly in place, use a wrench to turn the extender counterclockwise. The drop assembly key is similar to the one used on wheel lug nuts. Thus, it will turn as the socket turns.
It may be hard to turn the wrench at first, but it becomes easier as you continue turning, and the tire gets closer to the ground.
By the time the tire hits the ground, the key will be loose and you can remove it. Withdraw the extender from the hole, and use a flathead screwdriver to pry the nut out of the socket.
While the tire is now on the ground, you can’t use it until you detach it from the hoist. To disconnect the tire, reach into the large opening in the middle of the wheel. Next, locate the metal flange connected to the cable and turn it from a horizontal to a vertical position, pulling it out of the rim vertically.
Finally, the hole left behind by the key can fit a jack crank. Put the crank through the opening near the license plate till it gets to the hole vacated by the key. Turn the crank clockwise to raise the hoist back up
While Chevys store spare tires under the truck bed like other trucks, the removal process differs. So, if you’re wondering how to lower spare tire on Silverado without tool, follow the steps below.
You will need a couple of tools, including an ignition key and a jack kit to make a chevy spare tire removal tool.
Like other trucks, the access hole is on the rear license plate’s right side and covered with a rectangular shaped plastic.
Newer models may have a lock over the hole as a security measure. In such cases, use the ignition key to remove the lock assembly covering the hole.
Open the jack kit and select the rod with the broader end and flanges on all sides. This rod is the “female” rod and the one you’ll insert into the now open keyhole.
Get another rod from the tool kit, and attach it to the end of the female rod to make it long enough to reach the spare tire from the bumper. Ensure that the press locks enter properly to prevent the rods from disconnecting while you’re turning it.
Insert the composite rod into the spare tire hole. Press and turn the rod simultaneously until the end locks into the cable crank.
Put a wrench on the other end of the extension rod and turn counterclockwise. The tire will begin to drop as you turn. Continue turning until the tire touches the ground when you can remove the cable flange from the rim.
Furthermore, you can use the procedure above on different models of Chevrolet trucks. As such, you can follow the steps if you’re wondering how to remove spare tire from Chevy suburban.
It’s always an unpleasant experience when you get a flat tire. It’s even worse when you can’t get the spare down for lack of the specialized factory tool.
However, there are other ways to bring down the spare tire even without the tool. These methods are straightforward and use common tools like extenders, flathead screwdrivers, sockets, ignition keys, chunks of wood, pliers and hammers.
Thus, with or without a factory tool, you can get the spare tire out in minutes and be back on the road quickly.
Author: Oleg Polazhinets
Perhaps the replacement of a punctured wheel is the little that a modern motorist is used to doing himself, and not delegating it to an official dealer or master. And even though a “stowaway” or a repair kit is increasingly found in the trunk, the “spare tire” is still relevant. And today we remember how it all began.
Did you seal the wheel? - Yeah, glued all night. In the morning the owner of the glue will come.
From the movie "Boomer"
The very first cars, created at the end of the 19th century, did not have a spare wheel for a simple reason - solid rubber or wooden wheels could not be punctured. When, to increase the level of comfort, cars began to be equipped with "pneumatics" (hollow tires filled with air for elasticity), drivers immediately faced the problem of multiple punctures - the wheels "caught" nails and sharp debris, which were generously strewn with roads 100-120 years ago.
The designers quickly realized that it was necessary to take an extra wheel "just in case" with you. More precisely, not the entire wheel assembly, but only a tire with a chamber or two tires connected together, since the wheel hub was made non-removable, that is, only the tire with the rim could be dismantled.
"Spare wheel" was placed on the sidewalls of the body - usually on the driver's side - on the starboard side. After all, on cars of the early 20th century, the steering wheel was located to the right of the longitudinal axis of the car.
In the event of a puncture, the driver had to be able to change the tire himself, and this had to be done frequently. Sharp objects were found on the roads in large quantities, and even the small width of the treadmill did not save smooth tires with a poorly developed tread.
Somehow car owners (and more often hired drivers) coped with these tasks, but the engineers still tried to make life easier for the driver, and over time, spare wheel assemblies began to be used on cars. Having such a spare tire, it was enough to remove the wheel from the hub, without doing the tedious procedure of sealing the puncture and beading the tire on the spot. The first complete replacement wheel is believed to have appeared on Thomas B. Jeffery's Rambler in 1919.09, however, in the photo of cars of other brands (for example, Ford T) of those years, you can see both individual tires and entire spare wheels.
Out of habit, in most cases, cars of the first half of the 20th century were equipped with not one "reserve", but two - fortunately, the body structure with protruding wings and hinged steps contributed to this.
Spare wheel mounts were usually located just behind the front axle, in a specially provided recess between the fender and the sill, so the spare wheels did not eat up the space of passengers and luggage.
Over time, tire construction has improved: in 1923, wheel manufacturers began to use a cotton cord casing, and ten years later, tires received a viscose base. All this increased the strength of the rubber and favorably affected its durability. Road construction also did not stand still, and the number of punctures decreased markedly. It was possible to be limited to one "reserve".
The most logical place to place it was the center of the stern. For safety and for aesthetic reasons, some manufacturers covered the "reserve" with a special casing - soft fabric or all-metal, which completely covered the wheel, forming a blind niche. However, for a long time, a wide variety of variations were possible here.
On many off-road vehicles of the first half of the 20th century, the spare wheel was placed vertically on the rear wall of the body or a "reserve" was installed on the sidewall - but not behind the front axle, but in front of the rear wheel, since the length of the wheelbase and the distance between the doorway and the front fender they didn’t allow to place a “reserve” there - there was simply not enough space.
Finally, on many trucks, the spare wheel was installed under the body, attaching it horizontally to the longitudinal frame spar. This solution became very popular and subsequently survived for a long time. An alternative arrangement of the "cargo spare" - vertically on the rear wall of the cab - made it possible to save usable space, but when replacing, the driver faced a problem - how to remove (and then return to its place!) A heavy wheel of large diameter.
Interestingly, in 1941, due to a lack of resources, the US government at the legislative level prohibited the completion of new cars with spare wheels.
Over time, car bodies became more and more aerodynamic, and as the popularity of pontoon bodywork became more popular, the sidewalls lost their footrests, behind which it was possible to install a spare wheel. That is why the fifth wheel on passenger cars finally "moved" back - first, as before, remaining outside the trunk, and later - inside it. As it turned out, in this case, the tire is much better preserved, and the designers do not need to rack their brains on how to place the "reserve" and stylistically link it with the rest of the design elements.
British automakers even came up with the placement of the fifth wheel in an original way!Since the wheels of most cars until the end of the sixties of the twentieth century had a rather large outer diameter, the "reserve" had to be placed horizontally or at an angle, as a result of which it significantly reduced the volume of the luggage compartment.
As soon as the mass transition to fourteen- and then thirteen-inch wheels began, the designers found a great place for the fifth wheel, placing it vertically in the luggage compartment. A striking example is the Fiat 124 (or any Zhiguli with a sedan body), where the spare wheel was installed in the wing cavity behind the left rear spar, so it did not take up useful trunk space at all!
True, not all designers found such beautiful and competent solutions, placing the wheel in the trunk in the old fashioned way "how it goes." On station wagons, the "reserve" lay horizontally in a special niche under the floor of the luggage compartment.
In the 1970s and 1980s, this option almost supplanted all the others. Despite the fact that he had one important drawback - if the "spare" had to be used for its intended purpose, the entire load had to be removed in order to get to the wheel located in the niche.
On the 24-02 station wagon, the spare wheel even had its own… door! Therefore, on some cars, the "spare wheel" was located under the trunk floor not from the side of the passenger compartment, but from the outside - that is, in the literal sense, under the trunk floor. This required the use of a special bracket with a mechanism that would allow the wheel to be lowered to the ground.
However, even here there was a fly in the ointment: in order to get a "spare tire", the driver had to kneel, and the wheel itself always got its hands dirty, because dirt constantly flew at it from under the wheels and from the road surface.
Another option is to install a "spare tire" ... under the hood. It would seem that it is almost impossible to place a rather bulky wheel in a cramped engine compartment. However, certain tricks and the power of design thought made it possible to cope with this task. For example, in the Soviet Tavria, due to the lack of a wheel hub, the spare wheel rim was literally "put on" the left cup of the MacPherson strut. The wheel under the hood stood (more precisely, lay) on other Soviet cars - for example, Zaporozhets, Oka or VAZ-2121.
There were also opponents of this decision, who argued that the constant overheating of the "reserve" in a hot engine compartment leads to premature aging of rubber. In practice, during active operation, the wheel wore out faster than dried out.
On some SUVs, the wheel is still vertical on the tailgate. The disadvantage of this solution is a large load on the hinges and metal of the door, unless a special separate bracket is provided for fastening.
On crossovers, the "reserve" is often placed under the boot floor (outside), but this worsens the geometric cross-country ability - when driving over rough terrain, there is a risk of sitting on the ground "fifth point".
In short, no matter how you place the fifth wheel, it still gets in the way.
Over time, the wheels have noticeably increased in tread width, and the diameter of the disk even on modest small cars has grown to immodest 15-16 inches. To place such a "skating rink" in a narrow niche of the "reserve" has become a rather difficult task, so the role of the fifth wheel has been played for some time by the so-called "roller", or emergency wheel.
It differs from a regular spare wheel in its smaller diameter and width, making the spare wheel much more compact than a full-size wheel. Of course, it does not imply constant operation, but only allows you to "hobble" on such a wheel to the nearest tire service in order to repair a regular tire.
It is better to put such a "crutch" on the rear axleFor this reason, there are opponents of such "crutches", which are spent on the purchase of a fifth full-fledged wheel and placed directly in the trunk. On the contrary, many car owners put a toroidal cylinder from a gas installation in the spare wheel niche, and instead of a standard “reserve tire”, they use a suitable “stowaway”, choosing an analogue with the necessary parameters of the bolt spacing, the diameter of the central hole and the offset of the disc.
When using the "rollover", you need to remember that regardless of which of the wheels is damaged, it is best to put the emergency gang on the rear axle and move on it at a speed of no more than 80 kilometers per hour.
Another option is a temporary wheel, which is stored in the luggage compartment in an uninflated state. Volkswagen Touareg and Porsche Cayenne are equipped with such a “roller”, so before using the “crutch” with a bright red disk, it will have to be pre-inflated with a compressor, and the removed full-size wheel will need to be placed in the luggage compartment, since it will not fit into the “underground”.
An even more advanced option is a spare wheel, which ... is completely missing. Instead, a special repair kit consisting of a sealant and a compressor is carefully placed in the luggage compartment. It is assumed that during a puncture, the sealant must be introduced into the cavity of the tire and pumped up to the operating pressure with a compressor.
In practice, however, it turns out that after a strong impact on the sidewall of the tire, a hole of such a size that no sealant can "tighten" can occur. Therefore, the complete absence of a "reserve" is suitable for Western European countries with their developed service infrastructure, smooth and clean roads and short distances between settlements.
What if we just made the wheels stronger? Such attempts are being made all the time. Not so long ago we wrote a detailed article about RunFlat hard tires, which can be ridden after a puncture. In the future, the tires should again become airless, as in the 19th century, but retain all the properties - handling, comfort, wear resistance ... A difficult task? Not that word. No manufacturer has succeeded yet, but they do not leave attempts . So chances are that in 20 years the spare tire will be as obsolete as the carburetor, drum brakes or CD changer.
history tires and wheels
Articles / New cars So that's what you are, Moskvich 3: getting acquainted with the car at the official start of production Yesterday, November 23, the Moscow Automobile Plant, which for a long time existed only in the status of a Renault Russia enterprise (until 2014 it was called Avtoframos) and stood idle for more than six months after the. .. 5197 eleven 3 11/24/2022
Articles / Practice What are universal, repair and sports catalysts and is it worth installing them Among the many promotional offers for removing the catalyst, there are others: in them, motorists are offered not a simple removal of the catalyst, but its replacement with a universal, repair one ... 1177 0 2 11/23/2022
Articles / Practice Do I need to warm up the car before driving in winter: we understand in detail In my personal rating of debatable and provocative topics, the articles “how to warm up a car in winter” take an honorable first place in terms of the number of absurdities, mistakes and other shortcomings. T... 3239 one 16 11/22/2022
Test drives / Test drive Haval Dargo vs Mitsubishi Outlander: the dog is barking, the stranger is coming In the Haval dealership in the south of Moscow, life is in full swing: buyers look at cars, communicate with managers and sign some papers. While I was waiting for the test Dargo, the same cross... 17447 7 205 13.09.2022
Test drives / Test drive Motor from Mercedes, emblem from Renault, assembly from Dacia: test drive of the European Logan 1.0 It would seem that what's new can be told about the second generation Renault Logan, known to every Russian taxi driver, as they say, up and down? However, this car has. .. 14080 ten 41 08/13/2022
Test drives / Test drive Geely Coolray vs Haval Jolion: Free Cheese? If! Do you want to buy a car today with a full warranty, on credit at an adequate rate, without wild dealer markups? Now this is still a task, because a full-fledged chain of "representation - s... 11188 26 thirty 08/10/2022
V. Maksimov, photo by the author, G. Piskarev and N. Ushakova
Since the beginning of 2005, new urban medium-duty trucks of the Gorky Automobile Plant - GAZ-3310 " Valdai. The main area of their application will be urban transportation. In connection with the increased cargo flows and structural changes in the country's economy, such a car has become extremely in demand both in small and medium-sized businesses.
When the GAZ-3302 Gazelle began to roll off the GAZ assembly line (in 1994), it became clear that the successfully found version of the city truck would not be limited to a carrying capacity of 1.5 tons. .2 thousand in 1993 to 9.3 thousand in 1996, there was an increased demand for Gazelles, the production of which in 1996 amounted to more than 75 thousand, which helped GAZ to withstand the difficult years of the perestroika period.
Such a bias in the production of trucks at GAZ in favor of light vehicles has created in recent years a certain tension in urban transportation and, as a result, the prerequisites for revising the company's policy for the production of trucks. The idea of creating a more powerful and carrying city truck has matured. In the meantime, marketing research was discussed, analyzed and agreed upon in high offices, the designers of GAZ OJSC were developing a new car.
Attempts to create such a machine have been made before. So, in 1998, on the basis of GAZ-3309, the city GAZ-330903 was created. It had a reduced platform height due to the use of 17.5-inch wheels. However, the bonnet layout, cab from GAZ-3307, transmission and chassis from a medium truck did not allow creating a competitive, maneuverable delivery vehicle within the framework of the concept of an urban medium-duty truck. On the other hand, the layout and design of the GAZ-3302 turned out to be so successful that it was simply impossible not to take advantage of the success of the Gazelle to develop a city car with a larger payload. Taking the layout of the Gazelle as the base, the designers created such a car, called the Valdai. He laid the foundation for a new direction in the type of medium-duty trucks of GAZ OJSC.
Design developments, backed up by experience in the creation and production of both the Gazelle and medium-duty trucks, allowed the Nizhny Novgorod enterprise to realize its plans in a fairly short time. Moreover, they revived the hope of returning to the traditional gas niche of the Russian truck market, which today is dominated by the 3-ton Zilovsky "Bychok". The experience of its commercial operation confirmed the correctness of the direction chosen by GAZ.
The traditional principles of designing new cars, laid down at GAZ back in the 30s of the last century, are model continuity and unification with manufactured products. When creating Valdai, the factory workers did not deviate from these principles, using components and assemblies that have been tested and debugged in the current production, which reduced the design time.
This evolutionary principle does not exclude, but rather presupposes the existence of new solutions. The urban specialization of the GAZ-3310 Valdai, which requires good maneuverability and visibility, minimal dimensions, low loading height, high cab comfort and safety in urban traffic, predetermined its layout and design features.
First of all, this is a three-seater half-bonnet cab from the Gazelle, but with upgraded plumage and suspension, adjustable driver's seat and seat belts. The Valdai cab was supplemented with side repeaters on the front wheel arches and upper marker lights. The upgraded instrument panel from the Gazelle has become more informative due to the installation of two electric pressure gauges for each circuit of the brake system and a combination of instruments from the GAZ-3110. Its combination with a small steering wheel from Sobol and an efficient heating and ventilation system gave the Valdai cabin the comfort of a passenger car.
Metal underrun protection bars are installed on the sides and rear under the load platform of the machine. The spare wheel is located under the frame behind the rear axle, and to facilitate its installation there is a cable lift located on the right side member of the frame. A powerful bumper consisting of a middle energy-absorbing part and side easily replaceable plastic elements, a large-mesh radiator grille and original head lighting give the car an impressive and aggressive, but very familiar look, more reminiscent of the exterior of a "long-range" tractor, rather than an urban medium-tonnage truck.
Following the principles of continuity and unification, the frame in a somewhat shortened form, as well as the loading platform, were used from the GAZ-3307. At the same time, the height of the longitudinal bars was reduced on the GAZ-3310 platform, which, combined with a decrease in the diameter of the wheels from 20 inches to 17.5, made it possible to reduce the loading height of the car in a laden state to 985 mm. To preserve the traction and dynamic performance, the gear ratio of the final drive was changed and the speedometer gear was adjusted accordingly. A five-speed gearbox with synchronizers, except for the 1st gear, was taken from the GAZ-3309.
However, along with proven solutions, GAZ-3310 also introduced innovations that distinguish Valdai from its predecessors and competitors.
Smaller wheels made it possible not only to reduce the loading height, but also to install new steering knuckles with an angle of rotation of the front wheels increased to 43o, which provided the car with better maneuverability. So, the minimum turning radius of the base machine became 6.4 m, and the long-wheelbase version - 7.7 m.
Both the front and rear suspension have leaf springs attached to the frame through silent blocks. At the same time, it became mandatory at Valdai to install not only telescopic shock absorbers from the GAZ-4301, but also anti-roll bars in front and behind. This improved the comfort, stability and handling of the car. But the most revolutionary changes were made to the braking system. On the GAZ-3310, it became a double-circuit pneumatic, equipped with a three-channel ABS as standard. At the same time, the front and rear wheels received ventilated disc brakes, which also increased the safety of a car with a gross weight of about 7.5 tons. The Valdai has a Borisov Plant (BZAGU) steering mechanism with a built-in hydraulic booster, which, in combination with an adjustable steering column, allows the driver to drive confidently and comfortably in difficult city conditions.
At present, due to the lack of a domestic diesel engine of the required power, it is possible to install a wide range of 4- and 6-cylinder liquid-cooled diesel engines of foreign production on the GAZ-3310 of the following models: MMZ D-245.7, IVECO - FIAT - 8040.45, IVECO - SOFIM - 8140.43, GAZ-562 (STEYR), IVECO - TECTOR (TCA), as well as Cummins B 3. 9 140 CIV. This set allows you to satisfy the needs of not only domestic, but also consumers from far abroad.
A characteristic feature of Valdai engines is that they are all turbocharged diesel engines with charge air cooling that meet Euro-2 standards. And this is understandable. In urban operation, for which the GAZ-3310 is designed, the economy of the vehicle, its profitability, as well as environmental parameters are the determining factors that buyers will be guided by.
The diesel MMZ D-245.7 is supposed to be the most promising as the base engine. The Minsk Motor Plant adapted them for the cars of GAZ OJSC. Although this engine does not have outstanding technical performance and design refinements, it has an affordable price and is well known to domestic transport workers. The service and repair infrastructure created in Russia for these engines allows us to hope for its trouble-free operation at Valdai as well. At the same time, the possibility of installing Cummins and IVECO diesel engines on the GAZ-3310 is not ruled out, although the chances of the former are preferable because of the greater power. However, the market will show which of the proposed diesel engines will meet the needs of Valdai customers to a greater extent.
In addition to the basic on-board model, there are other modifications that significantly expand its functionality and consumer capabilities, as well as the circle of its potential buyers. First of all, this is a modification with a base extended to 4,000 mm, which will be produced both as an on-board version and as a chassis for the installation of vans or other equipment. The long-wheelbase "Valdai" in the onboard version can have a double 6-seater cabin with a standard platform from the base model. The Gorky plant has always been distinguished by a wide range of modifications of its cars. GAZ-3310 "Valdai" will not be an exception to this rule and will be able to satisfy the needs of the most demanding consumers.
Another way to use the chassis of "Valdai" can be the creation of comfortable city buses with a capacity of up to 36 people. The chassis, designed for operation in urban environments and taking into account safety standards, allows you to do this. So, on the units and assemblies of Valdai, GAZ OJSC developed the GAZ-3291 bus with a wagon-type body. Their design and layout solution for a city bus based on the GAZ-3310 was demonstrated by such well-known and long-standing partners of GAZ OJSC as Samotlor LLC, IRITO and SEMAR OJSC. Prototypes of these buses were repeatedly demonstrated at automobile exhibitions and salons. Taking into account the tension with passenger traffic in our cities, the replenishment of the bus fleet with such rolling stock will at least partially alleviate the problem.
The start of serial production of the GAZ-3310 is a significant event not only for GAZ, for which this is the start of production of a new generation of medium-duty trucks, but also for the entire Russian car market. In addition to Valdai, there are already three participants in this market niche: ZIL-5301AO, KamAZ-4307 and MAZ-4370.
Facts speak about the serious intentions of other contenders for a part of this niche. Last year at the International Demonstration Exhibition "Commercial Vehicles" MAZ-4370 won the title of "The Best Commercial Vehicle of 2003 in Russia". KAMAZ, without a doubt, claims for the same prize, attracting consumers with a wide range of commercial vehicles. The production and commercial experience gained by ZIL over the 10-year period of the Bychka's presence in the Russian car market in the most favored nation regime creates serious motivation for maintaining the leading position with this car in the future. Each of the contenders for a dominant position in the niche of urban medium-duty trucks has its own strengths.
At the same time, it should be noted that both MAZ and ZIL had to use foreign prototypes when working out the design of their urban medium-duty trucks. In this capacity, MAZ was served by MAN L 2000, and "Bull" - by Mercedes 709D van. This reduced the time for optimizing the design and its refinement.
JSC "GAZ" relies on its own strengths - intellectual potential, experience, production and technological capabilities. And he chose his own cars as prototypes: Gazelle and medium trucks. By this, the plant once again confirmed the viability and consistently high positions of its design school, founded by V. Tsipulin and A. Lipgart in the distant 30s of the last century. This school is based on the high intellectual potential of designers, model continuity and unification with cars of current production. It allows you to create high-tech, economical and technically rich cars on which you can build the future of the plant.
Taking into account the design features of the GAZ-3310, a wide range of modifications, unification with components and assemblies of GAZ vehicles, the infrastructure for servicing and repairing GAZ vehicles, we can hope for a fairly optimistic market prospect for the Valdai car, which will undoubtedly take a worthy a place in the traffic flow on city streets, perhaps not only in Russian cities.