Before your engine turns and starts, when you enter the car and start your car, a series of steps are required. The starter relay is one of the most critical and often overlooked components in any vehicle ignition system. The starting relay is a small electrical device located in the starting circuit of a large current motor. The relay is just a remote control switch that regulates the current in a high-current circuit. The starter relay in the car uses a moderate ignition switch current to close the much more powerful starter circuit.
The starter relay and the starter solenoid work together to run the starter mechanism in several automotive applications. A starter solenoid circuit can be controlled directly by an ignition switch in some cases. These are usually small vehicles and the starter motor does not require a lot of current to run.
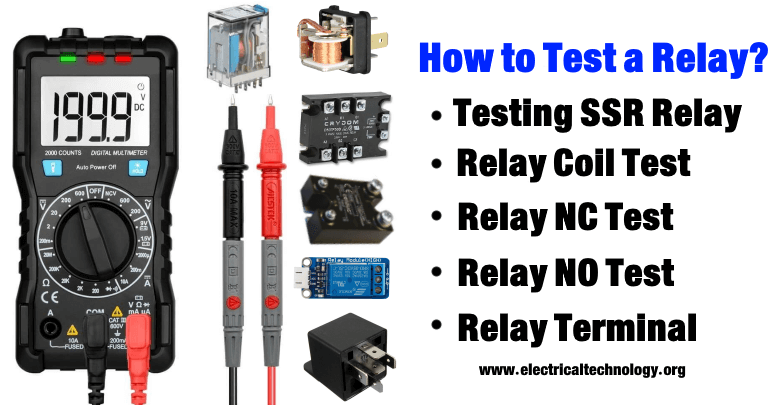
We will tell you everything you need to know about starting relays in this article: their function, their location in the vehicle, and how they work. We also include information about the sign of a bad start relay, how to test it, and how to replace or repair a bad start relay. continue reading.
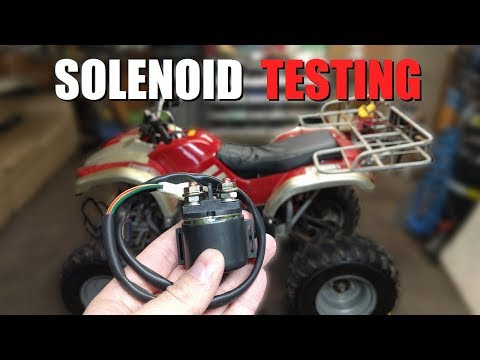
video. How to test the symptoms of a bad starting relay
Between the vehicle’s battery and the starter motor, the starter relay acts as a circuit completer or circuit breaker. It helps to increase the battery’s current so that less current needs to be ignited. According to the description, this is a switch between the start solenoid and the start motor.
When you turn the ignition key or press the car’s start button, a large current is generated. The starter motor requires considerable current, and the ignition switch cannot be controlled. If there is no relay, it will burn out.
If the starting relay fails, the vehicle may not start. As we will see later, there are many reasons why this component may fail. They also require various treatments according to the nature and severity of the hazard.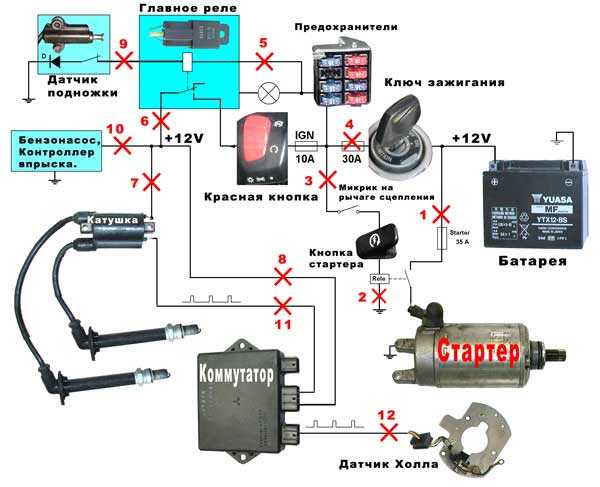 Some can be repaired, and some require the installation of new relays.
When you turn on the ignition switch, your key activates the starter relay, which sends power to the starter solenoid, and the solenoid sends power to the starter motor.
When you turn on the ignition key, the starter relay transmits small power to the starter solenoid, and the solenoid draws a large current directly from the car battery. This activates the solenoid, which delivers power to the starter motor, and the starter motor rotates the flywheel.
All modern launchers follow this procedure. In order for the starter to engage and turn the flywheel, power is sent to the starter relay via the solenoid.When starting your car, the starting relay is essential.
The location of the start relay varies by vehicle type and model. The fuse box (also called the power box), the instrument panel under the fuse panel, or the right fender are all possible locations.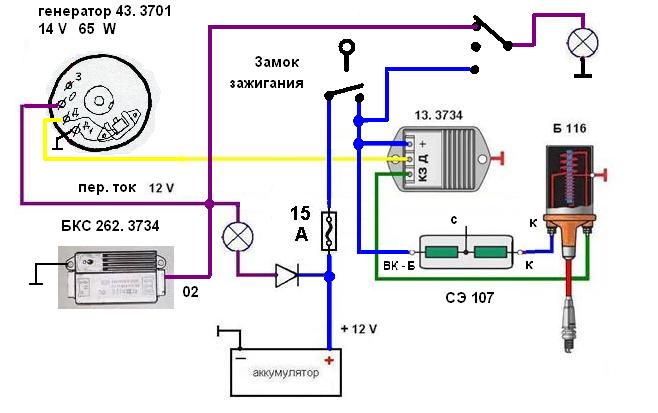 In most cars, it will be under the hood, in a large box with a black lid. This is where car fuses and relays are installed. It is also called a fuse box. This box is usually installed on the driver’s side of the vehicle.
Wires go in and out of the relay. However, many other relays have similar appearances in cars. The fuse box with the starter relay installed under the dashboard may be difficult to find or even remove. It may not be difficult to locate the starting relay attached to the fender wall. These relays are usually cylindrical and can be identified by their mounting posts and leads. If you are not sure which one is the starting relay, please refer to your service manual.
The starter relay, like other mechanical and electronic components in your car, will show signs of failure before it finally stops. Some signs of damaged or worn starter relays are listed below. If you see these warning signs, please make an appointment with a local ase-certified mechanic to conduct a thorough inspection of your car, as these symptoms may indicate a problem with other components.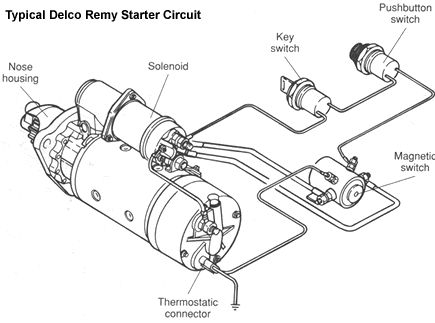
When we turn off the ignition switch, both the starting solenoid and the motor should stop working. When the starter relay doesn’t operate in this order, the engine won’t start. It is likely that the main contacts are already welded together, in the closed position. If this happens, the starter relay will be trapped in the start position, causing damage to the starter, circuit, relay and drive flywheel, if not dealt with immediately.
1) The vehicle cannot be started
The failure of a car to start is one of the most obvious signs of a car breakdown. Although many potential failures may prevent the car from starting, the failure of the starting relay is often the source of the problem. To understand why, we must first understand the function of the starter relay better.
When you turn the ignition key, your battery is shaken, releasing a burst of electrical energy. The starter motor is triggered by this energy and turns your engine. A starting relay completes the circuit before reaching the starter motor, but also increases battery current when it passes through it.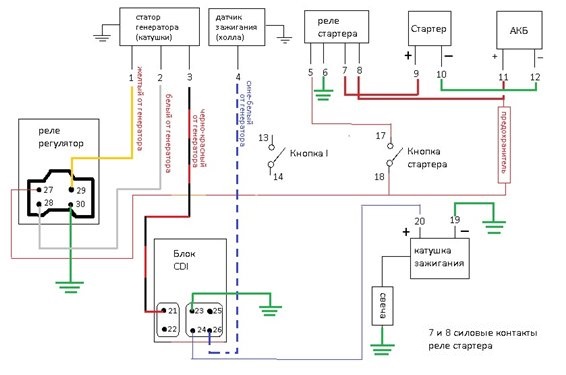
A defective starter relay will prevent your battery from delivering electrical signal to your starter motor. Therefore, no matter how many times you turn the key, your engine will not start. When you turn the key, if the circuit is not broken, you may hear a click. In either case, you should get professional help to evaluate the symptoms and accurately diagnose the cause.
2)The start relay remains open after the engine is started
The starting relay and the starting solenoid send current to the ignition switch when you turn on your ignition.The starter motor rotates the flexible board to start the engine, and the solenoid supplies power to the flexible board.
When we turn off the ignition switch, both the starting solenoid and the motor should stop working. The main contacts of the starter relay are probably already welded together, in the closed position, if it does not operate in this order, the relay keeps the engine started. If this happens, the starter relay will be trapped in the start position, causing damage to the starter, circuit, relay and drive flywheel, if not dealt with immediately.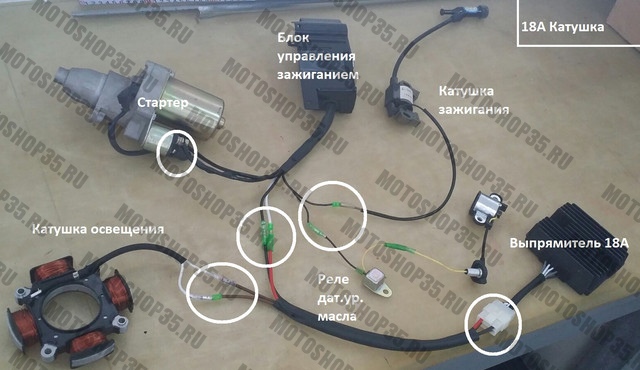
It usually happens when the relay touches anything or is exposed to a lot of electricity. Because this problem may damage the entire boot system, it must be diagnosed and dealt with immediately.
3) The starter makes a clicking sound
Relays usually operate on an all-or-nothing basis. It either sends the entire current, or it sends nothing. However, when the starter relay is destroyed, only a part of the signal can be sent.
The starter relay makes a clicking sound, but the engine does not rotate, which indicates that the starter motor is not receiving enough current from the relay. This may also be a sign of low or exhausted battery power. Only when it transmits enough current to the starter, the relay starts to work. Smaller power may damage the entire starting device or cause the vehicle to fail to start, accompanied by annoying clicking sound.
Both of these conditions may be caused by corroded or aging relays with damaged contacts. Cleaning the contact points to ensure the correct flow or replacing the old relay are the only two options for repair. Scrape the corroded surface of the relay with sandpaper or a gravel scraper. You can replace the relay to get a larger output, or you can contact a professional mechanic.
4)The vehicle starts intermittently
When the starter relay is working, it transmits power to the starter every time it is turned on. However, debris, dirt and high temperatures can contaminate this ingredient. Corrosion and residues in the circuit restrict the flow of current. Due to these conditions, the starting relay may be forced to work intermittently.
The starter relay is the basic component of the ignition system and has very few moving components, which is why it rarely fails. However, when it happens, it is due to conductivity issues. If the relay is not malfunctioning, there may be a damaged or corroded wire connection under the hood.
Material:
Tool:
Safety glasses and gloves
Step 1
Ensure that the car is parked safely and the transmission is in neutral or parked state.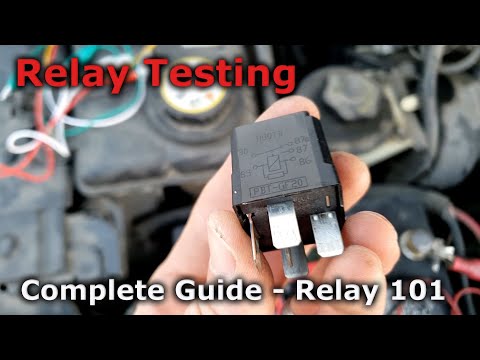 When working under the hood, you don’t want the vehicle to move forward accidentally.
Step 2
Before testing, prepare a fully charged battery and a portable jumper. Or, you can check your car battery to make sure it is fully charged and not the source of your problem. During the whole test, please pay attention to how to connect the jumper cable to the battery terminal.
Step 3
Check the connection terminals on the battery and starter. Make sure they are free of rust, oil, dust and debris. Before cleaning corroded terminals, disconnect the negative battery cable and set it aside. Remove the battery positive cable from the battery and set it aside. Take care to prevent the cables from accidentally contacting the battery terminals. Use baking soda, water and a wire brush to clean the rusty terminals. If necessary, clean the starter terminal. If possible, disconnect the battery cable.
Step 4
The cable from the starting solenoid to the starting relay should be followed. There are four terminals on the relay. Two smaller wires are used to “turn on” the relay and come from the critical switching circuit. Two larger wires connect from the battery to the starter, carrying the battery voltage. Remove the wires from the starter relay and mark the two smaller wires so that they can be reconnected appropriately. Connect one end of the jumper wire to the chassis ground. Terminal 86 should be connected to the other end.
Step 5
Connect a jumper wire to the positive terminal of the battery. Since the connection between the battery and the starter has been cut off, the jumper can be connected for a short time. A digital voltmeter should be used to measure the resistance between terminals 30 and 87. Its resistance should be less than 1 ohm. If the resistance is greater than 1 ohm, the relay does not work. The relay needs to be replaced.
Install a jumper wire between the positive and negative terminals of the battery. You can now leave the jumper connection for a short time now that the battery connection to the starter has been disconnected. Between terminals 30 and 87, measure the resistance with a digital voltmeter. A resistance of less than 1 ohm is required. If the resistance is greater than 1 ohm, the start relay will not work. The relay must be replaced.
Material preparation: safety glasses, safety thread
Tools: pliers, wrenches, wires
1) How to disassemble the starting relay correctly?
You can open the hood and disconnect the negative connection of the battery if it is a fuse box to start the relay. Next find the fuse box. Usually a box with a black lid. If you cannot find the starting relay, please use the instructions. Determine the position of the starting relay according to the information on the fuse box cover. Then, remove the starting relay.
If it is a mud wall relay, follow the method below to get rid of it. First, use a wrench to remove the battery terminals. Second, disconnect the leads connected to the relay terminals. Use a wrench to remove the bolts connecting the wires to the relay column. Two large and two small pillars serve as connection points. Third, remove the relay from the mudguard by unscrewing the mounting screws.
2) How to install the starting relay
The process of installing the fuse box starter relay is simple. There are no nuts or screws to tighten, and no need to worry about torque.
Bring your new relay. Push the relay in slowly and slowly until it reaches the end of the valve seat, matching the pins with the slots in the fuse box. Close the lid and reconnect the battery terminals that were disconnected when the old relay was removed.
Follow the steps below to install the start relay on the mudguard.
Place the relay on the mounting surface and fix it there. By inserting and tightening the screws, attach the relay to the fender wall. Install the starter circuit and battery wires, taking care not to connect the wrong wires to the wrong poles.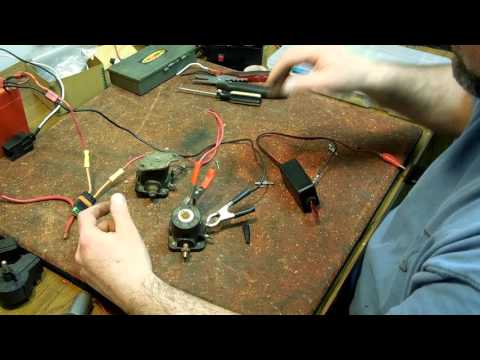 Reconnect the battery cable that was disconnected before.
After the installation is complete, test and start the system. There should be no difficulty in starting this car. If this is the case, check the wires and connections. Make sure the connection is firm and the fender wall start relay is wired correctly. If you can’t figure out the problem, you need to look at the other components of the boot system. Or, ask a mechanic to check the car.
3) Wiring of starting relay
The wire is installed on the connecting post of the starter relay mounted on the fender. Usually, these leads are connected during the installation process. The relay must be wired correctly in order to work safely. This picture shows how to connect a four-connection starter relay
Step1
Disconnect the positive terminal of the battery. To avoid accidents, please fix the bare end. You can do it with tape.
Step 2
Thick start solenoid cables can be found here. Connect it to a large stud or upright of the relay. Tighten the mounting bolts to secure the connection. Because the starter relay has no polarity, which large one do you connect the wire to
Step 3
Prepare ignition switch wiring. They are usually thinner than starting cables because they only carry a limited amount of current. One of the two wires should be connected to a small stud on the relay. Connect the remaining small post to another wire.
In some relay races there is only one small post. If this is the case, connect the ignition wire to the mounting screw or bolt. Any other part of a relay housing can also be connected to it. This is because a small terminal of the relay is usually grounded.
Fourth
Connect the remaining thick wires to a single huge stud or pole. This is the cable connecting the positive terminal of the battery.
Finally, turn on the ignition switch to test the relay wire. There should be no difficulty in starting the engine and cranking.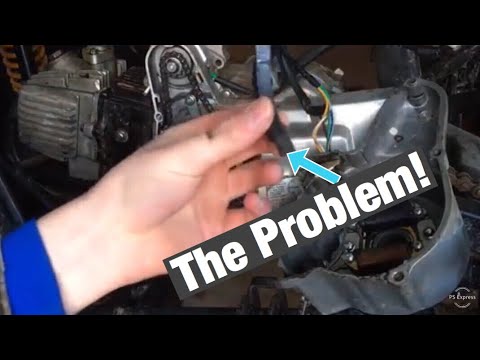 If it still doesn’t work, check the wires again to make sure that each cable is connected to the correct terminal and securely.
In the vehicle that needs to start the relay, it is very important to check whether the start relay is normal. This is a standard aspect of vehicle daily maintenance. It can save you from getting into trouble and being trapped in remote places. The first step is to understand how relays work and how to identify failed relays early.
We hope this starter relay guide has provided you with enough knowledge to help you solve the starter relay problem that caused the car’s starting problem. You can now recognize the signs of starting relay failure and how to test it.
1) Can you fix the starting relay?
If the starter relay fails, you will not be able to start the engine. Damage to the starter relay is usually caused by a short circuit due to a poor power connection on the starter.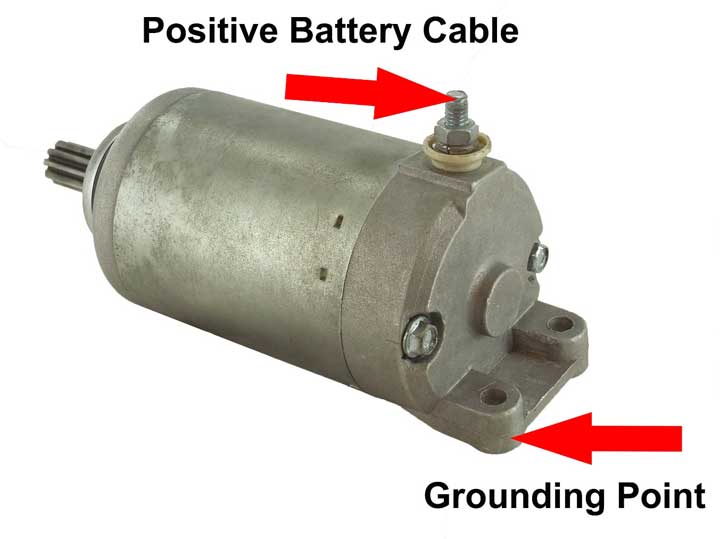 Relays that are not working cannot be removed for repair; in order to start the engine, you must install a new one.
2) Is it easy to replace the starting relay?
With the right tool and knowledge of what wire to connect to which terminal, the process of replacing the starter relay should be easy. Fuse box relays are easier. It usually involves unplugging the old relay and then plugging in the new relay.
3) What is the cost of starting relay replacement?
Excluding the cost of starting the relay, it is expected to pay about $30. Adding the cost of purchasing the components, the total cost of installing a new relay is approximately $50.
4)How long does the starting relay last?
Normally, the starting relay will last more than 100 miles. These parts are durable, with only a few moving parts, so wear is minimal. The biggest threat to the life of the starting relay is usually the contact burnout.
5)Is the starting relay the same as the starting solenoid?
In most cases, a real starter relay is a small black cube plugged into the electrical fuse/relay box in the engine room, and the starter solenoid (in most cases) is directly connected to the starter on the engine (although it Sometimes located elsewhere in the engine room).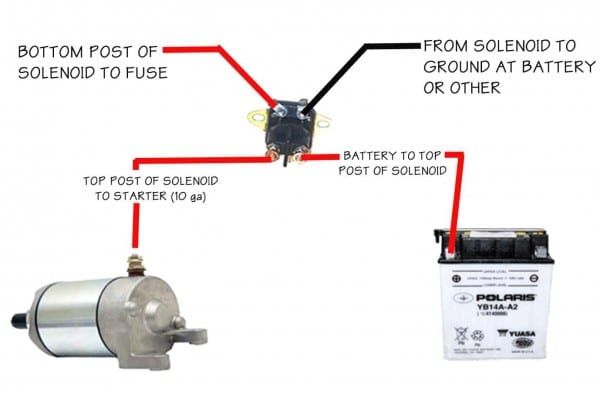
The starter solenoid turns an electric signal from the ignition key into a high voltage signal that activates the starter motor. If there is a problem with your starter solenoid, your ATV won’t start. While you can’t rule out replacing the starter solenoid, sometimes it’s not necessary and all it may need is a bit of troubleshooting.
Before you make any conclusions, it is important you rule out other problems such as battery issues. Fortunately, there are several tell-signs that something is wrong with the starter solenoid. These include:
This is the most common sign pointing to issues with the starter solenoid. If you engage the ignition process and your vehicle doesn’t turn on, it may be because of a faulty starter solenoid.
When you start the engine and stop pressing the starter button on modern vehicles, the circuit is supposed to close, discontinuing power to the starter motor. If your starter stays on after the engine has ignited, most likely the main contacts in the starter solenoid have welded together in the closed position.
Check this too: Best Dust Mask for ATV Riding
This is a common symptom when the battery is low on amps, but it could also be the starter solenoid isn’t sending a full signal.
A starter relay sends power to the starter each time it is engaged. If it is not working properly, maybe due to damage arising from dirt, excessive heat, debris or other issues, the starter might operate sporadically. If the starter doesn’t activate instantly when you try to start your ATV but then works when you turn the key switch once again, this is most likely a problem with the solenoid.
There are two basic tests you can do to evaluate the condition of your solenoid. You will need the following tools:
This test is designed to establish if the contactor is pushing up and completing the solenoid connection. To do that:
The tests involve first checking to make sure the connector is engaging and completing the starter circuit and then making sure the starter circuit is connected when the connector is engaged.
If you have a bad solenoid, you can start your quad by jumping the starter solenoid wires with a wrench. First, you will need to find the starter solenoid, usually located on the outside of the plastic next to or under the battery and close to the wiring harness. You should see two big main wires once you’ve located the starter solenoid. If it is set up, you can then jump the wires and be able to start the quad.
A starter relay consists of a coil wire wound around a ferrous core and an armature on one of the coil. A starter solenoid, on the other hand, is a coil enclosing a movable plunger. Unlike in the starter relay where the coil core is immovable, a starter solenoid core is an iron or steel plunger free to move in and out of the coil. However, the terms solenoid and relay can often be used interchangeably.
Check this too: Best ATV Goggles For The Money
You can jump a starter solenoid if you have a good and strong battery to start the engine. You should only proceed if your battery has enough current to turn the motor, otherwise, you won’t be able to start the vehicle by jumping the starter solenoid.
Posted by by MotoDoctor
One of the problems with starting the engine on an ATV is found in the electrical system. To start the engine, we need to turn on the ignition and press the "Start" button (if the ATV is in gear, you need to additionally press the brake pedal). All ATV owners are familiar with this startup process. But here is the problem itself, after the actions performed, your ATV does not even make any sounds. Of course, first of all, we check whether the battery is holding a charge. If the battery is good, we proceed to check the wiring connections. Sometimes at the factory, when installing electrical equipment, the connecting chips are turned on, but not fixed with a lock. So sometimes, due to unscrupulous assemblers, these chips are disconnected and the contact naturally disappears. It is not very difficult to identify such a malfunction; it is enough to inspect the entire electrical wiring circuit and determine where there is no reliable connection. True, for this it is often necessary to dismantle plastic elements, so that there would be access to all electrical equipment connections. If it's plastic on a Chinese ATV, be extra careful as he is very fragile.
 Very often, the power relay of the electric starter fails. In order to check it, it is enough to close two contacts between each other (2 nuts x 8,) 2 power red wires, this is the positive wire of the electric starter in the gap. If all other elements are in good order, then the electric starter will start working and you will have to replace the starter power relay. But in rare cases, the power relay itself is working properly, but the power that should come to it is missing and naturally the relay will not work. This is where you will need a control or multimeter to check whether power is supplied (+) and (-) (12 volts) to the starter relay. In some ATV circuits, the starter relay constantly receives (-) and (+) is supplied when the (start) button is pressed, and in others, vice versa, you can determine all this with the help of instruments. For example, you have determined that the power is not going to the relay, then we recommend that you check the start button for serviceability.
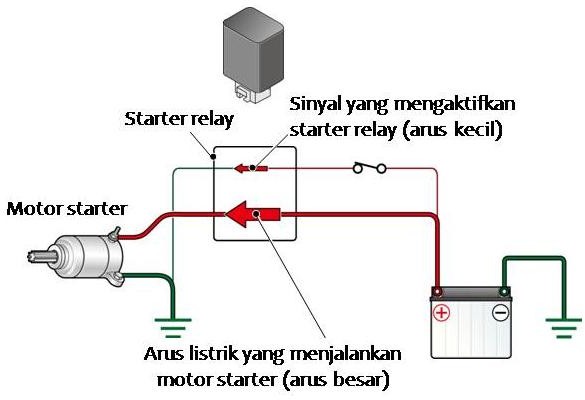 Bookmark the permalink.
 In the practice of every car owner, there must have been a moment when turning the ignition key did not lead to the desired result - the car did not start. Often the wiring is the cause of the problem:
The last reason baffles many novice motorists. But in order to solve a problem, it is not enough to understand what it is, you need to know what exactly it is. In this matter, a multimeter will be an excellent assistant. Today we will tell you how to check the starter relay with a multimeter.
Contents
 1 Checking the windings
 What is a starter? In fact, it is a DC motor. When a voltage of 12 V is supplied to it from the battery, it starts to rotate. Connected by means of a belt drive to the shaft of an automobile engine, it transmits rotation to it. This is exactly what happens every time the driver starts the car.
When the engine is started, regardless of whether the vehicle is in motion or stationary, the reverse process occurs: the starter turns from a DC motor into a generator. The motor, which rotates the starter shaft, stimulates the production of electric current with a voltage of 12 to 14 V, charging the battery.
But the starter cannot operate by itself. To control it, a traction relay is used. Therefore, any check of the starter necessarily includes a check of the traction relay, since it is it that “manages” the transfer of the starter to the generator or engine mode.
The most vulnerable elements of the starter are:
The main reason for their breakdowns is that when the engine is started, the generator experiences extreme loads, since a current of hundreds of amperes flows through its windings.
This name comes from the movement of the relay armature:
The solenoid relay consists of the following parts:
Before checking the retractor with a multimeter, it must be removed from the starter. When removing, it is highly recommended to note the location of the anchor in relation to the hull. This is very important, because sometimes the attachment point with the bendix may have a non-standard shape. Relays turned upside down during reassembly can cause performance problems. If the screws connecting the relay to the starter do not turn, their heads can be tapped with a hammer.
When it is necessary to pay attention to the relay:
The main causes of relay failure can be:
The first two causes can be diagnosed with a multimeter that allows you to check the continuity of the power contacts, as well as the holding and retracting windings.
The retracting winding should be checked as follows:
The holding winding is tested as follows:
Power bolts are checked in the following order:
In the case when numbers appeared on the multimeter screen instead of a squeak, there is a lot of resistance at the contact points of the plate. Perhaps there are mechanical damage or soot. In such a situation, disassembling the device is indispensable.
If all the circuits turned out to be working, and the retractor relay does not work, then the reasons are different. If, for example, an interturn short circuit occurred in the coils, the part cannot be repaired. Will have to change it.
Thus, the multimeter allows you to quite accurately determine the most common malfunctions of the solenoid relay, which allows you to make a timely decision on the possibility of repairing the part or replacing it.
Question: Is it possible to test the starter for operation with a multimeter without removing it from its seat?
Name: Kirill
Answer: You can. The device is set to measure DC voltage. A crocodile (red probe) is put on the positive terminal of the retractor relay (a large bolt on the starter, to which a thick wire from the battery goes). The black probe of the multimeter is connected to the mass of the car. Next, you need an assistant to turn the ignition key. The multimeter should display 12V and the starter will start making clicks.
Question: Can an undercharged battery cause the starter not to work?
Name: Nikita
Answer: Yes, maybe. Therefore, it is worth immediately checking the battery charge with a multimeter.
Question: During the start of the starter, the lights that receive power from the on-board network of the machine dim.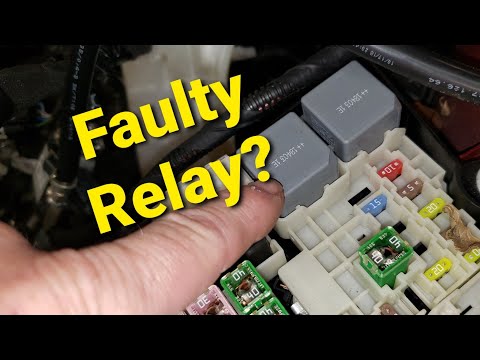 What does it mean?
Name: Radik
Answer: Check the voltage drop of the battery at this moment with a tester. If it drops to 9.5 - 10 V, the starter may take on a lot of starting current. So, it needs to be checked for the production of bushings. Because of it, the armature, rotating, begins to touch the stator, which leads to overheating of the elements and entails the risk of an interturn short circuit.
Question: With a normal battery charge, checked with a multimeter, the bendix almost does not move. What is the problem?
Name: Albert
Reply: The problem may be an armature failure. Then you need to remove the starter anchor from the housing and check it. To do this, you need to measure the resistance between the windings and the rotor housing. If the device shows from zero to two ohms, then there is an interturn circuit and the armature, most likely, will need to be changed.