The wheels that came installed on your vehicle are designed to perfectly fit your vehicle’s suspension, gearing, and bodywork which can affect ride quality and vehicle performance. But that doesn’t mean you can’t have different wheels or rims installed on your car or truck. To understand what wheels will work for your vehicle, we’ll take a look at rim sizes and some basic measurements.
There are many reasons you might want to switch out your rims. Maybe you want an extra set of wheels and tires for easy installation every winter, or you’re looking for added performance and handling. You might even be going for a specific look, including sleek and stylish or rugged and cool. Whatever your reason, it’s important to note that getting the wrong wheel setup could cause a vibration, or some rubbing on suspension components or vehicle body parts.
Les Schwab Tip: Before you change the tire sidewall height, tread width, or rim size on your vehicle, talk to the experts first. We’ll help translate the difference in RPM, tire speed, load index, and speed rating and how it will or will not fit with your vehicle’s suspension, gearing, and bodywork.
First, start with the wheel size for your vehicle. You can find that on the sidewall of the tires on your original wheels or the inside frame of the driver’s door. Check out Tire Size Explained (Reading the Sidewall) for more.
The wheel diameter (in inches or millimeters) is the fifth set of numbers and letters. What do rim size numbers mean? This number represents the distance between the two bead seat areas where the tire is sealed onto the wheel.
The wheel size also includes its width and offset. The width is the distance from each bead seat (from inside to the outside). The offset determines how the wheel and tire set aligns with the wheel well.
The offset is how far inward or outward the mounting surface is in reference to the center-line of the wheel. The center-line is calculated by simply dividing the wheel into two equal halves. Les Schwab has the tools to accurately measure your center-line.
The offset is how far inward or outward the mounting surface is in reference to the center-line of the wheel.
Here's how offset determines the look of your rims. If the hub mounting surface is in front of the center-line, your rims and tire will be pulled inward. This is called positive offset.
If they are behind the centerline, your rims and tire will stick out from the body of the vehicle. This is negative offset.
Les Schwab Tip: Measuring the offset on your vehicle is difficult without removing the tire and wheel. Consult the pros to get the right fit.
To ensure a set of rims fit properly on your vehicle, you’ll need the hub size on your car or truck as well as the wheel center bore measurement and number of wheel studs (as well as the distance between those studs).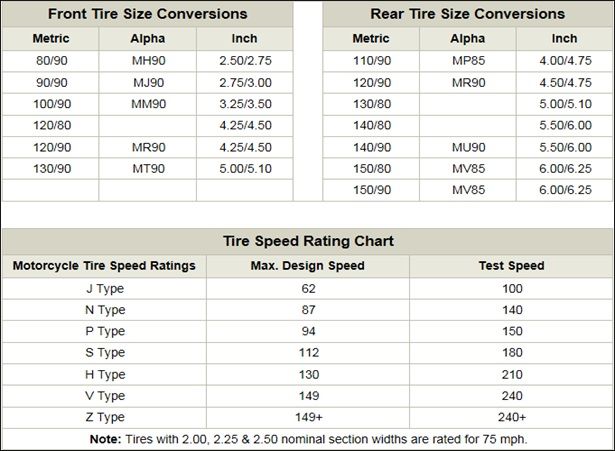 Les Schwab has those measurements for your vehicle, including bolt patterns.
Most vehicles come with a 4-, 5-, 6-, or 8-lug pattern. These bolt patterns, which are specifically spaced, help narrow your wheel or rim choices. While counting the number of bolts on your vehicle is important before buying a set of rims, it’s vital the wheels you choose match the spacing between the wheel studs on your vehicle.
To measure a 4-lug pattern on a set of rims, measure from the center of two holes across from each other. For a 5-lug pattern, measure from the outside of one wheel stud hole and the center of the opposite. And for 6- and 8-lug patterns, measure from the center of one hole to the center of the opposite wheel stud hole. You’ll either need this measurement in inches or millimeters, depending on the wheel manufacturer.
Remember, there’s no need to take these measurements on your own. The pros at Les Schwab do it every day and can ensure you get the right rims for your vehicle.
At Les Schwab, we take pride in our custom wheel expertise. Stop by and ask about new wheels for your vehicle. We’ll show you all of your options, whether you’re going for a new look, a boost in performance, a new set of wheels for your winter tires, or simply as a replacement of your current set.
Find A Store Near You
| How-To - Wheels and Tires
You've got your head on straight and know wider and lighter-weight wheels will always make sense. You also know there's a lot of fake news, wrong info, and just plain speculation on the interwebs about wheel offset and proper sizing, and how those things relate to vehicle fitment. Lucky for you, tape measures and math don't make stuff up, which means you figuring out what will or won't fit underneath your fenders just got a whole lot easier.
It starts with the easy stuff, like a wheel's overall diameter and width, and ends with you wondering whether or not its centerbore and offset will work, all of which, when calculated properly, will keep things like tires and fenders from becoming too good of friends with one another.
You already know some sort of aftermarket wheels are on your mod list. Spend a few minutes to be sure whatever rims you're eyeballing won't make your car look and handle worse than whatever you've already got.The number of lugs and the pattern they form are the first things to think about when wondering whether or not a wheel might work. Imagine a circle passing through the center of each lug and you've just imagined its bolt pattern.
Bolt patterns are expressed using two numbers, the first of which is obvious and represents the number of lugs there are, and the second, which tells you how far apart those lugs are from one another. All of a sudden, 4x114.3 means something and tells you that a wheel doesn't just have four lugs, but spaces them 114.3 mm apart from one another.
Chances are, if you're driving something that's as least as old as Justin Bieber, it's got hub-centric wheels, which means your car's hubs have extruded rings on them that interface with whatever wheels you've got. The results are less vibration and less stress on a wheel's mounting studs.
Fuhgettabout using non-hub-centric wheels, but don't beat yourself up over wanting to use aftermarket wheels with a different centerbore than your car's. Most aftermarket wheels are designed with centerbores the guy who made them knows are bigger than what your car needs; a cheap set of ring adapters that slip onto your hubs and into your wheels is all you'll need to make everything right.
Use a tape measure or an outside micrometer to measure your hub's centerbore and a tape measure or an inside micrometer to measure the wheel's. As long as the wheel's number is bigger, chances are, there's a ring adapter to make it all work.
Most aftermarket wheels' centerbores are bigger than whatever your car needs. Here, a plastic ring adapter can be slipped into place to make up the difference.The late 1990s have come and gone, which means you probably aren't trying to stuff 19s onto your Civic hatchback and you understand smaller, lighter wheels are almost always better. Stick to a diameter that's close to what you've already got and you can be sure whatever wheels you're eyeballing will probably fit. Downsize too much and plan on investigating whether or not all sorts of important things, like brake calipers for example, will survive.
If you care about the right sort of things, then trying to fit a wider wheel into place is important to you. Wider rims can provide better stability and handling and even allow for more communicative steering. Getting them to fit isn't as glamorous sounding. Before you can go on and slap on anything wider than what you've got, though, you have to understand offset.
The consequences of botched-up measurements are wheels that'll bump up against shocks or brake calipers, torque steer, and overall cruddy handling. The path to doing it right starts with knowing your original wheels' offset.
A wheel's offset is simply the distance between its centerline and its hub-mounting surface. It determines where the wheel sits, laterally, its track width, how your suspension reacts vis-?-vis its motion ratio, and, when bungled up, can make a good car look ridonculous and an otherwise well-handling one steer like a sea vessel. Offset is typically expressed in millimeters and can be categorized three ways:
Positive: Here, the wheel's hub-mounting surface sits closer to its outboard side. The larger the number, the farther a wheel's mass gets pushed underneath the car, reducing the overall track width. Most FWD cars have positive-offset wheels, which creates a negative scrub radius up front and affects how well it'll handle, how stable it'll feel, and is the first thing that gets screwed up when jerking around with the wrong wheels.
Negative: A wheel with an offset less than zero positions its hub-mounting surface closer to its inboard side, giving the illusion that the wheel's been moved away from the car and increasing track width. The smaller the number, the farther away the wheel's mass will sit. Many RWD cars have negative-offset wheels.
Zero: Here the wheel's hub-mounting surface aligns with its centerline in mathematical bliss.
If you're considering significantly wider wheels, then chances are their offset's got to be reduced in order for them to clear the stuff you care about. A reduced offset positions the wheel's hub-mounting surface farther inward, placing the bulk of the wheel farther outward. If you didn't change anything, then half of the wheel's extra width would land underneath the fender and probably interfere with something it shouldn't.
Get the wrong offset and all of a sudden tires are hitting all sorts of important things, like shock bodies and fender linings.
The consequences of your botched-up measurements are wheels that'll bump up against shocks or brake calipers, torque steer, and overall cruddy handling. The path to doing it right starts with knowing your original wheels' offset.
According to Eddie Lee of Titan 7, excessive negative offset can be a real pain. "Strain on hub bearings, improper handling and driving characteristics, rubbing, and noise" are all side effects Lee points out as consequences of straying too far away from your car's recommended offset. Get it right, though, and according to Lee, you'll improve grip, handling, and high-speed stability. "Just like when you shop for shoes for yourself," Lee points out, "if you don't get the right size and sole for your feet, it can make a big difference."
A wheel's offset as well as its overall diameter and shape determine whether or not it'll clear whatever brake calipers you've got.Before you can do anything, you've got to know your existing wheel's width, backspacing, and centerline. Start by measuring the width or just look for some numbers stamped onto the back of the wheel someplace.
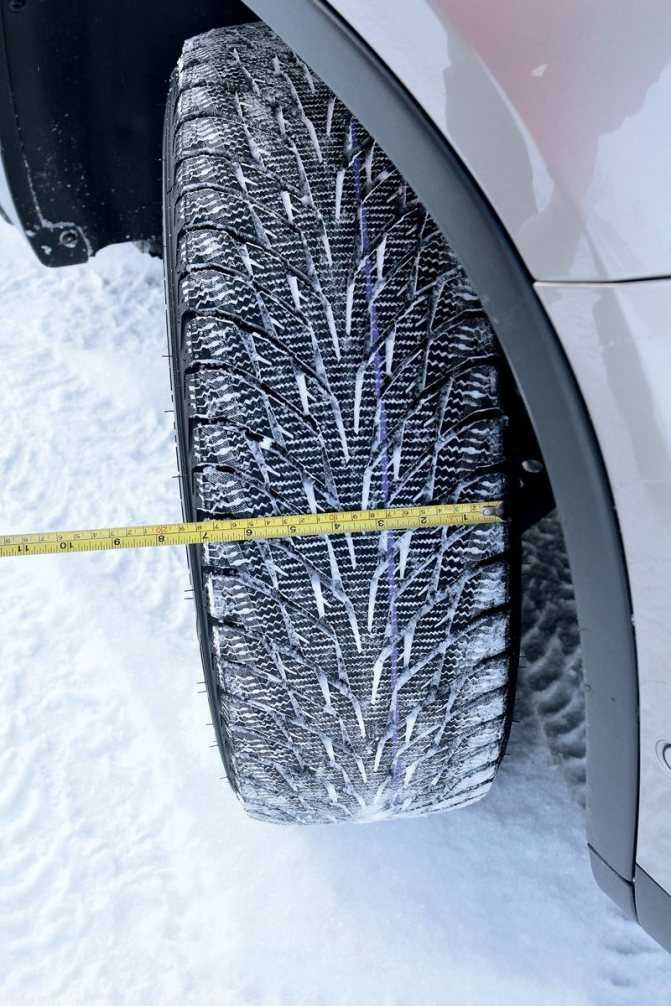
Next, lay the wheel face down on the ground, lay a straight edge across it, and measure the distance between the wheel's hub-mounting surface and the bottom of the straight edge. You've just determined backspacing. Divide the wheel's width in half and you've figured out its centerline. Offset is simply backspacing minus the centerline, which in some cases may be a negative number.
Measuring offset is easy. Start by laying a straight edge across the rim's backside and measure the distance between its bottom edge and the wheel's hub-mounting surface.Once you know your original wheels' offset, you can determine what else might fit. Mount the wheel back onto the car and measure the distance between the tire and whatever it might hit, like a suspension member, for example. Keep in mind that only half the width of whatever new wheel you're considering has to fill that space, so you might have more room than you think.
If you don't have any extra space, consider reducing offset to push the wheel away from the suspension. In other words, say you've got an inch of clearance between the wheel or tire and, say, an upper control arm. It'll take a wheel 2 inches wider to smack up against that arm. Before finalizing anything, know that not all tires are the same, despite their sharing the same advertised size, which means it'll do you well to budget an extra 1/8 inch into your calculations for any irregularities.
Bolt patterns, offsets, and widths are absolute, but sometimes trial and error is the only thing separating you and a wheel that's bound to bungle up a fender. Suspension changes that occur upon travel and tire sidewalls that flex mean clearances aren't fixed. Hope lies in you measuring properly and, if all else fails, adding another quarter-inch for good measure.
Properly fitting wheels will clear any pre-existing braking and suspension components, won't veer too far away from the original wheels' offset, and won't disturb speedometer or traction control calibrations.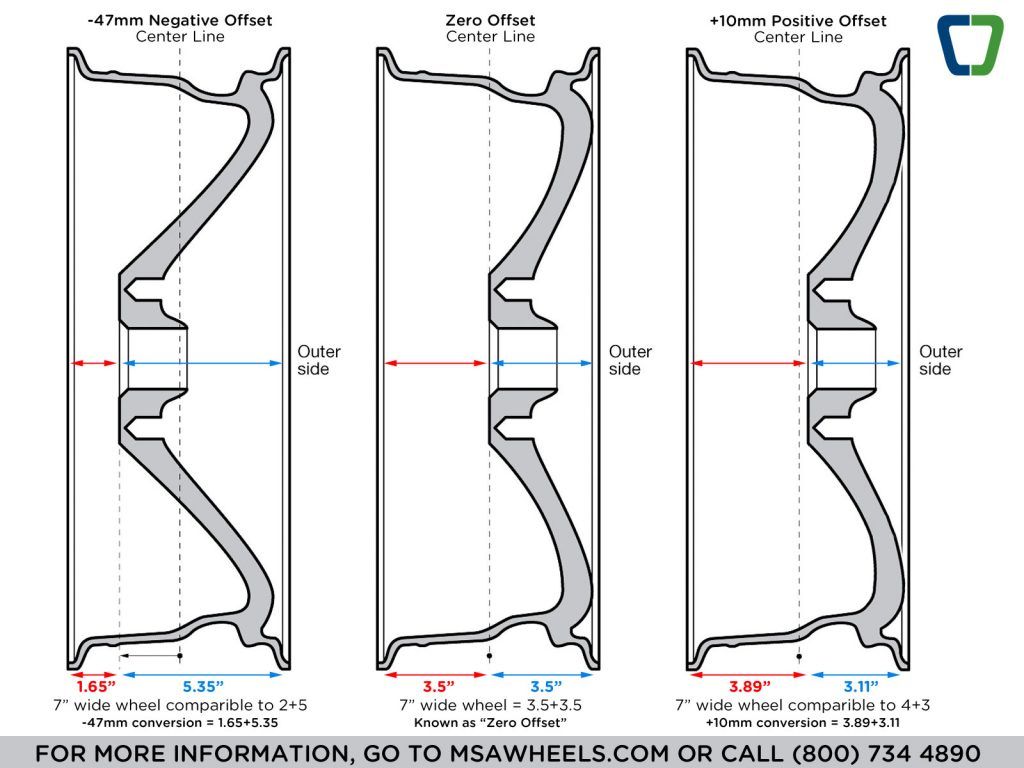
This story was originally published July 2015 and was updated with new information March 2020.
On this episode of Epic Drives, Nate Martinez tours Japan's greatest driving roads in Subaru's rear-wheel-drive BRZ coupe. Along the way, he tears up the Toyo Tires Turnpike, climbs Mount Fuji, dances down the hairpins of the Nihon Romantic Highway, and drops the hammer at the tight and twisty Gunma Cycle Sports Center. Sign up for a free trial to MotorTrend+ to watch more episodes of Epic Drives, plus much more!
adv. rbc.ru
adv.rbc.ru
adv.rbc.ru
Autonews
TV channel
Pro
Investments
Events
+
New economy
Trends
Real estate
Sport
Style
National projects
City
Crypto
Debating Club
Research
Credit ratings
Franchises
Newspaper
Special projects St. Petersburg
Conferences St. Petersburg
Special projects
Checking counterparties
Library
Podcasts
ESG index
Policy
Economy
Business
Technology and media
Finance
RBC CompanyRBC Life
adv.rbc.ru
Photo: Shutterstock
adv.rbc.ru
Read also
The safety, handling and service life of some vehicle components directly depend on the disc offset.
adv. rbc.ru
An expert in this material: Vyacheslav Subbotin, director of the GAZ Reid Sport racing team and author of the Ministry of Transport program on the REN TV channel
You can understand that you have a departure parameter in front of you by marking ET / OFFSET (einpresstiefe - insertion depth). The numerical value is indicated in millimeters. For example, if the rim has the parameter ET42, it means that the disc has a positive offset of 42 millimeters.
The offset value of rims varies over a wide range - from zero, when the mating plane is located directly in the center of the wheel, to strongly positive or negative (if the offset value is negative, the “-” sign is put in the marking). This parameter is set by the vehicle manufacturer depending on the specific technical features.
Standard, “factory” offset ensures optimal operation of wheel bearings and suspension components. In addition, a disc with the correct offset does not stick out of the wheel arch and does not go too deep into it, it does not cling to the brake caliper.
If motorists usually don’t have any questions with zero departure, then everything is a little different with positive and negative. It is quite easy to understand what kind of departure you are dealing with, even visually. With a positive value of ET, the plane in contact with the hub is in front of the center line of the disc (the platform is shifted to the outside, the disc goes deeper into the arch), and with a negative value, it is behind it (the platform is shifted to the inside, the disc protrudes outward). The smaller the offset compared to the standard, “factory”, the more the wheels will stick out and the wider the track will be.
In the store, you can choose a set of discs suitable for the number of mounting holes and the distance between them, but the offset parameter may differ from that specified by the manufacturer. It is important for sellers to sell their goods: if the wheel is properly fastened and does not cling to suspension parts, then in their opinion, there will be no problems. In reality, this is far from the case. For example, official dealers, having found “wrong” disks, can simply refuse warranty repairs. Now let's explain why.
The overhang of the original rims is determined by the vehicle designers at the design stage. The geometry of the wheel is selected according to many parameters: the expected load, speed characteristics, suspension elements, brake system and many other nuances. It is for this reason that the specific ET value is indicated in the operating instructions. Often, discs of each of the recommended diameters have their own overhang. You should listen only to the recommendations of the automaker, but not to the advice of the manager of the auto parts store.
Selecting ET, designers are guided by the model of distribution of force vectors in the suspension. The contact patch of the tire with the road is the point of application of these forces. It is through its center that the middle line of the wheel should pass. The suspension strut force vector falls into the same area. If the offset deviates from the normal value, a displacement of the center line and suspension axis occurs, which, in turn, leads to a deterioration in handling, accelerated wear of the suspension elements and steering components.
Photo: Shutterstock
The main consequences of incorrect departure:
It happens that it is physically impossible to read the offset marking. For example, if you have an old rim in your hands. A simple instruction will help determine the departure value:
When measuring, do not neglect accuracy. Remember, we are talking about millimeters!
There is another way to measure disc offset. It is carried out in the same way - using a flat bar and a ruler:

The scheme is something like this:
In practice, most automakers allow a slight deviation from the factory offset parameters, both up and down. However, usually we are talking about no more than 5-7 mm.
When choosing rims, first of all, you need to refer to the vehicle manual and only as a last resort resort to experimentation. Sometimes it is impossible to find and purchase wheels with "factory" ET, for example, if we are talking about an old or rare car. You can try to eliminate the discrepancy with the help of special spacers - metal rings of a certain thickness that are installed between the disk and the hub. In other cases, you can use the table of valid values.
If for some reason you have not been able to find discs with a minimum deviation from the recommended offset value, then before buying discs, be sure to try them on a car: such discs may not physically fit.
Vyacheslav Subbotin, director of the GAZ Reid Sport racing team and author of the Ministry of Transport program on the REN TV channel:
“You need to install only those wheels that are recommended by the automaker - with the correct offset. This affects the handling of the car. If you look at some tuned "nine" with a huge negative offset, in which the wheels crawl out half of the wing, then you have an uncontrollable car in front of you - you should be wary of it.
The same goes for SUVs. With such tuning, the running-in shoulder always changes - the steering wheel will simply break out of your hands. At a key moment it will be impossible to keep the car. The car is out of control, that's all!
The offset is set by the manufacturer in order to have good handling and directional stability, so that there is stability in turns. In no case should you go plus or minus. People do it for beauty, not understanding what is happening. Moreover, wheel bearings are heavily loaded. Very much! They wear out pretty quickly. The bending moment hits the bearing - and it's gone! Even in a small hole.
If you drive on normal wheels with normal offset in the same hole, nothing may happen. And with the wrong takeoff, there are only problems.
And the last. Steering knuckles on modern cars are made out of nowhere - without any margin of safety. This is confirmed by the experience of carsharing: when cars come to the service, their wheels stand in a house, because the steering knuckles are bent. Even the disks are intact, and the fists are bent. With the wrong offset, the load goes to the steering knuckle. And these are serious consequences.”
The list of recommendations for wheel offset is extremely short:
adv.rbc.ru
adv.rbc.ru
Tires are the only thing that connects a motorcycle to the road. Handling, dynamics, comfort, cross-country ability of the motorcycle ... and the safety of the driver himself depend on their design and condition. And his concern is to monitor the health of tires and be able to repair them, often in the field.
THREE SIDES OF THE ONE MEDAL. Any tire is a more or less successful attempt to combine the incompatible. Or, in other words, the conscious deterioration of some tire properties for the benefit of others. This is precisely the difficulty for designers when creating a tire. This is also the complexity of the choice for the consumer. Here are the three main properties that a road tire should have.
The first is to ensure reliable traction. On asphalt, soft rubber has the best grip (which is especially important in corners). But it wears out quickly, losing its properties. Moreover, tires with a soft compound are very demanding on their own temperature and seriously lose when cold.
The second (for the rear wheel) is to realize a large moment. It is because of this that the rear tires on modern motorcycles are at least thirty percent wider than, say, motorcycles twenty years ago. But again there was a minus - due to the increased width, the maneuverability of the motorcycle worsened.
The third (more for the front wheel) is informative. The tire should “inform” the driver about the condition of the roadway, which is especially important for fans of fast driving. The disadvantages of "detailed information" are an excess of vibrations transmitted from the road and discomfort. The choice of a specific tire for a particular motorcycle depends on many factors - the rider's riding style, his skills, and finally, the budget. Practice shows that the more experienced and skillful the driver is, the less attention he pays to a particular brand (all world-famous manufacturers mainly offer products of a similar level) and more to the condition of the tire and the pressure in it. Of course, if you are the owner of a sportbike, you should not install purely tourist tires on it, but sports pseudo-slicks for driving on wet city streets will not work well.
Road and sport bikes mainly use radial (RADIAL TYPE) tires. They are the most resistant to deformations that occur at high speeds and loads, provide a more regular contact patch and lower internal rolling losses. The threads of the carcass of a radial tire are located in planes passing through the axis of rotation of the wheel and, accordingly, do not intersect. Above the frame is a strong, as a rule, multi-layer breaker with a base of steel or synthetic threads, which perceives and distributes loads. A radial tire has less internal friction, hence less heat.
Bias (BIAS TYPE) tires are much simpler and therefore cheaper to produce than radial tires. They are more durable on bad roads, but heavier and have greater internal friction losses than radial ones. "Diagonals" have proven themselves well on enduro and motocross bikes.
In a bias tire, the carcass threads are at an angle to the direction of travel and cross, in contrast to a radial tire. The number of plies in the carcass is often indicated on the tire label (usually 2 to 6). The larger it is, the more load the tire can withstand. There are also BIAS-BELTED tires. They have an additional reinforcing belt on top of the carcass, just like radial tires.
The first two digits in the oval indicate the week, the last two indicate the year the tire was manufactured.
TIRE FIT AND DIMENSIONS. It is believed that rubber stored for more than a year loses its hermetic properties. In fact, the layer is not. Thomas Bischoff, Market Development Manager for Eastern Europe at Metzeler, explained that in the past, rubber did crack quite quickly when exposed to sunlight. But for more than twenty years, thanks to special additives, the tire can be stored without loss of properties for at least five years. Even on the street. The only type of tires that this does not apply to are racing slicks. It is believed that they do not stand on a motorcycle for a long time, and there is no sunlight in the warehouse. Therefore, “extra” components are not added to the composition of their compound.
Each tire has tread wear indicators. As a rule, these are visible "bulges" (bridges) in the grooves of the tread. On the sidewall opposite these indicators are the letters TWI (Tread Wear Indicator). If the indicator at least in one place has begun to wear out, the tire must be replaced immediately. Without regret!
HOW MUCH TO DOWNLOAD? On any production motorcycle you will find a plate that will indicate the pressure when riding alone and with a passenger. In everyday life, you can safely follow these instructions. But in some cases, the recommendations will have to deviate. First of all, this applies to multifunctional motorcycles - enduro. Typically, the indications for them refer to road tires. When replacing tires with off-road tires, the pressure is usually lowered. As a rule, it should not exceed 1.8–2 atm (for light enduro there are hard tires in which it is recommended to maintain 1 atm). Off-road tires with a pressure above 2 atm behave disgustingly both on asphalt and on a country road! But on them you can carefully get to the place of repair and in case of a puncture - if the tire does not turn on the rim.
When using sports bikes on the track, the pressure must also be reduced. A "stove" for light vehicles can be considered 2.0 atm in the front and 1.8 atm in the rear wheel. Reducing the pressure allows you to increase the contact patch of the tire with the road, which is especially important in corners. And don't forget to inflate the wheel after your track workout! Driving with low pressure on the motorway will lead to increased tire wear and can be unsafe (because on the track the tire heats up, due to which the pressure still rises). When traveling on a loaded road bike, the pressure in the rear tire can be increased to 3 atm to increase the life of the rear tire. But don't do this if your route is through winding mountain roads or if you're traveling in cold weather.
Replace tires that are unevenly worn from long freeway driving. Flat in the middle and virgin along the edges, the tires behave very insidiously in turns and on uneven roads (especially in ruts and on longitudinal sections of asphalt), and in the rain they generally cease to hold.
REPAIRING A TUBELESS TIRE. Flat tire. If this happened while driving at high speed on the highway, you will not notice that the pressure has dropped. Centrifugal force at speeds over 160 km / h will not allow the tire to squeeze through to the rim. (On the other hand, the same force can release air from the wheel by “squeezing” the nipple valve inward. Make sure that a cap with a sealing rubber gasket is always screwed on the nipple!) Trouble will show up at the most inopportune moment - during braking. Most often, the culprit of a puncture - a nail, a screw, or a piece of glass - gets stuck in the tire. If you don't have a special kit for repairing tubeless tires with you, it's bad, but do not rush to remove the self-tapping screw from the wheel. All is not yet lost. You can try to ask a good car enthusiast for a pump, pump up the wheel to maximum pressure and rush to the nearest tire service. (You need to find out about his whereabouts before you start pumping a leaky tire, because you will have no more than seven minutes on the road.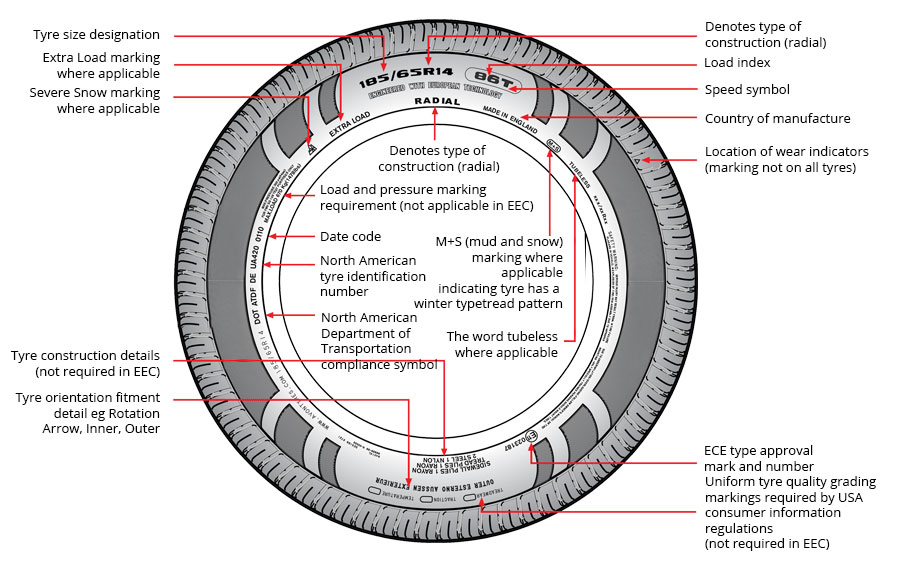 ) Focus failed? We call a tow truck.
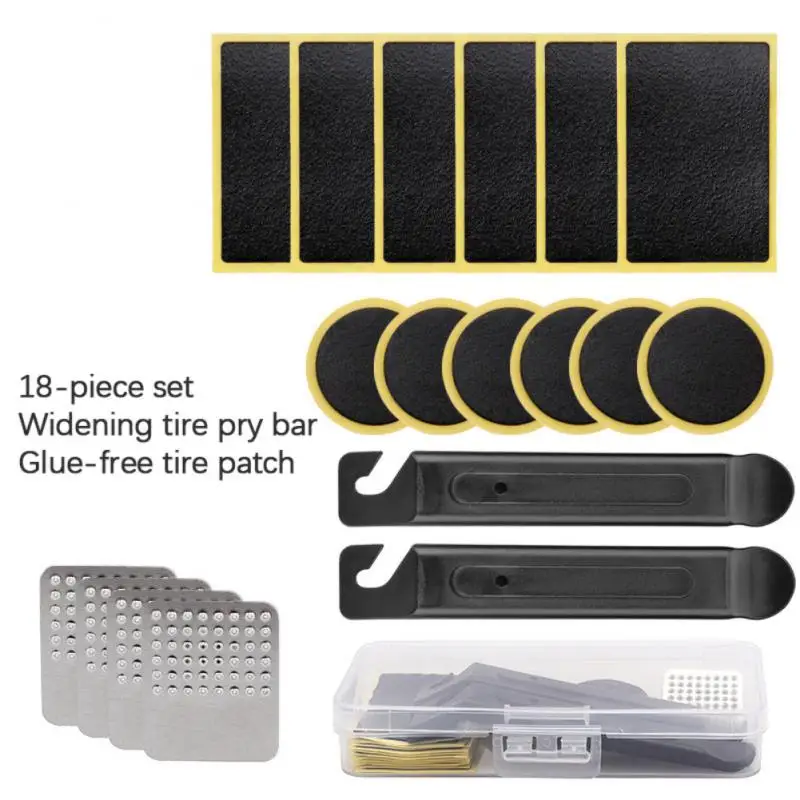
Tubeless tire repair kit.
If you did not rely on chance and stocked up on a repair kit, there is a chance to leave on your own.
Carefully remove the self-tapping screw (nail, glass) from the hole. We take a special hook from the set - a needle file and insert it through the hole into the tire cavity. We process the inner surface of the hole with reciprocating movements. We don't get carried away! The tool should pass into the hole with a slight but perceptible resistance. Squeeze the glue from the kit into the hole.
We take a rubber band (they are both round and in the form of a figure eight), also coat it with glue, hook it onto the hook of a universal tool and insert it into the hole with a confident movement.
The further process is a real art, the culmination of the whole action, and each master performs it in his own way. Someone pulls smoothly, gently shaking, someone drags boldly and sharply. The point is to remove the tool from the hole so that the inserted tourniquet remains inside. A few crampon workouts in the garage will help a lot, and on the road, you will effortlessly handle repairs.
After removing the instrument, cut off the protruding remnant of the flagellum.
Now it remains to inflate the wheel with compressed gas cylinders. They need to be carried at least two, since one is not enough for the rear wheel. Remember, when the tire is inflated, the balloon cools - do not touch it with bare hands. In Europe, it is generally accepted that a repair with a flagellum does not give a 100% guarantee, since under the action of centrifugal force at high speeds, the flagellum can leave the tire. And despite the fact that in practice I have not seen this, I advise everyone to listen to the opinion of European colleagues. Take a look at the service and ask to change the tourniquet to a “fungus” or a patch that is more securely fixed from the inside of the tire.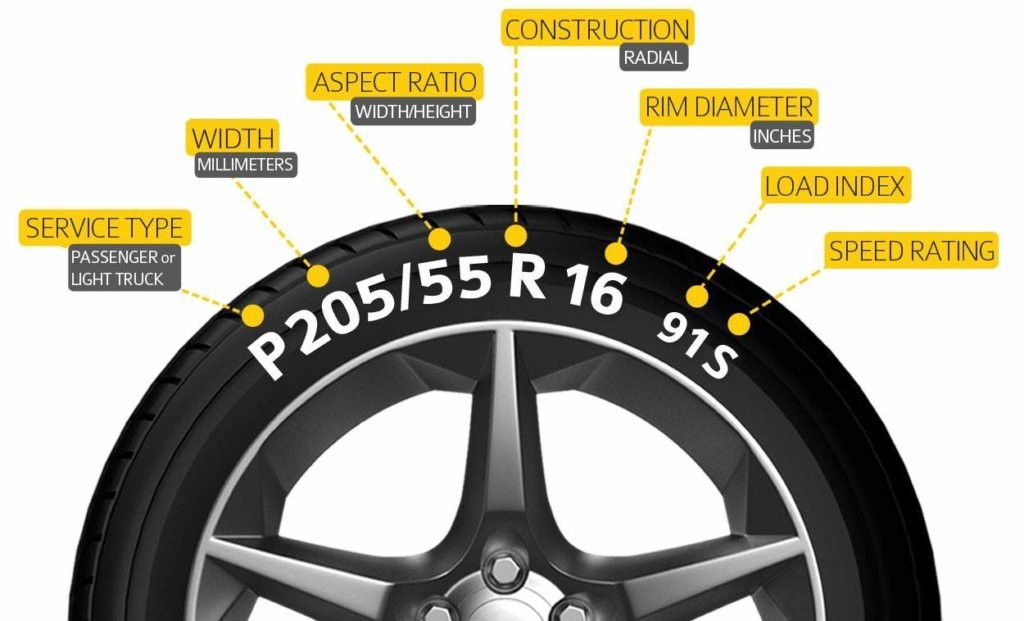 But a puncture with a diameter of more than 5 mm or in the side of the tire, or a "hernia" is useless to repair. It's a shame, you have to part with such a tire.
HOW TO BALANCE? When picking up a motorcycle from a tire shop, it is worth checking the work of the master. First of all, make sure that the arrow drawn on the side of the tire corresponds to the direction of rotation of the wheel. At the same time, the type and shape of the tread should not confuse you in any way. It is also important that the marking of the lightest part of the tire (usually a bright circle painted on the sidewall of the tire) is near the valve. Otherwise, the wheel will have to be weighted with additional balancing weights that spoil the look of the motorcycle.
Too many motorcyclists torment tire workers in an effort to achieve perfect dynamic wheel balance. In vain! First of all, the width of the motorcycle rim (even the rear one) is relatively small, as is the possible dynamic imbalance. Moreover, it has been experimentally verified that a motorcyclist cannot feel a weight less than 50 g on the rear and 25 g on the front wheel. That is why in many motorcycle factories, regular weights are attached to the middle of the rim, and not to the rim, like in cars. Moreover, even in world-class competitions such as WSBK, tires are manually balanced by spinning the wheel in special cones and gluing a weight against the rim that is below. An imbalance of 10-15 g can be considered the norm and the balancing should be stopped at this point.
REPAIRING A TUBE TIRE. A tire puncture should not confuse a true endurist. After all, he has with him everything necessary “for autonomous navigation”, including the tool needed to remove the wheel and tire fitting, as well as strength, dexterity and experience. In the absence of the latter, this article will be of help. In addition to the tool, you will need a spare chamber (if you take one, it is better to take the front one - it can also be used in the rear wheel, but the opposite will not work) and a pump.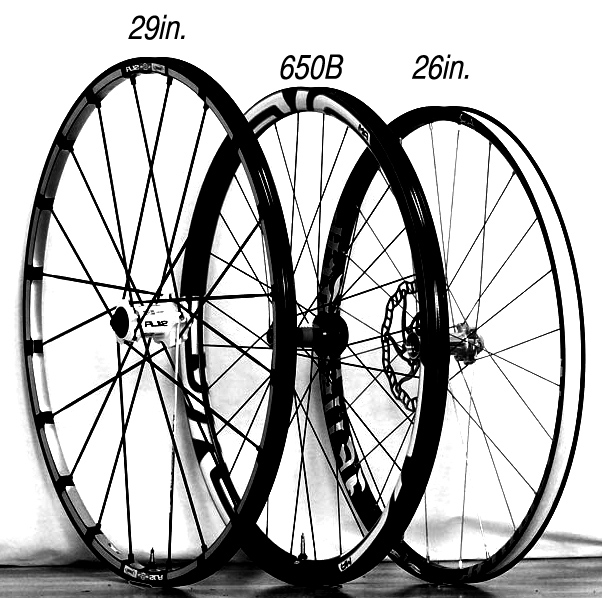 On a long trip, it is better to take patches and glue, and now special patches are sold that are designed for a long service life (cut out from the camera are considered temporary, that is, not very reliable, especially at high loads and temperatures). There are also special cans for tire repair, including tube ones, on sale. Their advantage is that they seal the damage and inflate the tire at the same time. Cons - "disposability", the inability to repair a large puncture and the price. Sometimes the water poured into the chamber allows you to do without tire fitting (50-100 ml is enough). With luck, you can drive this way for several hours. And if a rigid diagonal tire is installed on the rear wheel, then on a flat road it allows you to move with a puncture, especially for one driver on a light motorcycle. You just need to balance the speed with the heating of the tire - otherwise it may exfoliate from overheating. From the front, such a trick will not work - the motorcycle will be uncontrollable.
It is very important to have the right mounts - not too long, "hooky", but also without sharp edges. Experienced travelers sometimes make mounts themselves from wrenches for axle nuts.
To remove the rear wheel, we need a wrench for the rear axle nut; the second key (to hold the axis) is usually not needed. Sometimes the nut sticks to the thread or is simply tightened with a long wrench, and you can’t shake it with a frail regular tool. When tightening the axis, do not overdo it - a moment of 8-10 kgcm is sufficient. By dragging, instead of getting a reliable connection, you will simply ruin both parts. It is not necessary to loosen the chain to remove the rear wheel on an off-road motorcycle, but it is still a good idea to have wrenches with you to tension it (on some motorcycles, the chain is tensioned by a “snail” that does not require keys). When collecting a set of tools on the road, try to do the procedures for which you take them in the garage. Indeed, in an open field (or a dirty swamp) there is nowhere to wait for help!
Remember to loosen the pinch screws on one of the fork legs before removing the front wheel axle. On some motorcycles (where there are two brake discs) you will also have to unscrew the brake calipers, otherwise the wheel cannot be removed. It is desirable to put a set of tools not on the ground, but on a rag.
Loosen the rear axle nut...
...and remove the chain from the sprocket.
Light enduros do not have center stands. Therefore, to remove the wheel, you can lean the motorcycle on a stump or bump. If they don't, no problem. We find a clearing more evenly, close the gas valve and lay the motorcycle on its side so that the axle is pulled up. If you keep an eye on the bike, the axle comes out easily. But woe to those who are lazy! If the axle is rusted to the spacer bushings (or the inner rings of the bearings), without kerosene (WD-40) and a decent-sized mallet, you can’t get it out of there.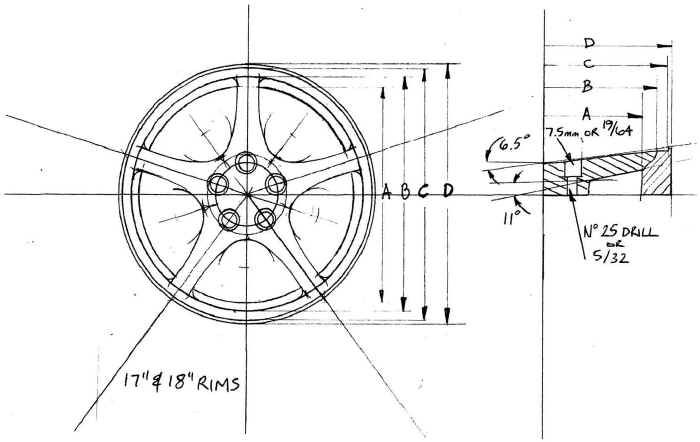
It is important not to mix up the bushings (they are not the same everywhere) and not to stain them.
If a large nail does not stick out of the wheel, the search for a puncture should be postponed. We put the wheel with an asterisk on the underlying fabric (or with a rim - but not with knitting needles! - on two logs) so that dirt and sand do not get into the bearings. We unscrew the “shoe” fastening nut (if any), press on the bolt so that the “shoe” moves away from the rims, loosen the nipple. Now you need to press the tire from the rim. The longer a tire has not been changed, the harder it is to do so. We boldly step on the sidewall with the heel of the motorboat closer to the rim and ... bounce.
Sooner or later the tire will come off. (Sometimes the sprocket is far enough away from the edge of the rim and does not allow you to firmly press the wheel to the ground. In this case, you can put the edge of the wheel on the bike's swingarm, using it as a stop. ) Now we need to squeeze both tire beads so that they dive into the recess in the rim. This makes it much easier to remove the opposite side of the bead from the rim.
Hereinafter, in the green frame - the correct position, in the red - incorrect.
We begin to remove the bead of the tire from the nipple so as not to damage the rubber around it with the bead of the tire (yes, at the nipple it will not drown properly). If the edge of the tire cannot be pulled over the bead, then the opposite edges have not fully entered the recess.
We start the first pry bar under the tire, hook the edge, turn it out.
Now, if the length of the mount allows, we bring its rear part under the brake disc. If the mount is short, you will have to hold it with your knee.
Then, with the second pry bar, we sequentially pull out the edge of the tire.
Once one side of the tire is completely off the rim, the tube can be removed.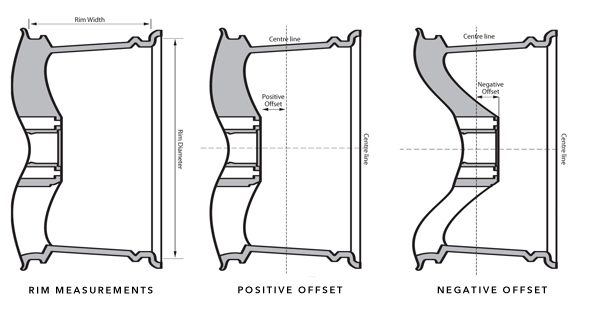 It is worth noting which side it was installed inside the tire.
After examining the chamber, we find a puncture.
When removing a nail or screw from a tire, it is important not to injure yourself. To make it easier to find damage to the tire, we combine the chamber nipple with the hole in the rim.
Sometimes sticking out ends of the spokes or burrs on their nipples are the culprit for a puncture. This usually happens when the special rubber seal is torn or dislodged, exposing the spokes. If we put a regular patch on rubber glue, we cut it out with an allowance of 15-20 mm from a puncture. We sand the camera and the patch, degrease (with gasoline or glue, removing the dried layer), apply a thin layer of glue, dry for 5-10 minutes, and then press with all our might (you can even wash it with a motorboat) - you're done! If the camera is rubbed against a defect in the tire, during installation we put a piece of an unnecessary camera there. It’s enough to get home, but it’s better to throw away such a tire.
Before inserting the tube into the wheel, it must be slightly inflated.
This will help the tube to properly orient itself inside the tire and reduce the chance of it getting caught and torn by the tire iron or being squeezed by the shoe.
Having installed the nipple in the hole, screw the outer nut onto it without tightening it.
Let's help the camera lie down inside the rim by adjusting it with your fingers. The edges of the chamber must not stick out.
The tire bead can now be inserted, first with the knee, then with the pry bar, in small increments.
It is very important not to “bite” the camera when working with mounts. To do this, only grip the edge of the tire and never raise the mount more than 90°.