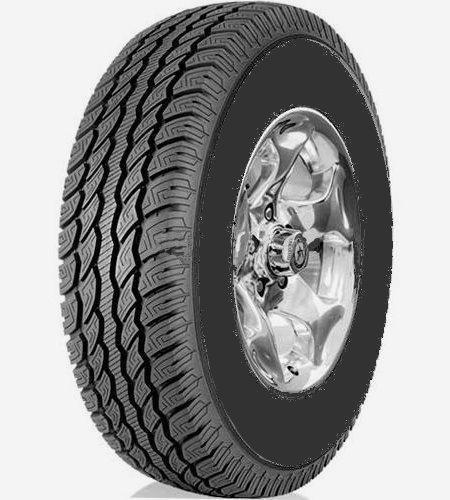
As a car owner, you need properly working tires for a seamless driving experience; however, your tires could still develop problems despite the introduction of the more advanced tubeless tires.
Tire leakage is one of the most common issues for most drivers because it happens unexpectedly. If your tire has a leak around the rim, how do you fix it? Here’s all you need to know!
Tires leak air around the rim because of punctures, tire bead damage, ripped tires, rim problems, or deteriorating valve systems. To fix the leak, drivers have to remove the tire to reseat the bead and reseal, which can be done at home if you have the appropriate equipment or with the help of a mechanic if the inner-tube tires need fixing.
For more information about what causes the tire to leak around the rim, how to fix and prevent it, and how much it will cost to repair your tires, read on!
Identifying a rim tire leak can be difficult to notice at first if your car has a slow leak; however, if your vehicle has a built-in tire-pressure monitor system or TPMS, you’ll get a low-pressure notification because the leak causes the PSI )pounds per square inch) to decrease.
If your tire is leaking, here are the reasons why this could be happening.
Tire Puncture
Once you run over a sharp object, you could puncture your tire. While most drivers assume that the puncture will cause the tire to go flat immediately, this is not usually the case, and the hole might cause a slow two-to-three PSI leak per week.
In some cases, the sharp object like a nail can remain lodged in the tire, which prevents the air from leaking out quickly.
Whether it’s a minor damage or not, you shouldn’t ignore the leak as this may lead to extensive tears and tire damage.
According to The Inflator, approximately seven tire punctures occur every second in the U.S. alone; therefore, this is the first thing you should check for when there’s a leak.
Valve Stem Damage
Valve stems are critical parts of the tire system, and they come in different forms and sizes depending on the tire.
These stems are the tiny protrusions on your tire that you unscrew during inflation; therefore, they need to be in good shape, without any damages or dirt-clogged.
Additionally, when valve stems get exposed to elements over time, they become worn out or corroded, which can cause the air to leak around the rim.
Bead Leak
Tire leaks can also result from bead damage, where the tire seals itself to the rim.
To know whether the bead is the problem, you’ll need to determine how old the tire is because if your tire has dry rot or is older, it may no longer seal properly and have reduced elasticity.
Additionally, beads also get damaged because of a corroded rim or when the tire is mounted or removed using a tire lube.
Your entire wheel gets this type of damage if you regularly hit potholes or bumps at high speed, deforming the wheel’s metal surface, which may cause the tire to pull away.
Keep in mind that if the bead is damaged and you can’t seal the tire to the rim, you have to replace the tire.
Rim Issues
If you are using aluminum or magnesium alloy wheels, your wheels are more susceptible to corrosion, which affects the part where the rim meets the tire bead.
Rim damage can be caused by several causes, especially if you are constantly driving on bad roads with many potholes.
Before installing new tires, ensure your technician checks the bead seal and wheel correctly to confirm that the rims are not corroded.
Furthermore, check for wheel porosity that causes air to leak from the rim due to corrosion, incorrect wheel weights, or poor casting. To fix the leaking issue, avoid injecting a tire sealant and fix the rim first.
Once you discover that your tire is leaking air around the rim, what next? Here are some steps to guide you.
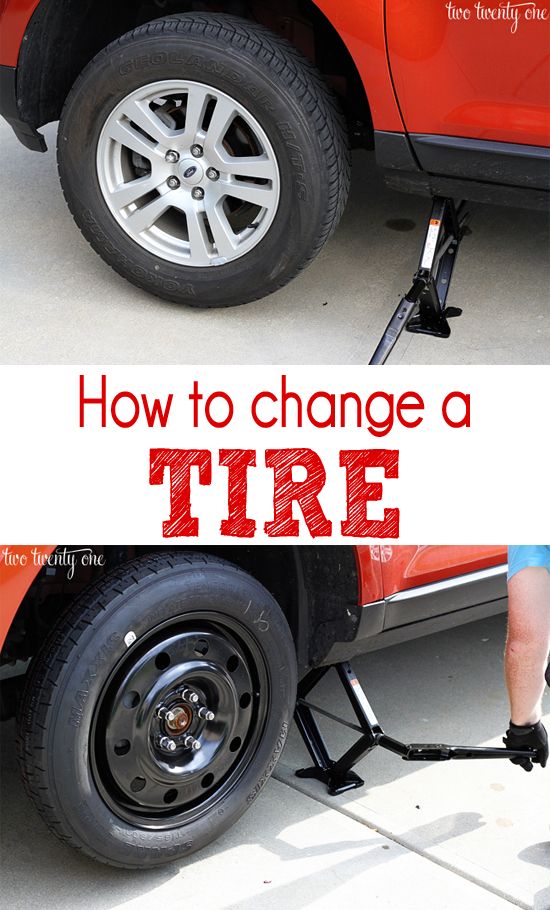
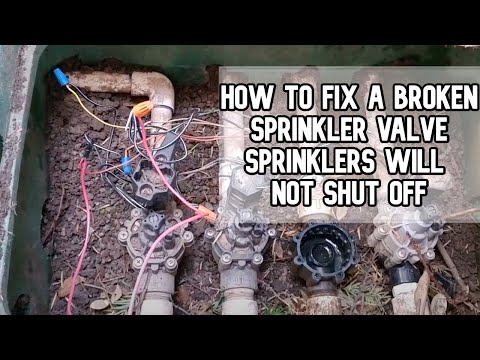
1. Remove The Tire
To identify the cause of the leak, you’ll need to remove the tire and place it on a flat surface with the valve stems facing up.
2. Fill The Tire And Rim With Soapy Water
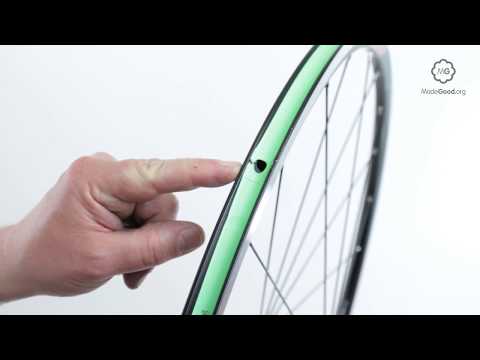
Add soapy water to your tire; around the outer edge of the rim, the area of the leak will be identifiable through bubbles from the leaking air. Mark the area and move to the next step.
3. Release Air From The Valve Stem
After you’ve marked the area, empty the air from your tire by pressing inward on the valve system using the valve removing kit in your car or unscrewing it from the stem.
4. Separate The Tire and Rim
Since the tire and the rim are attached with a seal, you’ll need something heavy like a wood board to separate them.
Use a hammer to hit the wooden plank until the tire’s bead breaks free from the rim.
5. Clean The Tire and Repair
Once the two parts separate, you can stop the leak around the rim by cleaning the tire’s edges with a cloth to remove loose debris and dirt.
After the cleaning is done, you can add some repairing solution to the leakage and start filling the air.
Once you fill the tire with the desired air pressure, you can check again for any leakages using the same process with soapy water.
Fixing a tire rim leak can be expensive or affordable, depending on the leak’s cause and where you get the service done.
According to customer reviews, if you get the leak repaired at the shop you bought the tire from, you are more likely to get this service for free, but if you go to a different dealer, expect to pay $10-$20.
However, if the leak is because of a damaged rim, you’ll incur more costs which vary greatly depending on the brand.
If you check popular online sites, rims’ prices range from under $25 to $200; therefore, it will cost you more to repair the leakage if you have to replace the rim or entire tire.
To avoid this tire leak, there are some preventive measures that you can take.
Regular Maintenance
As mentioned above, tire leakage can result from valve stems or rims that are dirt clogged; therefore, you need to check your tires regularly.
With more accidents connected to tire blowouts and issues, it’s safer to have your tires checked for any potential problems to prevent leaking around the rim.
Drive Carefully
We have already established that punctures are the number one cause of tire leakage; therefore, if you can, it’s best to avoid situations that could cause punctures.
To achieve this, you should drive more carefully and at recommended speeds, especially on roads with potholes or speed bumps.
Avoid Overinflating Tires
Overinflating tires doesn’t solve a tire leakage problem. Once you identify that air is leaking around the rim, follow the above steps I shared to fix the issue.
However, if you choose to overinflate, the tires will become unstable, rigid, and lose traction when you are driving.
Use A Professional Mechanic
According to the U.S. Tire Manufacturers Association, drivers should supplement their monthly inspections with regular professional tire care.
The check should include wheel balancing, alignment, and tire inspection to protect your tires from leaking air.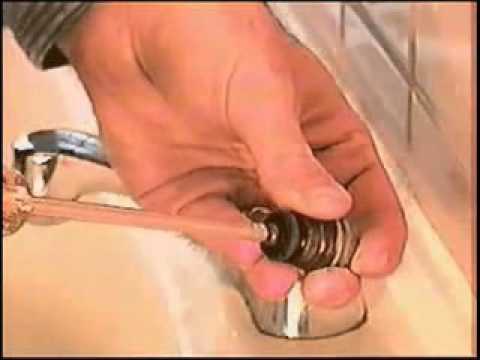
To find out more, you can also read our posts on how common are flat tires, underinflated tires, and how long will tires last with bad alignment.
Tires leak air around the rim for several reasons, but luckily this problem can be fixed and prevented.
While it’s possible to fix a leak at home using the kit from your car, you can also enlist the services of a professional mechanic if you spot extensive damage.
I have shared some simple steps that you can take to fix the leak, especially if you are doing it at home.
To avoid these tire problems, regularly check your tires for air pressure and damages at least once a month, consult professional mechanics, and drive carefully to avoid incurring extra repair costs.
Tires are an essential part in automobiles. There is a lot of advancement in tires from traditional vehicles to modern age. From tube tires to tubeless ones, the manufacturers have strived hard to make our long drives smooth. Tubeless tires are the most advanced technology in the market. These tires hold air for longer, and the grip is perfect as well. One of the biggest dilemmas related to tires is leakage. A leaking tire worsens the beautiful journeys in no time. Getting familiar with the fixing process of how to stop a tire from leaking around the rim might assist greatly.
Let us introduce to you “how do you seal a leaking rim” by checking the process of fixing tire bead leak below.
The tire does not work “alone” so you may find that even if the tire is not leaked, the tire is still flatted. So there is a really easy way for you to check if the tire is leaking around the rim or not. Let us show you how to do it!
Get yourself a generic spray bottle. Then make a mix of liquid which includes the dish soap with water, mix well and put it into the bottle. The ratio is 1 soap and 4 water, but you do not need to make it exactly. The next step is inflate the tire to the valve caps off and spray solution on the end of the valve as well as so you can see if the valve itself is leaking. If you see the soap bubbles forming anywhere there is a leak. For the small leak, it takes 10-20 minutes to see the change of the tire and the bubbles of the soap.
This method is easy to check your tire at home and you can do it without experience.
Fixing the leaking tire is not that intricate as it may sound. The changing process is much easier if you have an appropriate equipment kit with you. One might have to visit a mechanic for fixing the inner-tube tires. Fixing tubeless tires is easy with special technique and equipment.
Let’s go through the fixing process of how to stop a tire from leaking around the rim in an automobile.
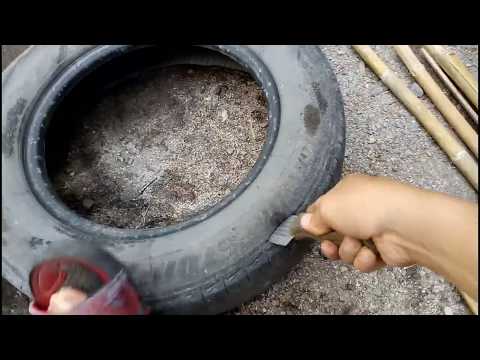
The first step of how to stop a tire from leaking around the rim is removing the tire and placing it on a flat surface. Make sure the air inlet valve is not facing the ground. Examine if there is any leak or hole visible. It will be easier to treat the leakage outside than that of tire leaking around rim seal. Fill the tire and rim attachment with water. The leak area will be identified with bubbles from leaking air. Check both sides of the tire and with simple or soapy water.
SEE MORE:
Spot the leakage area on the tire and mark it accordingly. Empty the tire air by pressing the valve inlet with a pin. It is essential to release the air from the tire before treating. There is a valve-removing tool in the car equipment kit as well. Make sure the leaking side of the tire and rim are visible to treat. That’s all you need to do for the second step of how to fix a rim leak.
Procedure to solve problem of tire leaking air around rim Release The Tire-Rim Attachment
Tire and rim are attached with a seal. The air inside the tire tightens the seal. You might need something heavy to release the attachment. According to expert’s maintenance tips, a heavy hammer and wooden plank will do the job perfectly. It is essential to remove the tire from the rim if the tire leaking around rim seal is the issue. Hit the plank with the hammer after putting it close to the tire-rim seal.
The final step of how to stop a tire from leaking around the rim is cleaning the edges of the tire with a cloth after releasing the seal. It is easy to press the removed tire with hands and clean it accordingly. Put some repairing solution on the leakage and fill the air again. While the air flows into the tire, make sure to position the tire and rim appropriately. You can check the tire leakage again with water.
>> We have used Japanese cars whose tires are always in perfect condition. Click here!!! <<
Most people who ask how to stop a tire from leaking around the rim wonder how much it costs to fix the leak. If it is the rims, then the wheels have trouble. At the mechanic, the repairman will unmount the tire, clean the rim on the inside, then apply the bead sealer and the unmounted tire. He also changes the valve stem for you. The total cost is around $20 – 30 for one wheel.
The problem is, may shop, instead of fixing the problem from the rim, they write it off as a bad bead or something that they will charge you a lot of money to throw the sealer at the issue. Your car will be fine for one week and the leak will come back to what they were before. Besides, some shops may just grab something around the shop and smooth it out. They try to smooth out the surface where it was leaking then slap on a bunch of bead sealer. So again, the problem is not completely solved.
That’s all about how to stop a tire from leaking around the rim. Follow these vital tips and continue your flawless journey on the roads. You can do it yourself at home or if you are not sure that you can do it or not. Bring your car to the trustful garage, tell them that you have a slow leak on the tire and ask them to check the rim. So everything will be on track.
Rim leaks can be an expensive problem, depending on the severity. In most cases, a simple fix can cost less than $10.
How much does it cost to fix a leaking rim?
Rim leaks can be an expensive problem, depending on the severity. In most cases, a simple fix can cost less than $10.
.
 Calculate how much air to bleed per day to get your tires wet from rain or snow (this number depends on your vehicle). Consider labor costs and other associated costs such as spare parts and fluids. Estimate total costs by multiplying each figure by the appropriate percentage (for example, if labor costs are 25%, multiply 25% by the total cost). A small rim leak may require only one part to be replaced, while a larger rim leak may require several parts to be replaced at once, so always consult an expert when estimating repair costs! Rim leaks can also cause increased wear to other components in your vehicle, so always keep this in mind when budgeting for repairs...Always get suggestions from two or three different professionals before making any decisions about fixing your rim leak! Sources : https://www2-usa-auto-repair-tips-and-tricks-.com/how-much-does-it-costs...
  If there is visible water damage on the surface of the tire or wheel, the repair is likely to cost more than if there were no water damage.
 Rim leaks can be caused by a variety of things, including cracked rims, worn valve stem seals, and improper installation.
If you notice a small hole in a tire or wheel that seems to be leaking air, don't panic - it's usually just a sign that the surface of the tire or wheel there is a crack that needs to be repaired.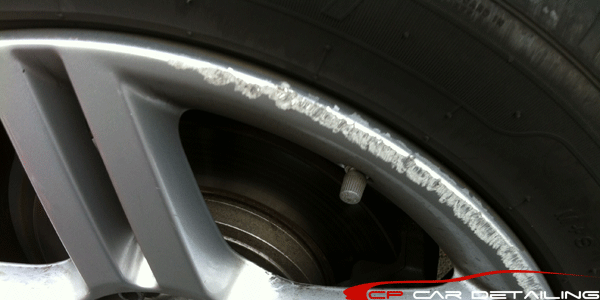 If you have large holes or cracks in your tires or rims, you will need to take them in for repair.
There are many different ways rim leaks occur, here are some common causes:
There are a few things you can do to prevent rim leaks. First, make sure your wheel is properly sealed. Second, be sure to tighten your spokes and hub nuts regularly. Finally, if you notice any signs of a leak such as water on the ground or wet spots on the bike, take it in for repair as soon as possible.
How to identify a leaking rim? What are the steps to fix a leaking rim? How much does it cost to fix a leaking wheel? There are many factors that go into determining the cost of repairing or replacing a wheel or tire. In general, however, most repairs fall into one of two categories: those that require only basic tools and equipment, and those that require more specialized skills and equipment. When evaluating the cost of repairing or replacing a wheel or tire, it is important to consider not only the price of these items, but also the time it takes to complete the repair. a rubber seal around the edge of the wheel hub. This hole allows air to escape from the space between the wheel and the hub, causing pressure to build up inside the tire and eventually bursting. Rim leaks can be difficult to detect as they usually occur gradually over time and do not cause immediate damage. symptoms. The first sign that you may have a tire problem is acceleration or braking problems. If you notice any unusual noise coming from your wheels, then it's time to get them fixed! In order for the professionals from the workshop Tire Rack® Tampa Bay Fl has serviced all makes and models, we need some information about your vehicle including: year, model, vehicle identification number (VIN).
 Make sure this information is available before arriving at our store so we can properly diagnose your problem! Some simple checks you can do yourself include looking at the front and rear discs for cracks/chips/seams; tire pressure check; tread depth check; visual inspection of the sidewalls for breaks/breaks, etc. If none of these inspections revealed any problems, then it is probably time for an alignment check, and possible inspection and replacement if necessary! Workshop Specialists wheel repairers will use state-of-the-art equipment such as digital cameras and lasers when performing repairs to determine what needs to be repaired rather than guessing and saving on future repairs! Here is a rough breakdown of the average costs associated with different types of wheel repair services: - Wheel alignment (if necessary): $75-125 - Tire change: $60-120 +/- depending on make/model - Wheel reconditioning (if necessary): $50. -$150+/- depending on make/model Tire Rack® Tampa Bay Fl offers FREE shipping on all orders over $75*service area includes Hillsborough County*, Pinellas County*, Pasco County*, Hernando County*, Sumter County* and Sarasota County* .
 (*excluding shipping costs)
Locating Rim Leaks
One way to determine if your tires might be a problem is to check their pressure. friction and loss of traction. In addition, if one or more tires have completely lost air, they are likely to show signs such as reduced traction when driving on wet roads or poor handling when cornering.
Another sign that something is wrong with your tires is unusual noise while driving - this may indicate damage either inside the tire itself or at the junction of its inner tube, where sound waves easily pass through thin walls Finally, if one or more discs look noticeably different from either side, it may be worth taking them into consideration for further inspection, especially if there has been a noticeable loss of traction in certain areas during recent driving.
Steps to Repair a Leaking Rim
Once you have determined that there may be a problem with one or more of your tires, write down exactly where the problem is occurring - this will help our wheel repair technicians determine which parts need urgent attention during repair work.
A rim leak is a small hole that can form in a tire or wheel due to defects in the manufacturing process. If the leak is small, it may go unnoticed. However, if the leak becomes large enough, air can escape, resulting in poor fuel economy and reduced handling. Rim leaks are usually repaired by replacing the tire or wheel. Prices vary depending on the type of tire or wheel being replaced, and whether it needs to be replaced immediately or later. The average cost to repair a leaking rim is about $200-$300.
Rim leaks can be hazardous to driving as they can cause a loss of air pressure in a tire and cause it to burst. If you notice a rim leak, it is important to take action and fix the problem as soon as possible. severity, but in most cases, repairs range from $50 to $100. While it can be costly, fixing a rim leak is definitely worth it if you want to avoid getting stuck or damaging your car.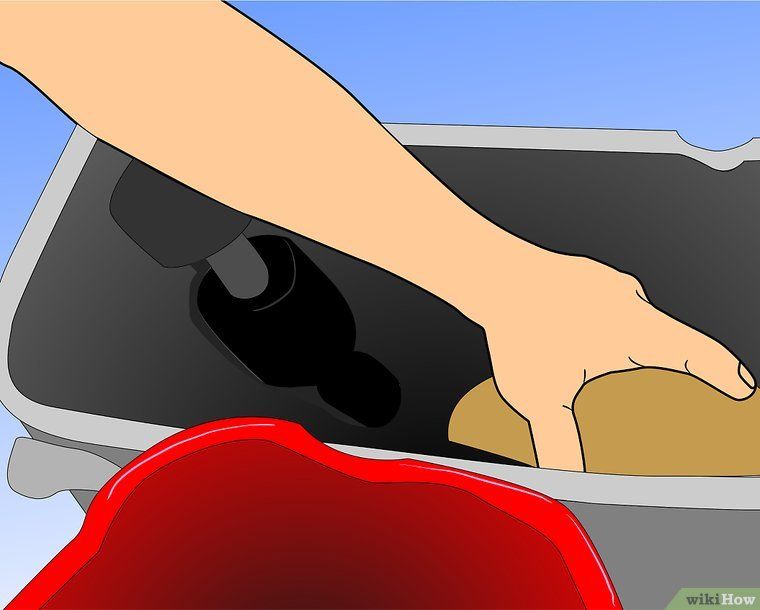
There is no definitive answer to this question as it will depend on the specific circumstances of your case. However, in general, rim leaks can be fixed relatively cheaply and without any special skills or equipment. In most cases, a qualified mechanic will be able to fix a rim leak for about $100-$200. If you have comprehensive coverage, your insurer may cover some or all of the cost of fixing the leak.
How much does it cost to fix a leaking tire? What is the average cost to fix a leaking wheel? How much does it cost to change a tire? What is the average cost to change a tire?
There are many factors that go into determining the overall cost of repairing or replacing an item, such as the type and size of the item, the severity of the damage, and the need for additional equipment or materials. However, on average, a leaking rim can cost $50 to $200, and a leaking wheel can $40 to $600. And finally, tires can usually be replaced for around $60-$120. So in general, depending on the specific situation and what needs to be repaired or replaced, fixing or replacing an item can typically cost anywhere from $50 up to 1200 dollars.
A rim leak is a small hole that appears on the outside of your wheel. This can be caused by a number of things, including metal fatigue or corrosion. If you notice a rim leak, it's important to take action before it gets bigger and causes more damage .You can fix a rim leak yourself if you have the right tools and know how to fix it. Here are some tips:
 Remove debris before proceeding.
 There is no definitive answer to this question, as the cost to repair a rim leak will vary depending on the severity of the leak, its location on the vehicle, and the type of repair required. However, some general estimates for a rim leak repair range from $200 to $1,000. It is important to remember that that these costs are estimates and may vary depending on the specific circumstances of your case. If you need help estimating the cost of repairing your vehicle, contact a qualified mechanic or auto mechanic.
There is no definitive answer to this question, as the cost to repair a leaky rim will vary depending on the make and model of your vehicle, the severity of the leak, and any additional repairs that may be required. $100 to $1,000. Also, some cars may require more serious repairs than others. So if you're not sure if your car has a leaking rim, it's best to take it to a mechanic for an assessment.
A rim leak is a small hole that can form in a tire and wheel assembly due to many factors, including manufacturing defects or wear. When this happens, air can escape from the tire, which can cause loss of traction and possible If you notice any signs of a rim leak, such as moisture on the ground near your vehicle, it is important to take action immediately.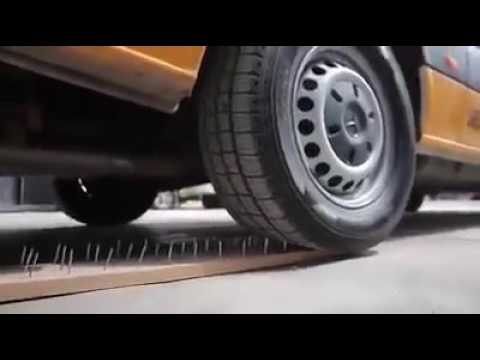 There are several ways to fix a rim leak, depending on the severity of the problem. In most cases, simply replacing the failed tire and wheel should be enough However, if the leak is severe or continues, you may need to replace more than just the tire and wheel assembly. In these cases, it will likely cost around $200-$300 to fix the problem. so don't worry - even if your annual inspection doesn't reveal any RimLeaks leaks, it's always best to have your car checked by a mechanic every year for safety reasons.
If you are selling your vehicle, it is important to report any known problems with the vehicle. A leaking rim can be a serious problem and lead to costly repairs. It is best to let the buyer know of the potential problem so they can make an informed decision about buying the vehicle. You can also include a video of the rim leak in question if possible. This will help buyers better understand what they are buying.
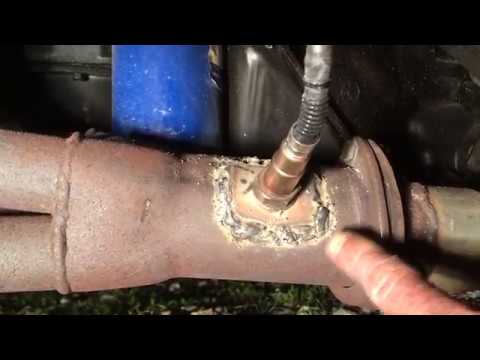
What is a fast drying titanium filled epoxy adhesive putty? This mixture sets in as little as 5 minutes. The hardening process takes 15 minutes. It is machined in exactly one hour. It is distinguished by its ease of use. And most importantly - it is absolutely waste-free. It has excellent adhesion to almost all materials. With its help, you can easily glue metal, plastic, glass, ceramics and wood. A distinctive feature of plastic cold welds is their volumetric expansion at the time of setting. In this case, a kind of cork effect occurs. Under such conditions, repair when fluid flows out of a damaged unit and even under water becomes possible. Leakage can be stopped in 5 minutes and for life. It is indispensable for both the house and the garage. With its help, you can easily repair the leak of heating pipes, plumbing, sewage. It can withstand high temperatures up to +260°C. When the putty hardens, the surfaces are drilled, threaded, turned, sanded and painted.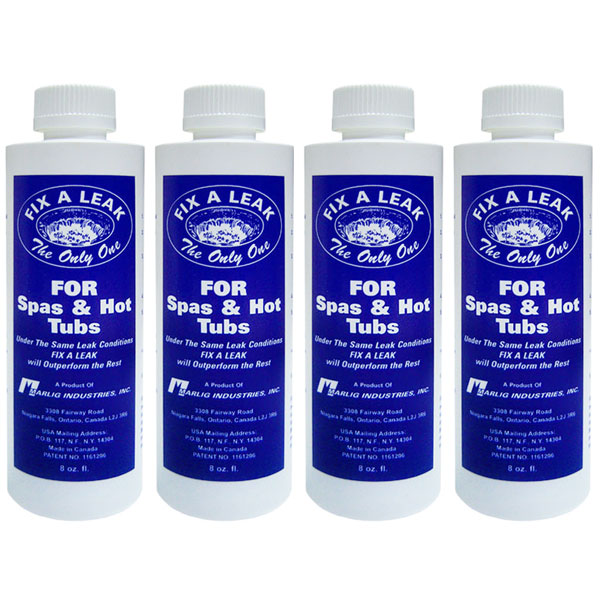 With their help, you can restore a split metal part by fashioning the lost elements: broken fastening lugs. Now it has become possible to seal the crack, repair the trunk and other parts of the bike. Under normal conditions, such a composition can be stored for as long as 3 years. However, it does not lose its unique properties. The country of origin is the USA.
Merida bikes available with delivery to your region! Big choice. Best Price Guarantee!
You can also find “cold welding” on the shelves of auto and sometimes bike shops. It is packaged in cylindrical plastic boxes. Its appearance is a two-component "sausage". Its layers have different colors. The color of the outer layer is light, the inner is dark. This is a two-component epoxy composition with various fillers depending on the “welding” task. Cold welding is produced by various manufacturers. Each package of such a “sausage” has a corresponding inscription stating that this product is specifically for the strong and fast connection of different materials. It can guarantee the elimination of leaks in the radiator of cooling systems or in a punctured boat sump. What is cold welding?
Large selection of bicycles. We will deliver Merida bicycles to your region. Best price guarantee.
To connect the elements using cold welding , it is necessary to thoroughly knead a previously cut piece of “sausage” with your hands until a sticky and plastic mass of a uniform color is obtained, like plasticine. There is a simultaneous mixing of layers. A polymerization reaction occurs. There is a warming of the mashed homogeneous mass. With the beginning of this process, it is necessary to connect the parts as soon as possible, repair the cracks in the product. Otherwise, when the composition is cured, an unused piece of “sausage” should be discarded.
Surfaces to be joined by cold welding must be free of grease, clean and abraded with emery cloth. Surface roughness required. Surface temperature should not be below 15-17C. Otherwise, the adhesion of cold welding will become reduced and a quality connection will not be obtained. In the cold welding market, domestic manufacturers are represented by the most typical representatives of the “sausage” family. These are Polyrem and Almaz. "Polyrem" is a two-component "sausage", which is packed in a transparent plastic pasted on cardboard. It is produced in the form of plates with layers of gray and yellow. Or in the form of a standard “sausage” with layers of the same colors. This product is intended for the repair of plastic and polymer products. But you can also risk connecting the metal parts. But the quality of such gluing is not known. After curing, this composition will retain its plasticity.
“Diamond” is sold in a plastic cylinder. Inside the cylinder, it is securely wrapped in cellophane and looks like a “sausage”. This sausage is white on the outside, dark gray on the inside. It should be remembered that it is the outer white layer that will stick to the hands and a significant amount of this material will remain on the fingers.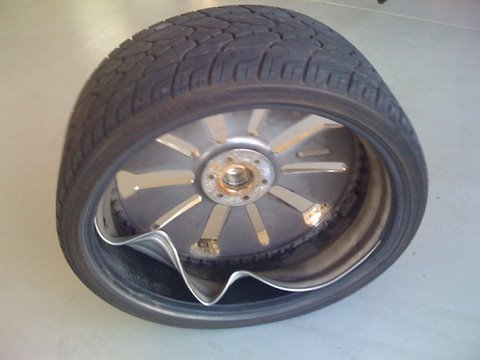 This is very bad, since the concentration of the components during stirring must be carefully observed. The composition may be rejected too early. Also, the cut piece may not harden in principle. In order to reduce the sticking of “cold weld” components on the hands, it should be handled with slightly damp hands. After kneading “Diamond”, a large number of small lumps form inside the piece of “cold grease” itself. Thus, “Diamond” should be used only for minor household repairs.
Good welding is also represented by foreign manufacturers, such companies as ABRO and Hi-Gear. ABRO's products are called "ABRO-Steel". The polymer composition has steel powder as a filler. Mix "ABRO-Steel" in the same way as any other similar cold welding. The resulting homogeneous mass has a lifetime of about 3 minutes. Therefore, you have to work very quickly. "ABRO-Steel" hardens very quickly and is a reliable bond. It can be used to secure nuts from loosening. A power thread, of course, cannot be restored with the help of ABRO-Steel.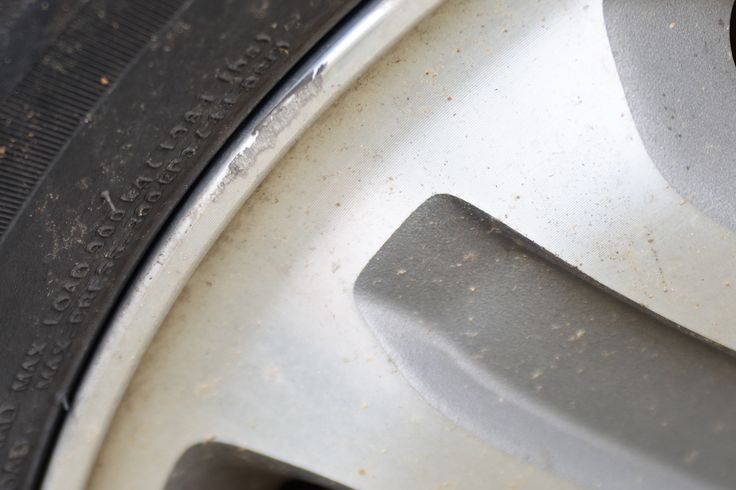 But even without this, the properties of cold welding are high. It is not inferior in hardness to duralumin.
Hi-Gear products are also impressive. It is characterized by a very rapid heating of the mixture when it is kneaded. Has a fast grip. Its purpose is a quick repair (of a bicycle) in difficult road conditions. This is evidenced by its speaking name - "Quick Steel" (Quick Steel). It is an epoxy putty that is hardened with steel. Hi-Gear cold welding can be used on a variety of materials such as Titanium White and Flexoplast. It is flexoplast that is used to repair plastic products. At the same time, the strength of the connection is much higher than the strength of the plastic being joined. In all cases of cold welding, one rule must be followed: the surfaces to be joined must be dry and free of grease. Otherwise, the connection will not be of high quality.
Text: MaxSt.
RUB 18,390
27% discount
RUB 13,400
In Stock
Bicycle Stinger Graphite Pro 29 (2021)
RUB 58,280
32% discount
RUB 39,890
In Stock
Bicycle Forward Iris 26 1.