An ATV that has a clutch is considered a manual transmission ATV, unlike an automatic transmission ATV that does all the shifting for you. Driving a manual ATV is actually pretty easy once you get the hang of it. After a while it becomes second nature and you will be able to ride without even thinking about it too much. You will need to be able to coordinate between your hands and your feet to shift. I will go over step by step exactly how to start, get into gear, and shift with a manual ATV.
First, lets go over the components you will need to know to drive an ATV with a clutch.
It’s best practice to start the quad when it’s in the neutral gear. It is possible to start the ATV in any gear as long as you hold in the clutch lever. Remember, when you pull in on the clutch lever, you’re essentially putting the quad in neutral, as long as you’re holding in the clutch.
If you start your quad in gear, you need to pull in on the clutch and start the engine. Be careful though, if you let go of the clutch with the engine running and the transmission in gear, you will stall and could do damage to your transmission. I only start mine in neutral so that way I can let off the clutch and the quad will idle, and I suggest you do the same.
To get into neutral before starting the quad, you need to pull in on the clutch lever and use your left foot shifter to find neutral. Neutral is usually located between 1st and 2nd gear. You typically won’t be able to get into neutral from 2nd gear though. You should shift to 1st gear by clicking down on the foot shifter, all the way down to 1st gear. Then lightly shift a half click up into neutral. A full click up from 1st gear will put you into 2nd gear, a half click up will put you into neutral.
This is the part that everyone gets hung up on, I know I did when I first learned. It’s really not that hard once you get the hang of it though, it takes some practice. Don’t let yourself get discouraged too easily and you’ll be just fine.
Start off by being in neutral with the engine running. Pull in the clutch lever and hold it in. Now shift into 1st gear by pressing down on the shifter with your foot. To start accelerating, you need to give it some gas with the throttle while you slowly let out the clutch. You have to do these at the same time, that’s what usually gets people.
When you feel the clutch engage, the quad will start to move forward and you can let go of the clutch all together. You’re now in 1st gear moving forward. Be careful though, if you come to a stop without pulling the clutch back in, or getting back into neutral, the ATV will stall.
It may help to just practice getting the quad moving in 1st gear using the clutch and throttle for a bit. Every quad is a little different so it’s hard to say how much throttle to give, and how far to let the clutch out before it grabs. A good starting point though is to try about half throttle, and let the clutch out slowly until you get a good feel for it.
If you keep stalling your engine, you’re either not giving enough gas or you’re letting the clutch out too quickly. If the front end lifts up on you, you’re probably giving it too much throttle when you let the clutch out. It may take patience to get the hang of, but just take it easy and practice.
Once you’ve got the ‘start driving’ part down you’ll want to go faster. Luckily this isn’t as hard as getting the quad moving in the first place. To shift up a gear you want to be about 75% or more of the rpm range for your engine. You typically want to shift up in the higher rpm ranges or you will just bog down the engine. For example, being in 4th gear but only going 5mph will give you no power, and you might even stall.
To shift up, you have to let off the throttle and pull in the clutch lever all the way. With your left foot, pull up on the shift lever into the next higher gear then let the clutch out and give it throttle. Keep in mind when switching from 1st to 2nd you need to do a full click up to shift, a half click will put you in neutral.
If you feel more comfortable slowly letting the clutch out and giving gas at the same time like you did to start in 1st, that’s fine. It is not necessary though. That’s why I think shifting between gears is easier than starting out in 1st. Because you can just let off the gas, pull in the clutch, shift, let go of clutch all together, and give it gas again. You’ll be able to do this faster with time, and it becomes second nature after a while.
To downshift you do the same steps except press down on the shifter with your left foot. Keep in mind that if you down shift at a high speed you will red line your engine and could cause damage. Downshifting is only really needed when you’re slowing down. What I do is just hold the clutch in whenever I’m slowing down, and once I’ve slowed to the speed I want, I shift down into the gear best suited for that speed, and let the clutch out.
You really do need to know what gear is best for the speed you’re going. Unlike shifting up through gears, you can shift down through multiple gears at a time depending on how much you slowed down. If your ATV doesn’t have a speedometer, the best you can do is just get a feel for what speed you’re going and what gear you should be in.
This is the easiest part, but the most important, you should definitely know how to stop before you even try riding an ATV with a clutch. To come to a complete stop simply let off the throttle, hold in the clutch, and apply the front and rear brakes until you’ve stopped moving. You can down shift while you’re slowing down or wait until you’ve stopped to down shift all the way to 1st gear. Either way, it’s important that you hold the clutch in this entire time. Once you’re into 1st gear, do a half click shift up into neutral. Now you can let off the clutch and the engine will idle.
The front brake is applied by using the front brake lever on the right side of the handle bars. The front brake is typically about 3/4 of your stopping power. Some people never even touch their rear brakes at all, which is fine. To use your rear brakes apply the foot brake by your right foot. The rear brake becomes more useful when you start to learn more advanced braking and cornering, or if you just like to skid to a stop.
That’s it! now it’s time to practice, a lot. You’ll get the hang of it and you’ll want to start trying more advanced maneuvers in no time. As always, remember to wear proper safety gear. At the very least, make sure you wear a helmet, goggles, and a decent pair of boots. If you want to check out some gear I’ve tried, tested, and recommend myself, check out the Recommended Gear section of this site.
Sharing is caring!
Doing a wheelie on a quad might seem hard, but if you practice and do it right it becomes easy.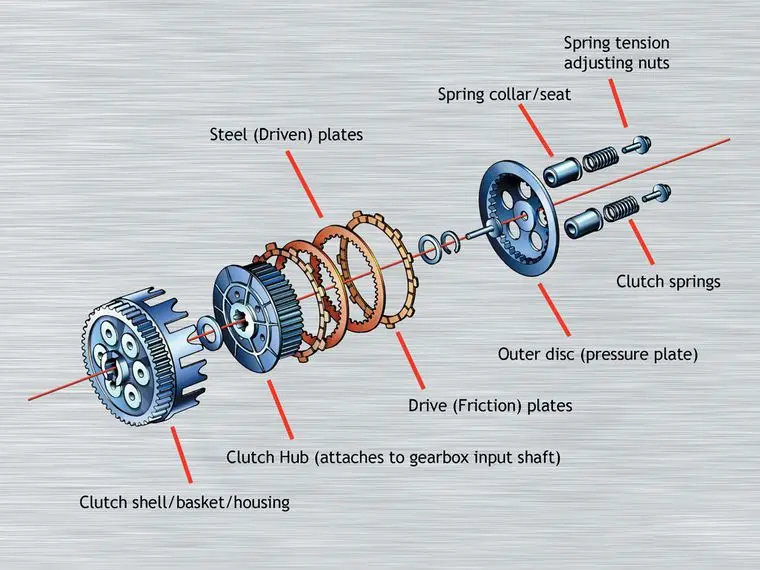 If you use proper technique, doing wheelies on a quad can be done safely, and is a lot fun.
Wheelies can be dangerous, especially if you’re trying them out for the first time. It is important to take your time learning, and wear proper safety gear. A helmet and goggles, gloves, boots, long pants, and a chest piece are all recommended. For the best safety gear check out the recommended gear section of this site.
If you have proper safety gear and feel comfortable on your quad, then let’s learn how to pop a wheelie the right way.
You can learn and perform a wheelie on most any stock quad. You will usually see them mostly done on sport quads or racing/trick type quads. Even though they may look cooler, don’t think you can only pull a wheelie with a sport type ATV. You can pull a wheelie on any type of ATV with or without a clutch if you do it the right way.
Although it can be done on a stock quad, here are some things to consider for optimum setup of your machine.
Most of the time having a low tire pressure is ideal for stunts, tricks, and wheelies. Having your tire pressure lowered a bit will help with turning, balance, and traction. It helps with turning because your tires will squish more on whichever side you shift your body weight too.
When this happens it allows your quad to turn more easily in that direction. When the tire squishes, its diameter shrinks, allowing you to turn by just leaning from one side to the other.

Having that flat spot on your tires allows for more traction when trying to get up into a wheelie too. When more of the tire can make contact with the ground, you will get a better lift. Set your tires to an air pressure lower than stock to increase the flat spot where your tires touch the ground.
For normal trail riding I set mine to 5-6 psi and I can pull wheelies easily. If you want to set your tires specifically for wheelies, start with 3 psi and go from there. It’s best to try different things and see what works best for you.
Here is an article about ATV tire pressure if you want to know more.
Make sure your throttle isn’t loose, and that it operates smoothly without sticking. It can be dangerous to be up in a wheelie and your throttle gets stuck. Nothing special to do here except basic maintenance and make sure everything’s working the way it should.
This is mostly personal preference. Just adjust your clutch so that you are comfortable using it. Leaving it stock is probably the best way to go for beginners, if you want to customize it a little for yourself that is fine too.
Some people want their clutch to grab and release real close to the handle bars. You will be pulling your clutch all the way in most of the time with this setup. Others want the clutch to engage with the slightest touch. It’s all up to the rider and what they prefer.
I like it somewhere in the middle, and that is how the machine comes from the factory. It works, that’s how it was made, so I’m good with it.
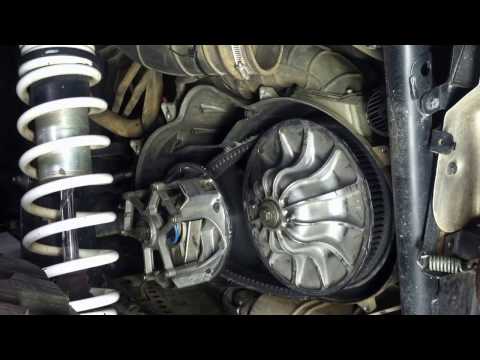
You probably don’t need to do anything special to your sprocket for pulling a wheelie. Most stock sport quads are fully capable of pulling up into a wheelie even in 4th or 5th gear.
However, if you want to you can change out the front and rear sprockets to different sizes. Usually known as ‘gearing up’ or ‘gearing down’. For the purpose of doing wheelies I would suggest gearing down. By installing a larger rear sprocket you are gearing down, which increases the final drive ratio.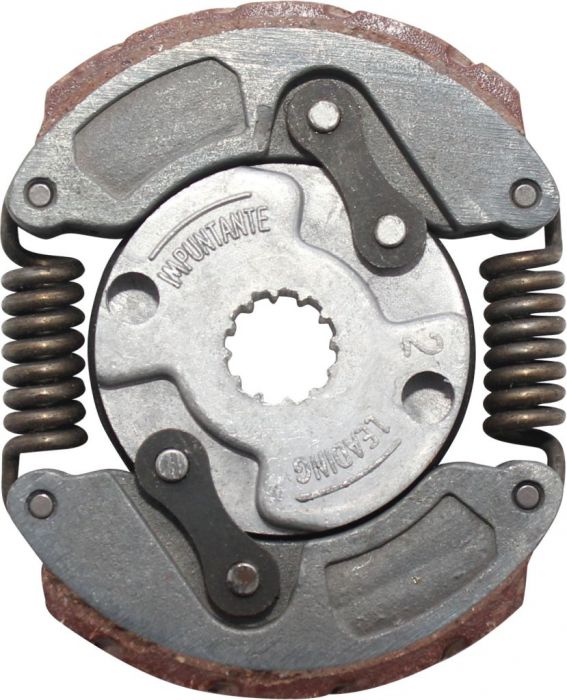
This will reduce top speed but increase acceleration, which what you want to be able to pull up into a wheelie.
If you don’t want to hassle with all of that, don’t worry. Like I said, you can get most any stock quad up into a wheelie without any modifications.
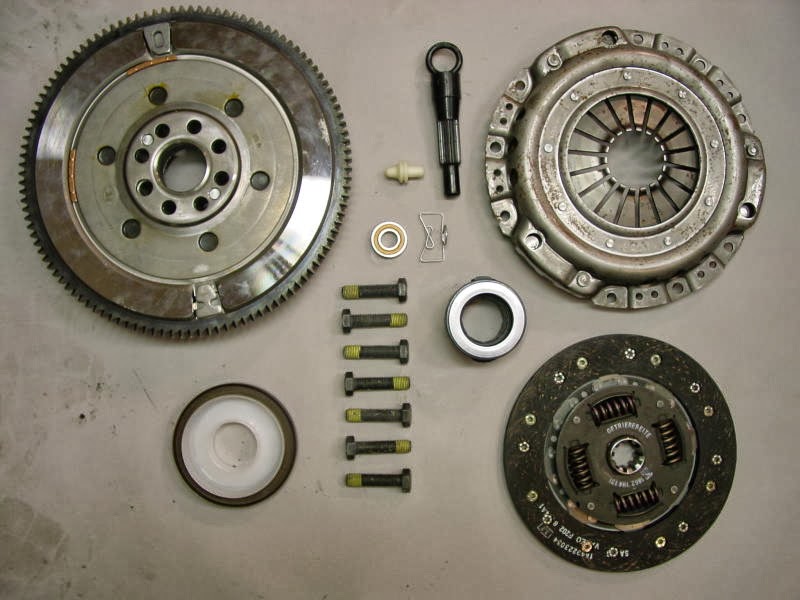
The important thing here is to make sure your chain is adjusted to factory specs. A loose chain will cause you to make changes in the way you use your throttle to get into a wheelie. And having a sloppy drivetrain can cause other issues as well.
If you change out your sprocket, it is a good idea to change the chain out with it. It is best practice to let your sprocket and chain wear together. There is no need to go out and buy a special chain just to do wheelies with.
A grab bar is sometimes called a wheelie bar, and it’s the bar on the quad right behind the seat. You’ve probably used it to pick the ATV tires up off the ground to move it to the side.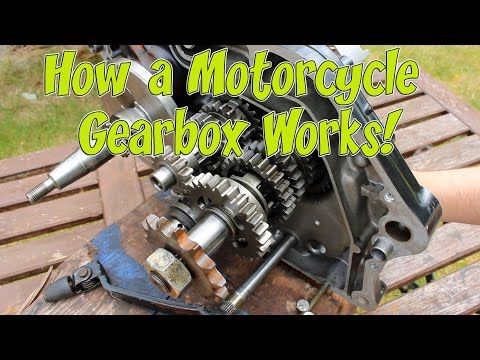 This is a fairly important piece to have if you plan on doing wheelies a lot. It will stop you from tipping your quad backwards onto yourself.
The idea behind this piece of equipment though is to have it but not need it. You should not consider your wheelie successful if you used the wheelie bar to stop you from getting hurt.
The only thing to do is to check it for cracks and bends. If your wheelie bar is damaged I would consider getting a new one. If you don’t have a wheelie bar, consider getting one, or be really careful.
You can find a grab bar for almost any quad at a reasonable price on Amazon, here is a link to get your search started.
You really don’t need any special modifications to your quad to do a nice wheelie. You could try some of the things I mentioned above if you’re having a hard time, but everything is just optional. Some people prefer different handle bars for added security and better control.
For doing wheelies getting an aftermarket pipe might be something to consider. You will get more low end torque which will help you when trying to lift into a wheelie. This is more helpful on lower powered quads like a 200cc. The higher powered quads won’t need the added benefit of an aftermarket exhaust.
The way you position yourself on the quad makes a big difference in how you do a wheelie. You should keep in mind the different body positions for what type of wheelie you are trying to perform. A few options are the sit down, stand up, split, and seat standing.
This is the most common type of wheelie, and the one most people try to do first. It seems easier because all the controls are easily accessible and you feel comfortable riding in this position. But I don’t recommend this position for beginners.

For beginners just doing a quick pull the front up and set back down wheelie this is good. It is a good way to get a feel for the machine, but I don’t recommend trying to ride a wheelie this way if you’re just starting out.
If you go too far back in the wheelie the quad can tip over backwards, and this is one of the hardest positions to hop off the machine in.
This is how I like to pull up into a wheelie. I spend a lot of my time riding in the standing position anyways, unless I’m going for long distance rides. I like having a clear view of whats ahead of me a better understanding of how high the front end is in a wheelie.
Start in a standing position with your hands on the controls and feet on the foot pegs.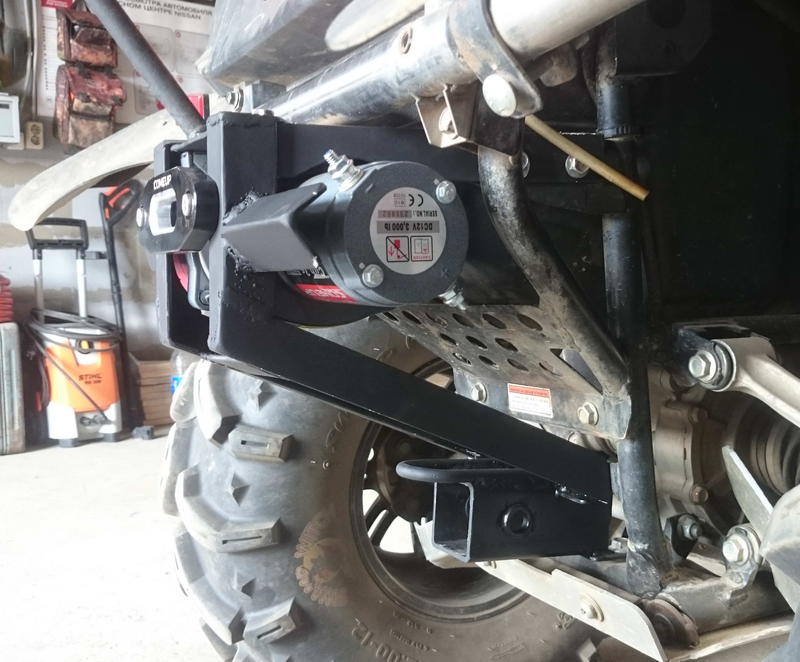 The controls, like the brake and clutch, can be a bit harder to reach, so you might get tired more easily in this position. Your legs will get tired faster while standing also.
If you tip too far backwards, it is easier to hop off in this position so I think it is safe for beginners. You also have more leverage to pull up with to get into a wheelie.
You would want a grab bar for this position. Stand with your right leg on the right foot peg, your hands on the controls, and your left foot on the grab bar. You could do something similar with your left knee on the seat. This is basically the standing position except with your left foot back on the grab bar.
Jumping off in case of an accident is easy in this position, so I would say it’s safe for beginners to try. The gear shift can’t be used in this position so it’s not really good for long riding wheelies. But, for getting a feel for the quad and short or slow wheelies this is fine.
Be careful of your foot on the grab bar catching the ground when you wheelie. It can be dangerous and cause injury if your foot hits the ground and you get pulled off the machine. You can protect yourself by instantly lifting your foot off the grab bar, putting all your weight on the leg using the foot peg, if anything bad does happen.
In this position you are standing with both feet on the seat or grab bar with your hands on the controls. You will have no control over the rear brake or the gear shift so this position is definitely not good for longer wheelies. Stick to short pop-up wheelies with this one.
Although you won’t have access to your rear brake, it is as simple as hoping backwards and letting go to get off the quad in this position. I think it is safe for beginners to try, and you will see success quicker because of how easy it is to pull up the front into a wheelie.
Again, be careful that your feet on the grab bar don’t catch on the ground if you pull too far back into a wheelie. You can protect yourself by immediately getting your knees on the seat and getting your feet off the grab bar if anything bad does happen.
Once you find a position that works for you, you need to turn your focus to balancing your quad and your throttle control. Knowing how to use the throttle and finding the balance point will not only help you get into a wheelie, but will help you ride the wheelie longer. The balancing point is when you’ve pulled up into a wheelie and no longer need to accelerate anymore to keep the front end up.
Some people like to chop the throttle by quickly giving gas and backing off repeatedly. The idea there is that the machine will be given just the right amount of gas to sustain a wheelie.
I haven’t found that to be the case. In fact what I’ve noticed works best is to just use the throttle as smoothly as you can. I will give it a good amount of throttle to get the front end off the ground, and when I get to that perfect balancing point, I smoothly adjust the throttle down so I can hold the quad steady.
The balancing point will be different depending on your riding position because of your body weight. Speed and incline also play a role in where the balancing point is. If you are going slow, the balancing point will be higher up than if you were going faster.
At first, be ready to use your rear brake to bring the front end back down in case you pull up too much, at least until you learn where your balancing point is. It really is something you have to find on your own through practice and experience.
The most important aspect of getting the front end up is speed. I don’t mean you need to be going fast to do it, I mean you need to get the front up quickly and smoothly. If you try to slowly bring the front up, you will end up needing to accelerate more than you wanted to.
Getting the front up will be easier depending on the quad, a sport quad for example, will be the easiest. You may have to hit the throttle harder or pull up on the handle bars more on smaller or utility machines, but it can be done.
You will be using the ATV’s engine power and the power of you pulling on the handle bars to lift the front end. Think of it as something like a brute force method. This is the most common method I use, and it’s pretty easy. It’s not all brute force, it takes a bit of timing, but it’s the easiest to master right away.
Just before you hit the power band and get that burst of power, let off the throttle slightly and then hammer it wide open while pulling up on the handle bars. You should be pulling up on the handle bars just as you get that burst of power from the engine. To help you out, you could pull your body weight back to add to the lift from pulling on the handle bars.
This will take some time to get used to. Every machine is different and every rider is different. Take it easy at first and be careful not to over do it by tipping the quad over backwards. Experiment a little before going full throttle and ripping the handle bars off the machine.
Using this method you will use the clutch to help you pull the front up more quickly and smoothly. Mastering this method will also allow you to more consistently get into a wheelie every time. This is usually done by more advanced riders. I really only use the clutching method when I’m at a dead stop, that way I can get into a slow moving wheelie if I want to.
The benefit of the clutch is the rear tires going from no power with the clutch pulled in, to having a burst of power sent to the wheels immediately. It helps get the front end up quickly even at low speeds, and if you do it enough, it becomes second nature.
I don’t recommend doing this method to beginners, get good at the traditional power method first.
This is the easy part, all you’re doing here is exiting the wheelie. I would recommend a few pointers to help make the transition softer on you and your quad though.
You want to make sure your wheels are straight when your front tires touch back down. If your tires aren’t straight it could jolt the quad sending you in a direction you don’t want to go, or worse, you could lose you grip and end up in a dangerous situation.
Sometimes there isn’t much time to plan and think about exiting the wheelie. If you forget everything else, just remember, wheels straight and hold on.
Shifting is the same in a wheelie as it is normally. Smooth transitions from one gear to the next using the clutch. You shouldn’t have to switch gears anyways. Once your in the wheelie, maintain throttle control and balance to keep riding the wheelie. If you want to accelerate while in a wheelie though, you will need to switch gears.
I don’t recommend switching gears and accelerating your wheelie for beginners. Get good at balance and keeping your wheelie at the same speed first. Then move onto accelerating wheelies if you want to.
To do an accelerating wheelie, get the front end up like we talked about above. But this time keep the front end low, like near the lower end of the balancing point. This is helpful because for the next part you need to accelerate up to just before your quad needs to shift.
Right before you need to shift get your quad higher, a little passed the balancing point. Doing that will give you enough time to make the shift without your ATV’s front end coming down out of the wheelie. Release the clutch smoothly while giving a little throttle to keep the machine up in a wheelie.
The main thing to focus on here is smooth deliberate transitions. You shouldn’t feel rushed, and you should have a feel for the quad throughout the process. That will help you compensate after the shift to keep your front end in the air. I typically stay in the same gear when I pull a wheelie. It’s a lot less to worry about and more fun I think.
You should never need to use your rear brake to keep yourself up in a wheelie. It is good to know when to use the brake though. I would say other than finding the balance point and throttle control, the rear brake is the most important thing for pulling off a wheelie. If you don’t properly use your rear brake when you need to, you could end up damaging yourself, or worse, your machine.
The problem here isn’t how you use the rear brake, you would use it just like you would on the ground. The trouble is remembering to use it at all. A lot of people panic if they pull up to high into a wheelie.
You want to keep your foot ready to hit the brake before your grab bar hits the ground. If you have to bail off the ATV to save yourself that’s a different story. But most of the time, hitting the brake instead could have saved you the hassle.
To practice using the rear brake, you could keep popping up into little wheelies and use the brake to come back down just to get used to it. I did this when I first started learning and it helped me remember to keep my foot ready to brake.
Using slight pressure on the brake can help you stay in that perfect balancing point to ride out long wheelies too. If you start to feel like you are tipping past the balancing point, apply a little pressure to the rear brake to bring you back. After a while, you will learn to use the throttle and brake together to keep you up in a wheelie longer.
You got up in a wheelie, great! But now how do you turn? Even though the front tires are up in the air, it is possible to still steer your quad. It’s not all that difficult either really. I talked a little about this in the tire pressure section above.
You will use your body weight to steer the quad. By leaning your body weight to the left or right of the machine you can get your quad to move in that direction. You have to anticipate when and where you will want to turn because the quad doesn’t usually turn immediately after you lean. Start your lean a little before you actually want to start turning.
If you want to, you can still turn the handle bars to help you steer. I’ve had people tell me it works like the rudder of a boat, but I doubt it works that way. The main benefit in using the handle bars is to help you lean. You still need to lean to turn, but using the handle bars may help you lean off to the side a little more.
Alright, now that you’ve got all the steps we can put them together to pull off a wheelie. After you’ve decided what body position you want to be in, you need to know what gear you want to pull up in. When I first learned, I used 2nd gear. For me it was easier to find the power band, and in 1st gear the balancing point was higher so it made me nervous. The higher gear you’re in, the faster your going, the lower the balancing point will be. Find a gear and speed you will be comfortable with.
Now, let off the throttle and punch it right away while pulling up on the handle bars. This will lift the front end up. Remember, keep your foot ready to hit the rear brake just in case. Now that the front tires are up, you want to get to the balancing point as soon as you can. Stay on the throttle until you reach that point. This is the hard part, getting into the balance point will be the hardest part of a wheelie for beginners.
Slowly ease off the throttle as you approach the balance point. I can typically stay in the balancing position using only a quarter to half of the throttle. Once you’re in this position it’s all about staying there. Keep in the balancing position by using the throttle and your body weight to make adjustments. For me, this was the funnest part about doing wheelies. Once I could get into a balance, I loved to see how long I could stay there.
When you’re done with your wheelie, it’s time to lower the front end back down. Keep your handle bars straight and slowly let off the throttle. When your tires are a couple feet from hitting the ground, give the quad some throttle to make an easy smooth landing.
You aren’t going to read this and all of a sudden be able to pull off amazing wheelies for miles. This stuff takes practice and patience. For some people it can be hard at first, just take it slow and over time you will see improvements. When you start to see improvements, it can be addicting.
Doing tricks like this on an ATV can be dangerous. I always recommend you wear proper safety gear when trying things like this on your ATV. A helmet and goggles, gloves, boots, long pants, and a chest piece are all recommended.
For the best safety gear check out the recommended gear section of this site. Better safe than sorry.
If things go south on you and you think you need to hop off the machine, do it. It’s best to never get into that situation in the first place though. Get a feel for your quad first, and don’t try anything that is above your abilities. Learn the right way, and you will be pulling wheelies in no time.
Sharing is caring!
 03.2020
 To turn it over or fall from it, it , on a steep slope or when making a sharp turn. Due to the high center of gravity, small width and short wheelbase, the equipment easily stands on 2 wheels. At the same time, a fall, even at low speed, threatens with fractures. Therefore, after buying an ATV, you need to familiarize yourself with the basics of control.
To start an electric start engine, turn the ignition key to the ON position, press the brake and press the green electric start button for no longer than 5 seconds.
ATVs usually shift automatically—the shift lever is used to shift up, down, neutral, reverse, and select park mode.
To start or increase speed, you need to press the thumb of your right hand on the throttle. The gearbox must be in the “H” or “L” position. The middle finger of the right hand rests on the front brake lever while driving, and the middle and index fingers of the left hand rest on the rear brake lever.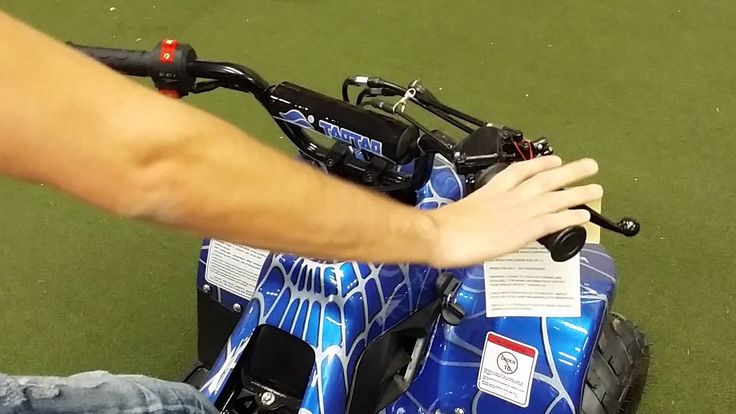
Also on the steering wheel there are buttons for turning on the four-wheel drive and locking the differential. Four-wheel drive will be needed when driving off-road, slippery roads, transporting goods and towing. A differential lock is needed so that the wheels of the ATV spin synchronously - for example, it will help to drive out if one of the wheels is stuck in the mud, and the second remains on a stable surface. When the lock is off, in such a situation, only the wheel that is stuck will spin.
Whether it is possible to turn on the four-wheel drive and blocking on the go and at what speed - should be indicated in the instruction manual. At the same time, regardless of the model of the ATV, the lock cannot be turned on after a jam, since the differential gears must engage without load.
1 - ignition key. 2 - starter button. 3 - light switch. 4 - signal.
1 - throttle lever. 2 - switch 2WD / 4WD. 4 - fuse.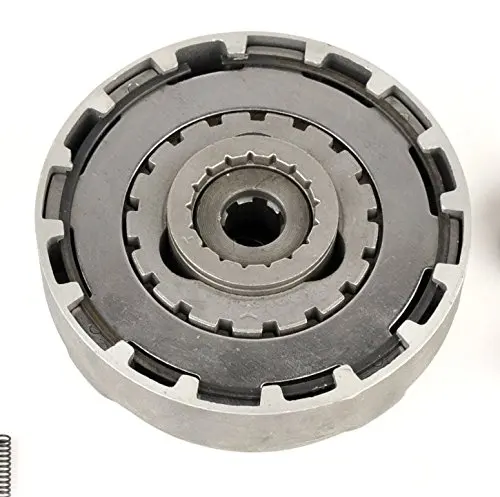
1 - throttle lever. 3 - 4WD / LOCK differential lock switch. 4 - fuse.
Standing up makes it easier to avoid the ATV tipping over by shifting your body weight. There are 3 main racks:
The worst stance is when the back is tense, the person leans on his hands, and his legs are straight. In this case, the body does not absorb shocks and shocks, and the bones, intervertebral discs and joints experience a strong load.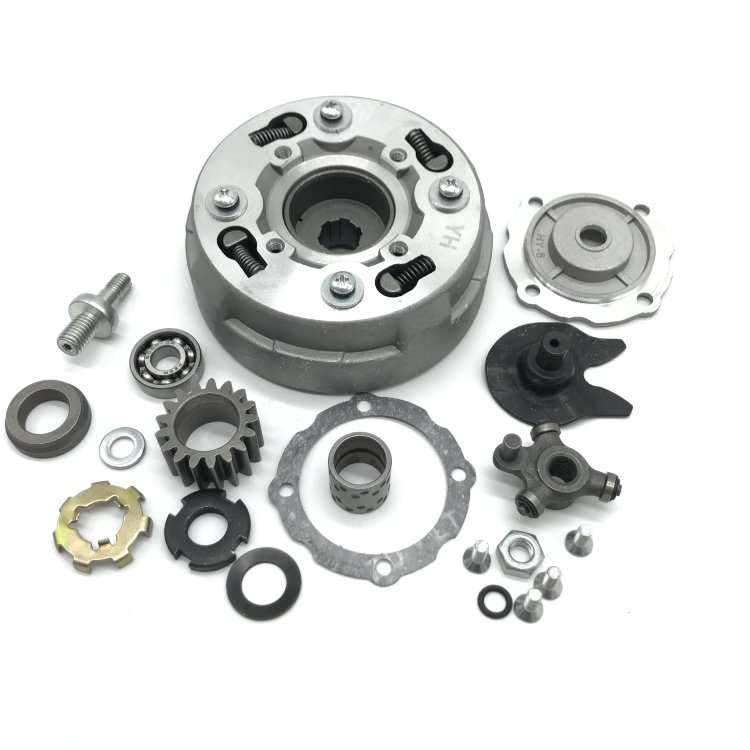 In addition, control over technique worsens and fatigue increases.
middle rack
A-pillar
rear pillar
Climbing involves shifting into low gear, landing in the front strut and moving at medium engine speeds. It is impossible to sharply press the gas when driving up a slope or mountain - there is a risk of rolling over.
When stopping in the middle of a hill, start carefully, as a sudden start will be followed by tipping over. If the ATV rolls backwards, you need to press the front brake lever, and after stopping, turn off the engine, put the equipment on the handbrake, turn around manually, slide down and try again.
To descend, you need to take the rear rack and shift into a lower gear. In order not to roll over, brake should be simultaneously front and rear brakes. To avoid skidding, you can not change the trajectory of movement and speed abruptly, as well as brake too hard. It is better not to touch the gas lever when descending.
To drive downhill, shift into low gear and shift your body weight towards the top. Don't hit the gas hard and don't brake hard. You can also fall when making a sharp turn. If the slope is steep and the ground on it is slippery, it is better not to risk it.
To enter a tight turn, lean on the outside footrest and tilt your upper body inward. On slippery surfaces, shifting forward will improve handling, and shifting back will improve the grip of the drive wheels with the road.
Before driving into deep mud, you need to make sure that there are no logs, large stones and other obstacles in it, and the soil is not marshy. You should drive smoothly, without sharp pressure on the gas lever.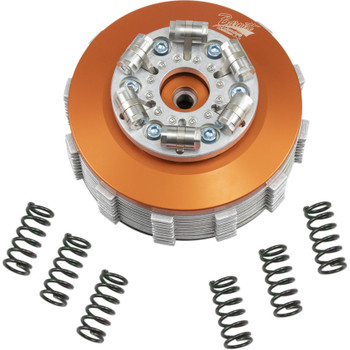 At a slow speed, high engine speeds should not be allowed - the wheels will begin to slip and dig deeper. If the ATV has sunk deep into the mud, after releasing it, you need to dry the brakes with a few clicks on the levers.
To estimate the trajectory of the ATV in advance, you need to look into the distance and not fix your eyes on any one object.
It is not necessary to drive into steep mountains and hills unless absolutely necessary, because if you lack experience, you can, for example, press the gas too hard or allow the engine to stop - both errors lead to a rollover.
ATV requires special equipment. It will protect against getting wet, hypothermia, wind and dirt, and will also reduce the risk of injury after a fall or collision.
Did you check the depth of a ford or puddle? Didn't notice the water under the duckweed and mud? Or simply did not notice a puddle on an unfamiliar road at high speed?
If you find yourself in such a situation, and the ATV stalled in the water - in most cases this does not threaten the complete death of the equipment: after all, it was equipped with protection, including from moisture. The main thing in such a situation is to act as soon as possible.
Rule of thumb: don't try to start an ATV that has stalled in water. If the engine is still running, but you have sunk down the snorkels or the air filter inlet and are not moving, it is best to turn off the engine.
If there is a winch, and the battery is alive, we cling to the tree with a cable and try to drag it. If there is no winch, or it does not work, or there is nothing to catch on, we drag the ATV with other equipment.
If there is no other equipment, you will have to cope with your bare hands. If the bottom is firm and even, you can roll out the equipment, even just pushing it (it’s unlikely to be alone, but it’s already more real for two or three), or dragging it by a tied cable.
If you cannot cope on your own, you will have to call for help. Sometimes for this you even have to leave the ATV for some time in the water - for example, if you drowned in the forest, without a phone, and you only have to walk to the nearest track. In this case, do not forget the place of flooding. It can be marked by hanging some bright rag on the nearest tree
 Then we turn off the engine, and turn it on again for a few seconds. You can repeat 2-3 times.
If the ATV did not dive deep, and even more so if it did not stall itself, but you drowned it in the water, after the above actions, you can try to start. If the engine starts, you must leave it to idle, and after 1-2 minutes turn it off and check the purity of the oil.
If clean oil is drained, everything is super: you can go home. If the emulsion of the color of condensed milk drains, it is necessary to repeat the washing 2-4 more times.
Even if, after first aid on the spot, the ATV started up and drove off, you need to get to a place where more serious work can be done.
The sequence is:
 If necessary, change or clean.
 This list can take a whole day to complete. If there is no time to recover, you do not succeed, or if the damage is more serious, it is better not to try to cope on your own, but to take the ATV to a service center.
What are ATVs and what are they How to properly transport an ATV