Published on November 2nd 2015
Share:
Find out how to change a bike tire! Click here to subscribe to GCN: http://gcn.eu/SubscribeToGCN Changing a bike tyre is one of the things that all cyclists should know how to do. It's certainly a job that warrants learning. Depending on your wheel, you may need a 15mm wrench to remove it. Once you've done this, you can move on to the tyre itself. Start by using one or two tyre levers, if the tyre is really tight, though, you may need to use a third one. As well as the tyre levers, you'll also need a pump, the tyre that you're changing too, and possibly a new inner tube. Are there any other mechanical jobs that you're struggling with? Let us know down in the comments and we'll see what we can do! Watch more on GCN: How to remove your rear wheel: http://gcn.eu/1HYOFqS How to replace a chain: http://gcn.eu/1kmqSsd All of our maintenance videos: http://gcn.eu/maintmon Buy GCN cycling kit - USA: http://gcn.eu/GCNkitUSA Rest of World: http://gcn.eu/gcncyclingkit Get GCN T-Shirts and hoodies: http://gcn.eu/buy_GCN_stuff Music Erwin Steijlen - Super Sunny Day (Instrumental) Pause - Put Me In The Game (Instrumental) Photos: © Bettiniphoto / http://www.bettiniphoto.net/ & ©Tim De Waele / http://www.tdwsport.com About GCN: The Global Cycling Network puts you in the centre of the action: from the iconic climbs of Alpe D’Huez and Mont Ventoux to the cobbles of Flanders, everywhere there is road or pavé, world-class racing and pro riders, we will be there bringing you action, analysis and unparalleled access every week, every month, and every year. We show you how to be a better cyclist with our bike maintenance videos, tips for improving your cycling, cycling top tens, and not forgetting the weekly GCN Show. Join us on YouTube’s biggest and best cycling channel to get closer to the action and improve your riding! Welcome to the Global Cycling Network | Inside cycling Thanks to our sponsors: Santini cycling kit: http://gcn.
eu/BuyGCNKitYT Kask helmets: http://gcn.eu/1FrbcHK fi’zi:k shoes and saddles: http://gcn.eu/1tsXI7S and http://gcn.eu/1KxBGd5 Garmin: http://gcn.eu/1GtylOY SCOTT bikes: http://gcn.eu/1Btx0Bj Ridley bikes: http://gcn.eu/1EDbfPy Topeak tools: http://gcn.eu/1Lc4HAj Canyon bikes: http://gcn.eu/1Oge4gz Muc-Off: http://gcn.eu/1XlT5Og Science in Sport: http://gcn.eu/1GrXo6n Ass Savers: http://gcn.eu/1XlTmkm Reynolds: http://gcn.eu/1JjCDVL YouTube Channel - http://gcn.eu/gcnYT Facebook - http://gcn.eu/gcnFb Google+ - http://gcn.eu/gcnGPlus Twitter - http://gcn.eu/gcnTW Leave us a comment below! Music - licensed by Cue Songs
Get the latest, most entertaining and best informed news, reviews, challenges, insights, analysis, competitions and offers - straight to your inbox
Email address
By Jim Langley
Here are four reasons why it’s good to be able to fix flat tires fast on your road bike: 1) so you don’t cool off too much and have to warm up again; 2) so your riding buddies don’t have to wait too long for you; 3) so you don’t freeze or overheat in extreme weather; and 4) so that you have a chance to chase back onto that fast group ride or event where they don’t wait when you flat.
But none of these reasons is why I learned to fix flats at warp speed. Bruce Anderson, the owner and head mechanic at Andy’s Cycle Shop in Keene, New Hampshire, taught me. I went to work there in 1973, and my first job was fixing flats. Bruce wanted it done right and done fast so that customers wouldn’t have to wait to ride. So, he would egg rookies like me on with taunts and insults, motivating us to get as fast as he was.
I wanted to give Bruce a shout out because this summer I visited our old shop and found him, at 75 years young, still running the place almost single-handedly with the same energy and passion he had back when Nixon was in the White House. He told me he still loves the bike biz and he’ll retire when he turns 85!
The process Bruce taught me and that I have used ever since is fast because it’s simple. It also avoids the most common problems caused by other techniques.
First, a few disclaimers. I’m focusing on how to fix a flat fast, so I’m assuming you already know that you need a spare tube and a good pump that inflates fast (I carry a full-size framefit pump, not a mini), and that you know how to remove and install your rear wheel. I’m also figuring that you have Presta valves (not Schrader — the same type found on car tires).
Further, I assume you know that if you don’t remove any sharp object(s) in the tire before you install the new tube, that you’ll likely have a second puncture down the road.
Tip: But I want to point out that you may be willing to take a chance. Let’s say you’re doing a century and you’ve found a fast group riding at the perfect pace for you to achieve your target time. Suddenly you flat and have to stop.
In this situation, you might be willing to not spend much time trying to find and remove what caused the flat. And you could get lucky and have the piece of glass or sharp rock fall out as you remove and replace the tire. Or, just removing/reinstalling the tire/tube might change the angle of the object against the tube, letting you finish the ride without another puncture. Obviously, it’s always best to know that you removed the tube popper, but for sheer speed you may sometimes want to skip that step and hope luck is on your side.
There are only a few tricks to know, but they make a big difference. In the order used, here they are:
1. With the majority of standard clincher tube-type tires, you don’t need tire levers to remove tires. You can do it with your hands and it’s a lot quicker to “rip” the tire and tube off in one move than it is to pry the tire off little by little with levers.
Tip: Taking the tire and tube completely off the rim is faster than removing one side and pulling out the tube. But more importantly, it gets the tire off the rim, where it’s much easier to see/find any sharp object in it and knock it out, and it also makes it easy to see and check that the rim strip is still covering the sharp holes in the rim, another flat-causer.
Trick: When the tire is fully inflated, it’s essentially locked onto the rim. To get it off by hand, you must: 1) get all the air out of the tube; 2) push the Presta valve up inside the tire; and, 3) squeeze the sides of the tire together to get the tire edges (called the “beads”) off their locked position and down toward the middle of the rim.
With practice, you can do all of this in one “move” by pressing and holding the Presta valve with one hand, while you go around the tire and wheel with your other hand. The hand holding the valve keeps it open and also pushes it up inside the tire. The hand going around the wheel squeezes the tire forcefully to get any remaining air out and to pinch the beads together and off the rim sidewalls. You can do this whole move in a few seconds.
2. Next, remove the tire and tube as one by holding the wheel vertically with the valve stem at about 6 o’clock. Place both hands together side-by-side at the top of the tire so that you can squeeze the tire with your fingers there and roll it back.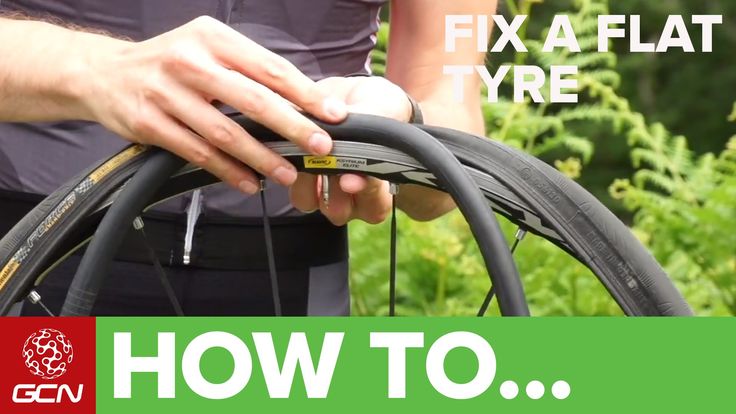
The object is to get both thumbs beneath the side of the tire (the sidewalls, not the beads) so that you can pry with your thumbs to pull the tire up. Doing this gives you a lot of surface area to hold onto and lets you force the bottom of the tire into the rim so that you have a bit of slack at the top where your thumbs are.
When you’ve pulled the tire as far as it wants to go, continue holding the tire with your thumbs so that it can’t slip back where it was, and push it over the opposite side of the rim. Don’t be gentle. Show that tire who’s the boss. You can do it!
Tip: The weight of the hanging wheel helps you keep the tire in place on the bottom and lift it up over the rim on the top. If it seems too tight still, keep your dominant hand/thumb in place up top, and use your other hand to go back and squeeze and wiggle the tire at the bottom, and as you do this shake the wheel using its weight to force the tire to relax and drop into the rim.
To remove tighter tires, it helps to put the wheel on the ground so you have something to push against.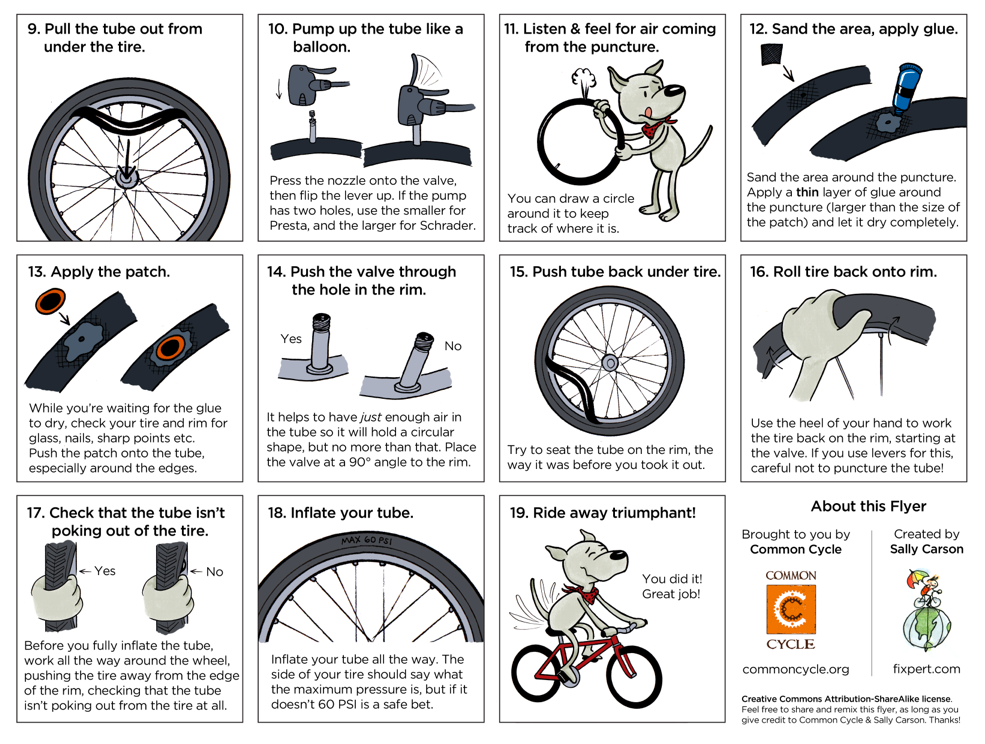 Just keep pushing and the tire and tube will come right off the rim and you can then pull if needed to remove it from the wheel completely. If only one side comes off, reach inside and pull the tube out partially, which helps free the other side of the tire.
3. If the tube is still in place, now pull the flat tube out of the removed tire and stuff the tube in your jersey pocket. Get your spare tube out, remove any valve cap and nut and put them in your jersey pocket with the ones you might have already removed from the old tube (no caps or nuts are needed to fix flats fast).
Trick: Then, perhaps the most important step, is to inflate the new tube just enough to make it round and remove any wrinkles. Do this by opening the Presta valve tip, pressing it down if it’s stuck and blowing into it with your mouth as if you were blowing up birthday balloons. But — and this is the part of this step many people don’t get right — be sure to tighten the valve tip after you’ve blown air into the tube so that none of the air you just blew in can escape during tire installation! The tube has to be inflated and round for fast tire and tube installation.
Tip: If you don’t do this and the air gets out during installation, the tube becomes flat and has a tendency to slip beneath the tire beads. That makes it much more difficult to install the tire and can also cause the tire to get blown off the rim when fully inflated and/or cause a pinch flat.
4. To put the tire back on, take the new tube that you just put air in and put it inside the tire. The aired tube has shape so it will want to stay inside the tire. Pick up the tire/tube combo, holding it up vertically near the valve stem, stand the wheel vertically, leaning it against your shins with the valve stem hole at 12 o’clock.
Tip: Place the valve stem in the valve hole in the rim. Do not force the valve stem fully into the valve hole. Just get it in place and started into the hole. If it’s pushed/pulled down at this point it will interfere with getting the tire in place.
Now quickly move your hands from the top of the wheel down and around the wheel in opposite directions, pushing down on the tire and manipulating it to get the side of the tire that’s on the bottom onto the rim. You may need to lift the wheel off the ground to get the portion of tire at 6 o’clock on the rim.
To finish the job, go back to 12 o’clock, push the other side of the tire onto the rim there and then repeat the process of moving your hands down, pushing and popping the other side of the tire onto the rim. With a little practice you can put both tire sides on in one move instead of doing it in two moves.
Trick: Almost always, about a 6-inch section at the top fights you and doesn’t want to pop over the side of the rim. To create a little slack, use the same tire pulling-and-squeezing technique you used to get it off, and then let all the air out of the tube that you blew into it.
If it’s still tight, pick the wheel up while holding your hands near the tight section you still need to pop on. Kneel or bend over and rest the wheel on your thigh/knee so that the tight section is right on top of your knee. Now, you have something solid to push against and with the heel of your hand (not your thumbs), you can push the tire onto the rim and finish the job.
Tip: Don’t try to push the entire tight section on in one push. Instead focus on getting an inch on at a time and with a few pushes, it’ll pop back on. Again, show that tire who’s in charge!
5. All that’s left is to inflate the tire, install the wheel and hit the road. Good job! Keep in mind that you don’t need full inflation to ride, even if you’re in a race, so you can save a bit more time by just getting the tire hard enough to ride rather than trying to top it off fully.
Bicycle tires provide contact with the ground. It is impossible to overestimate the influence of tires on the movement of a bicycle. Tires transmit pedaling force, participate in braking, and keep the bike on the track.
Tire changes and even a simple change in pressure change the behavior of the bike dramatically. If you want to change the behavior of the bike or adjust to the planned route, it is almost always enough to change tires.
Tires are consumable and need to be replaced regularly. Parallel use of tires of different types is possible. Because of this, I got a lot of experience using a variety of tires on 700c wheels (622 rims). From the narrowest clinchers - 28x700s, to wide tires for difficult conditions.
Naturally, for other wheel diameters, everything written is also relevant.
At first glance, a simple product has many parameters and nuances. The image shows the basic elements of a bicycle tire.
Bicycle tire elementsMain parameters influencing tire behavior:
An important general indicator is tire weight. The wheel spins fast, it needs to be constantly spun. Wheel weight is a key factor influencing the driving dynamics of a bicycle. The weight of the tire makes a significant contribution to the weight of the wheel.
Most tire parameters have a formal description. For example, the carcass properties of a tire are described by the TPI/EPI parameters, carcass density.
For a general understanding of the situation with tires, the recess in the details is redundant. You can easily find information on the Internet.
Touring is a traditional type of bike for traveling on all types of roads. Tourings have existed for about 50 years, in their modern form for about 30 years, from the beginning of 90s. Traditionally, a 700c rim has been used with 28-35 tires, sometimes a little wider, on a complete bike. The frame and fork usually allow you to put rubber up to 42-47mm.
When I bought my first Touring in 1998 I was looking for 32-35mm tires. There were no special options and I got a Trek 520 with a 28mm clincher. I planned to immediately change the tires, but due to economic realities and the banal impossibility of buying an interesting version of the tire, I did not succeed.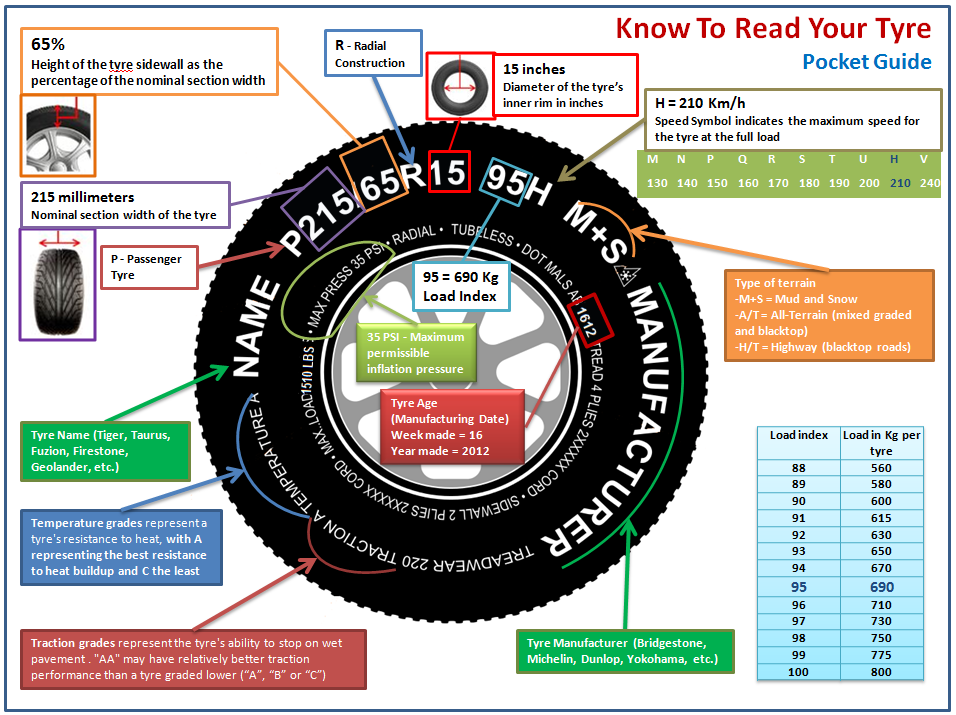 Having driven narrow clinchers, I realized that this is a very good tire option. When they wore out, I switched to 32-37 mm rubber. The reason was banal - I rode a lot of MTBs with people and clinchers often created problems. But I always remember them with pleasure.
The second type of bike that has served as the basis for gravel is the cyclocross bike. Cyclocross is a sport, the participants' bikes are regulated by the UCI standards. The maximum tire width according to the standard is 33mm, in practice tires up to 37mm are used.
Mountain bikes, which also gave a lot to gravel, traditionally use wide tires from 1.8-2.0″ (45-50mm).
Accordingly, tires with a width of 40-42mm have become an unspoken standard for gravels.
The gravel trend also influenced the touring, they also began to use wider tires. In my opinion, this is a tribute to fashion, and not a conscious choice.
There are two manufacturers' approaches to fitting bicycles with tires:
 In the case of touring and gravels, we are usually talking about smooth tires - slicks.
 Stock Shulz Wanderer Tires - Compass W3113 Saturn Ring, 700×42C, Kevlar cord. These are universal all-terrain tires. Their versatility is amazing. Their main niche is gravel roads. If you want to ride them on the path or on the asphalt, then they immediately become suboptimal. With few purely gravel trails and Shulz positioning the Wanderer as a commuter, tire choice is questionable.
Tire width - 42 mm is also standard for gravel, in fact the tire width is closer to 45 mm.
In the world of cycling in recent years there has been a massive rejection of narrow tires. From clinchers or pipes 20-23-25x700c they switched to 28x700c rubber, in some cases wider. It has been proven that such rubber is more rolling and copes better with surface problems.
Developers Shulz and not only, by all indications, believe that this approach applies to all types of rubber. As a result, all-terrain bikes are equipped with 42mm wide tires.
I, like many experts, do not think so, in my opinion, narrower tires are optimal. Which one depends on the type of riding you do. If you are road oriented and want to have a light bike ride, in my opinion, tires no wider than 37mm are optimal.
You can read a discussion of the comparison and optimality of bicycle tires of different thicknesses, for example, in the discussion of this material in VKontakte.
Strange things are compared in the discussion - for example, the behavior of tires of different thicknesses inflated in the same way. The meaning of such comparisons is incomprehensible, they put narrower tires in order to pump them tighter.
Or this is the opinion of the creator of Shulz:
« Denis, my idea is that as long as you don't sit in an aggressive position and don't wear tight clothes, you can drive equally fast on roads and 23, and on 55 tires. At the same time, at 55 you will be more comfortable, which means you will drive more.
As I wrote above, tires should be soft and not pumped over. «
It is not clear what arguments can be here. Narrow tires weigh drastically less, this alone changes the feeling of the ride.
As an example, the characteristic GNC gravel tire test. Both tread types and tire widths are compared.
WTB Gravel Tires
WTB Byway 40x700c, WTB Riddler 37x700c, WTB Riddler 45x700c, WTB Resolute 42x700c.
GNC testing confirms my feelings.
To get away from WTB products, review the 11 best gravel tires.
Best Gravel Bike Tires 2022: Fast and grippy gravel tires (Bikeradar.com in English)
And one more video comparing tires of different thicknesses.
Current tires are not suitable for my riding style. I plan to switch to Continental Contact Travel 37×622. These are classic "tourist" tires available in three sizes (different thicknesses):
In Russia they are not very popular, we have Schwalbe Marathon in this class. I tend to use the narrowest 37mm tires in the range. Tires behave well in different conditions, problems can only arise on sandy soils and some wet surfaces.
Tires Continental Contact Travel 42×622 Tires are available for any style of riding, including aggressive in difficult conditions. The photo uses aggressive bicycle tires Continental Race King Wire, 50-622 (29×2.00).
Photo courtesy of Evgeny Alexandrov, Volgograd
Choose from bike tires available in your area. A huge range of tires of different types and classes is offered.
On GRAVELO in a review article about wheelset, I reviewed the main types of tires. In the case of gravels, it is a matter of choosing between several basic tire types.
Personal experience with only two different tires will greatly expand your understanding of the topic of choice. Usually it is enough to drive a few tens of kilometers or even less.
Initially try your stock tires with different pressures. Each tire has a maximum pressure for which they are designed. It is indicated on the tire, in the case of the Compass W3113 Saturn Ring it is 4.5 atm. Pump up to the maximum and ride on a hard surface, then lower it.
You can read about other elements of the wheel in the material
The bicycle wheel is its most important element
The theory of the issue of choosing a wheel set is described on GRAVELO
Wheels (wheelset) of gravel and touring
If you want to immerse yourself in the theme of tires as much as possible, then the best place for this resource testing all kinds of bicycle covers since 2014:
BICLE ROLLING Resistance
Preliminary 0.9991 dated 08/28/2022, Published 09.06.2022 9000 9000 9000 9000 9000 9000 tests, what else to read
All practical texts
Shulz 2023 – bikes have arrived, expected in autumn and spring, prices
Choosing the right bike
Outleap, Shulz, Format, Rush Hour - the choice of the Russian bike
Schulz (Shulz) - bicycles for travel and tourism
Schulz bicycle (Shulz) - development and production features
Shulz Wanderer 2020-2023 - positioning and reality
Frameset or complete bike - what to choose?
Chromium frames myths and reality on the example of Shulz and not only
Shulz Wanderer detailed specifications with illustrations
Bicycle dimensions - how to choose yours
Bicycle presale
Bicycle setup - fit and equipment
Adjusting the derailleurs
Brake adjustment
Bicycle wheel its most important element
Bicycle tires - range and the importance of choosing the right speeds
- Do I need a front derailleur, chainrings, cassetteBicycle cranks, Q-factor (Ku-factor) - an important selection parameter
Shulz bicycles - experience of selection, operation, alternatives
The author will be grateful for any comments, ideas and wishes. If you have any questions write, I will try to help. I can add some topic or give recommendations on choosing gravel, touring and other types of bikes. Contacts of the author.
You can also comment on any text, authorization is available through the social network profile (FB/VK).
GRAVELO never compares brands and bikes. The features of gravel and touring are described, only a person can choose and compare. My task is to identify possible alternatives - to orient in the types and classes of bicycles.
Bicycle manufacturers - which company to choose a bike
© 2021-2023 Denis GRAVELO
Photographs of bicycles from manufacturers' websites.
Together we become better!
Bobruiskagromash - a leading manufacturer of trailed agricultural machinery in the CIS
, our cars operate in more than 50 countries of the world
Bobruiskagromash offers a wide range of financial instruments
for Belarusian and foreign consumers
Learns the details of
9000 9000 9000types of machinery
Find out more
BOBRUISKAGROMASH produces more than 100 types of agricultural machinery
and we continue to expand the range
Learn more
News
Read all news
10. 03.2023 09:51:00
Discounts on round balers!
For residents of the Republic of Belarus, until the end of March 2023, seasonal discounts are established for round balers: for PRF-145M (with a roll diameter of 150 cm)...
03/10/2023 09:50:00
ATTENTION! Special price for USM-1 silo packer
It's time to get ready for harvest season! Hurry up to buy USM-1 silage and haylage mass packer with a 10% discount! Now for farmers...
03/10/2023
СРВ-8 – an effective solution for the preparation of high-quality feed and high productivity of cattle
How to get high milk yields? Due to proper, balanced nutrition, which directly affects the productivity of cows. Organization...
03/08/2023
Congratulation of the Minister of Industry Alexander Rogozhnik on Women's Day
Dear women! On behalf of all the men of the Ministry of Industry and myself personally, I congratulate you with great joy on a wonderful holiday - the Day of. ..
..
28.02.2023
We offer for rent
28.02.2023
KR-F-10-2 - all-season and universal solution for distribution of feed and transportation of various cargoes
What equipment is most valued by farmers? One that can: operate all year round; save time and effort to perform ...
Catalog of agricultural machinery
To date, the range of products is constantly expanding: machines for agricultural and general technical purposes are produced, as well as consumer goods
Forage equipment
Go to catalog
Balers
Go to catalog
Fertilizer application
Go to catalog
Tractor trailers
Go to catalog
Feed preparation and distribution equipment
Go to catalog
Tillage equipment
Go to catalog
View entire
catalogTop sellers
Liquid organic fertilizer spreader MZhT-F-11
Leave a request
Liquid organic fertilizer spreader MZHU-20
Leave a request
Tractor trailer 2PTS-4.