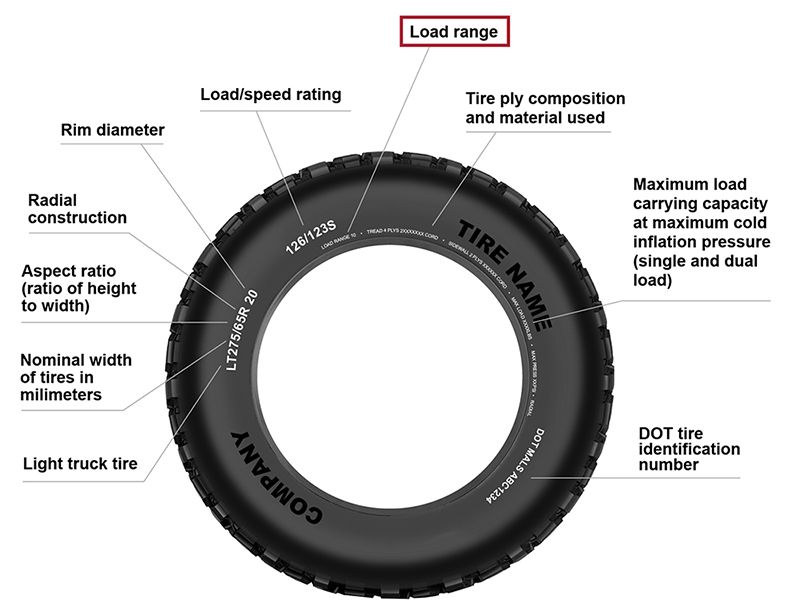
The starter solenoid turns an electric signal from the ignition key into a high voltage signal that activates the starter motor. If there is a problem with your starter solenoid, your ATV won’t start. While you can’t rule out replacing the starter solenoid, sometimes it’s not necessary and all it may need is a bit of troubleshooting.
Before you make any conclusions, it is important you rule out other problems such as battery issues. Fortunately, there are several tell-signs that something is wrong with the starter solenoid. These include:
This is the most common sign pointing to issues with the starter solenoid. If you engage the ignition process and your vehicle doesn’t turn on, it may be because of a faulty starter solenoid.
When you start the engine and stop pressing the starter button on modern vehicles, the circuit is supposed to close, discontinuing power to the starter motor. If your starter stays on after the engine has ignited, most likely the main contacts in the starter solenoid have welded together in the closed position.
Check this too: Best Dust Mask for ATV Riding
This is a common symptom when the battery is low on amps, but it could also be the starter solenoid isn’t sending a full signal.
A starter relay sends power to the starter each time it is engaged. If it is not working properly, maybe due to damage arising from dirt, excessive heat, debris or other issues, the starter might operate sporadically. If the starter doesn’t activate instantly when you try to start your ATV but then works when you turn the key switch once again, this is most likely a problem with the solenoid.
There are two basic tests you can do to evaluate the condition of your solenoid. You will need the following tools:
This test is designed to establish if the contactor is pushing up and completing the solenoid connection. To do that:
The tests involve first checking to make sure the connector is engaging and completing the starter circuit and then making sure the starter circuit is connected when the connector is engaged.
If you have a bad solenoid, you can start your quad by jumping the starter solenoid wires with a wrench. First, you will need to find the starter solenoid, usually located on the outside of the plastic next to or under the battery and close to the wiring harness. You should see two big main wires once you’ve located the starter solenoid. If it is set up, you can then jump the wires and be able to start the quad.
A starter relay consists of a coil wire wound around a ferrous core and an armature on one of the coil. A starter solenoid, on the other hand, is a coil enclosing a movable plunger. Unlike in the starter relay where the coil core is immovable, a starter solenoid core is an iron or steel plunger free to move in and out of the coil. However, the terms solenoid and relay can often be used interchangeably.
Check this too: Best ATV Goggles For The Money
You can jump a starter solenoid if you have a good and strong battery to start the engine. You should only proceed if your battery has enough current to turn the motor, otherwise, you won’t be able to start the vehicle by jumping the starter solenoid.
This guide will help you troubleshoot the most common causes for an ATV that won’t start. Some issues are easy to fix at home, while others require assistance from a mechanic.
These are the main reason why an ATV will not start:
To identify what is causing your ATV’s starting issues, you need to notice how it behaves when you attempt to start it.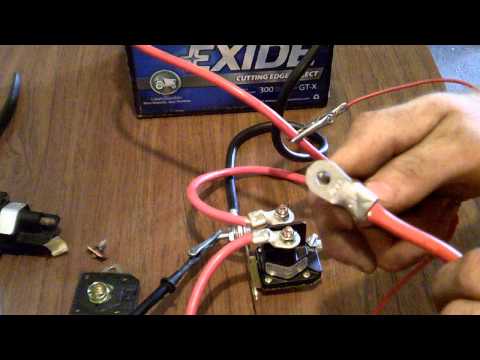 Choose the topic below that describes your bike’s behavior best to begin your troubleshooting.
Page Contents
If your ATV doesn’t crank when you’re trying to start it, there are a few basic things to consider.
You’d be surprised how often the solution to an ATV that won’t start is forgetting to turn on the kill switch.
Also, if your ATV has a tether pull-cord style kill switch, ensure it is connected properly.
Many ATVs are designed not to start when in gear as a safety precaution.
The battery should read 12,6 – 12,8V. Use a multimeter or a voltmeter to check the voltage.
If the voltage drops too low, the battery won’t have enough charge to start the bike.
Charge the battery or replace it if it’s dead. An easy way to test your battery is by checking the voltage drop with a multimeter as you try starting the bike. If your fully charged battery drops below 11,5 volts under load (while you crank the starter), it needs to be replaced.
Most ATVs have a main fuse; your user manual will help you locate it.
If your battery is charged, but you still get nothing when turning the key, you may have a blown main fuse. Replace it with the right size fuse and try starting again.
The solenoid works as a switch that sends a high current to your starter when you push the start button or turn the key. For it to work, you need to make sure it is getting power from the battery.
The solenoid should make an audible “clicking” sound each time you hit the starter. If it does, you know it is getting power, and the problem is likely with the solenoid itself or possibly the starter. Solenoid and starter issues will be covered later in the post.
If you do NOT hear a clicking sound, you can use a multimeter or voltmeter to verify that the solenoid is, in fact, not getting power.
The solenoid is usually located near or on the starter.If you don’t get a reading, you need to trace the wiring back to your battery to wind where the connection is broken. Look for loose or corroded terminals or shorts from damaged cables.
A gasoline engine needs three essential components to start and run:
If the plug is dry, the bike is not getting fuel and you need to continue the troubleshooting as described below.
Alternative method: If you don’t have a spark tester tool, you can do a visual test to check for spark. Please note that this method may cause electric shock if done incorrectly.

You will find the proper steps for troubleshooting an ATV that is not getting a spark further down this post.
If the spark plug is still dry after cranking the engine for a few seconds, you know that fuel, for some reason, is not getting to the cylinder.
It’s often either an issue with the fuel-pump or that the fuel supply line is clogged up somewhere between the gas tank and the carburetor.
Old or unstabilized gas tends to gum up over time and may create a clog. Dirt and debris getting inside the tank is another common culprit for a clogged-up fuel supply.
The easiest way to identify the cause is through a process of elimination.
Note that if you find contamination such as dirt or gummed-up fuel at one spot, the whole system is likely dirty and needs a complete clean for the best result.
The steps involved are slightly different depending on whether your ATV has EFI (electronic fuel injection) or a traditional carburetor system.
There is either a vent in the gas cap or a separate gas tank vent tube. Make sure neither is clogged and allows air to flow freely.
Fuel needs to be replaced with air as it gets pumped out and used. If the vent is blocked, the fuel pump may not be able to suck fuel out of the tank.
Older ATVs, and some of the cheaper models still today are designed with a traditional carburetor fuel-system.
There should be a shut off valve at the lowest part of the fuel tank. Make sure it is turned on.
This step will help you narrow down the possible causes of why fuel is not reaching the cylinder.
With the fuel valve open, disconnect the fuel line from the fuel inlet of the carburetor. Turn over the engine to see if gas is coming through the fuel line.
If it is very little or no fuel coming from the fuel line, you likely have either:
If there is a steady or pulsating stream of fuel you know that
Continue your troubleshooting based on the results of this initial test.
Fuel exits the fuel tank through a shut-off valve at the lowest part of the tank. Inside this valve, a mesh screen is supposed to stop dirt and debris from entering the fuel lines.
Disconnect the fuel line from the valve to see if gas comes through. If fuel does not flow freely, you need to remove the valve to clean it.
All of the fuel left in the tank will drain as you remove the valve. Use a bucket to collect the fuel.
Use carb cleaner, some fresh gas, and a toothbrush to clean the valve and mesh screen. Pour some fresh gas in the tank to flush out any remaining gummed-up old fuel or debris before installing the valve.
If the gas in the tank is old or contaminated, you should not put it back in the tank after cleaning the valve.
Not all ATVs have serviceable fuel filters, but some do. Trace the fuel line all the way from the fuel tank to the carburetor. Look for a cylindrical canister unstalled in-line anywhere on the fuel line.
Fuel filters are cheap and easy to replace, so it’s worth doing if you suspect that something disrupts fuel flow.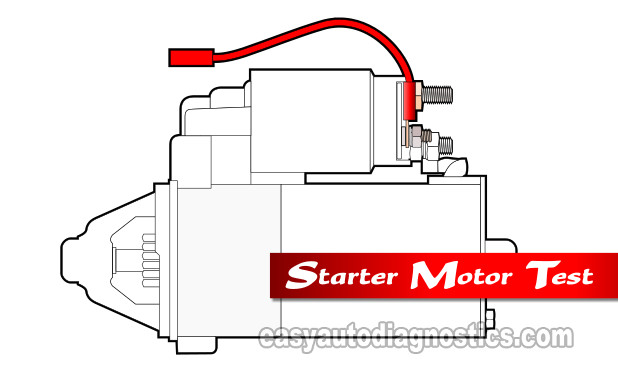
ATVs with traditional carburetors usually have a vacuum-operated fuel pump. They are run by vacuum/pressure pulses created in the crankcase. The negative pressure pulls fuel in, while positive pressure pushes fuel out.

If the pump is still not working, you may need to replace it.
Alternatively, you can pull it apart to give it proper cleaning and a rebuild. Inside there are check-valves that may get suck if dirt enters the pump. There is also a rubber diaphragm that may stretch or crack over time.
Some ATVs have a vacuum-operated shut-off valve that is designed to open only when the engine is running.
Identify the vacuum line that goes to one of the inlet ports. Disconnect the line and draw a vacuum to the disconnected port. The valve should now open and allow fuel to flow.
Inspect the vacuum line to make sure it is correctly connected at both ends and has no cracks that will draw false air.
If you suspect that the valve is not working, put it in “prime” as this will override the vacuum-operated valve. This will tell you if the valve is working or not.
Old unstabilized fuel and debris from the gas tank may completely gum up the carburetor or block the jets so that the engine is not getting any fuel.
I recommend using a product like Seafoam or similar to see if it will dissolve the gummed-up fuel before embarking on a more thorough cleanse. Leave the choke wide open to allow maximum flow.
Click this link for instructions: https://seafoamsales.com/uploads/2018/12/HOW2_Gummed-Up-Carburetor.pdf
If Seafoam doesn’t work, your best bet will be to remove and disassemble the carb to clean it properly. This job may not be for everyone. Consider asking a mechanic if disassembling the carb seems intimidating.
 Drain or siphon all of the old fuel out of the gas tank. Flush the tank with some fresh gas. Replace any fuel filters, as well as they are likely just as dirty as the carb.
 I recommend these links for a more detailed and illustrated guide on how to disassemble and clean a carburetor (external links):
How to disassemble and properly clean a carburetor:
https://www.rockymountainatvmc.com/rm-rider-exchange/clean-carburetor-motorcycle-atv/
Clean a carburetor by using chemical carb cleaner:
Fuel-injected engines use an electronic pump to feed pressurized fuel through fuel injectors and into the engine.
Troubleshooting a fuel-injected ATV is a bit trickier than carbureted ATVs, but it’s possible:
 Make sure the internal fuel filter is not clogged
Most fuel-injected ATVs do not have a serviceable fuel filter.
Instead, they have a non-serviceable screen or a sump-filter located inside the gas tank. Note that some EFI ATVs also have an inline external fuel filter.
The screen or filter is one component of the complete full fuel pump assembly located inside the tank. These filters are not meant to be serviced but may still clog up.
You need to remove the whole fuel pump assembly to access the filter.
Begin by removing any plastic covers to access the top of your gas tank. There you will find a large plastic locking-ring that connects the entire fuel filter assembly to the fuel tank. You may need a set of large pliers to remove the ring as they tend to bind.
Be careful so that you don’t damage any fragile plastic components as you remove the pump assembly.
The filter will be at the very bottom of the assembly. You will generally need to replace the whole assembly to replace the filter.
If you want to save some money, consider looking up a suitable replacement filter on-line.
Electric fuel pumps tend to fail for no apparent reason from time to time. Before they break completely, they may be getting weaker gradually due to wear.
A worn fuel pump may not create a high enough fuel pressure for the injection system to mist the fuel properly, which may prevent the ATV from starting. Aftermarket fuel pumps are available for most ATVs, but replacing them is not for everyone.
Also, you have possible fuel pressure regulator issues or bad o-ring seals.
The best way to test an electric fuel pump is by measuring the fuel pressure at the fuel rail. This will, however, require a specialist tool that the average home mechanic does not have.
A clogged fuel filter or clogged fuel lines may cause too low fuel pressure as-well.
Before replacing the fuel pump assembly, it’s worth making sure the bike is charging correctly, as a low voltage will negatively impact fuel pump performance.
Modern EFI ATVs may provide an error code indicating fuel injector issues. Troubleshooting fuel injector problems, however, is a task that often gives even seasoned mechanics a headache. I recommend you save this job for a dealer.
Here are a few things to try out if your ATV is not getting a spark:
 Set the meter to 200. You should get a reading of 0-2 ohm. Over 2 ohms, the coil is likely bad and needs to be replaced.
When you try to start the ATV, the engine seems to crank just as normal. But the engine will not start. All you get is one or several loud bangs coming from the exhaust.
These bangs are known as the ATV backfiring, usually caused by the air/fuel ratio being too rich or too lean.
If you forget to engage the kill switch before trying to start the bike, it will pull gas into the carburetor, but there is no spark to ignite the fuel.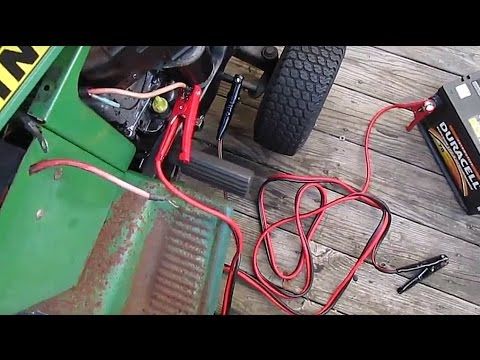
When too much gas enters the carburetor, there won’t be enough space left to mix the required air/fuel ratio for the bike to start and run.
If you have the time, let the bike sit for a couple of hours before trying to start it again.
Alternatively, you can remove the spark plug while turning the engine over for a few seconds. Any excess gas will escape through the spark plug hole. Wipe the plug clean and put it back in. Then try starting the ATV as usual.
Spark plugs are considered consumables that may need replacing from time to time. A spark plug that has gone bad may prevent the ATV from starting and only cause it to backfire.
Replace the plug with a new one according to the manufacturer’s specifications.
A clogged air filter will restrict airflow and, therefore, significantly impact how rich your ATV engine operates. Too little air will cause an overly rich mixture, resulting in symptoms like the ones you experience.
Clean or replace the air filter with a new one before trying to start the bike again.
Another possible cause of these symptoms is that your valve clearance is incorrect. As the engine gets some hours to it, the valves may seat deeper in valve seats and may need adjusting.
Checking and adjusting the valve clearance on an ATV is not that hard to learn, but it is recommended that you ask for guidance from someone more experienced the first time you do this job. If you do it incorrectly, you risk causing permanent damage to your engine.
Your bike’s timing is what tells the bike when to pull air and fuel into the cylinder, when to ignite the fuel and when to discard exhaust gasses out the exhaust. If one cam is off by just one tooth, you may run into starting issues accompanied by the occasional backfire.
If you’ve been working on or removing some of the timing components, you need to make sure that everything is reassembled correctly.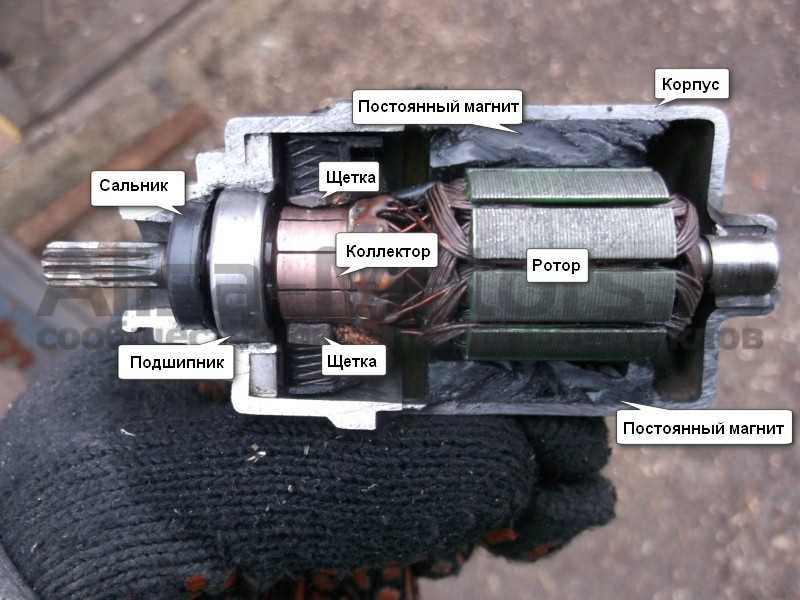 Lookup a timing diagram for your specific ATV and make sure all the timing marks line up.
If the task of aligning the timing marks sounds intimidating, you are probably better off leaving the job to a mechanic.
The timing might be off even if you did not work on any of the timing components. What often happens is that the timing advance key, also known as a rocket key, has sheared and needs replacing.
The timing key plays a crucial role in timing your bike’s ignition as it locks the flywheel in the right position on the crankshaft. If it breaks, your bike’s timing will be off immediately.
This little metal part is designed to break to protect other engine components. From time to time, it may break even if there is nothing else wrong.
Luckily they are not that expensive or time-consuming to replace. It is not a job everyone will be comfortable doing for themselves. Still, nothing an averagely skilled home-mechanic can’t manage after watching a couple of youtube videos for their specific brand and model.
The key is located on the crankshaft. You need to unbolt and remove both the flywheel-cover and flywheel (the flywheel on an ATV is actually called a generator) to access it. A flywheel puller may be required.
If the key is sheared, remove all pieces from the old timing key and install a new one according to factory spec. Ask your dealer to make sure you get the right one. Install the flywheel and flywheel cover before trying to start the bike.
Make sure the timing marks are lined up correctly. The timing mark layout will be different from model to model. Please refer to your service manual.
A dirty carburetor may prevent enough fuel from getting to the cylinder, causing a lean backfire.
Due to the backfire, you know that at least some fuel is getting through. Please refer to step 3 on how to clean the carb.
Before spending money on a mechanic, it may be worth draining your gas tank and adding fresh gas. Gas may go bad if it sits too long, or it may get contaminated with water due to condensation.
Most gas tanks will have a removable drain plug or on/off switch at the bottom. Your next best option is to pump or siphon the fuel out of the tank.
If a valve has stuck open, the compression will be too low, and the bike will not start. Repairing a stuck valve is usually a task for a trained mechanic.
If all you hear when turning the key is a buzzing sound, it is usually because your battery is dead or needs charging.
The buzzing sound you hear comes from the starter solenoid relay that won’t kick in due to low voltage.
The solution is usually quite simple. Charge the battery or replace it if it is dead.
Also, make sure all of the power wires going from the battery to the solenoid are correctly connected and not corroded. Put a test light across the connection you are testing as you activate the starter.
If the problem is not battery-related, you may have a bad starter or even a seized engine, preventing the starter from engaging. After ruling out a bad battery, it’s recommended to have further troubleshooting done by a mechanic.
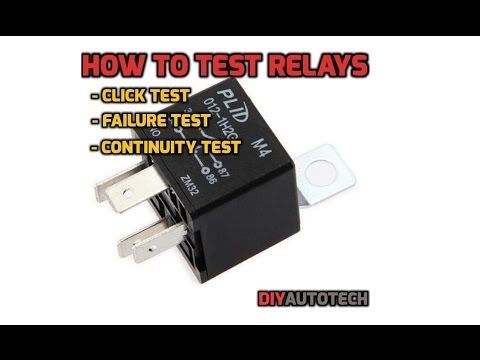
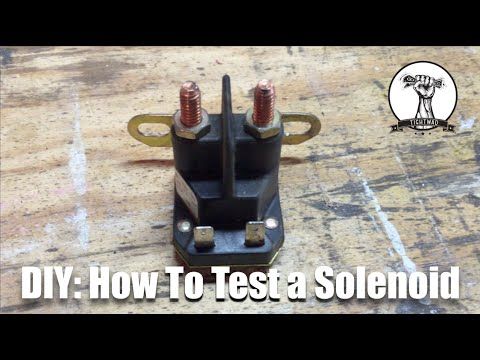
When activating the starter, the engine won’t turn. All you can hear is a clicking sound each time you press the starter button. The clicking sound is coming from the starter solenoid.
A solenoid that is working correctly will provide an audible click as you activate the starter. But the solenoid may be bad even if it clicks due to internal corrosion.
Use a multimeter to test if the solenoid closes the circuit as you try activating the starter.
Put your multimeter to DC Voltage. The red lead goes to the starter side of the solenoid. The black lead goes to ground. There should be no reading when not pressing the starter button.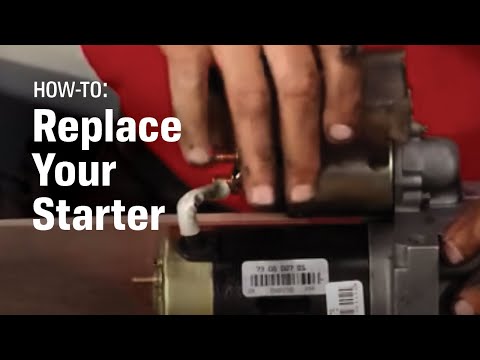 But when you activate the starter, you should get a voltage reading of 12V or more.
If you don’t, your solenoid is probably bad and needs replacing.
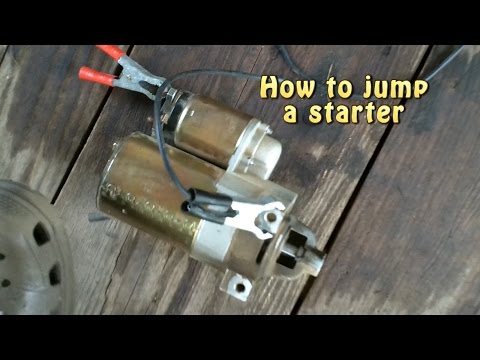
As an alternative method, you can use a piece of cable to jump your solenoid. Make sure the cable you use can handle the high current. If the ATV starts when jumping the solenoid, you know that the solenoid is bad and needs replacing.
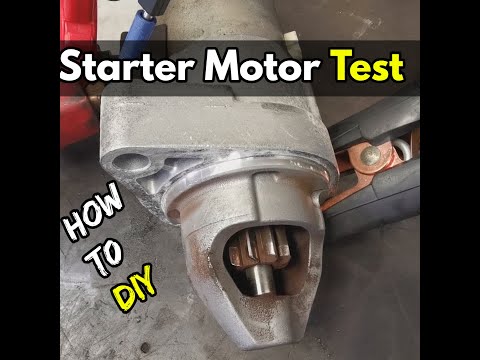
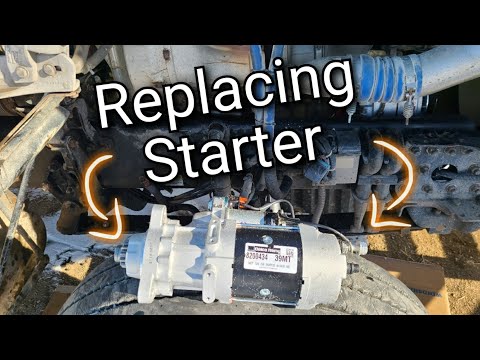
If your solenoid is good, the problem is likely with the starter. Starters may wear out due to old age, or they may go bad from a busted seal that will allow oil or water to get inside of the starter.
To test the starter, you need to remove it from the ATV. It’s connected with a few bolts. You will also need to remove the cable coming from the solenoid.
Use a fully charged battery and a set of jumper cables to test if the starter will spin as it’s supposed to. First, you should use the positive lead to connect the positive battery terminal with the positive (red) starter cable. Then attach the negative lead to the negative battery terminal.
Hold the starter firmly in place and complete the circuit by connecting the negative lead to where your starter ground to the engine.
The starter engine shaft should start spinning freely with no signs of drag or scraping. Replace the starter if it is bad.
After running your ATV completely dry, you may find that it won’t start even after filling it up with fresh gas.
If it was running fine before you ran it dry, your problem is likely fuel-related as running the bike dry will not cause damage.
The fuel pump will need some time to suck up fuel after the bike has run completely dry. Fuel-injected ATVs, in particular, can be extra tricky.
Not all ATVs have one, but if yours has a primer pump, you should use it to pump fuel back into the carb manually.
Look for a button on the side of the carb that may look like a choke knob. You will need to pump it several times for it to have any effect.
Switching to “Reserve” and letting the bike run completely dry may allow dirt and gummed-up fuel that has set on the bottom of your gas tank to be sucked into the carburetor.
The same applies to gas contaminated with water, which is heavier than gasoline and will fall to the tank’s bottom.
Clean the carburetor, as described in step three.
Remove the spark plugs and pour a dash of gas into the spark plug holes. Reinstall the plugs and try starting the bike.
This will provide enough fuel so that the ATV starts and begin sucking fuel on its own. You may need to do this 2-3 times before you succeed.
Blowing with a steady pressure into the gas tank vent tube while running the starter may help the fuel to start flowing.
Running the bike dry won’t harm the spark plug per se, but contaminated fuel may. You may need to replace your spark plug to get going again.
Some ATV fuel pumps cant take being run dry. When run dry, the RPMs will go up, and the pump will burn out due to a lack of cooling and lubrication from the fuel.
Try removing the pump and check for internal resistance with an ohm-meter. If there is no resistance, the pump is likely bad.
First of all, it is not really recommended that you use starter fluid on your ATV in the first place. Starter fluid evaporates very easily, and the vapor is highly flammable. Both you and the ATV can catch fire from a spark caused by a short.
It’s much safer and just as effective to carefully pour or spray some gas straight into the cylinder through the plughole. A couple of ounces should be enough before installing the spark plugs and starting the bike.
As long as the spark plug provides a bright blue spark and fuel is entering the cylinder, you may suspect that your compression is not good enough. Use a compression gauge and check if the bike’s compression matches factory spec. If it doesn’t, the engine might need an overhaul.
If the spark seems weak, the problem may be with the pick-up coil. Look for cracks or any other visible damage. If the coil is damaged, replace it with a new one. Note that the coil may be bad even if you’re getting a spark.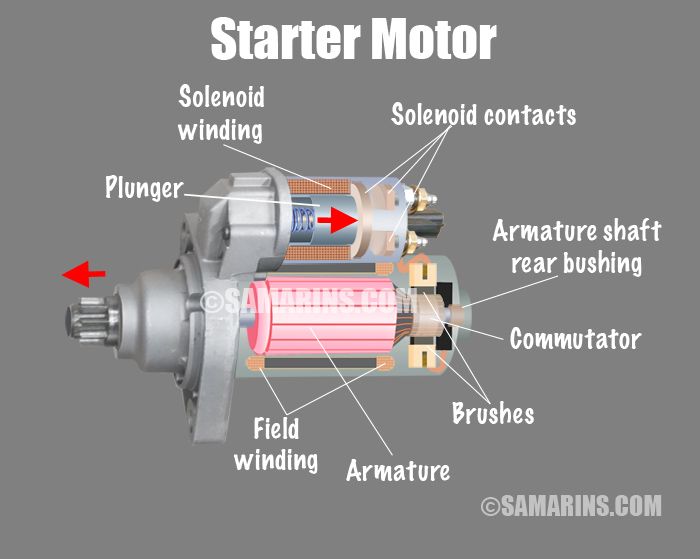
Most ATV manufacturers recommend that you not use a pressure washer to clean your ATV, which may damage electrical components. Instead, it would be best if you washed the ATV by hand using only a garden hose and mild soap.
Here are a few tips to try if your ATV won’t start after washing it:
I’ve dedicated an entire post on how to repair an ATV that’s been submerged in water.

You’ve just installed a new battery, but the ATV still won’t start.
Then, refer to the other topics in this post according to how your ATV is behaving. Does the engine turn over? Does it make clicking or buzzing sounds? Start from the top and work your way down if you are not sure where to begin.
If you cannot jump-start your ATV, it may not be a dead battery that is causing your starting issues. Make sure you are following the proper procedure for jump-starting an ATV.
If the ATV starts with the electric starter, it should start with a pull starter as-well. I recommend that you begin troubleshooting as if the turns over but won’t start.
Posted by by MotoDoctor
One of the problems with starting the engine on an ATV is found in the electrical system. To start the engine, we need to turn on the ignition and press the "Start" button (if the ATV is in gear, you need to additionally press the brake pedal). All ATV owners are familiar with this startup process. But here is the problem itself, after the actions performed, your ATV does not even make any sounds. Of course, first of all, we check whether the battery is holding a charge. If the battery is good, we proceed to check the wiring connections. Sometimes at the factory, when installing electrical equipment, the connecting chips are turned on, but not fixed with a lock. So sometimes, due to unscrupulous assemblers, these chips are disconnected and the contact naturally disappears. It is not very difficult to identify such a malfunction; it is enough to inspect the entire electrical wiring circuit and determine where there is no reliable connection. True, for this it is often necessary to dismantle plastic elements, so that there would be access to all electrical equipment connections. If it's plastic on a Chinese ATV, be extra careful as he is very fragile.
 If all other elements are in good order, then the electric starter will start working and you will have to replace the starter power relay. But in rare cases, the power relay itself is working properly, but the power that should come to it is missing and naturally the relay will not work. This is where you will need a control or multimeter to check whether power is supplied (+) and (-) (12 volts) to the starter relay. In some ATV circuits, the starter relay constantly receives (-) and (+) is supplied when the (start) button is pressed, and in others, vice versa, you can determine all this with the help of instruments. For example, you have determined that the power is not going to the relay, then we recommend that you check the start button for serviceability. But as we said, the first thing to check is all electrical wiring connections. And now let's consider the option if power comes to the starter power relay and the relay itself works but the electric starter is silent, then here it seems to be faulty.
 In this case, you need to unscrew the mounting bolts and remove the starter from the ATV launcher. In this state, turn on the button (start), if the electric starter does not start working, then the malfunction is in it. In this article, we examined the problem of an electric start malfunction on an ATV, which is directly related to the operation of electrical equipment, but in some cases the engine cannot be started from an electric starter due to a malfunction of the mechanical start system, this is the so-called electric starter overrunning clutch. If it fails, only the hum of the electric starter will be heard at the time of launch. In this case, this part must be replaced. This entry was posted in Motorcycle Repair Tips by MotoDoctor. Bookmark the permalink.
 As you know, the starter is a device that starts the car engine. In fact, the starter is an electric motor that is powered by a battery. It is quite obvious that the failure of the starter greatly complicates or makes it impossible to start the internal combustion engine.
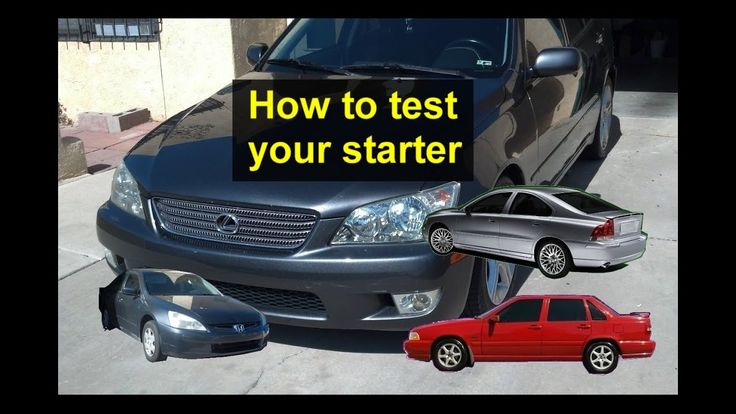
However, the starter rarely fails unexpectedly. In other words, certain symptoms indicate the occurrence of malfunctions. Next, we will look at what symptoms can be used to determine that the starter is faulty, as well as how to check the starter from the battery or with a multimeter.
You can check the starter of a VAZ or any other car directly on the car in various ways that allow you to identify problems with the solenoid relay, starter motor, etc. The easiest and most affordable way is to check the starter with a battery.
To perform this test, the battery must be charged and a pair of power wires must be available. Please note that the battery cannot test the armature, starter winding or brushes. To check these elements, the starter must be disassembled, and then called with a multimeter (tester.). The available methods will be discussed below.
In terms of battery starter test, this method allows you to quickly check the operation and efficiency of the device. The fact is that if you just try to start the engine in the usual way, the starter may click, but nothing else happens.
When checking from the battery, the terminals with leads on the retractor and starter housing are closed. This test method allows you to determine the malfunction of the solenoid relay or the starter itself. This check allows you to understand whether the relay is operating, whether the starter motor is turning, etc.
To check how the starter pushes the gear and turns, you need to connect the negative terminal to the housing, and apply the plus to the upper terminal of the relay and the enable contact.
If the gear does not extend, there may be several reasons:
Normally, the bendix should extend with a characteristic click, after which the gear begins to scroll by the starter motor. This method allows you to check the retractor relay, while checking the retractor relay from the battery is quite reliable.
Brushes are most quickly checked with a 12 volt test light. One lamp lead is connected to the brush holder, while the other is connected to the housing. If the lamp starts to burn, the brushes need to be changed, as the protection is broken.
You can also check the brushes with a multimeter tester. To do this, the starter must be disassembled. The main purpose is to check for a short to ground. Normally, the brushes should not close.
An ohmmeter test is performed by measuring the resistance between the brush holder and base plate. The result is considered normal when resistance rushes to infinity. Also, when removing the brush assembly, it is necessary to inspect the brushes themselves, in parallel, the collector, bushings, winding and armature are inspected.
For example, if the bushings have worn out, then during start-up the voltage drops, the starter motor malfunctions, and the burnt collector actually eats out the brushes. If the bushings are badly broken, this leads to distortions of the armature, the brushes wear out unevenly, and the winding may be shorted.
To check the starter bendix, the freewheel housing is clamped in a vise. To avoid damage, you can put rubber gaskets on the “lips” of the vise. Next, an attempt is made to scroll the bendix in different directions. Please note that it should not rotate in two directions.
If such a rotation is noticeable, this indicates a malfunction in the overrunning clutch, because normally, when trying to turn in the other direction, the stopper should work. It also happens that the bendix does not engage, that is, the starter spins at idle (no load). In this case, the bendix is either stuck or the teeth are worn out. At the same time, problems with the gear can be detected during inspection, while the problem of occurrence is detected only after complete disassembly and cleaning of the gearbox from dirt and grease.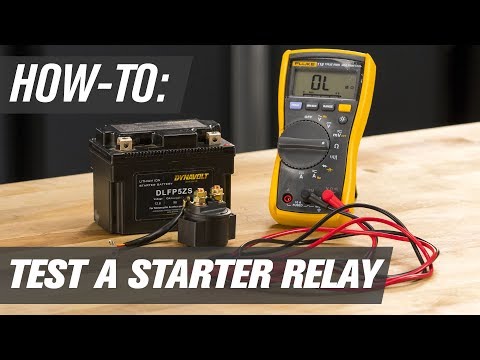
To understand how to test the starter winding, it is important to know that such a test can be performed with a flaw detector or a 220 V light bulb. The method is similar to how brushes are tested. To check a light bulb with a power of up to 100 watts, you need to connect it in series with a wire between the winding and the case.
One housing is attached to the housing and the other to the winding terminal. If the light is on, then there is a breakdown. If there is no light bulb, you need to take a multimeter and measure the resistance. Normally, the indicator is about 10 kOhm.
If it is necessary to check the starter rotor winding, the same procedure must be carried out. One output of the test lamp is applied to the collector plate, and the other is thrown onto the core. If the lamp is on, this indicates the need to rewind the winding. Also, the problem can be solved by completely replacing the rotor.
It is important to know how to test the starter armature during the diagnostic process.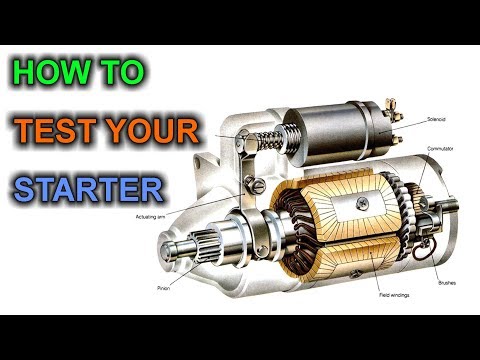 To do this, you need to directly apply 12 volts from the battery to the starter. In other words, voltage is bypassed to the relay.
If the starter turns, this means that the anchor is in perfect order. If there is no rotation, then both the anchor and the brushes may be problematic. In such a situation, the starter must be disassembled, and then troubleshoot and check with a multimeter, switching the device to ohmmeter mode to measure resistance.
As a rule, in the list of problems with the armature, one can single out possible breakdowns of the winding on the case, the collector terminals are soldered, or an interturn short circuit of the winding has occurred. By the way, the last malfunction is usually detected with a special device (PPY).
We also add that the short circuit of the winding can be determined by characteristic features, when shavings and small particles that conduct current are visible between the collector lamellas. Also, the closure is indicated by the burnout of the lamellae, which is the result of contact between the “shank” of the winding and the so-called “cockerel”.
Commutator wear, especially if uneven, causes brush wear and starter failure. One of the reasons when the insulation protrudes between the lamellas is due to the fact that the collector has shifted relative to the axis of the shaft. Please note that the total depth between the grooves of the anchor collector should not be less than 0.5 mm.
Having dealt with the methods described above, you can separately highlight how to check the starter with a multimeter. This method is optimal if there is no flaw detector or test lamp. The tester allows you to quickly ring the brushes and starter windings for a short circuit, as well as check the relay windings by measuring the resistance.
Please note that there should be no conductivity between the housing and the winding, the rotor shaft and the commutator, the ignition contact and the positive contact of the relay, and between the two windings. We also add that the resistance of the armature windings is minimal, it cannot be measured with a simple multimeter.