Tire liners … do they work? Well …………………………….. yes and no. Once more it all depends. I used to use them and as far as helping prevent externally caused flats, yes they work. However, I and a couple of friends who also used them found that they caused flats internally. Also the service dept. manager of a local bike shop has told me that he agrees that they do indeed cause internal flats and thus won’t use them or recommend them. Now there are things which can be done to help prevent this from happening. Unfortunately we did not do any of it so we got occasional flats as a result. I would think that there should not have to be any thing done extra such as this for the tire liners to work properly and not cause internal flats. Now that I use the best tire money can buy I no longer use tire liners as I don’t need them. That being said when I first switched to the Schwalbe Marathon Plus tires I installed the tire liners initially as I already had them and had been using them for a few years on all the various tires I had tried previously.
I thought it would be a good idea to have the extra measure of protection. Big mistake! I got about three flats over a period of a few years. All were internally caused flats. When I replaced the inner tubes I removed the tire liners. I have not had any flats since.
So my advice is if you are going to use a regular tire prone to getting flats the tire liners are a good thing. If you are going to use them either sand the end of the tire liner where it overlaps itself to remove any sharpness or use duct tape to help protect the inner tube from any sharpness on the end. Personally I would do both … sand the end and use the duct tape.
And be sure the end is rounded as this will help with the edge the inner tube comes in contact with.
Lastly with or without tire liners I highly recommend using a generous amount of talcum (corn starch baby) powder inside the entire surface of tire and on the entire surface of the inner tube to reduce rubbing and abrasion which cause ‘internal’ flats. Put the talcum powder inside of the tire after the tire liner is in place.
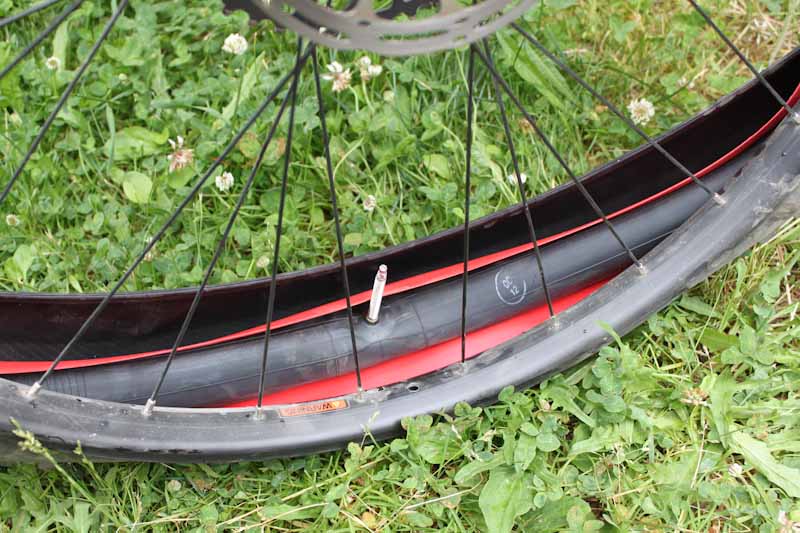
Definitely there is “abrasion” which occurs when tire liners are used. Take a look at this picture.
You can plainly see the outline of the tire liner on the inner tube. Notice the sharp line of the end of the tire liner where it overlaps itself. Again, using duct tape on the end will greatly reduce this. As to the use of duct tape some say to put it over the end which overlaps. Some say put it on both ends. I see no reason to put it on both ends as it is only that which is in contact with the inner tube which is a concern. I would only put it on the overlap area. Here is one way to do it … wrap it around the top and bottom of the tire liner and then trim the duct tape to the rounded end shape.
I wonder if it would not work better to just place a piece of duct tape over the overlap once the tire liner is in place inside of the tire. That way there would be less thickness at the overlap so that the overlap would not protrude out as far into the inner tube.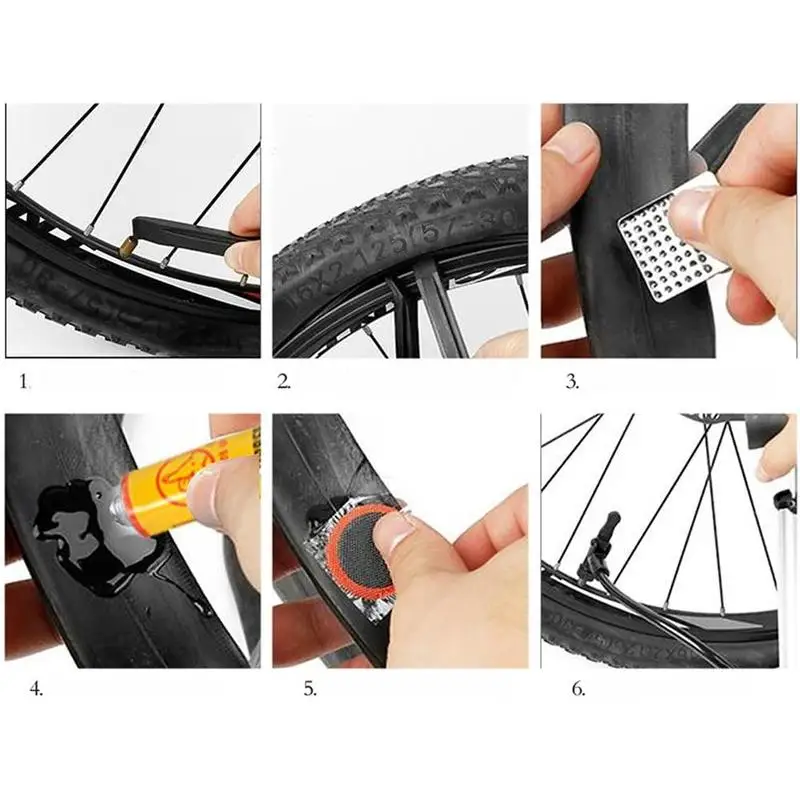 I see no advantage to having tape on the bottom side of the tire liner since it is not in contact with the inner tube. Also the tape on the overlap would help hold the tire liner in position inside of the tire. The end which overlaps tends to want to drop away from the rest of the tire liner once it is up inside of the tire so I think it would be very helpful to place duct tape over the overlap.
To the best of my knowledge there isn’t all that much difference in quality and protection offered between the various brands of tire liners. I have read that the Kevlar liners should not be used as they don’t work very well. Stick with the plastic type such as Mr. Tuffy, Rhino Dillos, Stop Flats 2, Zefal, and Slime. As you can see in the picture above they are pretty tough.
I think that with the exception of Rhino Dillos all of the tire liners come packaged all rolled up tightly in a small coil/roll. In doing so the inside end is all curled up and presents problems when trying to work with it to install it.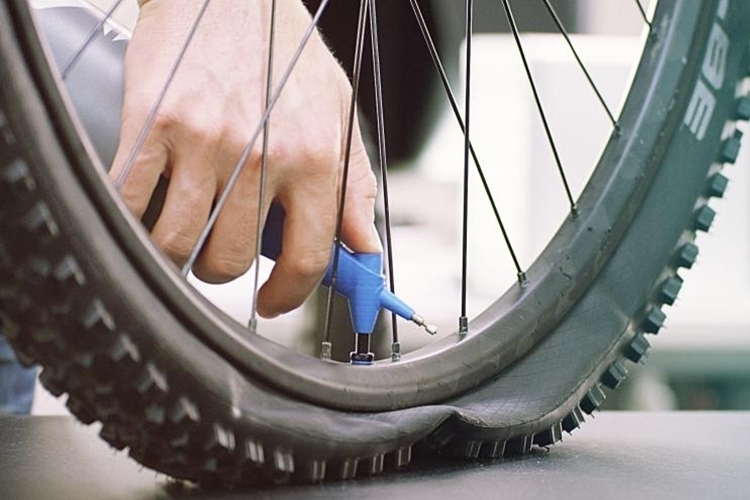 So because of this I recommend buying the Rhino Dillos as they are packaged so that this doesn’t happen. They are rolled up in a larger diameter. If you buy one of the other brands it is best to take it out of the packaging and hang it up by the small inside curled end (if it is one rolled from the end) so that it can straighten out for a day or two before installing it.
If it is one rolled from the middle like pictured below then, of course, you should hang it from the end (either end).
Again, my thinking is the worst way of packaging these tire liners is to fold them in half and then roll them up like the red one pictured above. If I were buying any I would steer clear of any packaged like that.
I myself have only used Mr. Tuffy tire liners, which is the originator of tire liners. They are made of made of durable, lightweight polyurethane. They also have what they say is a lighter weight product for those who are weight conscious/concerned. They claim that their liners will not cause tire or tube damage.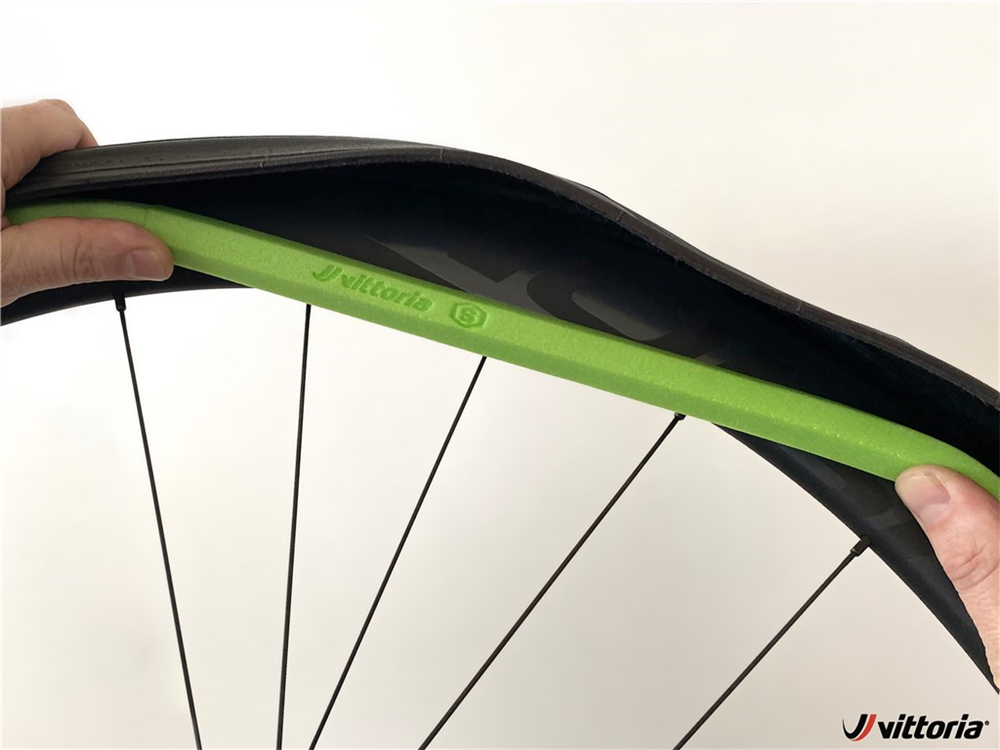 I take issue with that as I consider causing internal flats as “damage”. Whether the hole is the result of a puncture from the outside or abrasion on the inside it is still damage and has the same consequences … a flat and a destroyed inner tube.
Tire liners come in different widths since tires come in different widths so be sure you get the correct width for the tires you are using. They also come in “XL” for FAT tires.
As to installing tire liners you will find different methods and suggestions ‘out there’.
Some say to remove the tire and inner tube completely off of the rim so you can install the tire liner inside of the tire off of the rim. That is the way I have always done it. Some say to leave the tire and inner tube on the rim and just remove one side of the tire off of the rim so you insert the tire liner between the tire and inner tube. Some say to remove one side of the tire off of the rim and remove the inner tube. Certainly it can be accomplished in any of these ways. It is important, of course, to ensure that there is nothing sharp inside of the tire or rim before installing the tire liner. That is best and easiest accomplished by removing both tire and inner tube off of the rim. It is also important to be sure the tire liner is centered inside of the tire and that the inner tube is installed correctly with no twists or other abnormalities.
Here is what Mr. Tuffy shows as to how to install the tire liners:
I found it interesting that their instructions say to remove any debris found inside of the tire casing before the inner tube is removed. How in the world are you supposed to check inside the tire casing without first removing the inner tube? DUH!
I personally much prefer to take the tires completely off of the rims to install tire liners. Doing them while still on the rim one can not nearly as easily tell where the tire liner is positioned as far as getting it centered in the tire. Of course, no matter how one goes about it there is always the chance that the tire liner will move out of position during final assembly and re-inflating the inner tube.
Another good reason for removing the tire completely off of the rim is one can much more easily and thoroughly examine the casing of the tire and do anything needed to ensure the tire is fit and ready to use.
The side of the tire liner that has the extra layer of material bonded to it (it is usually darker color like shown above in the picture) goes outward toward the tire.
I watched several videos on installing tire liners and quite frankly I was not very impressed by any of them. I settled for this one to use here.
Well, like ol’ Forest Gump … that’s all I have to say about that. Tire liners? … Use them if you need them. As for me, I am going to just continue to use the best tire money can buy and not concern myself with flats. My Mr. Tuffy tire liners are hanging up on the garage wall. I will probably never use them again. It is a real joy to just be able to …
KEEP ON TRIKIN’
and not be concerned about flats. And it is great to get such phenomenal mileage out of the tires as well.
A FREE GIFT awaits you!
An addendum to my previous post about Slime and other tire sealants.
As I mentioned in my previous post, tire sealant solutions like Slime can be a huge hassle. They’re messy, expensive and have questionable reliability. In my case, one of my tubes was ruined because the Slime sealant kept clogging the valve core and stem, which would not allow you to add or remove air from the tube.
There are other things, though, one can do to prevent punctures. Since the Slime didn’t work, I employed a different technique on the Sedona: tire liners.
Tire liners are essentially a thick piece of flexible plastic (or other material) that lies in between the tube and the tread-side of the tire casing. (It is not to be confused with the rim strip, which goes between the tube and rim and prevents the tube from being damaged by the spoke nipples or imperfections in the rim itself.)
The most common brand of tire liners is “Mr. Tuffy,” although others exist. For the Sedona I went to my local Walmart and picked up a Slime-brand tire liner.
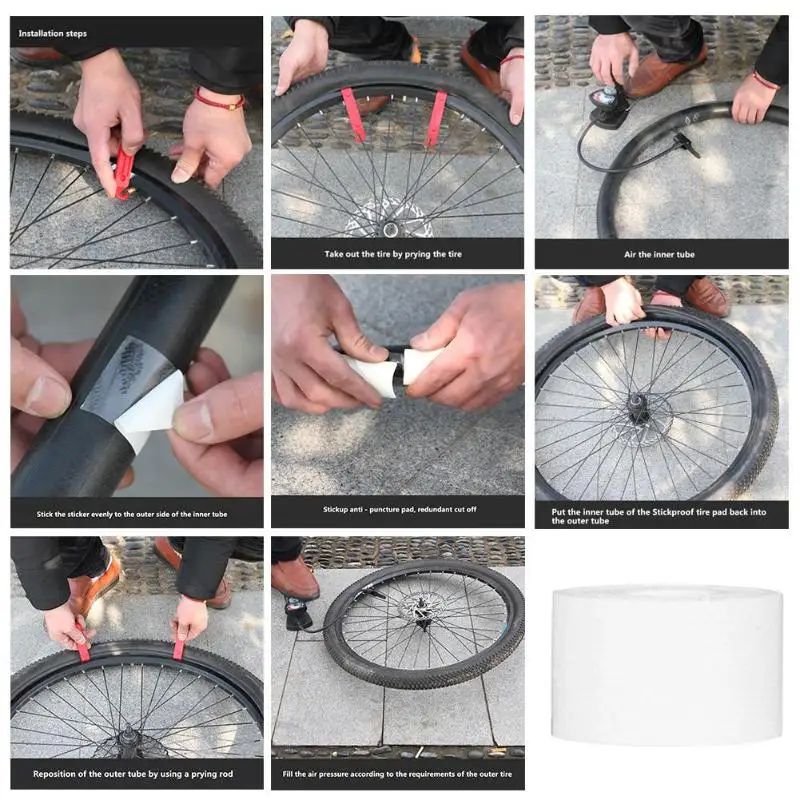
The Slime-brand “Flat Protector” tire linerInstallation of tire liners is fairly quick and easy. It’s recommend to move the entire tire from the rim. After removing the tube, you essentially uncoil the tire liner and line it inside the bottom of the tire, making sure it is center.
Instructions for installing the tire liner. The Slime-brand liner is a “one size fits most” design.Since some tire liners (like the one I purchased) are “one size-fits most,” you may have to overlap the tire liner. That’s okay, and makes sure the entire tire is protected.
Installing the tire liner is simple – just remove the tube and install the tire liner in the bottom of the tire casing, making sure it is centeredIn my case, there was a part near where the tire liner overlapped where it was bent and didn’t want to stay flat because of how it was packaged. When the tube is installed and inflated, this was taken care of.
After making sure the liner is centered all the way around, you reinstall the tube. I like to inflate the tube after getting it in to set everything.
Obviously, don’t put too much air in the tube if you decide to do this.After deflating the tube, I install everything on the rim as normal. Then I inflate to the desired pressure as normal.
If you have to remove the tube later to patch it or replace the tube or tire casing, I found the tire liner may stick to the tube. The tire liner will also form its shape and the overlapping portion will stick to each other. (At least in the case of the Slime-brand tire liner.)
There is one big drawback to using tire liners: They only protect punctures from the tread-side of the tire. The sidewall is still vulnerable to punctures. If you live in an area with thorns and other things that regularly cause sidewall punctures, a tire liner will not help you very much.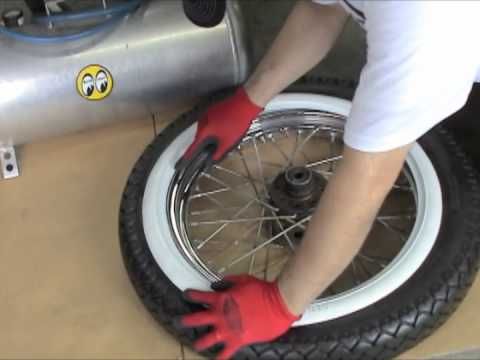 But Slime and other sealants claim to only work on the tread-side, so neither would help you in such a situation.
But since most people experience punctures on the tread-side (e.g. glass, nails, thumbtacks, etc.) then the tire liner should be satisfactory for most people.
For most people, tire liners are an excellent option in preventing punctures. While the liners cost a little more than a bottle of sealant (I paid my local Walmart $12 for the two-pack of the Slime-brand liners and the official Mr. Tuffy liners cost ~$20,) it’s worth the difference. The tire liners are easy to install and produce no mess. The tire liners don’t affect the operation of the valve or the tube itself, and the tire liner can be passed on from tube to tube and tire casing to tire casing, as long as it properly fits and isn’t damaged.
You can also still patch your tubes if they have been punctured. Which you can’t do with tubes that have had sealants installed.
I used to use Mr. Tuffy liners on the Pinnacle way back before it was decommissioned for the first time. I don’t recall ever having a flat caused by a tread-side puncture on that bike – although (and I’ll bring this back up at the end of this post) it didn’t prevent flats caused by low pressures and harsh riding.
As I mentioned in my previous post, there are many other methods for preventing flats. Some are inexpensive, others are expensive and require extensive modification.
It may come as no surprise that tires come in different thicknesses and constructions. Some are more puncture resistant than others.
If you regularly flat or get tread-side punctures, there is one alternative to tire liners: upgrading to a thicker tire.
They now make tires that feature a Kevlar strip in the tire under the tread to prevent objects from entering the tire and puncturing the tube. You can still install a tire liner to double the protection, and they also make tubeless Kevlar tires. (I’ll talk about tubeless a little bit later.)
In conjunction with installing new tires, you can also move to beefier tubes that are thicker and more puncture resistant. While a thicker tube won’t be 100% puncture-resistant, it will reduce the chance that something will penetrate all the way into the tube.
There’s another option here: If you have an old tube laying around, you can cut the old tube open and wrap it around the tube being used, to have another layer.
In the world of automobiles, tubeless tires are ubiquitous. The automotive industry moved away from tubes in the 1950s and haven’t really looked back.
Many bicyclists are following that trend, especially mountain bikers.
Tubeless tires have superior puncture resistance, mostly because tubeless bicycle tires have sealant installed in them. (The sealant is installed to help the tire seal to the rim, but can also be used to seal punctures. Exactly like Slime and tube sealants.) Tubeless tires are also typically more robust.
Here is a good video (also shared in my previous post) of someone testing the puncture resistance and sealing power of tubeless tires.
But before you go shying away from tubes, there are a lot of things to consider – and there are a lot of drawbacks to running tubeless tires.
 Cyclists in other fields have tested tubeless on road bikes and BMX bikes with mixed results, and running tubeless on those bikes is typically discouraged.
That is a long list of cons against tubeless bicycle tires. However, the technology is improving and it may just be a matter of time before tubeless tires spread to other types of bikes and becomes as mainstream as tubeless tires on cars, trucks and motorcycles.
While tubeless requires a lot of specialized parts (special rims, tires, rim strips, etc.,) some have had success with the “Ghetto Tubeless” technique. In the Ghetto Tubeless technique, a cut inner tube serves as the rim strip, seals the rim and provides the valve. Then a tubeless-ready tire is installed with sealant and inflated.
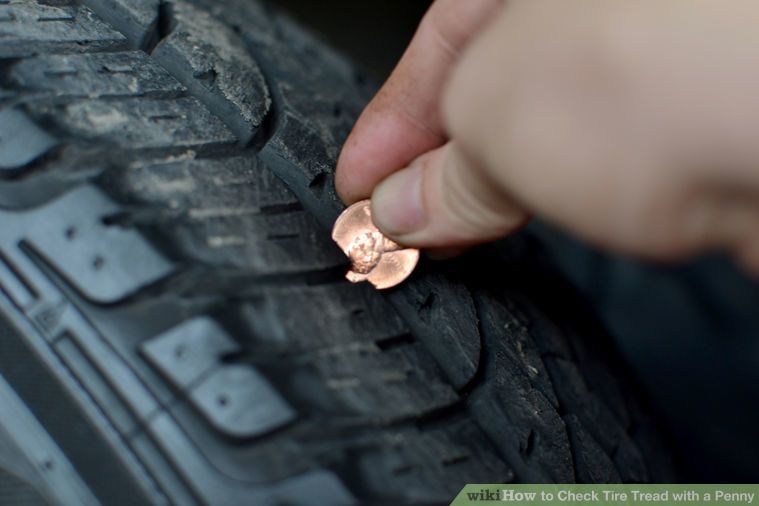
Flats caused by punctures are the most common. A nail or piece of glass punctures the tube, the air is going to escape and eventually the tire is going to completely deflate.
But there are lots of other types of flats, caused by different things.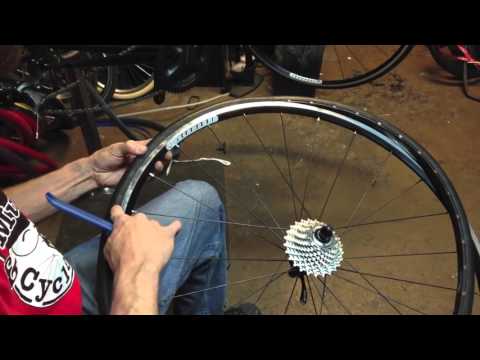
For more information about flat tires and the types of flats, read this article on Sheldon Brown’s website.
In summary, flat tires are a common thing. If you cycle a lot, there is likely going to be a moment where you experience a flat. Sometimes that moment happens at a bad time – when you’re 40 miles from the nearest town and have absolutely no bars of cell phone reception.
It’s important to know how to correctly mend a punctured tube and change a tube/tire. It’s important how to know how to do it properly – as improper techniques can result in additional unnecessary flats that can really ruin your day, especially if you only had one spare tube or tire. It’s also important to be prepared: on longer trips, always carry a spare tube, hand/frame pump (or CO2 cartridge), and a patch kit. For longer rides or rides where you may be out in the middle of nowhere, carry more stuff: a spare tire or tire boot kit, food and water and tools. Always carry money in case you need to make an emergency repair.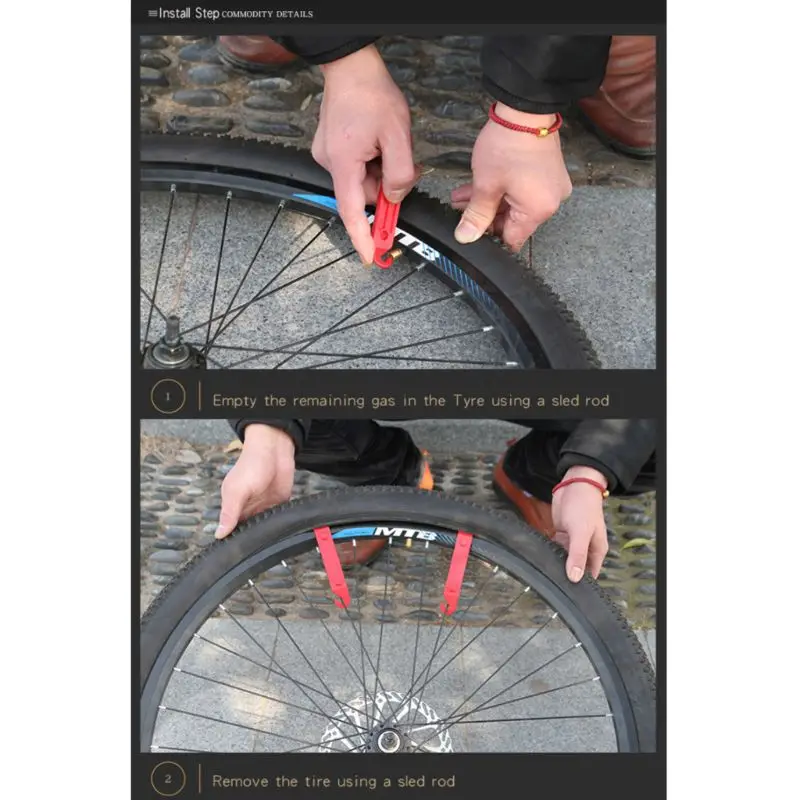
Flat tires can be prevented – but they can’t be completely eliminated. Even with the thickest Kevlar tire, tire liner, thickest tubes with sealant installed and proper pressures, a nail or thorn may still find it’s way through. You should always prepared and not let a simple flat ruin your day.
Recommended
Video how to raise the handlebars on a mountain bike
Seat post
How to remove the fork from the bike?
Maintenance: do-it-yourself bicycle fenders
A bicycle is an environmentally friendly means of transport, and riding it is very popular. Owners of this technique should have some maintenance and repair skills, because this will allow them to quickly and efficiently find a way out in unforeseen situations, for example, to seal the camera or put fenders on a bicycle. The latter option causes a lot of controversy among fans of two-wheeled vehicles.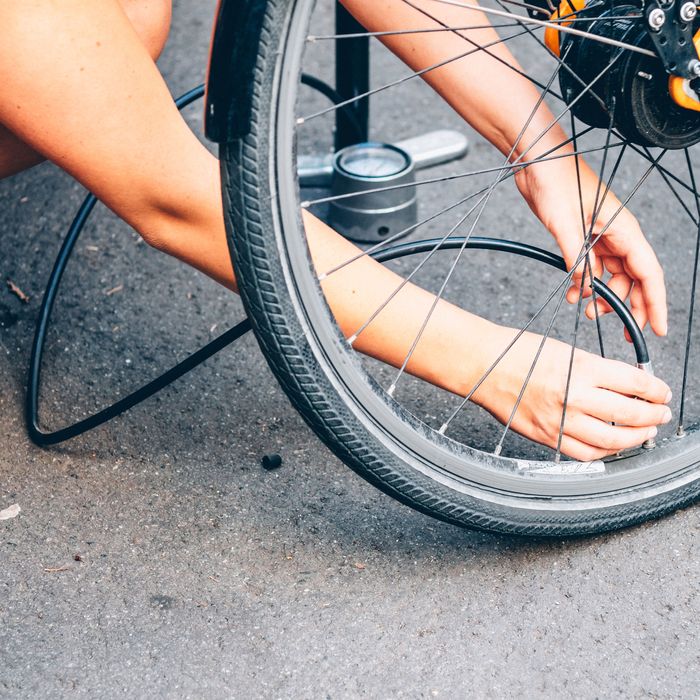 It all depends on individual preferences and it is worth familiarizing yourself with this topic in a little more detail.
Fenders for bicycles have both advantages and disadvantages, which are determined by the type of bicycle and its purpose. Among the positive aspects of this part on the wheels, it can be noted that:
Fans of sports bikes most often do without fenders, as they add weight to the bike, which is unacceptable for sports. For city riding, this detail can be very useful: it will protect the cyclist from getting dirt on his clothes. In order to understand whether the installation of this element is really necessary, you need to try everything on your own experience, as well as choose the right type of fenders for wheels. They can be:
The first option is quite common and they are made of plastic. You need to fasten them to the fork or frame using a bolt. Protection is not complete, which in some cases can be significant. Their weight is small and therefore they do not particularly affect the weight of the equipment.
Quick-release shorts are also made of plastic, but are mobile. They should be fastened with a special clip, which ensures quick installation and removal. Many cyclists use this type of fenders on wheels despite the fact that the level of protection is not very high. It is important to carry out the installation correctly, otherwise the part will be useless.
Long fixed fenders for a bicycle are metal parts that are mounted by attaching in three places to the fork, frame. The area of protection against dirt flying from the wheels is quite large, but it is necessary to periodically clean the part itself. Most of all they are suitable for road or road bikes.
For mountain models, a special type of wing construction should be chosen. Medium-sized options are well suited, which provide the most effective protection and are easy to remove. Here, an acceptable option is to use only one wing per wheel - the rear. You can tie a rubber band on the front.
Mobile versions of this part are easy to install, but the process of fixing stationary ones requires especially close attention. The rim brakes must be disengaged before starting work, which will allow you to attach the rear fender without problems. Then the screw located under the seat is removed and you need to put the element on the seat post. The front fender is easily bolted into place at the fork crown. It is important to calculate the force with which the bolts are twisted. If you tighten too much, then the fasteners may be damaged and become unusable, in the opposite case, it will hang freely and interfere with the ride.
Most often, the option of installing one part is not selected, it is more efficient to install a complete pair. This will provide better protection against splashes and dirt. If you plan to install a rack, you must first install the rear wing. If the roof rack is already installed, it must be removed.
Tools you will need:
Now the question of how to install fenders on a road or road bike is solved. Choosing the right option is not difficult, because modern manufacturers produce a sufficient range of such devices. You can also make wings yourself, but this is a rather laborious process. Correct installation will ensure the functionality of the part and will not make it useless, weighing down the bike.
Today's bike manufacturers don't consider it necessary to equip every bike with a complete set of accessories. But without them, rides will be accompanied by low comfort and safety. We are talking about the trunk, mirrors, fenders. It is with the installation of the last element that problems often arise, especially for novice cyclists. Today we will learn how to install fenders on a bicycle, look at the various options and make you a professional in this field.
Bicycle fenders almost always come with installation instructions, as well as the necessary fasteners
Bicycle fenders almost always come with installation instructions and the necessary fasteners. An exception may be Chinese models. Some instructions even have a diagram that greatly facilitates the work. But questions still arise and they require immediate clarification.
Installing fenders on a bicycle is, in principle, simple. Even a novice cyclist with a minimum set of tools can easily cope with this. It will be a little more difficult to find a quality model and decide on the type of installation that will be suitable for a particular situation.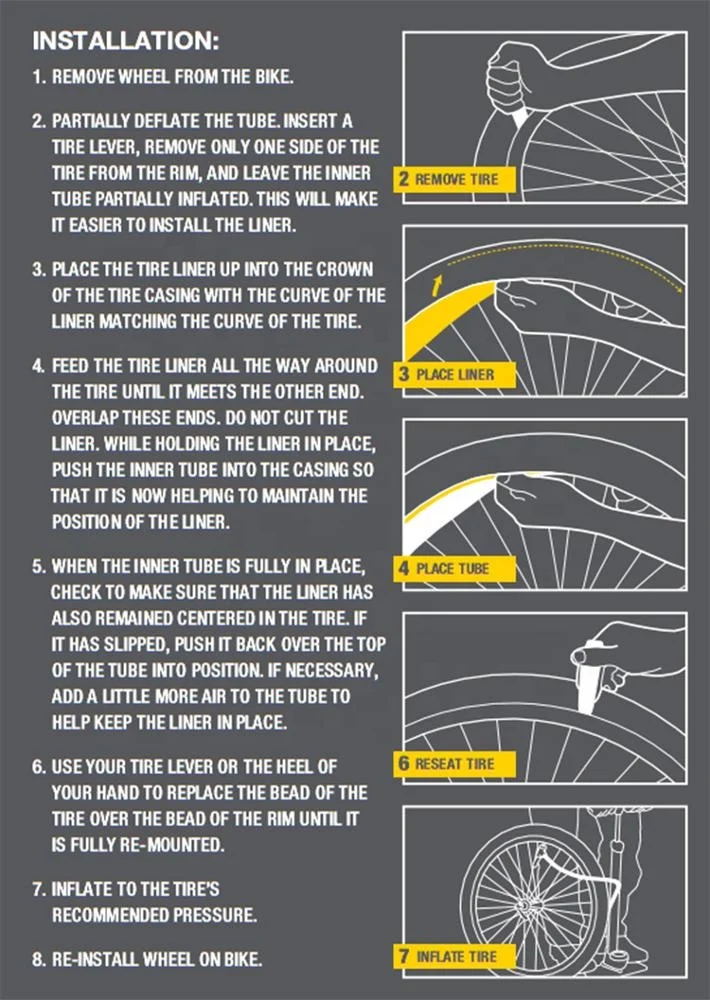 The whole variety of wings can be divided into two large groups: stationary and quick-detachable.
Accessories of this type are mounted with screws to the rear stays and the front fork. City bike owners can opt for larger models that cover half of the wheel. As part of such accessories, there is usually high-quality metal, and long “mustache” made of wire is responsible for their fixation. They cling to the tips on the axles of the wheels.
Pay attention to the height of the wing during installation. If it is located close to the wheel, then splash protection will be more effective. But in this case, one cannot hope for high cross-country ability, which will be well felt while moving along difficult routes. Dirt will clog under the wings, and it will have to be cleaned periodically.
Fixed fenders mounted with screws to the chain stays and front fork
If the protective elements are to be installed on a bike with rim brakes, then they will need to be slightly loosened or generally disconnected before proceeding with installation.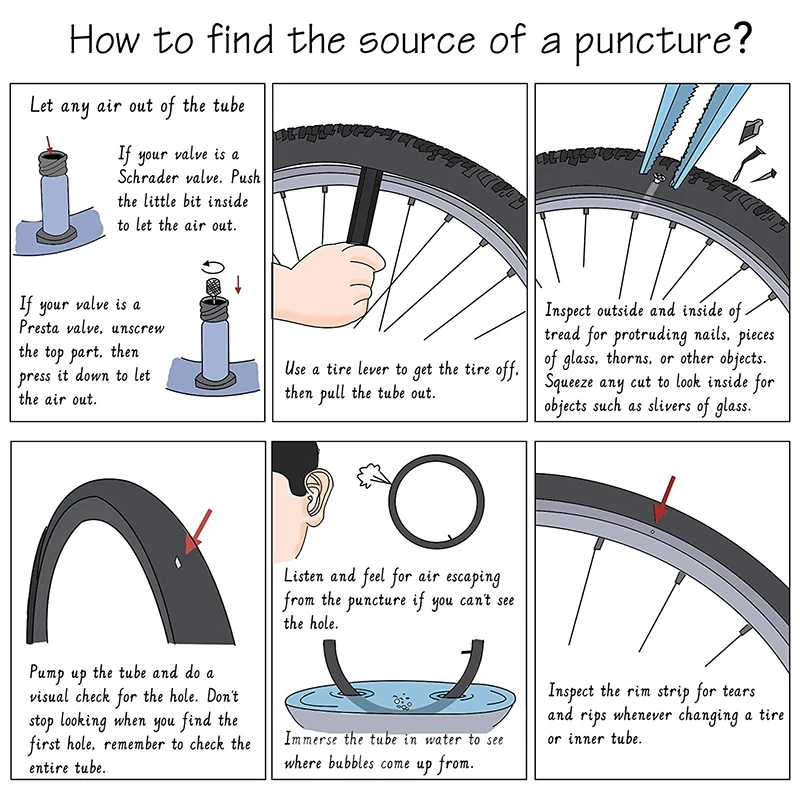
In some cases, a reflector or corner reflector may be located at the fixed wing attachment point. In this situation, there is nothing terrible and irreparable, moreover, the length of the bolt is sufficient for both of these elements to be fixed.
Installing the front fender is most often limited to only one mounting point. Designs that are equipped with so-called mustaches are not affected. For the wing on the rear wheel, two fasteners are usually intended: the element is attached to the frame with a bolt, and it is attached to the bottom of the seat tube with its lower part. Some manufacturers equip their products with special arc-shaped latches.
If the bicycle has a luggage carrier, the installation of the wing is carried out under it, if the design of the bicycle, the wing and the luggage carrier itself allows it.
Usually the front fender is fixed at only one point, while the rear fender has two fasteners
You can remove vibration on the wing and eliminate displacement during intense rides with the help of rubber bands, ties and other elements that will allow you to pull the wing to the trunk structure.![]()
In most cases, the installation of protective elements is carried out according to the general scheme, which looks like this:
Fenders are not installed in the same way on all bicycles.
Fenders are mounted differently on different types of bicycles
Mountain bike owners try to avoid fenders, but the reluctance to ride in dirty clothes takes over. Therefore, from time to time the question of how to install wings on a mountain bike is gaining relevance. Wings can be placed on both wheels. If you think wide bikes are going to ruin the look of your mountain bike, you can install a guard that needs to be fixed under the bottom tube of the frame in the area of the front wheel. For the rear wheels, such shields are not produced.
How to attach wings to a Forward bike is a topical issue for many owners of these solid bikes. To handle the front wheel, the following instructions must be followed:
 A similar procedure applies to both wings.
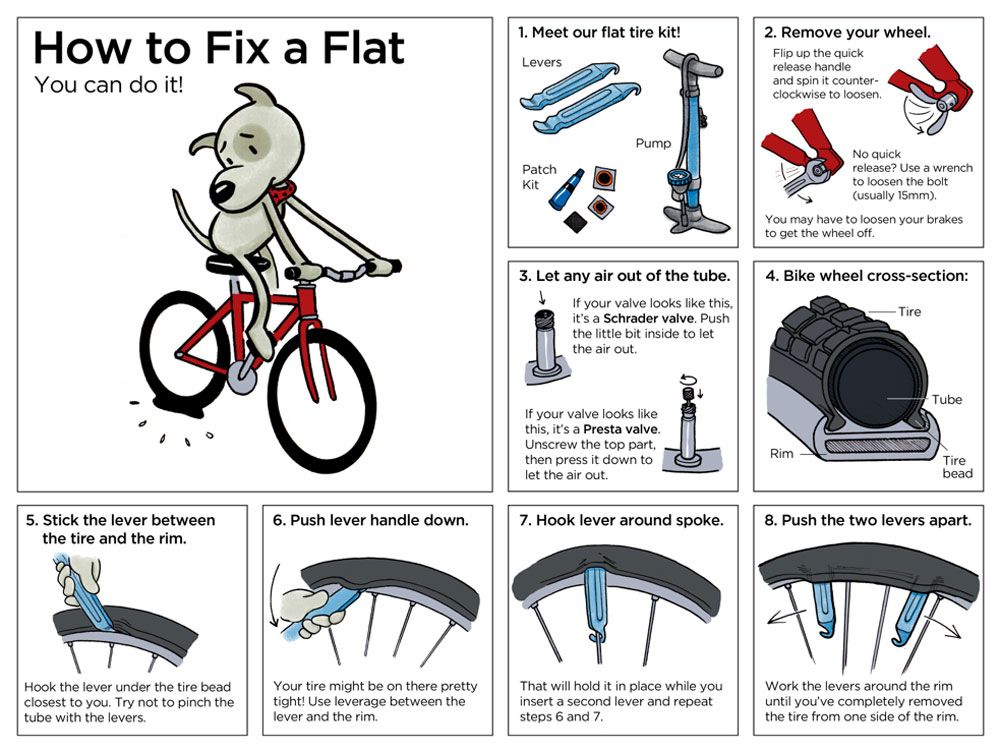
Installing quick-release fenders is not carried out directly to the bike, but to its mounts
This type of bicycle accessory is mounted on the head tube and on the seat post. Such protection elements have an increased width, due to which the cyclist is not afraid of side splashes. Not every model of quick-release accessories involves the installation of a trunk.
Installation of quick-release protective elements is carried out not directly to the bike, but to its mounts. Due to this feature, the accessory will not be easy to steal, since the wing itself can be removed easily, and it takes time and effort to release the mount.
A wing fastener or strut intended for the front wing must be inserted from below into the head tube assembly. Then it is necessary to tighten the fasteners / spacer well with the adjusting screw. It remains to insert the wing into the groove, as evidenced by a characteristic click.
The quick-release type rear guard installation is centered on the pin that holds the saddle. Some bikes have a stud that is so smooth that a well-fitted fender will move when you ride it. To exclude such a situation, it is necessary to use a rubber gasket, which will increase the friction force and will not allow the wing to live its own life.