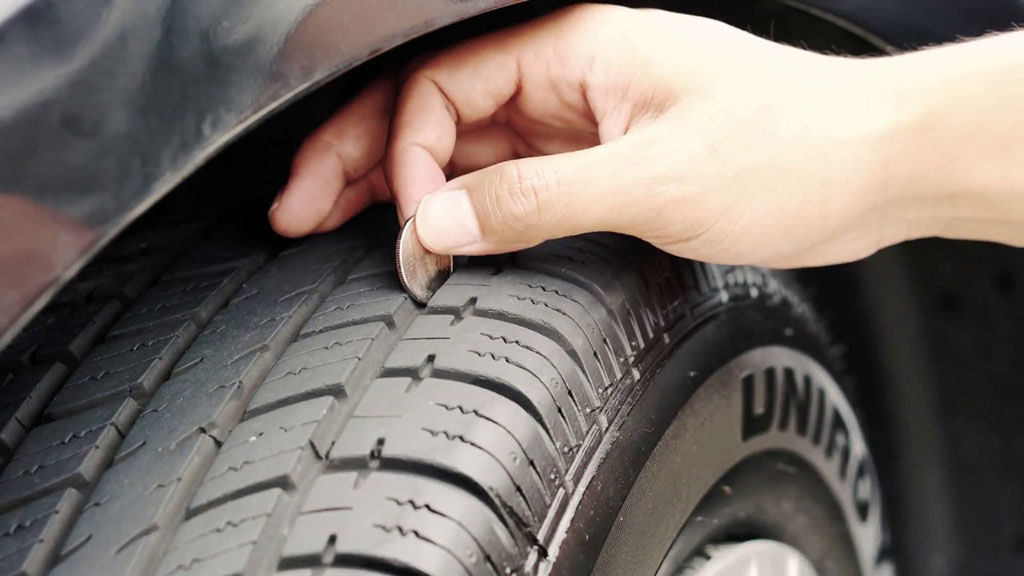
Evaluate the tread depth of your tires to make sure you have enough traction to grip the road. The penny test is a simple way to do this. Just place a penny upside down in your tread. If you can see the top of Lincoln’s head, it may be time for new tires.
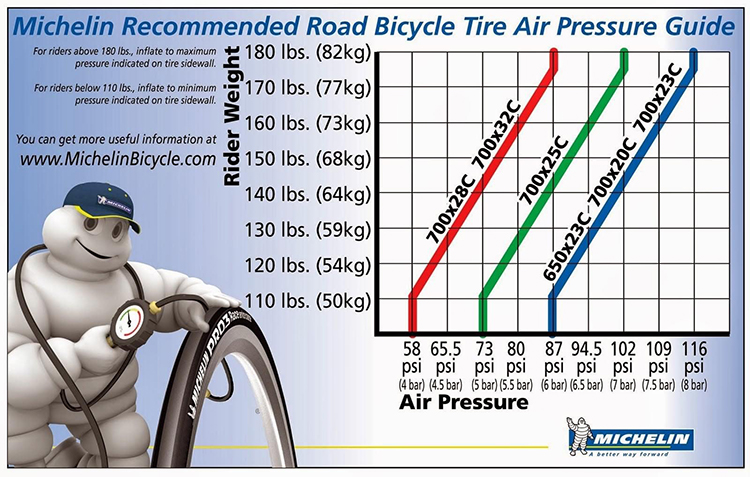
Use a tire pressure gauge to make sure your tires are properly inflated and then fill your tires with air as needed. To check your pressure, remove the valve stem cap, press the gauge head evenly onto the valve stem, use firm pressure so that the hissing sound stops. Remove the gauge and read the pressure. Compare this to your vehicle’s recommended inflation pressure. Always check your tires while they are cold (after sitting for at least 3 hours or before you’ve driven 1 mile at moderate speed).
Never bleed pressure from a hot tire.
In addition to tread depth and inflation pressure, you should also inspect your tires for any damage or conditions that would warrant their replacement. Look at the tread and sidewalls for any cuts, scrapes, punctures, bulges, bumps or cracks. If you see anything suspicious, have a tire service professional take a closer look.
You also want to keep an eye on your tire’s age. Depending on how much you drive each year, your tire’s tread may last for years but just because the tread is not worn out does not mean that your tires don’t need to be replaced. Bridgestone, following industry standards, recommends that tires be removed from service no more than ten (10) years after the date of manufacture.
To determine your tires age just look at the DOT stamping on the sidewall. At the end of the DOT stamping there will be a 4-digit number.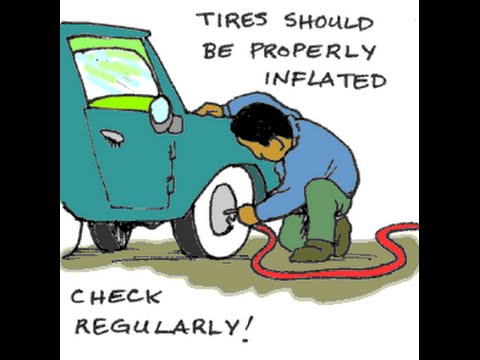 This is the date code. The first two numbers are the week and the last two are the year. For example, 4617 would tell you that the tire was manufactured the 46th week of 2017.
After fuel, oil is your vehicle’s most important fluid, and it gets worn and dirty during its lifecycle. Regularly scheduled oil changes will help keep your engine clean and avoid the potentially engine-damaging effects contaminated oil can inflict. If you want to maximize engine performance, and most importantly, engine life, don’t skimp on your engine’s most vital lubricant. Skipping oil changes, exceeding mileage or going long periods of time before your next oil change can accelerate the wear on the vital parts that keep your car running smoothly, eventually leading to premature engine breakdown.
Want More Road Trip Safety Tips?
See our easy road trip safety tips and learn more about prepping your car for travel.
Learn about our mission, our achievements, and our ongoing commitments
Read Our Origin Story
By: Deanna Sclar and
Updated: 05-24-2021
From The Book: Auto Repair For Dummies, 2nd Edition
Explore Book Buy On Amazon
You should check your tires for wear at least once a month and before and after long trips. You check them to determine whether you need to buy new tires, have your wheels balanced, have your wheels aligned, or change your driving habits.
Underinflated tires wear out faster, create excessive heat, increase fuel consumption, and make your car harder to handle. Overinflated tires can “blow out” more easily, wear out faster, and make the vehicle unstable and unsafe to handle. And a new set of tires on wheels that are out of alignment can wear out completely in as little as one day of hard driving!
What the signs of poor treadwear mean.
To determine what’s causing problems with your tires, try the following:Look for things embedded in each tire. Do you see nails, stones, or other debris embedded in the treads? Remove them. If you hear a hissing sound when you pull a nail, push the nail back in quickly and take the tire to be fixed. Tires with leaks should be patched by a professional.
Look at the sidewalls. Check for deeply scuffed or worn areas, bulges or bubbles, small slits, or holes. Do the tires fit evenly and snugly around the wheel rims?
Look at the treads. Most tires have built-in treadwear indicators. These bars of hard rubber are normally invisible but appear across treads that have been worn down to one-sixteenth of an inch of the surface of the tire (the legal limit in most states). If these indicators appear in two or three different places less than 120 degrees apart on the circumference of the tire, replace the tire.
It’s time for new tires when treadwear indicators appear.
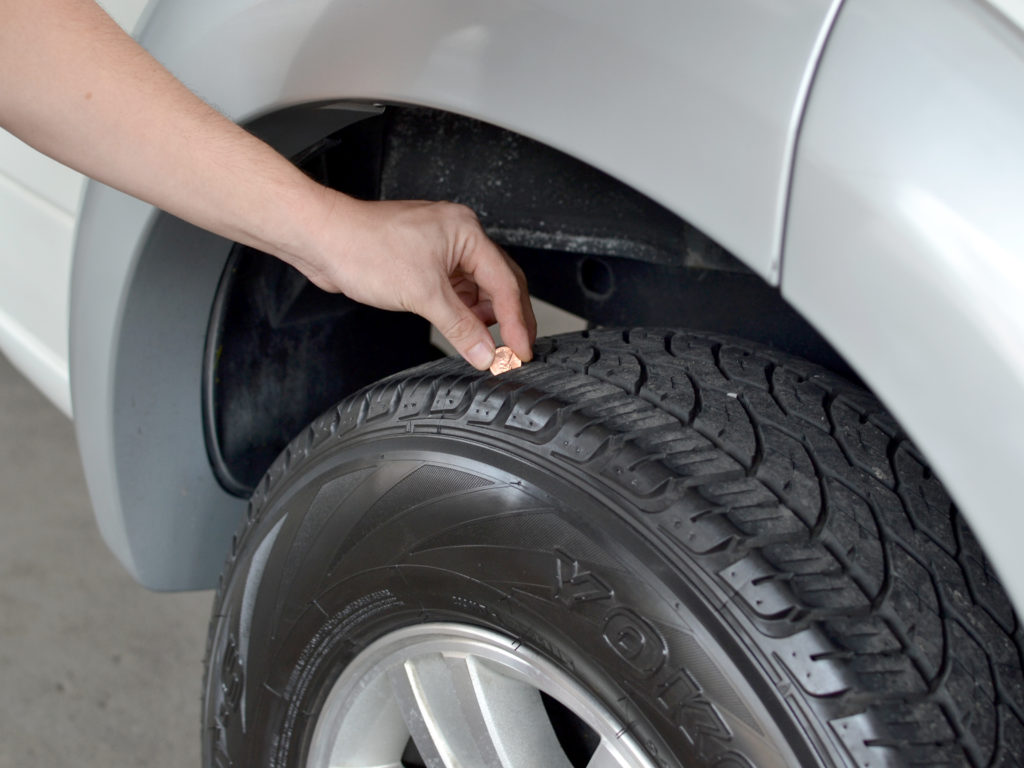
If your tires don’t show these indicators and you think that they may be worn below legal tolerances, place a Lincoln penny head-down in the groove between the treads. If you can see the top of Lincoln’s head, your tire probably needs to be replaced.
To measure treadwear more precisely, place a thin ruler into the tread and measure the distance from the base of the tread to the surface. It should be more than one-sixteenth of an inch deep. (If your front tires are more worn than your rear ones and show abnormal wear patterns, you probably need to have your wheels aligned.)
Sometimes one-sixteenth inch of tread isn’t enough to keep you safe. If you live in a rainy area, measure the depth of your treads with a quarter rather than a penny, using Washington’s hair to see if your tires have at least two-sixteenths of an inch of tread remaining.
Pay attention to leaks. If you keep losing air in your tires, have your local service station check them for leaks. Sometimes an ill-fitting rim causes a leak. The service facility has a machine that can fix this problem easily.
| Clue | Culprit | Remedy |
|---|---|---|
| Both edges worn | Underinflation | Add more air and check for leaks |
| Center treads worn | Overinflation | Let air out to manufacturer’s specifications |
| One-sided wear | Poor alignment | Have wheels aligned |
| Treads worn unevenly, with bald spots, cups, or scallops | Wheel imbalance and/or poor alignment | Have wheels balanced and aligned |
| Erratically spaced bald spots | Wheel imbalance or worn shocks | Have wheels balanced or replace shocks |
| Only edges of front tires worn | Taking curves too fast | Slow down! |
| Saw-toothed wear pattern | Poor alignment | Have wheels aligned |
| Whining, thumping, and other weird noises | Poor alignment or worn tires or shocks | Have wheels aligned or buy new tires or shocks |
| Squealing on curves | Poor alignment or underinflation | Check wear on treads and act accordingly |
If your tires appear to be low, check the pressure and note the amount that they’re underinflated.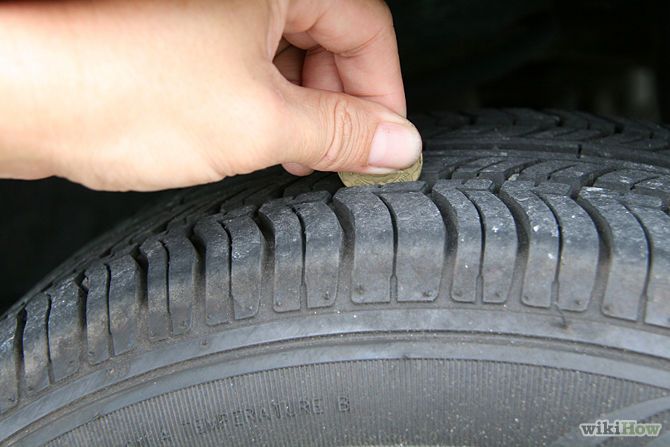 Then drive to a local gas station and add air. It’s easy, but be sure to bring some change (usually quarters) with you for the air dispenser. (Forget about things being “as free as air” — at many stations it isn’t!)
Park your vehicle by the air dispenser.
You will need to reach all four tires with the air hose.
Remove the cap from the tire valve on the first tire.
Use your tire gauge to check the air pressure in the tire.
Air hose gauges at many gas stations are inaccurate.
Checking your tire pressure
The pressure will have increased because driving causes the tires to heat up and the air inside them to expand. To avoid overinflating the tire, no matter what the second reading indicates, you should only add the same amount of air that the tire lacked before you drove it to the station.
Use the air hose to add air in short bursts.
Check the pressure after each time with your tire gauge.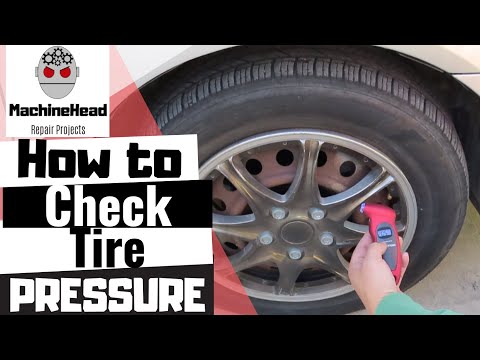
If you add too much air, let some out by pressing the pin on the tire valve with the back of the air hose nozzle or with the little knob on the back of the rounded end of the tire gauge.
Keep checking the pressure until you get it right.
Don’t get discouraged if you have to keep adjusting the air pressure. No one hits it on the head the first time!
Deanna Sclar is an acclaimed auto repair expert. She has appeared on hundreds of radio and TV shows, including NBC's Today show and the NBCNightly News. Sclar lectures internationally on the ecological impact of vehicles and is active in promoting residential solar energy programs.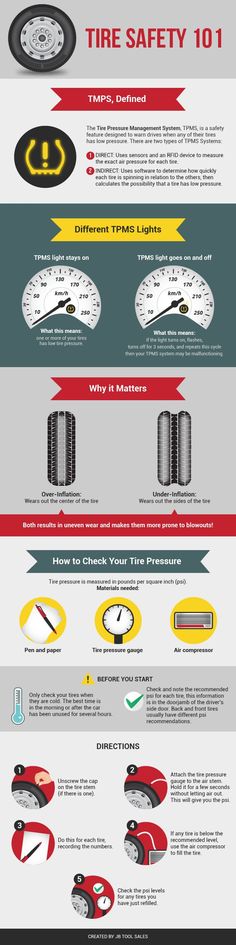 Sclar is also the author of Buying a Car For Dummies.
We have already written how to check the geometry of the body, generator, ignition system, battery, engine, running gear when inspecting a used car. In this article we will tell you how to check the tires when buying a used car.
Some experts say that using used tires is like playing Russian roulette - you only have to rely on luck. And to make the case really happy, you should check the wheels as carefully as possible.
Tires are a guarantee of safety on the road. When inspecting a car and used tires, check the following:
Each of the parameters is important in its own way, and therefore ignoring at least one of them can significantly reduce the level of safety on the road.
We recommend checking first. If the tires have served their allotted time, further operation does not seem rational. This is easy to do - the date consists of two digits: the week number and year of issue, applied to the outside of the rubber. If, upon inspection of the machine, it is found that the numbers on each wheel are different, then this indicates a non-simultaneous replacement of the wheels. The reason for the replacement, if the service life has not yet come up, you should ask the seller.
Visual inspection is sufficient to check tire wear. It is important that tire wear (if any) is uniform over the entire circumference of the wheel. Uneven tire wear can be a sign of wheel imbalance, and it also indicates a possible sloppy driving style of the previous owner, which can cause several more problems when operating a car. Increased wear on the outside indicates insufficient tire pressure, which should also be checked before a test drive. The operation of such wheels is fraught with the fact that in corners the rubber will not “hold” the road well. If the center part was more subject to wear, get ready for a decrease in acceleration, handling and braking.
When buying a car, be sure to pay attention to this parameter. Tests show that the permissible tread depth should be at least half of the original - for summer tires it is at least 3 mm (1.6 mm by law, but it would be better to leave a margin), for winter tires - at least 4 mm.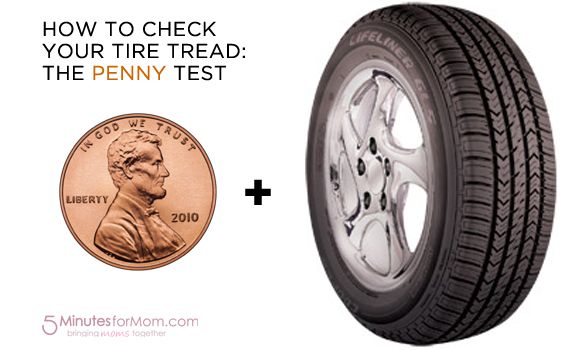 It is not difficult to check the depth - in car dealerships you can buy a special probe with marks or use a simple ruler.
When inspecting the tread, it is not superfluous to check for signs of repair from the inside (on a smooth surface). By themselves, the patches on the tread are not critical, but only if their number does not exceed a couple of pieces per wheel, and their size is a third of the width of the pattern. Otherwise, the operation of the "horse" on such wheels should be abandoned. Pay attention to the nature of the patch - the restored tread pattern (the so-called "grooving") can result in a tire rupture.
The tire grips the road surface across the entire tread width. The edges of the tire also have an impact on braking performance. The smaller they become, the less grip the rubber has on the road surface, and therefore the risk of driving on wet or slippery surfaces increases. A worn leading edge indicates problems with the car's suspension, which is also worth paying attention to. You can check this part of the tread "by touch" - the problem is present if the teeth on the tread edges differ in sharpness.
Tire micro cracks can occur even under conditions of minimal rubber wear and careful storage. The average service life of rubber is 5 years, but, as a rule, by the end of the term, the tire naturally becomes unusable. In the presence of small cracks, it is not recommended to exceed the speed of more than 80 kilometers per hour, otherwise the chances of complete tire wear increase rapidly. Deep cracks appear with a large degree of delamination of the tire. The use of such tires is highly discouraged.
Defects in the form of cuts and repair marks are a clear signal to stay away from the selected used rubber. As a rule, tire side cuts are dangerous due to the fact that the repair of such defects is extremely difficult and not gives a further guarantee of the quality of rubber operation.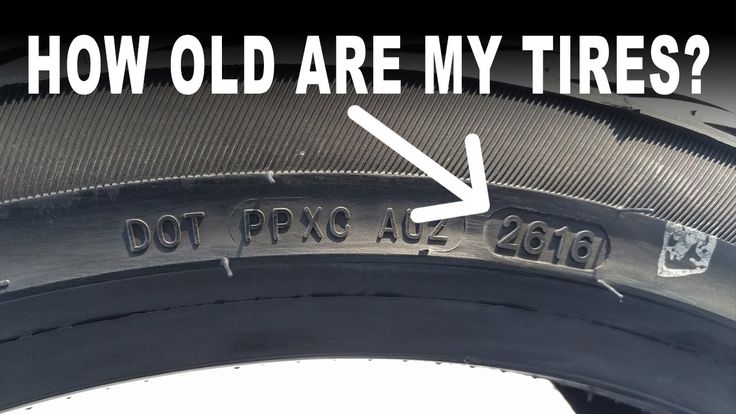 But, in addition, it is necessary to check and make sure that there are no hidden damages. Deformation of the tire carcass in the form of dents and creases can be the result of driving or parking on a flat tire, as well as a strong impact. The end of the service life in this case may come earlier than expected.
The internal delamination of the tire is extremely difficult to detect. A warning can be various types of swelling on the inside of the tire. Visible breaks in the layer are also possible. Check the degree of puncture of the tire - when pressed with two thumbs, the tire should not deform much, but will quickly return to its original shape.
These tire and wheel test parameters apply to both summer and winter tires. But, in the cold season, when the car is “reshod” in winter tires, some other factors should be taken into account.
In winter, buying a car with winter tires is considered correct, but another situation is possible, so do not neglect the inspection of the wheels.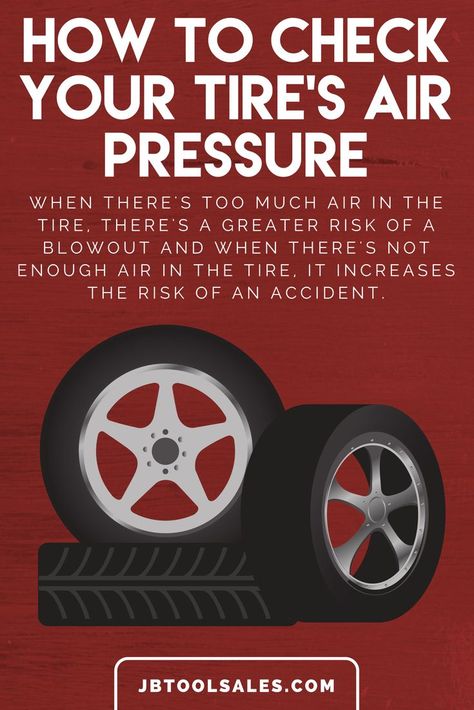 First of all, you should check what the car is “shod” in - it can be idle for a long time, especially if the transaction takes place in the car market. Winter wheels are divided into two types: studded and friction.
Equally important is the tread depth. For 100%, it is customary to take the tread depth of new tires, 0% - unusable, respectively. The minimum permitted tread depth for winter tires is 4 mm, otherwise 0%. From the factory, tires are produced with different depths. Keep in mind that if the initial depth reached 8 mm, then 4 mm is not 50% wear, as some sellers say.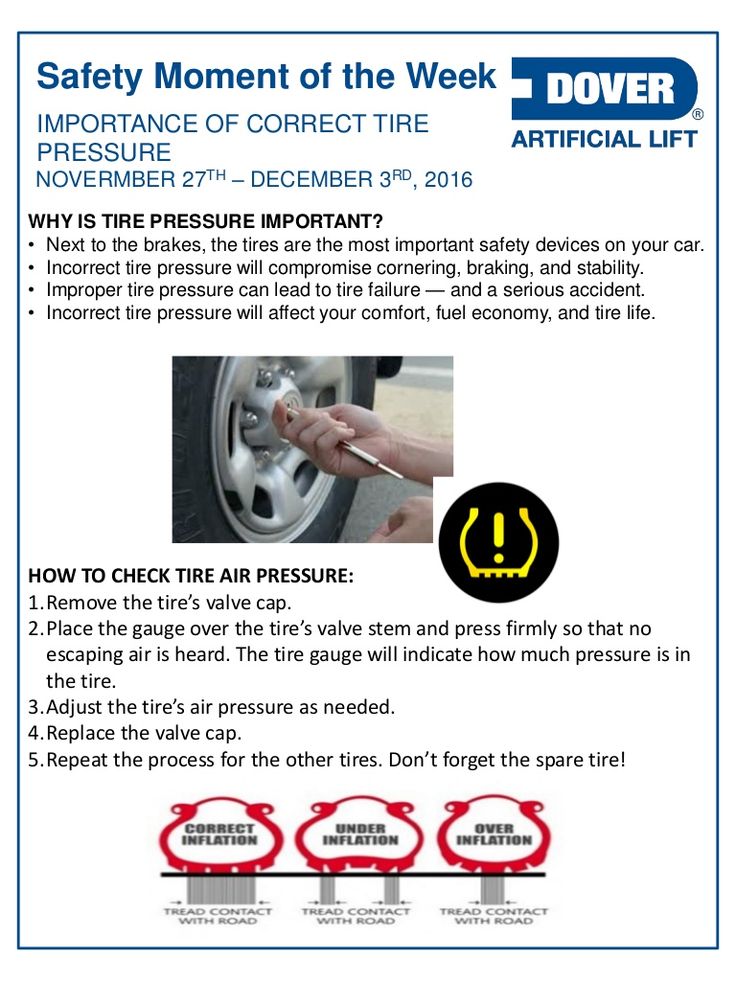
A buyer's vigilance will be a guarantee of a good deal. Bad tires in the general good condition of the car is not always a reason to refuse a purchase. If the wear is natural and even, and also corresponds to the average life of tires, the option of purchasing a car is worth considering. You can always eventually replace the rubber with one that will inspire confidence.
In order to avoid doubts about the history of the purchased car during the inspection, check the history of the car using the Autocode online service. To obtain a complete report, only the VIN, chassis number or state number of the vehicle of interest is required.
By driving in unique car numbers, you will receive the following data:
If you are a professional car dealer, you can also use the Autocode Profi service of unlimited car checks. Autocode Profi allows you to quickly check a large number of cars, add comments to reports, create your own lists of liquid vehicles, quickly compare options and store vehicle data in an orderly manner.
Tire wear or other negative factors may be hidden by the seller. So that they do not subsequently lead to problems in other parts of the machine, order an on-site Autocode check. The specialist will arrive at the place at any time and conduct a professional inspection of the vehicle. Checking the machine through Autocode will help to verify the correctness of your assumptions or refute them.
If there are no serious problems in the history and technical part of the car and you decide to buy, take the final step - enter the seller's passport data through the car owner verification service. This service will show whether he has problems with the law, whether his passport is valid, whether there are debts and enforcement proceedings. If the audit finds serious problems, it is better to refuse the deal. View sample report
Car tires are one of the main parts of a car. In addition, it is the only part of the vehicle that has contact with the road surface. Perhaps your tires have saved you and your car many times in various situations.
Unfortunately, but it is a fact - tires are poorly maintained and rarely checked by car owners and unscrupulous car services. And if they are checked, then only during maintenance.
We hope that our tips will help you get the most information you need to achieve the best performance and the safest driving experience for you and your family.
As a suggestion, why not immediately after washing? This way you can get a better view of the sidewalls and surface of the tire. Raise the wheel to check all sections of the tire. To do this, we recommend using safe lifts (jacks).
Now we will tell you how to check tires without resorting to a jack or a lift.