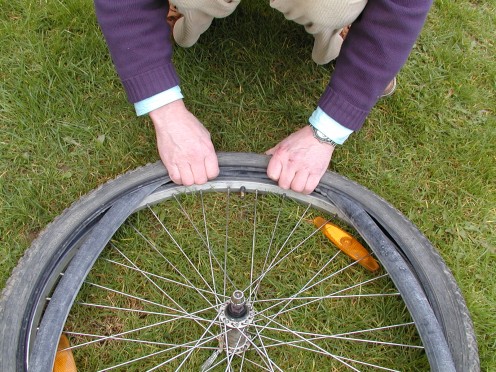
It’s pretty rare to get a flat tire when you have a tubeless setup. The sealant inside your tires will quickly seal small holes and cuts to keep you rolling on the road or trail. However, flats are always possible – even with tubeless. Whether you’ve discovered your tire is flat after storing it in the garage, or you lose pressure after a sudden impact with a rock, we have you covered with the tips you need. Check out our guide to fixing your tubeless flat and getting back out on your ride.
You also might need:

PRO TIP: Opt for plastic tire levers over metal ones. They won’t scratch the surface of your rim and they are lighter and easier to carry!
 If you find a large hole or gash in the tire that cannot be fixed with sealant alone, you’ll need to patch the tire and you might even need to install a tube until you arrive home.
PRO TIP: If the last bit is super tight, start back at the top and use your hands to wiggle the tire into the center of the rim. Just like you did at the beginning to loosen the bead from the rim, this creates extra slack in the tire and will make it easier to get onto the rim. While you wiggle the tire push down. When you get to the bottom, you might be able to pop that tire on with your bare hands!
 Then, just give it a spin and squeeze your brake to make sure everything works like it should. Nice job!
How to Choose the Right Saddle
How to Store Multiple Bikes and Gear in Small Spaces
How to Adjust Your Suspension on the Trail
How to Adjust a Dropper Post
How to Set Up Mountain Bike Suspension
Get Your Printable Fix-a-Flat Zine
How to Fix a Flat Tire | Tubeless
How to Fix a Flat with a Tube
Top Five Bike Maintenance Tips
What to Pack for an Epic Mountain Bike Ride
How I Became a Professional Bike Mechanic
How to Use a Torque Wrench
How to Select Mountain Bike Tires
How to Select Road Bike Tires
How to Perform a Safety Check on Your Bike
The Importance of Proper Bike Fit
How to Prep Your Bike for Riding in the Rain
How to Replace Disc Brake Pads and Rotors
How to Cut MTB Handlebars
Trailside Bike Repair Fix Guide
How to Setup Tubeless Tires
How to Silence Common Bike Noises
How to Replace Handlebar Tape on a Road Bike
How to Pack and Ship a Bike
How to Wash a Bike
How to Adjust a Bike Derailleur
How to Repair a Broken Bike Chain
How to Make a Wall-Mounted Shelf to Hang your Bike
How to Make a Bike Hook out of Pipe Fittings
How to Carry a Yoga Mat on a Bike
Removing and Reinstalling a Bike Wheel for Transport
How to Navigate the Subway with a Bike
How to Lock your Bike in a City
Parts of the Bike
How to Fix Squeaky Disc Brakes
Bike Safety | Hand Signals and Riding Tips
Cycling at Night: How to Light Up Your Bike
The sealant used in a tubeless tyre setup is designed to quickly plug small holes, often without you even realising.
However, sometimes the size or the location of the puncture will require more than sealant to fix it.
Here’s how to repair a punctured tubeless tyre using tubeless plugs, patches or sewing.
Tubeless punctures are often easy to find: look for tell-tale sealant or listen for the hissing of lost air pressure.Immediate Media
These days, a tubeless plug kit is a key part of any rider’s tool kit.Steve Behr
To repair a tubeless tyre puncture, you will require
For a more serious or stubborn puncture, you may need a tyre patch and/or a needle and thread.
If your sealant has dried out, you might need to refresh it.Russel Burton
You may also require:
Tubeless puncture plugs are a quick and effective solution.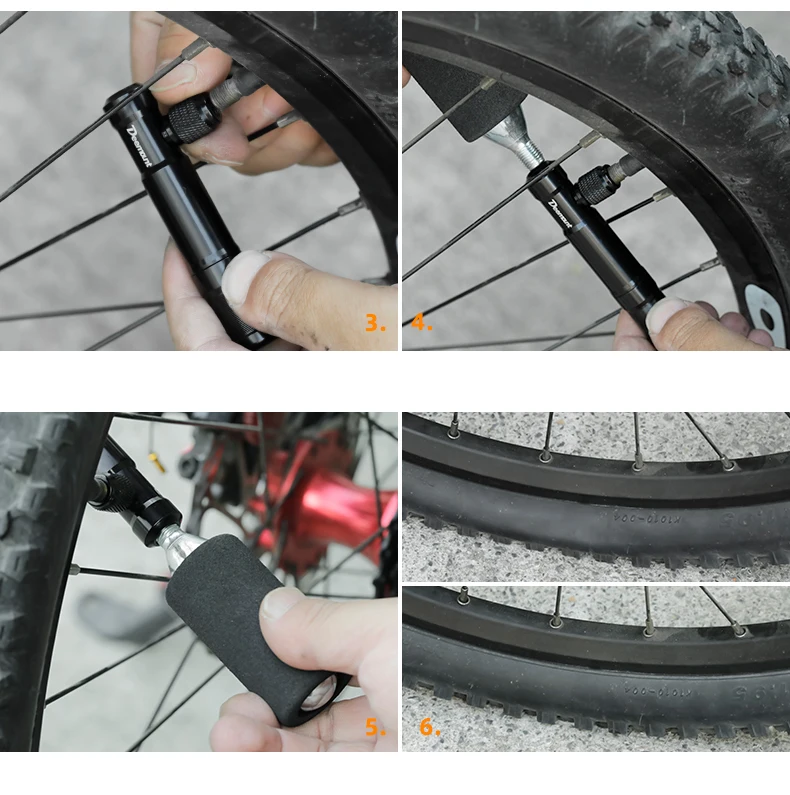 With these, there is no need to take off the tyre – just plug, re-inflate and go.
While there are a number of tubeless repair kits out there, most work in a similar way, using a rubber plug to fill the hole.
Once you’ve found the puncture, remove any offending items (a pick or a small pair of pliers are a useful addition to your tool bag for this very purpose).
Next, use your tubeless plug tool to make sure there’s a sufficiently large hole for the plug to enter – carefully insert the spike into the tyre to avoid damaging the rim tape, and twist to give a clean, round hole.
Thread a tubeless plug through the head of the tubeless plug tool. Most tools will come with a choice of different plug sizes to suit the size of the hole.
With the plug in the centre of the tool, insert it into the tyre, making sure you don’t push through fully.
Then twist carefully to slowly remove the tool, leaving the two ends of the plug on the outside of the tyre.
Inflate the tyre to your desired pressure, taking additional caution with high-pressure road tyres, and rotate the wheel so that the plug is at the ground for a few minutes before you get going again.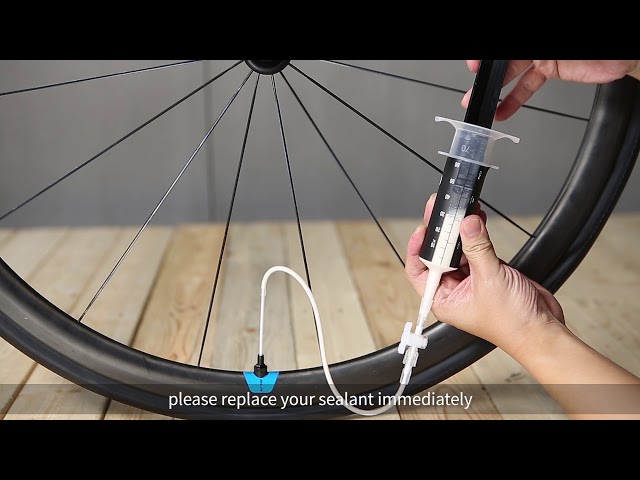 This will allow some sealant to flow into the repair and fully seal things.
You may need to trim the tails of the plug that are left behind, but take care not to cut it too close to the tyre.
For more stubborn tubeless tyre punctures that can’t be fixed with a plug, it may be necessary to patch the tyre internally. The process for this is very similar to patching an inner tube.
First, you’ll need to roughen the surface that you want your patch to adhere to, using a little sandpaper, making sure there’s no debris left from the puncture. Cleanliness is key when it comes to gluing patches.
Add some vulcanising rubber solution to the area where you want to add the patch, waiting for it to become tacky as per the kit instructions.
Add the tubeless tyre patch and press down firmly. Try to avoid touching the surface that is to be glued because this can contaminate the adhesive.
Depending on the patch type, these may need minutes or hours to dry, before setting the tyre up tubeless as normal.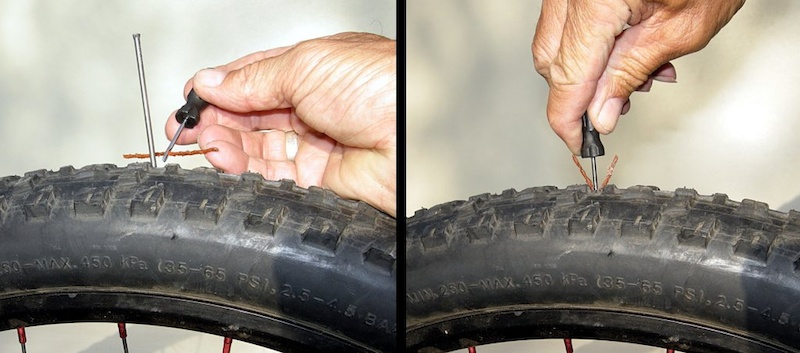
If successful, a patched tubeless tyre can last for many rides, often to the end of the tyre’s life.
A torn tyre can be a rider’s worst nightmare. These repair options should be viewed as a way to help you limp home before fitting a new tyre, rather than a long term solution.
A tyre boot can be placed on the interior of the tyre without any adhesive, held in place by the addition of an inner tube.
This flat boot keeps a flush internal surface to prevent the inner tube from bulging out of the slashed tyre. You can buy pre-made boots or make one out of a number of materials: toothpaste tubes, a section of inner tube or cash notes all work surprisingly well.
You’ll need a strong thread and needle to sew a tyre, such as this thick nylon or tooth floss.Immediate Media
If you don’t have a boot but you do happen to have tooth floss and a needle, you can actually sew up a torn tubeless tyre.
Using stitches perpendicular to the direction of the slash can help hold the casing of the tyre together before you insert an inner tube.
If you do use this method, it’s a good idea to add something between the sewn rubber and inner tube, such as a strip of strong tape.
If you are heading to the hills for an extended bikepacking or touring trip, packing a needle and thread is a good idea for this and any other fabric repairs.
No matter how hard you try, there’s always the chance a tubeless tyre might not be fixable on the road or trailside. Inserting an inner tube can be a mucky business with sealant already in the tyre, so it’s generally a last resort.
Before fitting an inner tube, thoroughly check the tyre for any punctures or offending items such as thorns. Just because you’ve found one, doesn’t mean there won’t be more embedded in the rubber waiting to puncture your inner tube too!
You can still get snakebite punctures with tubeless too, so make sure you’re running adequate pressures in your tyres, especially over harsh or rocky terrain to avoid a nasty double puncture from an impact on the rim.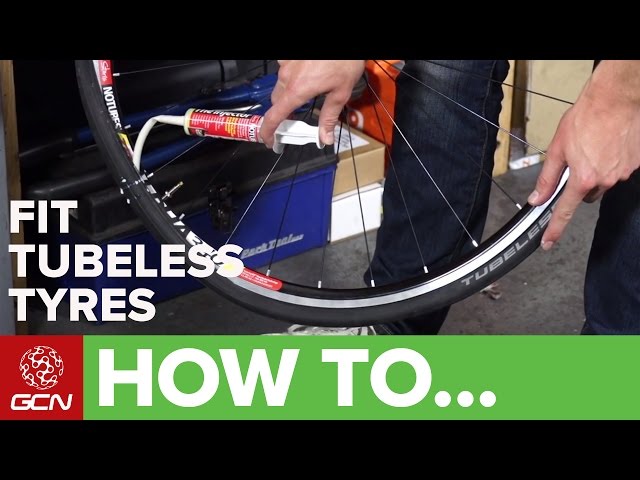 These are notoriously tricky to fix, with holes often too close to the tyre bead.
Besides punctured tyres, there are other things that need careful maintenance to keep your tubeless set up running smoothly, including the rim tape, tubeless valves and sealant.
It can be pretty hard to sort these on the go, so that’s when you might need to pop in a tube and leave the closer inspection until you’re home.
Katherine Moore is Bristol-based gravel and bikepacking expert who judges her rides by stoke level, rather than speed. When she’s not scouting out the best long-distance and local off-road routes in the UK, Katherine works as a freelance writer, bike tester, presenter and guide. Katherine is the former editor of advntr.cc and has also worked as a presenter on the Global Cycling Network. As well as being a regular contributor to BikeRadar.com and the BikeRadar Podcast, Katherine has also written for Cycling Weekly, Bikepacking. com and hosts the Unpaved Podcast. If you’re out on the trail you’ll likely see her from a mile off, thanks to her rather bright colour palette!
06 Breast 2018, Thu
In this article, we'll show you how to fix a puncture or cut on a tubeless bike tire. What tools are needed for this. What mistakes should not be made when repairing bk rubber.
For repairing punctures and cuts up to 2cm, special tire repair kits can be used. They are a screwdriver with a sharpener and a special hook for a tourniquet made of vulcanized rubber. In our store, such sets are represented by the Lezyne brand:
1. So, we got a puncture or a cut in the tire. First you need to quickly find the puncture site and prepare a repair kit.
Important! It is advisable not to let the tire go down "to zero" as it can "snap out of the beads" (this is when the tire peels off the rim bead) and then, in addition to the puncture, you will also have to solve the problem with inflation in the field, and this requires a special Co2 pump or a high-performance pump/stack/compressor. So that the tire does not go down completely, you can not remove the object due to which the wheel has broken through or pinch the puncture site with your finger until you start to eliminate the puncture.
2. Prepare the site of damage to the tire: We remove the cause of the puncture from the wheel, if it remains, and insert the awl of the repair kit into the site of damage and grind it. We take out the awl and again hold the puncture site with your finger so that the wheel does not go down.
3. Take the tourniquet and insert it into the holder as shown in the photo.
4. Together with the tourniquets, we insert our awl into the puncture site by about 1.5-2 cm so that two tendrils of the tourniquet stick out. Glue is not required. If there is sealant left in your tire, it will seal the remaining puncture well. If the sealant is not enough, it is advisable to add it, but after using the repair kit.
5. Now the most difficult moment that everyone who has ever dealt with tire repair does in his own way is how to remove the awl and at the same time leave the tourniquet in the tire. Someone simply breaks the tourniquet in half by twisting the awl in the tire (this is what many motorists or motorcyclists do), but for this you need to have a fairly strong tire with a thick bead. If the tire is light and thin, then this trick will not work.
Tip: In my experience, I stretch the tourniquet a little in the middle, thereby making it thinner at the awl grip. This allows you to easily remove the holder from the flagellum when it is already in the tire.
Q&A:
How reliable and durable is this repair? How wide can a hole be repaired with a repair kit?
- With the correct use of the repair kit, this repair will last the entire life of the tire. An exception occurs only in cases where the cut is more than 1.5-2 cm or the tire at the place of the cut begins to "diverge along the seam".
Do I need to cut the tendrils from the harness protruding from the tire?
Not required. Over time, they will rub against the asphalt because they have a softer rubber compound than your tire.
Can the repair kit be used in wet weather?
Yes. No problem.
Can an awl or a small screwdriver be used instead of a special awl-screwdriver for repairing tubeless tires?
- It is possible, but this entails certain nuances. It is better to use a small screwdriver, but you need to be careful as you can damage the tire carcass.
I have run out of special flagella, what should I do?
- No problem. Alternatively, you can use a vulcanized patch cut into strips or a regular patch, or a piece of felt rope. Many even managed to seal it with a cigarette filter or rubber bands. But these are temporary options, so to get to the finish line.
Repair harnesses are always available in our shop.

In addition to the rim and TR tires, you will need:
First of all, you need to forget about the use of beads, as they can damage the tires. We do everything with our fingers.
1 All manipulations are carried out on an already assembled wheel. First we need to seal the rim. To begin with, we clean and degrease the rim. Since the holes for the nipples sometimes have burrs and can damage the yellow tape, we check the holes on the rim and grind the burrs with a file (most likely they will not be there). Then we wipe the rim over the entire diameter with a zero, degrease it with alcohol or another liquid and wipe it dry. Attach yellow tape. At the same time, we stretch the tape, we are not afraid to apply force, be sure to pass the central groove so that the tape fits into it. We start gluing 7 - 10 mm from the hole for the nipple with the expectation that it will be glued twice. We cut the tape and pierce the hole for the nipple with an awl. In order not to crush the seals, tighten the valve without using any tools. Then lubricate the rim from the inside and the heel of the tire from the outside with a special fluid designed for installing tubeless tires. Also, instead of this liquid, you can use a solution of water and soap. First we need to seal the rim. To begin with, we clean and degrease the rim. Since the holes for the nipples sometimes have burrs and can damage the yellow tape, we check the holes on the rim and grind the burrs with a file (most likely they will not be there). Then we wipe the rim over the entire diameter with a zero, degrease it with alcohol or another liquid and wipe it dry. Attach yellow tape. At the same time, we stretch the tape, we are not afraid to apply force, be sure to pass the central groove so that the tape fits into it. We start gluing 7 - 10 mm from the hole for the nipple with the expectation that it will be glued twice. We cut the tape and pierce the hole for the nipple with an awl. In order not to crush the seals, tighten the valve without using any tools. Then lubricate the rim from the inside and the heel of the tire from the outside with a special fluid designed for installing tubeless tires. Also, instead of this liquid, you can use a solution of water and soap. | |
2, 3 - first put the first tire bead inside the rim, and then carefully the second bead. You have to work consistently and slowly. You have to work consistently and slowly. | |
| 4, 5 - after installing both beads into the rim, the tire is inserted entirely inside the rim and simultaneously straightened with a smooth circular motion of the hands. | |
6 Then we insert the tube, pull the tire onto the rim (it will be tight, it will fit both sides into the central groove on the rim, and the heel zones of the tire will be located close to the inner cavity of the rim). Loading up the camera. You can usually skip this step, but we need it in order to properly press the yellow tape to the rim with the camera and level it. In addition, we can see how the tire sits on the rim, which at the stage of installation with sealant will greatly simplify your life. As the tire sits tight, it may become crooked at first. That is, part of the bead cord of the tire will become as it should be under the bead of the rim, and the other part will remain in the central groove and, regardless of the force applied, it will not want to move into place. To correct this situation, we pump air to the pressure recommended by the manufacturer or a little more. It's different for every tire width. A loud sound will indicate that the tire bead has popped out of the center groove and snapped into place against the rim bead. If even now the tire has not become even, then you can help it to fall into place with your hands. If you want the labels on the tire to match the stickers on the rim, then pre-tighten the tire evenly, because after you have tensioned at least one side, it will be very, very difficult to dislodge the tire. In this state, the wheel should be left for a day or several hours and you can start pouring tire sealant. We release air from the chamber. In the process of pressure drop, one or the beads may slip into the central groove. In the ideal case, one side remains in place, and we dismantle the slipped side. We take out the chamber, screw the nipple into place and fill in the sealant for tubeless tires. The amount of sealant depends on various conditions - I would recommend 100 grams. To correct this situation, we pump air to the pressure recommended by the manufacturer or a little more. It's different for every tire width. A loud sound will indicate that the tire bead has popped out of the center groove and snapped into place against the rim bead. If even now the tire has not become even, then you can help it to fall into place with your hands. If you want the labels on the tire to match the stickers on the rim, then pre-tighten the tire evenly, because after you have tensioned at least one side, it will be very, very difficult to dislodge the tire. In this state, the wheel should be left for a day or several hours and you can start pouring tire sealant. We release air from the chamber. In the process of pressure drop, one or the beads may slip into the central groove. In the ideal case, one side remains in place, and we dismantle the slipped side. We take out the chamber, screw the nipple into place and fill in the sealant for tubeless tires. The amount of sealant depends on various conditions - I would recommend 100 grams.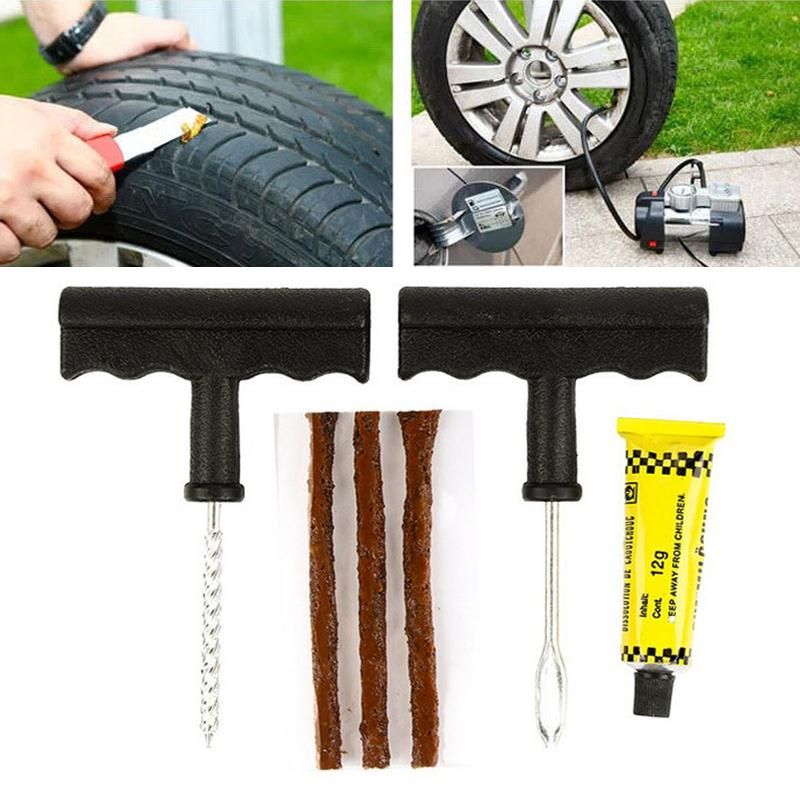 Before pouring the sealant, we board the tire about 3/4 of its circumference with the nipple up. It would be nice if someone could help you. One person holds the wheel and tire to keep the bead from slipping off the rim while a second person measures and pours the sealant. If you still have to work on your own, then it’s better to hang the wheel, because it’s wrong to pour sealant into a wheel that is on the ground with disassembled rubber. In order not to try to measure the sealant with the help of a container, we hang the jar of sealant on a conventional electronic kitchen scale, remember the weight and pour it until it comes out approximately 100 grams less when weighing again. So you kill two birds with one stone, firstly, you know exactly how much sealant is filled in (a few grams will still run away during sealing), and secondly, you know how much the weight of your bike has increased. Filling the sealant, we begin to bead the tire. The bead slides into the center groove and prevents sealant from escaping from the side. Before pouring the sealant, we board the tire about 3/4 of its circumference with the nipple up. It would be nice if someone could help you. One person holds the wheel and tire to keep the bead from slipping off the rim while a second person measures and pours the sealant. If you still have to work on your own, then it’s better to hang the wheel, because it’s wrong to pour sealant into a wheel that is on the ground with disassembled rubber. In order not to try to measure the sealant with the help of a container, we hang the jar of sealant on a conventional electronic kitchen scale, remember the weight and pour it until it comes out approximately 100 grams less when weighing again. So you kill two birds with one stone, firstly, you know exactly how much sealant is filled in (a few grams will still run away during sealing), and secondly, you know how much the weight of your bike has increased. Filling the sealant, we begin to bead the tire. The bead slides into the center groove and prevents sealant from escaping from the side. | |
7, 8 Turn the wheel a little by hand so that the sealant spreads evenly and pump it up with a high-quality floor pump that is able to create sufficient pressure. Since the tire sits tight, even at the very beginning the air loss will be insignificant, we pump up the air and wait until the bead falls into place. We recognize this moment by the loud sound of rubber hitting the rim flange. Along the way, you need to check for any bubbles of liquid or soapy water for installation, which may indicate the presence of gaps between the walls of the rim and the tire. Take the wheel in both hands and shake it in all directions to seal small holes - if the tires are of good quality, then this process will be quick. We put the wheels on the bike and go for a ride. At first, it is possible that the tire will lose pressure - this is a slow process, but in 2-3 days the pressure can drop by one atmosphere. This problem can be solved by disassembling, draining the sealant and washing the inside of the tire with a brush and soap.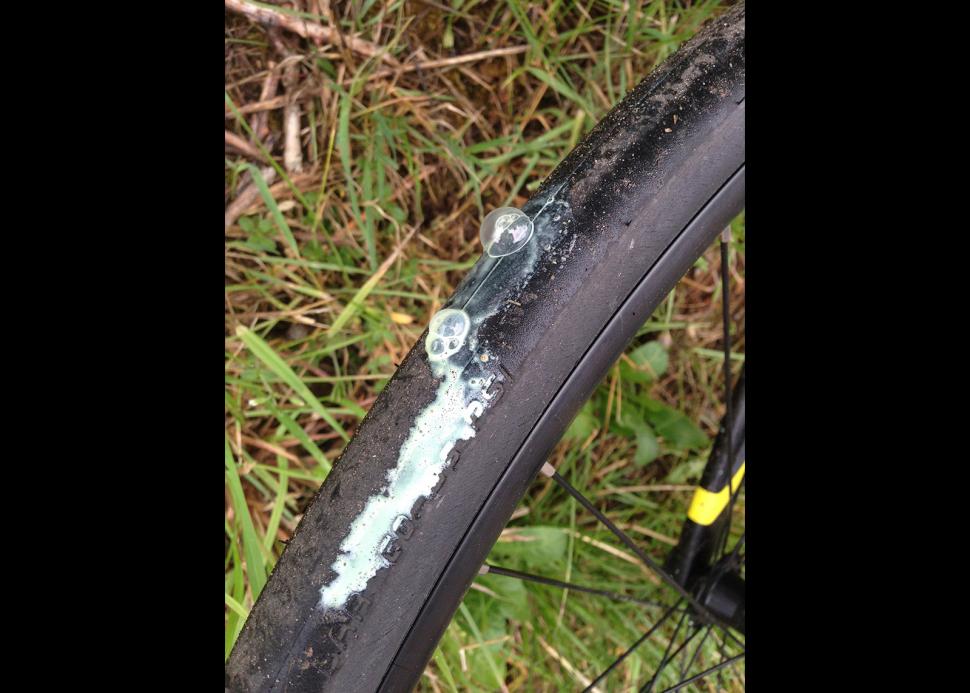 In the middle, the tire is specially treated with a substance due to which the sealant does not stick, but flows down. As for me, if you ride actively, then the tire can be simply periodically pumped up every three to four days. If the installed tire still strongly poisons the air, then it must be strongly rubbed with a solution of laundry soap. For better spreading of the sealant, sometimes the tire inside can be lubricated with an alcohol solution. When the sealant is completely dry and does not cope with small punctures, it can be sealed with 88-m waterproof rubber adhesive. Similarly, you can seal tires with defective sidewalls or holes that the sealant cannot seal in any way. A tire that is torn or cut during operation must be cleaned of sealant, sealed with a patch for cameras and reinstalled. If the sealant has not dried, it can be reused. In the middle, the tire is specially treated with a substance due to which the sealant does not stick, but flows down. As for me, if you ride actively, then the tire can be simply periodically pumped up every three to four days. If the installed tire still strongly poisons the air, then it must be strongly rubbed with a solution of laundry soap. For better spreading of the sealant, sometimes the tire inside can be lubricated with an alcohol solution. When the sealant is completely dry and does not cope with small punctures, it can be sealed with 88-m waterproof rubber adhesive. Similarly, you can seal tires with defective sidewalls or holes that the sealant cannot seal in any way. A tire that is torn or cut during operation must be cleaned of sealant, sealed with a patch for cameras and reinstalled. If the sealant has not dried, it can be reused. |