When your ATV loses some of the fire in its belly, and you can’t quite put your finger on it. It may be time to check the valve lash. Your ATV engine is designed with a ton of power, and it’s still there, waiting to be tapped.
The top seven symptoms of poor ATV valve adjustment include:
1 ATV won’t start
2 Engine noisy
3 Engine misfires
4 Bike lacks power
5 Engine runs rough
6 Erratic idle
7 Hard on gas
By the end of this post, you’ll understand and recognize common valve lash symptoms, know which condition your engine suffers from and how to fix it.
This guide covers the more common rocker-style valve train. If your ATV is fitted with an OHC (Over Head Cam), the procedure is a little different.
Page Contents
Valve lash or clearance is a factory-specified gap that must be maintained between rockers (or cams) and valve tips. As an engine wears, the valve clearance usually gets larger and so needs to be adjusted. Unfortunately, on some bikes gaining access to the valves is a bit of a chore and is regularly ignored until it can’t be.
All single cylinder engines will have at least two valves, one inlet, and one exhaust. However, most bikes will have four, two of each.
The valves, as you know, are activated by the rockers (cams in OHC engines), which are driven by the camshaft. The camshaft is driven by the crankshaft, and the whole process is sequenced. The timing of this sequence is mission-critical to the optimum performance of your power plant.
Only four-stroke engines have valves, and valves allow for more accurate, predictable, smoother, and cleaner engine performance. A four-stroke engine is just easier to live with, but because it has more internal moving parts than a two-stroke engine, it needs more maintenance.
1 Intake stroke
– Intake valve(s) opens as the piston moves down the cylinder and closes again as the piston bottoms out.
2 Compression stroke – Intake valve(s) now closed as the piston moves up the cylinder, compressing the air/fuel mix into the combustion chamber at the top of the cylinder.
3 Power stroke – The spark plug fires and ignites the compressed mix causing the piston to move down the cylinder under power.
4 Exhaust stroke – Exhaust valve(s) open as the piston moves up the cylinder, pushing the spent gases out. The valve is fully closed as the piston reaches the top of the cylinder, and the cycle starts over.
I’ve covered valve lash adjusting previously and you can check it out here “ATV valve adjusting in 6 steps”
An ATV may not start for many reasons. Incorrect valve lash will certainly be on the list. Hot start problems are often caused by valve lash issues. As the engine reaches operating temperature, lash tolerances change. If the valves are too tight, they may remain open, which will reduce cylinder compression.
An engine without compression won’t start. If the valve lash is excessive, your valves won’t open, and the engine won’t receive fuel and so won’t start.
A noisy engine is a useful clue. The tell-tale ticking noise of an idling engine could very well be miss-adjusted valve lash. Loose rockers, as you can guess, will make a racket if the gap between the rocker and valve tip is excessive. And you already know that excessive lash will cause poor running or no start.
Excessive lash, if neglected, can damage the valves and rockers as they hammer together. Checking the lash is the best test, but I’ll often use a stethoscope to confirm. Especially useful if access to the valve cover is labor-intensive.
A misfiring engine could be caused by miss adjusted valve lash. Excessive lash will cause the engine to run lean (not enough gas) and that will cause the plug to misfire. Running the engine with tight valves can also cause the plug to misfire.
If the valves are not closing fully, the engine mix is lean, and that will, as you know, cause a misfire.
If your engine lacks power, maladjusted valves could be the cause. Incorrect valve lash causes the valves to open for more or less time than needed. Excessive valve lash means the valves open late and for less time than needed. This causes a lack of gas which in turn causes a lack of engine performance.
Tight valves can cause the valves to open early and for too long. This causes (depending on how tight they are) lean running, hot running, misfiring, and a general lack of performance.
A rough-running engine is irritating but worse than that. If it’s caused by maladjusted valves, you could cause lasting damage to the motor. If valves are tight, it may cause the engine to run lean. A common symptom is popping noise from the engine.
Overheating engines, burnt valves, hammered valve tips, blown head-gaskets are all real risks that will cost a packet to fix.
Valve clearance will affect idling big-time. If valves are tight, you might find the engine starts but then dies as it warms up. Or the idling is even rougher when warm. Whatever the symptoms, your engine valve lash should be checked once a year. If I owned a used bike, I’d assume it hasn’t been done recently as it’s commonly overlooked.
Adjusting the valve lash is a bit of a chore on some bikes, but it’s worth it. You will notice the difference right away. The engine will start more easily, quieter, and throttle response will be sharp and more powerful.
Whenever performance suffers, so does gas mileage. It simply takes more gas to do the same work. So anytime you notice gas mileage drop, it’s a big clue that your ATV has a problem.
The problem could be something simple like a dirty spark plug, or more serious altogether. Either way, early diagnosis is always best.
You may find the following posts helpful:
ATV idles up and down
How to tell if ATV jumped time
Regular maintenance ensures that your ATV runs smoothly. What about valve adjustments? Valves allow fresh gas to flow into the combustion chamber and spent gas to exit. On average, valves require no more than periodic clearance, inspection, and occasional adjustments, but how often should you perform ATV valve adjustments?
ATV valve adjustments ought to take place every few months for most machines. However, if you own a high-performance ATV, you will want to check and adjust your valves after every 3-4 riding trips or during oil changes.
In this article, you’ll get a quick guide on how often to adjust your ATV valves. In addition, you will also learn the following:
When a valve is closed, you need to have a gas-tight seal in the space between the valve seat and the valve face.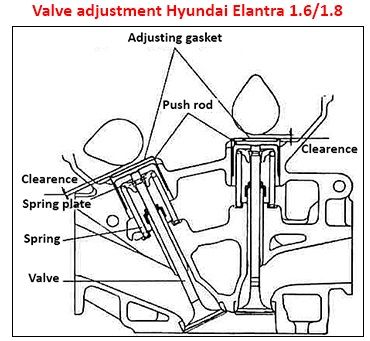 To ensure the valve is well-seated, you need to have some valve clearance (lash) between the rocker arm and the valve stem. You can adjust the lash with a screw, shim, or with a hydraulic device.
As the engine heats up, the metals inside expand. This happens to the valve train components too. If the lash between the valve stem and its operating mechanisms is insufficient when the engine is at rest, it will be even more so when it gets hotter.
If the valve clearance is reduced too much, the following occurs:
Again, if you remove the clearance, the valves get to sit a little further from the valve seat. This reduces the seat-to-valve-face contact area, giving combustion gases room to leak past.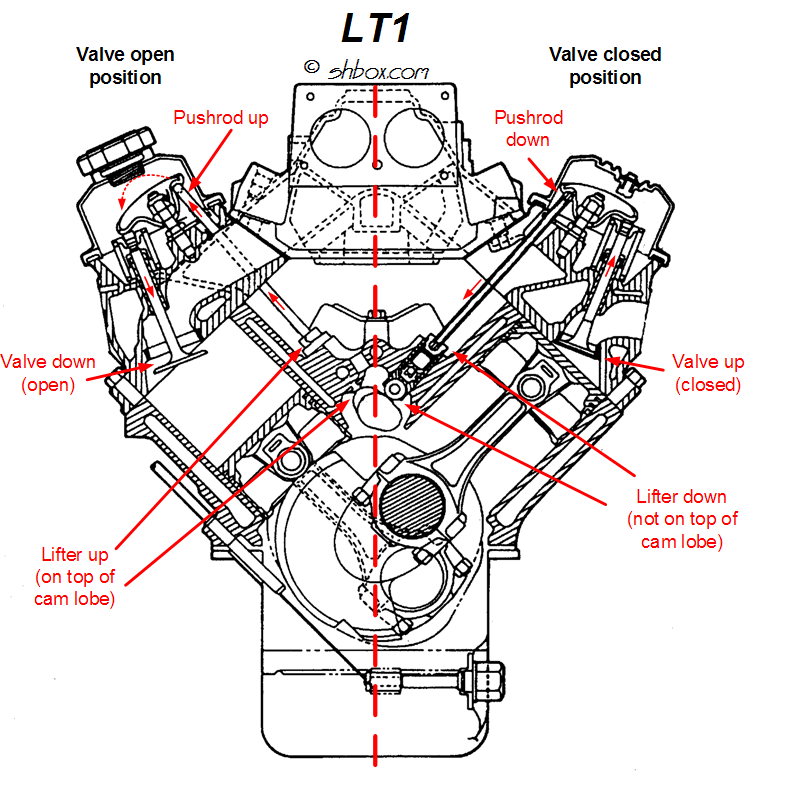
By now, the engine might not start, and your valves are badly in need of attention. At this point, trying to start the engine could cause the exhaust valve to overheat or even burn.
Is there a way to tell whether your ATV valves need checking or adjusting without necessarily pulling the top to check the clearance? In other words, are there any particular signs that you need to look out for?
For starters, indeed, the most foolproof way to tell whether your valve clearances are in good shape (spec) is to pull the cover and measure them. Fortunately, there are other ways to tell. Out-of-adjustment valves usually make it easy for you to notice them because:
In a nutshell, they might be noisy – if too loose- or the bike could lose compression or overheat – if too tight.
ATV Valves can lose clearance (slip out of adjustment) due to several reasons, including:
 Again, with this wearing out, clearances usually tighten as the valve beds itself with the head.
What happens if you don’t adjust your valves? The reason for setting valve clearance is simple; metal expands when hot. Therefore, if the clearance gets too tight, the valve can’t fully sit in the head.
As mentioned previously, this situation can lead to compression loss or overheating. The latter can even lead to the valve’s destruction since the head helps to dissipate the heat from the valve. If the valve is unable to close fully, it loses the chance to transfer enough heat to the head.
And how does this affect your ATV?
If the valve is too tight, the ATV loses compression and performance while your gas mileage suffers. If it gets too loose, it becomes noisy and gets damaged by excessive clearance and metal bits slapping against each other.
Sometimes, if it gets too loose, the valve fails to open fully in a timely manner, and the engine fails to breathe optimally.
Finally, poorly adjusted valves can cause the entire valve train to wear out. Furthermore, if your valves have too much clearance, they can cause valve damage and failure, which can extend to the camshaft lobes and rocker arms. If you notice your valve train components failing, be sure to check the valve clearance.
So, how often should you adjust your ATV Valves, or should you base this on standard maintenance intervals? Well, this depends on your machine type and the manufacturer’s instructions.
High-performance engines require servicing more often than other utility quads. As such, you will find that you need to adjust your ATV valves every 20 hours or so or with each oil change.
There’s a good reason for this too. You see, if you allow the valves to go too far, the intakes become too tight and they start leaking. Then, you’ll be setting yourself up for some big-time repairs.
Additionally, depending on the type of bike you have, you might notice that the valves tap slightly when correctly set. Any noticeable sound changes would therefore indicate a need for adjustment.
Even so, the adjustment interval is not cast on stone. Rather, it’s what most manufacturers consider to be a safe bet between the adjustment cost and the heightened risk of valve problems or, worse, decreased engine lifespan.
Consequently, you can decide to either half or double the interval, depending on what works for you. Besides, experience and familiarity with your ATV should also enable you to diagnose valve clearance challenges.
It’s important to note that valves tend to tighten with age. With this in mind, some ATV owners suggest that you are better off adjusting on the looser end than the tighter end of the specs when making adjustments.
For detailed instructions on how to adjust your ATV valves, check out Dirt Wheel Mag’s guide. Alternatively, you can also check out this video:
ATV valve adjustments are an essential part of your ATV’s preventative maintenance. If you fail to perform the adjustment, nothing will happen immediately, but with time, additional wear and tear happen.
Again, by the time your ATV lets you know that you need to do your maintenance – noisy valves, reduced performance, etc. – more often than not, you will have done some damage already.
Sharing is caring!
Author: Aleksey Kokorin
If you witnessed a scene when an experienced motorist busily opened the hood of a car (yours or his own), listened for some time to the sound of a running engine, and then pointedly uttered the phrase “the valves need to be adjusted”, but at the same time for you his words were is not clearer than the sound of the engine that he listened to, today we will try to fill this gap. What is valve adjustment, why is it needed, when should it be done, and what will happen if it is not done at all? And why do many cars not need valve adjustment at all? Let's figure it out. nine0011
What is valve adjustment?
The operation of a conventional piston engine involves the supply of an air-fuel mixture to the cylinders and the removal of exhaust gases from them. Both functions are performed by valves - respectively, intake and exhaust, alternately opening at the right time to fill and empty the cylinder. They are controlled by a camshaft, which has special cams that act on the top of the valve, opening it into the cylinder. There are several designs of the drive mechanism - the camshaft can act on the valves almost directly, pressing the cam on the pushers, or, for example, through special rocker arms, pushing one end of them, while the other presses on the valve. But in any of the cases, the design has a feature of interest to us: a thermal gap between the camshaft cam and the part of the valve mechanism that opens the valve. After all, the operating temperature of engine parts, especially the valve mechanism and the valves themselves, is very high, and when heated, the metal tends to expand, which leads, in particular, to an elongation of the valve. It is to compensate for this expansion that a thermal gap is needed, and adjusting this gap is called “valve adjustment”
Yes, from a logical point of view, the wording "valve adjustment" is not quite correct. The valve under normal conditions, when the camshaft cam does not press on it, is closed: the valve disc is tightly pressed against the seat in the cylinder head by a spring, and proper tightness is ensured by chamfers on both elements. Accordingly, no valve adjustment is required here - but the thermal gap must be correct. That is, it is more correct to say not “valve adjustment”, but “adjustment of the thermal clearance of the valve drive”. nine0011
Why is valve adjustment necessary?
If we imagine the combination "valve - pusher - camshaft" without a thermal gap - that is, tightly adjacent to each other when the engine is not running, then it is easy to understand that when reaching operating temperature, an elongated valve, "pulled out by a spring from the cylinder" in side of the camshaft, due to thermal expansion, this same camshaft will begin to constantly press, leading to a slight compression of the spring and loose valve closure. That is, when the operating temperature is reached, the valve will actually cease to fully perform one of its functions: it closes tightly to seal the combustion chamber and isolate it from the intake or exhaust tract. nine0011
This can happen, for example, due to wear of the valve seats and discs. Accordingly, in this case, the adjustment of the valves is necessary to provide the necessary thermal clearance to ensure complete closure of the valves.
— Kolesa.Ru (@Kolesa_Ru) June 3, 2019
The second option is to increase the thermal gap: for example, due to wear on the surfaces of the camshaft cams and valve drive elements. In this case, even after the engine reaches operating temperature, there will be a gap between the camshaft and the valve mechanism, and they will touch shock and only at the moment the cam is actuated. This already adversely affects the resource of the valve mechanism, but there are other consequences: the valve will open a little later and not completely - which means that the filling of the cylinder with the air-fuel mixture will deteriorate. nine0011
What happens if the valves are not adjusted?
If the valves are not adjusted in time, this will lead to a change in the thermal gap. At the same time, both an increase and a decrease in the thermal gap, as we have already understood, negatively affects the resource and operation of the engine. Reducing the gap means incomplete closing of the valves, which leads to a number of consequences. Leakage of the combustion chamber due to an ajar valve leads to a drop in compression and a breakthrough of hot gases into the intake or exhaust tract (depending on whether the intake or exhaust valve is ajar). nine0011
In addition, it is worth noting the significantly increased thermal load on the valves. After all, tight contact of a closed valve with a seat is one of the important conditions for its cooling, and if the valve does not fit snugly against the seat, cooling deteriorates significantly. This is especially true for exhaust valves: the intake valves are additionally cooled by the air-fuel mixture entering the cylinders, while the exhaust valves provide the exit of exhaust gases of extremely high temperature, and for them cooling in the contact zone with the seat is of critical importance. In extreme cases, poor valve cooling due to a small thermal gap can lead to its overheating and destruction - the so-called burnout. In addition, the breakthrough of the burning air-fuel mixture into the exhaust tract increases the load on the catalyst (and if it is destroyed, abrasive dust can also damage the cylinders). nine0011
The consequences of increasing the thermal gap are somewhat different. As mentioned above, it leads to a shock effect of the camshaft on the valve mechanism, which negatively affects its resource, as well as to untimely and incomplete opening of the valve. The deterioration of filling the cylinder with an air-fuel mixture in this case means a violation of the gas distribution phases and a decrease in the output of the engine: that is, it will pull worse.
How do I know what the thermal gap should be?
The value of the thermal gap is determined by the manufacturer for a particular engine: if the design of the motor provides for valve adjustment, the indicators are usually indicated in the instruction manual.— Kolesa.Ru (@Kolesa_Ru) June 3, 2019G.
In general, the thermal gap is, of course, very small, these are tenths of a millimeter - approximately 0.1-0.4 mm. At the same time, it is usually determined using a set of probes with a step of 0.05 mm or less - that is, accuracy to hundredths is observed. It is worth noting that the thermal gap for the intake and exhaust valves is different: as we already know, the exhaust valves heat up more - and therefore, increase in size more and require a larger thermal gap.
In practice, you only need to know the specific values \u200b\u200bof the thermal gap for adjustment - that is, if you do not do it yourself, these numbers will not be very useful to you. nine0011
How to know when to adjust the valves
The frequency of valve adjustment, if provided by the engine design, is indicated in the car's owner's manual. In general, this procedure is not performed so often - usually every 50-80 thousand kilometers. However, a more frequent check will not hurt - especially if the car is equipped with gas-balloon equipment, since gas fuel increases the thermal load on the engine.
The second way to find out about the need to adjust the valves is a characteristic sound: a knock or clatter when the engine is running, which does not go away as it warms up. nine0011 — Kolesa.Ru (@Kolesa_Ru) June 3, 2019
Well, if the car was not purchased new, and its mileage is already rather big, then adjusting the thermal gap will definitely not be superfluous - you just need to find out if it is provided for by the design.
How to adjust the valves?
There are several design options for adjusting the thermal gap. For example, one of the options is the selection of washers of the desired thickness, which are inserted between the valve lifter and the camshaft cam. To adjust the gap, it is first measured with the existing washer, and then the washer, if necessary, is replaced with another, greater or lesser thickness. An alternative option with a similar design is a selection not of shims of the required thickness, but of the pushers themselves with the necessary parameters. nine0011
Another variation is the adjustment of the thermal gap using a screw mechanism. In this case, you do not need to select anything: the gap is measured with a feeler gauge and then, if necessary, adjusted by screwing in or unscrewing the adjusting bolt, which is then fixed with lock nuts — Kolesa.Ru (@Kolesa_Ru) June 3, 2019
We clearly demonstrated this method of adjustment in a separate article using Renault Logan as an example.
Why do some motors need no valve adjustment? nine0011
The repeated clarification that valve adjustment should be provided for by the design of the motor is very important: after all, many engines do not require this procedure. It depends on whether the motor is equipped with hydraulic compensators: these are devices designed to automatically adjust the thermal gap. They work due to the oil supplied to them from the engine (which is why, in fact, they are called " hydro compensators") and completely eliminate the need for periodic manual adjustment of the valves. They themselves, of course, are also not eternal - the same clattering knock speaks of the need to check and replace them, which does not disappear soon after starting, and sometimes even after the engine has warmed up. However, the main thing to know in the context of this material is that motors equipped with hydraulic lifters do not need valve adjustment. nine0011
FAQ
Articles / Interesting Faster than they look: 15 best sleepers of 2023 We talked in detail about what sleepers are - these are outwardly inconspicuous cars that can actually give odds to many in traffic light races. And the recently introduced fifth po... 2170 0 1 01/03/2023 nine0011
Articles / Practice Eternal youth: how to prevent the car body from aging Those who bought a new car at least once in their lives experienced a feeling that can be described by the common phrase "if only nothing happened to the swallow. " But life is so badly arranged that with la ... 3550 1 four 27.12.2022 nine0011
Articles / Popular questions Area of action of road signs: how to determine it Road signs are well known to almost all drivers. But many, years after driving school, sometimes ask themselves the question: “how long does the sign that I just passed?”. To the head... 2192 0 1 27.12.2022 nine0011
Test drives / Test drive Haval Dargo vs Mitsubishi Outlander: the dog is barking, the stranger is coming In the Haval dealership in the south of Moscow, life is in full swing: buyers look at cars, communicate with managers and sign some papers. While I was waiting for the test Dargo, the same cross... 21139 7 205 13.09.2022
Test drives / Test drive Motor from Mercedes, emblem from Renault, assembly from Dacia: test drive of the European Logan 1.0 It would seem that what's new can be told about the second generation Renault Logan, known to every Russian taxi driver, as they say, up and down? However, this car has... 16825 10 41 08/13/2022 nine0011
Test drives / Test drive Geely Coolray vs Haval Jolion: Free Cheese? If! Do you want to buy a car today with a full warranty, on credit at an adequate rate, without wild dealer markups? Now this is still a task, because a full-fledged chain of "representation - s. .. 14374 26 thirty 08/10/2022 nine0011
And as usual, people who buy a pit bike are usually beginners and such a simple action as adjusting valves on a 2 valve head causes difficulties.
This article will detail how to adjust the valves correctly.
1) Unscrew the alternator cover, valve covers and timing star cover.
2) Using the 14 key, scroll the generator COUNTER-CLOCKWISE to the T mark, while the marks on the timing star must also match. nine0011
ATTENTION !!!The camshaft has TWO positions, but the MARKS ARE CORRECT!
In the first position, you can even visually see that the valve is moving! That is, the valves in this position are CLAMPED! And there is no way to regulate them!
In the second, the marks match correctly and there is no effect on the valve, to make sure of this, you can shake the adjusting screw and a small play will be clearly transmitted, and the feeler gauge 0. 01 must also pass. EXACTLY WHEN THE VALVES ARE IN THE UNCLOSED STATE AND ADJUSTMENTS ARE MADE!!! nine0011
But there is a third option, when the valves are not unclenched in either the first or second position, which means there was again a competition at the factory “assemble the engine with your eyes closed and without hands”, in other words, the valves from the factory are “wildest” clamped. You should loosen the adjusting screws and look for the desired position and only then adjust.
3) And so we check that the marks are aligned and the valves are in the open position, if everything is so, you can start adjusting.
4) To adjust the valves we need: key 9mm, a set of probes from 0.01 to 0.2 and pliers with a narrow nose, but if you have a special wrench, then you are lucky and it’s easier for you.
5) Set the gaps only on a COLD engine! Otherwise, you will put it in such a way that it will either not go, or they will burn to hell. Yes, and you don’t have to think - “YES WHAT THERE . .. A HUNDREDTH OF A MIMETER, FUCK AND THIS WILL GO!” It will go, but not for long and not far, it's up to you.
6) On 110/125cc (152/153/154FMI) engines, the intake valve clearance is: 0.05mm, tolerance ± 0.01mm; nine0127 outlet: 0.06mm, tolerance ± 0.01mm.
On engines with a volume of 140cc, as well as on 150cc engines with a piston D 56mm (156FMJ, 1P56FMJ-5), the intake valve clearance is: 0.07mm, tolerance ± 0.01mm;
outlet: 0.08mm, tolerance ± 0.01mm.
On 150/160cc engines (1P60FMJ, 1P60FMK ,ZS1P60YMJ (also 4 valves)), the intake valve clearance is: 0.09mm, tolerance ± 0.01mm;
outlet: 0.1mm, tolerance ± 0.01mm.
ZS190E (ZS1P62YML-2/W190) intake valve clearance is: 0.15mm, tolerance ± 0.02mm; nine0127 outlet: 0.15mm, tolerance ± 0.02mm.
7) Loosen the valve adjusting screw nut with a 9 wrench.
8) Valve clearances are given with tolerance. For example, if clearance is given: 0.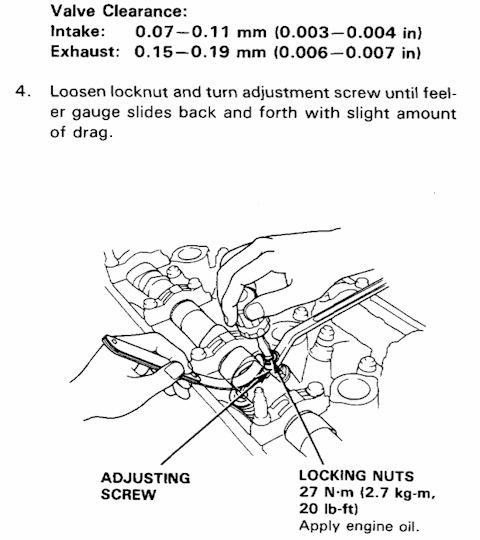 06mm, tolerance: ± 0.01mm, then valve clearance will be between 0.05mm and 0.07mm. It is advisable to set: 0.06mm, that is, the average value.
Insert the dipstick and tighten the adjusting screw until the dipstick is slightly tight, but it must go in!
9) Now hold the adjusting bolt with pliers, and with a wrench 9"we control".
ATTENTION! After that, the gaps may go away so be sure to double-check! It doesn't work the first time, and maybe not even the third. Ideally, after setting, for example, at gaps of 0.06mm, the probe 0.06 should pass freely, 0.07 with little effort, and 0.08 already with effort, if so, then the gap is set correctly!
10) We turn the motor twice again with the key 14 counterclockwise, why? Because if you turn it once, then again we get to the position of the clamped valves, and on the second circle to the position of the unclenched valves we need, we again bring it to the marks and check the gaps again! If there are no deviations or they are not large, then we can put all the covers and start.