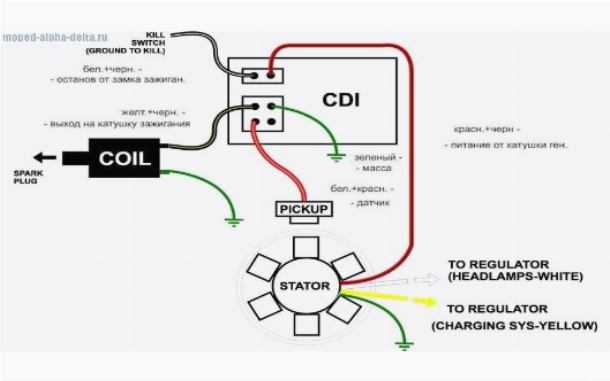
Without getting into boring technical detail, let me just say that a CDI box is an important part of the engine ignition process. It stores energy, or, rather, an electrical charge, much like a battery, and starts an ignition. Initially, capacitor- discharge ignition boxes were invented to avoid overly long charging times. These units are mostly found in bikes, boats, and, of course, ATVs.
Now, if the sparks aren’t strong enough, and/or if the motor is struggling to start, chances are, it’s the CDI acting up. So, what should you do? Can you bypass a CDI box to figure out what’s causing the malfunction? The answer is yes, you can, but there are strict instructions to follow. In this guide, I’ll tell you everything about bypassing the box without damaging the ignition system. Let’s get right to it!
Flammable liquids inside of the bench can lead to rather bad consequences. So, the first thing that you should do is to make sure the bench is crystal clear. Even if there’s a tiny bit of fuel left in the engine chamber, chances are, the bench will “light it up”. Next, test the battery unit. If it can’t reach a full charge, maybe it’s time to replace it. Batteries are often the cause of bad starts, and the sooner you figure out the faulty part of the ignition system, the better.
Now for the main event: the CDI box is usually colored black and has a pair of plugs. You should also see a bullet connector: remove it to be able to work with the electronic components. I highly recommend getting your hands on the service manual, because to get everything right, you’ll need to follow the provided instructions. Most likely, the ATV came with a detailed user guide. It will answer the question – how do you bypass a CDI box?
This isn’t rocket science, though: all you’ll have to do is cut the right wires so that the CDI isn’t “in business” anymore. Some quad vehicle drivers even go the extra mile and take the box out completely, cutting all the wires and leaving a hole in its place.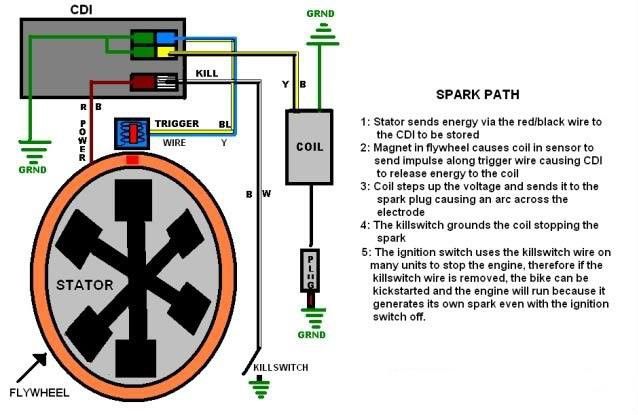 You shouldn’t do that, however, because if you learn that the box isn’t the issue, you’ll still have to pay a pretty penny for a new one.
And before you do anything with the electronics, turn the vehicle off and let it cool down for a while. I’d say wait for at least a couple of hours – ATV engines are known to stay warm for quite some time.
To figure out the exact resistance of the ignition box, use an ohmmeter. It is a pretty straightforward, intuitive device. This is important: although most ATVs are designed and manufactured to universal standards, they still have different electrical resistance. I’m talking about the coil, of course. So, what you should do is make sure your vehicle’s coil meets the resistance levels that are specific to your four-wheeler.
If it doesn’t, then I bet you’re dealing with a damaged coil that needs to be replaced as soon as possible. Again, refer to the service manual for the resistance specs.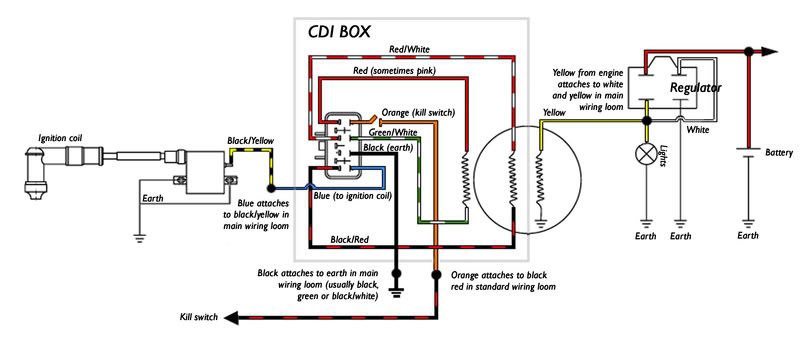 If you can’t find it anywhere, look for it online. Search for your ATV’s EXACT make, model, year, and engine.
With that out of the way, go ahead and ground the wire that’s running from the stator (a component of the CDI box) to the motor. Then, disconnect the main ignition box wires. Double-check this, because if you forget to take care of the wires, you may end up creating a short circuit and ruining the capacitor discharge ignition box, the engine, and the battery altogether.
I know we just used the ohmmeter to check the coil’s electrical resistance, but that’s not it yet. What you must do next is measure the coil’s winding resistance. And remember: to do everything properly, measure both the primary and the secondary coil resistance. Start by touching the contacts coming out of the distributor. For the secondary resistance, locate the ignition coil’s outer and inner contacts.
You should be able to see the distributor connecting to the main wires – that’s the spot. The ohmmeter takes very little time to do its job. So, go ahead and compare both resistance measurements with the vehicle specifications we discussed earlier. They need to be a 100% match. If they’re not, the ignition box needs to be replaced. A damaged/malfunctioning CDI box can cause you a lot of trouble. So, again, replace it the first chance you get.
There’s nothing worse than rushing yourself, especially when trying to fix something in your all-terrain vehicle. Take a slow pace; read the service manual a couple of times to really know what you’re doing. Always be super careful when dealing with electronic components, as they can be pretty dangerous. I already mentioned that the engine needs to be turned off and cooled down.
On top of that, make sure to wear protective gloves and at least some sort of protection for the eyes. And if you’re not sure that you’re up to the task, I advise letting a professional handle it. Good news: mechanics usually don’t charge a lot for bypassing the ignition box, as the whole process takes 30 minutes tops.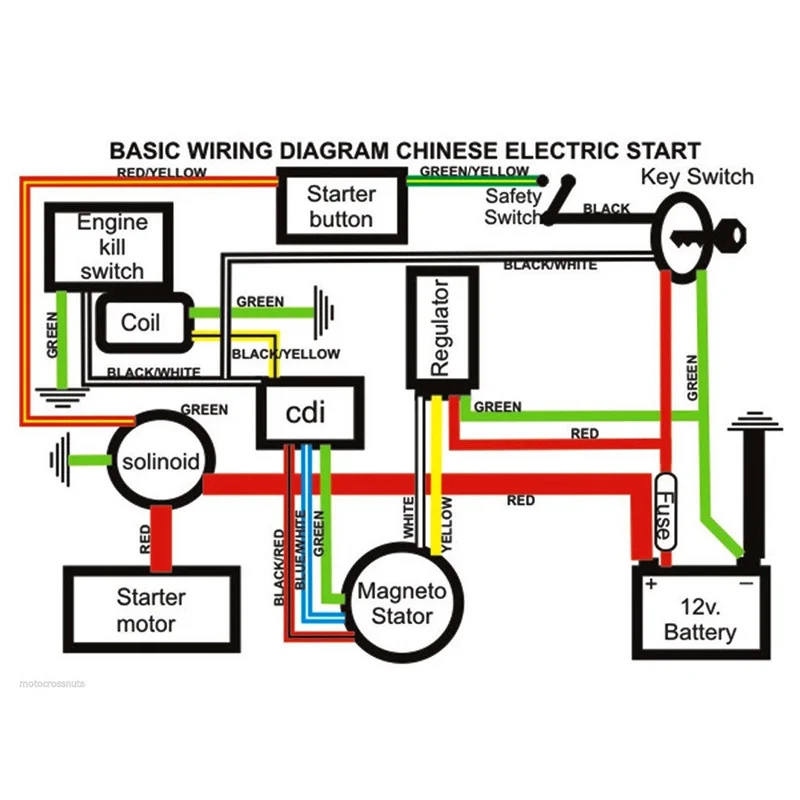
A quick note: CDI boxes are pretty sturdy and long-lasting, but they do fail sometimes. Mostly, this is due to the “abuse” and beating. All the vibration, branches and bushes, and the heat cause these devices to break down. The electronic components are pretty fragile, so, take proper care of them.
CDI boxes have one important job: they receive voltage from the battery and discharge it to start the ignition and fire up the engine. Now, a brand-new CDI usually costs a lot, which is why it would be wise to troubleshoot it first before buying another igniter box. Misfires, engine stalling, rough running – these can all be symptoms of a bad CDI box. Today, we learned how to bypass it to figure out which component is acting up.
While this isn’t a procedure for the amateurs, if you followed my guide closely, I bet you know your way around the CDI module by now. Still got some questions left you’d like to find answers to? Don’t hesitate to send me a message or start a conversation in the comments section. I’ll see you out there!
Black box, brain box, pulse pack, igniter box, CDI module, power pack, whatever you want to call it: if your motorcycle is newer than 1980, it probably has a black rectangle spouting wires under the seat that makes the magic happen. If you're lucky, you're reading this for your own education. If you're not, you're wondering what a CDI does... because you suspect yours doesn't. Let's take a look inside.
CDI stands for capacitor discharge ignition (alternatively, “capacitive.”) If you’re new to capacitors, they’re similar to batteries in that they can store energy for later. What sets them apart is their ability to release all that energy near instantaneously, which is ideal for an ignition circuit.
Here's a CDI box in a dirt bike. You'll often find them lurking under your seat. Andy Greaser photo.
The basic CDI system is a trigger mechanism, coils, and a box, often black, with capacitors and other circuitry inside. The trigger tells the box to fire, the box determines when to fire which coil with the capacitors, and zap goes the spark plug, ad infinitum. In addition to dischargin’ those capacitors, the box may also influence your rev limit, timing advance, and other variables related to spark, but that’s it.
A popular variation of this system is TCI, which doesn't use capacitors in the same way. For the purposes of this article, I'll refer to all the black box ignitions as CDI, since they all use the same basic components: box, coils, sensor.
This is a TCI box. On an electrical engineering level, it's different from CDI, but the troubleshooting process is the same. Andy Greaser photo.
CDI's complexity is in its circuitry, but its ancestors relied on clever mechanical systems to fire the coils.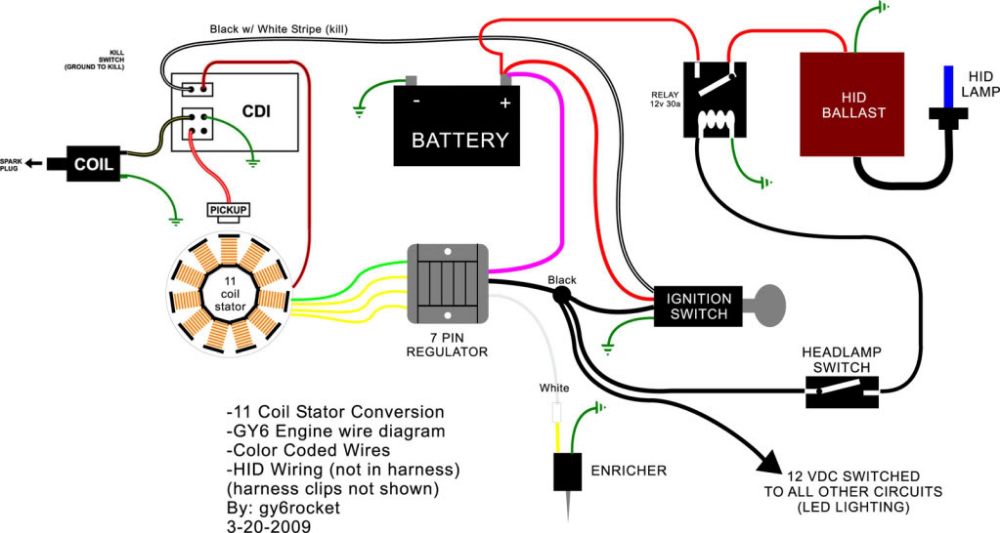 Springs, weights, cam lobes, and other simple machines worked together to deliver spark at the right time, even as revs rose. These ignitions did just fine for decades, but those moving parts wear out over time. Motorcyclists accepted occasional maintenance in exchange for rugged reliability, easy adjustment, and cheap cost of replacement.
In a points system, the crank basically opens and closes a switch. Eventually, your switch wears out. Not so with modern sensors. Andy Greaser photo.
That's all great, but the jump to CDI was like going from carburetors to fuel injection. Electronics gave manufacturers new control over their engines. The ignition advance, once mechanically limited to a curve, could be tuned to squiggle any way you liked all the way to redline (read Lemmy's timing article if you'd like more on this). Increased power, better efficiency, less maintenance, and fewer moving parts earned CDI, and systems like it, a good reputation. But that doesn't mean they stay problem-free.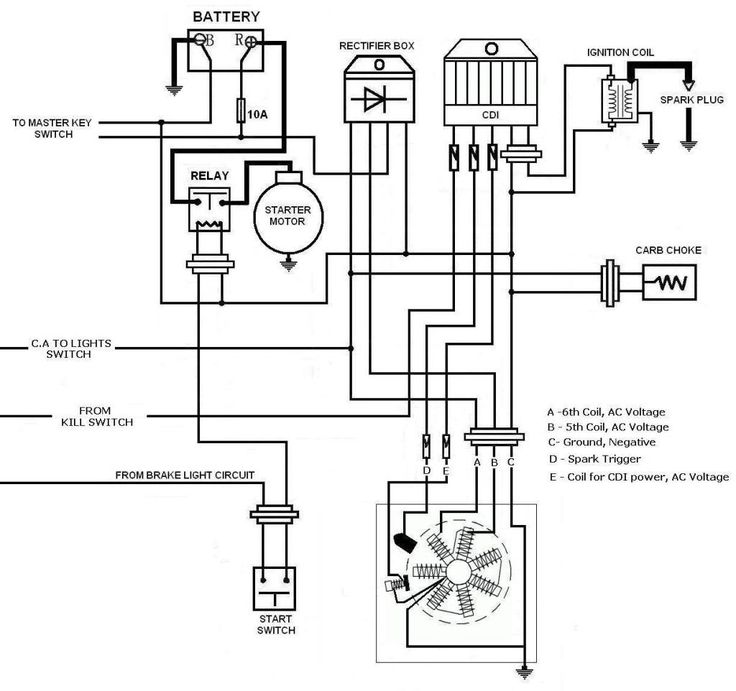
So you’ve got a spark problem on your CDI-equipped motorcycle. Symptoms could include misfiring, dead cylinders, backfiring, bizarre tach behavior, and countless other things related to how your engine's running. The problem may get worse as the bike warms up. It might not even hold low revs at all.
You’ve tested everything but the CDI unit, including the charge of your battery, your spark plugs, the health of your coils, and the triggering mechanism itself. Could it be your black box? Sure, particularly if your motorcycle is older, but still new enough to have CDI. Black box ignitions tend to fail all at once, unlike the gradual decrease in performance you’d expect from a points-ignition motorcycle. (Some riders retrofit points-based systems onto their newer motorcycles to avoid the shortcomings of CDI systems. Conversely, plenty of other riders swap factory points-and-condenser setups out for more modern ignition.)
The key is eliminating every variable until only the box remains, because they’re not easy to troubleshoot. Most are sealed up like a sarcophagus. These systems are supposed to be maintenance-free, but even a loose trigger sensor can mess with your bike’s little brain. Some manufacturers give specs for testing your box pin-by-pin, but don’t count on it. The best solution when troubleshooting black boxes is to replace a suspicious one with a known good part after checking the other possibilities first. Be careful when buying replacements. An eBay special may have the same issue as yours, and a new replacement may not be returnable once installed.
See that rectangular bump on the flywheel rotor of this Yamaha Vision? A magnetic pickup senses it as it goes by. Jetav8r.com photo.
The box itself is packed with electronics, and delicate components inside can fall victim to vibration and moisture over time. Thousands of miles of bouncing down the road can take its toll. Heat can also damage or destroy a black box.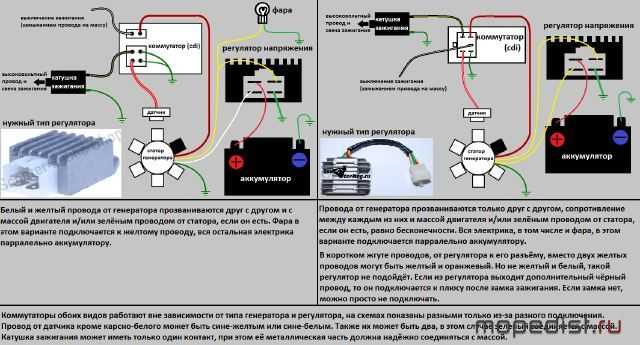 Finally, if you see the Magic Smoke come out, time for a new one.
Sure, there are aftermarket options for all kinds of applications. Most offer more power, and the best units come from reputable tuners. Do your research before buying one. You can also gain power by keeping your stock box, but using an ignition advance kit to alter the trigger mechanism. Again, read up on safe options for your motorcycle before attempting. I've tried both with good results.
If you’d like to know more about black boxes, the engineering behind them, and troubleshooting for your specific motorcycle, there are endless resources online to check out. We owe countless miles to these creations. Might as well know a little about what’s happening under your seat.
ATTENTION!!! DO NOT SWITCH ON THE IGNITION WITHOUT THE HIGH WIRE, THE PLUG, OR IF THE PLUG IS NOT TWISTED INTO ITS PLACE OR IS NOT RELIABLELY EARTHED TO THE ENGINE BODY!!!
THE COIL WILL COME WITH A PROBABILITY OF MORE THAN 50 PERCENT!!! THIS IS ESPECIALLY RELATED TO "DRY" COILS OF THE TYPE FROM "VOLGA", "OKI" OR "MATIZ".
IN THIS COIL, THERE IS A BREAKDOWN INSIDE THE COIL AND THE INTERTURN SHORT CAN APPEAR!!! THE PRESENCE OF INTERTURN SHORT ON SIMPLE SYSTEMS WITHOUT PROTECTION AGAINST SHORT CLOCK DOES NOT INTERFERE TO WORK AND THE SPARK IS PRESENT, BUT NOT FOR LONG - AT THE END OF THE END THE COIL DIES AT ALL. MY SYSTEM HAS BUILT-IN SHORT PROTECTION AND WILL NOT WORK WITH PUNCHED COILS!!! nine0006
To connect the ignition control unit (BUZ) to the ATV's on-board network (only connector 1 is used), disconnect the standard CDI unit from its connector (or disconnect the DPK connector) and disconnect the BB wire of the standard ignition coil from the spark plug to the "signal" wire ( most often it is a blue or white-blue wire) DPK connect the BUZ input (blue wire), make sure that the second DPK wire (most often green) is connected to ground (sometimes it is connected to ground only in the CDI unit, sometimes directly in the generator)
Black wire BUZ to ground, the second black wire to the "-" DPK, yellow wire BUZ to + battery (battery) after the ignition switch (it is convenient to connect it to the "+" terminal of the cigarette lighter), white wire to the terminal of the ignition coil, Terminal " + "ignition coils through a 15 amp fuse !!! on + battery, BB wire to the coil and spark plug. Increase the gap on the electrodes of the candle to 1 mm (If you are not sure that you can correctly increase the gap so that the contact surfaces of the candle remain strictly parallel, then you will have to learn how to do it :). Securely fix the ignition coil and BUZ on the quadra frame (the unit is fastened with self-tapping screws or M4 screws through the holes that are accessible when the cover is removed). nine0004
We strongly recommend that the block body be securely connected (electrically) to the quadra frame, if the body is attached to plastic - with an additional thick wire (to the wire terminal, terminal for the block mounting screw) connect it to the "-" battery or frame!
If this is not done, then in most cases nothing terrible will happen and everything will work fine anyway :o)
Everything, you can start it. As wound up, you should reduce the speed of the twentieth - most likely they will increase to 2000 - 2500 rpm.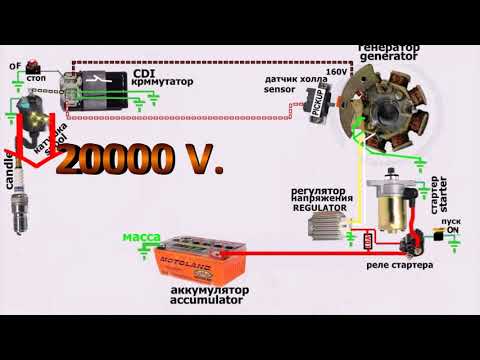 nine0006
To return to the standard ignition system: disconnect the connector 1 BUZ, the standard CDI unit back into its place, the BB wire from the standard coil to the spark plug.
Connector number 2 is up to you :o)
There are a few points to pay attention to when installing and starting the system. Here is a list of what caused the ignition to work poorly on different quadrics:
 (Better just buy a new NGK spark plug)
  (once they forgot to connect the second wire from the inductive sensor to ground - naturally, nothing worked and the blue LED did not light up ... not in all quadrics it is shorted to ground directly in the generator ...)
  If it's too big, it won't start well. (in the new version, the problem of a small gap is solved - everything works without increasing it)
ATV chip tuning is a flashing or installation of a new engine control unit (ECU), which regulates ignition and fuel supply. This allows you to increase power and torque, improve low-end traction, accelerate gas response, achieve better fuel combustion and eliminate the problem of excessive exhaust manifold heating. Which of the above will be achieved depends on the specific firmware. In the article we will tell you in more detail what chip tuning is and why it works. nine0006
Carburetor ATVs do not have an engine control unit, so there is nothing to flash initially.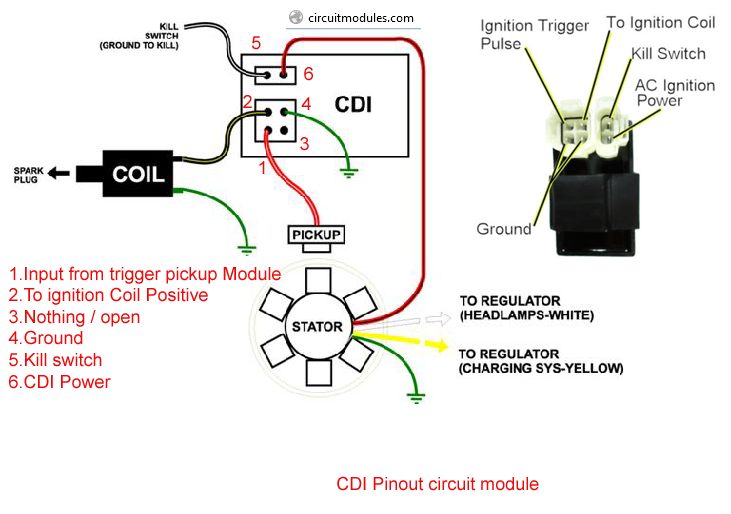 But to improve engine performance, you can install microprocessor-based ignition (MPSZ). It has two main advantages over the stock CDI - it is a consistently strong spark and automatic adjustment of ignition timing parameters based on sensor information. This improves engine performance and reduces fuel consumption. Another plus of the MPSZ is an easy start at low air temperatures and with a minimum battery charge. nine0006
An electronic control unit (ECU) is installed on the ATV with an injection motor. This is a computer that, according to the readings of the sensors, regulates the ignition and fuel supply. He is guided by data tables “hardwired” by the manufacturer - the values \u200b\u200bin it change during chip tuning.
ECU programming is comparable to reinstalling the operating system on a computer. The unit is connected to a PC through an adapter, after which a new firmware is “filled in”. nine0006
There are two main reasons why chip tuning is needed:
Enrichment of the mixture.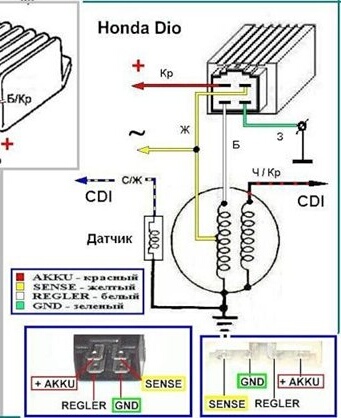 In stock, many ATVs run on
lean mixture. If you increase the amount of gasoline in the composition, the engine will receive more energy to work.
Setting the optimum ignition angle. From the factory, the ignition timing is late - so that the engine runs normally on a lean mixture. Since the mixture is richer during chip tuning, the ignition can be made earlier, which will speed up the cycle speed and increase the efficiency of the motor. nine0006
On average, the "aspirated" becomes more powerful by 5-10%. On a turbocharged engine, the increase is more noticeable - up to 30%.
Mistakes in chip tuning can lead to critical engine failures. For example, due to too early ignition timing, there may be detonation - explosive ignition of the air-fuel mixture. It leads to deformation of the piston and other breakdowns in the crank mechanism and the cylinder head.