Having the right PSI in your bike tires can make a world of difference. However, it would be an oversimplification to say that less air offers a more comfortable ride and more air makes you go faster. While this is true in many instances, the fact of the matter is that proper inflation for optimal performance depends on the individual rider and his or her bike.
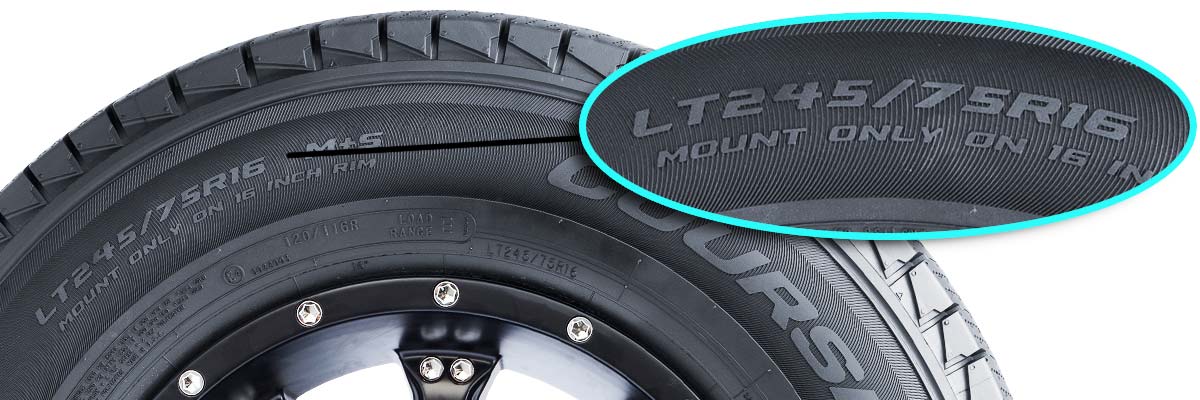
Every tire has a recommended psi printed on its side close to where it touches the rim. This is usually written as a range (for instance, "90 to 115 psi") since there are reasons why you'd want to be on the higher or lower end, which we'll get into shortly.
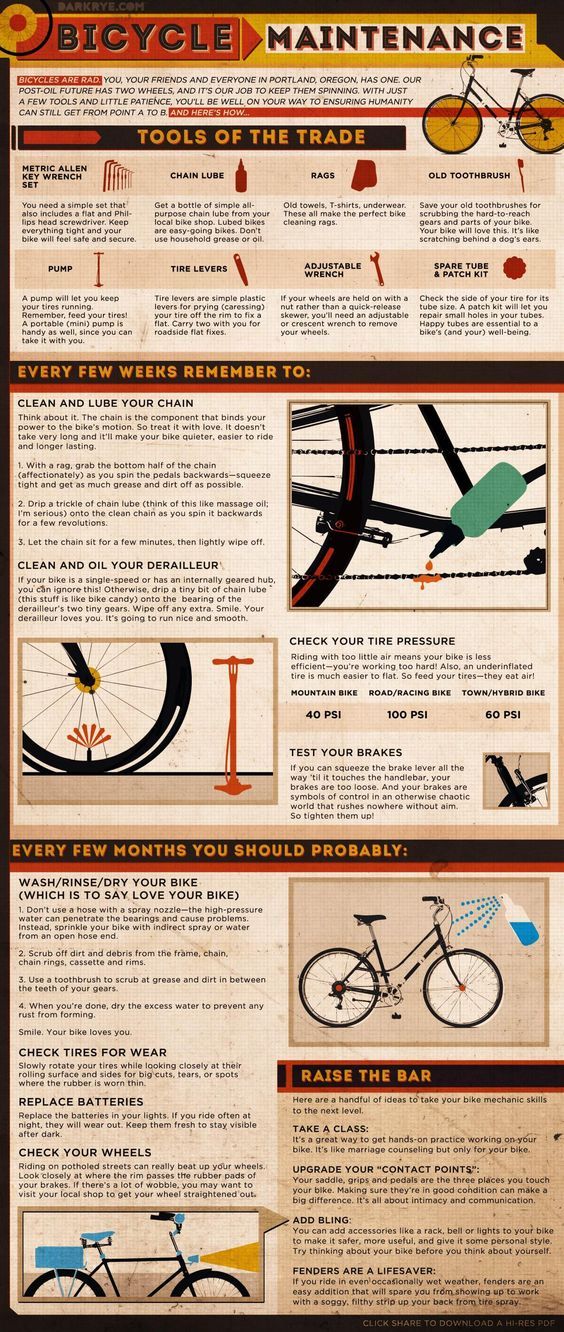
Basic rule of thumb if your tires happen to not indicate a recommended pressure: pump them up until they're firm but still slightly squeezable. Alternatively, there are generally-accepted ranges based on bike type:
| Bike tire type | PSI range |
| Kids' bike tires | 20–40 PSI |
| Narrow tires / road bikes | 80–130 PSI |
| Medium tires / hybrid bikes | 50–70 PSI |
| Thick tires / mountain bikes | 30 PSI (off-road) 50 PSI (on-road) |
Road bikes and tires are built for speed over smooth surfaces. Higher air pressure lets them roll easier and faster. A typical range for these would be between 80 and 130 psi, although racers can sometimes go as high as 160 psi. Quick tip if you're caught inflating a road tire without a gauge and need to ballpark it: at 100 psi, a tire can barely be compressed with your thumb.
Unlike roadies, mountain bikes are flying over loose, bumpy terrain. Tires with too much air lead to too much bounce, making for a jolty ride. Lower pressure helps with shock absorption while also giving you more traction since more of the tire comes into contact with the ground. MTB manufacturers recommend between 30 and 50 psi on most of their bikes since this is a nice balance between on-road (closer to 50) and off-road (closer to 30) riding.
Hybrid bike tires require pressure levels between those of road and mountain bikes. This is usually in the 50 to 70 psi range. Kids' bikes have the lowest recommended inflation, typically 20 to 40 psi. Keep in mind that these are called "recommendations" for a reason, though. A number of factors go into the inflation process beyond just your style of bike.
Which leads us to…
Because nothing in life is ever as simple as it should be, we've included a few more things to ponder when it comes to making sure everyone's tires are in good shape for their next ride.
As a general guideline, more weight = more pressure. Whether you're competing in the Tour de Whatever or shredding up the backcountry, heavier riders should use a higher psi than lighter ones to see the same performance in their tires. For perspective, someone weighing in at 200lbs will probably want to pump in around 20 more psi than someone who's 160. There's no real slide rule for this, so just play around with the pressure and see what feels best for you. Also keep in mind that rear tires tend to carry more weight than those in front, so adjust accordingly as necessary.
We know through physics that temperature affects air pressure. So, all else being equal, people biking in Miami in August are going to have higher pressure in their tires than people biking in Boston in January. In addition to weather, sustained deceleration using rim brakes generates friction that can increase temperatures inside the tube significantly. Fortunately, they also cool off relatively quickly, but it's something to keep an eye on during long descents. It may also be worth mentioning to your burgeoning roadster as he or she is learning the basics of hand braking.
In short, don't do either. If you overinflate, you run the risk of blowing the tube either while pumping or while riding due to sudden or constant impact. If underinflated, the low pressure could cause pinch flats. This occurs when the tube becomes squeezed between the rim and tire casing by hitting a bump with an underinflated wheel. Not only does this damage the tire, it can also hurt the rim. Plus, flat tires slow you down and make you pedal harder, which is just no fun.
"How often should I inflate my tires?" is a common question among many casual bikers. The answer depends on how often and how hard you ride. Some people break out the pump every few days, others once a week, and still others even less regularly than that. Even if you or your kids have left your wheels in the garage for months, air tends to seep out slowly, anyway. Therefore, as a bike-safety best practice, just like a car it's certainly never a bad idea to check your tires before each ride. Especially if it's been a while.
The pro's choice, floor pumps do a great job. They are easier to pump and attach, and will pump your tires up much quicker than a hand pump will. Some come with gauges, which eliminate 1) the need to switch back and forth between a pump and standalone gauge, or 2) if you're really lazy, outright guesswork.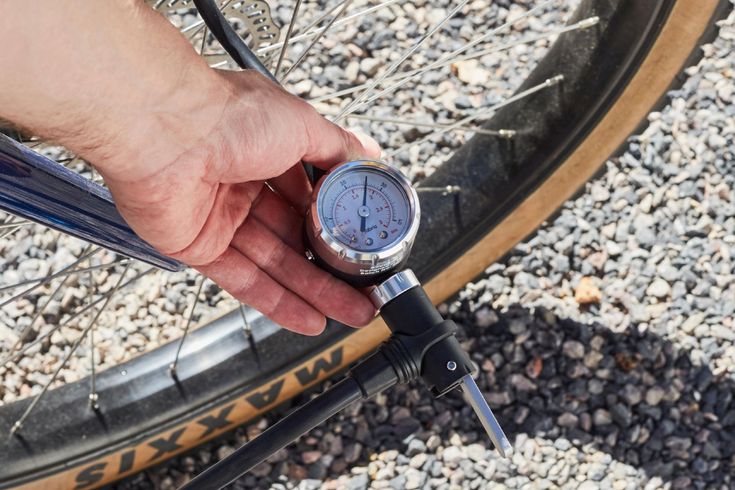
However, some expert cyclists are cautious of floor pumps with gauges, as the accuracy of the gauge can svary and may be off by as much as 10 PSI. On the plus side, if the gauge is consistent you can calculate the difference and adjust your target PSI to compensate.
It may be tempting to simply use the air compressor at your neighborhood Exxon, but these are less than accurate and can often overinflate your tires (it's a gas station, they're meant for cars). For serious riders whose circuits take them far from home, a small hand pump can help you change a flat on the fly. Carbon dioxide inflators accomplish the same thing if you're an air-in-the-can kind of guy.
Essential for any enthusiastic cyclist, hand pumps are harder work to fill the tire with, and aren't as quick. But they're transportable, so you always have your pump with you. It's simply foolish to embark on any long distance bike ride without your trusty hand pump and puncture repair kit.
So there you go, we hope this quick guide to bike PSI pressure was useful. To recap: figure out what feels most comfortable based on your particular cycling style. Go with that. Keep an eye on your pressure, and check it before every ride. You'll get a feel for it over time. Like, literally.
Here are a few things you need to know about the recommended bike tire pressure for your cruiser:
Your Tire Pressure Will Fluctuate as Temperatures Change
A 10-degree change in temperature will increase pressure by about two percent. But, it’s not just temperature changes to look out for. Sustained rim braking during long descents can also increase the temperature inside of your tubes past 300 degrees.
Find My Bike Tire Pressure
Correct tire pressure not only enables your bike to ride more smoothly, but it also fends off flats. To find your bike tire pressure, you initially need to know what tires are on your bike.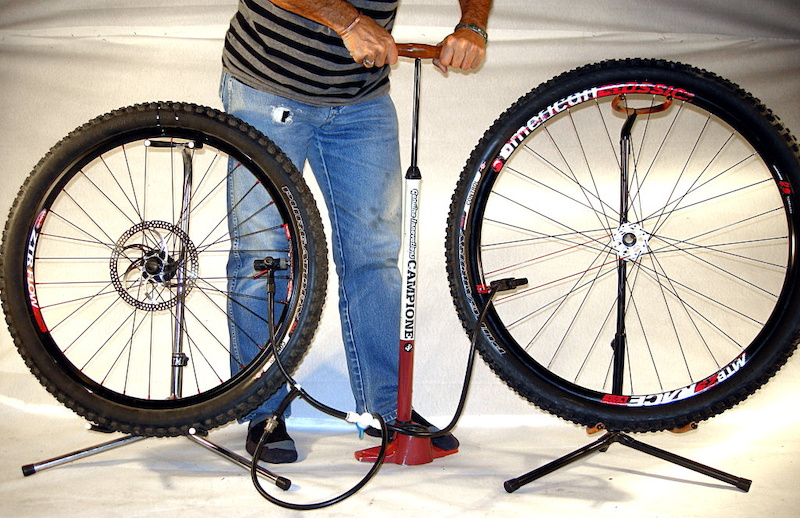 Narrower tires need more air pressure than widespread ones, with road tires needing about 80 to 140 psi (pounds per square inch) and hybrid tires needing 50 to 70 psi. You can also use a bike tire pressure chart to find your idyllic tire pressure for your bike.
To find your perfect pressure, start within the middle of these choices according to what tires you own and then factor in your body weight. The heavier you are, the more tire pressure you will need. For instance, a 200-pound rider should use closer to 120 psi and a 120-pound rider can get away with only 70 psi.
Stop Resisting
Conventional knowledge makes us think that higher pressure in tires equates to lower rolling resistance. This is because on a level, flat surface, hard tires flex less and have less contact patches. But as you know, no road is flawlessly smooth. Properly inflated tires will conform to impacts and absorb shock whereas overinflated tires will transmit impacts to the rider, which makes your ride less comfortable.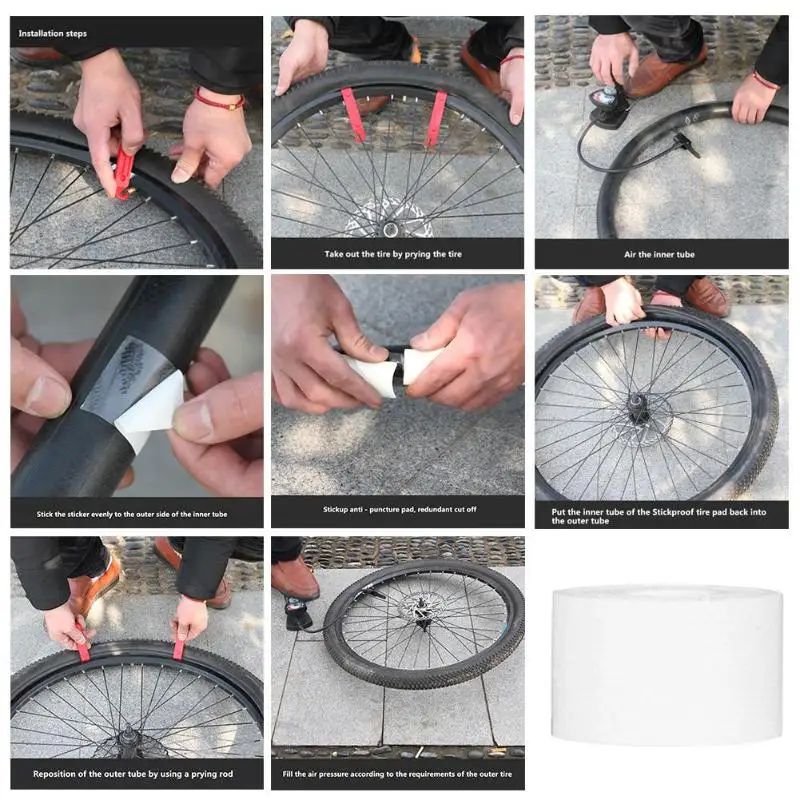
Keeping the Air in There
If you ride over sharp terrain, immediately sweep your tires with a gloved hand to get rid of dirt and debris. For the ultimate protection, utilize tires liners. Get in the routine of checking your air pressure before each ride to ensure that your tires are properly inflated.
Frequently Asked Questions About Tire Pressure:
How Do I Know if My Bike Tires Need Air?
The most accurate way to determine if your bike tires need air is by checking them with a tire gauge. Locate the air valve on the inside of your tire and remove the cap. Press the air pressure gauge down on the valve and watch for the reading. Check the side of your tire to confirm whether it is within the acceptable range.
Keep in mind that tire pressure increases when you are riding. The range provided is the range for when your tires are cold. If you have been riding for a while, expect the pressure to be higher than normal.
If you don’t have a tire gauge handy, you can check by feel or look. For a road bike, the tires typically need to be inflated to the point at which you can’t easily squeeze the sides of the tire. For a mountain bike, sit on the bike and look down at the tires. If they protrude more than a couple of millimeters, they need more air.
How Much Air Should Be in My Bike Tires?
The recommended air pressure is written on the side of your tires in embossed lettering. Simply fill your tires with a pump and check with a gauge that the pressure matches the recommended range. This range is for cold tires. If possible, only fill your tires when your bike has been sitting still for at least 30 minutes.
If you don’t have a gauge, you can use the methods described above to determine if your tires need air. A road bike will typically need higher pressure than a mountain and fat tire bike.
Does Air Pressure Affect Your Bike Ride?
Yes, air pressure can significantly affect your bike ride. Low air pressure will cause the bike to ride less smoothly and get more flats. Additionally, the bike will typically be slower when in motion because of increased friction.
However, overinflated tires are also a problem. They fail to absorb impacts properly, which can be uncomfortable. Additionally, they have more trouble getting moving from a standstill. Air pressure within the recommended range is important.
Tubeless tires can hardly be called the know-how of the bicycle industry, however, they still raise questions for many. The topic itself, as a rule, is surrounded by a lot of skepticism and distrust, which are more often explained by a lack of understanding of basic things and a lack of experience in riding such wheels. To dispel all these doubts, we answer the main questions related to tubeless technologies.
These are bicycle tires that do not have a tube. At the same time, tubeless technology is not only about tires.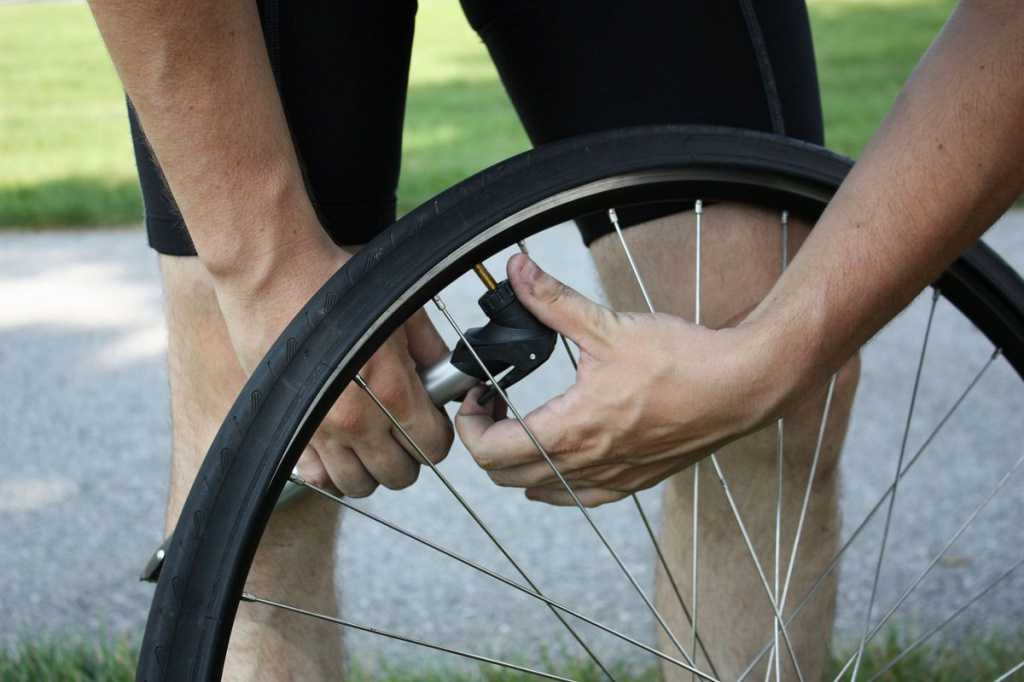 We are talking about a whole wheel system, which also includes a special rim and a sealant that gives the wheel anti-puncture properties. The tubeless concept makes the bike more comfortable to use and improves its riding performance, which will be discussed in order.
How long ago did this technology appear and can it be trusted?
Those who hear about bicycle tubeless for the first time usually tend to be suspicious of them. You can dislike this technology for subjective reasons, but you definitely shouldn’t distrust it. Tubeless tubes have been massively used for cars and motorcycles for several decades, and during this time they have not given reason to doubt their reliability.
The first tubeless systems for bicycles appeared in 1999, when the French rim brand MAVIC, in collaboration with tire manufacturer Hutchinson, presented their concept of a simple and effective tubeless wheel. In the 2000s, this technology remained the prerogative of mainly professional athletes, who quickly appreciated its main advantages: lighter weight, more air in the wheel, good "traction" and durability.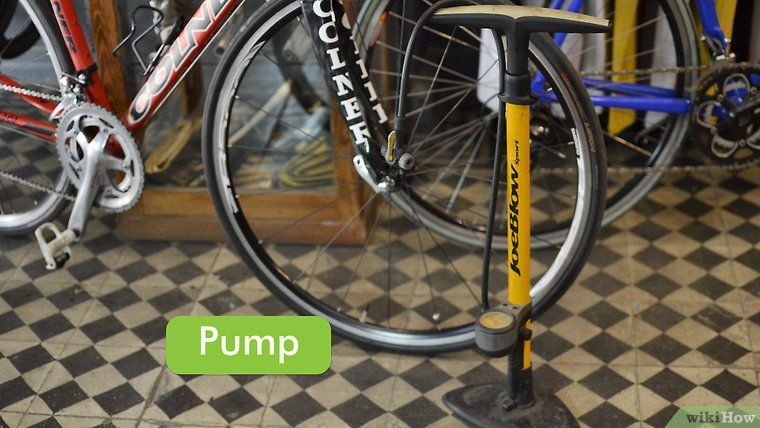
In recent years, tubeless has finally ceased to be perceived as something exotic. For example, today a significant part of the MTB and almost all touring cars come with such wheels as standard. A wide variety of sealants are also available on the market, and the number of those who are discovering the benefits of tubeless technology is steadily increasing.
The tubeless system provides a special rim and tires that are labeled tubeless ready or TR. However, the rims themselves are easy to distinguish visually - they have a low side and characteristic walls with recesses, forming a kind of lock in which the tire cord is wedged when air is injected. Due to this, in the inflated state, the rubber reliably and hermetically “sits” on the rim, without breaking off the wheel even at low pressure. The rim itself is additionally glued with a sealing tape, after which the nipples are installed separately.
The benefits of tubeless wheels are revealed no matter how often and what kind of bike you ride: whether it's weekend trips, extreme downhill or long-distance touring. Nevertheless, for certain categories of cyclists tubeless still open up more opportunities: first of all, we are talking about those who are seriously passionate about off-road.
When actively driving off-road with tubeless tubes, you can ride on lowered wheels and at the same time not be afraid of such an unpleasant type of puncture as a snake bite. Low tire pressure, in turn, gives better handling, dampens vibrations more effectively and generally provides more comfort on difficult tracks. If we are talking about cyclists, then they appreciate tubeless for their anti-puncture qualities.
Road bikes also use tubeless wheels. Moreover, they are the pioneers of this technology. But road tubeless tubes are a different story: they are designed for different operating pressures and have tangible design differences. Therefore, further we will talk mainly about those tires that are put on mountain, touring and city bikes.
These are the two rim formats that define the features of a tubeless wheel assembly. BST is a standard that involves the installation of a special sealing tape that prevents air from leaking through the holes in the spokes. This is the most common version of tubeless systems.
UST is a blind rim in which an additional bridge isolates the spoke holes. Thus, there is no need for laying a sealing tape. In practice, this greatly simplifies life, because when installing a tire (especially without proper experience), the tape tends to crush, which is why you have to reassemble the wheel. It is easy to guess that such rims also have a drawback - their price.
The tubeless system in the form in which we wrote it above is already a full-fledged wheel, it can be installed on a bicycle and hit the road. But there is an important nuance. First of all, tubeless tubes are valued for their anti-puncture qualities: for this, a small amount of a special liquid, a sealant, is poured inside the tire.
Yes, you can. But you should not do this. Firstly, this is illogical: for no reason you are depriving yourself of the main advantage of tubeless - the anti-puncture effect. But more importantly, it is very difficult (or even impossible) to inflate such a tire in a completely flat state with a portable pump: to do this, you need either a strong floor pump or a booster. Naturally, no one will take such bulky things with them on the road. Filled with sealant 95% of punctures "seal" without a critical loss of pressure, and in most cases there is no need for even light pumping. Thus, the probability of being with a flat tire is very low.
So, if you put tubeless, sealant is still needed. Such fluids are easy to find in any bike shop, they are inexpensive and require replacement on average once every three to four months, so there is no need to talk about any inconvenience. Yes, in order to cope with the fill, you need to acquire a certain skill, but this is much easier than constantly changing broken cameras. In addition, sealant can be replaced once a season in a specialized service.
Bicycle sealants are based on fine particles (rubber or polymer fibers) suspended in a liquid carrier. Inside the wheel, the sealant does not polymerize: it is in a liquid state and is distributed along the inside of the tire during movement. When a puncture occurs, the air flow begins to push the solution out. A fine suspension clogs the hole, and the sealant dries quickly. Thus, there is a reliable "sealing" of the puncture.
If we talk about typical punctures - collisions with thorns, wires, small glasses - such damage is self-healing without a noticeable loss of pressure. Usually, a puncture can only be guessed from a small spot on the surface of the tire. Naturally, the sealant works with more complex damage. You can count on it even if you pierce the wheel with a thick nail, 4-5 mm in diameter. If you don't understand how a liquid can seal such holes, you can watch numerous crash tests on YouTube that demonstrate the miraculous properties of sealants.
The consumption per tire is from 50 to 100 ml. If we are talking about standard MTV tires, the golden mean is about 60 ml per wheel. The exact dosage will always be written on the bottle. It is difficult to get confused even for those who do not like to read instructions: most sealants have measuring containers or a dosage scale on the bottle itself.
Here, too, everything is conditional and depends on the characteristics of the specific composition and intensity of punctures. In the absence of serious damage that entails the leakage of a large volume of sealant, you can easily skate a whole season on one fill. Some cyclists prefer to do an incomplete start-up gas station and gradually add 20-30 ml of fluid every two to three months. You can also navigate by how effectively the sealant works: if you see that small punctures are sealed with a strong deflation of the wheel, it may be that the composition is no longer enough and it needs to be added. Be that as it may, sealant is a very economical thing that lasts for a long time.
The sealant inside the tubeless tends to dry out, forming a characteristic film. Whether or not to clean the tire cavity is up to you. This is a purely aesthetic moment, which does not affect the operation of the anti-puncture fluid. The sealant can simply be added as it dries and not bother with unnecessary worries. It is more likely that the tire will completely wear out than it will have time to completely clog with dried filler.
Serious damage - large diameter punctures, small cuts, run over nails with subsequent tire rupture - are repaired using special repair worms. These are rubber or fibrous bands that are inserted into the hole to reduce its area and allow the sealant to seal the puncture.
With long longitudinal cuts it is more difficult. Here you need to either sew up the dissection with nylon threads, or stick a patch on the inside of the tire. You don’t have to worry about the tightness of the repair site - the sealant will do this work, of course, if it does not have time to leak out. But being able to inflate a completely flat tire with only a portable pump will require skill.
In fairness, we note that such complex injuries are rare for most cyclists. But for those who are seriously passionate about off-road, it is better to play it safe with a spare camera. In this case, having caught a cut, you can always drain the sealant, unscrew the nipple from the rim and install a regular camera. And in order not to drive with a “hernia” protruding outward, we recommend placing, for example, a bill folded in half under the cut on the tire.
Tubeless allows you to forget about such an unpleasant form of damage as a "snake bite" forever. It usually happens when at full speed you catch a pothole in the pavement, unsuccessfully jump onto a curb or run into a stone on a downhill. Hitting the edge of a hard object, the tire is crushed, and the rim walls work like incisors, damaging the chamber in two places. In tubeless wheels, this scenario is excluded, because. there is nothing to break through here. Of course, it can be assumed that the rim will cut the tire itself, but this should be a blow of enormous force, which is almost never encountered in practice.
Rejection of the chamber increases the volume of air in the wheel. This changes the contact patch (it becomes flatter) and allows the wheels to better absorb off-road bumps. Add here the ability to ride at low pressure, without being afraid of a snake bite, and it becomes completely clear why tubeless lovers of hard off-road riding so idolize. Soft tires with a large contact patch "fit" all the bumps in the road, giving excellent traction on rocks, forest primers and other off-road.
In addition to traction, tubeless tires improve shock absorption, dampen vibrations better, and generally provide more off-road comfort. At the same time, to get the most out of this rubber, you need to experiment a lot with tire pressure, trying to find the indicators that will best suit your individual riding style.
Finally, the camera is extra grams. By refusing them, you can save an average of 70-100 g of weight on each wheel. For some, this may seem like a formality, but it is worth considering the fact that extra grams on the periphery of the wheel have a stronger effect on driving performance. This difference is especially felt on road bikes: road bikes, gravel, touring.
They also exist. Moreover, it is far from formal. First, it's the price. The difference becomes especially noticeable when you buy tubeless systems separately: rims, tires + small things (tape, removable nipples, sealant). For tubeless you will have to pay an average of one and a half times more than for ordinary wheels, plus or minus the same class. And if we are talking about more advanced UST rims, then this means another + 30-40% to the cost.
With tubeless by default, everything is more difficult in terms of installation (here we are talking about conventional BST systems). You need to learn how to properly glue the tape, accurately insert the nipples, carefully install tight rubber, making sure not to displace the tape and not fill everything with sealant. On the other hand, all this comes with experience, but what you will always have to put up with is the difficulty with pumping a completely flat tire.
A tubeless tube cannot be inflated until its landing board snaps into place on the rim. To do this, you need to sharply introduce air into the tire. The tire should straighten up and fall into the grooves with a characteristic click - then it can be safely pumped further. This all sounds simple if there is a compressor in the garage. Putting a tubeless tube into the grooves by pumping air with an ordinary floor pump is quite difficult, and almost impossible with a portable bicycle pump.
All this makes life much more difficult. But there are solutions. In the field, a compact can of compressed air can help out. At home, installing tubeless tubes greatly simplifies the booster. This is a cylinder into which a high pressure is pumped with a pump, then it is connected to a nipple, the valve is lowered - and the air from the reservoir pumps up the wheel sharply.
As you can see, tubeless cameras also have enough disadvantages, but it is wrong to consider them in isolation from the advantages. For example, the probability of being with a completely flat tire away from home is very low, due to the anti-puncture qualities. Complicated installation is offset by the lack of punctures and roadside repairs. And by overpaying in price, you save on interchangeable cameras, and, of course, win as a roll on off-road.
When buying a bicycle, many do not even think about the fact that the convenience and comfort when riding it is achieved by correctly selected tire pressure. The service life of the bicycle, the speed of riding, the degree of tire wear, safety, control of the two-wheeled friend depends on how the wheels are inflated.
Many cyclists believe that inflating the tires is only necessary for a good bike ride. However, flat tires have a wider area of contact with the road, which means that grip will be better, but it will be very difficult to accelerate to a speed of 30-35 km / h on such tires.
When inflating your tires, you should always consider the type of terrain or surface you will be driving on. If the walk is supposed to be on an asphalt road, the tire pressure of the bicycle should be close to the maximum allowable value. Elastic wheels on a flat surface will provide a smooth rolling and high speed of movement.
For cross-country riding with unpaved paths, it is better to set the tire pressure to medium tolerable, so that you can ride long distances in comfort and convenience. At high pressure, the grip of the wheel with the road will be minimal, respectively, all holes, pebbles, and bumps on the road will be sensitive. And with flat tires, the likelihood of damage to the wheel or puncture of the chamber increases.
In order to protect yourself on the road, as well as to keep the bike or its individual parts intact, you need to know exactly the lower and upper limits of permissible values, to what pressure the bicycle wheels can be pumped.
Information about tire pressure gives you an advantage when cycling:
Forget the old "old-fashioned" way to check the wheel with finger pressure. No need to rely on tactile sensations, trying to feel with your hand the degree of rubber penetration on the tire. The air leaves the wheel gradually, through the pores in the rubber. Within 2-3 weeks, the pressure decreases by 0.1-0.2 atmospheres, but you cannot determine this with your fingers. The exact value at any time will help determine the pressure gauge that every cyclist should have in his arsenal. With its help, it is simple, with a minimum error, the level of pressure in bicycle tires is measured. A pump with a pressure gauge (floor or manual) will become an indispensable tool for cyclists.
There are three standard values in which bicycle tire pressure is measured.
kPa = 14.504 PSI
All these units are used to some extent - in different countries, by different manufacturers. For residents of Russia and the post-Soviet space, the change in bars is more familiar, since this unit is clearly associated with the pressure of the 1st Earth's atmosphere at ocean level. In America and Western Europe, a popular unit is PSI, as they actively use pounds and inches in measurements. Pascals are the least used unit of measurement, but the most modern. Some bicycle manufacturers write data on the wheels about the allowable pressures in all three systems.
Manufacturers indicate on the sidewall of the tire how many atmospheres to pump the bicycle wheels. Specifies the range within which the owner of the "iron horse" determines the desired values, depending on the specific factors of riding his bike. Values in the range are labeled from min to max, in two or all three dimensions. Numbers up to 10 are atmospheres (or BAR), tens-hundreds are PSI, and six-digit values \u200b\u200band with the prefix “k” / kilo are Pascals.
When inflating a tire, you must strictly follow the manufacturer's recommendations and try not to go beyond both the minimum and maximum pressure levels indicated on the tire. Moreover, it is better to leave a small margin of 0.2-0.5 BAR, both in one direction and in the other, so that the tire does not burst.
The pressure in the wheel is kept by the tire, not the tube, so there is no single standard for its value. There are several significant factors that determine how much you need to pump the wheels on a bicycle.
The type of tire is determined by the surface of the track on which the cyclist will predominantly ride. Accordingly, the level of inflation of the bicycle wheel will be different. There is a direct dependence on the roughness of the tread and the width of the wheel - the more lugs and the wider the wheel, the lower the pressure should be. Empirically, cyclists quickly determine how many atmospheres should be in the tires of their bicycle
Many cyclists do not realize that air temperature affects the pressure level in bicycle tires. From the course of school physics, we recall that when heated, bodies expand. This means that in hot sunny weather, the pressure inside the air chamber will increase without additional pumping. Conversely, on cold winter days, a decrease in tire pressure is quickly felt due to low temperatures. So, when going for a bike ride in the cold season, the pressure indicators need to be adjusted a little higher than usual, and in the summer heat, let the air out a little. It is worth noting that when going on a bike ride, you should always take into account the weather conditions.
It is important to take into account the load on the bike created by the weight of the rider, especially the fact that most of it is on the rear wheel. Therefore, the degree of its pumping should be slightly higher than the front, the optimal difference is 10%.
To calculate the optimal tire pressure for a bicycle, given the weight of its rider, you can use the table:
Rider weight (kg) Pressure (atmosphere) Pressure (PSI)
The nature, riding style and type of bike also affect tire pressure. Buyers who prefer an active pastime often opt for mountain bikes with 26-inch wheels, which ride well both on city streets and in rough terrain.
To understand to what pressure to inflate the wheels of a bicycle, it is necessary to take into account the features of both the bike itself and other, at first glance, weightless factors. For example, weaving threads on a tire, rim thickness, driving style. The likelihood of a tire coming off a wide rim is much less than a narrow rim, because a wider rim will hold the tire better than a thin one. Mountain biking already by its name suggests the presence of a difficult surface on the track, with possible obstacles and bumps. The driving style is more aggressive than on a smooth, calm trajectory, it obliges you to increase the tire pressure to a level slightly less than the upper limit.
The diameter of the wheel will also affect the selection of the optimal pressure value, since the larger it is, the higher the volume of air pumped will be.