31 shares
Have you seen those dreamy rope ottomans on Pinterest? They’re all the rage, especially with a boho decor. When I found out how much the rustic-looking items cost, though, I immediately decided to make a DIY tire ottoman with rope and am very happy with how it turned out!
Not only is this DIY home decor project very thrifty, but it also helps to reduce landfill waste. Because old tires are a major source of pollution unless they are recycled or repurposed.
What’s better than that? I can save money and save the environment, while making a really cool looking footstool!
The great thing about this recycled tire ottoman is that it works both indoors and outdoors. Especially if you seal the rope rather than leaving it unfinished.
This twisted sisal rope is great to use for this project!
It would be perfect to add to my backyard makeover, don’t you think?!
I’ve also made a storage ottoman out of an empty popcorn tin container. It’s perfect for small spaces and extra storage!
Love this project and want to remember it? Be sure to Pin it to a DIY or Home decor board on Pinterest!
Where can you get a used tire to make this upcycled project? Here are some great places. Keep in mind, businesses might have to pay to recycle a tire due to environmental laws. So they’ll probably be happy to give it to you for free!
 Make sure it is thoroughly dry before continuing.
Want more upcycling projects? Check these out:
Have our free weekly newsletters with the best tips, new home improvement projects and easy crafts sent to you!
31 shares
Want to know exactly how to make your very own diy tire ottoman, but have no idea where to start? Follow these exact steps to see how you can make your very own jute rope tire ottoman in just a few hours.
I could spend hours on Pinterest scrolling through pictures of cozy backyards and dreaming of ways how to make my backyard look better. Last year I came across an article where someone used a recycled tire and some jute to make seating in their backyard and I couldn't wait to try it myself!
You are going to learn exactly how to make a diy tire ottoman that can be used inside or outside. I'll even go over the commonly asked question, "how much rope is needed for a tire ottoman?" This was a cheap project that has quickly become one of my favorite DIY's yet!
I'm going to walk you through EVERYTHING I learned so that you will know how to make your diy tire ottoman like a pro.
This post is all about how to make a diy tire ottoman.
Let's start with the basics. You are going to need tires.
If you don't have old tires laying around, try calling your local garage. More than likely, they have piles of used tires that they would be willing to give to you for free. I called the closest garage to my house and asked them if I could have 4 or 5 used tires for a project I'm working on. They were more than happy to let me take as many as I needed.
Obviously the tires do not need to be in perfect condition, but if it's falling apart and looks like it blew off the car then it's not going to work. Honestly, I just looked for 4 or 5 tires that were about the same size, were not falling apart, and had sides for the MDF to drill into.
Once I got the tires home, I gave them a quick wash with soap and water. This isn't completely necessary, but the ones I got were pretty filthy so I took about 5 minutes to clean them up.
Start by cutting the MDF into circles. We measured the circle around the rim of the tire to get the diameter. Then, using a compass draw the circle onto the MDF. You can make your own compass with a piece of wood (or string) and a nail like we did in the picture above. Next, use your scroll saw to cut the circle pieces. If you don't have a scroll saw, a jig saw would work as well.
Pro Tip: If you are planning to make more than one diy ottoman, it will probably be cheaper to buy one big piece of MDF. We bought a 4'x8' piece from Lowes and had them cut down to 4- 2'x4' pieces. This made the pieces smaller and easier to handle, but still big enough to make the circles we needed.
Next, drill the circle pieces of MDF into both sides of the tire. We used these 1 1/4" drywall screws from Lowes, but as long as it has a spiral side that will grip into the tire and MDF you will be okay.
To drill the holes, we used a small drill bit to make pilot holes around the MDF. This helps guide the screw into the hole easier. We then used a counter sink bit so the screws would sit flat. Finally, we used an impact driver to drill in the screws. You will want to make sure the screw goes through the tire and grips tightly.
According to some, this step isn't completely necessary. But if you're extra like me and already have the caulk laying around, why not? Don't you want your hard work to last?
If you plan on using your tire ottoman outside, this will have a huge impact on the durability and longevity of it. MDF is not waterproof so applying the water seal will protect it from outdoor weather elements. We used a foam brush to apply the water sealer and it worked perfect. If you don't already have a foam brush laying around, you can get buy a whole pack for super cheap!
When planning this DIY, I also worried about water getting into the center through the seam of where the MDF meets the tire. Applying a bead of caulk around the edge will prevent water from ever making its way into the tire.
{Other Post You May Like: A STEP-BY-STEP GUIDE ON HOW TO BUILD A NERF GUN WALL}
Next, you can start to glue the jute (aka sisal rope) to the MDF. After trying several different methods, and sizes of jute we found that 1/2" looks and works the best. The 1/2" Twisted 3 Stand, Lightweight Synthetic Rope from Amazon is sturdy, smooth and much better looking than the original jute we purchased from Lowes. The best part is the it doesn't make a mess like most other types of jute either. Surprisingly, it was cheaper than what we found at Lowes too.
These 10" hot glue sticks were perfect for this DIY.
When starting this process, I would glue the jute together in a spiral (like in the picture above). Then, I would glue that to the center of the board. From there, you can continue the same pattern by gluing as you go.
We used 252' of 1/2" jute for a 17" tire.
Continue wrapping until you reach the bottom base. The base doesn't need wrapped because it's on the bottom and no one will ever see it. Once you are finished cut the rope with sharp scissors and burn the end (to avoid fraying) with a lighter. Then, glue the end piece to the tire.
As I mentioned before, we tried several sizes of sisal rope. The first tire I wrapped (pictured above) using 1/4" rope and it took me over 5 hours. Obviously I knew that wasn't going to work so that's when I ordered the 1/2" rope. I honestly didn't think the bigger rope would look as good, but boy was I wrong! The bigger (1/2") jute not only looked better, but it also only took me about 2 hours to wrap the whole thing!
Best rope for recycled tire diy ottoman:
Click Here To Buy From Amazon
Finally, apply a layer of the Thompson's Water Sealer and your diy tire ottoman will be complete! I seriously can't get over how easy these were to make and how cute they turned out! To make a little table, I just stacked one on top of the other.
{Related Post: 17 GENIUS OUTDOOR DIY IDEAS THAT WILL TRANSFORM YOUR BACKYARD}
For a 17'' tire you will need about 255 feet of 1/2" rope. The smaller the tire, the less rope you will need.
We used (26) 10" glue sticks for a 17" tire. I know, I know, that's a lot of glue! This 5lb box of glue sticks from Amazon was perfect for this DIY and now I have leftover glue for future projects too.
Good afternoon, dear subscribers of the construction portal - StroyVopros. net. With this lesson, we continue step-by-step guides aimed at improving the suburban area, as well as its design. Today we will analyze how to make an ottoman from tires with your own hands.
Do-it-yourself ottoman from a tire
Rope twine
 nine0014
 Necessary tools to create a puff from a tire
Drill holes in plywood and rail
Attaching the plywood sheet to the rail
we will attach roller legs to the bottom of our ottoman, which will move our ottoman on wheels.

Starting to lay the twine
We begin to lay the twine in the shape of a snail
Turn the tire over and start laying the rope from below
Tire ottoman is almost ready
 nine0014
 DIY tire ottoman
Tire ottoman - ready. By the way, as a decor, you can screw legs to it - wheels, then it will become the object of adoration for your children. That's all, subscribe and join our group of builders with your own hands!.
Tweet
Share
Share
Classify
Submit
Article Rating:
(votes: 3 , average score: 9021)0003
Loading...
Tires that are out of use are widely used in the household. What skillful craftsmen just do not invent: flower beds, and crafts for decorating a personal plot, and children's swings. Another option is to make an ottoman out of a tire with your own hands. Practical and creative! Such furniture is useful not only in the country, but also in a city apartment. So, do-it-yourself ottoman from a wheel: features and a detailed master class. nine0003
Handmade furniture is always appreciated. Often it can become the main decoration of the house, because in the manufacture of each master puts his soul into his product and applies an individual approach. In addition, no special skills or expensive materials are required for work. Often used wheels are simply thrown away as unnecessary. But it turns out they can be given a second life!
This ottoman is quite comfortable to sit on as it is stable. In addition, it can be used as a coffee table. Such ottomans will look great in the gazebo, on the veranda or in the hallway. As you can see in the photo, they look quite original. There are at least three ways to make such unpretentious furniture. nine0003
Tire pouffe (option 1)
You can make a pouffe from one wheel, but it will be a bit low for an adult. Therefore, we suggest trying to connect two tires together. To work, you will need the following tools:
 nine0014
Materials will be two tires, plywood, foam padding, upholstery fabric, belt or hose. Wash the tires thoroughly to keep them clean. On the one that will be the top, we cut out four small holes for further fastening the seat.
Holes for fastening the seat
You can connect the wheels to each other using screws.
Joining
The seat is made of plywood. Draw a circle on the sheet - the same diameter as the tire. Then cut it out with a jigsaw and finish the edges with a file. nine0003
Cut out the base for the seat
Make a round spacer out of the foam.
Foam padding
Upholster the seat with fabric, stapled to the plywood from the back.
Cloth cover
Use a belt or hose to secure the seat.
Temporary fixation
Screw it to the top wheel.
Seat attachment to rail
The rubber part can be painted in your favorite color. This is one of the options for making an ottoman from a tire. As you can see in the photo, it looks quite original.
Pouffe from an old tire (option 2)
There is another method - using a rope. You will need:
Required tools and materials
In this case, we cut out two circles from the chipboard sheet and attach them with self-tapping screws on both sides of the tire.
Fixing the plywood circle
Then you can start decorating the future pouffe. To do this, use a coil of rope. You need to start from the center of the upper circle. Using a glue gun, the rope is fixed in a spiral.
Decorating the lid
When the lid is ready, proceed to the sides of the wheel. In the same way, we wind the rope in a spiral. You need to work carefully, tightly pressing the new coil to the previous one. We leave the bottom as is.
Decorating the sides
When the twine sets, that is, the glue dries well, we cover the ottoman made of the tire with a colorless varnish.
For reliability, it is better to apply several layers. This will protect it from moisture and dirt, which will facilitate further care of the product. nine0003
Lacquering
This do-it-yourself seat made of tires looks beautiful in an eco-style room.
Pouffe from an old tire (option 3)
If you don't want to mess with the rope, it doesn't matter. To quickly make a seat, you can simply place an old pillow inside the wheel. In this case also prepare:
If you want the pouffe to be as high as a chair, use two wheels. Connect them together with self-tapping screws. Cut out a rectangle of foam rubber large enough to wrap around the wheel. Sew along the edges. Thanks to this, the frame will become soft and beautiful.
Cover the top of the frame with a dense fabric, and put a circle of foam rubber on top. Then sheathe the seat with one piece of upholstery material, and the side part with the other. Use strong thread. You can decorate the product with lace, fringe or other decorative elements. Look at the photos of such products and borrow the idea. nine0003
And one more thing: to make furniture easy to move around the room, you can attach handles to it. An old belt will work for this. Make loops out of it and attach with screws to the frame. Thus, you have learned how to make beautiful puffs out of tires in three ways.
There are different ways to equip "your" suburban area. Of great interest are the ideas of creating original items from old things that have served their intended purpose.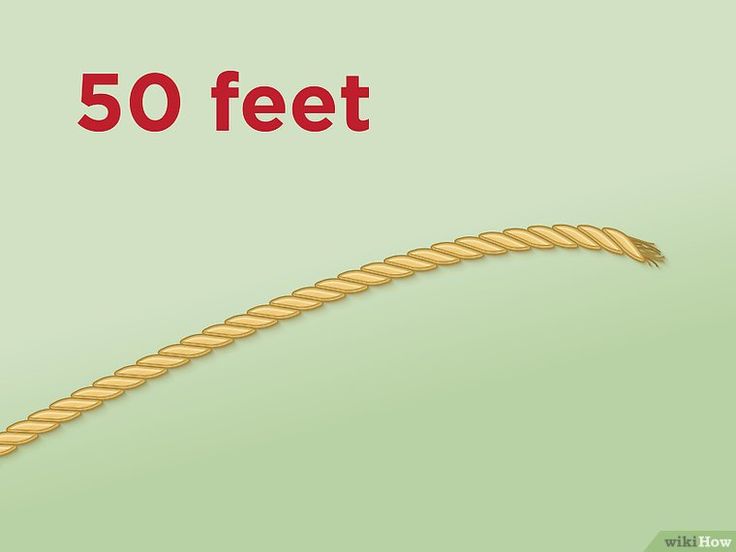
Craftsmen make furniture from wooden pallets, polypropylene pipes, plastic and wine bottles. New applications are also found for old car tires. They make armchairs, tables, ottomans and even sofas. Practical and durable furniture is used in the garden, for arranging a garage, as an unusual accent in the interior. nine0003
Tires can be used uncoated, but more often they are dyed in bright colors, wrapped with jute, sisal, linen, cotton or hemp rope, and pulled with cloth.
Car tire rubber contains toxic substances and should not be used in a child's room or in a poorly ventilated area. But even without this, there is enough space for improvement: in the living room of a private house, on the terrace, in the garage and utility room, in the open air. nine0003
The simplest thing that can be made from used car tires is comfortable ottomans for relaxing and gatherings with friends. They can be in the form of "pills" covered with a thick rope or with fabric upholstery on legs. Consider several manufacturing options.
First, the tire is cross-wrapped diagonally with a thick cord to block the through hole. Then completely cover the circumference. To do this, the rope is twisted in a spiral, starting from the center of the hole blocked by the cord. The rope is fastened with a glue gun. nine0003
Alternatively, 2 plywood discs of the appropriate diameter are used to close the holes in the center. They are attached with screws. Next, the structure is wrapped with a thick rope, fixing with hot glue.
You can make a soft ottoman covered in fabric. To begin with, blanks are made from plywood sheet to close the holes. Then a foam strip is glued to the side of the tire around the entire circumference.
Using a screwdriver, screw the plywood disk from below. Next, they cover the tire with a dense cloth, fastening it with a construction stapler. Legs or wheels are screwed to the bottom plywood. nine0003
The remaining disk is wrapped with foam rubber and covered with fabric. The resulting cover is placed on top. It can be fixed with glue.
Several fabric-covered ottomans can be used as a cozy seating area.
Two busbars are connected with bolts or screws from the inside. Next, the structure is painted or left as is.
A wooden circle made of MDF or chipboard is nailed on top, which is also painted, and soft bedding is laid. Also, a wooden circle can be covered with foam rubber and fabric. nine0003
An excellent set will be obtained from high pouffes and a table. The table is made according to the same principle, only its height is twice as large. A casual white paint job while maintaining a contrasting black tread pattern gives the furniture a stylish look.
Wide tires with a small diameter are suitable for making designer boxes for crafts and small items. Their manufacture is similar to the creation of ottomans, only in addition to the outer skin, they also pay attention to the interior decoration. nine0003
For interior design, plain fabrics are used, and for external sheathing - bright fabric with patterns and colors. Such cute interior items will be a good idea for a business.
Instead of simple pouffes, you can make armchairs with a back and armrests. The backrest rail is also attached to bolts or self-tapping screws. Armrests can be made from strong, thick, varnished branches. When the structure is assembled, proceed to close the holes in the center. nine0003
In addition to the methods already mentioned, weaving can be used. To do this, holes are made in a circle with a drill in increments of no more than 5 cm (more often). Later, a strong rope or cord is threaded through the holes with an awl, interlacing each longitudinal row with the transverse ones. You can experiment with the pattern, especially if you have weaving skills.
Bent steel tubes can be used as armrests. And for weaving instead of rope - soft wire. nine0003
Single chairs can be turned into a bench by connecting two sections with a common wooden frame.
Tires and scrap materials can be used to make spectacular designer furniture. Here are some proofs.
"Auto"-chair of 4 tires on a metal or wooden base. In the manufacture, the techniques already described above are used. All elements are connected with bolts.
Low legged armchairs with upholstered backs in Art Nouveau style will perfectly fit into the interior of a spacious living room. For manufacturing, one tire is cut in half in diameter. This part will serve as the back.
A strip of thick foam rubber is glued inside. In order for the back to be beautifully raised, two slats-racks are nailed in the center.
For the seat, a wooden disk is cut out, sheathed with foam rubber. Then the entire foam rubber is covered with leatherette. Screw the back and seats and the chair is ready! nine0003
The next option is done in a similar way. Only for the back is taken a wide tire, which is attached closely, without rails.
For a chair with a high back, thick wooden slats will serve as a support, which are covered with a piece of foam rubber and covered with fabric. As a result, a brutal basis is not even guessed in the product. Everything looks elegant and stylish.
Garden armchair with wooden back left unupholstered. Even without painting, it looks very aesthetically pleasing. nine0003
As a backrest, several tires connected to each other and placed on edge can be used. They can be attached to the tire serving as a seat using cables or elastic springs. Further tricks for converting waste material into a comfortable resting place can be suggested to you by fantasy or our good example.
Another interesting option for a chair for a private house made of a large tire. In this case, a segment is cut out in the tire, a soft seat is arranged below, and the inner walls are sheathed, and they serve as a back. A stylish combination of materials and a selection of trendy prints will allow you to get an excellent youth chair for watching TV. nine0003
Sofa requires car and mini truck tires. Solid tires are used for the base, and cut-off sectors for the back and sides.
Eco-leather or coarse wear-resistant fabric can be used as upholstery. Such a sofa can be placed in the garage or on the spacious terrace of a private house.
Tires are also used to create an unusual coffee table. There are many ideas: on wheels, with or without legs, with a glass or wooden surface, painted or natural. nine0003
Gold-plated version with chrome legs and glass top looks harmonious if it matches the color background of the interior.
With wood top and wenge legs, perfect for classic style. The legs are screwed to the lower wooden disk, and the table top is fixed with hot glue.
The rail can also be used as a base for a round washbasin. Thus, you can equip a bathroom in a private house or an open washstand in the country. nine0003
The selected ideas show the wide range of applications of car tires in the creation of original home and garden furniture. Having mastered the basic principles, you can develop your project and surprise with new ideas.
Welcome to the site of crafts and needlework. Today we will describe how to create a creative puff with our own hands from a car tire, thick rope and plywood.
The idea is very simple, but at the same time very useful and versatile: it is comfortable to sit on, the ottoman can be used as a coffee table. nine0003
We have already written about how car tires can be used: creating flower beds in the country, and in this case we will use car tires more practically. A pouffe made in this way can be useful not only in a summer cottage, but also in a city apartment, in a cafe, at a picnic.
Tools: drill, screwdriver or screwdriver, jigsaw.
First you need to prepare the tire itself, for this you need to wash it and wipe it dry with a cloth or let it dry in the sun.
We install the plywood circle on the tire and screw in 4-5 self-tapping screws along the radius of the tire (the screws must fully enter the tire). For convenience, you can pre-make holes with a screwdriver. We do the same actions by turning the tire over to the other side. nine0003
Next, let's start decorating our ottoman with a thick rope. With a glue gun, we begin to fasten the twine, starting from the center of the plywood circle. Further in a spiral, we cover the entire tire. We do not touch the bottom of our ottoman, and leave it as it is. If there is an extra piece of rope left, then simply cut it off.
It is possible to apply a colorless lacquer to an already finished ottoman, which will reliably protect it from dirt. You just need to apply it in several layers for the best effect. After waiting for the previous layer to dry, apply the next one. nine0003
We are waiting for the varnish to dry completely, we can use a tire puff by appointment. And using your imagination, you can come up with a lot of appointments for him.
Read more interesting things on our website. We are always glad to see you!
You don't need to pay money to create comfort in your home. You can make beautiful things from improvised materials. For example, make an ottoman from old car tires. It does not require much effort and time, but the product will delight for many years. The pouffe is useful in the country, in an apartment or in a garage. nine0003
 You can build a base from one tire, but it will be low. If the product is made in the nursery, 1 piece is enough.
 How to make an ottoman out of a tire with your own hands? Additional materials:
Plywood is cut to the diameter of the tire. If desired, you can process the edges with a jigsaw. Polyurethane foam is laid on top and fixed with glue (when used, polyurethane foam will not slide to the edges).
For aesthetics, a lid cover is made from fabric. The pattern is simple: we measure the height of the resulting seat and the diameter. From the material we cut out two circles and a ribbon (the width will be equal to the height, the length will be equal to the diameter). On a typewriter, we sew circles with a ribbon, leaving room for a zipper. Put on a seat cover. nine0003
TIP: You can simply upholster the lid with a cloth and secure with a stapler. It is recommended to close the back of the top of the ottoman with a non-woven fabric.
Tires are fastened together. Holes are made with a drill, you can fasten with bolts or wire. For beauty, it is advised to sheathe the rubber with cloth.
TIP: another way to hide the tires is to carefully wrap the product with a rope and fix it with glue. The option is more suitable, with one tire.
If there are two wheels, you can first wrap them with fiberboard or thick cardboard from boxes. nine0277
To make an ottoman out of a tire with your own hands, it is recommended to sheathe the bottom platform (chipboard swells from moisture, the fabric serves as a protection). If desired, you can fix the legs or rollers. Then the part is attached to the base with bolts or wire. We connect the lid to the base with the help of hinges (it will open).
The pouffe is ready for use. Creative individuals can spend a little more time to make the furniture more beautiful.
 You can apply paint to the fabric and remove the lace. It is also recommended to apply any forms through a stencil. nine0014
 Good afternoon, dear subscribers of the construction portal - site. With this lesson, we continue step-by-step guides aimed at improving the suburban area, as well as its design. Today we will analyze how to make an ottoman from tires with your own hands.
we will attach roller legs to the bottom of our ottoman, which will move our ottoman on wheels.