As an ATV owner and off-road riding enthusiast, it makes sense to learn how to do basic maintenance tasks yourself. This not only saves costs but will allow you to make adjustments when you are out on the trail, and something goes wrong. Learning how the brakes work on you ATV and making your own adjustments is the perfect place to start.
Tightening the brakes on your ATV can be achieved by a simple 5 step process.
The process for adjusting the front and back brakes differ slightly from each other. The back brake also has the hand brake, if your ATV is fitted with one, which will require adjustment as well. We detail this process for the front and back brakes and also the adjustment of the rear brake pedal and handbrake.
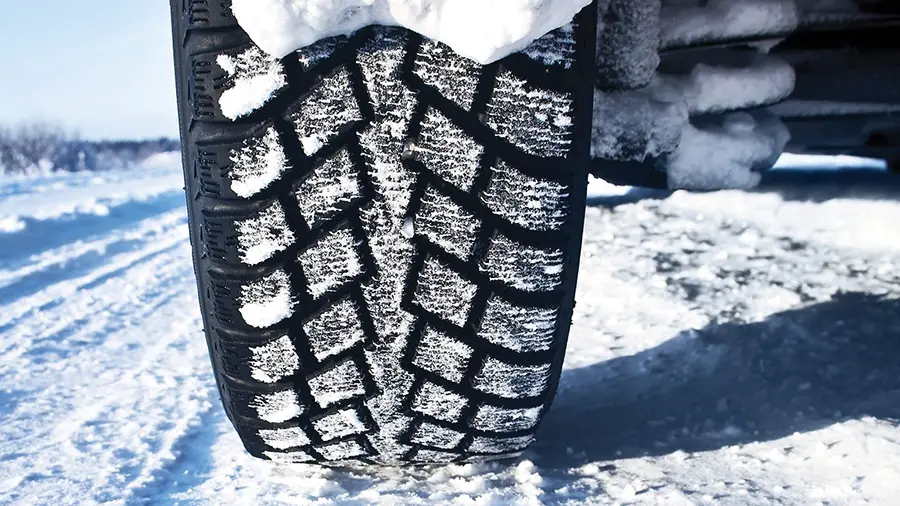
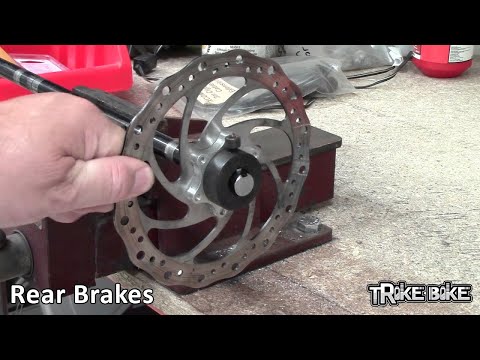
Establishing whether your brakes are drum brakes or disc brakes is essential because if the brakes are disc brakes, they cannot be adjusted.
Disc brakes work on a hydraulic system that does not require adjustment. If you have disc brakes on your ATV and they are causing you problems, then you should check fluid levels in the brake fluid reservoir or check to see if the brake pads have worn down.
If the brake pads have worn down, you would usually be warned by a squealing noise when you apply the brakes.
Other problems can go wrong on hydraulic disc brake systems such as replacing seals and pistons I the master cylinder of the system, but this is probably best left to professionals if you are unsure how to tackle it.
If your ATV has drum brakes, then we are in business and can make adjustments to the brakes. This brake system is mechanical as opposed to hydraulic, and we can adjust the distance of the brake shoes from the drum.
A jack or a stand that can lift the ATV so that all four wheels are off the ground is the ideal position to work on the brakes of your ATV, and it makes the job quicker and safer!
If you don’t have this equipment, jack up the end of the ATV that you will be working on. Remember, for safety, place chocks behind the wheels that are still on the ground to prevent the ATV rolling off the jack and potentially causing injury to you or damage to the ATV.
With the wheels you are working on lifted off the ground, you will easily be able to turn the wheels by hand while you are adjusting the brakes. In this way, you can make sure you have not tightened the brakes too much, causing the wheels to bind and not spin freely.
The front brake adjustment and the back brake adjustment processes differ due to the different adjustment mechanisms for the two brakes.
Each of the front wheels has an access port through which you can reach the adjustment wheel for the brakes. You can remove the front wheel for easier access, although this is not completely necessary. This access port is often covered with a dust-plug, which on some models of ATV is red. You will need to remove this dust-plug to access the adjustment wheel through the access port.
It is handy to have a small torch on hand to shine into the access port so you can locate the adjustment wheels inside the drum.
With the plug removed as per the previous step, turn the front wheel by hand so that the access port is located at the six o’clock position. From this position, you can move the wheel to access each of the two adjustment wheels, one to the right of the 6 o’clock position and one to the left of the 6 o’clock position.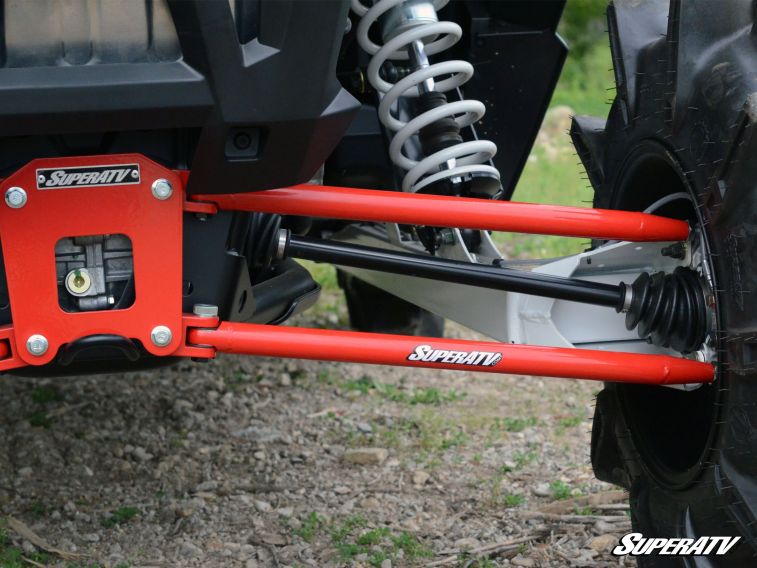 The adjustment wheels have little arms on them, so they look like a cog. You can use a flat screwdriver through the opening to turn the wheel in the required direction.
Once you have the adjustment wheels located, move on to the next step to make the actual adjustment.
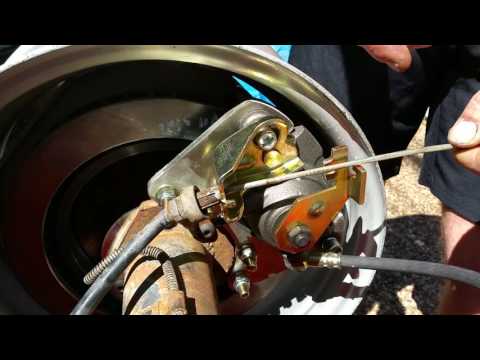
The rear brakes have two adjustment points, one for the pedal brake and one for the hand brake. Both these are cable adjustments and can be accessed via the rear brake panel, on the right rear axle of the ATV.
The adjustment can be accessed without removing the wheels, as the adjustment nuts face the rear of the ATV. The rear brake panel will have two cables coming into it, one for the hand brake and one for the foot brake.
Each of the cables will have a wingnut at the end, which is used for adjusting the tension or length of the cable.
Due to the difference in procedure between the front and rear brake adjustment, we will cover them separately.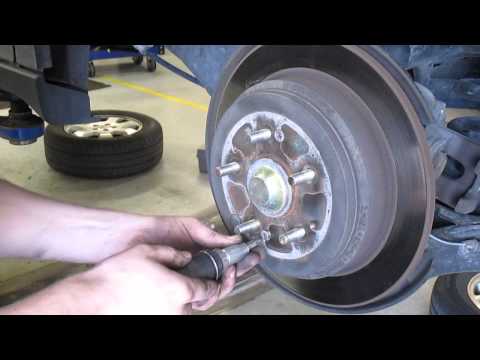
You will need to turn both the adjustment wheels to get the correct adjustment on the brakes. Turning the adjustments in one direction will pull the brake shoes in, effectively tightening them. Turning the adjustment wheel the opposite way will push the brake shoe away from the drum, effectively loosening the brakes.
The direction to turn to tighten and loosen depends on your ATV, so you will need to turn it one way to see if it tightens or loosens to establish which direction works for your ATV.
When adjusting the rear brakes, you will have to adjust both the foot brake and the hand brake. Both these brake mechanisms are activated with a cable, one running to the foot pedal, and one to the hand brake mechanism. The adjustment for both cables is via the wingnuts on the brake panel on the rear axle.
The wingnuts are usually one above the other, with the top wingnut being the adjustment for the hand brake and the bottom for the foot pedal.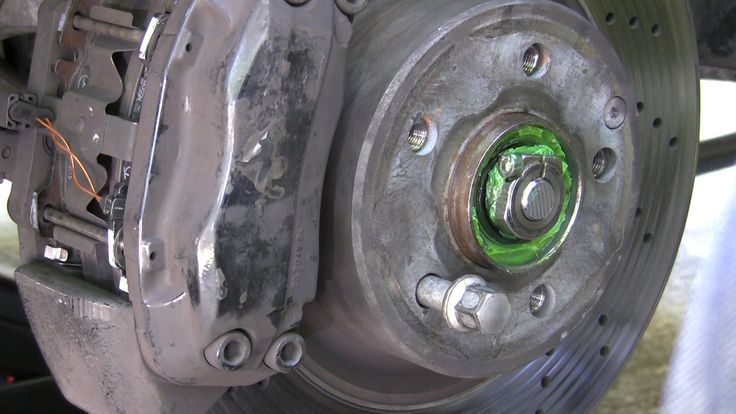 This configuration may differ for your ATV, so you may need to trace the cables to confirm where they go.
The adjustment is achieved by tightening the wingnuts to tighten the brakes or loosening the wingnuts to loosen the brakes. Tightening the cable effectively pulls the brake shoes closer to the brake drum, and loosening the cable allows the shoes to move further away from the drum.
While adjusting the wingnut, hold the cable with a small wrench or a pair of pliers to stop the cable from twisting. There is a hex-shaped section on the cable for this purpose. If the cable twists while you are tightening the brakes, it can weaken the cable and cause it to snap, which will require the cable to be replaced.
Adjust the foot pedal cable till the pedal engages the brake without having to be depressed very far. Then, with the ATV in neutral, spin the back wheel to make sure the brakes are not binding on the wheel. If they are binding, slacken the cable off a half turn at a time until they are no longer binding.
Then adjust the tension on the hand brake cable to accommodate the changes made to the foot pedal cable.
If the adjustment of the cables does not tighten the brakes sufficiently, then the drum and or shoes may be worn to the point that they need to be replaced. If you are uncertain how to do this job, rather take it to a professional who can fit the new parts for you.
Lower the jacks and remove them from under the ATV. As a final check, put the ATV in neutral and push around a little to make sure there is no binding of the brakes.
This is important because if the brakes bind, it will wear them out faster, generate heat, which could cause a fire, and use more fuel.
If there is still binding, repeat the adjustment procedure to alleviate the problem, if there is no binding, you have successfully set your ATV brakes!
Mastering these basic maintenance tasks on your ATV will make you more confident when you need to make adjustments while out on the off-road trail. Set yourself some goals to learn how to do more of these types of tasks and basic maintenance, you will be a more confident off-roader as a result!
Happy ATV’ing!
It’s a hair-raising ride, taring into a corner, only to find you have no brakes. While exciting, it’s not an experience I’d like to repeat.
Common causes of ATV brake problems include:
In this post, you’ll learn all about the most common ATV brake problems and how you can fix them. I’ll also share some insider hacks for fast brake system troubleshooting and some really valuable maintenance tips.
Page Contents
You can tell a lot about the possible cause of a problem by the way a customer describes their issue.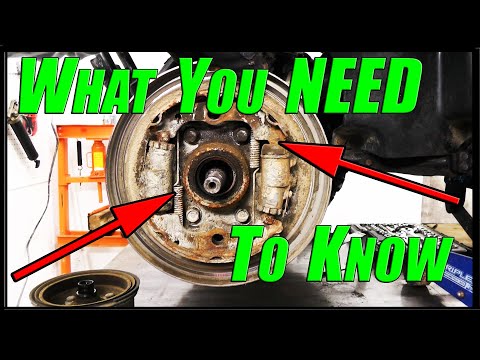 Common brake system complaints include:
I don’t want to get waste high in the weeds here, so I’ll outline in basic language how an ATV braking system works. It’ll help with diagnosing and repair work later.
ATV braking systems vary, depending on the make, engine size, and year of your bike. But all ATV brakes are broken into two separate braking circuits.
What’s a brake circuit? A circuit is a fully independent brake system that (in most cases) shares no brake system components.
On a typical ATV, the independent circuits are:
The system is designed so that if one circuit fails, the rider has a backup system, which makes good sense.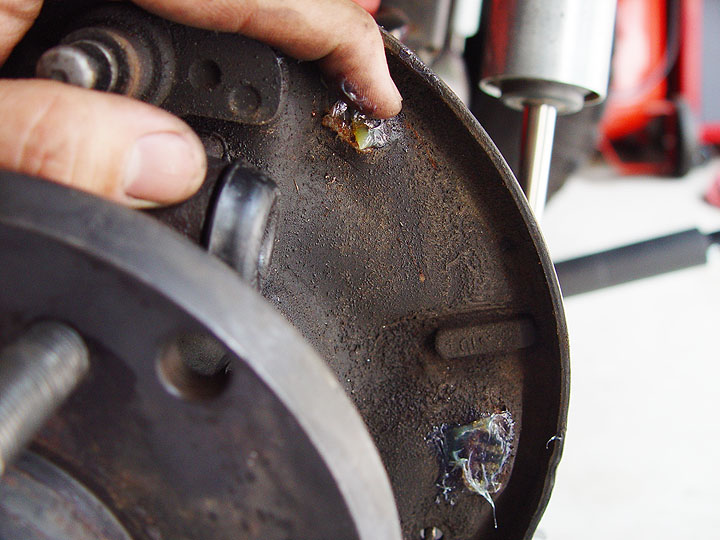 The brake circuits are either hydraulic or mechanically operated and commonly a mix of both.
ATV brake setup – A typical setup (brake systems will vary) looks like this:
Many modern ATVs however, offer four-wheel braking from the hand lever and just both rear-wheel braking from the foot pedal.
Other common ATV brake setups include:

A single rear axle brake indicates the lack of a limited-slip differential.
All ATV hand-operated braking circuits are hydraulic, as are most foot pedal systems. A hand lever hydraulic brake circuit consists of the following components:
Brake Lever – Made from lightweight corrosion-resistant alloy and incorporates brake fluid reservoir with fluid level sight glass. It also houses the master cylinder. Some incorporate a hands-free brake holding control.
Brake Master Cylinder – The master cylinder lives in the base of the brake lever housing and is serviceable. It creates fluid pressure within the hydraulic system.
Brake Lines – A fluid-resistant rubber pipe covered in braided steel.
Brake Pads – Brake pads are what slow and stop your ATV. They are a special high friction material, which converts the rotational energy into heat as it slows the bike.
Brake Rotors – Metal disks fixed to each wheel hub and turned with the wheel.
Brake Calipers – Calipers are the business end of the braking system. The caliper applies force to the brake pads proportional to brake lever pressure. The caliper is fixed to the wheel knuckle and, together with both brake pads, sandwiches the Rotor.
Brake Fluid – Brake fluid is what makes the whole system possible. The fluid is designed to resist compression, so pressure at the hand lever is immediately transferred to all calipers evenly in the circuit.
DOT 3 and DOT 4 (Department Of Transport) are common fluid types, but your brake fluid reservoir cap will specify which type to use.
Not all brake fluids are compatible, see chart.
Some bikes may use a hydraulic foot brake to brake one rear wheel. The components of a hydraulic single rear wheel setup include:
Brake Pedal – Steel pedal pivoting on a bushing, mounted on the chassis.
Rear Brake Master Cylinder – The foot brake master cylinder is mounted close to the foot pedal and is often mechanically operated by a short steel braided cable.
Master Cylinder Reservoir – The small plastic transparent reservoir bottle is mounted close to the master cylinder and supplies brake fluid via a rubber hose.
Brake Line – A single steel braided brake line from the master cylinder to the rear (r/h usually) wheel.
Rear Pads – Most models will run the same pads front and rear.
Rear Rotor – Rotors front and rear tend to be identical.
Calipers – Calipers tend to be identical front to rear, but be mindful they are always different left to right.
Brake Fluid – As per front reservoir.
Some bikes may use a mechanical drum brake setup on one rear wheel. The components of a drum setup include the following components:
Brake Pedal – As per the above.
Control Rod/Cable – Adjustable mechanical lever connected from brake pedal to single rear (r/h) wheel brake assembly.
Brake Shoes – Shoes are a serviceable high friction material located on the brake assembly, used to slow and stop the bike.
Brake Assembly – The assembly is fixed to the rear axle and is stationary. It houses the shoes and brake adjusters.
Brake Drum – A metal drum that turns with the wheel and fits over the brake shoes and brake assembly. As the brakes are activated, the shoes push against the inner wall of the brake drum, slowing the bike.
This may seem like it’s too simple to be the solution, but it’s the first item I’ll check when a customer complains of poor brakes.
If the brakes are drum brakes with a mechanical cable/ rod set up, they can be easily adjusted. You may, however, need a wire brush and WD40 to help loosen the guaranteed to be rusted adjusters.
Each wheel drum brake will have an adjuster. Some adjustment at the hand lever may be possible, but it’s better to do the major adjusting at the wheel adjusters first.
The adjusters will have a lock nut that needs to be backed off before turning the adjuster clockwise to tighten the brakes. Adjust all drums a little and test, repeat until you have good brake performance.
Over-adjusting any single wheel will result in brake grabbing. Remember to tighten your adjuster lock-nut afterward.
If your adjusters are already well adjusted, you’ll have to roll your sleeves up a little further and remove the wheels and brake drums. Inspect the brake shoes and adjust the shoes so that they contact the drums.
You’ll find an adjuster inside each drum between the brake shoes. The adjuster is a screw that pushes the shoes further away from each other.
Adjust the shoes too much, and you’ll struggle to get the drums back on, or they’ll drag.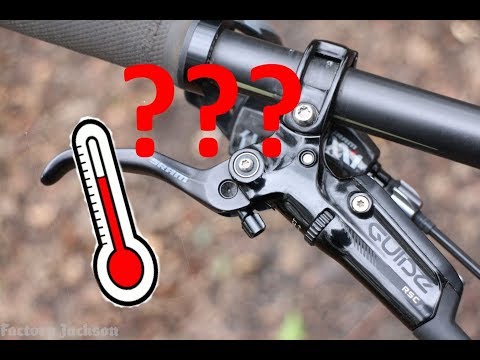 Not enough adjustment and the shoes won’t contact the drum.
There’s no adjustment on a hydraulic brake system, that said rear master cylinder rods typically have adjustments to take up foot brake pedal free play. Hydraulic brake system faults tend to revolve around air in the hydraulic brake lines. A common symptom is a spongy feel from the brake lever and poor or no brake bite.
Your front brake reservoir has a sight to check the level and the rear reservoir is clear, so a quick visual check will reveal any issue with low fluid levels.
A low fluid level could mean your brake pads/shoes are worn, or it could mean a more serious situation – A hydraulic brake fluid system leak.
If you have a low fluid level, check for pad wear. If the pads are worn, replace and check the fluid level again. If the pads are not worn, you’ll need to check all components, connections, and brake lines for any signs of dampness. We suspect a leak in the system.
Brake fluid is oily, so you shouldn’t have a problem spotting a leak unless, of course, the bike is wet.
Common brake fluid leaks include:
You have a few options when it comes time to bleed the brakes. But before bleeding, we’ll need to top up the fluid. Go ahead and top up the fluid at the fluid reservoir, remember your rear brakes is likely a separate reservoir, positioned towards the rear of the bike.
Use whichever type of fluid is recommended on the cap, DOT 3 or 4, remembering it’s best not to mix fluid and some types can’t be mixed.
Gravity bleed set-up
Go ahead and open all bleed screws and place a cloth around each, allow gravity to push the fluid down the lines. This is messy and may take a while. Gently work your brake lever (careful it splashes) to move the fluid into the brake lines. You may find holding the lever open a touch (I use tape) helps the gravity bleed process.
Gravity bleeding works a lot faster on vehicles with larger reservoirs.
One man bleed set-up
See the brake bleed tools I recommend here on the ATV tools page or you can go the MacGyver route.
The MacGyver setup is a clear plastic drinks bottle with some brake hose:
With the system bled, you’ll need to clean around your bleed screws and reservoir cap. Build some pressure and check the whole system for leaks.
Other brake bleed options
A brake service vacuum bleeder kit works great on ATVs, or you can go the two-person pump hold method.
If you’re having problems building or holding brake pressure, you may have a master cylinder, brake line, connection, or caliper fault.
Check all connections (including bleed screws) and components for weeping fluid. If fluid can get out, then air can get in.
With a fully bled system, go ahead and clamp all brake caliper flexi hoses using hose clamps. Check brake lever feel. It should now be firm (if it isn’t, see master cylinder below).
Now go ahead and remove one clamp at a time and check the brake feel. Repeat on all wheels until your brake lever feels soft. A soft brake indicates the problem wheel circuit. Check brake hose for bulging or trapped air in the caliper, leaking bleed screw, or leaking brake line connection.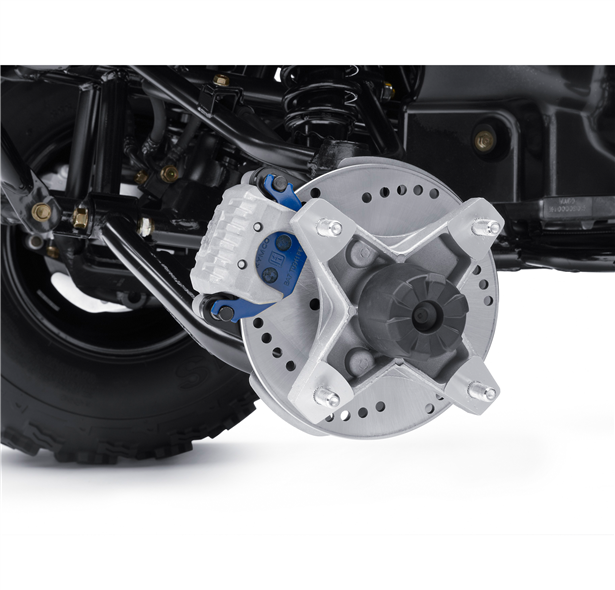
If you recently removed your brake calipers or fitted new ones, make sure they are on the correct side of the bike. The left-hand caliper is different from the right-hand. Hey, it’s an easy mistake to make!
The caliper bleed screw always goes to the top.
Worn-out brake pads/shoes will, without a doubt, leave your ATV difficult to stop. But worn pads will make a hell of a racket when they’re worn down to the steel base plates.
Unless your muffler is missing, you’ll have certainly noticed the noise. But if you are in any doubt, you can usually check brake pad material depth by simply looking through the wheel. Shoes are a little harder. You’ll need to remove wheels and drums.
Glazed Pads – Old pads lose their bite, so although they may have lots of material still, they may offer a hard brake feel. It’s a condition known as glazing, the best fix is to replace the pads, or you can try cleaning them.
You’ll need to remove the pads and, wearing a mask, sand the friction surface to remove the glaze. Lay coarse sandpaper on a flat surface and run the pad across to remove the glaze.
Replacing brake pads is simple. Brake shoes are a bit more work and can be a pain in the jacksie. So if you haven’t tried any DIY maintenance previously, as a rough guide – Replacing brake pads will be 3 out of 10 for difficulty but shoes, about a 7.
If you’ve had a collision recently, a brake hardware issue is a likely place to start looking. If you’ve been into the drink and parked your bike up for a time, corrosion can accumulate on the rear foot brake pedal bushing. A frozen rear brake pedal is common as they are rarely used compared to the hand lever.
Plenty of WD40 will fix the issue.
Your master cylinder is, as you know, brake handle assembly integrated. The master cylinder creates the pressure needed to push the pads against the rotor.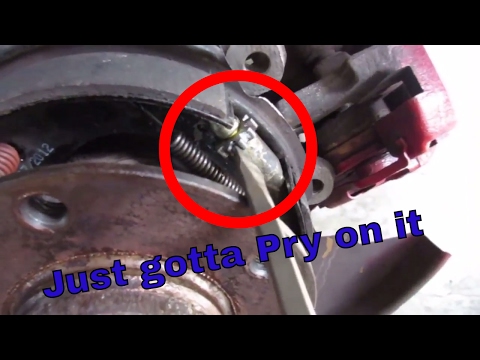
A spongy brake feel is a symptom of air in the system, but it could also be caused by a faulty master cylinder. A leaking master cylinder will be easy to diagnose, but often the master cylinder will show no telltale signs of failure.
To quickly troubleshoot a master cylinder, you’ll need three hose clamps. Clamp each wheel on the circuit (usually three calipers) at the flexi hose (if possible).
Go ahead and check the brake feel now. If it’s improved, you’ve eliminated the master cylinder as the source of the problem.
If, on the other hand, the brake feels the same, and you’ve bled the system correctly with no leaks at banjo bolts, etc., then you’ve diagnosed a faulty master cylinder.
Master cylinders are pretty durable but can fail prematurely because of old brake fluid. The old fluid carries contaminates like rubber and metal particles. Add water to the mix because brake fluid is hygroscopic (attracts moisture), and the moisture creates corrosion inside the brake system.
Metal partials, rubber particles, rust, and water damage seals, pistons, brake lines, and bleed screws. Your fluid should be changed at least every three years to help maintain the system and prevent expensive brake overhauls.
Most ATV brake calipers use a floating caliper setup. It simply means the caliper is free to move from side to side.
Sliding bushings make this possible, and It’s a good system but prone to binding when bushings wear, which results in ineffective braking. So go ahead and check that your brake caliper has free movement across the Rotor. If not, remove, clean, and lube the fixings.
So you already know the problems old fluid can cause. And caliper pistons bear the brunt of corrosion. A frozen caliper piston is common.
A symptom of a frozen caliper piston is a hard brake lever feel and no brake bite. A frozen caliper means the piston inside is corroded and can’t be fixed. It will need to be replaced.
How to check for a frozen caliper? – Remove the caliper from the bracket, and try pushing the piston back.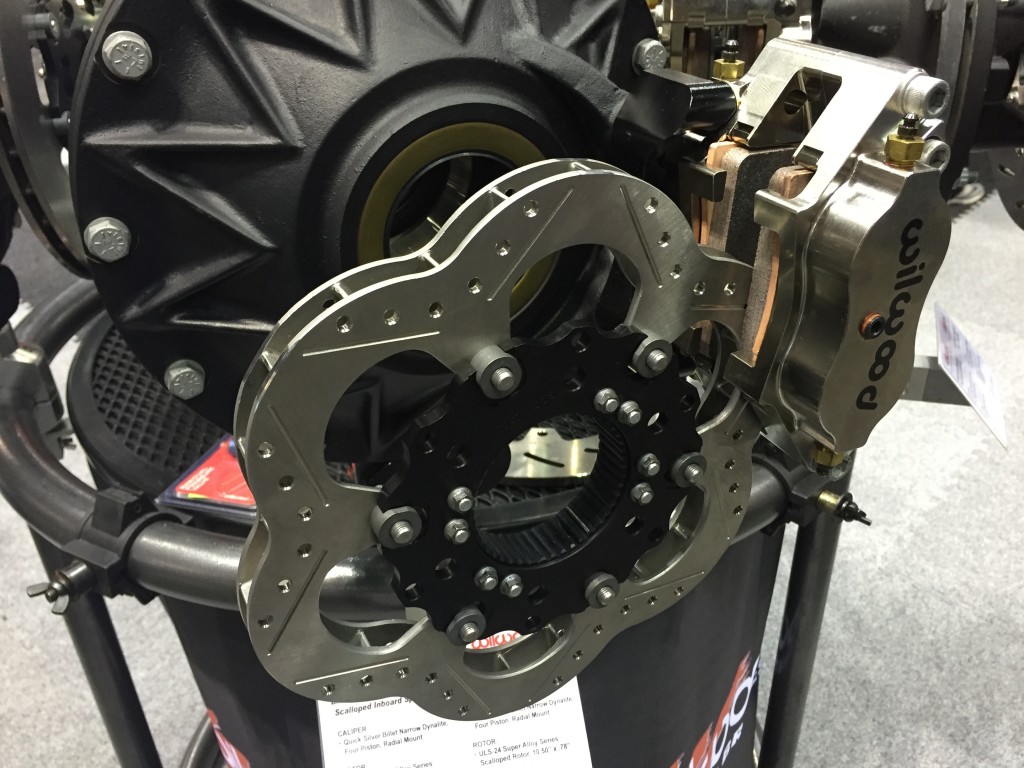 You’ll need a channel lock or brake tool. If the piston doesn’t budge, try opening the bleed screw. If the piston still won’t move, then it’s seized and will need replacing.
If it did move, you’ve found an issue with the brake hose. The internal lining may have come away from the line and created a blockage. Go ahead and order a new brake line set.
Are ATV brakes soft? A soft brake feel indicates air or contaminated fluid in the Hydraulic braking system. Try replacing the brake fluid and purging the air from the system. Most ATVs will use DOT 3 or 4 brake fluid.
You may also find these posts useful:
ATV rear brake pedal stuck
ATV parts page
How often to start ATV?
Does tire size matter?
Buying a reliable ATV is great. But in order for it to be really reliable and not fail at the most inopportune moment, it must be regularly serviced, and in particular, the brakes must be bled after the repair of the elements of the brake system.
To bleed the ATV brakes yourself, you will need the following tools:
ATV's brake circuits operate from the front and rear brakes. The first is located on the frame of the vehicle, and the second is on the steering wheel.
To complete this procedure, and Linghai ATVs are no exception, you need the help of a friend. Bleeding the rear and front brakes of the ATV is as follows:
 These actions must be continued until all the old brake fluid has poured out of the barrel and a new one has come out;
 Checking if the ATV's brakes have been bled correctly is quite simple, just press them. If you feel a moderate hardness, then everything went well, and if they are still soft, then this means that air has entered the brake system. To get rid of it, slightly loosen the brake hose fasteners.
Among the most common breakdowns of the brake system of an ATV, it is worth highlighting:

If your ATV's disc brakes are deteriorating, it is recommended that you bleed them by changing the brake fluid. Preliminary check all elements of the brake system for serviceability and absence of damage in order to exclude the possibility of their wear. If any part of the ATV is still out of order, then it should be replaced with a new one.
Brake pads break more often than other functional motorcycle components because they are made of composite materials instead of metal. The pads can be replaced both independently and by contacting a service center. Quite often, the brake calipers of the ATV also break. With sudden braking, they overheat, which negatively affects the service life of this component. In order not to have to repair the brake calipers too often, it is recommended to change the oil regularly. Sometimes calipers from OKI are put on ATVs, but before that they need to be somewhat modified on a milling machine. A good option if the original calipers cannot be repaired.
Bleeding the brake system on children's ATVs is the same as on full size motorcycles. The main thing is to choose a high-quality and reliable brake fluid that will cope with its task at a decent level.
The most wear and tear-prone component of a child's ATV is the brake pads. Fortunately, you can determine this malfunction by eye. If the pads look frayed and worn, then it's time to change them. Among other signs it is worth highlighting:
While children's motorcycle brakes are not subjected to excessive stress, they should be checked for stability and performance at least twice a season.
Diagnostics and timely repair of the brake system of an ATV should always be given special attention, since the safety of the rider largely depends on its operation.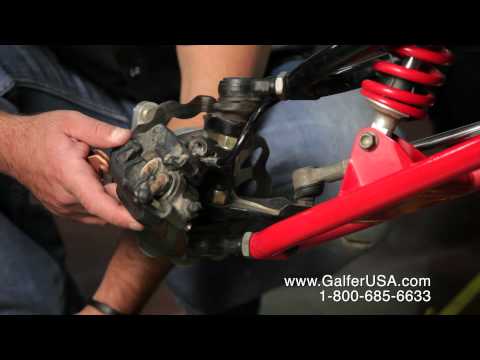 Regular maintenance of the rear and front brakes of the vehicle can be done both on its own and by contacting the services of service center specialists for help.
05/29/2021 1530
ATV brakes are a basic safety system and should work perfectly. And if you notice the slightest slippage or decrease in the efficiency of the nodes, the system needs to be checked. Therefore, let's figure out how to pump the brakes on an ATV and diagnose all the components.
The first fluid change is recommended as soon as the rider has purchased the ATV. The fact is that many manufacturers fill in the cheapest composition, which does not have a high operational resource.
After buying a used ATV, you also need to service the brake system: change the fluid, check the hoses and pads. Remember that during the operation of equipment, moisture and air enter the composition. This leads to the formation of corrosion and even freezing of the liquid in winter. For example, if the composition contains only 3% water, its operating temperature drops from 230 to 165 degrees.
You need to figure out how to pump the front and rear brakes of an ATV even if they “fail”. If the lever has lost its elasticity, then air or moisture has accumulated in the system, which has affected the characteristics of the fluid.
Before you adjust the brakes on your ATV, have the necessary tools ready. To bleed the system you will need:
 Choose only a high-quality composition, because the operation of the entire system depends on it.
 It is worth noting that in order to pump the ATV, you need a partner who will clamp the brake lever. If there is no assistant, you can fix the position of the brake lever with a belt.
Bleeding the brakes scares many motorists. However, the procedure itself is very simple, so even a novice ATV rider can handle it. The rider only needs:
This procedure is carried out for all calipers (front and rear). But if the brakes on the ATV do not pump, then you need to find places in the system where air accumulates and eliminate them.
Experienced motorists recommend using only high-quality brakes that are suitable for specific temperatures.