If your ATVs front end alignment is off, you may notice the ATV pulling to the side while riding, or a shaking and wobbling feeling in the handle bars while on the trail.
That’s not the only effect you’ll notice either, your tires will wear unevenly and need to be replaced sooner if you’re out of alignment. Not to worry, a front end alignment is a pretty easy task you can do yourself at home with some basic hand tools.
When you buy a brand new quad, the manufacturer recommends you do a front end alignment after the first 30 days. Then, every 3 months after that. To me, that seems a bit extreme. I do mine once a year with my yearly maintenance before I take it out for the season.
You will also want to do an alignment any time you swap out your tie rods, or do any work on the machine involving those parts. Here are the steps you take to do an alignment, I go into more detail on each of these steps below.
First you want to make sure your quad is on a level surface. You don’t need to spend a ton of time on this getting it perfect. But try to get the machine as level as possible, it makes the whole job easier.
If you have a flat spot in a garage or drive way, that would work best. But you could always jack up one side of the machine if you’re on a really uneven area. The quad won’t need to move for you to do the alignment.
As part of this step, make sure your tire pressure is set to spec or to what you normally ride with it set to. The most important factor is that the tire pressure is the same from side to side. Front and back doesn’t need to match, and usually shouldn’t. But make sure the left front tire matches the right front tire at least.
This step isn’t absolutely necessary, but it sure makes everything a lot easier knowing the handle bars aren’t able to move and mess with any of your measurements. If you have someone that won’t mind sitting there holding the handle bars straight that would work.
In fact, having someone sitting on the machine is better because the measurements will more closely match the conditions you have when someone is riding the machine. But if it’s just you doing this job, you’ll have to find another way to secure the handle bars.
I usually just get a ratchet strap and wrap the two hooks on each side of the handle bars and through the grab bar on the back to keep the handle bars from moving at all. It’s really a simple step that will save you some headache later on. Don’t strap it down to tight or you could cause other damage, just enough to hold her steady.
The camber of your front tires is often overlooked. But since we’re doing an alignment, this is the best time check the camber is on point. You’ll want to take a level and place it against the side of the tire vertically. Try to be as close to center near the axle as you can.
Rest the level against the bottom of the tire on the outside of the tire and get the bubble into the center of the level. Now measure the gap between the top of the level and the top part of the tire. You should get somewhere between 0.2 and 0.8 inches distance.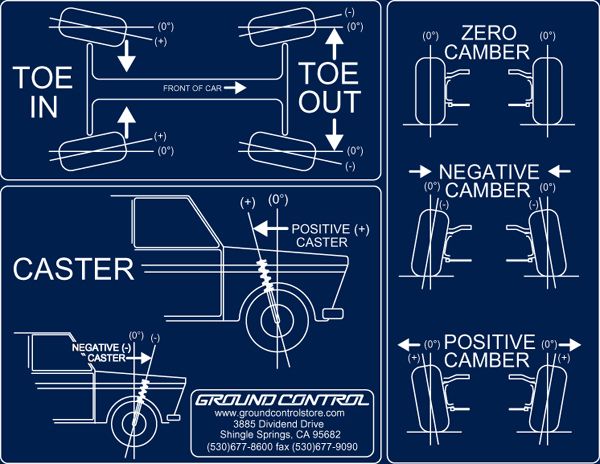
Not all ATVs and UTVs are rated to have the same camber. Check your service manual for the exact measurements, but about 1/8 inch to 3/4 inch is a pretty common standard to go by. If you’re not within those measurements, you should adjust your camber.
To adjust your camber, take the cotter pin out of the castle nut of your ball joint where it connects to the upper A-Arm and loosen the castle nut. Now with the correct size wrench, adjust the ball joint by screwing it in or out to get your camber within the recommended range.
Some A-Arm assemblies require that remove the ball joint from the spindle it sits in order to adjust. Once you’re done with the adjustment tighten back up the castle nut and put back the cotter pin.
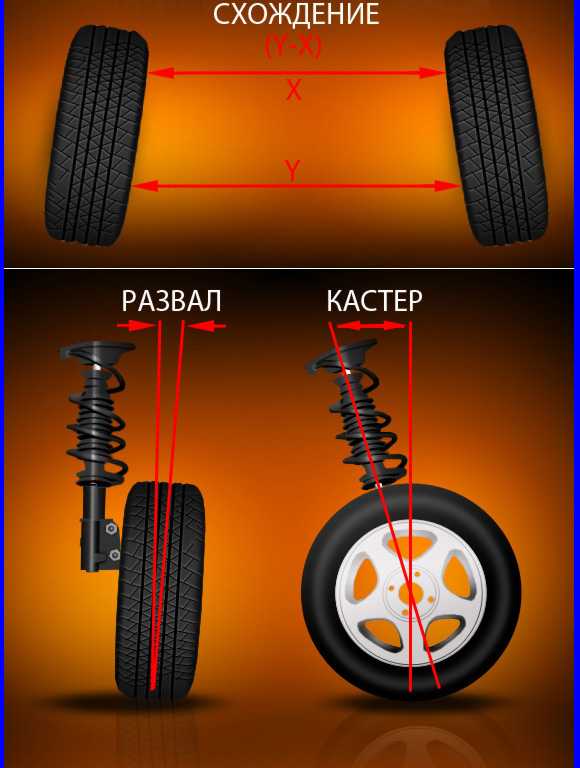
If you want to think of the camber as the vertical alignment, then think of the toe as your horizontal alignment. First determine weather your machine calls for a toe-in or toe-out alignment by checking your service manual. Most quads require a 1/4 inch toe-in alignment.
There are two popular methods for actually getting the toe-in toe-out measurements. I prefer method two because it’s easier to see if only one tire is out of alignment or if both are.
Method 1 is quicker and a pretty straight forward way to get your measurements. You’ll simply measure the distance between the middle point on both your front tires, front and back at axle height.
The distance measurement between the center of the front of the tires will be measurement A and the distance between the center of the back of the tires will be measurement B. You will take your measurements and subtract measurement A from measurement B to find your toe-in. If the measurement is negative, you have a toe-out situation.
I found it easiest to measure the front of the tires, then put a piece of tape or something to mark where you measured. Then rotate the tires 180 degrees by rolling the quad to get the back side measurements.
To find out which wheel is out of alignment, maybe both are, maybe just one is. Take a long 2×4 or something long and straight that won’t bend. And hold it flush with rear tires and along-side the front tires.
Measure the distance the from the 2×4 to the front tires. The distance should be the same from right tire to left tire. If it’s off then you will want to get the adjustments done to the tie rods to get these to match.
For a toe-in alignment you will want the front of the tires measurement away from the 2×4 to be higher than the back of the front tire by about 1/8 inch. Remember that the standard toe-in measurement is about 1/4 inch? Well, that’s both front tires combined.
If you find that you need to make adjustments to your toe, that is all done with the tie rods. Start by loosening the lock nut on the tie rod ends. You will want to use two wrenches to do this part.
One wrench to hold the tie rod in place and the other to loosen the tie rod end lock nut. If you don’t use two wrenches you could cause damage to your machine.
Once the tie rod ends lock nut is loosened up, you will be able to adjust the tie rods. Make the adjustments to the tie rod by spinning clockwise or counter clockwise to get your correct toe measurement.
You will most likely need to adjust the tie rod, and take another measurement, repeating until the toe is where you need it to be.
After you’ve got your toe-in or toe-out where you want it, you can tighten the tie rod end nuts back up and you’re good to go. It’s a good idea to take another measurement after you’ve tightened them up just in case it shifted a little bit when tightening.
There you have it, an ATV front end alignment. If you’re alignment is still off after doing this, you may have a bent tie rod or A-Arm. If you notice, the handle bars still wobble or shake, you may just need to Balance The Tires or maybe even Replace The Wheel Hub Bearings.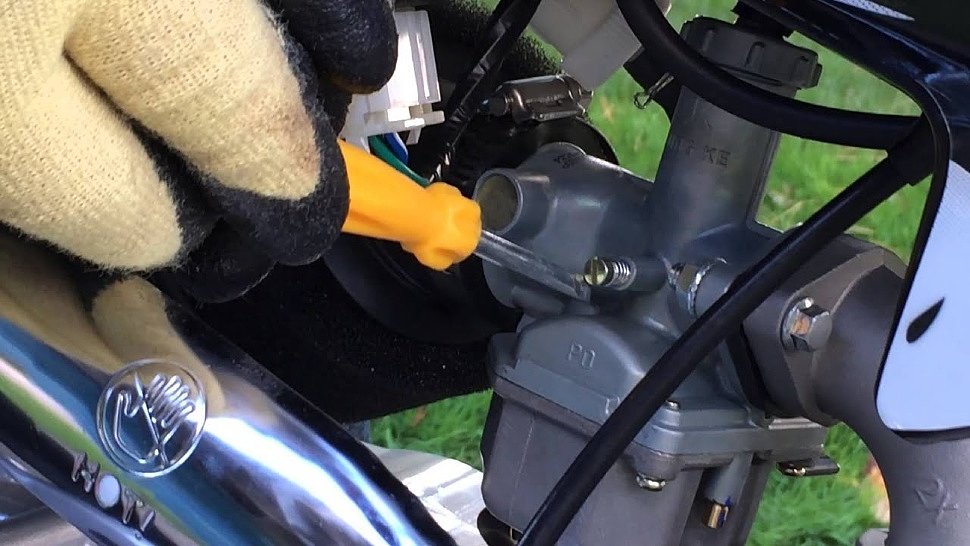
Sharing is caring!
Please enable JavaScript
Carbon Bodykit von MTR Design am Audi Q8 SUV (2020)
tuning blog 24 September 2020 Tips, products, information & Co., Tuning Wiki
If a camber strut is installed in the vehicle, it reliably prevents an excessive fall on the rear axle. This ensures that when tuning the camber values specified by the manufacturer can be achieved again for lowered cars or the camber is adapted to very special needs. In addition, the driver will feel much less of the slightest bump in the road after installation. After a significant lowering of the car, the installation of a suitable crash strut is actually essential. For almost every vehicle, more precisely for almost every model, there are now suitable camber braces to buy. One advantage is that an extremely precise setting is possible with the tuning parts.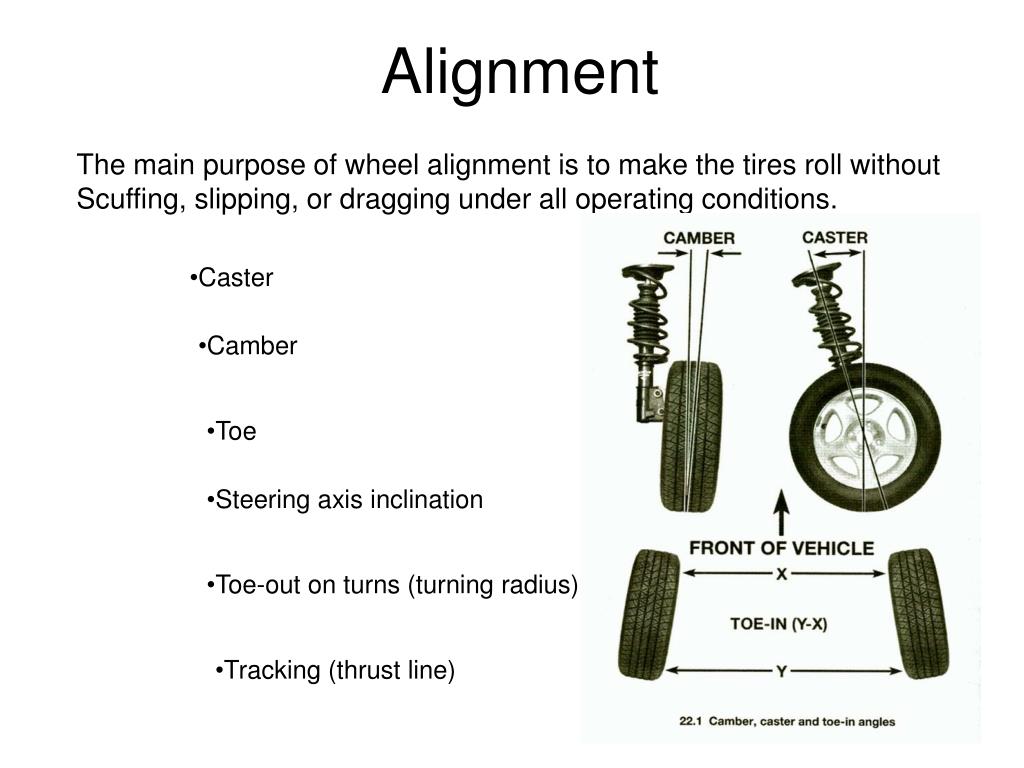 report this ad
A camber strut is also often used in motorsport. The installation should, if possible, be carried out by a specialist who also carries out an axle measurement. The required parts can be ordered relatively inexpensively over the Internet or from the tuner on site. High-quality adjustable camber struts should have stable PU bearings and enable particularly precise adjustment of the axle geometry. Especially when using a coilover kit, the camber must also be readjusted after every change in the vehicle height. Camber struts with PU bearings enable a more direct connection of the steering knuckle with the rest of the chassis and also a much more precise setting of the axle geometry.
We hope that you have read the info report on the topic / term Adjustable camber strut (Further designations / keywords: Adjustable camber arms, adjustable drawbar, camber adjustment, adjustable tire wheel alignment) from the field of autotuning. Our goal is that the largest German-language tuning dictionary (Tuning Wikipedia) and to explain tuning terms from A to Z easily and understandably. Almost every day we expand this lexicon and how far we are, you can HERE see. Soon the next one will be Tuning scene concept be illuminated by us. By the way, you will be informed about new topics if you have ours Feed subscribe to.
But of course tuningblog has countless other articles on the subject of cars & car tuning in stock. Do you want to see them all? Just click HERE and look around. We would also like to provide you with news aside from the tuning. In our category Tips, products, information & Co we pick up contributions from car or accessory manufacturers. And also our category Test sites, laws, offenses, information has almost daily new information for you. Here are a few topics from our tuning wiki:
"Tuningblog.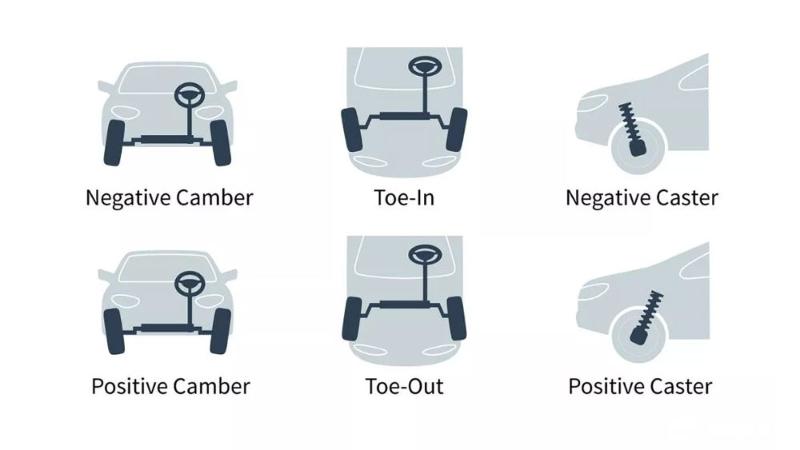 eu" - we keep you up to date on the subject of car tuning and car styling with our tuning magazine and we present you the latest tuned vehicles from all over the world every day. It's best to subscribe to ours Feed and will automatically be informed as soon as there is something new about this post, and of course also to all other contributions.
previous Video: Shmee on the road with the V10 Engler Superquad!
Continue Drift racing Japan - what makes the illegal scene?
06/16/2014
to the side with the steering wheel straight ahead - all these are clear signs that it's time to adjust the toe and camber.
It should be noted that on some ATVs only toe-in is regulated, and camber is set by the manufacturer.
Getting rid of the problem.
There are many ways, we will try to talk about the most obvious and intuitive.
Which nuts to turn?
#1 Loosen nuts; No. 2 Toe adjustment (turn the tie rod itself with a wrench; No. 3 camber adjustment;
Attention! You do not need to hang the ATV, adjust it on a flat surface without holes and hills, set the steering wheel straight.
Visually, we try to evaluate the wheels in front, look at the eye, it will immediately become clear which wheel goes to the side more and which one less. Sometimes adjusting by eye is enough, if we want everything according to science, then we move on.
Method 1
On the rim, at the very edge from the inside, on both sides of each wheel, near the shoulder, make marks with a marker so that the marks are parallel to the ground.
With the help of a simple ruler, we set the convergence, we rest the ruler against the marks and measure the front and back along the marks.
A ruler is a pipe inserted into a pipe of a larger diameter, at its ends there are L-shaped stops (curved so that the bottom of the ATV does not interfere), with which we will rest against the marks.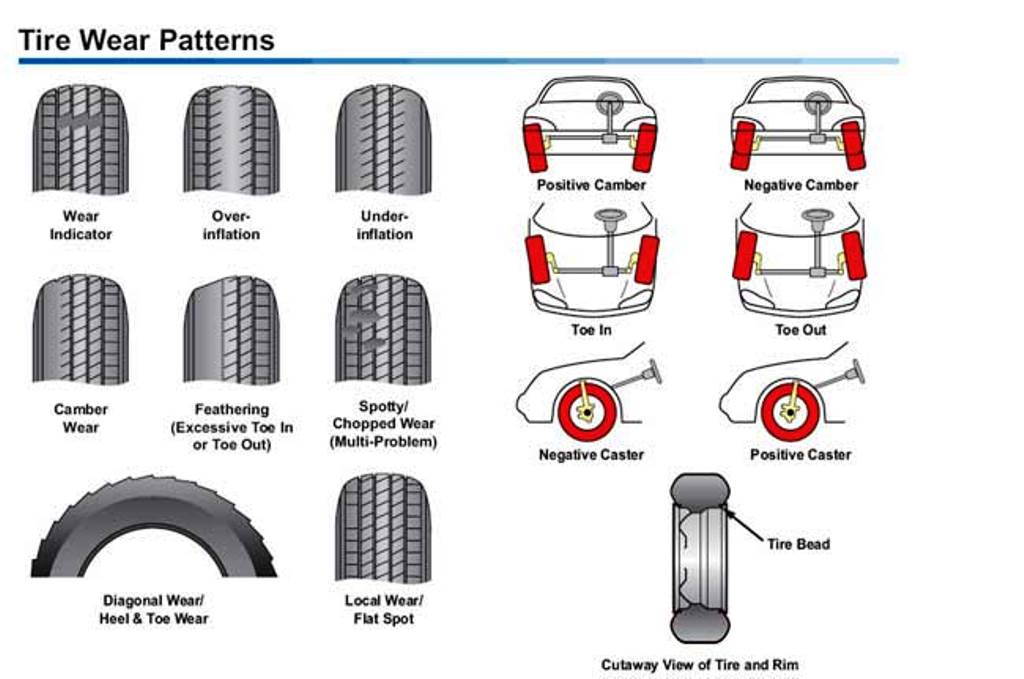
For convenience, we fasten the tape measure onto the ruler and look at the numbers, the shiny bolt is the lock, rested on the marks in front and fixed it, looked at the numbers and repeated the procedure on the back of the wheels.
We loosen the locking nuts on the steering rods, turn the rods in one direction or another, twisted and measured a bit, realized that there was little or a lot, we turn further. Wheel alignment is measured between the edges of the rim.
The wheels should be as in the figure below, the difference between A and B should be 0-3mm (less in front and more in the back).
Make universal toe 0 mm.
Do-it-yourself camber on an ATV (5)
After we lock the nuts and try to drive, perhaps the steering wheel will be a little crooked, and the quad will drive smoothly.
Again we loosen the lock nuts and turn the rods by the same number of revolutions, thereby aligning the steering wheel, but without touching the convergence.
Nothing needs to be adjusted on the rear suspension.
Method 2
1. Set the steering wheel to straight ahead.
2. Position the stands in front of the ATV perpendicular to the rear wheels as shown.
3. Stretch the elastic band around the ATV legs until it just touches the rear wheels.
4. Measure the distance between the tensioned band and the front and rear points on the front wheel rim.
The distance to the far point on the rim must be 2 to 3 mm greater than the distance to the near point on the same rim. You yourself were able to see for yourself that there is nothing complicated in adjusting the toe and camber on an ATV, and you yourself are quite capable of doing this without resorting to the services of a car service. So we put the saved money in our pocket and happy and satisfied we go for a ride.
Source
Photo www. multiscreensite.com
Even those car owners who in life with technology only “you” are forced to have at least a remote idea of the nature of preventive maintenance that is periodically required to be carried out with the car. After all, we are talking not only about the health of the "iron horse", but also about the safety of the driver and his passengers. For example, about such an important procedure as adjusting the wheel alignment angles, there are many different myths among motorists, the most common of which were debunked by the AvtoVzglyad portal.
Ivan Flyagin
All four wheels on the car must be set at a certain angle. If we look at the car in front or behind and see that the wheels are not strictly parallel to each other, but at a significant angle, then their camber is not adjusted. And if you look at the car from above and notice a similar unevenness, it is obvious that the wheels have a misalignment.
Proper wheel alignment, commonly referred to as wheel alignment, ensures optimal tire-to-road contact when the vehicle is in motion. Not only the premature wear of the "rubber" depends on this, but most importantly - the stability of the car and its handling, and therefore - road safety.
Don't believe the official car service websites that recommend wheel alignment strictly once a season. The more often customers contact them, the more profitable it is for them. But this only makes sense in one case - when summer and winter wheels have different sizes. For example, if your car is shod with low-profile 19-inch tires in the summer and practical 17-inch tires in the winter, you really have to spend money on wheel alignment once in the offseason. And with the same size seasonal tires, it is not necessary to adjust the corners.
Many people have heard stories about how older drivers in Soviet times managed to adjust the wheel alignment angles of their “swallows” on their own. But in such cases we are talking about Zhiguli or vintage foreign cars with a simple suspension.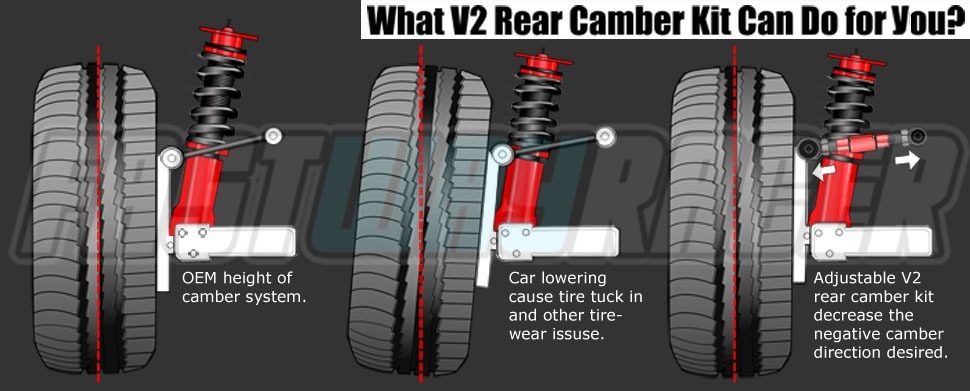
The vast majority of car owners will not be able to independently make wheel alignment in modern cars somewhere in the garage. This requires special equipment and the ability to use it, so it’s better not to save on such a procedure and not give the car to all kinds of garage craftsmen. In addition, do not forget that before adjusting it is recommended to undergo a full suspension diagnostics.
According to experts, the “zero” camber angle provides the maximum contact patch of the wheel with the road only in the straight steering position. That is, in this case, the machine is optimally controlled on a straight trajectory. However, when turning, the wheel tilts a few degrees, the contact patch decreases, and the opposite effect develops: the car is already less stable and brakes worse. So the ideal wheel angles on "passenger cars" are really close to zero, but rarely when they coincide with this parameter.
158990
For each specific model, the dimensions are calculated separately depending on its weight, dimensions, technical characteristics of the engine, suspension, braking system, expected vehicle operating modes and much more.
The software of the special computer equipment for adjusting the wheel alignment contains the factory parameters of certain models, and the wizard only needs to select the desired settings.
The most common symptom of a misaligned wheel alignment is uneven tire wear on the outside or inside. This is usually accompanied by the following phenomenon: while driving on a flat road, the car "prowls" or pulls to the side, despite the fact that the steering wheel is held in a straight position. In the event of braking, the car also noticeably pulls to the side or even skids. Sometimes when turning the steering wheel becomes heavier and requires additional effort. All this can be considered clear signals for the need to check the wheel angle settings with specialists.
In addition, wheel alignment is required after replacement of tie rods or ends, stabilizer links, control arms, wheel or support bearings, ball joints, or after any other undercarriage repair that affects these components.