Delivery options and delivery speeds may vary for different locations
Sign In
or enter a zip code
Email * Password *
REPAIR & HOW TO
MAINTENANCE
TROUBLESHOOTING
GUIDES
TIPS & TRICKS
ALL ARTICLES WATCH VIDEOS ABOUT US SHOP PARTS CONTACT US
Unbalanced wheels and tires on a motorcycle lead to rapid tire wear, poor fuel economy and increased danger to the rider. For these reasons alone, you should know how to balance your bike’s tires.
But if you’re in the habit of installing your own tires, knowing how to balance motorcycle tires is absolutely essential. Here's how to balance motorcycle tires and wheels.
The first indication of an unbalanced tire is a vibration when riding at certain speeds. That the vibration only occurs at specific speeds and isn’t constant shows that it’s caused by a wheel/tire imbalance and not a mechanical issue. The other sign that a bike’s wheel and tire is unbalanced is accelerated and uneven tread wear.
If your motorcycle has a tire and wheel imbalance, don’t lower the tire pressures to soften the ride, or increase the pressures to try and reduce the effects of the imbalance. Riding on pressures other than those specified on the tires is dangerous, and will heighten the negative effects of unbalanced tires.
Balancing a Motorcycle Tire and WheelTo make balancing a wheel on your motorcycle much easier, first make sure the tire is fitted correctly on the wheel rim. Motorcycle tires have a colored dot (usually red or yellow) on the sidewall. This dot is the balancing mark and indicates the lightest point of the tire. A correctly mounted tire will have its balancing mark aligned with the valve stem on the wheel rim. The most accurate method of balancing a motorcycle wheel and tire is by using a wheel balancing stand. However, you can balance tires with the wheels still on the motorcycle if you absolutely have to.
Step 1. Put the balancing stand on a flat, stable surface. Use a level to check the balancer is set correctly.
Step 2. Remove the wheel from the motorcycle.
Step 3. Clean the wheel of any dirt that might affect its balance, which also provides a clean surface for the wheel weights to adhere to. Remove any old wheel weights from the rim.
Step 4. Slide the balancing stand’s axle through the wheel, insert the centering cones into the wheel bearings and secure the cones in place.
Step 5. Place the wheel into the balancing stand, and make sure it spins smoothly and freely.
Step 6. Gently spin the wheel so it rotates a few times and gradually comes to a halt. The wheel will naturally stop with its heaviest point at the bottom. Mark this point with a piece of tape. Spin the wheel again to check that it comes to a halt with the tape mark at the bottom.
Step 7. Tape a wheel weight to the inside of the rim at the very top of the wheel directly opposite the tape mark. Don’t remove the protective strip from the wheel weight’s adhesive backing just yet, because you may need to add more weights or use a lighter weight.
Step 8. Rotate the wheel 90 degrees so the tape mark is at 3 o’clock and the wheel weight at 9 o’clock.
Step 9. Release the wheel so the heaviest point can again fall to the bottom. If the tape mark falls to the bottom, you’ll need to add more weight to the wheel, and if the side of the wheel with the wheel weight(s) falls to the bottom, you’ll need to remove some weight(s).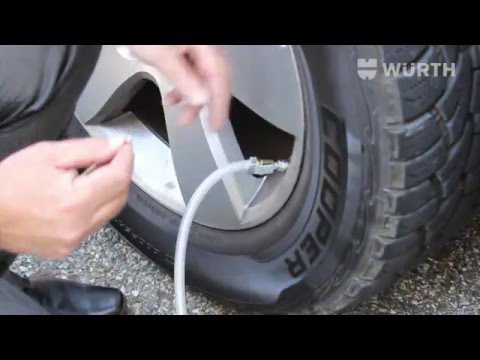
Step 10. Repeat Step 9 until the wheel remains in place when you release it and neither side falls to the bottom. This indicates a perfect balance, and when you gently spin the wheel it should come to a halt at a neutral point without the tape mark falling to the bottom.
Step 11. Remove the protective strip from the wheel weights’ adhesive backing and attach then to the wheel rim.
Step 12. Remove the wheel from the balancing stand and reinstall it onto your motorcycle.
Balancing a Motorcycle Tire and Wheel Without a Balancing StandFront WheelStep 1. Remove the brake caliper and (if applicable) the speedometer cable so there is nothing dragging against the wheel. If anything prevents the wheel from rotating freely, you won’t be able to accurately balance the tire.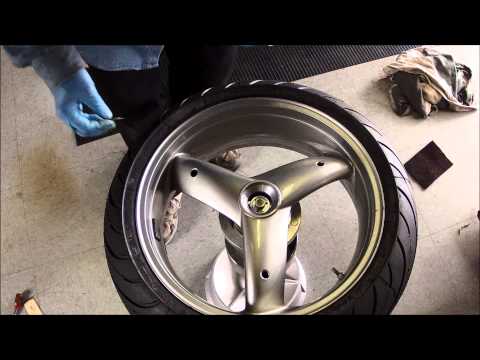
Step 2. Loosen the front axle pinch bolts and the axle nut so there’s nothing binding against the wheel bearings.
Step 3. Clean the wheel.
Step 4. Follow Step 6 through Step 11 from the previous section to balance the wheel.
Step 5. Tighten the axle nut and pinch bolts. Reinstall the brake caliper and speedometer cable.
Rear WheelStep 1. Remove the brake caliper, and the chain or belt from the rear sprocket.
Step 2. Follow Step 6 through Step 11 from the previous section to balance the wheel.
Step 3. Reinstall the chain or belt over the rear sprocket, and reinstall the brake caliper.
As mentioned earlier in this article, unbalanced wheels and tires can lead to rapid wear on your bike’s tires. Watch the video above to learn how to inspect motorcycle tires for tread wear.
body
Unless you’re an automobile mechanic, you probably know how to balance car tires without a balancer. Balanced tires ensure even weight distribution and optimal wear characteristics. Tires should be balanced at every oil change. This article will cover static balancing and other methods. It will also cover the importance of checking tire balance at every oil change and why you should consider balancing your car tires regularly.
There are a few different ways to balance your car’s tires. Static balancing is one of the most basic and is suitable for minor tire imbalances. To balance the tires manually, you place the wheel and tire assembly on a vertical supporter.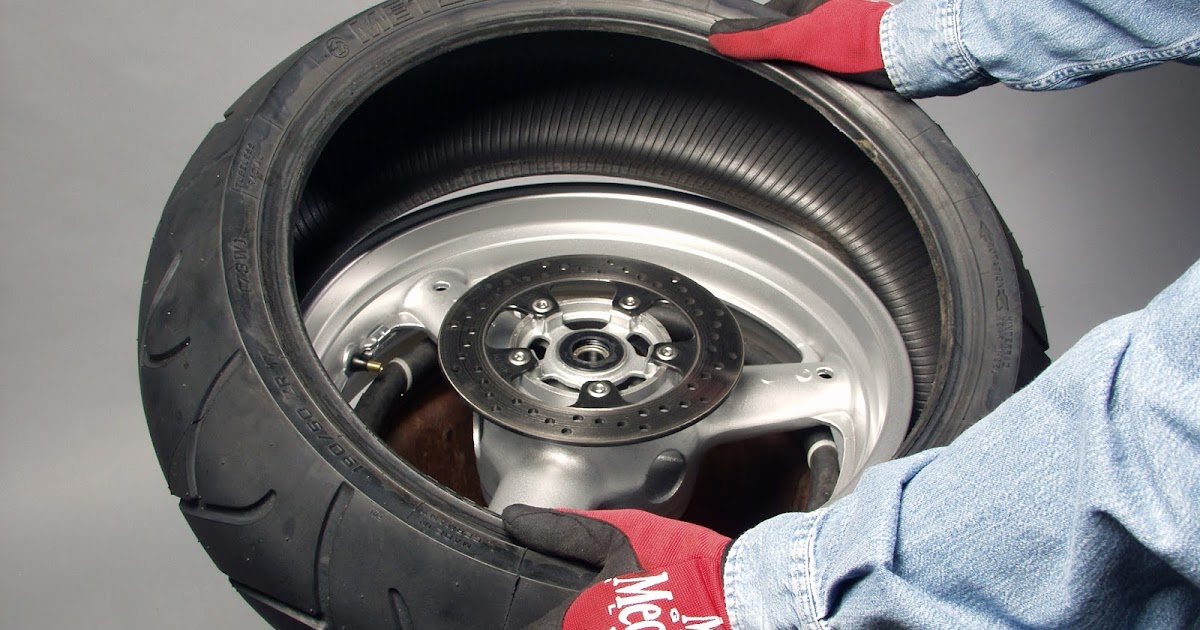 This will enable you to measure the balancing of the wheel and tire on one axis. The weight on the heavier side of the tire will lean lower to the ground than the other. During this process, the mechanic will place a small weight 180 degrees across the plane of the tire to counterbalance the other side of the wheel.
While using a balancer is the most convenient way to achieve this, there are other methods that can be performed by an amateur driver. One of the simplest ways is to place equal weights on each side of the wheel. This can ensure that the weight is evenly distributed throughout the tire. If you can’t use a balancer, you can use a jack. You can also place a weight on a jack to level the car’s wheels.
Dynamic balancing, on the other hand, is a more complex technique. This process uses computer balancers to spin the wheel while measuring the weight on all three axes. The technician places the assembly on the balancer and spins it at certain speeds. The machine has sensors that detect any imperfections in the weights. The computer then specifies where to place the weights, and the balancer then calculates how much they should apply.
Performing tire balancing on a regular basis is the most effective way to ensure the weight distribution on the tires. Besides removing wobbling, this process also helps in improving fuel efficiency and extending the life of tires. It also reduces stress on the vehicle and ensures optimum tire wear. It’s easy to do and will save you time and money. In addition, you’ll get an expert’s opinion on the topic.
There are other ways to balance a car’s wheels without a balancer. The static balancing method involves adding weights to a single line of a tire. Static balancing is often the simplest method to use, especially in cases of light imbalance. The tire is placed on a vertical supporter and a spindle tool or bubble balancer is used to balance it. The heavier side will lean 180 degrees from the ground.
The Equal Flexx balancing compound is another method. The material, which is plastic or soft rubber, is injected into the tire‘s valve stem. The compound rebalances the tire assembly while it is in motion, so there is no need to dismount the tire. While equal-flexx does not require a balancer, it can be used on vehicles with all four wheels.
Another method is to add weights to a single line of a tire. These are easy to add and work well for light imbalance situations. Once the wheels are supported, the mechanic will add weights to one side of the tire to balance the car’s tires. In this way, the wheel runs true while still being balanced. The tire can be mounted back onto the car once it is balanced properly.
Regular wheel balancing improves fuel economy. Tire balancing reduces the wear and tear on the vehicle’s tires, which means lower fuel costs. Additionally, it prolongs the life of steering assemblies and axle end components. Regardless of the method, regular wheel balancing is important for a good ride. The Technology & Maintenance Council recommends that car owners balance tires regularly to ensure optimal performance and efficiency.
Dynamic balancing is a method that uses computer-controlled spinning balancers to measure a tire‘s weight on all three axes. The technician places a fully-assembled wheel on a machine that spins at various speeds. The machine’s sensors measure the weight placement and determine whether it’s too heavy or too light. Small weights are then added to the inner and outer rims to correct the imbalance.
The difference between wheel alignment and tire balancing is significant. Tires should be balanced at every oil change to ensure safety and smooth ride. An out-of-balance tire can contribute to early tire wear and can damage your car’s suspension. Getting your tires balanced on a regular basis will help prevent these problems and improve your car’s safety and handling. Here are a few tips on how to check the balance of your tires.
One way to check tire balance without a balanced balancer is to have a professional do it. A balancer spins the wheel at high speed to measure the mass of the tire.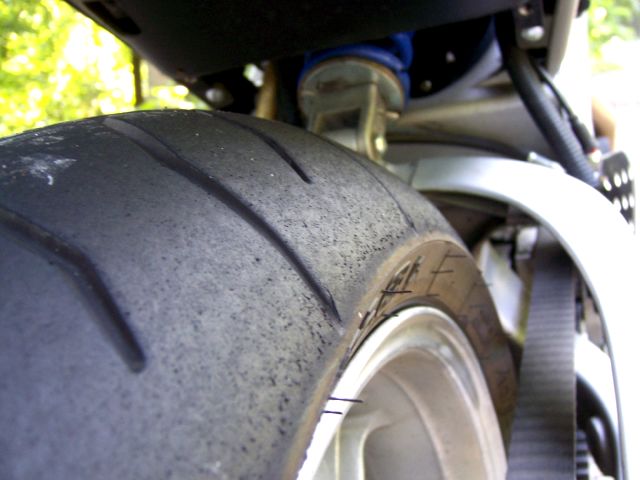 When this is done, a balancer will display the heaviest part of the tire. If the weight is uneven in one part of the tire, vibrations will be felt in the steering wheel.
If you do not have a balancer, then you may want to consider getting one. Tires that are not balanced can cause uneven wear, vibration, and other problems. You may even end up buying new tires. Taking your car to a mechanic for balancing will prevent you from needing new ones down the road. Also, balancing your car’s tires can help you identify underlying issues, such as wheel alignment and suspension problems.
Most vehicles should have a tire balance done at least once every 5,000 miles. A tire alignment job is a specialty of an automotive technician. Your vehicle’s alignment is based on the angles of the wheels on the car. Alignment technicians adjust the angles of the wheels to maintain proper balance. This adjustment can help prevent dangerous situations and extend the life of your tires. Your car’s alignment is another key element for safe driving. If you don’t have a balancer for every oil change, you may want to take your vehicle to a shop that specializes in alignment.
Unbalanced tires may cause your car to vibrate when you drive. It may also affect your gas mileage. The vibrations will cause your tires to wear out faster and can damage your suspension system. It may also lead to uneven wear on the sidewalls. If the wheels are not balanced, they may even cause a blowout. When you are driving at high speeds, the tires should be checked to ensure proper balance.
Tires can be out of balance for a variety of reasons. Sometimes, a vehicle is over-balanced, requiring a balancer to adjust the weights. Other times, a tire has uneven weight distribution and requires a tire mechanic to adjust the weights. Depending on the type of imbalance, there are different methods to balance a tire without a balancer. Some methods are listed below.
First, remove the weights from the wheels and clean them thoroughly.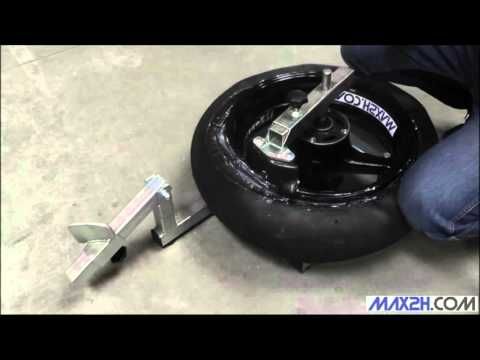 The wheels need to be thoroughly dry and clean before balancing. Once the wheels are clean, slide the balancer’s scale out of the bead edge. After a few seconds, turn the car off. The balancer will then automatically wake up and display the results. Once you’ve achieved a proper balance, install the balancing weights on opposite wheels.
If you feel vibrations while driving, you may have out of balance tires. These vibrations can be caused by a number of things, including out-of-balance tires, a bent wheel, and aging suspension parts. If you notice these vibrations, be sure to consult a car mechanic as soon as possible. An out-of-balance tire can also result in patch-wear, a type of random pattern of wear on the tire.
Regardless of the reason, tire imbalance is dangerous. Even the smallest imbalance can cause significant damage to your suspension and car. In addition to tire wear and damage, an out-of-balance wheel can drastically increase your vehicle’s treadwear. There are two types of imbalances: static and dynamic. Static imbalance occurs when a heavy spot is in the tire. Dynamic imbalance is when weight is uneven on both sides of the tire centerline. This imbalance causes side-to-side movements.
Tires should be balanced after you install new tires. Not only will a properly balanced wheel increase the life of the tires, but it will also lower the cost of replacements in the future. Even the slightest imbalance can also lead to vibrations and premature tire wear. Furthermore, it can lead to excessive heat and reduce the life of the tires. As with any work, safety should always be your first concern. Wear proper protective gear and follow instructions carefully.
For All Motorbike Tires
Click Here For Tire Prices
Tire pressure
Sooner or later, the owner of a motorcycle is faced with the need to replace the rubber on the disks of his steel horse. Doing it yourself, even if you have never encountered this problem before, is simple. But one important point should be taken into account - balancing motorcycle wheels, which is almost impossible to do with your own hands. So what to do when you can handle it yourself, and when to resort to the help of specialists?
A motorcycle is a very versatile vehicle, depending on its type, tires with different treads can be used. Rubber for modern two-wheeled vehicles is:
Rubber of this type is purely civil, designed to be able to move at an average speed on public roads. The tread has the necessary number of sipes to ensure reliable grip even in heavy rain.
Road-sport tires warm up quickly, allowing the rider to maintain increased speed with confidence. This comes at the cost of reduced maneuverability in the rain.
Touring motorcycle tires allow you to feel good on the pavement, but not be afraid to move off it if necessary. Here the tread has a clear uniform pattern, the directionality of which is designed to facilitate movement in the mud.
Real off-road tires behave very badly on asphalt, they are “noisy”, uncontrollable in the rain. But the directed grooves of the tread are able to “gnaw” the ground, self-clean from dirt, and allow you to get off the road.
The type of tires is selected based on the conditions of use of the motorcycle, its power, season.
You can learn more about tire marking HERE, and how much to pump according to the motorcycle model HERE!
In the operation of motor vehicles, a characteristic feature is that 99% of their owners do not ride in winter, therefore, with the change of season, tires are not replaced on a motorcycle. Although studded tires for motorcycles are produced, they are not very popular. Based on this, the change of rubber occurs in several cases:
Tire rupture or puncture is especially dangerous if tubeless tires are used on a motorcycle, the wheel may explode, which is fraught with loss of vehicle control.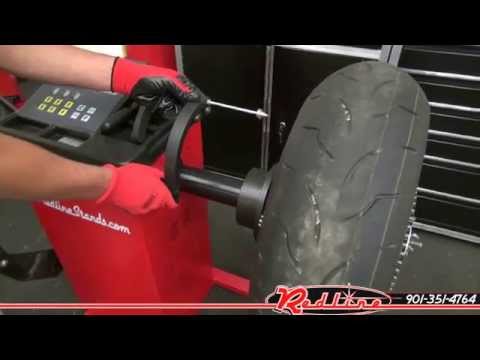 The reason for the appearance of cracks is usually driving on road tires over rough terrain, or driving onto curbs, steps, etc. And regular loads and high mileage contribute to an increase in cracks, which leads to the fact that the tire becomes unusable.
Due to natural aging, tires must be replaced when the motorcycle has not been used for a long time. Such wear of rubber contributes to a long downtime on flat tires, or riding a motorcycle with overload. In the latter case, the tire at the point of contact with the road takes an unnatural shape for it, “breaks”.
Tread wear limits for each tire model are prescribed by the manufacturer. At the same time, for different models, depending on the type of tire, this value can be radically different. Therefore, when choosing wheels for your motorcycle, it is worth making allowances for the likely riding conditions. It must be remembered that traffic rules regulate the minimum allowable limits for the remaining tread. Thus, the height of the tread pattern for legal movement on public roads should not be less than 0.8 mm.
1. To replace tires, you will need a very simple set of tools, tools, which are best purchased once and then used as needed. First of all, in order to pry the rubber, you will need a mount, and preferably two, since it is much more convenient for one, without an assistant, to be controlled by two.
2. A soapy solution will come in handy, it will help put the new rubber on the rim, make it easier to “pull” the old one off it. Without it, you can accidentally break the tire, if the old one deteriorates, then it's okay, it will be a pity for the new one.
Soap and water must be mixed in unequal proportions to form a thick liquid.
Special lubricants can be used instead of a soap solution, but this is not really practical, they are much more expensive, and they are needed every few years.
3. In addition, you will need a special cap to unscrew the nipple, quickly release air from the wheel.
4. You also need the usual set of tools. Replacing wheels on a scooter or motorcycle is more difficult than on a car, where 4-5 bolts need to be unscrewed to remove the tire. Here you have to tinker, it is advisable to get instructions from the manufacturer for the correct analysis of the necessary nodes.
If you briefly go through the tire replacement algorithm, it consists of the following items:
Now, in order. First of all, you need to deal with removing the wheel from the motorcycle, you have to change the rubber on the front and on the rear wheel.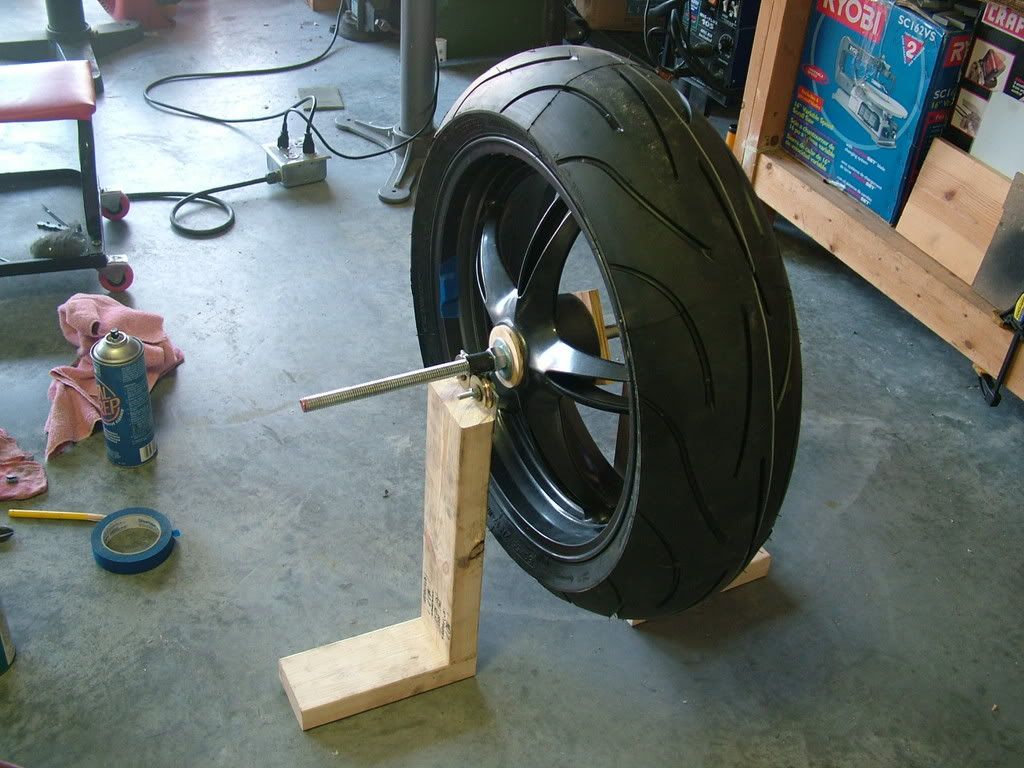 It is better to first pay attention to the factory documentation, so as not to spoil something out of ignorance. It must be borne in mind that removing the front disc is easier than the rear one, for this you do not need to dismantle the chain and other drive mechanisms. Let's take a look at the front wheel as an example.
Motorcycle tire replacement.
The first step is to loosen the wheel axles while the vehicle is still on the ground. After that, you need to put the motorcycle on a kind of stand so that the front part is hung above the ground. In this case, the bike must be firmly fixed to prevent it from falling while it is standing without the front wheel. Next, you need to carefully unscrew all the fasteners, dismantle the disk with the tire from the motorcycle.
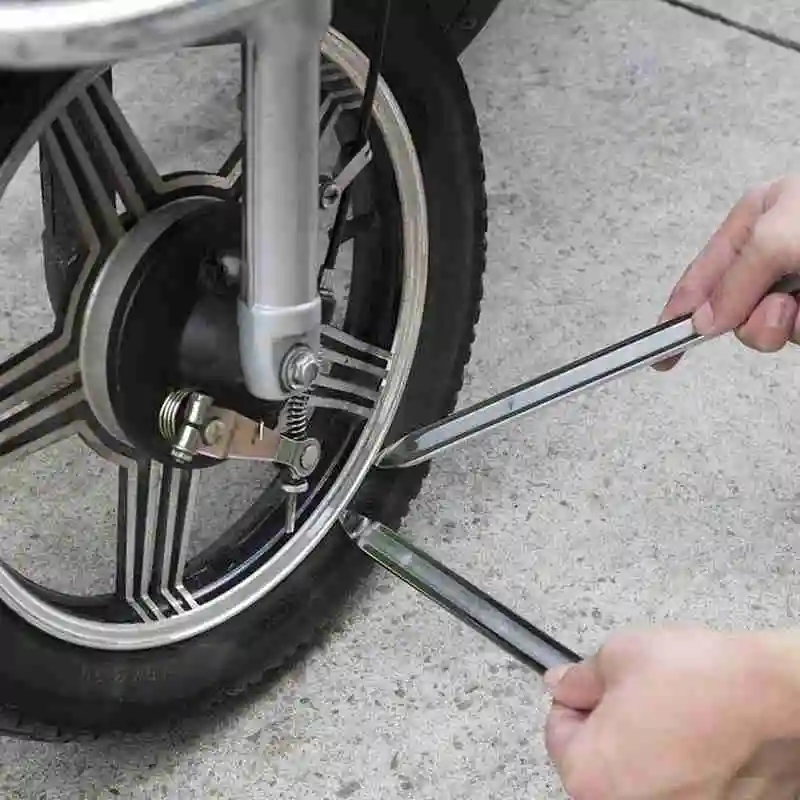
The next step is to release the air, in order to do this you need a special cap, on the other end of which there is a “fork”. She can unscrew the nipple from the valve of the chamber or tire. After the air is deflated, you can proceed to dismantle the tire from the disk. Separating the flat of the tire from the rim can be tricky. If the rubber is no longer subject to use in the future, you can gently tap it with a heavy hammer, or simply “kick” it with your feet. Doing this is important so as not to damage the rim.
Do-it-yourself disassembly.
After the tire still "unsticks" from the rim, take a pry bar and pry it, but this must be done carefully, otherwise the disc may be damaged. It's ideal here to have a second pry bar so that you can go around and take the tire out. Having done this, carefully remove the camera, try not to damage it. After that, you can again go around the mounts in a circle to finally remove the rubber.
First of all, if the wheels are spoked, check the condition of the rubber that protects the tube from the spokes, replace if necessary. On a new tire, you need to pay attention to the tread of motorcycle tires, find an arrow that indicates the direction of its movement. There is also a mark that shows where the camera nipple should be located.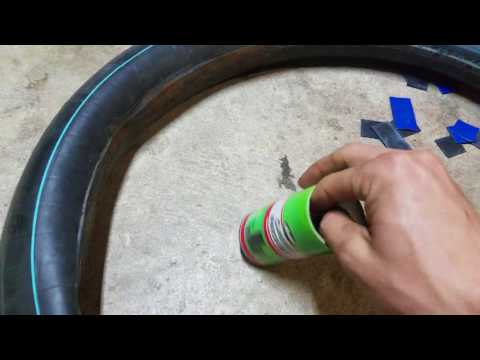 Lubricate the new tire liberally with soapy water, fold one edge over the rim, then insert the tube, lay it down, straighten it and then start the second edge. Now screw the nipple back into the valve, pump up the wheel and assemble in the reverse order. The tire pressure values are usually found somewhere on the motorcycle plates. The final tightening of the fasteners should be done on a motorcycle already installed on the ground, it is absolutely impossible to do this on weight.
Inserting the tube into the tire.
If the wheel has been in use for a very long time, separating the rubber from the rim can be a very difficult task. At home or in the garage, you can try to take any action, use the tool, but what if the repair needs to be done on the road? It is unlikely that there will be a mount for repairs with you, you will have to ask for help from passing cars. If you are traveling not alone, but with a company of motorcyclists, here you can apply a kind of "life hack". You need to open the footboard of another moped, put it on the rubber of the removed wheel, using it instead of a mount.
Alloy motorcycle wheels, especially those with spokes, bend extremely easily when hit by bumps in the road. You need to be aware that a severely deformed rim cannot be repaired, it is better to replace it. And it is generally not recommended to repair spoked motorcycle wheels on your own, because you may encounter such problems:
Non-repairable motorcycle wheel.
If there is a desire to repair spoked wheels on your own, then you should understand that the ideal - "zero" - radial runout may be unattainable, and you need to focus on generally accepted tolerances:
 2 - 2 mm for choppers, enduro and domestic motorcycles ;
 The whole point of the adjustment is to change the position of the rim relative to the wheel hub by shortening or lengthening each spoke. You need to understand which of them are subject to adjustment. To change the length of the spokes, you will need a special wrench and a stand to check the runout. Having fixed the disk in it, you need to place a piece of chalk next to it and turn the wheel. Where the chalk leaves a mark on the rim, this will be the most protruding area, although on a heavily deformed disk the “eight” will be visible to the eye.
Spoked motorcycle wheel.
Now you need to loosen the spokes on the side that does not have a mark, and on the opposite side, tighten them. In the central part of the deformed arc of the rim, tighten the spoke by 4-5 turns and, moving in both directions, tighten each of them a quarter of a turn less.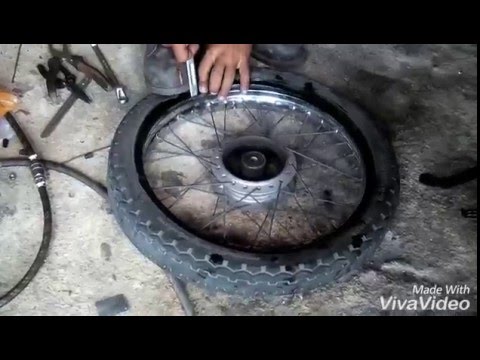 After that, you need to check whether those weakened knitting needles have stretched by themselves, on the other hand. If not, the tightening must be repeated in the same sequence.
After all the steps, you will have to put the wheel back into the stand and check how the situation has changed. You probably won't get it right the first time. It should be borne in mind that for such actions you will have to disassemble the wheel, disassemble the motorcycle, all this will take a lot of time. If you need a scooter every day, and you have never encountered such a repair before, then it is definitely better to turn to specialists so as not to waste your time in vain.
DIY needle adjustment.
There are pros and cons both in independent replacement and when contacting specialized motorcycle tire shops. The positive points when replacing with your own hands are:
However, there are obvious disadvantages. Firstly, you will have to spend more time, especially for those who do it for the first time. You also need to buy all the necessary tools. And if there is no garage or other premises, then you will have to do it on the street, which is not very convenient. And the biggest disadvantage is that you don’t have a wheel balancing stand in your garage, and you won’t be able to make a full and high-quality tire replacement. However, there is one important point - unlike a car, a motorcycle does not have a spare tire, and on a long journey, the experience of replacing it yourself will be very useful.
On the other hand, by turning to professionals, you will receive:
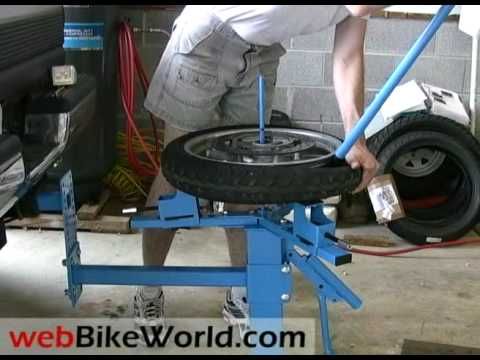
Despite the advantages of doing this task on your own, not every motorcycle owner is ready for this. Therefore, it is really easier for many to turn to specialists. Plus "tire fitting" in the presence of equipment and experienced staff.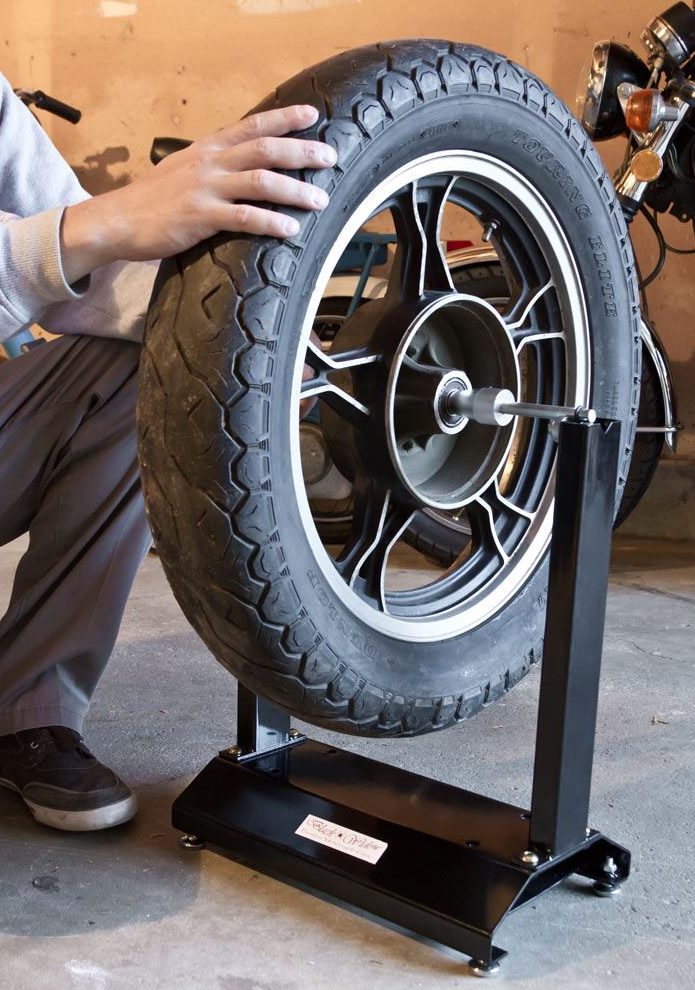 There, the motorcycle is fixed on a special stand, both wheels are immediately removed. The wheel breaking stand makes it easy to remove the tire from the rim, and the wheels can be immediately balanced. But even here there are drawbacks, unlike car workshops, which are everywhere, motorcycle “tire changers” are not so common. In a small town, you still need to try to find such a place. The price is also associated with low prevalence - such services are slightly higher than similar ones for cars.
Which rubber should I choose with spikes or Velcro?
Operation of winter tires
Changing wheels on a car
Repair, replacement of studs on winter tires, studding
How to choose winter tires for crossovers
Replacement of summer tires for winter. Tips
Tire pressure sensors
Which wheel locks to choose?
Truck tire repair
Bicycle tire marking
How to install a tire in the direction of the tread pattern
What is the life of the tires on cars
Wireless charging smartphone holder
Unique in-car smartphone holder with…
↑
Scooter wheel balancing is the process of reducing the imbalance of the wheel, hub, disc, wheel fastening and suspension elements to a level that does not lead to destruction of the moped suspension and does not impair vehicle handling .
Select the question you are interested in
Almost always the center of mass of the wheel does not converge with its geometric center. Such a tire vibrates when driving and transmits vibration to the entire vehicle, and this leads to a decrease in the comfort of driving a scooter and wear of steering parts and wheel suspension components, and also increases tire wear. The mass of the wheel should be distributed uniformly relative to the center of the tire, and then the vibrations will be minimal.
Thus, wheel imbalance leads to such unpleasant consequences:
 The results of losing a wheel at high speed will be very bad, that's for sure
 Depending on wheel imbalance there is static and dynamic balancing . Both of these types of imbalance refer to the incompatibility of two axes - the axis of rotation and the axis of inertia, passing through the center of gravity of each wheel.
Static balancing ka is produced when signs of static imbalance of wheel appear. Static imbalance is formed when the axis of rotation of the wheel is parallel to the axis of inertia and the center of gravity is not located on the axis of rotation at all (the mass of the wheel is unevenly distributed along the circumference).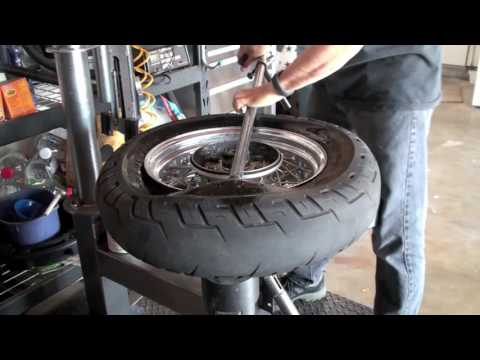
Dynamic imbalance occurs when the center of gravity is located on the axis of rotation, but the axis of inertia does not coincide with the axis of rotation, crossing it at some angle (the mass of the wheel is unevenly distributed over its width). Due to the low weight and width of the scooter wheels, as well as the relatively high precision of their manufacture, tires do not need dynamic balancing of tires.
If, upon reaching a speed of at least 60 km / h, you begin to feel that the scooter does not behave as confidently as at a lower speed, vibration of the front fork occurs, instability in control may be , you need to check balancing moto wheels .
Maximum allowable runout of the tire and mass of compensating weights when balancing the wheel in accordance with GOST 4754-97 | ||||
| Type and tire designation | Tire seat diameter, inch | Maximum permissible mass of corrective weights during balancing, grams | Maximum allowable tire runout, mm | |
| radial | side | |||
| Radial | 12″ | 50 | 1. 0 0 | 1.5 |
| 13″ | 60 | 1.0 | 1.5 | |
| 14″ | 70 | 1.0 | 1.5 | |
| 15″ | 70 | 1.5 | 2.0 | |
| 16″ | 70 | 1.5 | 2.0 | |
| 215/80 R16 C | 16″ | 140 | 1.5 | 2.0 |
| 225/75 R16 C | 16″ | 160 | 1.5 | 2.0 |
| Diagonal (all sizes) | 13″ | 80 | 2.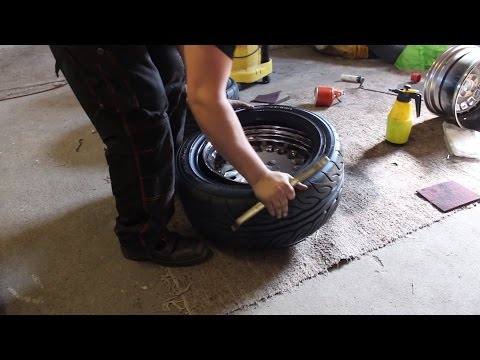 0 0 | 3.0 |
| 14″ | 100 | |||
| 15″ | 140 | |||
| 175/80-16 | 16″ | 120 | ||
For balance check it is necessary to put the scooter on the center stand so that the controlled wheel does not touch the ground, loosen the brakes by spreading the pads, disconnect the speedometer cable - the main thing is that the wheel spins freely, does not cling to anything and does not slow down.
Then spin the wheel and make a mark on it where it stopped at its lowest point near the ground. If, with further spinning of the wheel, it stops almost in the same place all the time, it means that in that place it is the heaviest and it needs to be balanced. On this wheel balance check completed.
Wheel balancing can be done in two ways:
In any case, the sequence of operations is the same with and without the balancing machine .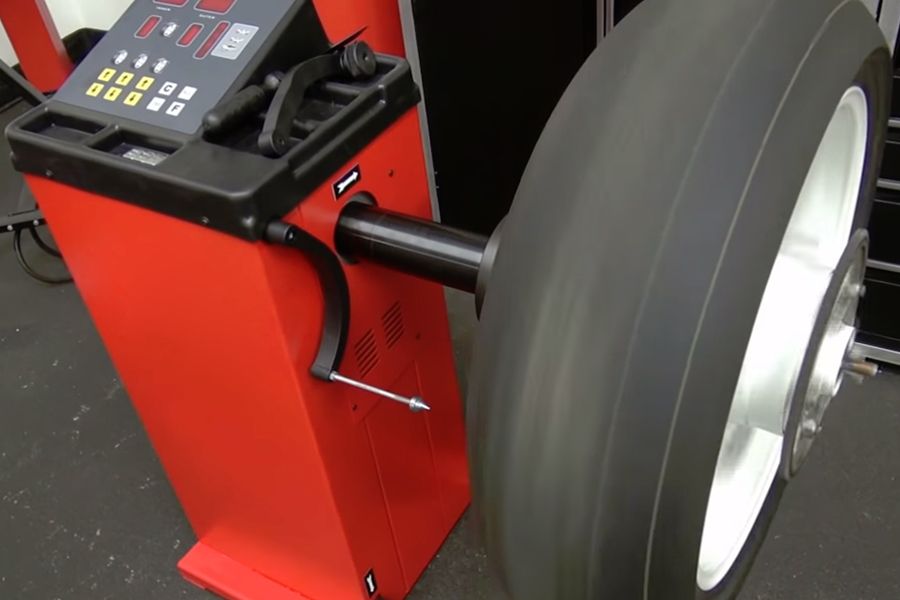
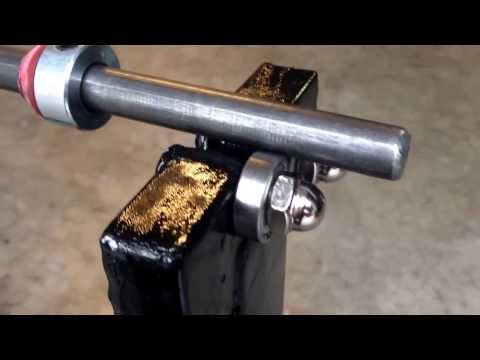
For balancing, you will need balancing machine in the form of an inverted letter "P" (50 euros in the Louis catalog), on which an axle with a balanced wheel is placed. In order for the axle to rotate independently, a pair of bearings is provided at each end.
The reliability of static balancing with this device is very high, no worse than on specialized machines. Tire balancers are designed mainly for car wheels, so do-it-yourself balancing may be more accurate.
Scooter wheel balancing must be carried out complete with brake discs. The rubber has a mark marking its lightest point. Before installing the wheel on the balancer , it is necessary to turn the wheel so that this mark coincides with the location of the nipple.
In fact, the process of balancing disks is very simple. It is necessary to achieve that the spinning wheel stops randomly, and not in the same section downwards.