In the spring and fall months, desert, MX and XC racing dominate the headlines. However, when summer rolls around and temperatures rise up, these guys take a break from the action. This gives way for dirt track racing to take center stage. Dirt track events typically take place at night, in front of big crowds, and on small, tight tracks at great venues throughout the country. On the ATVA National scene, there is a full field of pros to watch and plenty of amateur classes to enter yourself. We recently sat down with multi-time Extreme Dirt Track, TT and Flat Track champion Keith Little to find out exactly how to turn a standard sport quad into a competitive racer.
Steps one through three are all you need to enter your first race or practice section. Beyond that, changes become more exclusive to this type of riding and require a bigger budget and commitment. However, if you have a good local track close by or ride well in front of big crowds during a larger event, we think you will be hooked and should look more seriously into building that top-notch race machine.
STEP ONE: SWAY BAR
After you outfit your machine with the mandatory safety items, such as nerf bars and an ignition tether, adding a front sway bar will start your transformation. A sway bar basically connects the right and left A-arms together to improve cornering speeds. Rath Racing has the most popular sway bar ($395), and it actually incorporates a flexible torsion bar that helps transfer weight better and has a little give over the bumps. All brand sway bars use adjustable connecting rods that are used to do the tuning. Typically you want a light attachment between the sides on loose and soft terrain and a stiffer setup for tacky, high-grip surfaces.
STEP TWO: TIRES
At most tracks, your stock knobby tires will grip like a bowling bowl on an ice rink. Several manufacturers are offering dirt-track tires for ATVs this year. American Racing, Hoosier, Duro and Maxxis are some of the most common brands used on the flat tracks and Supermoto circuits.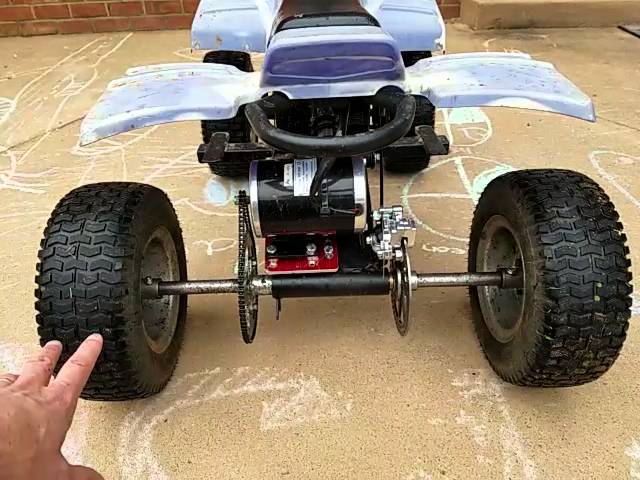 Instead of concentrating on tire patterns here, choosing the right rubber compounds will help you get to the front. Keith tells us depending on track conditions, pressures are typically the same in the front and rear, ranging from 8–10 psi. In most cases, new rear wheels will be needed to mount the tires on, which are commonly a larger-than-stock, 10-inch size. The harder the surface you are racing on, the softer compound tire should be used. If the track is loamy or sandy, harder compounds can be used, and typically the tread groves need to be more aggressive.
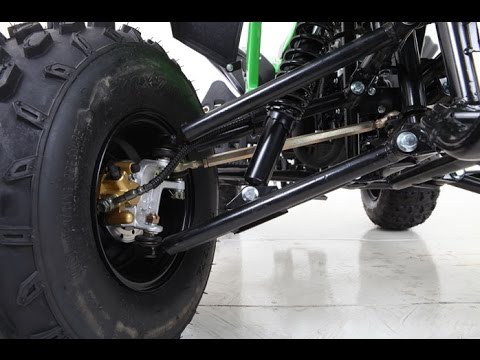
STEP THREE: A-ARMS
Like in most forms of racing and aggressive trail riding, wide A-arms are a big improvement. If you have anLT-R450,YFZ450R,DS450X-MXora KTM SX, you have a wide front end already. To outfit the rest of the machines, A-arms that accept stock-length front shocks are what to look for. A long-travel setup provides too much movement and will weigh considerably more. Wheel spacers are an option for budget-minded racers, but keep in mind the turning geometry will be affected, and it’s usually not for the better. The rear end should be widened at this time, too, with an extended axle or at the very least with wheel spacers.
STEP FOUR: SWINGARM
The advantage of shortening the swingarm will give you more weight over the rear tires for a better drive off of the start and out of every corner. Companies like Lonestar build shorter swingarms ($650) for this application. If you have the ability to shorten your stock swingarm, the length needs to be taken out between the axle carrier bearing and the shock mount as to not change the shock leverage and suspension action. On Little’s Honda race machines, he would run swingarms 1 1/2 to 2 inches shorter than stock. A good aftermarket swingarm will be a no-link setup as well. Removing the linkage can help lower the machine some and save weight. A small reduction in wheel travel is not a handicap in this form of racing, but weight is.
STEP FIVE: SHOCKS
Adjustability becomes very important if you get serious in this sport. Dual- and triple-rate springs help keep the ride height lower without interfering with shock action. A rule of thumb is, ride-height measurement should be right at 5 inches (from the bottom of the frame to the dirt). When choosing a shock, again, consider weight. Piggyback shocks are typically lighter than those with remote reservoirs. Having low-speed adjustment is crucial to helping keep the quad from squatting under acceleration or nose diving under hard braking.
STEP SIX: ENGINE
With all of the added traction on a dirt-track machine, it’s easy to tell when you are underpowered. Typical performance hop-ups maybe necessary to get you out of the beginner class. Passing is very difficult, so having lots of power and getting the hole shot will give you a big advantage. You want a smooth power band with more top end and over-rev that can keep you from having to make an extra shift just before the next corner. Shorter mufflers can help create that top-end power and help save even more weight. On today’s four strokes, you may also want to eliminate the heavy engine braking. Both Hinson ([909] 946-2942) and Rekluse have “slipper” clutches ($1675) that will do just that. Also, keep in mind standard clutches take a beating in this type of racing. Barnett ([805] 6429435) is a good source for quality stock-replacement components.
STEP SEVEN: CONTROLS
As much as you need to go fast, you want to be able to slow down just as quickly. Steel-braided lines, hi temp brake fluid and performance rotors are all good starting points. More performance can be added with dual-piston calipers and high capacity reservoirs. Lonestar Racing has caliper brackets incase you want to mix caliper components from brand to brand or go with oversized rotors. An adjustable clutch lever is important in this environment. Clutches heat up, so having the ability to adjust freeplay on the fly can help you later in the race. Keith starts out a race with as much as 1/4-inch free play in his lever. Renthal and Works Connection offer the best adjustable products.
STEP EIGHT: SUBFRAME
Moving as much weight as possible to the center of the quad is the goal of any serious racer. And regardless of size, the rider is the heaviest component of the package. Lowered subframes from Walsh Racecraft or Lonestar Racing can bring the rider’s weight lower to the dirt. QuadTech also makes lowered seats and covers with less foam, along with more grip. You can trim the foam on an ATV yourself too. A long carving knife works the best for the job. Trim the foam following stock contour so the seat cover will reinstall cleanly. Local upholstery shops can do the work for you if needed.
STEP NINE: LIGHTS
More weight savings can be found all over your race machine. Up to 10 pounds can be saved removing the headlights, brake lights, and wiring and bracketry. A small dirt bike kill button can be used to replace a starter button that is usually connected to the big light switch cluster. Parking brakes and the heavy support cables and hooks can be eliminated. If you can, avoid adding unnecessary parking brake block-off plates or other billet-aluminum, ignition-timing plugs, reservoir covers, and throttle housing caps. Fenders can be trimmed and some braces can be removed. A few ounces can be saved here, along with cutting down the wind resistance on those long straightaways.
STEP TEN: WEIGHT
Finding additional weight savings can turn into an interesting quest when building this type of machine. Companies like TekBolt sell fastener kits that have smaller, lighter heads. Precise-length bolts are a smart way to assemble things. When building his race machines, Little would shave off any excess bolt threads sticking out beyond their nuts. Renthal sells aluminum rear sprockets that are significantly lighter than stock, and their countershaft sprockets have holes drilled in them for considerable weight savings. On some machines you can change your lug nuts out for smaller units.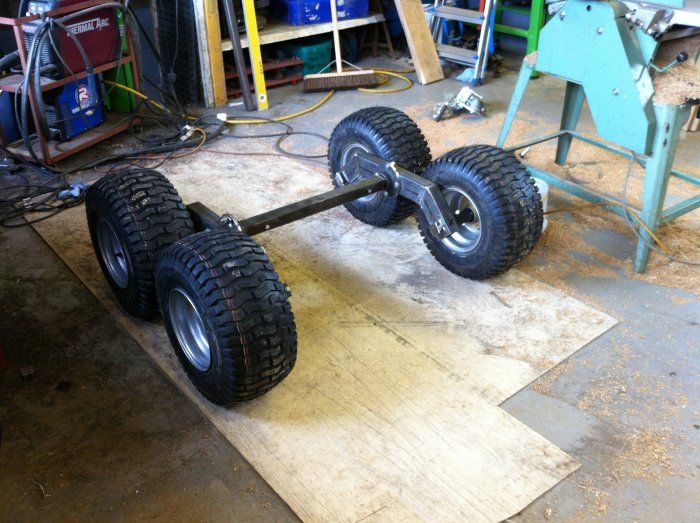 If yours requires a 17mm socket, it’s possible to find smaller nuts that only require a 14mm socket. Titanium fasteners are also used, but keep in mind the dollar investment may not be quite worth the savings in weight.
After you’ve been riding a quad for some time, you start building experience and confidence. It only makes sense to want to build some jumps in the backyard. Sure, a full on motocross track would be great, but not everyone has the time or space for that. Besides, you’d be surprised what you can do with just a little space, and how much fun you can have riding on a small track.
The topics I go over in this article can be used for any size space you have available, and you can make your track as big or as small as you’d like. But, the first step is planning.
When you start planning your ATV riding track, there are a lot of things to consider. Before you even start designing the layout, there is planning to do. First, you need to pick the site. This is important, and you don’t want to end up with legal problems later on down the road.
If you have neighbors close by, be prepared for noise complaints. I know, I thought everyone loved the sound ripping engines all day too. I can’t for the life of me figure out why, but they don’t. If you get dry seasons where you live, then you have to worry about dust kicking up too. A fence could help with the noise and dust, but you’ll need to check with your local building department about any setback requirements, and putting in a fence adds to the cost of the track. If you can, find a place with plenty of room where it bother the neighbors.
Water will always find its way to the lowest point, and will cause erosion on its way there. If you can find a naturally sloped area to build your track, then great. Otherwise you may end up putting in drainage pipes or sloping the terrain yourself. Take care to think about erosion control while you choose your location and start your planning. If you do install drainage pipes, keep in mind that they need to be covered with a fair amount of dirt. The ATV’s you plan on riding on the track will destroy most drain pipes over time.
You don’t want to get sued. You will probably want to allow people over to ride on your track at some point. Having it all to yourself is great, but sooner or later, you’ll want to ride with other people. Talk with your insurance agent to find out what your policy covers. Your insurance might go up if you want to allow visitors to ride ATV’s on your property. Accidents happen, talk with a lawyer to find out what would happen if someone got hurt on your property. In some cases, even a trespasser could sue you for damages if your track wasn’t properly fenced off. I’ve even been to places where I had to sign a waiver, basically saying I won’t sue if I get hurt.
If you can avoid having to buy dirt to build your track, you’re already ahead of the game. Buying dirt can be expensive, try to only buy dirt if you have to. I recommend working with the natural terrain. This will be done differently for every piece of land, but try to locate any hills and use them to your advantage.
It may be a good idea, if you have the space, to dig a pond near the track, and use the dirt from that to build the track with. You could dig out the side of a hill, use the hillside as a berm, and use the dirt for some tabletops or jump ramps. You have to get creative here if you want to save yourself from buying dirt. If you do end up needing to buy dirt, loamy soil works best but is the most expensive. Clay based soil holds its shape better, but sandy soil drains better. Loamy soil is a good medium between the two. I lean more towards clay based soil because I like the track to hold up over time.
Once you have all the approvals and a good spot picked out, its time to start designing the track.
For me, this is the fun part. I just love planning out what’s going to go on the track, to me, it’s exciting. The first step here, is decide what type of track you want to build. Maybe you want more of a supercross style track as opposed to motocross. Or maybe you just want a few whoops and jumps with a more natural feel to the track.
The type of terrain you have to work with might affect your decision too. If you have a super flat piece of land you might consider a supercross track, if you don’t mind bringing in a lot of dirt. If you have more hilly terrain, I would go with a more natural track or a motocross style track.
Also keep in mind why you’re building the track in the first place. What skills do you want to improve on and what type of riding do you enjoy the most? If you want to work on speed and cornering, I would go for motocross or a natural terrain track. If you can’t get enough of the jumping, level an area and build jumps, supercross style. If you’re building this for fun, I would go with a bit of a combination. Mostly natural terrain, but with enough obstacles to keep it fun.
Actually starting the design is very different depending on which type of track you chose to go with. If you want a more supercross style track, you will need very accurate drawn up plans of every obstacle and where they will go. A more natural motocross style track, you can basically wing it, I wouldn’t even worry about drawing up plans.
To start with a supercross track, create a scale drawing to work with. Supercross is entirely man made, you will need to flatten a good portion of land to make one of these. Try to design long straight lanes, that way you can put bigger obstacles in your track. Keep it simple with complete 180 degree turn arounds back to back. It would look like a series of parallel straight aways at first. Then add your obstacle in. You will need a lot more dirt to build this type of track.
If you want to go with a natural terrain track, there’s no need for planning or drawing. You could simply scout out your area on your ATV and sort of free ball it. Try to make the most of the land you have to use. Hills are great spots to create banks, step-ups, step-downs, berms, jumps, and so on. Avoid sharp turns, and plan using areas with available dirt. Avoid large rocks and trees that will get in the way, but keep in mind you can rent machinery to help scrape up the terrain. Creating jumps out of hills, and building upon existing features will help you. The very first tracks ever made were made out of the natural terrain, for me, that’s the way to go.
If you don’t want to spend hours shoveling, you may want to rent some heavy machinery. A small bulldozer could handle most of what you’re trying to do, you shouldn’t need much more than that for a small backyard ATV track. If your plan is simple enough you shouldn’t need to be carrying the dirt all that far. You will mostly be focusing on grading and shaping the existing terrain.
The bigger machines will work better and push more dirt, but they will cost more to rent. This one’s up to you, if you want to get it done fast, get a bigger dozer. You may need a water truck, or a way to get water to your track to pack the dirt down.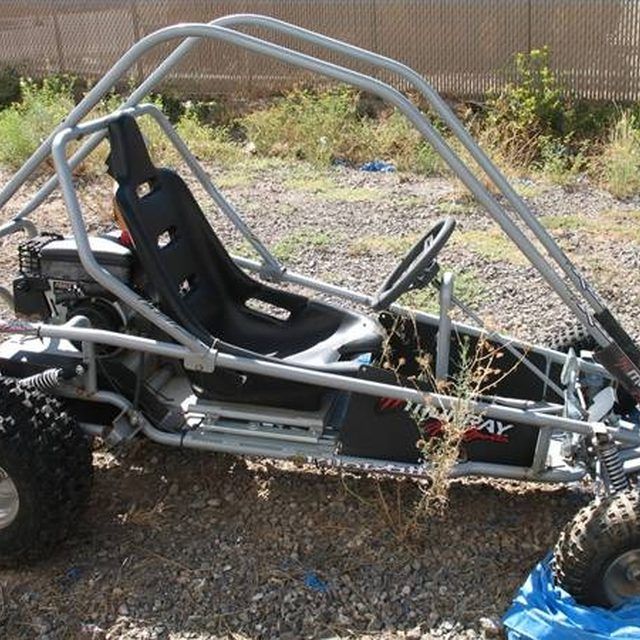 It depends on what kind of dirt you’re dealing with, but dry dirt usually doesn’t pack very well.
If you plan on building a supercross style track, you will probably need a bucket loader or an excavator. You will need to move a lot of dirt to where it needs to go and shape the track. You probably won’t get much use out of a bulldozer though. Supercross tracks are a lot more detailed finish work, the dozer wouldn’t be useful for that.
There are some obstacle you have in mind that you just need to have. I get it, but make sure you leave yourself room for improvement later on down the road. You’ll be a lot happier with your track if you can upgrade sections as you become a better rider. You don’t want all your obstacles jumbled together anyway, it will ruin the flow of the track.
Some ideas to get you started:
Don’t make a track you’re scared to drive on, you need to ride a lot to get better. You can always upgrade the track as your skills improve.
For a supercross track you will need some long measuring tapes, and some stakes and flags. Measure out the jump peaks and place your stakes before you start piling dirt on. Use your scale drawing and map out the entire track before hand. If you can, mark the stakes at the heights you want your obstacles to be.
For a natural terrain track you don’t really need to do any of that. I find it useful to place down a couple flags to remind me of where I planned certain obstacle. I also mark where I want to scuff up the terrain to make actual lanes to ride in around the property. Doing this also helps you to confirm if your plan for the track will actually work out or not.
You have a game plan down, you have the equipment, and everything marked out. Now comes the hard work, actually building the track. The best place to start is at the end, working your way back to the start. I suggest doing this because that way you’re not ruining the faces of the jumps with the equipment. In fact, you will always be working on the faces of the jumps if you build the track in reverse order.
You can do this per straight away, or work in reverse on the entire track as a whole. You can also work from the middle of a straight away outwards in both directions, especially if you build a larger obstacle in the middle of that lane. Either way, you would finish the lane and build the turns last, so you avoid ruining any berms or bowls you have planned for your corners.
This is more for a supercross track where everything is tight together. If you have a more open natural course, just do what makes sense to you. I would still recommend building any jumps or obstacles from the end to the front to keep the take off area nice.
It’s time to start piling the dirt where your obstacles are going to be. If you have a loader, grab a full bucket of dirt. Keep in mind that you will want to try grabbing the same amount of dirt every time. Get yourself into the area you will be working and line yourself up straight with the obstacle. If you can get yourself head on with the jump, it will make the rest of this process a lot easier. Just try to imagine at which angle you will be approaching the jump on your quad. Dump the dirt starting at the back of the obstacle.
Keep adding bucket loads of dirt until you’ve created the basic shape of the obstacle. You will want to add a little more dirt to the top to compensate for packing it down. If you marked your stakes for the correct height you wanted, this part will be a lot easier. I would start by doing the sides of the jump first, then filling in the middle. Make sure your obstacle is wide enough, having everything pre-marked makes this simple, just fill the areas you staked off.
This is where a bulldozer comes in handy. To start with the bulldozer, drive over the jump with the tracks to pack everything down. It’s ok to go back and forth, make sure the entire obstacle is packed down nicely. Now use the blade of the dozer to level off the jump and smooth out the areas that the tracks ruffed up.
Be sure to get rid of any bumps or indents on the jump. This is the fine tuning stage, you want to end with a nicely finished obstacle. You could also finish up the surface using the dozer. If you want better traction for your quad, leave it as is, you’re done. Fair warning though, it will be a lot more maintenance.
To pack the surface down, simply roll over the front of the jump with the tires of the loader. There will be less maintenance, and the jump will be more consistent, you will know what to expect every time you hit it. You can use the bucket of the loader to smooth out the tire tracks after you’re happy with how packed down the front of the jump is.
For a nice lane that flows well, I would consider a distance of about 30 feet between jumps. You can do a lot more than this though and still enjoy the track. Especially on a more natural track that flows with the landscape. Make your jumps where it makes sense to, but keep in mind not to have too many obstacles close together. Unless you plan on using them together, like for take off and landing purposes.
A good pitch for quad jumping is around 3:1. That means for every three feet your ramp is length wise, it will be one foot high. When you just naturally dump a pile of dirt, the ratio is more like 1:1, which is way too steep for a four wheeler. Of course, make the track to your liking and skill level, you can always change things later on as you improve.
Take care to keep the jump consistent all the way to the top, and side to side. If there is an indent or a hump, it could prevent the rider from leaving the jump at the top, which can be dangerous. Avoid creating any lips at the top, this could kick the rear tires up as you leave the jump.
After you’ve got the pitch you want, you will want to curve the jump a bit. Leaving it at an exact 3:1 ratio won’t give you that much lift. If you curve the face of the jump slightly, it will allow your suspension to compress into the ramp, and decompress on take off, giving you some nice lift.
Take your time and make sure the ramp faces are right. Make sure your jump is lined up with the track. Double check for kickers, swells, and indents. Make sure the top edge is level. Always do a slow pass around the track to make sure everything feels right before going full throttle. It’s always best to slowly get used to a track you’ve never ridden on before, especially a newly built track.
Always wear proper safety riding gear, to check out some quality gear I put through some tough testing myself, visit the Recommended Gear section of this site. The only thing left to do is enjoy all your hard work. Be careful, it can get addicting, before you know it you’ll be building all different kinds of obstacles.
Sharing is caring!
 Apple caterpillar - the most spectacular autumn craft
 Apple is one of the most favorite fruits for children. Autumn gives the opportunity to eat apples in large quantities. This is an amazing source of vitamins, because it is not in vain that they say that one apple a day saves from a visit to the doctor.
The abundance of apples in autumn allows fruits to act as material for a variety of children's crafts. It will be interesting for children not only to carve their favorite animals with you, but also to taste them. Crafts from apples are a great decoration for the festive table.
So what can be done with apples?
Let's start with a cheerful, carefree butterfly — a memory of a sunny summer. Cut a large apple in half, cut a slice from one half. When doing crafts, it is better to use a clerical knife or a small kitchen knife, as it will be necessary to cut out small details. Cut out the shape of a butterfly from a slice. Subsequently, it can be attached to one of the halves of apples or to a whole fruit with a toothpick and put on the festive table.
However, in the case above, the butterfly looks flat and somewhat unnatural. If you want the butterfly to become voluminous, cut out two triangular cuts from the apple, make curly cutouts on them and attach the joints to each other. The tail of the apple plays the role of antennae. Such an apple craft will be beautiful, but already inedible, since you will have to use glue to fasten the joints.
Apple kaleidoscope will increase appetite and mood for both parents and children. To do this, we take a few green ones and insert them into red apples, and red ones into green fruits. Apples will take on a cheerful color and look like clowns. You can decorate the glasses by cutting the apples lengthwise and stacking the slices on top of each other, alternating them with lemon ones.
A charming hedgehog can become a symbol of autumn. Making it is quite easy. Take half an apple, stick a lot of toothpicks on the soft side so that their ends stick out, forming needles. Cut out a triangle from the pulp of the fruit - this is the muzzle. Place small ears on top of apple slices. A viburnum or cranberry will act as a nose. An autumn leaf attached from above to the ends of toothpicks will become even more convincing and picturesque.
Figurines of swans can be a wonderful decoration for wedding dishes. To do this, cut the apples into slices from smaller to larger, cut out the necks from two larger slices. Next, we set the torsos vertically and lay out slices of apples in the form of wings next to each other, placing them with joints to each other. At the end of the wings will be the smallest slices.
Lemon can be added to apples when making crafts. It will give a cheerful coloring and a new taste to the dishes. We cut off the tails and front parts of apples and lemons. Using toothpicks, we fasten apples and lemons, alternating them and laying out, thus, a caterpillar. The role of the eyes and nose will be performed by grains or seeds.
Apple crafts will look great on the New Year's table. Fruits make cute Santa Clauses. They are made very simply. To get one Santa Claus, we take two apples - a large and a small one. They must be significantly different in size. We attach a small apple on top of a large one with a toothpick. In this case, you can not do without glue. Glue a cotton beard and paper eyes onto a small apple. Colored corrugated paper will serve as the execution of collars that are put on at the junction of two fruits. Beads are perfect for hands. Santa Claus is ready.
Fruit salad can be completed with a colorful Christmas tree. At the base of the Christmas tree we put a slice of grapefruit, cutting it in half and cutting out a flower from the half. Lay a flower from half an apple on top. Next, we will use smaller slices of different colors. The top of the Christmas tree can be decorated with a carrot or apple star.
Easter will not pass without apples on the festive table. Surprise your guests with painted apples in addition to eggs. To do this, take a few red apples of saturated color. A beaten egg white is suitable as a material for drawing. With a thin brush, we apply patterns on apples with protein, like on Easter eggs. When the pattern dries, the product will look unusual and picturesque.
Making crafts from apples, you can make a lot of discoveries for yourself: come up with new forms, plots, when animal figures, outlines of objects are suddenly born from the fruit. For example, two apples make an owl. At the same time, it is very easy to make it. We fasten two apples together with a toothpick. In the upper apple, cut out two circles: they will serve as holes for the eyes. We insert seeds into them to form pupils. On the top of the head, we make incisions in the skin of the fetus and understand them a little upward - ears are obtained. We will decorate the lower part with feathers, also cutting the skin of the apple and sticking it out.
Half an apple can be cut into a crayfish or a crab. To do this, we use a clerical knife so that the cuts are more accurate. If you are unsure of your "sculpting" abilities, draw a template on paper, cut it out and put it on top of the slice, and then repeat the contours with a knife. The remaining apple slices will replenish your today's menu.
On the autumn holiday of Halloween, in the absence of a pumpkin, you can use apples to make holiday decorations. In an apple, as in a pumpkin, we cut out the eyes, mouth, insert a small candle inside. In the dark, this craft will serve as a wonderful lantern or a children's toy.
Of course, these are not all apple crafts that you can make with your child.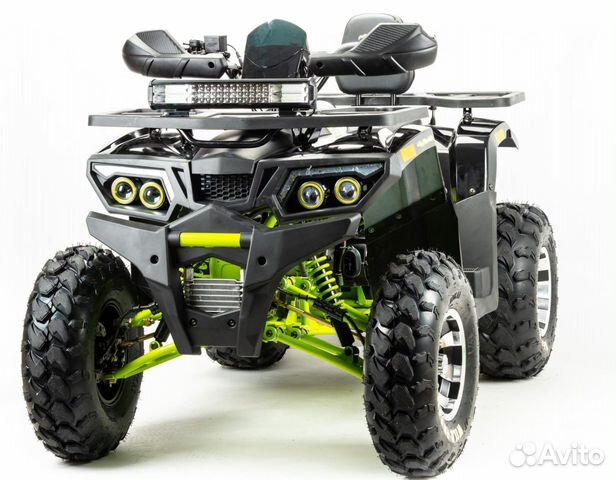 Come up with new options, fantasize. Let the kid offer his vision and idea of \u200b\u200bcrafts, which will be successfully realized. It is desirable, however, that you prepare crafts together with your child, since the process is closely related to the use of piercing and cutting objects, which is unsafe for the life and health of the baby. If you are still forced to leave the child alone with the craft, a plasticine cutting knife is perfect as a tool for cutting apple pulp (at least safely). Invent, create - and enjoy your meal!
DIY apple crafts even for small children. In itself, an apple is one of the best, and at the same time delicious materials for the manifestation of children's creativity. This fruit is multifunctional, eco-friendly and malleable. What else is needed for creativity?
Fruit crafts, as you understand, will not be able to stand for very long. Therefore, they are usually performed before they are consumed. They make crafts from apples and other fruits in order to diversify the child's menu or decorate the festive table, in particular, the sweet menu.
Agree, children will be much more interested in eating an apple hedgehog or a swan than just eating fruit slices. It is we adults who look at what is on the table, and not at the form in which it is served. In children, first of all - beauty. We are glad to offer you several options, which, by the way, you can do with your child.
Crafts from apples (photo) are usually made in the form of a wide variety of animals or plants. For example, you can make a wonderful hedgehog from an apple. And it is done very simply. Of the tools, we only need a special fruit knife. Cut the apple into two halves. Carefully remove the core so that we get a pyramid. The core will be the muzzle of our hedgehog, and the bones will be the eyes. As a spout, you can choose a cherry or other round berry. So, half of an apple is the body of a hedgehog, the core is a muzzle. It remains to make only needles. There are two options here - you can cut out pieces of an apple from the remaining half, resembling needles in shape and insert them into the hedgehog's body, after making cuts with a knife.
The second option is a bit more interesting. We take toothpicks and stick them all over the back. And we string grapes on toothpicks. You get a real hedgehog that carries home the fruits he has collected. Such a hedgehog from an apple craft will please your baby, especially if he makes it himself.
In recent years, a technology such as carving, which is a certain way of carving fruit, has become very popular. Using this technique, you can get a beautiful apple caterpillar craft and other equally interesting crafts.
Making crafts from apples by carving does not require special skills and special tools. Everyone can learn easy lessons. Children's crafts from apples can be obtained by making a few movements with a knife. For carving, it is better to select two knives: one is narrow and the other is small.
Let's take an example of how to make striped apples. These can serve as a wonderful addition to the festive table, and they are quite suitable for a family dinner. In order to prepare such a beautiful and tasty craft, we need three apples. Since we should end up with a striped apple, accordingly, we need to pre-select apples of different colors: yellow, green and red. It is desirable that they be about the same size, then it will be possible to harmoniously combine them with each other. The creation process consists in the fact that we cut the apples into circles of the same thickness, and then randomly connect them together. To prevent the slices from falling apart, connect them with a toothpick.
By the same principle, apples can be cut not into circles, but divided into slices, having previously cleared the core. Another not bad option is to take a whole apple and cut out small fragments of arbitrary shape from it. For example, it can be circles or triangles. Cut them all over the apple at the same distance from each other. From an apple of a different color, also cut out the same fragments and in the same quantity and insert them into the first apple, where there are already cutouts. Thus, we will get apples with multi-colored circles, stars or triangles. Do not be afraid to fantasize, because you can make original and unusual autumn crafts from apples .
Everyone can cope with a simple task. This is quite capable. Your task will be to cut out the details, since such a small child cannot be given a knife in his hands, and offer the kid to place the fragments in the apples. The process of creating crafts will bring a lot of pleasure to the child. Moreover, the implementation of apple crafts is not only interesting, but also useful. This is a kind of developmental activity.
If you think about it, how to make an apple craft , then we suggest you arrange beautiful animals and birds. An apple will look quite original, on top of which a butterfly will sit. We take an ordinary apple of medium size and cut out a segment from it, approximately equal to the third part. Please note that the petiole should remain on the cut out part, as it will play the role of the antennae of our butterfly.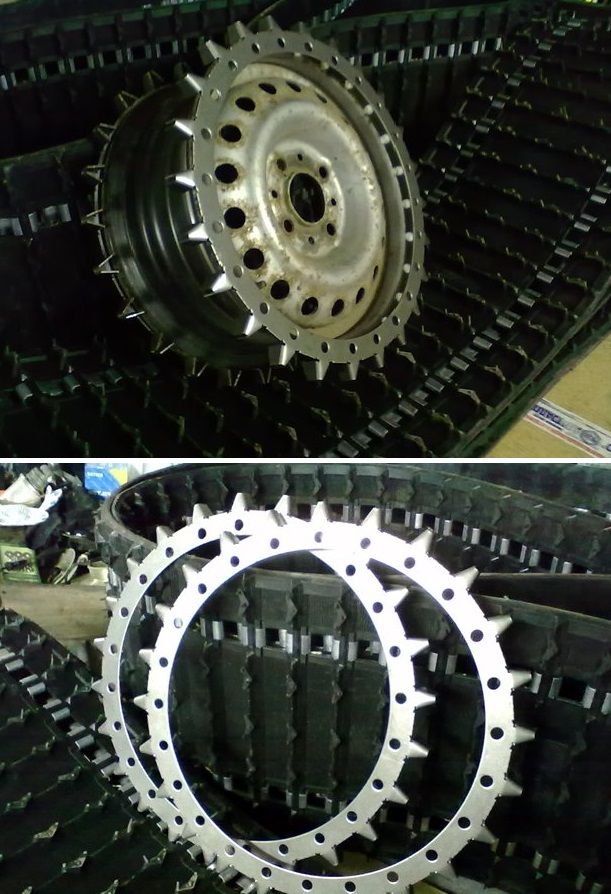 From the cut out part, cut off another segment. Cut off the remaining curved slice, as if creating wings. Here we have an interesting butterfly. Using a toothpick, attach it to a whole apple. Our craft is ready.
Swan apple craft is done in roughly the same way. A little strength and patience and your apple figurines will decorate the festive table, creating a wonderful warm atmosphere of celebration.
If you liked our site, express your "thank you"
by clicking on the buttons below.
Autumn is a wonderful time that loves to give us gifts: golden leaves, fruits, vegetables and late autumn flowers. This year, autumn brought a rich harvest of apples and ranetki, so we decided to do our work from them.
There were many ideas: turn apples in a ladybug, Smeshariki. But the most interesting craft for Alina was caterpillar , not even, a whole family "Dad, Mom, Me".
For work we needed:
1. Apples - 8-10 pieces;
2. Ranetki - 4-5 pieces;
3. Carrots - 1-2 pieces;
4. Grapes -1 pc.
5. Rowan berries;
6. Toothpicks;
7. Dried flowers;
8. Velvet paper - blue;
9. Satin ribbon (to match the velvet paper) width - 2 cm, length. - 25cm;
10. Threads for knitting;
11. Safety pins.
Progress:
1. To begin with, let's lay out all the available materials in front of us: apples, ranetki, carrots. Let's sort the apples by color, shape and size to make it easier to pick up "body parts" for the future caterpillar.
2. Let's make a caterpillar - mother. Take 2 apples and connect them with a toothpick
 Attach the grape to the apple - the head with a toothpick
9000 9000
 We first smear glue on one edge of the ring and glue it to the bottom. Then we smear the other edge of the ring and glue it to the large circle in the center.
Autumn crafts from apples - a great idea! A little effort, perseverance, patience and skill - and an ordinary apple turns into the most unexpected character.
Each child can make crafts from an apple with their own hands for school, and with the help of parents, children can make crafts from an apple , one medium-sized green apple, a sharp knife, and a few wooden skewers.
Toothpicks and pieces of bright orange carrots will also come in handy.
Let's get started!
Cut a green apple into two even halves.
Put one half on a plate and stick two toothpicks into it (you can break off a piece from a wooden skewer).
We take a large red apple and make two arcuate cuts on it, facing each other with the concave side.
We connect these cuts with two transverse arcuate notches. We try on the apple to the green half - it should be firmly fixed. We make the same arcuate communicating cuts on the opposite side of the apple - these will be the wings of the cockerel.
Remove it and make two parallel cuts next to the petiole.
Here we will insert a puffy tail cut from the remaining half of the green apple. It turns out the body.
Now we take a large peeled carrot, cut out a scallop, a beak and a beard from it (in the form of two triangles).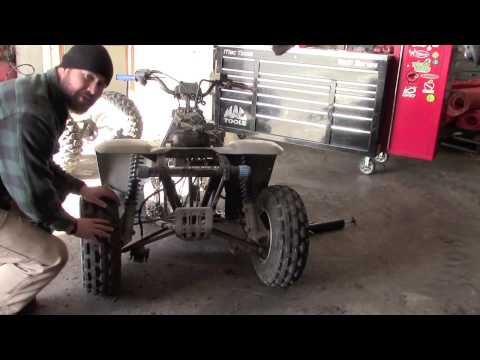
We attach the beak to the tail of a small red apple with a toothpick.
We fasten the cock's beard from below, inserting it into the cut.
Comb top. We've got a head!
We attach the head to the body - and ours is almost ready! To attach the head, it is better to use a wooden skewer, it will fix the parts better.
It remains only to make the cock two sharp eyes. To do this, we cut off a small piece of skin from both sides of the head, exposing the white flesh of the apple.
We insert a hot clove, a pea of black allspice or any other small piece that looks like an eye into this area. You can use beads or beads.
Well, now our cockerel is definitely ready!
Proudly he sits on his perch, looking around in anticipation of guests and spectators.
You can make a very simple but beautiful ladybug out of apples. For crafts, we need a red apple, a dense plum and a few dark berries (blueberries, blackberries).
Cut the apple into two parts. We put one part aside - we will no longer need it. The rest of the cut into two more parts in the center.
Cut off the front of the plum. This is the future head of a ladybug.
Attach the plum head to the shell of the two halves of the apple.
We connect the “head” and “shell”
Cut the berries into two halves. With these halves we decorate the ladybug's apple shell.
Ladybug is ready! For its manufacture, toothpicks, glue or paint are not used, so it can be safely put into the mouth.
The simplest and most effective version of an autumn craft is an apple caterpillar. She looks beautiful, always interesting and a little funny.
Caterpillar can be made into a strict lady, a flirtatious girl and even an elegant gentleman. It all depends on the accessories that complement her image and style.
 There may be more, depending on how long the caterpillar will be. You can take a wide variety of apples - yellow, green, red. But preferably round;
First, you should put aside one of the most beautiful apples, it will be the head of a caterpillar. In total, there will be 4 apples on the body, which means 8 legs are required.
Wash carrots thoroughly; peeling is not recommended. Cut 8 circles, 1-1.5 cm wide. I used to take two carrots so that the circles were the same width.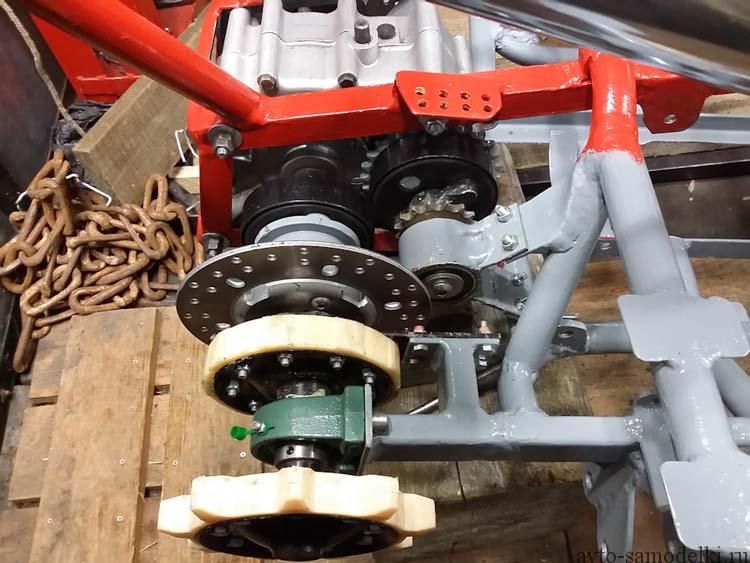 After all, the carrot is thick at the base, and very thin at the tip. But now I used only 1 carrot, I attached large circles at the back, and smaller circles at the front. Stick a toothpick into each circle at once.
Attach two toothpicks with carrot pieces to the sides of the apples.
Connect all 4 apples with toothpicks, in the calculation that where the tail is the back of the caterpillar. For reliability, it is better to fasten apples together with two toothpicks.
Once the body of the apple caterpillar is complete, proceed to the head. Glue the eyes, attach the nose grapes with a toothpick.
Connect the head to the body, again using one or two toothpicks.
Finish off with an interesting look for the caterpillar. I glued two dry maple leaves with double-sided tape, and stuck a rowan leaf into an apple. I strung a cranberry on a thread and decorated the neck of a fashionista.
The apple caterpillar is ready, it certainly won't go unnoticed at the autumn festival.
Get ready for a journey into the colorful world of insects! You will see unusual butterflies and caterpillars common in the Moscow region, learn how to identify them by their external features and just get aesthetic pleasure!
When we talk about the benefits of butterflies, we most often mean the properties of adults. So, these insects are able to pollinate plants and attract birds to the garden. And if we mention harm, then here we are talking about the caterpillar stage, when the insect actively feeds on plants and can harm country plantings. Butterflies themselves feed on nectar and are absolutely safe for plant health. Therefore, we will agree in advance that by calling a butterfly "harmful", we mean its caterpillars.
Now let's take a closer look at the most common fluttering insects that you can find on your site, and determine which ones are useful and which are harmful!
Vanessa atalanta, wingspan 50-65 mm
The admiral is easy to recognize: there are red stripes on both sides of his wings. According to one version, it is thanks to this color that the butterfly got its name, because. Russian admirals used to have ribbons over their shoulders and red stripes on their trousers. The lower wings of the insect are also decorated with red stripes, on which black dots are clearly visible. The edges of the wings are wavy.
You can meet such a beautiful butterfly not only in Russia, but also in North Africa, North America and even New Zealand. The admiral usually goes to the southern countries for the winter, but sometimes he hides under the bark of trees and remains there until spring. Previously, the admiral was included in the Red Book of Russia, but now the population has recovered.
animalreader.ru
It is not so easy to recognize the future butterfly in the admiral's caterpillar. Dark color, yellow dots on the sides of the body and frightening spikes - the insect is perfectly protected from birds and knows how to disguise itself. You can meet him from May to August on the leaves of nettles, hops and thistles.
How to attract the admiral's butterfly. Admiral likes thistles, asters and brambles, and at the end of the season is not averse to eating cracked plums and pears, especially if they have fermented. Put some fruit in a bowl and the butterflies will fly by the smell. And to see the caterpillars, plant nettles on the site, which will also come in handy as a top dressing for plants.
The ancient Indians believed: if you catch a butterfly, whisper your cherished desire to it and release it into the wild, it will surely come true. Try it!
Aporia crataegi, wingspan 50-65 mm
Hawthorn can often be found in gardens near Moscow. This beautiful butterfly with white wings adorned with black veins flies from apple tree to rosehip, from mountain ash to plum, from grape to pear, to lay its eggs, from which voracious caterpillars will soon emerge. Hawthorn is a "relative" of the famous cabbage. Prefers wetlands and easily travels long distances in search of food and masonry.
nature.baikal.ru
Hawthorn caterpillars are covered with thick hairs and in a short time are able to gnaw an entire bush or tree. They grow slowly, so they make their nests in the trees for the winter. If leaves appeared on the branches, entangled with mulberry threads, be sure that the hawthorn has settled in your garden!
How to deal with hawthorn and its caterpillars. You can put trapping belts on trees and put up birdhouses to attract birds. In early spring, it is worth spraying the plants with a solution of copper sulfate (100 g per 10 liters of water) with the addition of 500 g of urea. If there are a lot of pests, use insecticides: Alatar, Fatrin, Kinmiks, etc. Treat during bud break, when the caterpillars emerge from their winter nests, or in the summer after the caterpillars emerge from their eggs.
Pieris brassicae, wingspan - 45-63 mm
Cabbage, or white cabbage, is familiar to every summer resident. You can meet her in the beds with cabbage, turnips, turnips and other cruciferous crops. The butterfly is fussily looking for a place for masonry, from which yellow-green caterpillars will soon appear. During the season, one individual lays up to 300 eggs!
Inconspicuous in appearance, whitefish terrifies with its appearance. It is especially worth being wary of females, the main difference of which is black spots on the upper wings.
Voracious caterpillars of whitefish eat leaves and do not allow the head to form. After a while, only veins remain from the leaf.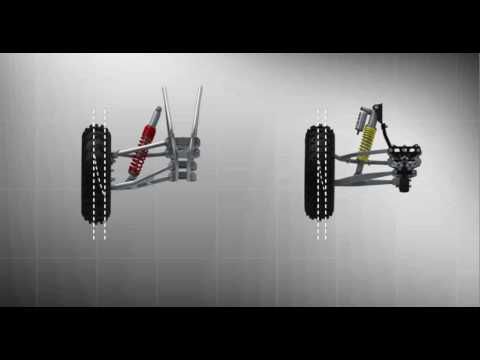 When food runs out, pests crawl to new plantings.
How to deal with cabbage and its caterpillars. Safe methods include manual collection of caterpillars and trapping of butterflies. You can also plant marigolds, marigolds, mint or sage in the aisles, which will scare away pests. A good way is to cover the cabbage with a mosquito net and agro-cloth so that the butterflies cannot lay their eggs. From folk remedies, spraying 2 tbsp will help. mustard and 1 tsp. red ground pepper in 10 liters of water. And if there are a lot of insects, use Fitoverm, Karbofos, Aktellik or another insecticide.
Aglais urticae, wingspan - up to 50 mm
You have probably seen this butterfly more than once, but you could not even think that the offspring of this luxurious beauty feeds on stinging nettles! A special sign of hives is large black spots on dark orange wings. The hind wings are covered with small blue spots. The insect feeds on nectar of various flowers, and also does not refuse birch sap.
nasekomus.ru
One clutch of urticaria can contain up to 150 eggs, from which black hairy caterpillars emerge. They begin to gradually eat nettles, and on its top they build a nest of cobwebs to hide from the weather. After numerous molts, the caterpillar turns yellow-black and is ready to pupate.
How to attract urticaria. The answer is obvious - plant nettles! But if you do not want to see this weed in your summer cottage, try pouring some birch sap into flat containers to attract insects. And plant lavender, oregano, echinacea, David's buddley, spirea, bird cherry and other fragrant plants in flower beds.
freenatureimages.eu. Catocala electa, wingspan - 65-88 mm
The second name of this butterfly is willow sash. The insect leads a twilight lifestyle, so during the day you are unlikely to see it. The front wings of the butterfly are gray and inconspicuous, but the lower ones are bright red with black edging and spots in the middle. Moreover, in males, a crimson hue prevails, and in females - red. The ribbon can also be seen in autumn. Most often it is found near water bodies, in meadows and in wetlands. It feeds on tree sap.
pyrgus.de
Willow worm caterpillars are excellently camouflaged. The yellow-gray body is covered with small black dots, the head is brown. The insect feeds on willow and poplar leaves, so it does not harm summer cottage crops. But if you have a willow growing on your site, be vigilant.
How to attract a ribbon girl. It would seem that the insect is nocturnal - why attract it? You can do this at least in order to just see this amazing butterfly. In the evening, turn on a flashlight or other artificial light source - and the ribbon carrier will fly to visit you.
Gonepteryx rhamni, wingspan - 52-60 mm
Lemongrass, or buckthorn, a rather nondescript butterfly from the white family. Small dots are placed in the center of its wings, and the wings themselves imitate the shape of leaves on a tree. Nature has tried so that these insects can hide from their enemies!
Males have more intense wing color than females. In the latter, a greenish-white hue predominates in the color of the wings. The development cycle of one individual takes about a year, which is a rare occurrence in the world of butterflies. Therefore, lemongrass can be safely called a long-liver.
macroid.ru
Schisandra lays 1-2 eggs on buckthorn leaves. Then green smooth, slightly flattened caterpillars appear. Despite their great appetite and fastidiousness, insects do not cause much harm to trees.
How to attract lemongrass. Butterflies mainly feed on the nectar of dandelion, meadow cornflower, thistle, but they will not refuse cultivated plants either. With weeds that attract lemongrass, it is better to fight at their summer cottage.
commons.wikimedia.org by Charles J Sharp. Callophrys rubi, wingspan 26-28 mm
Raspberry and raspberry blueberry are the same butterfly from the genus Zelenushki. It is not easy to notice her, because. the outside of the insect is brown, and the inside is green. In addition, the butterfly is small and almost always keeps its wings folded for camouflage. You can meet her not only at the dacha, where she flies for flower nectar, but also in swamps and meadows. Raspberry is common in the temperate zone of Eurasia. The habitat of the butterfly reaches the Polar Urals, and in the Alps it sometimes rises to a height of up to 1800 m!
insectamo.ru, author: Ponomarev AG
Raspberry caterpillars have a fairly rich "menu", which includes leaves of blueberries, heather, birch, gorse, buckthorn and other plants. What about raspberries, you ask? Alas, raspberry caterpillars really will not refuse raspberry and currant leaves. But despite food addictions, they are rarely found on these plants. Insects are sensitive to chemicals, so they prefer to stay away from summer cottages. In addition, in nature, this species is quite rare.
Some pigeon caterpillars are able to impersonate ant larvae. As a result, the ants feed the caterpillars, and the latter, without hesitation, also eat the eggs and larvae of their benefactors.
How to attract raspberries. Raspberry is not one of those butterflies that will brightly circle over a flower bed. But if you have clover, sweet peas or vetch, she may come for a short time to collect sweet nectar.
Papilio machaon, wingspan 64-95 cm
This butterfly is hard to miss! Swallowtail attracts attention with its large size and bright color. The butterfly got its name from the name of the mythological doctor who participated in the Trojan War. A special sign of the swallowtail is "tails" up to 10 mm in length on the hind wings.
The swallowtail is found all over the world: in Europe, Asia, North America and North Africa. The butterfly population in the middle lane suffers from fires and trampling of meadows. The view is listed in the Red Book of Moscow.
The bright caterpillars of the swallowtail resemble fantastic creatures. Immediately after birth, they begin to feed. In the Moscow region, insects prefer umbrella crops: hogweed, carrots, parsley, fennel and dill. If the caterpillar enters the garden, it can quickly destroy the above-ground parts of plants. But this happens extremely rarely, because. swallowtail practically does not fly to summer cottages.
How to deal with swallowtail caterpillars. Carefully remove them and take them outside the site, planting them on an umbrella crop. Be careful, the "horns" of the caterpillars emit a caustic liquid, so it's better not to take the insect with your hands, but tear it off along with a piece of the plant on which it sits.
Aglais io, wingspan up to 62 mm
This butterfly will impress any gardener! An insect will decorate any flower garden with itself and at the same time its offspring will not cause any harm to the garden and vegetable garden. The round spots on the front and hind wings of a butterfly are very reminiscent of the spots on a peacock's tail. With the help of such a cunning device, the peacock eye often perplexes birds that would like to feast on a butterfly.
dic.academic.ru
The peacock eye caterpillar is not so noticeable, although its black spikes can also scare off enemies. Black caterpillars live in large colonies of up to several dozen individuals. Basically, they prefer to eat nettles, thistles or hops, less often - willow and raspberries.
How to attract a peacock eye. These butterflies are excellent pollinators. To attract them to the garden, plant flowers in red, pink, orange or yellow shades in the flower bed. And also plant some nettles on the site.
How to deal with peacock caterpillars. Invasion of caterpillars can damage the raspberries, but if in the spring you treated the plantings with insecticides as a standard, do not worry about the safety of the crop. Pest colonies are easier to manually remove.
Argynnis paphia, wingspan up to 75 mm
Mother-of-pearl is a fairly large diurnal butterfly with an unusual spotted color. The name of the insect was given because of the iridescent greenish-silver spots, by which butterflies recognize individuals of their own species. In warm weather, you can see flocks of mother-of-pearl, busily flying over the flower beds. Also, these Lepidoptera are found along roadsides, in glades and near rivers. There are many subtypes Argynnis paphia , each caterpillar feeding on certain crops.
molbiol.ru
Most often in the country there is a large mother-of-pearl. Forage plants for its caterpillars are apple, blackberry, raspberry, and violets. The body of the larvae is covered with many villi.
How to deal with mother-of-pearl and its caterpillars. There are many ways to protect plants from caterpillars. The easiest is to install trapping belts or pheromone traps and inspect them regularly. Regular removal of curled leaves and attracting birds will also help. Of the drugs, it is better to choose biological ones: Fitoverm, Bitobaxibacillin, Entobacterin, etc.
Zygaenidae, wingspan 16-38 mm
Groups of speckles often flutter over flower beds in sunny weather. Insects are easy to recognize: they have rounded red spots on their dark blue or green wings. In addition, unlike other butterflies, the wings of the meadow moth fold in a roof-like manner, like those of moths. If the butterfly is caught, it will begin to secrete a deterrent foam. In nature, no one hunts a butterfly. It is poisonous and is itself very resistant to poisons.
Larvae are densely covered with warts, from which small bristles protrude. Body color: yellow-green with a scattering of black spots. Caterpillars can also release protective substances, so it is better not to take insects with bare hands. They feed mainly on clover and bird-foot.
How to attract meadow moth. Plant clover, plantain, alfalfa, or thyme. The butterfly will also be delighted with the dandelion, but usually, on the contrary, they try to remove it from the site.
Vanessa cardui, wingspan 47-65 mm
Thistle butterfly, or thistle, is often confused with urticaria. They are really similar, but, unlike the urticaria, the burdock is much larger and has not blue, but black spots on its hind wings. The number of this species varies from year to year. So, for example, in 2009 there were especially many of them. For the winter, thistles fly to North Africa, and then return to the European continent and start breeding.
wallhere.com
Females lay one egg each on thistle, burdock, coltsfoot, yarrow or nettle. After hatching, the caterpillar makes a shelter from the leaves. In her entire life, she can change them at least 7 pieces. Depending on the host plant, the color of the caterpillars will also change. In the summer cottage, they will help in the fight against weeds and become food for birds.
In the southern regions of Russia, burdock caterpillars can infect tomatoes, eggplants, soybeans, melons.
How to attract burdock. Plant kosmeya, asters, saplings, David's buddleia, phloxes and other plants that attract butterflies in flowerbeds. Thickets of thistles near the site will also attract the attention of the burdock.