Eating up the highway with clarity and volume.
During my first few years at Crutchfield, I served as one of our Advisors, helping our customers choose new audio components for their homes and cars. That helped me learn what's really important to our customers. Eventually, I moved to the writing team and spent a decade researching new products and getting even more hands-on with car audio gear.
As the editor of Crutchfield's car audio web articles, I couldn't ask for a cooler job. We listen to music and play with car audio gear every day!
Like most of us here, I've always been into music the electronics we use to listen to it. I installed my first car stereo system before the family car was even mine. In college, I helped friends and roommates install their car stereos and set up the stereos in their apartments. I was a volunteer DJ for the local community radio station for a few years (playing late night metal and Sunday morning bluegrass & alt-country).
That's where I also first learned a little bit about sound mixers.
I love playing role-playing games, board games (there were nearly 200 board and card games in my house at last count), spending time with my family, and watching horror movies when they aren't around.
What do IP waterproof ratings mean?
Video: Discounted car stereo installation gear
Hands-on with two Pioneer dash cams
How to choose a radar detector
Car stereo buying guide
Review of the Sony XAV-AX5500 car stereo
Building your own subwoofer box
is a great way to get the look and fit you want, without spending a fortune. All you need is a few basic tools, hardware, and materials.
In this article:
Building a box is a lot of fun and will save you some cash, but DIY jobs aren't for everyone. If you get through this article and decide that box building might not be for you, then check out our selection of high-quality, premade subwoofer boxes.
We spent right around $50, though your costs will vary depending on what you already have in the garage.
Building our subwoofer box took about three hours. Your project could take more time or less, depending on the complexity of your box's shape, and the tools you have at your disposal. We had a roomy workbench and well-equipped shop.
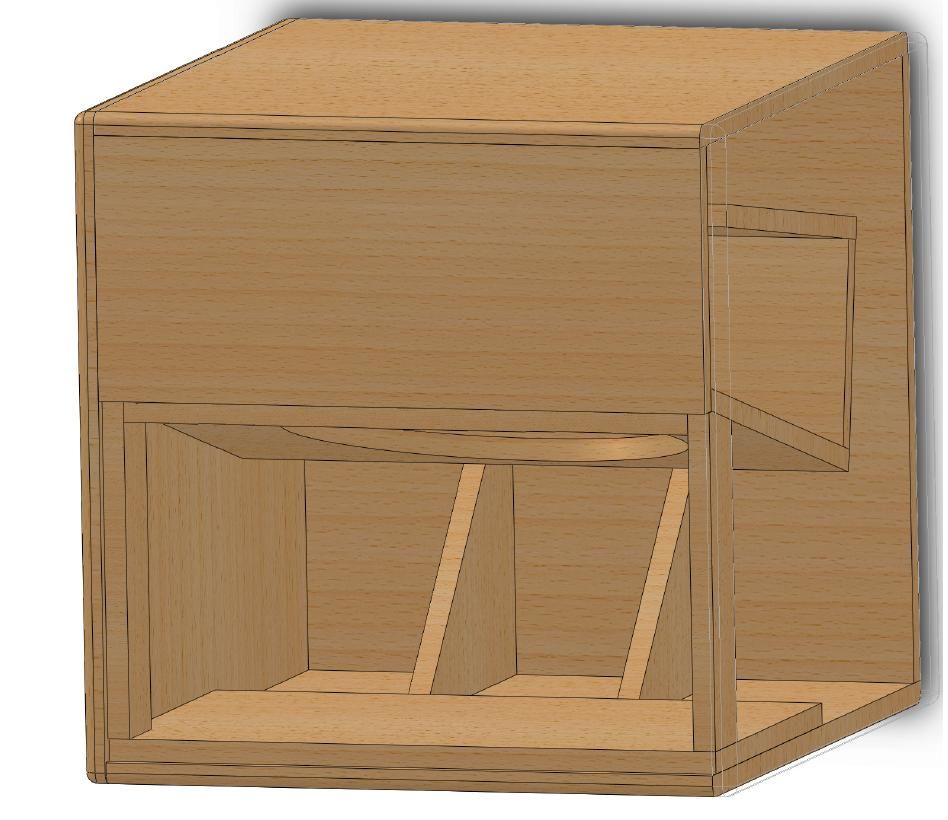
When choosing a subwoofer, carefully note the manufacturer's recommended enclosure size, especially if you have limited space in your vehicle.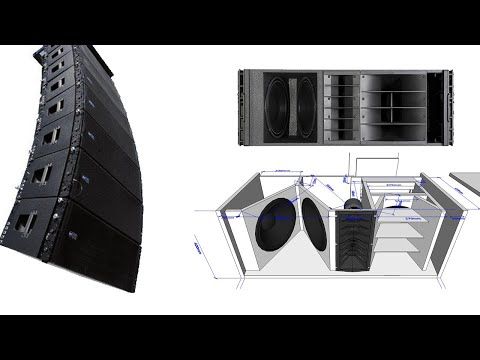 The box volume tells you how big your enclosure needs to be for maximum performance from the sub. The box shown in this article was intended for the trunk of my Nissan sedan, so I wanted to make sure it wouldn't take up too much space. With that requirement in mind, I chose a 10" Alpine sub. The manufacturer recommends a box volume of 0.65 to 1.0 cubic feet, so it'll be fine in a small box.
Shop component subwoofers
You can follow these steps to determine the correct dimensions for your subwoofer box design:
Determine the minimum depth of your box. Measure the depth of your subwoofer and add 2 inches. This measurement is the minimum depth of your box (in this article, the depth refers to the front-to-back dimension of the box, with the woofer being mounted to the front).
Determine the minimum height and width of your box. Measure the frame diameter of your woofer, or check the mounting template that may be included with the owner's manual, to determine the minimum height and width for the front of your box.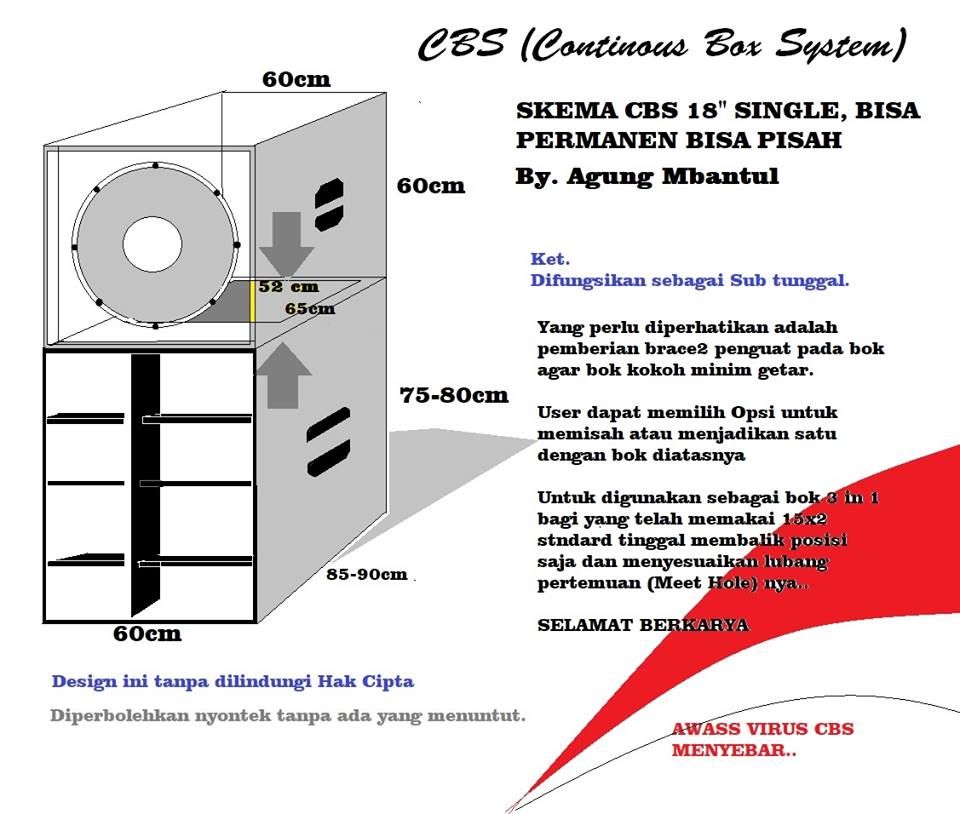 If you plan to mount a grille, be sure to allow for any additional space that may be needed to accommodate it.
Determine the available space in your vehicle. Measure the height, width, and depth of the vehicle space that you are willing to devote to your subwoofer. If the box must be wedge-shaped to fit, you will need to know the depth at the box's top and bottom.
Sketch out your box. Now's the time to sketch your box on paper using the dimensions you've gathered. The box shown in this article is rectangular, but you may find that a wedge-shaped box fits better in your car or truck. Your sketch may look like one of these:
For our examples, let's use the following external dimensions:
| Rectangular box | Wedge box |
|---|---|
| Height: 13" | Height: 14" |
| Width: 14" | Width: 18" |
| Depth: 12" | Depth 1: 5" |
| Depth 2: 8" |
Determine the internal dimensions and volume of your box. The above steps identified the external dimensions of the box. To determine the internal volume, just subtract the thickness of the wood to be used for construction. If you're using 3/4" MDF (recommended!), then you'll subtract 2 x 3/4", or 1-1/2", from each dimension.
The internal dimensions for our examples:
| Rectangular box | Wedge box |
|---|---|
| Height: 11.5" | Height: 12.5" |
| Width: 12.5" | Width: 16.5" |
| Depth: 10.5" | Depth 1: 3.5" |
| Depth 2: 6.5" |
Calculate the internal box volume in cubic inches. Based on the internal dimensions, you can calculate the internal volume of the enclosure using the following formula: Height x Width x Depth = Cubic Volume
Let's plug in some numbers:
Rectangular box:
11.5" x 12.5" x 10.5" = 1,509.375 cubic inches
Wedge box: Since the wedge box has two depth dimensions, we need to find the average depth before we can determine the volume. To find the average depth, add the two depth measurements together, then divide by two. Remember that Depth 1 = 3.5 and Depth 2 = 6.5.
3.5" + 6.5" = 10"
10" / 2 = 5"
So, the average depth of the wedge-shaped box is 5". Plug that dimension into the formula:
12.5" x 16.5" x 5" = 1,031.25 cubic inches
Convert cubic inches to cubic feet. Since most manufacturers will provide the recommended box volume in cubic feet, you'll need to convert the internal volume from cubic inches into cubic feet. This is done by dividing the cubic inches by 1,728.
Rectangular box: 1,509.375 / 1728 = 0.873 cubic feet
Wedge box: 1,031.25 / 1728 = 0.597 cubic feet
Adjust your box's volume to match the sub's specifications. Now, compare the volume of the box you've sketched to the manufacturer's recommendation. If it's too large or too small, you can make small adjustments to one dimension until your box's internal volume matches the manufacturer's recommendation as closely as possible. Often, manufacturers will recommend a range of enclosure volumes. You can get good results with a box that's anywhere inside the recommended range.
Determine the final exterior box dimensions. Once you've identified the correct internal dimensions, it's time to add back that 1-1/2" we subtracted in step 5, to derive the new external dimensions. Double check to make sure that these dimensions will fit properly in your car, and you're ready to move on to construction.
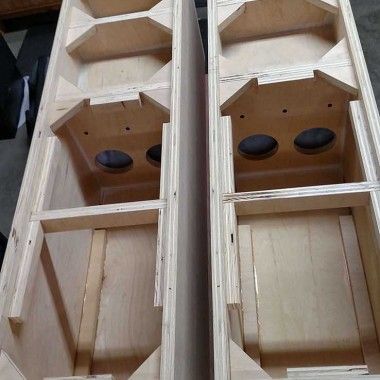
We started by measuring and cutting the main pieces of MDF for the front, sides, back and top of the box, using a table saw.
Don't have a table saw? Don't worry. If you purchase your MDF at any large home improvement store, they should be able to cut it for you for a small fee. (Shout out to Cameron at my local Lowe's. He turned the 6'x8' sheet of MDF into planks that would fit into my car.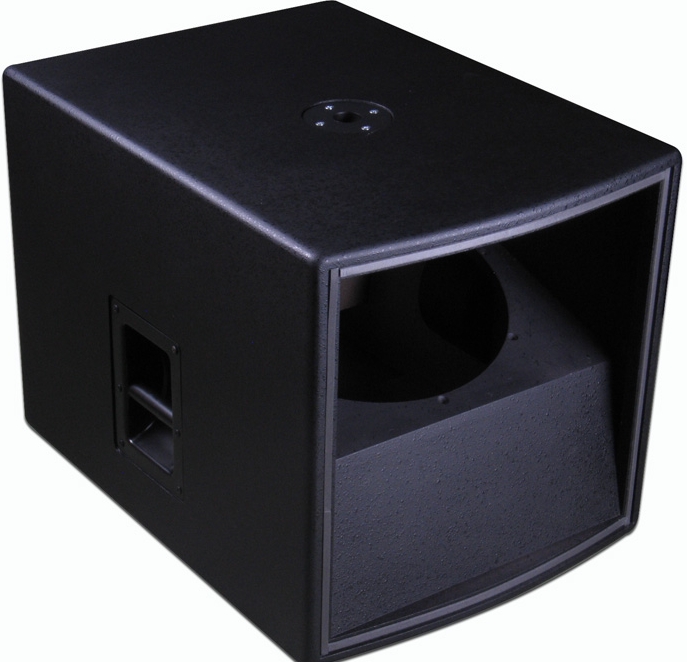 )
)
You could also use a circular saw, just be careful to keep your cuts square (smooth, flat cuts help to ensure that the box seals well).
We cut seven pieces total – top and bottom, two sides, the back, and two identical pieces for the front (since it was to be a double thickness). Once this is done, the rest of the process is like assembling a model kit or prefab furniture.
After the pieces are cut to size, use a compass, or the template that may be included in your subwoofer's packaging, to mark the woofer cutout on one of the identical front pieces. We used the cardboard packing insert as our template.
If you choose to use a double-thickness of MDF for the front panel (this method is recommended — it provides an extremely strong, non-resonant mounting surface for the sub), fasten the two identical front pieces together using plenty of carpenter's glue and several sheet metal screws. Also, the double thickness will serve to strengthen the box as a whole.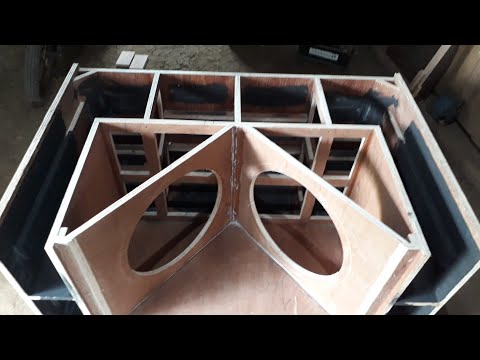
If you don't use a double thickness of MDF for the mounting surface, you should definitely plan to use bracing elsewhere in the box for added strength. In fact, it's never a bad idea to use bracing no matter what, especially if your box is larger than a cubic foot. The box will be subjected to extreme internal pressure, so the stronger it is, the better.
The easiest way to add bracing is with 2"x2" strips of lumber. Glue and screw these along at least two of your box's internal seams before attaching the top and bottom.
While the front panels were clamped and the glue was drying, we assembled the rest of the box.
We drew a bead of glue on the panel edge and pressed it against the attaching panel. We used wood clamps to hold the panels together until we got screws in place. The glue, not the screws, is what will ultimately seal the box, so don't be afraid to pour it on.
MDF can be prone to splitting, so we pre-drilled the screw holes, then inserted the screws.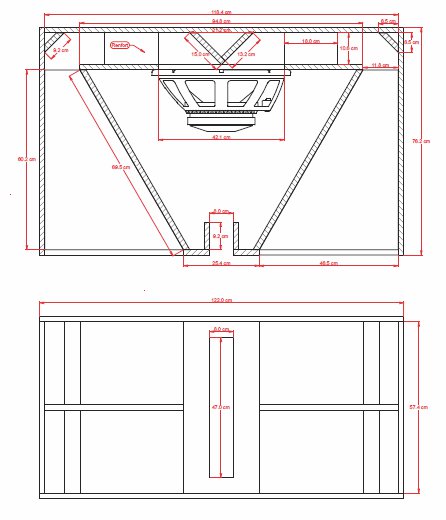 It's times like this that it really pays to have both a drill and a bit driver!
We fastened the pieces together using 2" drywall screws. Some of the glue will squeeze out during this step — you can wipe it off the outside of the box using a wet rag, but it's OK to leave it on the inside edges (it'll actually help with the seal).
When assembling the box, you might find that it’s a little out of square. This is where wood clamps can really help to pull things into shape. When you screw on the last two sides (front and back, in our case), it should pull things back into alignment.
Note: the largest sides of the box should overlap each of the smaller sides to provide the greatest strength.
Using our drill and a large bit, we made a hole near the inside edge of the circle we had traced, large enough for our jigsaw blade to fit in.
We cut out the circle with a jigsaw, gave it a quick hit with sandpaper, and the woofer opening was complete.
Flipping the box over, we used a 3" hole saw to create the opening for the terminal cup. If you don’t have such a large hole saw or if you have a square terminal cup, you can use the drilling/jigsawing procedure we used on the front of the box.
After smoothing the opening with rough sandpaper, we ran a bead of silicon caulk around the edge of the terminal cup and screwed it into place using 1/2" sheet metal screws.
After you've glued-and-screwed all the panels and cut the holes, you're just about done.
The next step is to drop the subwoofer in and make sure it fits. If the sub is a tight fit, use coarse sandpaper or a rasp to adjust the opening.
This would be a good time to mark the locations of the screwholes with a pencil so you can pre-drill the holes after you remove the woofer. We happened to do it at the end of the process.
To make double sure that everything was sealed and airtight, we waited for the glue to dry and ran a bead of silicon caulk over all of the box's internal seals.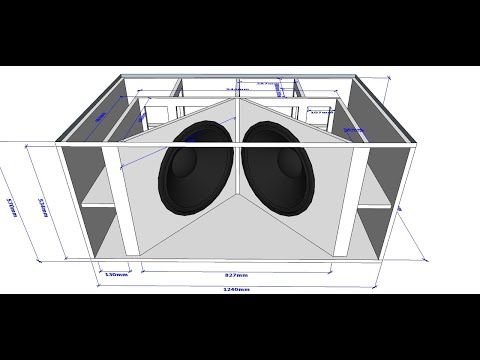 We used a hand-held tube of caulk, since it would be tough to get a caulk gun down inside the box at this point.
Let the caulk cure for 12-24 hours before putting the subwoofer back in. Some silicon caulk releases acetic acid fumes while curing, which have the potential to destroy subwoofer surrounds.
After the caulk had cured, we added some non-hardening rope caulk (found in the weatherstrip section of the hardware store) to act as a seal beneath the woofer frame.
Next, we dropped the woofer back into the hole and used a pencil to mark the screw hole locations, then removed the subwoofer and pre-drilled holes for the mounting screws.
Finally, we connected a length of speaker wire from the terminal cup to the subwoofer, placed the subwoofer back in the box, and screwed it down. We were very careful to not let the drill slip off of the screws and ruin my shiny new sub.
The box is finished, the woofer is installed. Now it’s time to take it out to the car and try it out.
But you’re not done. Naked MDF has a cool, rugged look, but it’s also prone to chipping. And you probably have a more sophisticated sense of décor than "woodshop chic." Prefab boxes are covered in rugged carpet. You can use that (we happen to carry box carpeting amongst our box-building supplies), vinyl, or any other material you want. This is where you really get to make the box your own.
Check out our article about customizing a subwoofer box for some ideas.
And big thanks go to my buddy Cris at Clever Home Improvements in Staunton, VA for use of his skills and shop.
Following the directions in this article, you should be able to build your own subwoofer box. Be sure to check out our selection of subwoofer installation accessories — we carry a variety of speaker terminals, port tubes, carpet, and other accessories you need to build your box. And if you need help, contact our advisors. They'll answer questions and make sure you get everything you need.
Last updated 10/14/2022
Please share your thoughts below.
Compare the sound
SpeakerCompare™
Patented Virtual Audio™ technology
Virtual audio technology allows you to compare sonic characteristics between speakers so you can make a more informed shopping decision.
To get started
Select your brand of headphones below.
Model
Please turn active noise cancelling off for best results
Don't see your headphones?
Rent our Listening Kit
SpeakerCompare™ is protected by patents and patent applications owned by Crutchfield Corporation.
SpeakerCompare™
Patented Virtual Audio™ technology
SpeakerCompare simulates the sound of home and car speakers through your headphones.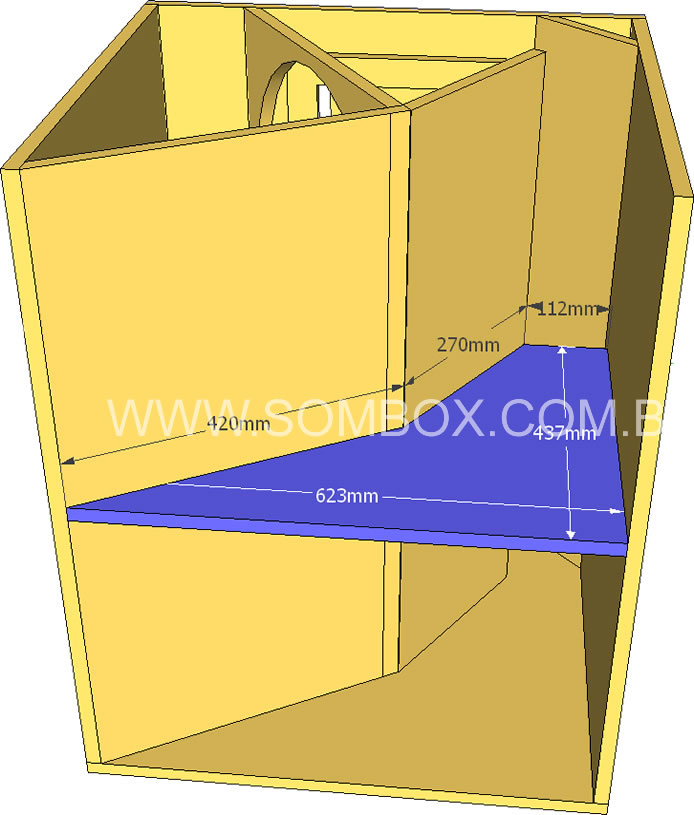 It lets you compare sonic characteristics between speakers so that you can make a more informed shopping decision.
To get started
Select your brand of headphones in the right-hand column.
If your headphones aren't listed, we recommend using our Listening Kit.
SpeakerCompare™ is protected by patents and patent applications owned by Crutchfield Corporation.
SpeakerCompare™
EQUAL
POWER
EQUAL
VOLUME
What to listen for
Track notes
Please turn active noise cancelling off for best results
We're here to help
For free personalized advice, call 1-888-291-8923. Our Advisors have listened to most of the speakers we carry, and can help you make the best choice for your system.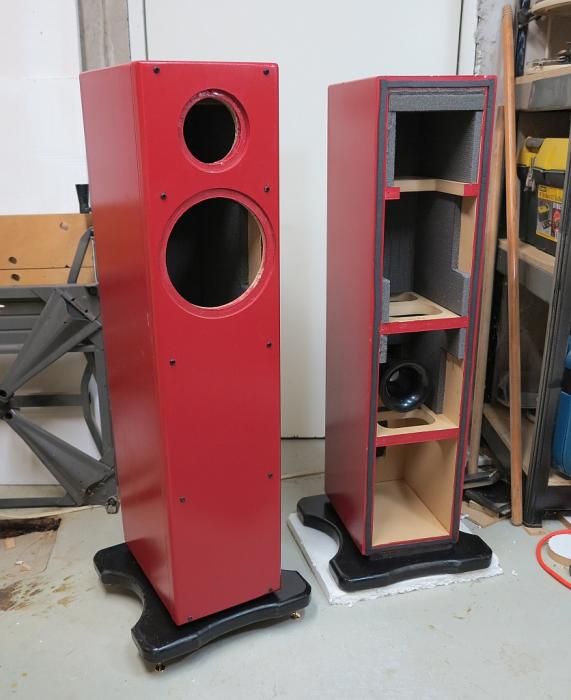
We'd love to know what you think
Select your headphones
Model
Please turn active noise cancelling off for best results
Don't see your headphones?
Rent our Listening Kit
Select a track to start listening
Audition speakers before you buy
SpeakerCompare simulates the sound of home and car speakers through your headphones. It lets you compare sonic characteristics between speakers so that you can make a more informed shopping decision.
Why selecting your headphones is important
SpeakerCompare tailors your listening experience to the exact headphones you have, so that what you hear is comparable to auditioning speakers side-by-side in person. Knowing which model headphones you’re using lets us remove any sonic coloring from your experience.
Two different listening modes
In an actual listening room, you'd find that some speakers play louder than others when fed the same amount of power. In equal power mode, you'll hear these differences in loudness as they naturally occur between speakers.
In equal volume mode, we've made the loudness of each speaker about the same. This gives you a more direct comparison of subtle voicing differences between speakers.
Nothing beats listening to speakers in your space
SpeakerCompare gives you a sense of the sonic differences. But performance in the real world is affected by the acoustics of your car or home, your choice of amplification, and your source material. We still believe that the gold standard for auditioning speakers is hearing them in your own environment — that’s why we offer a 60-day money-back guarantee.
Our Listening Kit
To help you choose the right speakers, we recommend using Crutchfield’s SpeakerCompare Listening Kit. It includes a pair of studio-quality headphones, and a guide to getting the most out of your session, and a few other necessary items. We’ve carefully chosen the components of this kit to ensure a crystal-clear listening experience.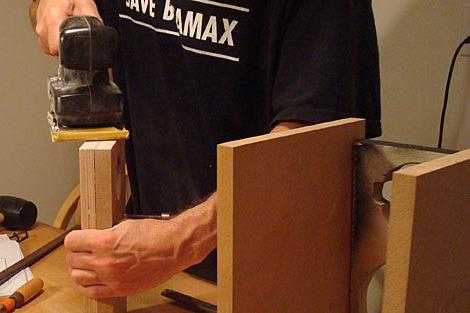 It’s available for a nominal rental fee, and includes a $25 Crutchfield merchandise credit.
Request a kit
Rate your experience with SpeakerCompare
Thank you for your feedback!
Rate your experience with SpeakerCompare™
Don't show this again
Thank you for your feedback!AudioReputation is reader-supported. When you buy through links on our site, we may earn an affiliate commission Learn More
Table of Contents
Speakers are one of the most popular audio devices, probably right after headphones. They come in all shapes and sizes and all of them have their own place in our cars, in our homes, offices, etc. Each of them has its own purpose and depending on that purpose, it has a specific build and size.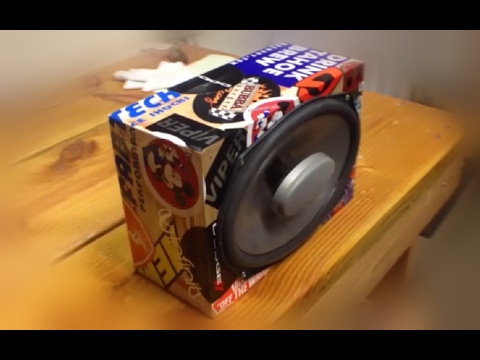 You might think that the market offers anything you could possibly need but it wouldn’t be surprising if you couldn’t find the speaker you are looking for, especially if you’re looking for the speaker for your car.
One of the simplest but the least applicable solutions for this problem is to take some basic material, some basic tools, a woofer or two, and build a speaker on your own. If you think about it, this may be great not only because the speaker box dimensions will fit perfectly your car, living room, or any other place but also because you will learn something new, have fun making the speaker enclosure, and also save a lot of money.
If you stay with us, we will show you what kinds of speaker boxes there are and give you a step by step explanation on how to build a speaker box on your own in a few days. Don’t worry, it’s not so difficult and even the beginners can do it successfully if they try hard enough.
What Kinds of Speaker Enclosures are There?Infinite baffle/free-air
Infinite baffle is actually not a real box, it is more like a board with holes where you put your woofers.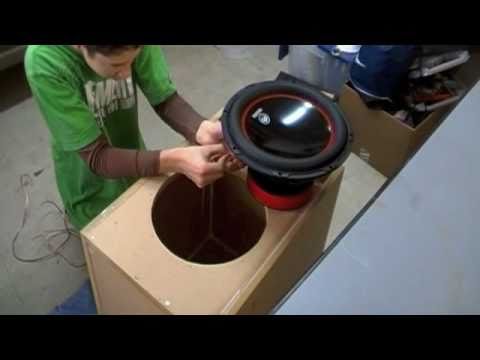 It is perfect for car trunks because the trunk itself acts as the enclosure, isolating the sound from the back of the speaker. These “boxes” are the easiest to make, they occupy the least space and their frequency response is flat. They require less power than the others and produce the least distorted sound. However, they make it difficult to separate back and front sound waves and the woofers are completely exposed to damages.
Sealed/closed enclosure
Sealed enclosures are the smallest and the easiest to build. They consist of a closed air-tight box and a woofer, and they are perfect if you need a deep bass to fill out your car or your apartment. They also require more power than the other enclosures so it is recommendable to use them with amplifiers in order to get the best performance.
Ported/vented enclosure
These enclosures are called venter or ported because of the ports/vents they have in order to reinforce (enhance) the bass response. This is the most popular type of enclosure because it offers the most powerful sound, although it is probably one of the most difficult to build and it occupies more space. The speakers with ported/vented enclosures can deliver even deeper bass than the speakers with sealed enclosures.
Bandpass
When it comes to bandpass enclosure, the speaker (woofer) is hidden inside the box with two chambers while the sound comes through one or more ports. These enclosures can have one port (4th order bandpass), 2 ports (6th order bandpass) or 3 ports (8th order bandpass). These speakers deliver loud sound with a limited frequency range. However, they are very efficient and they are perfect for hard rock music, hip-hop or reggae, although they can get a bit boomy. They are also extremely difficult to build and can occupy a lot of space.
Materials NeededNo matter what type of speaker box you want to build, you will need the same materials and, as you will be able to see, all the things from our list are easily reachable and relatively affordable. Of course, the final cost will be lower if you have the necessary tools in your garage but in case you don’t, try borrowing it from a friend or neighbor.
Basically, the things that are essential for building any kind of enclosure are a jigsaw, table or circular saw, as well as an electric drill. You will also have to get a piece of medium density fiberboard (MDF) which is the best for building these boxes. The next thing you will need are different kinds of screws, glue or some kind of adhesive applicable to wooden materials, and some kind of insulation like fiberglass or polyfill. Also, you might need a piece of speaker cloth for the final touch and a few braces to fix and strengthen the box.
Building a Speaker BoxBefore we start, we have to say that the shape and size of an enclosure affect and determine the sound quality and its color. They define how much power it will need and how deep the bass will be. You can’t build any speaker box without mathematical calculations and it is very important to do them accurately because even some minor flaws can affect the performance, especially with the vented boxes.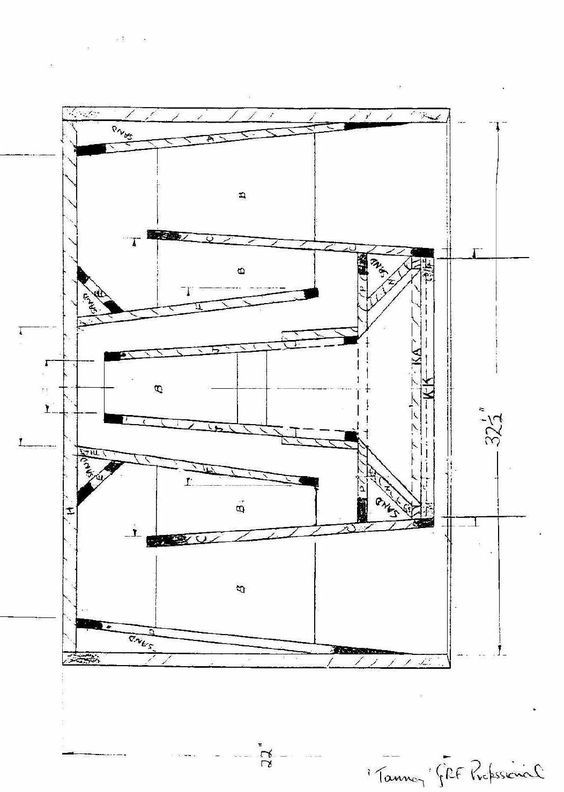
Step 1: Choose woofer/subwoofer and type of the enclosure
When you choose your new woofer/subwoofer depending on your needs and musical taste, you should pay attention to the manufacturer’s recommendations about the enclosure size and shape. Before you buy anything, think about the place where your new speaker box will be installed and what will be its purpose. Once you define the characteristics of the woofer and enclosure, you can pass to the next step.
Step 2: Making enclosure and calculating dimensions
Before you start cutting, make a model of your future box. You can do it on your computer or draw it manually with a pen and a piece of paper but the model should exist. Calculate the dimensions of the box based on the manufacturer’s recommendations. If you need more help, you can type into your browser Re Box Calculator and this program shall make it easier for you. However, you should determine the external box dimensions: minimum depth (add 2 inches to the subwoofer’s depth) and minimum height and width (measure the subwoofer’s diameter) of your speaker box. Also, don’t forget about the internal dimensions and the total box volume. In order to determine internal dimensions, take away the thickness of the wood from the external dimensions and it should be fine. The volume can be calculated by using the following formula: height x depth x width.
Step 3: Cut the wood
After completing calculations, you can start cutting the wood into the pieces you will later glue and screw together. Measure the woofer diameter and cut the hole in the speaker’s front panel. You should also drill a hole in the back panel because you will need to put some wires through it to connect the speaker to the power supply. You can reinforce every corner of the wood parts because it will make the box sturdier and more resistant, especially at high volumes.
Step 4: Put the pieces together
The next step is to put all the parts together but before that, it would be great to smooth the rough edges because every deviation can affect the performance. After that, you can take the glue/adhesive/caulk and start gluing the pieces together. It is very important to leave the adhesive to dry completely at least for 24h.
You might also want to put a layer or two of insulation (fiberglass or something similar) to smooth the speaker box walls so that the air can travel smoothly in and out of the box without affecting the overall performance.
Step 5: Customize your speaker box
Don’t leave the box like this. Apart from being stable and durable, it should also look nice so it would be good to paint it. If you are really in the mood, you can also think about buying some cloth or carpet that you can use to cover the speaker box surface. In order to do that, you will also need some calculations, a marker, and a scalpel but this is the topic for some other article.
James Longman
Hello, my name is James Longman.
I’m a writer and editor at AudioReputation. I disassembled my first portable AM/FM radio when I was only 8.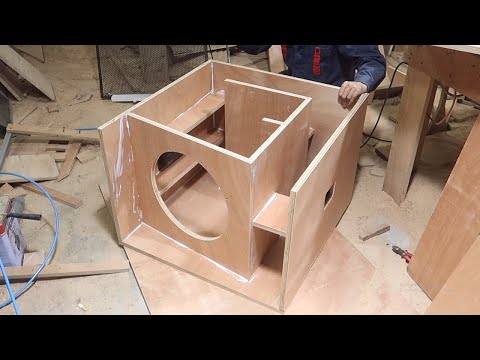 At the age of 11, I burned the circuit board on my old boombox cassette player. I’m not going to explain how but it was reckless and stupid.
Since then, I have become much more careful around radios, boomboxes, and other audio devices (at least, I like to think so) but I have never lost the passion for audio equipment. Throughout 20 years of my professional career, I’ve been working for various audio equipment manufacturers and even started building speakers on my own in my little workshop.
I love the work we do here at AudioReputation. Testing, comparing, and evaluating all kinds of audio devices (speakers, soundbars, headphones, home theater systems, etc.) is something I truly enjoy. I try to be unbiased and give you my honest opinion on every piece of equipment I test. Still, you should take my reviews with a pinch of salt and always be just a little bit skeptical. The fact that I liked some speaker or soundbar doesn’t mean that you are going to love it. If you have the opportunity, you should test it/hear it before buying it.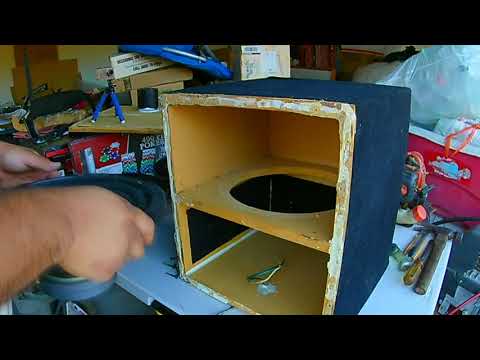
Hello to all DIYers, moto, auto and quad lovers. In this article, we will talk about how I made columns on a quadric. on the quadric there is a Chinese radio tape recorder (it seems to be waterproof) and with it small speakers that are not audible during trips, and even one barely worked. Decided to change the column and podzaparil this topic in earnest.
I bought pioneer speakers with a diameter of 13 cm. And I began to think about what to embed them in and how to install them. As a case, children's sand buckets came up. I specially went to a children's store and bought 4 buckets :) 2 for a quadric and one daughter each, so that everyone would be equally divided). Empirically, I measured the diameter so that the bucket fits snugly and accurately into the groove on the speaker grid. Marked and drank with a hacksaw. I started to try with a grinder, but I almost ruined it - the plastic melts and flies.
Here is a Chinese MP3 radio (AUX, CD card, USB and radio). As stated by the manufacturer, 10W is issued for 2 speakers
Such speakers stood and the left one almost did not work.
I removed the speakers and in their place I will make brackets for new large ones. It can be seen in the photo that the speakers are not fabric or paper, but plastic-rubberized (if you can call it that, I don’t know how to correctly :-))
The child is mastering the technique
To ensure the rigidity of the buckets, we take a sheet of aluminum and make inserts from it
We roll a little on the rollers
Then we cut out such plates from it, mark and drill holes for mounting the speaker. We drill holes slightly smaller than the diameter of the self-tapping screw.
We immediately cut the thread with self-tapping screws
Trying on the speaker with these plates, how it all goes into the bucket
Marking, drilling holes and riveting the plates
I also took a piece of rubber noise and glued it on the inside of the bucket so that it would not rattle from the sound.
It turned out like this. Pretty weighty speakers
Next, I made the bracket for mounting the speakers on the quadric. Aluminum bracket 2 mm. Bent it as needed and tapped on the pipe so that it fits completely to the column
From the inside, I put a bent plate and riveted it.
On the same holes that we fasten the column, we pass the wire through one
At the bottom of the column near the grid, I made a hole in case water gets in to drain. Dynamics, by the way, are not paper and if water gets in, I hope nothing will happen to them. They are rubberized and the membrane is some kind of plastic.
When the loudspeakers are running at full capacity, you can feel the air coming out through these holes. There are two holes.
Speakers turned out solid, weighty. It's nice to look at them. The sound is also good. I'll post a video later so you can hear it too. Now at the moment I connect the phone via AUX to bring out the music, and if I start shooting a video, then the music is immediately cut off.
I will definitely take it off and post it
When traveling, the speakers themselves vibrate a little, you will need to come up with another bracket and firmly fix it to the metal frame.
I have a question for music lovers:
From the radio is issued to the speakers 10W (I think that 10 for each - I'm out). I set the speakers to such a value of 35W, maximum 230W. They don't sound bad at all.
Actually the question is: Is it worth it to take a steam bath and install an amplifier for them or not, what do you think?
Here is a video with sound.
Of course, the sound is slightly distorted through the phone, but still...
 Today is the first session. All amateurs and specialists interested in reliable sound reproduction know that good acoustic systems are indispensable.
 Search for data on your request:
Schemes, reference books, Datashites:
Price lists, prices:
Discussions, Articles, Manuals:
Content:
- Homemade car speakers
- Basics of acoustics for dummies: types of acoustic design of speakers
- Do-it-yourself Hi-End acoustics, or how to make good speakers
- How to make a column with your own hands
- Subwoofer box calculation
- How to make speakers yourself
WATCH A VIDEO RELATED: do-it-yourself speakers! watch everyone!!
Designing acoustic systems according to ready-made drawings is, of course, fascinating, but the element of creativity, whatever one may say, is absent. Now, if you could master the basic principles of building an AU, and then calculate everything yourself and make it from what is at hand, that would be a class! This is possible if you take a few lessons from an experienced master. Today is the first session.
All amateurs and professionals interested in faithful sound reproduction know that good acoustic systems are indispensable. Therefore, the contradictions between different views on AS quality criteria are especially puzzling. It is even less clear which methods of creating AS are more reliable and lead to acceptable results. Even the initial listening experience is enough to notice a very big difference between the sound of the same music on different models.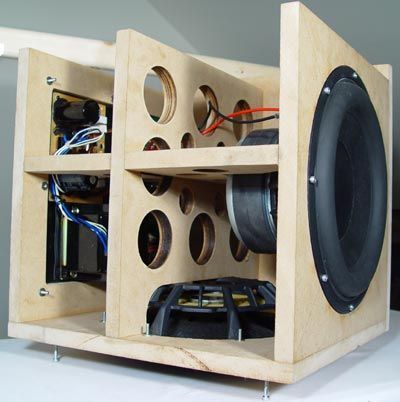
At the same time, the main parameter - the frequency response of the frequency response - is almost always close to ideal, according to the data of manufacturers. Most music lovers cannot measure the frequency response on their own and come to the conclusion: the problem of frequency response is practically solved, the quality of sound reproduction depends on the design and materials of speakers, cases, crossovers.
For example: a coil without a core is good, with a core it is worse. Or: a case weighing 40 kg is better than a one-kilogram case, with the same dimensions, etc. Of course, it would be a mistake to dispute the influence of speakers, cases, crossover elements, internal wiring cables, sound absorbers and other components, but is everything in order with the frequency response?
Independent measurements, for example, in well-equipped laboratories of reputable foreign and domestic audio magazines, do not confirm the optimistic parameters declared by the manufacturers.
In practice, each speaker model has its own frequency response curve, which is strikingly different from other types of speakers, and this applies to any price group. The observed difference many times exceeds the perceptibility threshold known from psychoacoustics, it is simply impossible not to hear it.
And listeners, of course, notice it as a difference in timbre balance when playing the same compositions with different speakers. It is not easy to identify timbre distortions with frequency response uniformity problems, because in front of your eyes there are even characteristics from the manufacturer, as if drawn along a ruler.
It's not a fact that these amazing graphs are a hoax. For example, with an increased scanning speed of the operating range, combined with high inertia, that is, averaging peaks and dips when registering the dependence of sound pressure on frequency. Manufacturers can be understood, in the end, we all want to look a little better than we really are, and therefore we comb our hair, wash ourselves, etc.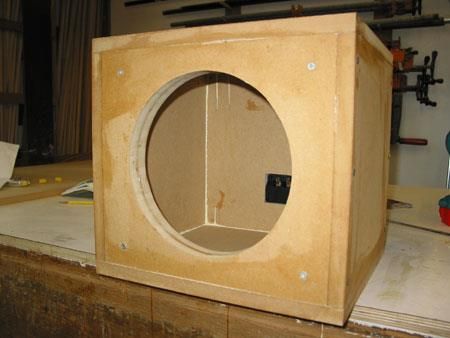 the patient's condition. Our task today is to learn how to analyze the frequency response. Let's start with the most general question.
Why, having everything you need, developers do not create perfect, equally good-sounding acoustics. After all, there is only one ideal, a standard! Obviously, all speakers close to it will sound very similar. There are other, seemingly logical and adequate methods, for example, tuning by impulse signals.
But working on the same algorithms, specialists get different results each time. Isn't it time to stop praying for the uniformity of the frequency response from the point of view of some well-known measurement technique? After all, any method of measurement in science and technology inevitably gives a whole range of errors of various kinds.
In our case, the most harmful errors are methodological, that is, those associated with the imperfection of the approach itself. For example, where should the microphone be placed relative to the speakers in the sound chamber? On the acoustic axis? Where is this axle? In front of the tweeter? And if it reproduces starting from 8 kHz? Then, apparently, it is more accurate to measure on the axis of the midrange speaker? And if you move the microphone 5 cm higher? We get a completely different frequency response.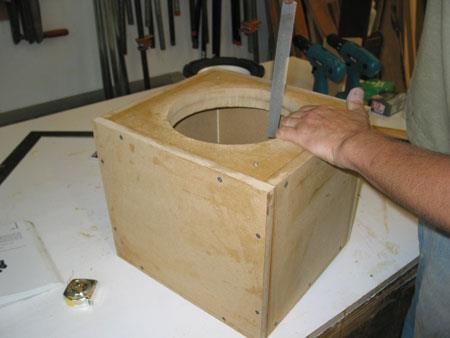 Which one to focus on? And why do we think that the listener's ear will end up exactly where the microphone was?
In addition, at low frequencies and lower mids, the speaker actively interacts with the floor, the influence of which is absent in the anechoic chamber. We will not even begin a conversation about the integration of speaker radiation with the listening room at the moment. Traditional speaker tuning methods do not take into account this important circumstance. This is unacceptable, since the main persons in music - soloists - are most often localized in the center of the sound stage, that is, they are reproduced by both speakers.
We can conclude that with such an abundance of methodological errors, conventional frequency response control methods give an incorrect response for really very smooth speakers, for example, Audio Note, Magnepan, etc. On the other hand, too smooth frequency response obtained using unreliable methods looks extremely suspicious.
In this case, measurement errors are compensated by a specially formed characteristic, which the developer provides, blindly trusting measurement methods that have not justified themselves in practice.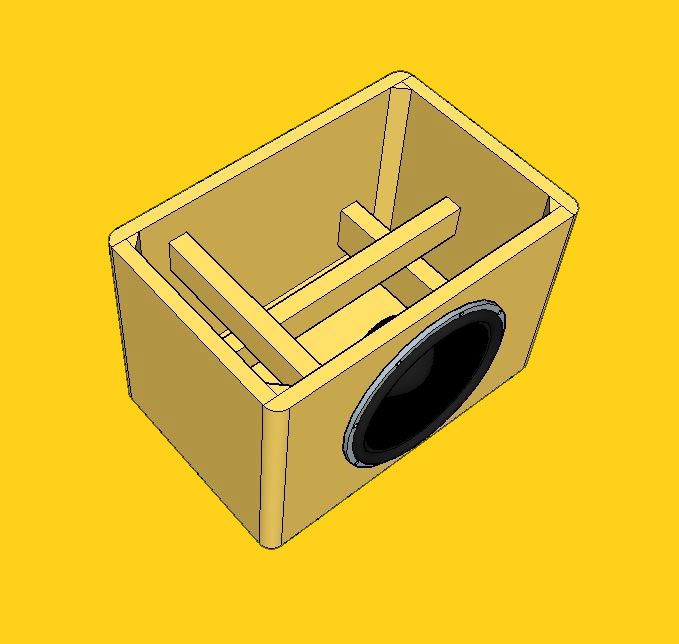 The last thing I would like to do is replace faith in some imperfect principles with faith in others, mine. They are also far from ideal, they contain noticeable methodological errors, only less gross ones. The key to progress is an understanding of the fragility of the role of acquired knowledge and skills, a willingness to perceive, in the process of practical work and research, new discoveries.
One must be able to revise approaches to achieve better results if quantitative growth allows a qualitative leap to be made. The result of the work depends on the methods and development of the personality of the creator of the AS.
Excellent products are known, born from traditional approaches, subject to the highest class and experience of developers. My goal is to equip everyone with a fairly effective technique for creating speakers with an acceptable sound. The long introduction was necessary in order to draw your attention to the factors that hinder the development of the art of speaker tuning.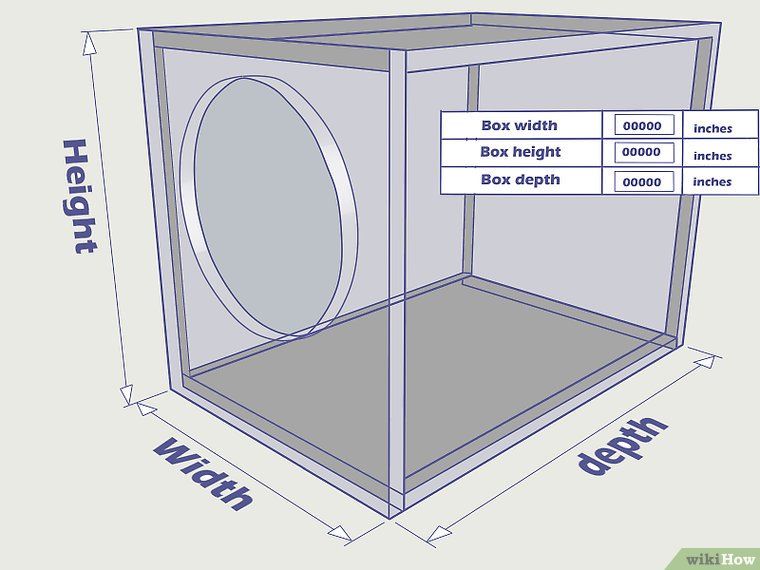
Therefore, I will only talk about the facts and methods of work obtained in practice, without substantiations and theoretical explanations. My principle is that you can confidently express your opinion if there is an audio system that confirms the author's recommendations with good sound. For accessibility, calculations and tuning techniques are simplified as much as possible, without significant harm to the result.
First of all, let's limit the immense topic. Consider the development and configuration of two band speakers with a phase inverter FI. In this case, the optimal diffuser diameter is approximately 10-20 cm.
Passport power hours of one-time noise without damage to the loudspeaker - 20 - 60 watts. The resonant frequency outside the case is not higher than 60 Hz.
If you are satisfied with the lower cutoff frequency of the finished AC Hz, you can take a speaker with a resonance of 80 - Hz. They can be restored with a subwoofer, but in order not to spoil the sound, you need to gain experience in matching it with satellites.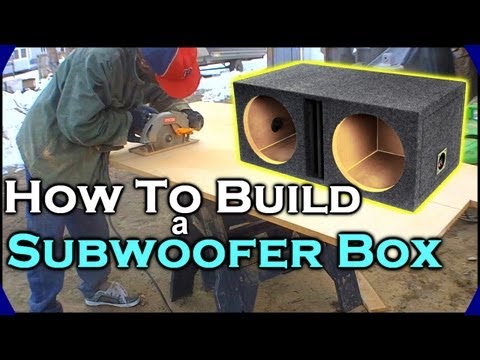
Do not flatter yourself about the nameplate data of inexpensive speakers, indicating the reproduction of low frequencies from 30 to 40 Hz.
We are used to thinking that this is 30 - 40 Hz, since we are guided by passport data with a tolerance of -8 - dB. Take a closer look in the audio press at the actual frequency response of the speakers. Measure, according to the given scale, -3 dB from the average level, and you will see that even large floorstanders work effectively somewhere from 50 Hz.
On the other hand, smaller diameter loudspeakers often have a more flat frequency response than larger ones. It is interesting that System Audio, one of the highest quality speakers, uses only small mid-bass speakers in principle. The full quality factor of modern small woofers is usually 0.2 - 0.5.
Do not rely on low-frequency design calculations, practical results do not match them exactly. Experience shows: it is better to choose speakers with a quality factor of more than 0. 3 - 0.4, otherwise, even with a phase inverter, it is difficult to provide acceptable bass.
For such loudspeakers, it makes sense to manufacture cabinets with a volume approximately equal to the equivalent volume of the loudspeaker. Very tentatively for the speakers recommended in terms of parameters, the equivalent volume corresponds to the diameter:. As a basic option, consider a case with a FI for a loudspeaker with a diameter of 16 cm. The volume is 26 liters. The length of the FI pipe is 20 cm. The tuning frequency is about 40 Hz.
It is necessary to compensate for the difference by changing the length l and area Sfi of the PI tube, otherwise the PI resonance frequency will increase sharply. Moreover, from the inner cut of the FI pipe to the nearest obstacle to the wall of the speaker cabinet, there must be a free distance of at least 8 cm, in extreme cases - 5 cm. For an 8-liter case, such a large size can only be height. A possible design of a slotted FI with a rectangular pipe section is shown in fig.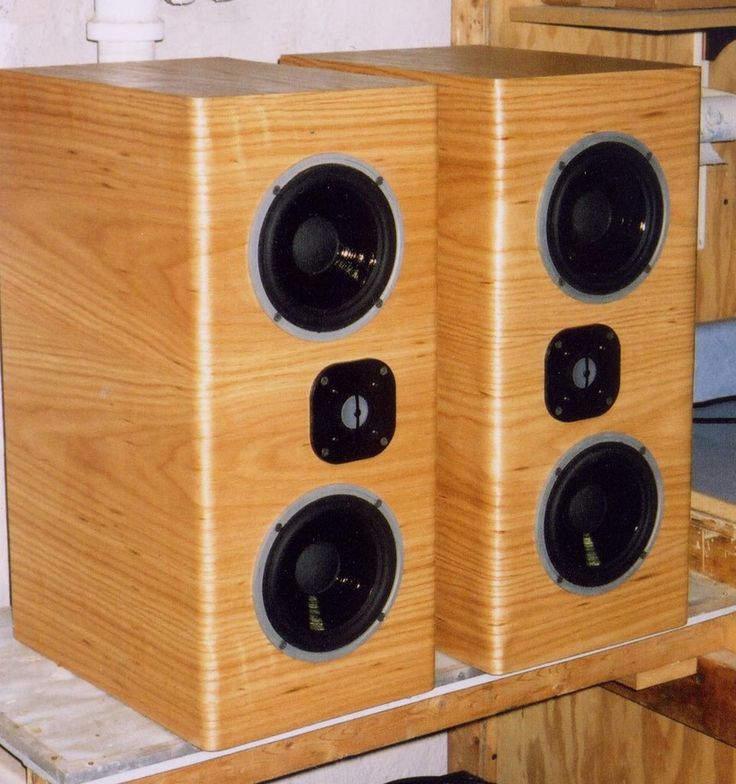
This is a very impractical design, since it requires installation on a special stand that does not block the output of the PHI. If you bring the port up, speaker installation will be simplified, but the view from above will worsen, in addition, the column will turn into an excellent trap for dust, litter and small objects.
The design shown in fig. This is not always acceptable. An increase in Ffi with a decrease in lphi is acceptable, since the resonant frequency of a speaker with a diameter of 10 cm is higher than that of a loudspeaker of 16 cm. An increase in Ve by 1.92 times has a stronger effect than an increase in Sphi by 1.45 times. In general, Fphi drops to approximately 35 Hz.
Since the resonant frequency of the speaker Fd with a diameter of 20 cm is lower than Fd with a diameter of 16 cm, the decrease in Fphi is a positive factor. It is not necessary to compensate for this by decreasing lfi. Experienced professionals are able to fine-tune the parameters of the phase-inverted acoustic design, achieving the most flat frequency response in the range from the lower cutoff frequency of the speakers to - Hz.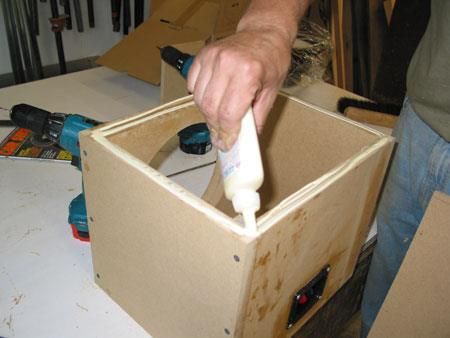
An amateur or a beginner should not spend much effort on this. In the future, I will explain how to control the received frequency response at low frequencies and how to eliminate unacceptable deviations, if any are found. In addition, the impact on the sound of imperfection in the low-frequency response is highly dependent on the ratio of the level of bass reproduction compared to the middle frequencies.
I thought for a long time and decided, but still I post my joint craft with a relative. Here is the work! Full size. The story is generally banal, constantly working in the garage interrupted by all sorts of shnyazhny music.
Learn how to make a subwoofer out of a regular speaker. 12 inches, which can be used in a box up to 35 liters.
In order to make a subwoofer in a car with your own hands, you must first choose the right speaker.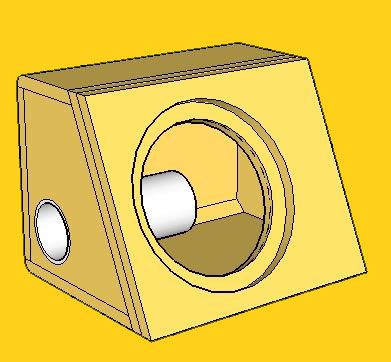 This is quite important, because it is this choice that will affect the size of the box and the spectrum of reproducible frequencies. In this video, I'll show you how to make homemade speakers from car speakers. I thought that all the accessories in the car should only be bought, but it turns out you can do it yourself. This article explains very clearly how to make a subwoofer: how to choose a speaker, how to design, how to make a box. A big plus in the article is that the author suggests using the WinLSD program, which will help to virtually make a subwoofer into the car in accordance with the main characteristics. And the article describes step by step how to use this program. The main advantage of a stealth subwoofer in a car is its stealth, if possible, to get the highest quality sound. As a rule, it is located in the trunk behind the rear wing arch, where it does not take up much space.
I want to present my project, so to speak, a home audio complex. At the beginning of my knowledge of acoustics, there was generally zero, I didn’t even know how to assemble ordinary class A amplifiers, let alone amplifiers for a subwoofer. I didn’t want to seem like a layman and climbed into Googledia to find something there on this topic, but either I googled badly, or there was no really useful information, in general I didn’t dig up anything sensible, climbed to smoke forums, scooped up information there and took for the cause. First of all, we need a low-frequency speaker, I immediately warn you, our subwoofer is low-budget and not very powerful, I found only 35gdn-1m-4 in my store, it looks like this:
Please enter. Habr Geektimes Toaster My circle Freelance.
Task: to create Hi-Fi speakers based on widely used car acoustic kits. Observation: not a single factory makes acoustic systems according to all the canons of building loudspeakers. Even in very expensive systems, there are thin wires, electrolytic capacitors, bare non-muffled case walls, and high-resistance inductors.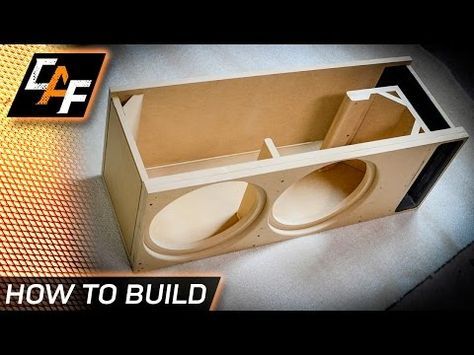 I made this conclusion after analyzing a dozen columns from different companies and there were very well-known brands! What do we do first of all when we pick up a woofer? Yes, we instinctively move the diffuser, as if checking its progress!
Previous topic :: Next topic. Added: March 03 Added: March 07 Added: March 08 Added: March 09 Last edited by Dimych on March 09, edited 1 time in total.
How to make a do-it-yourself speaker "green" radio engineer than I suggested making a subwoofer. Now let's deal with the box for him.
Contents: What is a subwoofer? Choosing a speaker How to make a subwoofer for a computer? How to make a subwoofer for a car? A real music lover does not like to listen to music through standard computer speakers.
Determine the speaker enclosure size. To find out the dimensions of the speaker, see its template. Templates and other documentation should be included with the speakers. If a template is not included, contact the manufacturer or measure the speaker yourself: Determine the depth of the speaker cabinet front to back by measuring the depth of the speaker and adding 5 cm.
in liters, port length and all other parameters necessary to create an effective box, without getting confused in formulas and calculations. Everyone understands that the box is an indispensable part for the correct operation of the low-frequency speaker, which is designed to work in a certain volume, without it, the speaker will simply drive air, while the efficiency will decrease by several tens of times.
Many users of computers and other devices purchase speakers for them - this accessory is used to play a wide variety of audio files. On the modern market there are a huge number of different models, which are supplied with more and more new features. But it is not at all necessary to purchase a new device if the old speakers are broken or did not exist at all. It is quite possible to make them with your own hands from car speakers. Such work does not take much time, and also does not require a large amount of additional materials.
Many people like to listen to music with good bass that literally rumbles and fills the whole air in the house.