When you purchase through links on our site, we may earn a commission at no additional cost to you. Learn More
ATV and UTV batteries are considered consumables that go bad over time due to sulfation, bad cells, poor maintenance, or simply old age. Before you go ahead and buy a new battery, it’s a good idea to test the condition of the one you have. That way, you know you are not wasting your money when other issues may be the real cause of your poorly performing battery.
No single test will troubleshoot all of the potential problems a battery can have. But by going through the steps in this little guide, you will cover most aspects that may be causing issues.
These are the tools you will need:
Caution: For all of the testing in this post, we recommend that you use safety glasses and gloves.
Page Contents
You may just have found that your ATV does not want to start, and you suspect that it’s caused by a dead battery. Keep in mind that there is a range of other reasons why your ATV seems completely dead or will not start.
Before spending too much time testing the battery, we recommend you make sure there are no simple solutions like forgetting to turn off the kill switch, not having the gear shifter in “park” or keeping the brake lever activated. Such mechanical safety features that may prevent your ATV from starting vary from model to model. Here is a complete guide for when an ATV won’t start.
Before you begin testing, it’s a good idea to inspect the battery visually. You may need to remove the battery from the ATV for a proper inspection.
If you notice any of the following defects, there is a good chance your battery is bad beyond repair. Replace it with a new one, no further testing is necessary.
A visible bulge may be a sign of overcharging. Smart chargers shut off automatically when a battery is fully charged.
Manual chargers, on the other hand, need to be monitored and turned off manually as soon as the battery reaches a full charge, or you face a risk of overcharging the battery.
The terminals should feel solid and not move even slightly. A loose terminal may create a potentially dangerous short circuit.
When a loose terminal short circuits, the battery will discharge all of its power immediately. Such a rapid discharge creates a lot of heat that can melt the plastic or make it catch on fire. A direct short like this can sometimes even cause the battery to explode.
Battery casings are tough but may crack open from impacts, mishandling, or if the battery has frozen. A cracked battery may still work fine but should be replaced never the less due to safety reasons.
Battery fluid should not leak off the battery. If it does, the battery should be replaced.
If the color of the electrolyte fluid inside one or more of the cells has turned brown or dark, your battery is most likely bad. It does not matter if the other cells look healthy; if one cell is dark, the entire battery is rendered useless.
Inside a conventional lead battery, there is electrolyte fluid that should reach up to a level where it fully covers the top of the lead plates or within a specified max/min level found in each cell.
Carefully remove the filler caps and inspect using a flashlight. If electrolyte levels are low, top of with distilled water until you reach the correct level. Never try charging a dry battery as it may cause it to burn up.
If the battery has been sitting dry or with a low electrolyte level for too long, chances are it has sulfated beyond repair.
By fully charging a battery and then measuring its open-circuit voltage, you can tell quite a few things about its overall health.
If you are not sure how to properly charge your type of battery, I advise you to follow the steps in this guide.
After charging the battery to a full charge, and with the charger disconnected, allow the battery to “rest” for a minimum of 12 hours.
This is necessary for the battery voltage to stabilize after the charging process, or you may get a false reading. Often there is a surface charge still present some time after disconnecting the charger.
If you don’t have time to wait as long as 12 hours, you could also turn the lights (high beams) on for two minuts to remove the surface charge.
Use a multimeter or volt-meter to read the battery’s voltage under no load.
| Open-circuit voltage reading | What it tells you |
| 0V | THe battery is not able to hold a charge. The battery likely has an internal short circuit and needs replacing.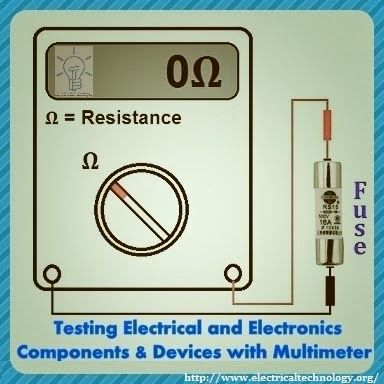 |
| Less than 10,5V | One or more dead cells. |
| Less than 11,8V | The battery is heavily sulfated beyond repair, and is not able to hold a suficcient charge. |
| Between 11,8V and 12,4V (12,4V equals about 75% state of charge) | The battery is sulfated to a level where it may no longer be fully recoverable. |
| 12.4V or more | The battery his able to hold a suficcient charge. You can expect a high level of recovery by performing a desulfation charge. |
An open circuit voltage reading, as described above, is helpful but does not always paint the full picture. The battery may still be bad even if you get a reading of 12.4V or higher.
Sometimes, you will find that the voltage drops fast as soon as you draw power from the battery.![]() If so, the battery is likely bad and needs to be replaced.
If so, the battery is likely bad and needs to be replaced.
To test if the battery can drive a load, you can perform a so-called load test. The goal of this test is to make sure that the battery voltage does not drop too low when drawing a high load.
A healthy ATV or UTV battery rated at around 200-400CCA should be able to maintain a voltage of 9,6V or more even under load (at 70°F (21.1°C)). A 400CCA battery should not drop below 10V.
You will need a multimeter. Preferably one that has a max/min function. If you use a multimeter without a max min, you may get a false reading, as the display refresh rate cannot keep up to show the actual minimum voltage reading.

A variety of consumer-grade batty testing tools are available in the $20 to 50 price range, where the two major types are digital and analog testing tools.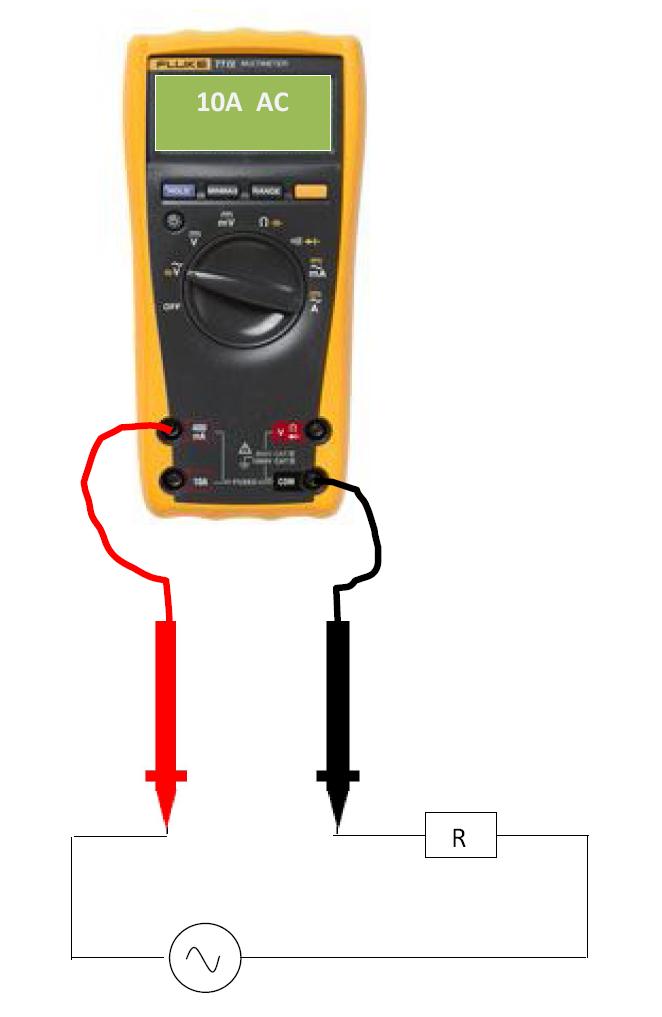 Each tool has a specific user manual that needs to be followed, but I will outline how they work on a general level below.
An analog testing tool uses a built-in resistance element/heat coil to simulate a high load. The tool measures the voltage drop under load, indicating if the battery is good, weak, or bad, relative to its CCA-rating*.
* CCA is the amount of current the battery can put out at -18°C (0°F) for 30 seconds while maintaining a cut-off voltage of at least 7,2V. You should find the battery’s CCA rating on the battery label. Each battery comes with a specific CCA rating. The actual CCA capacity decreases as the battery gets older or damaged.
If the voltage recovers to its full potentil an only a couple of seconds after releasing the load switch, you know that the battery is bad. However, if the voltage recovers slow, yor battery is likely just run down and needs a proper charge.
The scale on a typical analof battery load tester.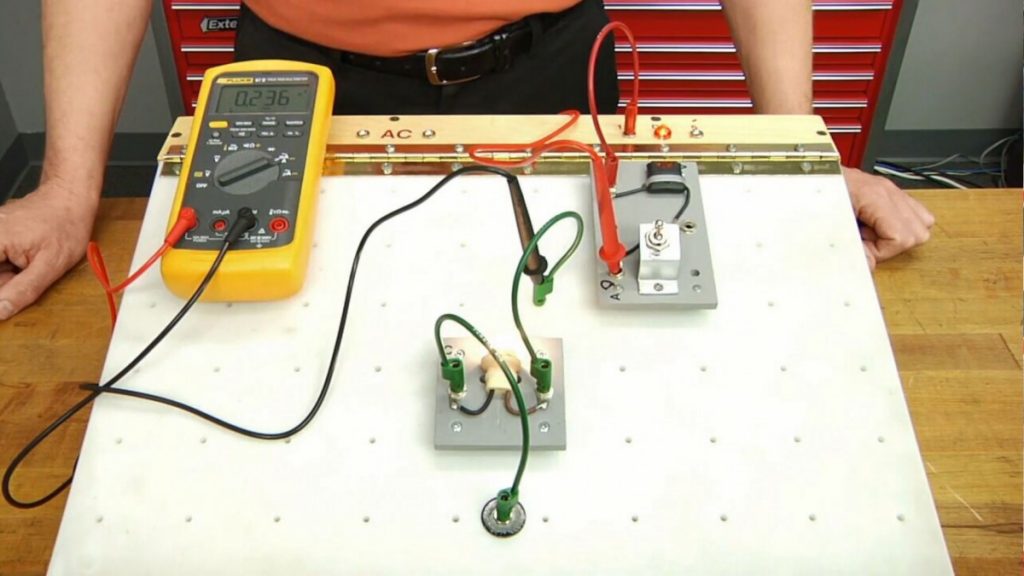
Please refer yor the user manual of your testing tool for test directions specific to your tool.
Digital consumer-grade battery analyzers are inexpensive, compatible with most battery types, and can offer a range of test features such as:
To load test the battery you need to set the tool to its CCA-mode. You will need to insert the battery’s CCA rating before you begin the test. You should find the rating stamped on the battery casing, or by looking up the battery model number online.
Head over to this post to learn more about what ATV battery numbers mean.
The test will indicate how many CCA the battery is capable of.
This AGM ATV battery gets a CCA reading well over it’s rated capacity of 320CCA, and should be in good health.
Based on the measured CCA, the test tool may also provide you with a useful capacity reading or state-of-health reading in %:
| State Of Health (SOH) in % | Battery status |
| 0% to 40% | The battery is damaged or too old for normal operation and should be replaced. |
| 40% to 60% | The battery is getting old or getting weak. Consider replacing it. |
| 60% to 80% | The battery is in normal working order. |
| 80% to 100% | The battery is in good to excellent working order. |
A digital test tool may also be able to test the battery’s internal resistance. Resistance is measured in milliohms (mΩ) and tells you how much restriction the electrons encounter as they travel through the internals of the battery. A lower value indicates less restriction.
This AGM ATV battery has an internal resistance of 6. 04 milliohms (mΩ).
The internal resistance of a modern ATV battery stays relatively flat throughout its service life and then increases as the battery starts to go bad. A high resistance reading indicates that the battery is getting close to the end of its life-span.
The internal resistance can vary as much as 5-10% from one batch of batteries to another. For the most accurate results, you need to measure the resistance of your specific battery when it is brand new as a reference for later testing.
A few years down the line, when you teat again and get a significantly higher reading, you know that the battery doesn’t have much time left.
Both Method 1 and 2 give you a relatively good indication of your battery’s health, but the accuracy of consumer-grade test tools are not always the best.
To get the most reliable results, you should have it tested with a professional load testing tool. A proper load test should draw a load that is half of the batteries rated cold-cranking amps for 10 seconds.
Most Battery suppliers have one and usually don’t charge to do a test. Disconnect the battery and bring it fully charged to be tested.
Several of the tests in this post are designed to indicate your battery’s level of sulfation. But what is sulfation, and why does it matter when testing an ATV or UTV battery?
Over-sulfation is the most common cause of premature battery failure. An undamaged battery with low levels of sulfation is healthy, while it gradually loses its capacity as levels of sulfation increase.
Therefore it can be helpful to have a general idea of what sulfation is and what it does to your battery:

 ”
” As we were re-reading last week's post about the different battery types, we realized that we talked about checking the voltage on the battery but never once thought about needing to know how to run a multimeter. Since a multimeter is one of the most important tools for troubleshooting your ATV, we thought it would be nice if we threw together a few basic tips for the beginner. Don’t worry, we aren’t going to be using this 70+ year old model. I’m a little higher tech than that. But before we go into too much detail, you might want to have a multimeter in front of you. Fortunately, they are very common and the web is filled with digital multimeters ranging anywhere from $6.00 to thousands. If you are looking for a very basic multimeter, I like this model you can find on Amazon. My current multimeter is an older Craftsman model 82175.
I bought this multimeter when I was in college in 2002 and it has since been discontinued. I also found this multimeter made by Klein on Amazon that is a very close match to the model that I currently use. Now that we've gotten some shopping out of the way, I can't wait to show you how to use this great tool. You could spend thousands on a multimeter with 50+ settings, but for most everyday use, you really only need three.
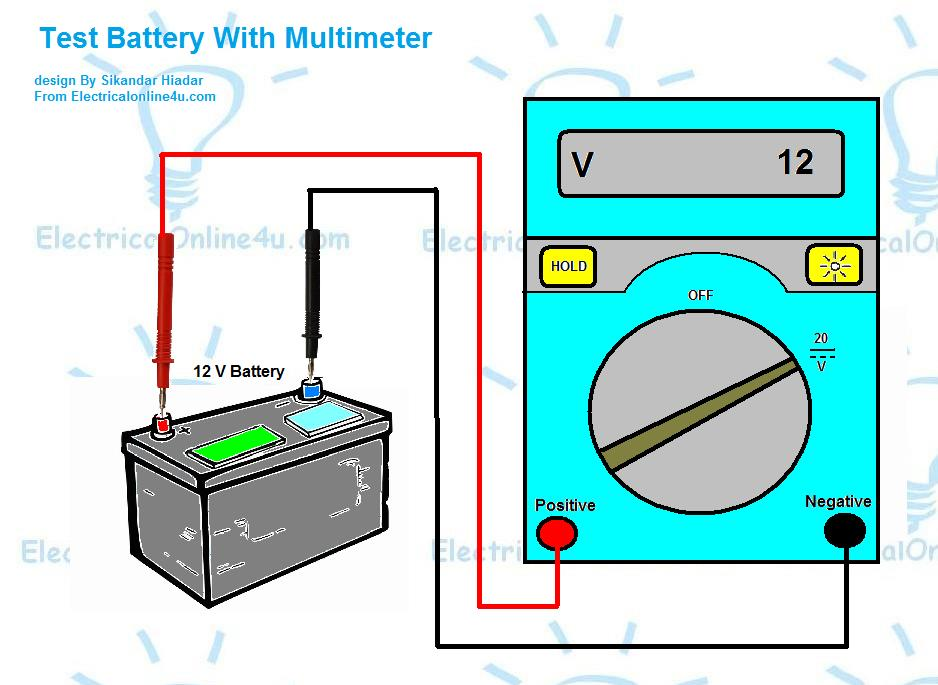
The voltage setting is probably the easiest for most people to use and understand.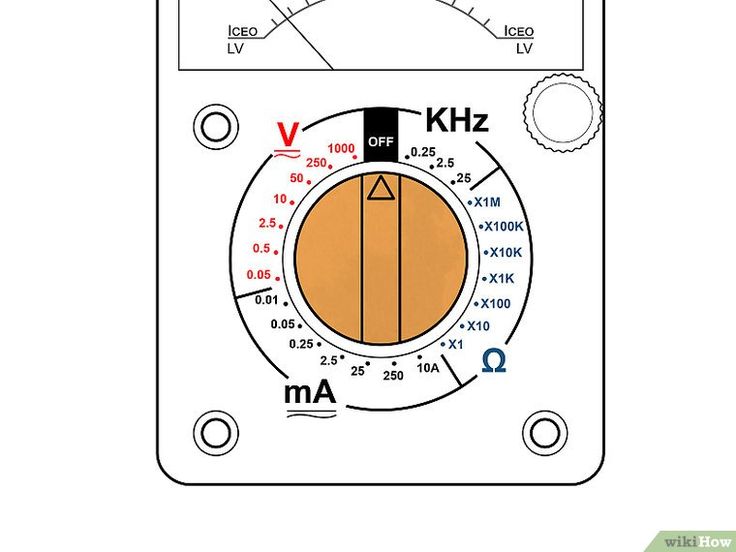 A practical example of using the voltage setting would be to test the voltage on your battery. For some more great examples of when and why to use the voltage setting, check out last week's post on battery maintenance. If your multimeter is autoranging, make sure the dial is turned to the V setting. If your multimeter is not autoranging, make sure you are in the DC setting. Unfortunately, there is no standard for multimeters and because all models are different, you may need to refer to your manual to find the correct setting for a 12V system (assuming you are using the voltage setting on your ATV). On most models, the attachment for your leads will be color coded; i.e., the black lead goes in the black port and the read lead goes in the red port. If these are not color coded, the black will always go in the port labeled COM (for common) and the red will always go in the port labeled V (for volts, when you are using the voltage setting). The ports may include other labels as well. For example, the red port on my model is labeled V, TEMP, Ω, and CAP.
 For our purposes right now, we’re only interested in the V. For almost everything in the automotive world; i.e., cars and ATVs, you will touch the black lead to the negative (- or ground) and the red lead to the positive (+ or power). If you have good contact and the system has live power, this should give you a reading. If your meter shows a negative reading, you most likely have the leads crossed. Adjust the leads and try again. Most of the time (key word: most) you can use any of the frame, engine, or any metal part on your ATV for the black lead. If you have an off brand (Chinese) ATV, keep in mind that some of them do not use frame ground. I have found two so far and you can imagine the confusion and time it took trying to figure out what the problem was. The exception to this is if you are testing a wire for ground, in which case the black lead will be used as the test lead and the red lead will need to be on the positive terminal. That may seem obvious, but sometimes when we're comfortable working it can be the simplest mistakes that cost us time when we want to get out and ride!
The OHM setting is used to see if you have the ability to flow electricity through an object or wire and how much resistance that object has. In laymen’s terms, you can use the OHM setting to determine if your wire has any breaks. Normally your leads will stay in the same ports as the volts. On an autoranging multimeter, you do not have to play with ten different settings, but you will have to pay attention to the readout. Autoranging multimeters are meant to be dummy proof. They automatically adjust the units to the one that best suits your reading. For example, if you buy a $5 hamburger, the guy at the counter will say, "That'll be $5." If he had said, "That'll be 500 cents," you would probably look at him funny. Well, so would an autoranging multimeter. When you get your reading, keep in mind that the k stands for Kilo or 1000, the M stands for Mega or 1,000,000, and the Ω is straight ohms. So when you are reading your autoranging meter, if the display is 1.5 k Ω then the reading is 1500 Ω. If it is 1.5 M Ω, then it is really 150,000 Ω. And lastly, if it is 1.5 Ω , then there is no conversion. Not all multimeters support both kilo and Mega readouts.
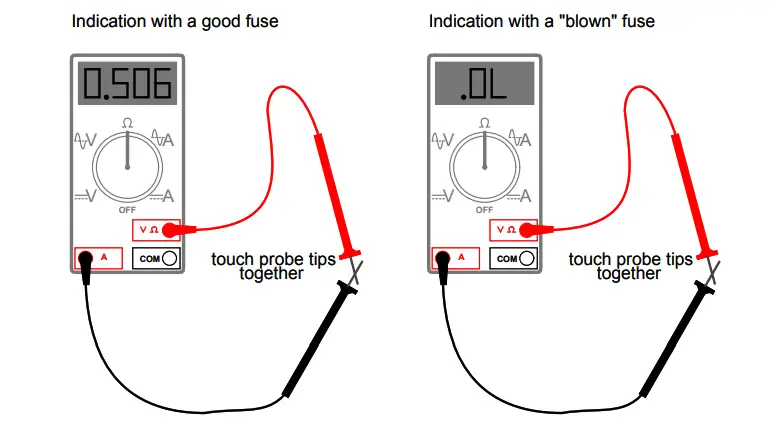 Like the hamburger example above, It doesn't really matter because it's just more than one way to represent the same number. Just keep an eye on the readout to make sure you are using the most accurate information. Something as simple as missing an M or a k could cause you to replace parts that don't need to be replaced (don't ask us how we know!).
The amperage setting is used to verify the draw of electricity from the battery. This setting is particularly handy if you have a battery that is going dead over night; however, it is very easy to damage your multimeter in this setting. If you are at all unsure, it is best to ask someone or avoid this setting all together. While most good multimeters are fuse protected, the fuses can run up to $10 to $20 and can get expensive if you go through a few while trying to figure things out. If you're at all confused, let us know in the comments or shoot us an email and we'll do our best to help you walk through the steps.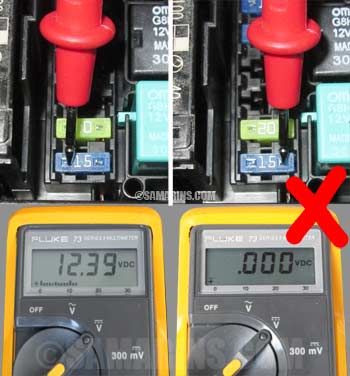 Notice that in the amperage setting, the red lead will need to be in a different port than we used in the voltage and OHM settings. On my model, the leads will need to be removed to turn the dial to the correct setting. Once the setting is dialed in to either A or mA, the appropriate red port opens and the previous port will close. This can vary among models, so be sure to check the manual that came with your multimeter. In my day-to-day use, I have never used the mA (mili amp) setting. That small of a draw is nothing that I am ever looking for. Most everything will have at least a few mA draw. This is normal and is not usually enough to drain your battery. What I am looking for when I use this is amps of draw. So I always start with the 20A setting on my meter. On some meters, the setting will be 10A or 15A, my meter is a fairly high one. To test the draw on the battery, you will need to put your meter in line. By in line, I mean that it will be part of the circuit and will give you a reading of how many amps or the amount of flow that is going out of the battery.
 To put your meter in line you will disconnect the negative cable from the battery, touch the cable to your red lead on your multimeter, and touch the black lead to the battery post (the - or negative terminal). This will give you a reading as long as you do not go over your fuse size. Again, this is an especially useful setting if you have a battery that is going dead very quickly. Even on multimeters with the most basic of settings, you can see how this one tool can be extremely useful in diagnosing your ATV. When you’re shopping for a multimeter, don’t get too hung up on having all the bells and whistles. At work we use a multimeter that has over 50 different settings on it and cost over $1800. I still don’t know how to use half of them because even in my line of work I never have a use for them. Know what you will use your multimeter for and purchase one that has only the features you need. It may be one of the most valuable tools you own, but it’s how you use it, not how much money you spend on it.
 And seriously, we’re dying to hear your thoughts. What model of multimeter do you use? What setting do you think you use the most? Are you brand conscious when you are shopping? Tell us in the comments below!
Filed in: Maintenance and Repairs
Share: Previous article A Look at The BEST ATV Service ManualThis device is considered an indispensable and even necessary attribute of every radio amateur. With it, you can always determine the voltage, clarify the parameters of transistors with diodes, ring the circuit. There are quite a few varieties of such a device, they differ in the accuracy of measurements and their functionality.
Content:
Before starting the story on how to measure the current with a multimeter, it is necessary to give a number of recommendations on how to work:
First of all, you should study the instructions on how to work with such a device so as not to disable it. To work confidently with an electrical circuit, you need to practice on weak batteries - batteries. If experience is not enough, follow the instructions strictly and learn all the functions of your multimeter:
This simple model is used by motorists when there are problems with charging the battery.
Many are interested in the question of how to measure the current of the charger. Examples can be different - a battery, a battery, and even an ordinary room outlet. Such a question is not entirely correct, and there is a reason for this - it is not possible to determine the current strength for a power source, since such an indicator is determined only in an electrical circuit. Therefore, you will have to create it by taking a power source, any device and a multimeter. An example diagram would look like this:
To perform such actions with a multimeter, you should switch it to the DC voltage measurement mode, setting the range slightly higher than the highest voltage on the battery. After that, we connect the probe of the multimeter. Painted black, to the minus of the battery, and red, respectively, to the positive pole. Readings of interest to us appear on the display of the device:
If the battery is fully charged, then its voltage should not be lower than 12.6 V. Otherwise, the battery charge level does not exceed fifty percent, it requires urgent replenishment. An indicator not exceeding 11.6 V indicates that the battery is completely discharged.
In order for the battery to charge for a long time, it is necessary to identify the reasons for the loss of current, which happens in any car. This is facilitated by an alarm system, a radio tape recorder, a dashboard and a central locking device. If the total current loss does not exceed 80 mA, then the battery will operate without problems for several years.
For operation, the multimeter is set to measure current at 10 or 20 amperes:
Having removed the "negative" terminal, we connect one of the wires of the device.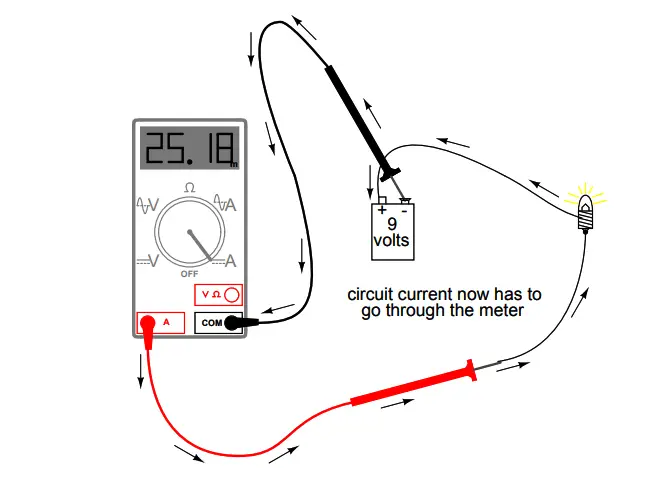 The second touches the removed wiring. Polarity in this case does not matter:
This is the main source of energy in the vehicle, and if it is faulty, then one battery will not be enough for you for long trips. Let's figure out how to check the voltage on the generator.
To do everything correctly, you will have to perform several verification operations:
Today, a motorist should be armed with all the benefits of technical equipment. These include the garage power supply, which is a powerful, reliable, quite versatile device and, most importantly, absolutely safe.
It is quite possible to assemble it with your own hands, having a transformer and other necessary parts at your disposal, or purchase it in a store. In the first case, it is allowed not to install a device for measuring voltage, just the indicator of this value on the block will have to be measured using a multimeter.
Working with such a device is quite convenient. It allows you not to plant the battery, start the engine for periodic recharging, open the garage door for ventilation. With the help of the block, it is possible to check almost all car devices for operability, adjust motorist designs.
The power supply will recharge the battery without problems, but it should not be used as a starting element - it will definitely burn out.
How to measure current with a multimeter
3.9 - Ratings: 37
The generator is a convenient autonomous source of electricity, which is actively used in cars to simultaneously power consumers and recharge batteries. If the electrical equipment began to “jump” in the car, then it’s time to check the generator. Its malfunctions can be both mechanical and electrical. And if the first are detected with the help of an external examination, then special devices and devices are used to determine electrical problems, one of which is a multimeter. And so that you can do everything yourself, we will tell you how to check the generator for performance with a multimeter.
Contents
What you need to do:
 The multimeter can be located on the battery itself.
 Normally, the battery charge on a non-working car is 12.5-12.6V. But that is not all. Now let's check the values with the engine turned on. Next steps:
The first thing to do is to remove the alternator. The course of further simple testing depends on which part will be tested: diode bridge, rotor or voltage regulator. Of course, for a complete diagnosis, you need to check all the elements.
A diode bridge is, in fact, a rectifier, thanks to which the alternating current (produced by the generator) becomes direct.
There are usually six semiconductor diodes in a diode bridge, one triple is “+”, the other is “-”. Each of them allows current in only one direction.
Let's not go into the jungle and discuss the design features of the diode bridge, let's just say that the cause of its malfunction is often the non-observance of the polarity of the battery or the short circuit in the generator. Any malfunction of the diode bridge has a negative impact on the entire on-board network, so it is important to check this element, especially since this is easy to do with a multimeter, and the process itself is called continuity, because the appropriate mode is selected on the tester.
 We advise you to follow the instructions that are attached to your unit. On some models, the bridge is attached with bolts, on others it is soldered. To make it easy for you to put everything “in place” after all the manipulations, apply marks to correctly position all the elements, this is especially important for beginners.
 To test each diode, first touch one wire to the core or plate, and the other to the opposite diode terminal. Then the probes are swapped.
Readings of a working diode in one direction range from 400 to 700, in the other - infinity or 1. Diodes with plus and minus are checked in the same way.
Check all diodes on the bridge according to this instruction. The small ones also need to be tested:
If you see a 1 when checking a diode from both directions, then this element is damaged.
In addition, the values on all semiconductors should not differ greatly. A diode with a serious deviation from others does not work very well, which can lead to charging problems.
Useful video on how to test a car generator with a multimeter using a diode bridge test:
And here is the check of the bridge, which has a slightly different design:
Using this important element, the on-board network is supplied with current with certain values. To check the voltage, you will need a 12V test lamp with two wires, as well as an adjustable power supply.
How to check the generator voltage with a multimeter:
The voltage can now be gradually increased. It is important to watch how the light is on and how the values \u200b\u200bare changing on the multimeter display. The bulb should burn brighter, but at about 14V it will go out. This shows that everything is in order with the regulator.
The video shows clearly how to check the operation of the generator with a multimeter:
Testing the rotor plays an important role in how to check the charging of the generator with a multimeter on a car. If this element fails, the battery will be discharged. We need to test the device to see if there is a short to ground in the excitation windings of the element.
How to test the generator winding with a multimeter:
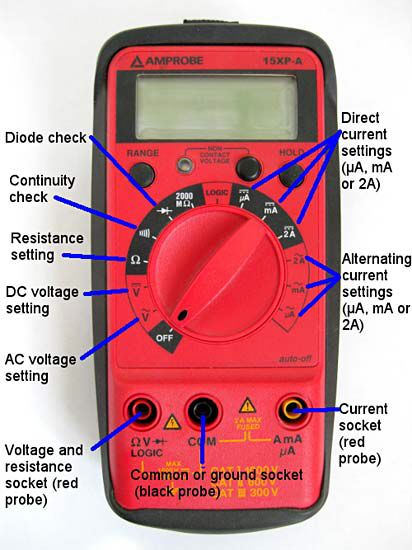
If you are looking for how to test the alternator on a machine with a multimeter, you will find it helpful to know how to test the stator:
 The absence of a signal indicates the integrity of the winding.
 More details on the video:
How to check the generator brushes with a multimeter? Actually, not at all. Checking these elements is carried out using an external inspection after removing the brush device. If necessary, the regulator can also be removed. Usually the brushes wear evenly. In good condition, their length is about 1 cm. If the indicator is half as much, the elements need to be changed. At the same time, clean up the coal dust that forms when the brushes rub against the rings.
Now you know how to check how much the generator produces with a multimeter and you can find out for yourself how its different elements will work.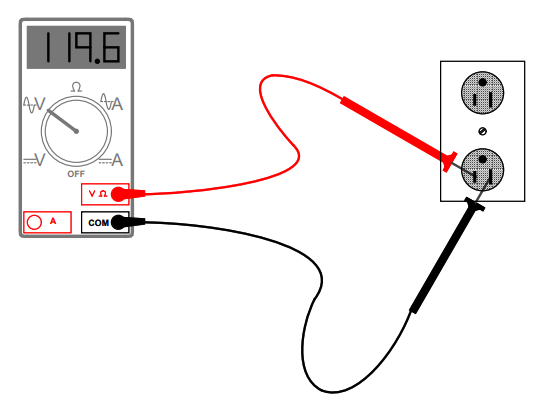 You can find other interesting articles about using a multimeter for different purposes in our helpful blog.
Safe and accurate measurements for you!
Q: How can I test a car alternator for operation with a multimeter?
Name: Fedor
Answer: You can check it right in the car, but a more accurate way is to test the removed generator. At the same time, its various parts are checked: voltage regulator, diode bridge, rotor stator.
Question: How to ring the generator with a digital multimeter?
Name: Kirill
Answer: The diode bridge is called. First you need to disconnect it from the generator. On the multimeter, the dialing / diode test mode is selected. The multimeter probes are connected in a certain order to the diodes and the plate.
Question: How can I check the charging of the alternator with a conventional multimeter on a car?
Name: Azat
Answer: To check the charging of the generator, you need to test all its elements: diode bridge, rotor, etc.