Gear reductions are very cool. It’s no wonder we like to throw them in wherever we can. And why wouldn’t we? They give you more torque—the most coveted of specs for the off-road enthusiast. But what is a gear reduction? Of course you know they get you more torque at the cost of speed, and you probably know that it comes from different gear ratios, but what that means isn’t always clear.
In reality, the way it works is deceptively simple. Here’s how a couple of gears can change the way you ride.
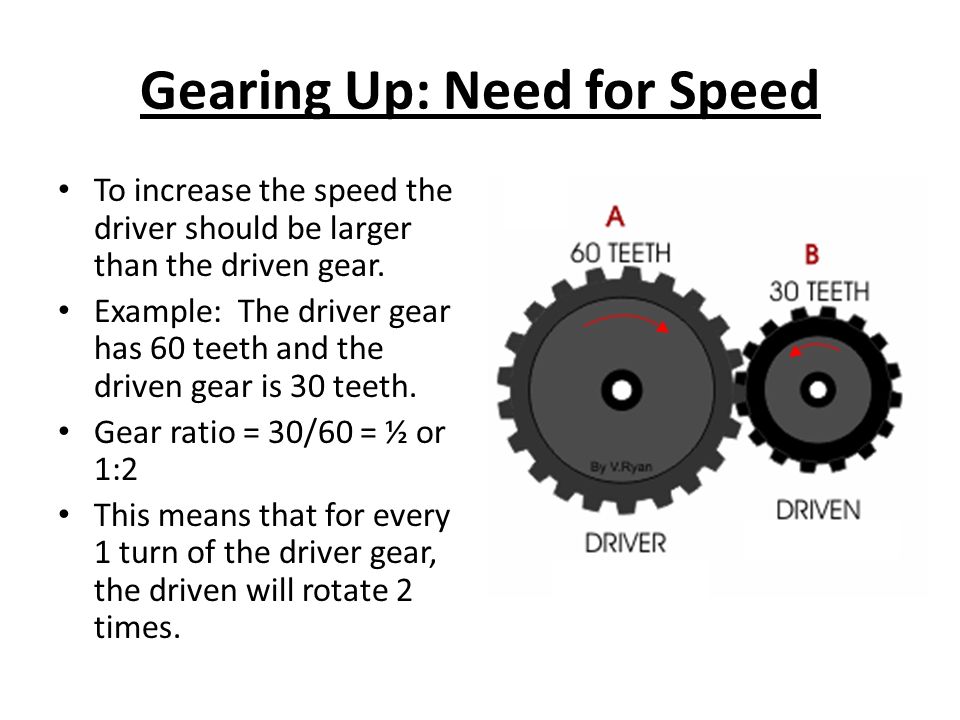
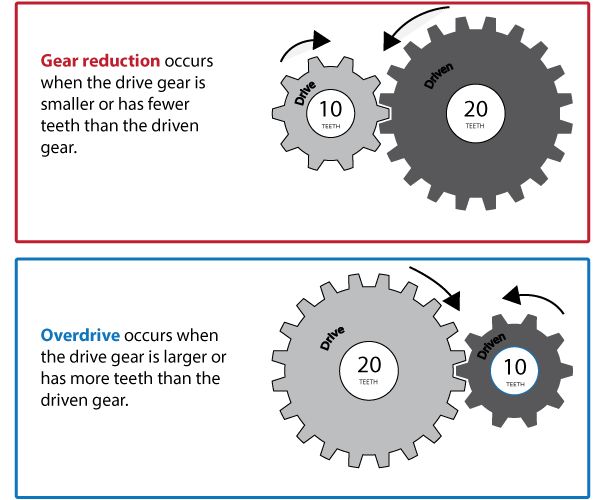
Let’s start with the very basics of a gear reduction. You first need a big gear (let’s say it has 30 teeth) and a little gear (let’s say it has 15 teeth). Now put them together. Turning one gear will cause the other gear to turn. Super simple.
You need different size gears to achieve a gear reduction. These gears will be paired with a smaller or larger gear to get a gear reduction.If you decide to turn the larger gear by hand, you’ll notice a lot of resistance, but the connected small gear make two rotations for every one rotation of the large gear. You will gain a bunch of speed (output RPM is two times the input RPM) but lose torque. If you decide to turn the small gear by hand, you’ll have almost no resistance. On the flip side, you’ll have to turn it twice to make the big gear turn just once. You lose speed but gain torque.
Now, speed doesn’t do you much good if you don’t have enough torque. You can spin that gear as fast as you want, but as soon as you hit any resistance, it’ll stop dead. That’s why you mostly see gear reductions that increase your torque and decrease speed. That trade-off is much more favorable because the extra torque will make up for a lot of the lost speed when you’re riding off road. Your speed is compromised by uneven terrain when you’re driving and torque helps you overcome those obstacle so you can reach higher speeds.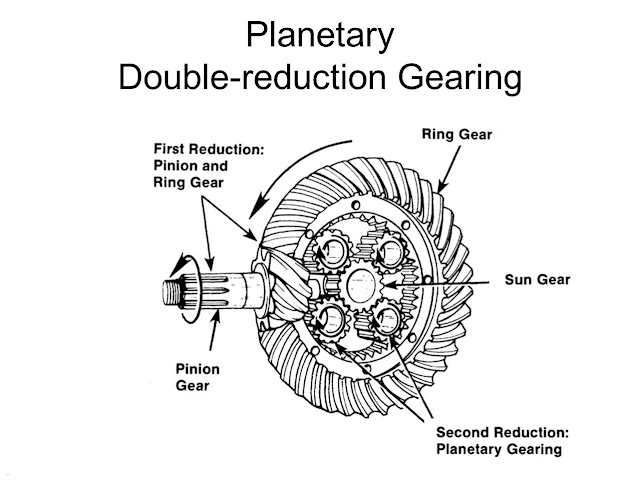
But how does using a little gear to turn a big gear get you more torque? That simply has to do with leverage. Everybody’s favorite old dead guy, Archimedes, said, “Give me a long enough lever and I shall move the world,” or something like that (ancient translations are wonky). The point is, the two gears moving together act like two levers trying to move each other. The big gear has a big lever and the small gear has a small lever.
In portal gear lifts, these two gears work alongside a third gear to gain leverage and give you a gear reduction.As you know, it’s easier to turn a stubborn nut with a long-handled wrench—and the longer the better. It’s the same thing with gears. Your little gear is turned by a motor in the center and has a lot of leverage against the large gear that is being turned at the edge of the gear. And out pops your bonus torque. Now you’ve got a healthier drivetrain and the ability to run bigger tires.
If you’re still not sure, imagine you have a frozen nut with a breaker bar on it—that’s the big gear and the radius of that gear is the length of the breaker bar. You are the small gear and your radius is the length of your arm. You can turn a much tougher nut in this setup than you could without a breaker bar, but it’ll take a lot longer to unscrew it completely.
Still lost? Here’s one more example. Imagine the sprockets on a bike. When you shift to the smallest sprocket on your pedal and the largest sprocket on your rear wheel, it’s really easy to pedal, but you can’t go very fast. That’s exactly what happens with a gear reduction. Your smaller gear drives your your larger gear, making it easier to go—even if you don’t go quite as fast.
We get the gear reduction in our portal gear lifts by applying this science. (Portals have a third gear between the big and little gear that doesn’t alter torque. The middle gear’s job is to make sure your wheels turn in the right direction. Just FYI.) And obviously, the same thing happens in the standard gear reduction kit that you stick in your transmission.
Gear reductions exist all over your stock machine as well. They’re in your differentials and transmission. But those are just stock. If you’re ready to take your torque to the next level, install a gear reduction to see how you can take some simple physics lessons and turn them into over-the-top off-roading fun.
GDP Portal Gear Lifts give you a lift and a gear reduction in one package, and they let you choose between a 15%, 30%, and 45% gear reduction. That’s a lot of choices! And you might have some misconceptions about what a gear reduction really does or why you’d want a small gear reduction instead of a huge gear reduction.
Never fear! We’re here to answer some common questions about this mystical force that lets your cousin ride like a pro, but leaves you getting winched out of the mud. We’ll help you understand why gear reduction is important, why you might need it, and how you can get it. Spend some time reading now, and you will be talking ratios and torque with the best of them later.
You should care about gear reduction because it helps to create more torque.
Ah, torque.
Here’s another word most of us claim to understand, but just in case you don’t—allow us to explain it. Torque is the amount of power that your engine produces to turn your tires. Simply put, the more torque your UTV can produce, the easier your engine can turn your wheels (which leads to faster acceleration). Less torque leads to higher top speed, but slower acceleration and less power.
Do I Need More Torque?More than likely the answer is yes, especially if you’re considering getting lifted with a set of portals. Even more simply put, if you’re going to put larger than stock tires on your machine, you definitely need more torque. How much torque you want depends on how you ride. A side-by-side that rolls off the showroom floor usually has a clutch and transmission set up for a balance of speed and power based on stock equipment. Your average ATV/UTV rider might find this completely adequate, but if you are all about hitting the trails and getting the blood pumping, you’ve probably already upgraded your machine. The list of upgrades that can potentially affect the performance of your ride is long, but we are going to focus on one of the biggest culprits: tire size.
The biggest torque killer with larger tires is the distance around the tire, or the circumference. When most riders say bigger tires, they are talking about their height from the ground. This is how tires are sold. The size of a tire = the height of the tire from the ground. But by increasing the height of a tire, you also increase the distance around the tire. If we think about the tire as a gear, it takes more force to roll a bigger tire one revolution because it needs to travel a further distance.
You can skip reading this next part and use this gear reduction calculator, or you can keep reading and learn something new. We suggest you keep reading.
A side-by-side with increased tire size, like this one, can experience a loss in power. This is because it requires more force to roll a full revolution. Installing one of SuperATV’s GDP Portal Gear Lifts can help to combat this issue.If you marked two tires, one 25″ and one 32,” and rolled them both together for a total of one complete revolution (or the distance it takes for that mark to travel from the ground all the way around and back again), the 25″ tire would travel about 78.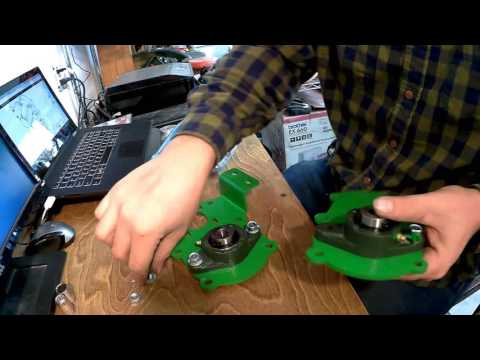 5 inches while the 32″ tire would roll about 100.5 inches. Trust us on this one—it’s math. (If you want to know more about the math, check out this article on determining gear ratios.) To roll that bigger tire the extra distance, your engine has to work harder because it needs to spin it more to achieve one revolution. In this example, if we figure the percent increase from 78.5 inches of travel to 100.5 inches, we find that you are losing 28% of your torque. This translates into a loss of acceleration and power.
And now, my friends, we have come full circle. If you want to make up for that loss caused by your bigger tires, you need more power. You need a gear reduction! How much reduction do you need? The simple answer—enough to replace what you lost by increasing your tire size. If you go from a 25″ tire to a 32″ tire, you would need a reduction of about 28%.
How to Choose Which Portal Gear Reduction You NeedWe list the recommended gear reductions for each tire size (and the lift you’d need in addition to the portals to achieve those tire sizes) at the bottom of each of our 4″ and 6″ portal pages. These recommendations are specific to each machine and they tell you which gear reduction you’d want to choose to get back to (roughly) stock max speed.
It’s a very basic way to optimize your speed and your power/acceleration with bigger tires. But you don’t have to follow it. For example, most mud guys aren’t worried about hitting their max speed through a mud hole—they stick it in low and crawl through crazy deep mud on monster tires. They want the biggest gear reduction they can get, not the most balanced one for bigger tires. That super-high torque lets them plow through mud like it’s nothing.
The same holds true for rock crawlers. More torque is more preferable than power balanced with speed. Getting up and over huge boulders is more about pure power than speed.
With trails and dunes, a smaller, more balanced gear reduction might do just fine. With tires that are just a little bit larger than stock, the smaller gear reduction can get your power back and keep you moving as fast as possible.
One of the best ways to reduce your gear ratio (and get a bigger gear reduction) on your UTV or ATV is to install a portal gear lift kit. Odds are if you’re thinking about bigger tires, you’re already thinking about a lift and now you should be thinking about a gear reduction—a GDP Portal Gear Lift gives you both and more.
Advantages of GDP Portal Gear Lift Kits:Unlike a transmission kit, there isn’t a need to replace your factory gears. Instead, a portal gear lift is attached to the end of an axle at the wheel hub. The reduction and increased power come from the gears that are built into the box that operates at the wheel. This makes installation much less time consuming and accessible to all riders.
Portals transfer the force of the engine more closely to the object being turned (the tire), so there is less stress on the axles, differential, drive shaft, and the transmission—even less than a stock machine. A transmission gear reduction, on the other hand, can cause more stress on your drivetrain components since they’re subject to even more torque than stock.
You probably need more torque because you added bigger tires or a lift. Remember? That means you also probably put your axles to work at an angle that they aren’t used to because they are now connected to your wheel hubs from a different height than factory. This can cause a lot of stress and wear. An advantage of going with a GDP Portal Lift is that it relocates the axle centerline so you retain much of the factory steering geometry.
Not only are you going to get more ground clearance from your bigger tires, but if you use a portal lift gear reduction, you will also get an increased height of 4, 6, or 8 inches (depending on which lift you choose).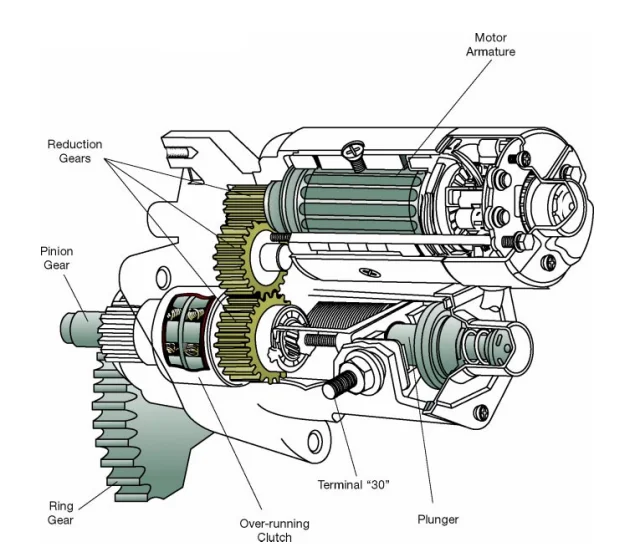 This is a big advantage that you won’t get by simply putting in a transmission gear reduction kit.
Finally, SuperATV GDP Portals allow a greater reduction than any transmission kit. This is really important if you have extra heavy tires or need additional torque for heavy rock crawling or climbing. The GDP 4″ Portal Gear Lift provides a 15 or 30% gear reduction, the 6″ GDP Portal Gear Lift gives a 30 or 45% gear reduction, and the 8″ GDP Portal Gear Lift comes with a 45% gear reduction. If you need a lot of torque, the only way to easily achieve it is with SuperATV portals.
Updated by Kavan Wright on 1/30/2020.
Motorsport attracts outdoor enthusiasts, and there are more and more people who want to create an ATV with their own hands. Four-wheeled motor vehicles make it possible not only to have an interesting time, but also become useful in the household. Having an old motorcycle, tools and drawings, it is quite possible to assemble an ATV with your own hands. Of course, the savings will be tangible, although it will not work to achieve high performance and driving comfort. Manufacturers are constantly improving engines, transmissions and chassis, introducing new technologies.
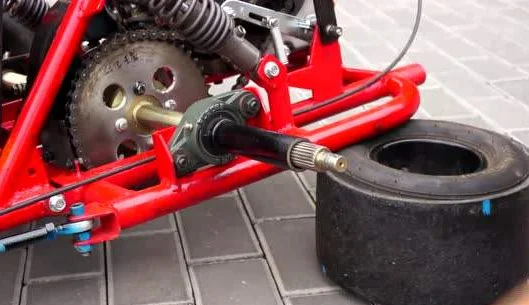
The first step is to choose more suitable drawings that fit the existing motorcycle model. Purchase metal pipes and start manufacturing the frame in accordance with the available technical documentation. Creating do-it-yourself ATV make the best use of the frame structure of a motorbike, making the necessary changes to it. Thus, the units and the drive system will stand in place, which will ensure their proper performance. All dimensions of the pipes to be welded must be exactly according to the drawing or well thought out so that the geometry of the ATV is ideal.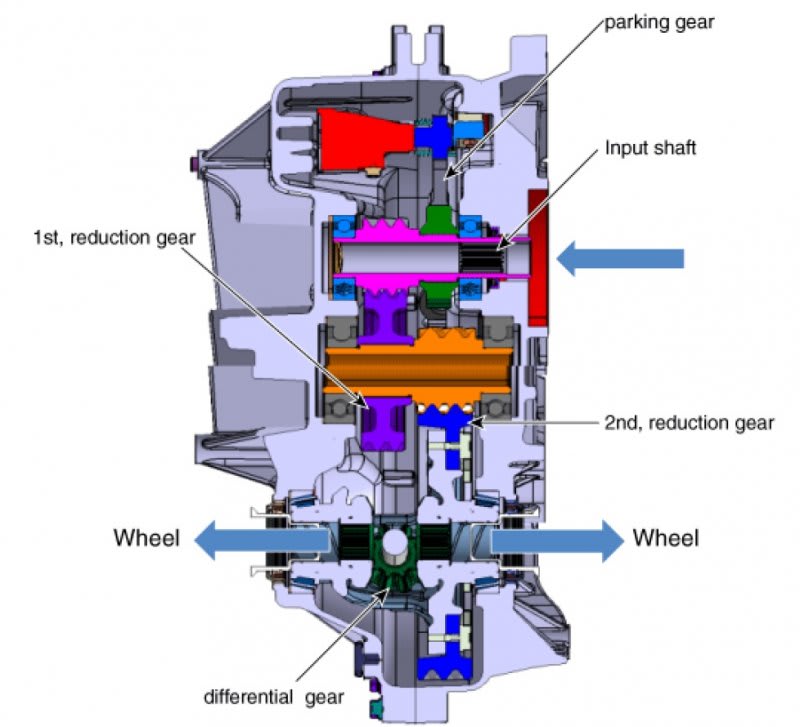 A little experience with welding will allow you to do everything yourself.
The engine and transmission remain in place, but the drive system will need to be adjusted to the rear axle with a gearbox. Making an ATV with your own hands with an independent rear suspension is impractical and difficult. The gear-shaft design is simpler and significantly reduces the weight of the ATV, as opposed to using an automobile bridge, which will need to be shortened.
It is better to install an independent suspension in the front and abandon the idea of all-wheel drive. It’s just difficult to create an all-wheel drive ATV with your own hands, and it will be expensive to buy factory components. The levers are made of metal pipes, but for control you will need automobile traction connected to the steering shaft.
You can provide forced cooling to the engine using an air system borrowed from the car.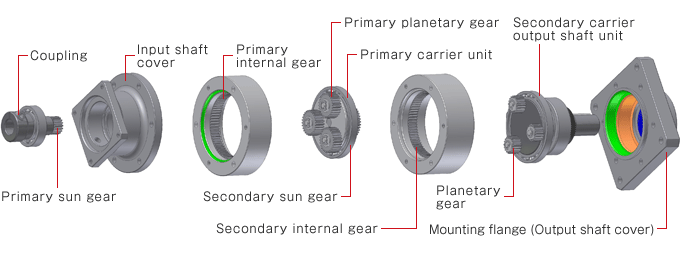 When making a do-it-yourself ATV , special attention should be paid to the brakes. The old brake system will not work, and it is better to replace some of its components with new parts.
At the last stage of creating an ATV with your own hands, you will install wiring, lighting fixtures and exterior elements. Body kit parts are made of sheet metal or selected from other equipment. Collecting do-it-yourself ATV it is important to carry out all the work with high quality, to think over the structural elements so that the created vehicle is practical and safe.
Without reverse, how is it usually? You’ll drive somewhere unsuccessfully - and suddenly the motorized towing vehicle gets stuck tightly, and then you suffer for a long time to get it. After a couple of such times comes a sensitive understanding of where you should not call. You become more careful, more careful. You can do without a reverse. If you drive carefully, carefully and thoughtfully.
What if the conditions are difficult? Rugged or wetlands? Deep snow?
With reverse, you can reverse and get out of almost any trouble, easily leave confined spaces (a small garage, for example). The reverse is especially helpful in the forest and on ice with hummocks, where increased maneuverability is required from the equipment.
With reverse you can take on steep slopes even in deep snow. A couple of attempts to climb up are enough - and pass back along the same trajectory. The snow will then become rolled - and it will be possible to call in without problems.
Reverse is also convenient if you buy a snow plow or, for example, a ski module for a motorized towing vehicle.
Reverse gear simplifies complex tasks. It has only one significant drawback: it increases the price of a motorized towing vehicle.
The reverse is installed only on new motorized towing vehicles, this is one of the additional options.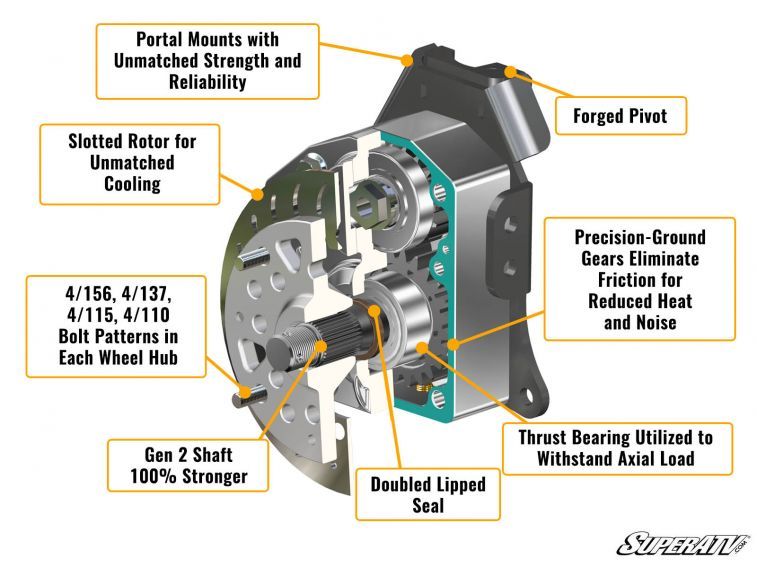
For models purchased without reverse, the engine is usually shifted to the center for proper weight distribution. Therefore, when installing a rather heavy reverse gear, it is necessary to shift the engine and modify the frame.
You will need to make calculations, pay attention to the weight distribution. Move the motor and install the reverse gear.
If you are confident in your abilities, it is worth taking a risk. If you are not sure, it will be safer to contact the master. It is good if this master will be your friend and will help you save money.
For our part, as a supplier, of course, we recommend buying models with a pre-installed reverse gear. You may not save money, but you certainly will save time and energy. Our craftsmen will make sure that the gearbox was installed correctly - and you will not have any problems with it in the future.
1. It will not be easy to get the alignment right.
2. You will have to strengthen the frame under the reverse gear.
3. It is necessary to distribute the weight correctly so that the motorcycle dog does not then fall on its side.
Engine oil LONCIN 4Т SAE 30 API SJ/CF 1 l (mineral)
Engine oil LONCIN 4Т SAE 30 API SJ/CF 1 l (mineral)
Order in 1 click
Ignition kit of domestic production (similar to DUKATI)
Order in 1 click
Drive shaft Taiga RM Lynx
Order in 1 click
Snowmobile TIKSY 250 LUX
The "Lux" modification is supplemented with an electric starter and handlebar heaters.