Share
With this crummy economy, we’re all looking for ways to save money. One way to save a few bucks is doing your own auto maintenance. We’ve already discussed how to change your own oil. Today we’re going to tackle another maintenance job that you can easily do yourself.
If you’re not careful, your car’s tires can become a big money pit. Tires aren’t cheap. A new one can set you back at least $80. If you go through a new set of tires every year, you’re looking at dropping at least $400. Boo.
One simple way you can extend the life of your tires is regularly rotating them on your car. Tire rotation means changing where the individual tire is mounted on the car. Some men don’t ever have their tires rotated, and those that do usually let a quick lube take care of it. But this simple 15 minute job will set them back at least $20 at most places. Save yourself the money by doing it yourself. In today’s post we show you how.
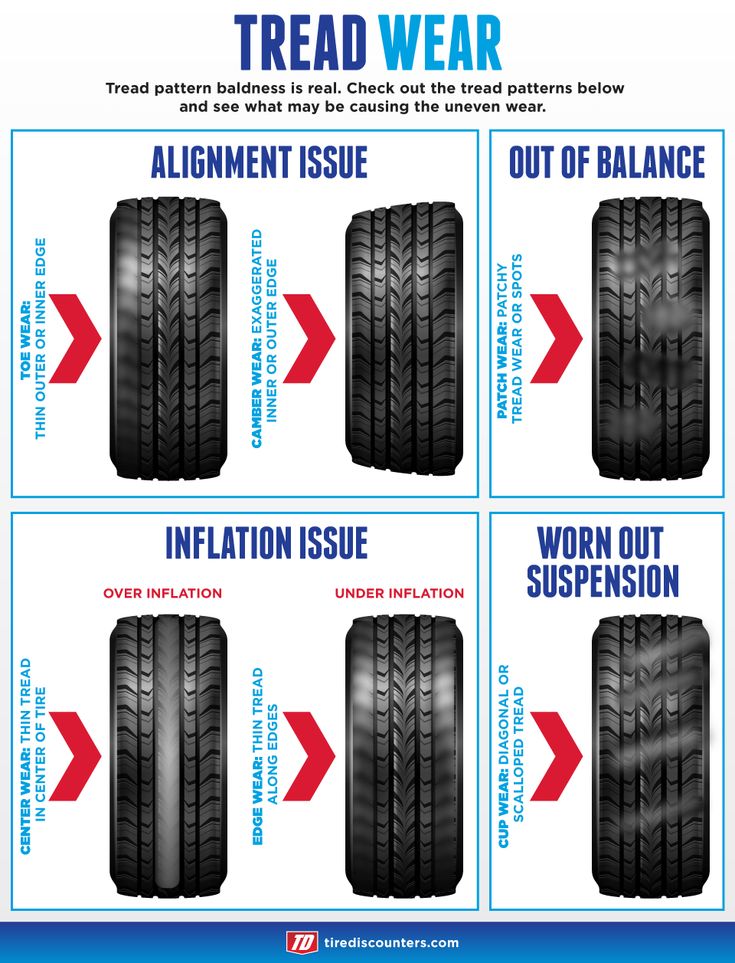
Front and rear tires wear differently. For example, the front tires carry more than 60% of your car’s weight; consequently, front tires wear down faster than the rear ones. Also, turning wears the front tires at different rates. In America, we generally take left turns faster than we do right turns. This puts more load on the right front tire which results in the right tire wearing faster than your left. After thousands of miles of driving, you end up with uneven tread wear.
Rotating tires equalizes these natural wear patterns by changing the positions of your tires. By rotating your tires regularly, you’ll ensure yourself a smoother and safer ride. And more importantly (for me at least) you’ll save money in the long run by extending the life of your tires.
Oh, and it feels manly to flip tires around, too.
Check your car’s owner’s manual for the recommended tire rotation schedule. Most manufacturers recommend that you rotate your tires every 5,000 miles.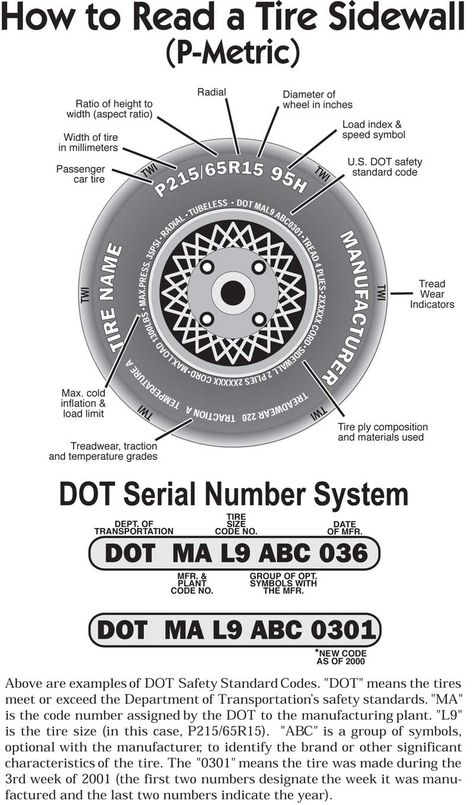 An easy way to remember to rotate your tires is to do it whenever you change the oil on your car.
Car jack. Using the jack that comes with your car can work, but it isn’t recommended for rotating your tires. It’s designed to lift up your car for a short amount of time so you can quickly change a tire. The safer route is to use a hydraulic floor jack. A good floor jack will set you back about $100, but your safety is well well worth the investment. A car jack will come in handy for other maintenance jobs as well.
Jack stands. You’ll need some jack stands so you can rest the car on top of them while you switch the tires out. You can buy a decent set of jack stands for about $30.
If you don’t want to fork over the dough, you can jerry rig a jack stand with a cinderblock and a two by four. Just place the cinderblock under a wheel and place the two by four on top of the cinderblock to prevent scratching the bottom of your car. Lower the car jack so the car rests on the cinderblock and two by four. Wala! Instant jack stands!
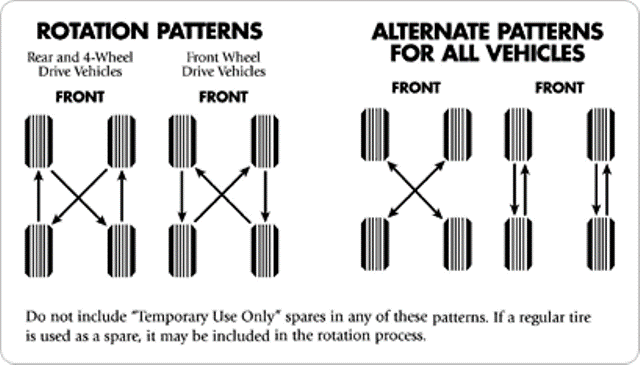
Before we start loosening those lug nuts, we need to know what pattern we’re going to use to rotate our tires. The way you rotate your tires depends on a few factors, the biggest one being whether your car has directional or non-directional tires.
How to Rotate Directional Tires. Directional tires have a “one-way” tread pattern that are optimized for the direction the tires rotate on the car, so they’re specifically made for either the left or right side. The grooves are angled to optimize handling, and they also do a good job of channeling water out from under the tire on wet surfaces, reducing hydroplaning and improving wet traction.
Little arrows or triangles on the sidewall indicate which way the tire is supposed to turn.
To rotate directional tires, just switch the front right tire for the back right tire, and the front left tire for the back left tire, like this:
How to Rotate Non-directional Tires.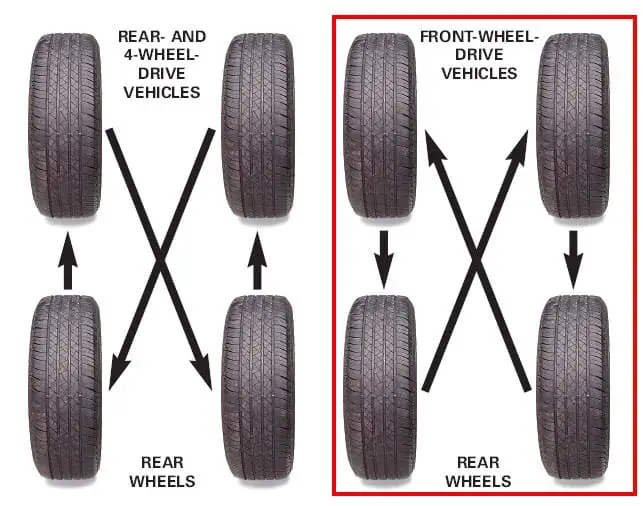 The tread pattern on non-directional tires is designed in such a way that the tire can be mounted on the wheel for any direction of rotation. So you can switch which side the tires are on when you rotate them.
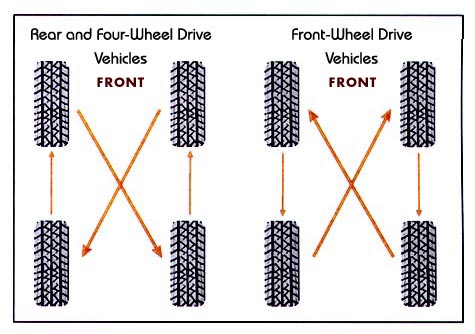
To rotate non-directional tires, use the cross pattern. For cars with rear-wheel drive, move the front tires to the opposite sides of the rear: left-front to right-rear and right-front to left-rear. The rear tires are moved straight forward. Here’s how it looks visually:
On vehicles with front-wheel drive, just do the opposite. Move the rear tires to the opposite sides of the front and move the front tires straight back.
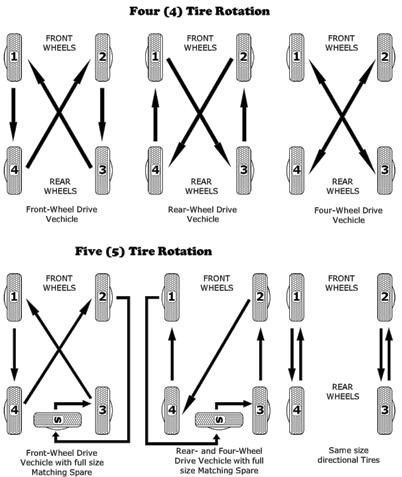
Some old car maintenance guides recommend that drivers rotate their spare tire into use in order to give one of the tires a much needed break. The problem with this advice is that the vast majority of modern spare tires aren’t designed for extended driving. They’re often smaller and feature a lighter-weight construction and shallower tread depth.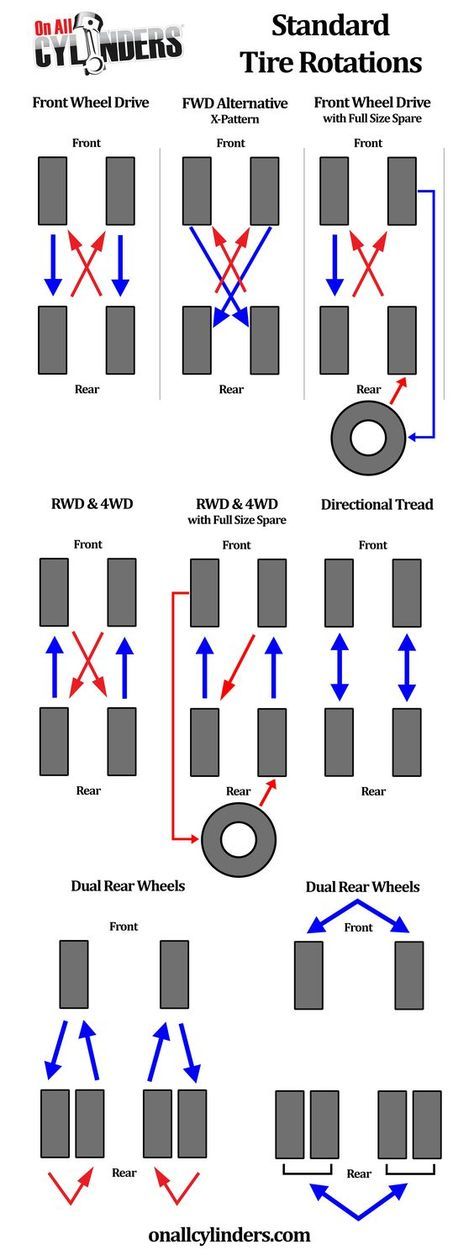 They’re designed to simply get you to a shop to fix the original tire. That’s it.
Some cars still come equipped with full-size matching spare tires. Off road vehicles and many SUVs usually have them. If you have a car that has a matching spare tire, it isn’t a bad idea to rotate it into use. Here’s a diagram for the suggested rotation:
Time needed: 20 minutes.
1. Engage parking brake. Just for your safety.
2. Loosen the lug nuts on all your wheels. You don’t want to take them completely off yet. Loosening them now will make unscrewing them when the car is elevated much easier.
3. Lift up one wheel with car jack and place jack stand underneath it. If you just have one or two jack stands (or cinder blocks) you’ll need to do a bit of mental work before you start jacking so you know how you’re going to proceed with lowering and raising your car. Because you have fewer stands, you’ll also spend more time lowering and raising your car in order to switch them out.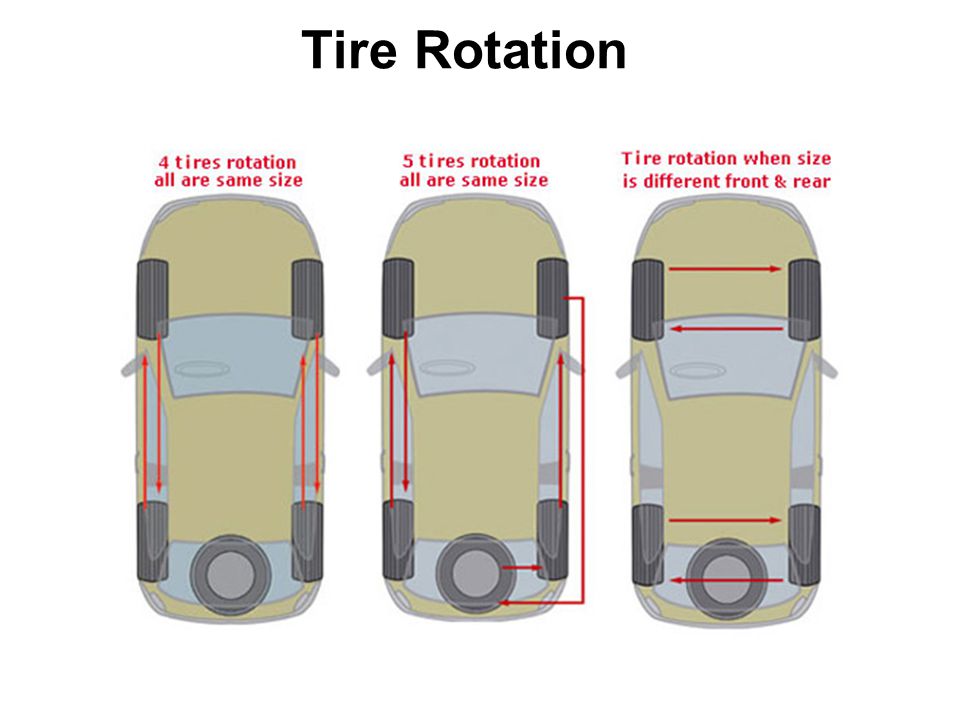 Despite the extra effort, you still won’t spend much more than 20 minutes on the job. I’ve seen some people place their car on all four jack stands. It’s not exactly the safest thing to do, but it will definitely help you get the job done faster because you don’t have to switch out jack stands.
4. Remove the tires and rotate them according to the appropriate pattern for your type of tires. When you place a tire back onto the wheel mount, screw the lug nuts on by hand as much as you can.
5. Lower the car from the jack stands. Take the lug wrench and tighten the nuts even more. It’s best to work the lug nuts diagonally from one to another. It looks like a star pattern. This ensures even tightening. Tightening the lug nuts unevenly can warp the brake rotor.
Star pattern when tightening lug nuts
That’s it! Now just mark down the mileage when you rotated your tires and remember to do it again in another 5,000 miles.
Tags: Cars
PreviousNextHow-To Guide
Posted on: September 17th, 2019
Taking off the lugs of the vehicle's tiresTo compensate for uneven wear and tear on your tires, regular tire rotation is important. Your front tires carry about 60% of your vehicle’s weight and are more likely to feel hard turns, therefore they wear out more quickly than your rear tires. By rotating your tires regularly, you will even out the tread wear that comes with daily driving and prolong the life of your tires. Generally, tires should be rotated every 5,000 miles; consult your owner’s manual to see if it provides a recommended tire rotation schedule.
Identify the possible rotation pattern for your vehicle, which will be based on the type of tires you have as well as whether your vehicle is front or rear wheel drive.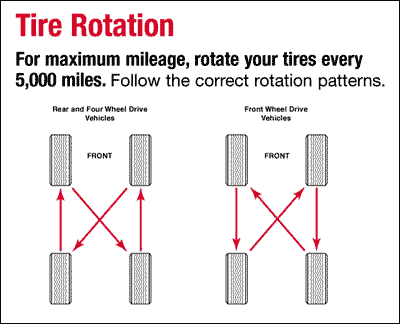
Loosen the lug nuts of all the wheels but don’t remove them yet.
Jack up your car and use jack stands to support the vehicle. Consult your owner’s manual to determine the proper placement of the jacks.
Remove the tires and rotate them according to the correct pattern for your tire type.
As you place each tire in its new position, screw in the lug nuts by hand as much as you can.
Raise up your vehicle using your jack and remove the jack stands. Then safely lower your car back down.
Finally, use the lug wrench to fully tighten the lug nuts of each tire. Tighten diagonally, in a star pattern to ensure even tightening. If you tighten them unevenly, you run the risk of warping the brake rotor.
Share This Article
Top Related Articles
More How-to Guides and Articles
For the normal operation of the vehicle, it is necessary to periodically replace and install high-quality tires.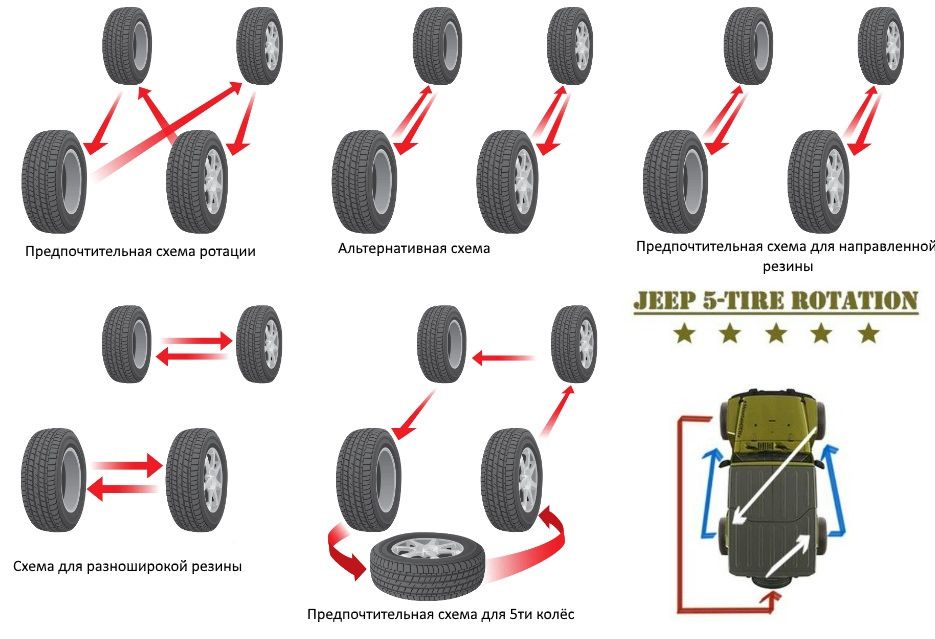 This is an almost simple process, but not all motorists can handle it, especially for beginners.
Usually replacement is carried out for certain reasons:
To carry out competent work on replacing rubber, it is necessary to follow the recommendations and rules. Otherwise, it can lead to a wheel out on the track and a serious accident.
First of all, you need to know that the tires to be installed must comply with the general dimensions and characteristics recommended by the car manufacturer. There may be small differences, but not more than 2%.
General properties and dimensions are specified in the vehicle's instruction manual. If these are not available, use the recommendation of the car dealer.
The next step is to find out the load index of the tire being installed, as well as the speed characteristics. They should not be less than the parameters specified in the instructions from the manufacturer.
Tire changes can be made with higher index values, but not with lower requirements. Typically, indexes are indicated in the operating instructions for the car.
Next, analyze the air pressure characteristics of the tires. The indicators must be completely identical with the factory settings. Otherwise, the wheel may be severely deformed and burst when driving a passenger car.
If the tires are over-inflated or, on the contrary, have less air, this will negatively affect the stability of the vehicle and its high handling characteristics. Tire pressure indicators are indicated in the operating instructions for the car.
Now let's highlight another important rule that beginners and experienced car owners should use when installing a complete set of tires: when purchasing sets of tires, you need to make sure that the characteristics of the landing and offset of the disk correspond to the factory parameters of the vehicle.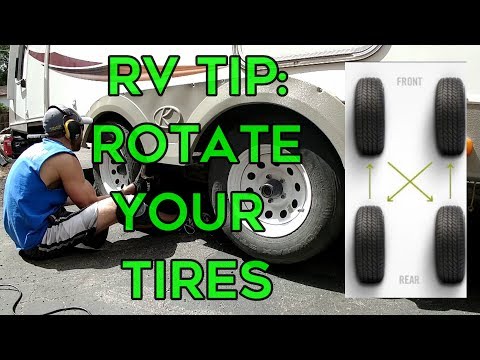
If these properties do not match, then this will negatively affect the handling of the car and quickly lead to deformation of the car suspension. General departure and landing characteristics are specified by the tire manufacturer and the factory where the vehicles are produced.
On any type of passenger car, the front tires are most often deformed, since most passenger vehicles have front drive axles. Accordingly, the rear wheels on them are subject to less wear.
Many owners often try to regularly change the front tires, and leave the rear tires for a few more seasons.
But in this situation, every car enthusiast should know that the absolute indicators of safe and reliable driving will only be achieved by using all 4 tires with the same tread.
Naturally, tires are expensive products and not everyone can afford to regularly replace products, especially in a complete set.
In such a situation, the installation of tires can be divided into two stages. To begin with, the front tires are replaced and after a certain period of time the rear tires are installed. However, all processes are recommended to be performed only with identical pairs of tires.
If the installation of new tires has to be carried out urgently due to deformation of the old ones, then you should know a certain rule. Regardless of the model or brand of tires, the thickness of all four treads must be identical to each other.
If only one tire is damaged and cannot be repaired, at least a pair of new ones should be used.
You can only replace one damaged tire if the set is brand new and has only been driven a few hundred kilometers.
In this situation, the owner of the vehicle can purchase only one similar tire and install it instead of the damaged one, without fear of losing the quality of control and safety while driving.
When a motorist has traveled more than 1000 km, it is no longer possible to replace only one tire.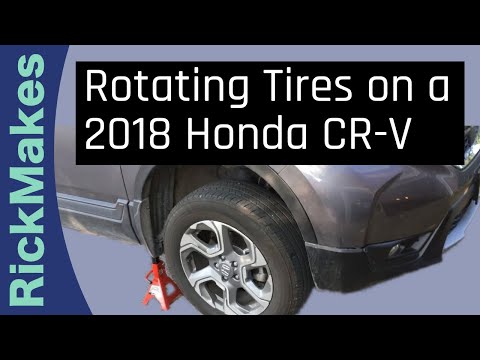 The protectors wear out quickly enough, and balance will probably be lost when installing only one new one.
Just before installing a new tire on a wheel, a detailed check of its condition is required.
The disc is checked for serious defects, warping, and wear on the flanges and rim. It is recommended to remove additional weights balancing the wheel and valve at the time of replacing the old rubber. This procedure is performed only in the situation when the tire does not have a chamber.
When installing a new tire, it is advisable to take into account the marking in the form of colored marks applied to its surface. They indicate the main direction of rotation in the form of an arrow on the side.
Easier and easier mounting of the tire is directly related to the application of individual spots on its beads or the use of soapy liquid. However, do not overdo it with lubrication, as the rubber will begin to slide on the disc rim.
Installation of new rubber on the disc is carried out in the opposite direction with respect to dismantling. First you need to put the tire on one side of the disc rim, and then insert the inner tube. Moreover, the valve should fall into a small hole in the rim. The next step is to install the second sidewall of the rubber.
Thus, the tire fits well on the rim, after which the air pressure should be reduced to the desired parameters. Here it is important to take into account the fact that the pressure is measured at the moment when the tire is installed on the wheel, subject to the car weight.
For tubeless tyres, this process is a bit more complicated. A simple pump for pumping or a special compressor cannot be used until the rubber beads are completely leaning against the disc rim, since air actively penetrates through the gap between it and the tire.
You can use an alternative method: inflate the vehicle tire to four atmospheres. Then we remove the hose and install one of its ends on the valve of the mounted rubber.
First unscrew the nipple and insert a part of the hose with a special fitting into the inflated tire.
Then, once the fitting is installed, most of the air will enter the tubeless tires and set them in place by stabilizing the pressure. At car service stations, original compressors with large receivers are used to inflate wheels.
However, this task can be done by yourself, if you show a little skill and logic. Also, do not forget that after installing new rubber, the wheel is balanced.
Every owner and experienced motorist knows that front tires should be changed at the very beginning. Since the car is subject to a lot of skidding when driving on worn rear tires, there is a great risk of deformation and rupture of the front wheels.
In a situation where the tires on the front wheel burst, accidents without serious consequences can no longer be avoided.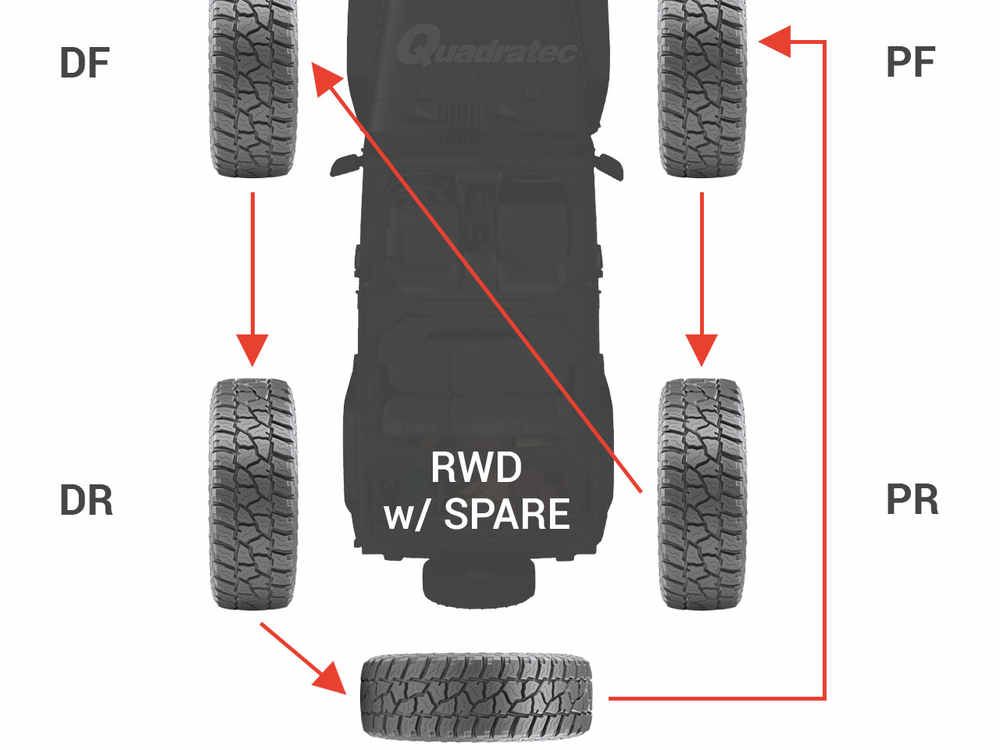
The main causes of severe front tire wear are associated with maximum axle loads and regular steering turns.
Since the front wheels are regularly subjected to severe impact and subsequently ruptured, higher requirements are placed on them in terms of increased strength and reliability.
To reduce the risk of punctures and warping, front tires should be replaced in pairs. The level of controllability of the car depends on the competent choice of tires.
Has a different tread pattern. In the summer, it is not recommended to ride on tires - wear will increase.
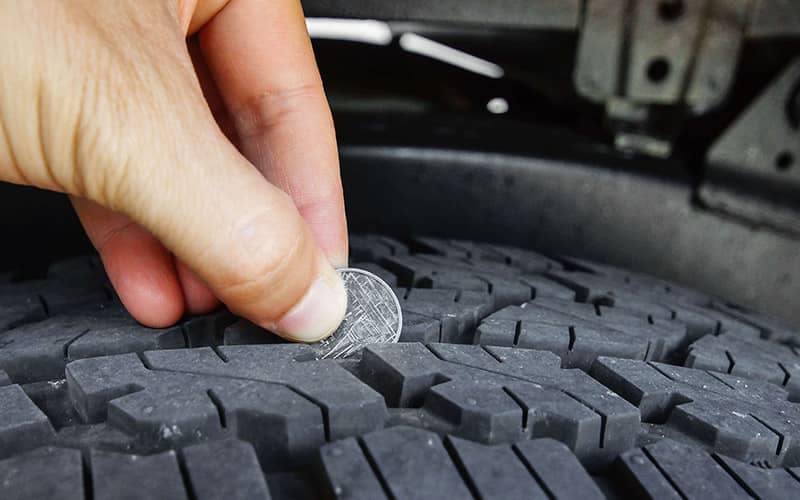
You can easily check the health of the tires. They must not: 1. Have "bald" parts.2. To be with inflated sidewalls.3. Have a tread depth of less than 1.6 mm (established by law).4. Differ in size from the tire on the other side of the axle.5. Have cracks.6. Used for over 6 years.
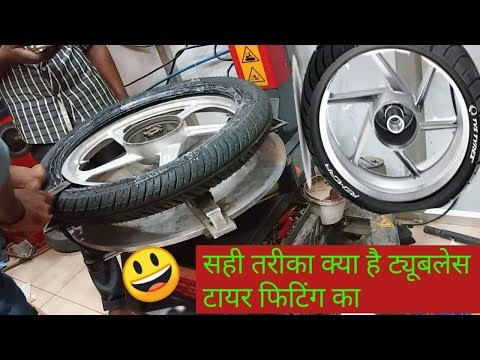
When it's time to change tires, you have to choose which tires to buy. All tires are divided into chamber and tubeless, radial and diagonal. All have their pros and cons. What you need exactly depends on the purpose for which you use the car.
There are three ways to change tires:
1. You will bead the wheels yourself. This is a very labor intensive process. It takes a lot of time and effort. It is not for everyone.2. You are contacting a service. They will do it quickly, the main thing is timely treatment. It happens that in the off-season queues of people wishing to change tires accumulate.3. You buy tires along with rims. Expensive, but the replacement is very easy to handle yourself.
Most importantly, when buying, carefully inspect the tires. They should not have cracks. Also make sure that all spikes are present.
Related article
What should be the sign "Spikes": dimensions and color of the sticker according to GOST
Sources:
The tread pattern on car tires has 4 main types: asymmetric non-directional, asymmetric with a directional pattern, symmetrical non-directional and, accordingly, symmetrical with a directional pattern. Each type of pattern on wheels has its pros and cons. It all depends on the type and pace of driving that the driver prefers, as well as on the car itself.
Relatively recently, directional tires appeared on the market, which immediately became very popular, although the price jumped significantly.
Directional pattern is much more common. In such wheels there are special channels through which water is squeezed out when the car is moving at the moment the tire contacts the roadway. They have a corresponding name - "rain protectors". On a wet road, they do their job perfectly, but on a dry surface, the performance deteriorates, as the channels for draining water reduce the area of \u200b\u200bcontact with the road. The Rules of the Road clearly indicate the installation of such wheels, since with the wrong direction of rotation, water accumulates in the central part of the tread and creates a water wedge, the so-called "hydroplaning", even at slow speeds.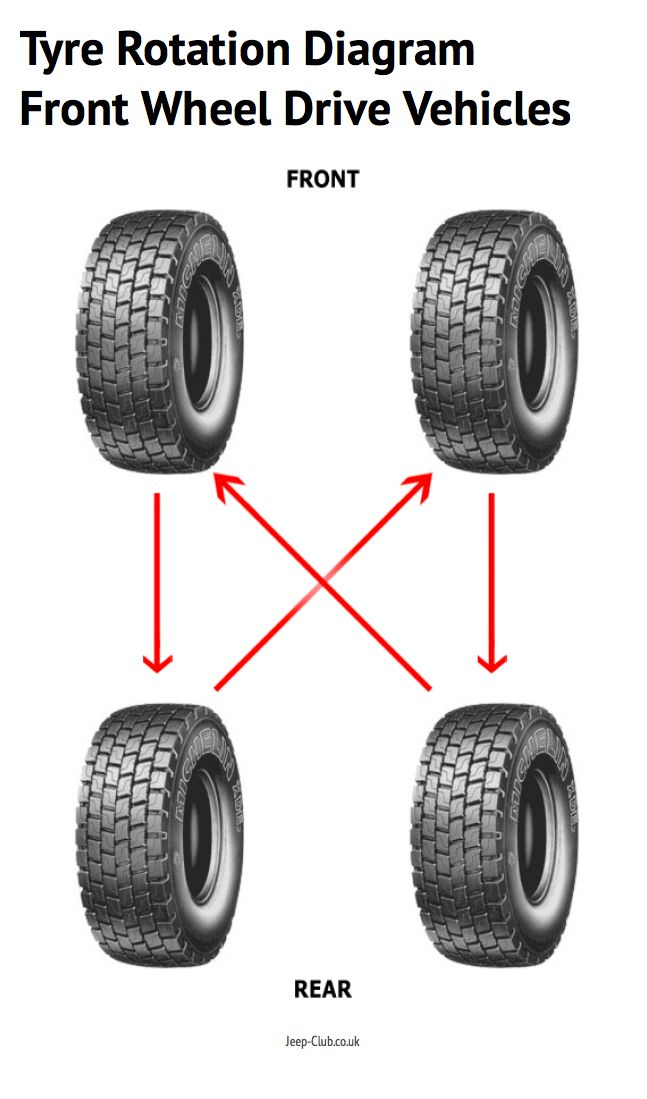
Tire hydroplaning is a phenomenon in which the wheels (tires) of a car lose contact with the road, and instead of a solid road, a thin film of water forms under the wheels, on which the car slides.
The most expensive are directional asymmetric tread patterns. Such wheels require special conditions and technologies in the production of rubber, because of this, the price differs from other types. Usually they are put on sports cars or premium cars. The bottom line lies in the fact that the inner part of the wheel provides traction, and the outer one cleans the tread from water, snow and dirt. The installation of such wheels requires taking into account both the direction of rotation and the axis of the vehicle.
Related article
Sources:
The tread is a protective element that is necessary to prevent damage to the tire and the inside of the tire. Such protection is applied to the outer part of the tire in the form of a specific pattern, each of which has its own distinctive features and advantages when operating at certain times of the year.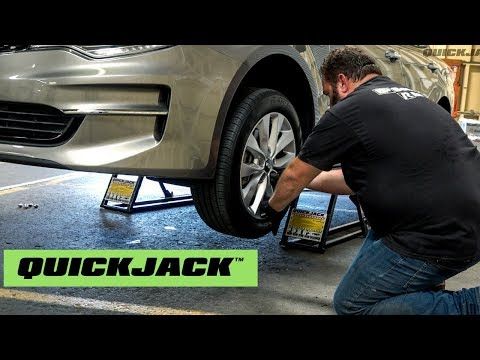
The main purpose of any tire tread pattern is to provide the most comfortable vehicle flotation. The drawings differ, as a rule, in the direction of the incisions, their depth and number. It is believed that stiffer treads are the best option for summer driving, while less pronounced and narrow patterns, supplemented with special spikes, are more suitable for winter. The cuts are filled with mud, snow, water and thus improve the conditions for cross-country ability.
There are several classifications of tread patterns. In a broad sense, they are divided into off-road, universal and smooth. The first category of protectors is characterized by a massive pattern. These tires allow you to move comfortably on almost any terrain. Universal drawings are designed for driving on asphalt roads, mainly in the summer. Smooth treads are only suitable for perfectly packed trails.
Directional patterns are applied according to the principle of inclination of the incisions towards the inside.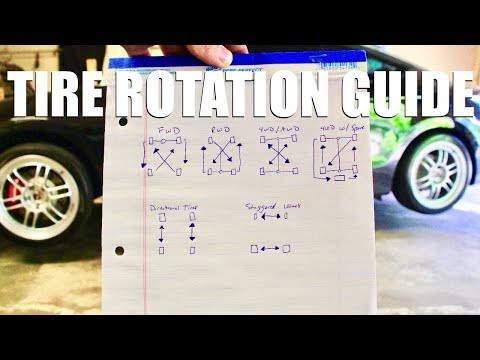 The difference between symmetric and asymmetric treads is that the patterns on them are the same in the first case, and in the second, the two lines are radically different from each other. For example, one tread band may have a directional pattern, while another may have horizontal notches.
Directional patterns for maximum driving safety in bad weather conditions. The tire resistance to wet asphalt in this case increases several times. The vehicle is much more stable on the road, and therefore it is much easier to drive.
Symmetric directional tread patterns are most commonly used for rear wheel drive vehicles. The advantages of such a set are obvious. The front wheels come into contact with the asphalt during intensive rotation, due to the directional pattern, the effect of “drying” the surface is created. That is why the rear wheels provide a safe ride, in contact with the already prepared road.
The non-directional tread pattern is applied predominantly in a horizontal pattern.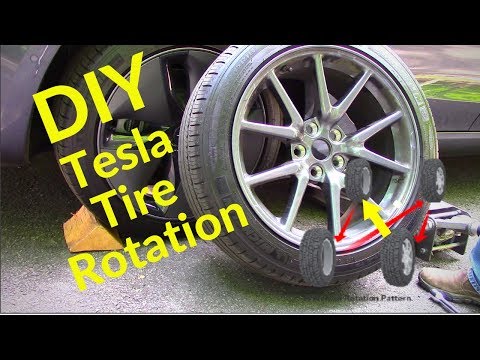 Such options are the most common both on sale and in use by car owners. The main features of such cuts are considered to ensure maximum ride noiselessness, comfort in driving, as well as high safety performance.
Non-directional tread patterns are only suitable for drivers who are not fans of fast driving. As a rule, such tires are an integral part of the factory equipment of most car brands.
A symmetrical non-directional pattern is applied evenly over the entire surface of the tire, an asymmetric one consists of two stripes that slightly differ from each other in the direction of the notches. The main advantage of such tires is versatility - the wheels can be swapped in any sequence.
Car tires play an important role in vehicle operation. They provide comfort while driving, make the movement in the car safe, provide reliable traction in adverse weather conditions. And the first thing to remember for both a novice and an experienced motorist is the need to control the level of tire pressure.
Why is this so important? It is the pressure indicators that determine the readiness of the wheel for road confrontation in all weather conditions. Thus, a decrease in tire pressure leads to an increase in fuel consumption. And in a critical situation, it can cause loss of controllability and stability of the vehicle. So is it worth the risk if regular tire pressure checks will help you avoid a lot of the hassles associated with the operation of the car?
Before mastering the tricks of tire fitting with your own hands - in a garage or outdoors, it is important to study the theoretical part of the process. To begin with, it is worth deciding on the complete set of an automobile wheel, consisting of a tire and a disk with a rim on which it is put on.
All types of modern car tires are divided into several categories with their own design features:
In addition, tires are divided into:
 Not applicable for operation at low temperatures;
 Car tires are graded according to the type of arrangement of threads in the cord base. It can be radial - at a right angle relative to the sides, or diagonal, with threads crossing from sidewall to sidewall diagonally.
The ability to dismantle and install a car wheel is a great advantage for a car owner. You can be calm in the most non-standard traffic situation, and in the conditions of an urgent seasonal tire change. And if you have not yet mastered all the wisdom of automaking, it is never too late to take the first steps in the right direction. The main thing is to learn the procedure.
To remove/install a car wheel, you will need:
After completing the preparations, proceed in stages:
A removed wheel must be replaced with a spare. To do this, a pre-prepared "reserve" is placed in the place of "landing" of the wheel, installing it with the help of studs or guides - depending on the design. And then they are fixed (not completely) with the help of previously dismantled fasteners, checking the reliability of fixation (the nuts must be screwed in order of priority, starting from the topmost, in a diagonal sequence - this ensures proper centering).
The final tightening of the nuts is done only after the vehicle has been lowered from the jack. Upon completion of the installation procedure, it is necessary to check the tire pressure (normally it should be from 2 Bar or more) and, if necessary, bring its indicators to the desired values.
Sometimes a tire fitting procedure requires more than just a temporary fix by replacing a wheel, but much more decisive action.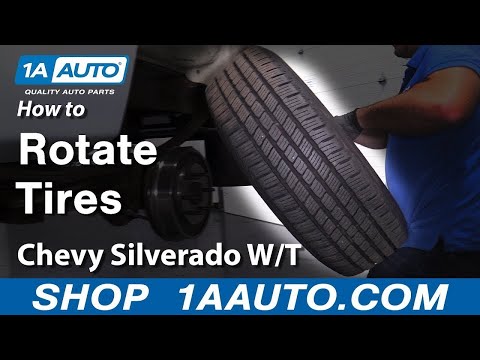 In particular, replacing a tire on a car disk, which even in a garage does not look like a simple matter. What does it take to change tires yourself?
Do-it-yourself wheel beading is a process that requires a certain endurance. It is necessary to separate the tire from the rim as carefully as possible, gradually pressing the rim. With paddles between the rim and tire, use the soapy solution as a kind of lubricant, making it easier to release the tire bead from under the rim.
It is important to note that during the dismantling process you need to work slowly, gradually moving along the rim. On average, in the absence of special equipment and skills, it will take about 30-40 minutes to dismantle one tire.
The process of changing a tire is the same. With the help of the blades, the tire is gradually placed in place, gently tucking under the wheel rim.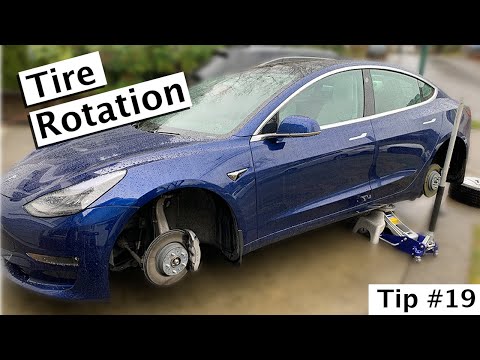
Upon completion of the tire mounting process, our wheel is ready to be mounted on the vehicle. To do this, it is placed at the attachment point and fixed with bolts, and then removed from the jack and the fasteners are fixed in the mounting sockets to the maximum. Upon completion of installation, the tire pressure must be brought to standard values.
We bring to your attention a video lesson "How to change a wheel on a car":
Having mastered the basics of tire fitting with your own hands, you can always cope with an emergency tire change in traffic situations without resorting to the help of specialists, and seasonal replacement of summer tires with winter ones will not cause serious problems.
Punctured wheel... This malfunction can unexpectedly overtake any driver, regardless of his status, gender and vehicle class. Of course, manufacturers of modern tires are increasingly using technology in their products that allows even with a punctured tire to get to the nearest tire service.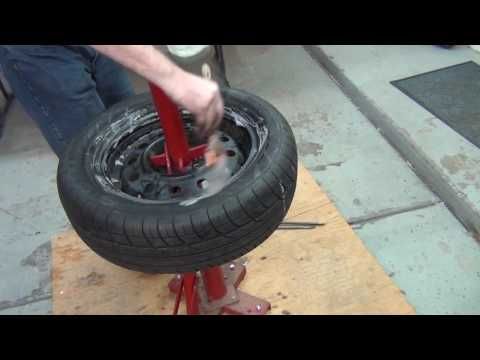 However, in life it may happen that there simply will not be a place where specialists can change the wheels on a car within a radius of several tens of kilometers. And no technology can withstand a long run on flat tires, especially on our roads. There is only one way out in this situation - to change the wheel yourself.
And this is where motorists who are far from nuts and keys, from ignorance of how to change a wheel on a car, may have problems. Although there is nothing super complicated in this. Only before proceeding with the elimination of the malfunction that has arisen, you need to perform a number of necessary measures that will help prevent much more serious troubles.
It goes without saying that every car should have a spare wheel and a tool kit for changing it, which includes:
There are also useful additions that, although not mandatory, can make the job easier, and whether to carry them with you or not is a personal matter for everyone.

If all this is available, and there is also theoretical knowledge on how to change a wheel on a car, the process will not be difficult. The main thing is to follow the order of work, to be attentive, careful and accurate.
Remove the damaged wheel and put a whole one in its place - everything seems to be simple and clear, only this work has its own small nuances, ignoring which can end badly. Wheel vibration resulting from improper installation will gradually destroy the vehicle's suspension. In addition, the wheel nuts, again, due to vibration, will begin to unwind. As a result, the wheel can simply fly off, and this already threatens a serious accident.
Installing the spare wheel is done in reverse order. Let's see how it's done.
Before installing the spare wheel, its inner surface must be cleaned of dirt with a metal brush, especially in the area of contact with the surface of the hub. The same must be done with the hub itself. Otherwise, the dirt between the disk and the hub will not allow the wheel to sit tightly in its place, it will turn out to be a micropercos. Because of this, wheel vibration, uneven wear of the tread surface, and gradual loosening of the nuts may occur.
The next thing to do is to check with a pressure gauge whether the pressure in the spare tire is correct and, if necessary, inflate the tire (standard is 2 kgf).
Lightly grease the threads of the studs before fitting the wheel onto the studs. Twisting the wheel begins with the nut located on top. It twists all the way, but does not tighten. You need to do this according to the cross system. That is, after tightening one nut, the next one is the one on the opposite stud.
The machine is then lowered, the jack is removed and the nuts are tightened to the maximum. The tool, together with the punched wheel, is removed into the trunk.
Actually, on this topic, how to change a wheel on a car yourself, can be considered closed.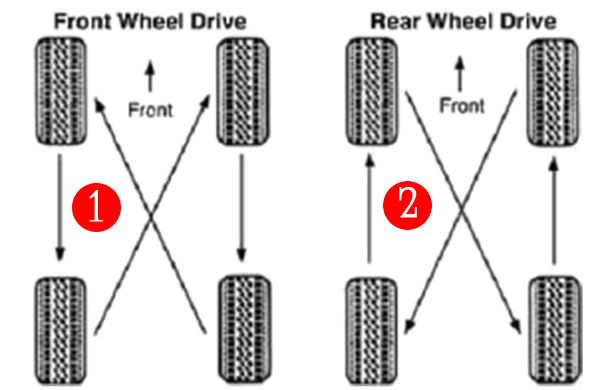 This work is simple, and it will be possible for any motorist, even without experience with the tool, to perform it.
In addition to the above, I would also like to raise questions about how to change the wheels on a car from summer tires to winter tires, and how to increase the life of tires using the rearrangement method.
When changing tires seasonally, there is a very important point that must be observed. In this case, knowing how to change a wheel on a car will not be enough. Before this procedure, the wheels must in any case be balanced. It will be impossible to do it on your own, unless, of course, there is special equipment and proper qualifications. That is, the wheels will need to be shown to specialists. The only way you can save a little on this is to take the wheels to a tire shop, and after balancing, already at home, replace them yourself.
To prolong the life of already installed wheels, experts recommend swapping them. Then the tread will wear out more or less evenly, because on the leading elements the wear of its pattern occurs much more intensively than on the driven ones.
To change the wheels on the car yourself, you just need to know the process diagram and keep in mind the frequency. The rearrangement should be done every 10 thousand km. There are several such schemes, depending on the drive of the car and the type of tires. If the tires are of an asymmetric type, then it will be universal for any type of drive. In this case, the wheels are simply rearranged from one axle to another in parallel.
Swapping symmetrical tires on a front-wheel drive car is also quite simple. In this case, the wheels, having passed the allotted mileage, are rearranged diagonally relative to the axis of the car.
But here you need to remember that if during operation at least one of the wheels received serious damage, then it should only be on the rear axle (not leading), and further rearrangement with its participation can no longer be done.
Swapping symmetrical tires on a rear wheel drive car looks a bit more complicated than on a front wheel drive car.
In this scheme, the rear wheels are mounted on the front axle, the shift is carried out in parallel, but the front wheels are mounted diagonally on the rear axle.
The swapping scheme for 4WD vehicles is similar to that for RWD vehicles, only in reverse.
In this case, the front wheels are mounted parallel to the rear axle, and the rear wheels "move" to the front diagonally.
In conclusion, I would like to note that knowing how to change a wheel on a car, and applying this knowledge in practice, the driver can not only solve the problem with a punctured tire on his own, but also increase the life of the installed tires, thereby saving his time and money.
The article is a must-read for novice motorists, especially for beautiful ladies. "Cool" racing drivers do not need to read.
This action, for "experienced" and with experience, cannot even cause feelings similar to panic, but for a beginner, and especially if this is a girl, a lot of all kinds of questions arise.
Here, in this article, I want to put all the dots where it should be. So that there is no mockery of ill-mannered sellers of automobile wheels over lovely young ladies.
Summer tires are dangerous to drive in winter unless you live in Australia or banana-lemon Singapore.
"Oh, why?" - the inquisitive girl will ask a question.
"Yes, you drive! All last winter, I drove on my chisel on summer tires, ”says an ill-mannered young man with a driving experience of 2-4 years.
I answer both at once:
You can of course ride on summer tires in winter, if wisely, especially in large cities where snow is seen mainly on TV. But, sometimes, one such snowy day is enough to send your iron horse to a body repair. Not in vain, it is precisely such “snow-icy” days that are called “bodybuilder’s day”.
I hope the first question is answered.
If the first question was accepted almost unanimously, then we smoothly move on to the second - to install winter tires with or without studs?
If your car plows the stone jungle of the metropolis, and trips out of town, for example, skiing or going ice fishing, are not your forte, then you definitely do not need spikes on wheels.
Moreover, they literally completely demolish the road markings, which are so painstakingly, at night, painted with brushes by cunning traffic police.
Winter tires (without studs) in the city will come in handy when one day, driving into your yard, you will see that a caring utility tractor has piled a snowdrift where you usually park. Or, when you leave a warm apartment on a gloomy morning, you will be surprised to find that magic snow was falling at night and the same tractor formed a snowdrift along parked cars.
There is a little parable about this, or if you want an anecdote.
As you know, all people are divided into two categories: - motorists and others. The rest, leaving the house, rejoice at the snow that fell at night like children, saying with delight: "What an amazing and magical snow fell tonight!"
And only a tribe of motorists, running around the car with a clue, mutter angrily: "Heaped this fucking snow again!"
Residents of the vast northern expanses of Russia, I will not advise. They already know everything. “What thorns are there for the devil,” they grumble, putting chains on the wheels.
Probably, even the most recent teapot knows that the diameter of the wheel is measured in inches (”) - well, that's how it happened. Accordingly, the disk under the rubber is selected the same.
A disk is selected under the 15” rubber, guess three times :), 15” is also correct.
The rim, as you know, is attached to the machine with nuts or bolts.
So, when buying rims, you should consider the size of the seat on the hub of your car and the number of these same holes. Here, measurements are already taken in millimeters.
For example:
mysterious numbers 4 X 10⁸, mean - four mounting holes and the distance between the centers of these holes is 108 mm.
There is also such a thing as the "removal" of the wheel (rim). A simpler explanation is how far the wheel, relative to the midpoint, is extended or recessed. Yes... I bent it... So, now I'll try it even easier...
Well, the wheel either sticks out or hides in the wheel niche.
More detailed information can be found on the vast expanses of the Russian Internet, if you enter a phrase in a search engine, for example: “pick up wheels”.
 When removing the wheel, we unscrew it first of all (remember that, thank God, we didn’t tighten it with our foot!).
 Of course, this is not all wisdom - only what I remembered .... Additional tips "experienced" are accepted in the comments.
The most costly way is a trip to a wheel supermarket, sparkling with forged, alloy wheels and sweetly, for the smell of a car enthusiast, stinking of imported rubber. Here you will be kindly offered a discount on the installation of wheels, all sorts of discount cards. In what amount everything will result, only God and, probably, the senior seller knows.
You can, of course, wander around all sorts of markets and small shops. Buy tires and then wheels. Next comes the cost of tire fitting and wheel balancing.
In my opinion, the most reasonable and economical way to become the owner of a set of winter (summer) wheels is to search and buy them on the Internet.
Advertise on various Internet resources that you want to become the owner of a complete set of wheels (on cast or iron rims - this is already on the volume of your wallet and ambitions).
Do not forget to indicate the size and mounting dimensions. For example: “I will buy a set of winter wheels on alloy wheels R15 4x10⁸, little used”, and at the same time, do not forget to look through the ads of other sellers.
With this method, you can save up to 50% of the cost of the wheels. (Tested, works!)
To extract maximum savings - you should look and buy, of course, not in the season of changing wheels.
Draw conclusions for yourself.
Changing wheels is like a physical exercise. Everyone knows to do it, but getting yourself to actually do it can be a challenge. While we can't really help you with fitness motivation, we have plenty of good reasons why you should swap tires every 5,000-13,000 miles.
Tire wear is inevitable when using a car. The location and extent of wear on a tire's contact patch depends on many factors, including the position of the tire on the vehicle. Keep in mind that each axle of a vehicle faces a different external force. For example, the front tires on a front wheel drive vehicle are regularly subjected to more intense stress than the rear tires. Thus, front tires on a front wheel drive vehicle typically experience accelerated wear compared to front tires on a rear or all wheel drive vehicle. Changing the wheels helps even out the wear on all four tires. If you leave the front tires uninterleaved on a front wheel drive car, they will wear out faster than the rears. Without a proper check, you will end up with two front tires almost or completely at their maximum tread wear, and two rear tires with life remaining.
Tire rotation helps to avoid uneven wear
As a result, you will have to replace some tires prematurely. In some cases, while some of your tires may technically retain their remaining life, it will no longer make sense to pair them with any new tires with unworn tread. So you have to throw away not only worn tires, but also tires with remaining service life!
See also:
Tire grip coefficient and factors affecting it
In summary, here are the top reasons for swapping tires:
Tires are absolutely essential to your vehicle's performance and safety. Keeping your tires in good condition with rotation and other simple maintenance will help keep them wearing evenly which directly affects your vehicle's stability, driving predictability and makes it easier to maneuver safely throughout the life of your tires. Tires in poor condition can cause the vehicle to vibrate.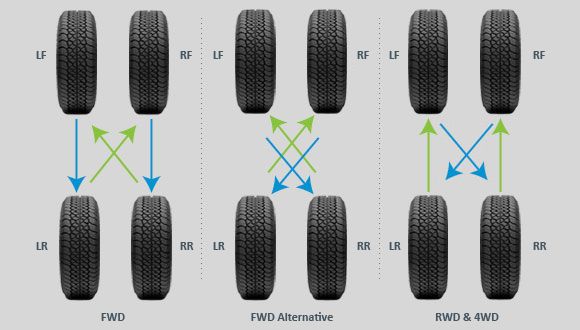
Remember: uneven tire wear can also affect the stability and handling of your vehicle. Swapping wheels is not only financially sensible, but it also helps to ensure the safety of your driving.
If tires are not rotated and maintained properly, you are likely to lose not just a few hundred miles of tire life, but thousands. The life of a tire can literally be cut off in the middle if you do not follow the rules for their alternation and do not take other necessary measures for their maintenance.
Tire manufacturers know that rotation is necessary to realize their full life. Tire mileage guarantees are most often set by tire manufacturers based on tire rotation. So if you never rotate tires and experience premature tire wear as a result, the manufacturer is unlikely to honor your warranty.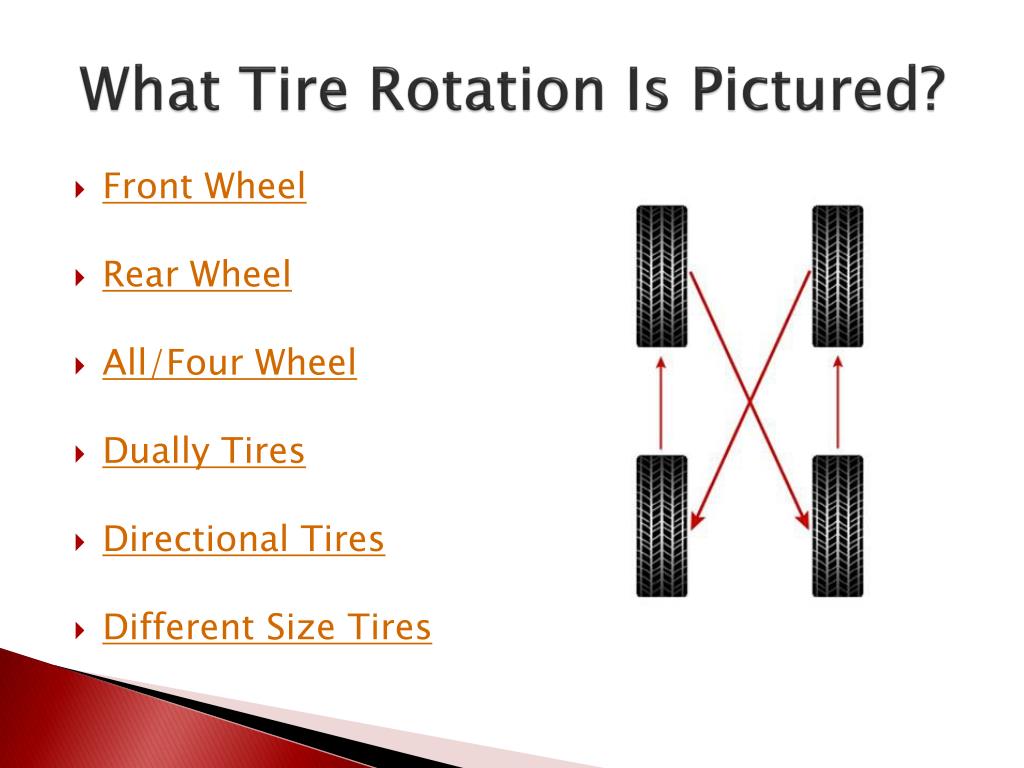 In other words, you'll be left on your own with a prematurely worn set of tires and a much more expensive replacement bill.
See also:
Inflating tires with nitrogen - pros and cons. What does filling tires with nitrogen give?
The good news is that it's inexpensive. That small investment comes back to you in the form of long tire life and sustained vehicle safety and performance. In the long run, the cost of periodic tire rotation will be only a fraction of the amount you have to spend on buying new tires due to premature tire wear. It is also not uncommon for tire shops to offer discounted tire rotation services for regular customers, or from time to time offer to do it for free. So contact the tire shop that installed your tires first - in some cases, your tire rotation costs may be zero.
Helpful Hint: don't forget to label the wheels with the numbers and keep the tire rotation data and receipts.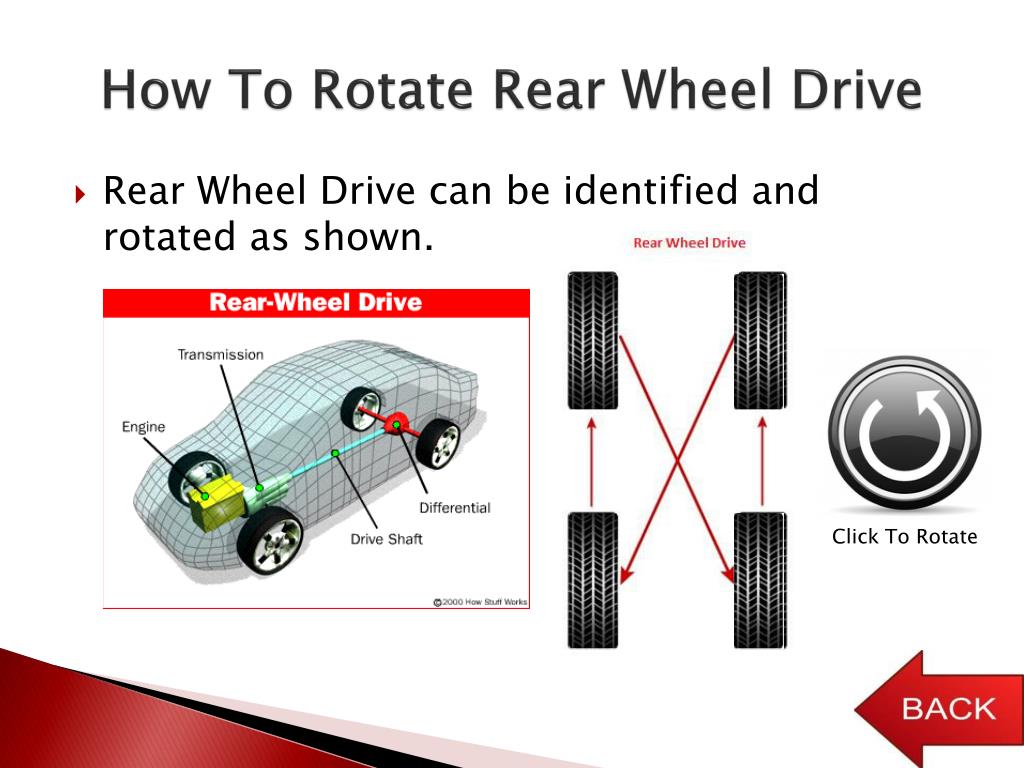 If you ever need to change tires under warranty, having these records will increase your chances of success.
Used to doing everything yourself? Then you can rearrange the tires. If you can safely lift the car and remove the wheels, you can change the tires in your garage or on your driveway. In addition to the rearrangement pattern, you need to consider whether your tires are directional or non-directional, symmetrical or asymmetrical, and whether the tire pattern is staggered or square. If you are not sure about at least one of these points, it is better to entrust the work to a professional. Also consider that it is a smart move to put your tires in the hands of a competent professional from time to time. Tire specialists monitor their potential problems, identify misalignment and other issues that can affect tire condition/wear and vehicle performance.
For non-directional tires of the same size, you can use the diagonal shifter pattern or move the front tires to the rear diagonal corner and the rear tires forward on the same side.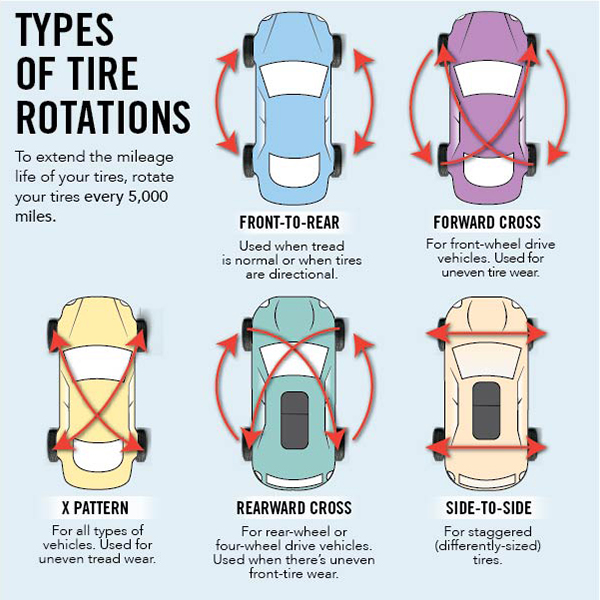
Different tire rotation schemes for rear and four-wheel drive vehicles rotation:
Schematic of changing wheels for cars with directional and non-directional tires
. If you have a full-size spare tire, it should also be included in the swap scheme.
Rear wheel and 4WD tire shift pattern with spare wheel included
Vehicles with dual rear wheels and non-directional tires can use one of the following wheel patterns:
Six-wheel swapping scheme with non-directional tires
Winter and studded tires also need to be swapped in order for them to last a long time and behave adequately on the road.