One of the most annoying things to find when you go outside to ride your ATV is gas sitting on top of your motor, transmission or pooled on the ground. Typically you can smell it well before you even make it to your four wheeler or dirt bike and you know what you’re getting yourself into.. Some trouble. If you have any sense of do-it-yourself work, then the fix for this gas leak is relatively easy and can be done in 15 minutes with the right parts. Let’s begin!
The first step in fixing a leak, is finding where it is coming from. You don’t want to replace the seal on the bottom end of your carb just to find out you have a cracked gas filter. For the purposes of this write up, we are going to assume the gas is leaking from the petcock on your gas tank. More often than not, the issue originates from either the carburetor (see here for fix) or the seal on your petcock.
Symptoms
Gas on top of your carburetor or pooled on your transmission.
Less gas in your tank!
Test
Here is a simple test you can do to check for the leak. With gas in your tank, flip your petcock to ON. Wipe the petcock with a clean rag so that it is completely dry. Go inside and grab a drink. Check the petcock for fuel dripping, if so you’ve found the cause of the gas leak.
Drain the gas in your tank by removing the gas line to your carburetor and inserting it in a clean bucket or in a gas container. Turn the petcock ON and let the gas drain completely from the tank. Alternatively, you can remove the gas tank from the quad and then then pour the gas out of gas filler inlet. Typically, four wheelers have a plastic cover over the gas tank to keep it protected which will need to be removed first. All 3 of my ATVs have had a 4 to 6 screws holding the cover on the tank. At least 2 at the hood, 2 under the seat or the back of the cover, and then most utility quads have 2 screws I the sides of the cover. Once removed you should be able to see the bolts/screws holding the tank onto the frame of the ATV. Remove these screws and you should be able to remove the entire tank. Most air filter boxes will share the same space as the gas tank, so you may be required to remove it to remove the tank.
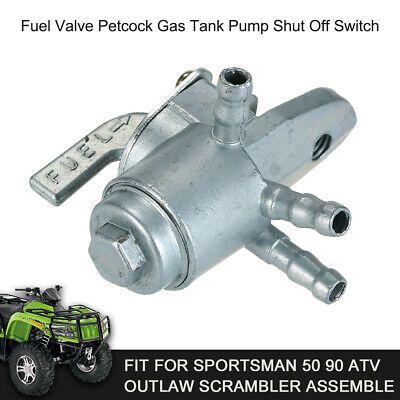
Now that the tank is removed, we can locate the source of the leak. To start, remove the petcock valve from the ATV and inspect the seal. Depending on the age of the ATV, there will likely be some deterioration of the seal between the petcock and the tank. 9 times out of 10, the seal is not working properly which is letting gas escape and drip onto the ATV or floor. The other place to check is inside the valve itself. If the gasket around the valve ball is damaged, this may cause gas to leak past the valve and into your carburetor or (rarely) through the face of the petcock valve. In the photo to the right, the arrow denotes to the valve seal and the circles denote the screws needed to be removed to check the valve ball and seat.
You have two options when replacing a bad valve seal. You can replace/fix the seal or purchase a new petcock valve. Price-wise, there is little difference unless you already have some RTV sealant (free), otherwise a new petcock will set you back less than $10 in most circumstances (See New Petcock Valves Here). To fix your existing seal, pick up some RTV from your local auto parts store. RTV is often used for auto parts sealant and is resistant to gas, oil and heat, so it is perfect for this fix.
Step 1: Remove the old gasket and clean the mating area on the gas tank and the valve. While RTV is gas resistant, existing gas or chemicals on either surface will prevent proper curing of the sealant and may create a leaky seal.
Step 2: Apply a bead of RTV to the petcock valve seat creating a solid gasket around the outer edge of the valve. See photo to the right. Ensure that the bead has no breaks which which prevent a seal around the entire valve. If needed, you can use your finger to smooth out the RTV to ensure adequate coverage.
Step 3: Reconnect the petcock valve to the gas tank and tighten screws to factory specs. Remove any excess RTV that seeps from the sides of the valve with your finger and a paper towel. Wait at least 24 hours before adding gasoline back to the tank.
Once the gas tank has been reinstalled onto your ATV and you have allowed 24 hours for drying time, refill the gas tank. Turn the petcock valve to ON and check for immediate leaks in the seal. Allow about an hour and check again for any gas dripping. If done correctly, you should be the proud owner of an ATV that no longer has a gas leak from the petcock valve! Go out and enjoy a ride. You earned it!
Contents
If you are an ardent fan of dirt biking with an ATV parked in your garage, you must be aware of the efforts required to maintain one. Yes, and All-Terrain Vehicles or ATV involves a lot of maintenance and, rightly so, because it steers upon the worst of trails non-stop. Of all the troubles you can encounter with your ATV, the most annoying one is a leak in the Petcock Valve.
Before we proceed towards the technicalities about how can you fix petcock leaking, here is an introduction to this component of your ATV.
Essentially, a petcock valve controls the flow of fuel into the engine. So, if it is “on”, you can ride your bike. However, when it is “off”, you cannot ride the bike. There is another petcock valve position – “reserve” that allows you access to the fuel lying in the bottom of the fuel tank so that you can reach the next gas station without having to drag the bike. Also, if you want to use the carburetor as you ride, you can switch the valve to the “prime” position. In this position, the vacuum doesn’t work so that you can draw carburetor without turning the engine on.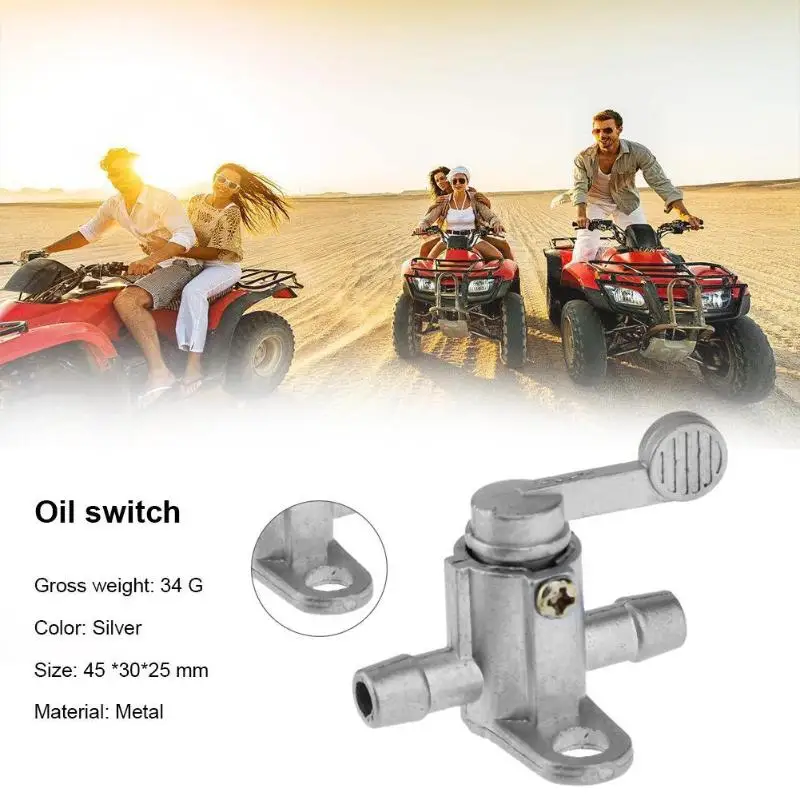
For those wondering why there is a need for “off” position in a petcock valve, the answer is safety. Yes, it is always safer to cut the flow of fuel to other parts of the bike to prevent leakage or unwanted combustion. It is also beneficial when performing repair and maintenance work on the bike.
The most effective way to detect leaking petcock is to witness it with your own eyes. Yes, when you see fuel dripping from your bike, sitting on top of its motor, or can smell gas around it; possibly the fuel is leaking from the petcock valve.
If you are still unsure, you can turn the petcock “off” and then check whether the fuel is still dripping. Even though you can ride your bike with a leak in the petcock valve, it is not such a great idea with a heated engine next to it. Such a situation can result in a blast.
Source: Ichiban Moto
Once you know that it is the petcock that is leaking, you can perform the following DIY tricks to fix it and bring your bike back on tracks.
Keep a clean bucket or gas container handy when draining out the contents of the carburetor so that you can remove the gas line and insert it into the bucket. Once you have created the setup, you can turn the petcock valve on and let the fuel flow out. If you are eyeing a more comfortable method, remove the gas quad from the vehicle and pour out the gasoline.
Then again, removing the gas tank can be a different struggle for different bikes since there are a lot of nut bolts and screws to be dealt with. Some of them aren’t even in the site when you are putting the tank back, resulting in a lose fix. Also, some of them require you to remove the air filter along.
Now that you have increased the visibility by removing the gas tank, you can easily locate the source of the leak. To begin with, take out the petcock valve from the ATV and check the seal. You might witness some damage on the seal due to the aging of the ATV. So, 90% of the time it is the seal that is causing the leak. Then again, if you see no visible damage in the valve, then it is perhaps its insides that are damaged. It can be the gasket around the valve that is letting the gas escape and leak into the carburetor or through the front of the valve.
For replacing the petcock valve seal, you can either repair the existing one with an RTV sealing agent or invest in a new one. Well, valve seals are not much of an investment as they do not cost more than $10.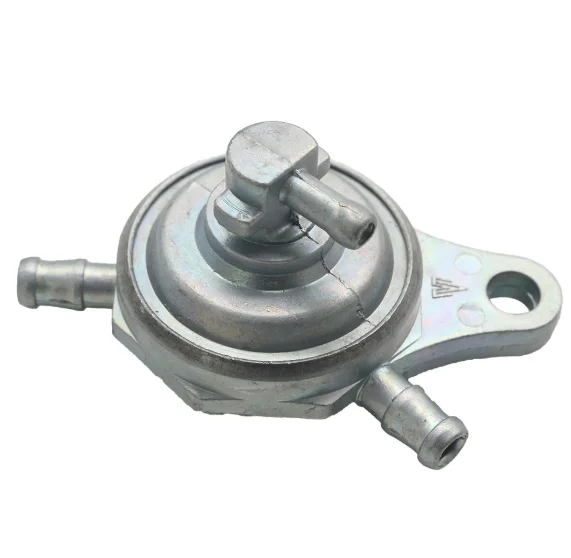
An RTV sealing agent is also something you can place your bets on as it is readily available in most auto parts stores around you. It is a common auto parts sealant which doesn’t let the gas, oil, and heat to pass through.
Follow the following steps for restoring the petcock valve seal:
 If there is any excess RTV, remove it with the help of your finger or paper towel and wait for at least 24 hours before filling the gas tank again.
After allowing the sealant to dry for 24 hours, it is the time to perform checks. You can now reinstall the gas tank and air filters back on to ATV. Fill in the gas and turn the petcock “on”. This will allow you to check for immediate leaks. Now let it sit for another hour and check again. Once you are satisfied with your job, wait no more and head out for the adventures waiting to happen!
Is it possible to ride an ATV in the snow in the cold winter season? Experienced owners and drivers of "quad bikes" are well aware that even in the very harsh winter conditions in Russia at sub-zero temperatures, with wind, frost and snow, it is quite possible not only to ride an ATV, but also to remain relatively safe and have fun.
There are two options for the owner. The first is to continue riding an ATV in winter. At the same time, it is important to operate your vehicle correctly and carefully. The second option is to leave the ATV for the winter period, that is, to preserve it. Both cases are discussed in the text of this article, from which you will learn the answers to all relevant questions.
Before you get behind the wheel and sit on the seat of your ATV, you need to prepare it. And the preparatory work will include the following mandatory actions:


A winter ATV is used with particular care and requires a certain amount of maintenance, which differs from the maintenance and service during the warm season, which includes the autumn, summer and spring seasons. It is necessary to take into account the peculiarities of the weather in order not only to drive normally without threats to life, but also to keep all mechanisms in good condition.
With the onset of winter, weather forecasts change, and different weather conditions can be observed: plus and minus temperatures, snow, freezing rain, frost, freezing of surfaces, and so on.
In order to successfully and without problems ride an ATV in winter, the following rules should be followed:
 Some supplement the wheels with chains, but this option is not suitable for a long trip. It is applicable to one-time short movements at low and medium speeds to perform certain actions (towing, for example).
 Owners of injection ATVs rarely face difficulties. If you have carburetor equipment, then you need to add a starting enricher to the standard operation. Starting is carried out with the open position of the enricher. When the engine is running, you need to move the lever to the middle position. And after the engine warms up, the lever is moved to the right, to the standard position.
If there is no enricher, manually close the damper to enrich the air/fuel mixture. Otherwise, the engine simply will not start (sometimes it starts, but immediately stalls): you turn on the ignition switch, press the start button, give a weak spark, but you will not achieve a quick full start.
Is it possible to travel on four-wheeled single or double motor vehicles in winter? Yes. But if you have experience riding only in the summer, skiing in the snow in winter can be very difficult. Consider the main rules of winter skiing:
 If the required experience is not enough, it is better to leave this idea right away. As a result of actions performed in the wrong way, you are at great risk of losing control and getting into an accident.
 If you do not plan to use your ATV in the winter, then it is worth finding out how the ATV is stored for the winter. Storage of four-wheeled standard, cross-country, sports, road and other motorcycle equipment in winter has some nuances, and the main main points are discussed in detail below.
Storing an ATV in winter requires its preliminary hygiene. It involves, first of all, a thorough cleaning. Apply foam to the surface, spread it with a sponge, remove dirt, and then wipe all parts of the vehicle with a soft, well-absorbing cloth. All important parts and assemblies are also cleaned, and for hard-to-reach places of the unit, you can use a brush or a brush.
If there are chips on the metal parts, be sure to treat them with an anti-corrosion solution and paint over so that in winter they do not rust and lead to cracking of the entire painted surface of the ATV.
Good hygiene also includes the obligatory lubrication of all moving parts. Lubricate the elements only after they have been thoroughly cleaned. Lubrication is applied to the drive chain, movable levers and handles. For information on which lubricant and how to use, find out in the instruction manual.
As a preventive measure, in order to provide protection, a so-called oil film should be applied by lubricating the equipment. To do this, soak a rag or soft microfiber cloth in oil (for example, in a suitable motor synthetic car), and then wipe all accessible metal elements, including a muffler with a knee. Instead of wiping, you can coat the parts with a special silicone spray.
How to store the ATV outside in winter? To protect the equipment as much as possible, you can cover it, moreover, with a breathable material, so that condensation, mold and corrosion do not appear under the cover. On sale there are special covers.
The oil should be changed just before conservation for the winter: if the products of the engine functioning remain in it, they can begin to corrode the engine from the inside, which will cause malfunctions in the future. When replacing, you create a neutral and maximum comfortable environment inside the engine that will keep working in the future. And in order for the oil not only to be in the engine, but also to get into other important parts, you should start the engine and let it idle for just a minute (this way it will lubricate everything that is needed and will not mix with combustion products).
The oil filter is also replaced during an oil change. But it is better to pull out the air filter completely so that rodents do not damage it, and also so that it does not dry out completely and does not deteriorate.
If you store your ATV during the winter period in the garage, then it is advisable to start its engine regularly: at least once a month, and preferably twice, for ten to twenty minutes. During such a warm-up, the motor will not work at full strength, but it will still be able to maintain its technical characteristics and remain in good condition. If the ATV will not start in winter (for example, in the case when it is stored and always located in an unvisited country house), then the following actions should be taken:
 Otherwise, the tires may be damaged due to low and high temperatures.
All parts that must be fixed must be well fixed, otherwise the gap may be covered with ice and condensate, which will subsequently lead to corrosion. Take a good look and tighten all the elements.
It is also recommended to carry out all adjustments or reconfigurations if the parameters of the driving modes do not suit you. Before setting up, carefully read the instructions or consult with a specialist.
So, your quad has been properly mothballed for the winter, but it's spring or summer time and you want to start riding again. Reconstruction includes the following manipulations:
 Next, fill in new fuel.
 Finally, it is worth giving useful tips that will ensure proper operation, as well as safe “rides” on ATVs in winter:
 Pick up warm shoes for frosty weather. To protect your head, you should use a motorcycle helmet with a balaclava. If the helmet does not have a glass visor for the face, you must also purchase glasses and a scarf or snood.
  But use this advice in extreme cases to warm up a very frozen ATV.
 To make winter riding a quad bike safe and avoid problems, just act thoughtfully and remember the rules, as well as use the many useful news from this article. Practice more to start driving confidently, get extended practice, including off-road and extreme. Make sure your ATV is winterized and you will keep your vehicle in good condition.
Crane operator (crane operator), pneumotracked, caterpillar.
During construction, a wide variety of equipment is involved, which performs various tasks. For example, a crawler crane is often used to transport various goods. And the machinist controls this technique.
It should be noted that the profession of a machinist has many narrow-profile areas that are responsible for a certain type of special equipment. It is to this category that the crawler crane operator belongs.
Occupation description
A crawler crane operator is a qualified specialist who has all the necessary skills to operate and maintain the equipment entrusted to him. The worker knows the principle of operation of all load-handling devices, therefore, he can inspect them, determining their performance. And if problems are found, he can fix them on his own. But situations are possible when the problems that have arisen are beyond the competence and knowledge of the driver, so he needs to report the identified case to his superiors.
Before being allowed to work, the driver must confirm his qualifications, as well as listen to a series of briefings on labor protection, safety precautions, as well as the basics of first aid. Already in the process of work, the employee regularly undergoes briefings, as well as medical examinations.
On the part of the employer, the driver can expect to receive full equipment, which includes the following: overalls, boots, mittens, gloves, galoshes, insulated jacket, insulated trousers, boots. However, the employee must independently check the suitability of all elements of the kit before starting work and report if any element of protection does not meet the quality requirements.
The driver works in tandem with the slinger, who secures the load, so he needs not only to be constantly on radio or telephone communication, but to learn a special signal system. At the same time, if for some reason communication between colleagues is impossible or intermittent, work is prohibited. Otherwise, there is a safety hazard during the work.
A young crawler crane operator is allowed to work only after successfully completing an internship with a more experienced specialist as assistants. Thus, it can be concluded that under the supervision of a qualified crawler crane operator there is an assistant and a slinger, whose activities he coordinates.
It is strictly forbidden to manipulate the crawler crane when the working perimeter is not well lit, so the driver must also convince the operator that the lighting devices used during operation are in good condition.
Where can I learn the profession of a crawler crane operator?
To become a crawler crane operator, you can take special courses on the basis of our educational center.
Crawler crane operator ranks
Crawler crane operator has two levels of professional qualification - the fifth and sixth grade.
Crawler crane operator, 5th category
Works with equipment up to 10 tons. He is aware of how the equipment functions, what parameters and limitations it has in operation, what malfunctions may occur during operation, and what needs to be done to eliminate them.
Crawler Crane Operator, Grade 6
Operates more powerful machinery with a lifting capacity of more than 10 tons. To work, he needs to know the features of maintenance and operation, the main characteristics and methods of carrying out repair work.