Are you looking for a way to enhance your tires’ performance? The good news is you don’t have to invest thousands of dollars in the highest quality tires and constantly replace them. All you have to do is fill them with foam.
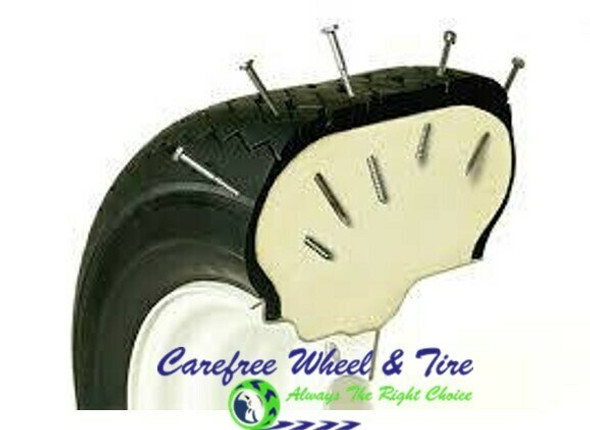
Filling tires with foam helps them become incredibly sturdy and resistant to punctures. You can get years of use from a foam-filled tire.
What does this process look like? Below, you can read our guide on how to fill tires with foam efficiently and safely.
Pneumatic (operated by gas under pressure) tires will most benefit from the foam-filling process. This technique works best with smaller tires, like those on lawnmowers or other types of farm equipment. It also works well with bicycles, children’s scooters, and other small, manually-powered vehicles.
So, if you’re one of the 50 million Americans who cycle regularly, you could benefit from learning this technique.
When learning how to fill tires with foam, you can do so via an insulating foam sealant, such as Great Stuff. Puncture holes in your tire and use one or two cans of foam to fill it up. Repeat the process as necessary with all of your equipment’s tires.
Check our guide: How Much Sealant Per Tire
Filling tires with foam can be incredibly helpful if your wheels become flat consistently due to exposure to nails or small leaks in the inner tubing.
Study our step-by-step guide on how to fill tires with foam before you attempt the process yourself:
Visit your local hardware store and browse the selection of rigid foams. You can ask a store employee for assistance or read the labels to find a brand that resonates with you. We recommend the brand Great Stuff, as it’s one of the most popular and widely accepted ones in the industry.
Alternatively, you can shop online. Once you find a brand you like, purchase at least two cans per tire.
With your cans in tow, you can now begin the process. Raise all your wheels off the ground via one of two methods:
Alternatively, you can remove the tires from your equipment altogether and have the freedom to roll them around as you fill them up.
Use a power drill to puncture your wheel’s rubber in several places. Create four to five holes, and be careful not to puncture the other side. Enter from one side and stop before you hit the other.
Attach a plastic extension to the can and start filling the holes with the spray. Roll the tire as you do so to allow the substance to disperse more easily.
Keep going into the foam leaks out of all the holes. Repeat this process with all your tires and allow them to sit for 24 hours.
After the waiting period, you’ll notice that the foam will protrude out. Wipe off the excess substance and feel your tires to test their rigidity. Put them back on your equipment and give your vehicle a test ride, starting at a slow speed.
Feel free to check out our guide: How To Seal Tire Bead
You don’t have to be a DIY expert to try this technique, but you should go into it with these precautions in mind:
All foam cans are always under pressure, so you should use them with caution. We recommend wearing safety goggles in case any of the foam shoots back at you as you’re spraying it into the holes.
You should also wear gloves, as all foam sprays are incredibly sticky. You’ll have a hard time getting the substance off your skin, so prevent a messy cleanup process by wearing gloves.
Consider checking: How To Seal A Tire On A Rim
Don’t attempt this technique with a car. Only try it with smaller vehicles, like farm equipment and recreational toys. If you attempt it with a car, you and your passengers will experience a bumpy, rugged ride and risk a blowout due to uneven foam distribution.
Filling tires with foam is a simple process to learn. You should have a successful experience as long as you follow the proper safety precautions and only apply this technique to the appropriate equipment. Try it for yourself today and notice the difference that foam makes in your vehicle’s performance!
If you find this blog helpful, feel free to look through the other guides:
How Do You Plug A Tire
How To Repair Tire
How To Fix A Tire Rim Leak
How To Use Rubber Cement On Tire
How Do You Patch A Tire
How Do Tires Get Dry Rot
How To Fix Dry Rotted Tires
How Much Is It To Repair A Tire
How To Fix Flat Spots On Tires
How Much Does It Cost To Patch A Tire
How Close To The Sidewall Can You Patch A Tire
How To Fix Hole In Tire
How Long Does A Tire Patch Last
How To Use Slime Tire
How To Use A Tire Plug Kit
How To Vulcanize A Tire
Foam-filling skid steer tires is considered a safe option as doing so gives more durability, traction, and strength to the tires. To fill foam in the tires, you can either take the DIY approach or get a mechanic to do it for you.
The better option is to go to a mechanic. But if you want to do it yourself, pay attention to the tire and closely observe till the point foam starts to leak out from the valve stem portion.
What's In This Guide?
 The wood or cloth is for the mess created with the foam filling.
 What Are Foam Filled Skid-steer Tires?
Foam-filled tires are a type of pneumatic tires that were introduced to replace air-filled tires. Because the air-filled tires run the risk of going flat due to a wide gamut of reasons, the foam-filled tires do not go flat. They also provide the same benefits as air tires in terms of traction, performance, and mileage without the part where the tires can get punctured.
Plus, the foam fill tires will also not lose air pressure. We use foam filled tires on skid steers due to their ability to perform well even in harsh conditions. Skid steers will majorly run on rough roads filled with pebbles, rocks, dirt, etc.
So, we prevent changing and repairing any damage caused to the tires due to such terrains using foam fill tires. In addition to these benefits, the foam-filled tires are better at maneuvering, and they bring efficiency into the operations, especially in the kind of work done by the skid steers.
Foam-filled tires give more stability to the skid steer, which is good. But some might argue that they also provide the extra weight, which can lead to mileage issues. Additional vehicle stability offers better control in rough terrains, which is difficult to obtain with air-filled tires. Hence foam-filled tires provide better footing to the vehicle.
However, the same extra weight on the tires reduces their lifespan relative to the air-filled skid steer tires. Added to this, if the vehicle is working in rough terrains continuously for a longer period with foam fill tires, the speed of tires losing their grooves and tread increases.
To sum it up, foam fill tires bring extra stability that contributes to the driver’s safety, reducing the tire’s lifespan.
Polyurethane is used to create the foam that takes up space inside the tires. Thus, giving the tire puncture resistance plus more stability along with the weight. Due to the usage of polyurethane, foam fill is also called polyfill.
The weight of foam-filled tires depends on the volume of foam added to the tire, which further depends on the size of the skid steer tire. Two of the most common skid steer tires have the following dimensions;
 5
5Based on these dimensions, the weight of one foam-filled 10×16.5 tire will be 130 pounds. So for four tires, the total weight added to the skid steer is 520 pounds, just for the tires. The same for a 12×16.5 tire will be 205 lbs, and for four tires, the total volume of foam required will be 820 lbs. This is what gives extra stability to the vehicle and makes it a better choice for rough terrains.
The short answer would be no. For one, the skid steer tires are nothing like car tires. These are the big boys we are talking about, and handling them is easier said than. We understand that taking the skid steer to the mechanic is also a task, but going to the mechanic is the safer route.
Foam is not bad for tires per se. Yes, it makes the tires heavier, and it won’t bulge or bend under pressure. In some situations, this can cause some trouble with driving due to gripping issues.
The only downside to filling foam in the tires is that they are practically junk after they wear out. You cannot use them in other places, at least not easily. Plus, the tires will be heavier than other bald tires, which may be used in other places.
But performance-wise, foam is not bad for tires. If anything, it improves the tire’s life span as there won’t be any puncture issues.
Yes, the process is safe. As long as you are following the proper process, things will go smoothly. However, the problem may arise after replacing the tire on the vehicle because we have heard cases when tires went flat right after bringing the vehicle down.
It depends on the tire and the cost of the container, and its capacity. As discussed above, one 10×16.5 tire requires 130 lbs, and one 12×16.5 tire requires 205 lbs of foam. Depending on the volume required (approximately 24. 5 gallons for one 12×16.5 tire), you can calculate the cost.
Yes, the US FMCSA regulations Section 393.75 mandates that the tire can be filled with materials other than air including silicone and polyurethane.
Over time, any villager and summer resident gets a lot of various wheeled vehicles that require constant attention and care, including the repair of pneumatic tires and their regular inflation. And it often happens that at the most necessary moment the wheels of turn out to be flat. And as technology ages, this happens more and more often. For example, these troubles began to haunt me constantly, and especially often in winter, in the most severe frost. And that's even worse. nine0009 To fill the wheel tire with foam, you first need to drill several holes in the rim with a diameter of 10 mm ... Finally, I got tired of it, and I solved the problem radically - I “pumped up” the tire not with air, but with polyurethane foam. But the trouble is the beginning! After trying several different options, I eventually found a way to fill the tire with foam without plugs or air pockets. To do this, I drilled several holes 010 mm around the circumference of the wheel disk in such a way that the tube from the foam can freely enter into them. Before starting to fill the tire with foam, it is necessary to prepare several wooden plugs-pegs (according to the number of drilled holes in the disk), which should fit tightly into these holes and prevent the foam from breaking free. nine0009 Insert the canister tube into any of the holes drilled in the disk and start the foam supply. As soon as the first traces of foam that have reached it appear in the adjacent hole, we stop the supply from the can and immediately plug the first hole of the plugs tightly with a peg. In the same way, you can fill the tires of any other wheeled equipment, such as a garden cart, with foam. nine0014 Fill the tire with foam as follows. We insert the tube of the can into any of the holes drilled in the disk and start the flow of foam. As soon as the first traces of the foam that has reached it appear in the adjacent hole, we stop the supply from the can and immediately plug the first hole tightly with a peg. After that, you can start feeding foam into the next hole. Then to the next. The last hole, as a rule, no longer needs to be foamed, and as soon as foam appears from it, you just need to plug it with a peg plug. With this sequence of filling, air sacs usually do not remain. nine0009 The process of self-vulcanization of the foam inside the tire - in a closed volume without air access - takes a little longer than under normal conditions. The operation of foam-filled wheels can be started no earlier than in a day. I have been using this technology for filling tires with foam for more than 10 years, and the first foamed tire is still working properly today, although I use it without any discounts both in winter and in summer. For several years, one of the wheels of my old truck was filled with foam. It no longer made sense to repair this wheel in the traditional way, and after filling it with foam, I drove it for quite some time, however, at low speed and for short distances, mainly in the village. The motorcycle that I use for trips to the forest for mushrooms has been running on foam tires for many years. nine0009 Initially, I had doubts about the durability of tires filled with foam, but over the years I have become convinced that without air access, the foam does not break down at all and serves reliably, especially where high speeds are not needed. It is also noteworthy that lugs can be easily fixed on foamed wheels, and using the most common screws with nuts or screws for this. Author; Vladimir Mikhailovich Legostaev0009 Rate this article: (26 votes, average: 4.4 out of 5) Share with your friends! NST / Catalog / Polyurethane foam / Polyurethane foam spraying equipment / Technology for filling voids In any case, polyurethane foam will be useful to increase the heat transfer resistance of the walls of the house. In other words, it will be cool in summer and warm in winter, in addition, the use of polyurethane foam between walls reduces the consumption of building materials, reduces the load on the foundation and floors. The photo shows the machine and components for filling the space between the walls with polyurethane foam. nine0009 Let's take a closer look at how this works. But first, a little theory to understand why PPU is needed in the inter-wall space . If theory is not required, then go straight to the question of how to fill the walls with polyurethane foam. Gone are the days of using single-layer solid brickwork as shown in the picture on the left. For in accordance with SNiP II-3-79BUILDING HEAT ENGINEERING with changes and additions from 2014, the heat transfer resistance of the wall must be at least 2.66 [m2 x deg. K / W]. And this means that the thickness of the brick wall must be at least 1.2 m, i.e. almost 5 bricks, which is unrealistic. 2.5 brick walls is the maximum. If more, then the cost of construction increases. Not only because the brick is required 2 times more, but also because the walls are heavier, therefore, the load on the foundation and floors increases. To increase the thermal insulation properties of continuous masonry, i.e. to increase its resistance to heat transfer, they began to make it two-layer: the inner, main wall and the outer half of the facing brick. Thus, an air gap of 50...150 mm is formed between them. Solid two-layer masonry does not have brick stiffeners between the inner and outer walls. They are interconnected by means of reinforcement or mesh or anchors. In houses built before the 2000s in the South and in the European part of Russia, this gap was most often not filled with anything. The air between the walls acted as a heater, by analogy with the air between double-glazed windows. In addition, due to the air gap, the wall is ventilated, condensation is not allowed when warm air diffuses through the wall to the outside. nine0009 But if we talk about the thermal insulation properties of such a structure, then they directly depend on the quality of the masonry of both walls: both internal solid and external facing. For such a construction, various plate heaters are laid between a solid wall and a facing wall, while the ventilated gap is reduced to 20...50 mm. Today it is difficult to find a homeowner who doesn't think at the construction stage how much he will pay for heating in winter. Even if the house is being built in the Krasnodar Territory, where it is warm: they think, consider, plan. Therefore, solid brickwork with a ventilation gap without insulation means that the owner is very rich or he did not control the progress of construction. nine0009 In private housing construction, if the height is not more than two floors, two-layer solid masonry with insulation and a ventilation gap has been replaced by lightweight two-layer masonry. External cladding and internal walls in half-brick or internal, maximum 250mm. In this case, both walls are connected by brick lintels. And then, if you look from above, then the voids formed by the outer and inner walls and transverse bulkheads look like wells. Hence the name - well masonry. nine0009 Well masonry means filling the entire space with insulation. Moreover, it is obvious that sheet or rolled heat-insulating materials are not suitable here. Bulk or liquid formulations are used. There are no air gaps. And such a design is more cost-effective: the walls are thinner (construction costs are less) and the solid insulation is thicker (heating costs are less). It should be noted that the inner wall is not necessarily brick. These can be gas silicate blocks or stones made of foam concrete or expanded clay concrete or a monolith. But if the inner and outer walls are connected by lintels made of brick (or other stone), then it is correct to speak of a lightweight two-layer wall (well masonry). Based on the design and the very definition of a wall with filling (well masonry), it follows that voids can and should be filled with insulation during the construction phase. The cavities are either filled or stuffed or poured. About backfilling and driving, such as: expanded clay, perlite, ecowool, sawdust, etc., nothing is said on the site poliuretan.ru, because we have three materials and technologies for FILLING insulation into the walls: this article is devoted to filling into the cavity with PPU , then we do not touch on this page the technology of insulation with foam insulation and foam concrete. Read about these two materials in other sections of poliuretan.ru. Filling voids with polyurethane foam has been a popular type of work in the last ten years, which is due to: On the other hand, in recent years, equipment and materials have been adapted to perform such work: space; NST equipment and chemicals make it possible to fill all voids in the interstitial space with polyurethane foam, seal even the smallest cracks and crevices. At the construction stage , the pouring of foam into the walls is carried out from top to bottom, i.e. into an open cavity. During reconstruction, when it is required to insulate an already built house, PPU is poured into the inter-wall space through holes in the masonry: By the way, about why voids appear or increase over time in the middle layer, previously filled with insulation, we recommend reading: Produced during the construction of the walls of the house. Standard installation and PPU sprayer are used. Next, there are two options. Visual control of the filling of the inter-wall cavity in both cases. nine0009 Option 1. A hose DN 12...16mm and L 0.3...0.5m is installed at the outlet of the gun; start time (30...40 seconds). The next four photos are a clear demonstration of this method of pouring PPU into an open cavity. Option 2. For a better understanding, watch the video below to see how a NST partner in Bashkortostan does this kind of work. external as well as in the internal wall. If the house has 1-2-3 floors, then the filling, of course, will be through holes in the outer wall. Similarly, if the house is already in operation, i. When a multi-storey building is erected, pouring from above into an open cavity is not practiced even at the construction stage. They raise the inner and outer walls and only then fill the voids with insulation. And since it is poured from the outside at a height: it is difficult, inconvenient, and risky, etc., then liquid polyurethane foam is poured through the inner wall . Panel housing construction, for obvious reasons, is not considered (it is assumed that the insulation is already embedded in the panel). nine0009 If the internal walls are made of foam concrete, polystyrene concrete, aerated concrete, etc., then it is not difficult to make holes in them. If the inner wall is a monolith, then technological holes are initially provided in it. How many holes do I need to make? How much liquid PPU can and should be applied through the hole? The time for pouring components through the hole is limited by the start time of the raw material. Thus, pouring liquid PPU through the hole into the cavity can be no more than 30 seconds. The capacity of any machine used for pouring into the cavity should be at maximum: The maximum actual density of polyurethane foam in the wall is 20kg/m3, i. Therefore, to begin with, it is necessary to estimate how much volume between the walls should be filled? The first row of holes 12...18mm is prepared at a height of 0.3m from the bottom filling point. Distance between holes from 0.5 to 1.0m: The second row of holes is 0.3 ... 0.5 m higher than the first, but with a side shift of half the distance between the holes of the first row, i.e. in a checkerboard pattern. nine0009 To assess the filling of the void between the walls, it is necessary to make control holes of small diameter (5. Filling starts through the holes of the first level and check the filling through the control holes, successively rising higher. If there are doubts whether the foam has filled this or that area, it is necessary to make a control hole and insert the probe there. nine0009 To better represent the above, we recommend the following video. It clearly shows both the FOAM-20 installation used to supply components, and a gun with a nozzle. But most importantly, the video shows the cavity from the inside, so you can clearly see how the polyurethane foam gets inside through the hole, flows down, and then increases in volume and fills the entire interwall space.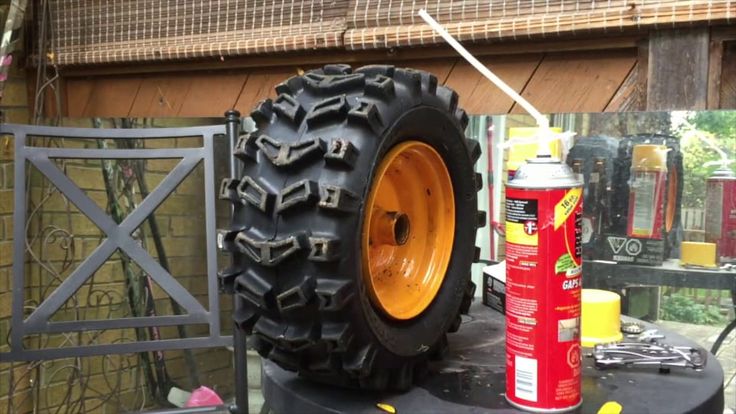 I first tried filling the tire with foam through the nipple hole. It turned out, but not entirely successful - in some places, due to traffic jams, air sacs remained unfilled with foam. In addition, a significant part of the foam from the hole of the nipple squeezed back. nine0009
  After that, you can start feeding foam into the next hole. Then to the next...
  And with a large volume of tires, it is better to wait at least two days.
  This is especially true when operating equipment in winter for driving on snow-covered roads or off-road.
Pouring polyurethane foam into the walls of the void cavity Pouring polyurethane foam into the space between walls

Hollows between solid and light brick walls
 Consequently, the foundation will be more monumental, deep, expensive, etc. nine0009
  And, if the quality of the masonry is not perfect, then the ventilation gap can cause freezing of both walls. In the warm regions of Russia, this aspect was not taken into account for the time being, but in the North, the Urals and Siberia, solid two-layer masonry with internal thermal insulation has long been used, which is shown in the figures below (click to enlarge). nine0009
  It is also called a well or wall with filling.
  If they are connected by anchors, reinforcement, mesh, then this is a solid two-layer wall. nine0009
 Pouring polyurethane foam into the space between walls of well masonry

 All the shortcomings of masonry are eliminated if liquid insulation is pumped into the cavity.
 2, 2005, about the destruction of mineral wool insulation;
 How to pour polyurethane foam into an open cavity
The process of filling polyurethane foam with the FOAM-20 machine in the cavity at the object  At the outlet of the gun, a pipe or a rigid hose DN 25...32mm L 1m is installed, components are used for spraying light foam (open cell, density 10...20 kg/m3) with a short start time (5 ...7 seconds). In this case, it is correct to talk about filling the voids between the walls by spraying polyurethane foam.
Filling voids in manhole masonry with light sprayed polyurethane foam How to pour polyurethane foam into the interwall space through holes
 e. interior decoration is already in place. In such cases pouring foam between the walls is carried out outside .
  The start time is the number of seconds that elapses from the moment component "A" (polyol) and component "B" (isocyanate) are mixed in the sprayer, and the moment when the liquid mixture "starts", i.e. begins to rise, increase in volume. Typical raw material parameters for filling voids with polyurethane foam :
 e. it can be 2 times greater than the density of free foaming. And this means that:
 ..7mm). They are also drilled in a checkerboard pattern and placed at half the height of the first row of filling holes, offset to the side by half the distance between the filling holes. Plugs (wooden pegs or corks made of PPU or other material) are prepared in advance to hammer into the control holes when foam comes out of them.