
If you’ve been thinking about growing potatoes but are hesitant about it, don’t be! Growing potatoes is insanely easy. Even better, you can grow them with the help of upcycled materials. Even if you don’t have a ton of space, you can grow hundreds of pounds of potatoes in tire towers.
This guide will show you how to make the most of your space with upcycled materials, so let’s get rolling!
Potato tire towers are pretty much exactly as they sound. Can you envision a mighty tower made of used tires stacked on top of one another? Now imagine a wealth of potatoes growing merrily inside that.
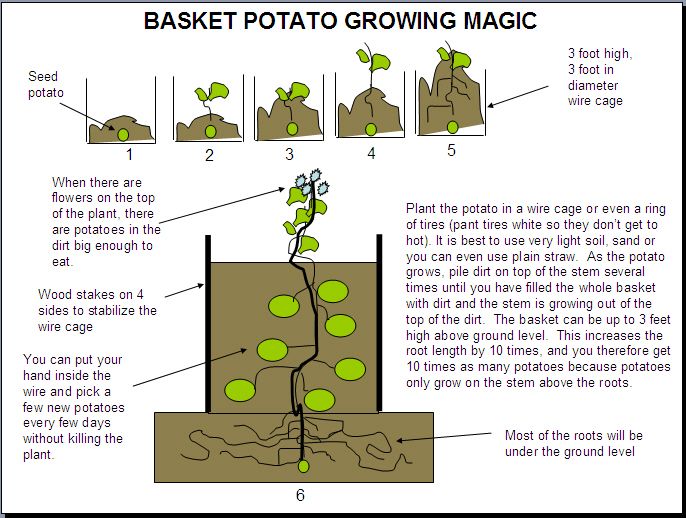
The reason these work so well for growing ‘taters, precious, is that potato plants produce really well when grown vertically. As the aerial (aboveground) parts of the plant grow, they keep creating root offshoots. These develop into the tasty tubers we love so dearly.
As a result, growing in towers means that you can double or even triple the yield you would have harvested with in-ground plants.
Tires happen to be ideal for these towers because of their stackability. You can keep on plopping new ones on as the plants grow. Just add soil around the stalks as needed. Then, at the end of the growing season, you lift the tires off again one by one.
A note about used tires: if you live in a cold area, you may come across used winter tires during your materials search.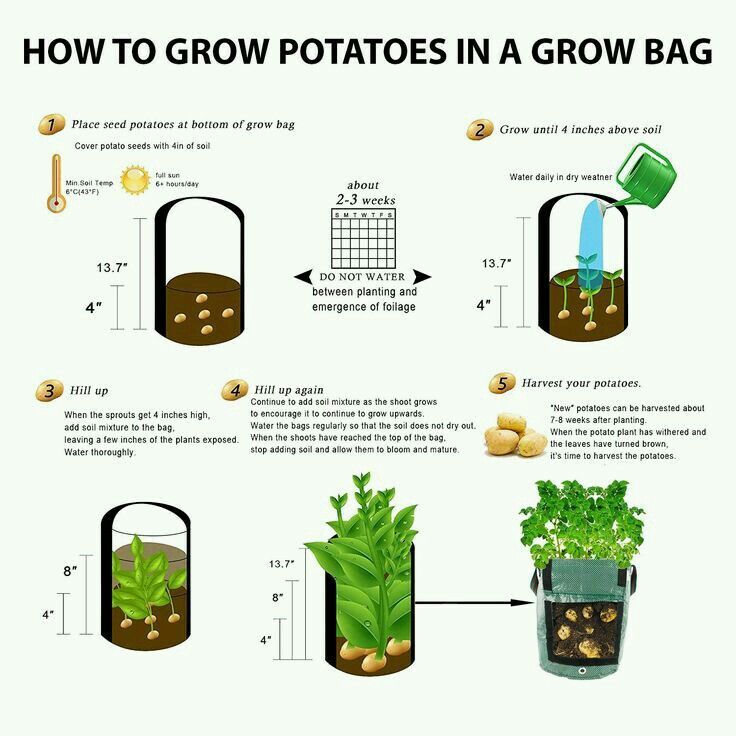 Don’t use these.
I made the mistake of creating some towers with winter tires accidentally once. Still have the scars from them. Those things have vicious little spikes on them that can cause a fair bit of damage if you brush across them. They’re even more vicious to kids and small animals that may bump into them.
Alright, now let’s get those potato tire towers started—first, location. Potatoes need a lot of sunshine to grow properly. Choose one of the sunniest sites on your property, and lay down at least two inches of heavy gravel or mid-sized stones as a base.
Potato plants will rot if they get “wet feet.” Make sure they plenty of drainage at the bottom, and you’ll avoid this issue. The last thing you need is to re-create your own version of the great Irish famine in your backyard with a water blight like Phytophthora infestans.
Place some tires atop this gravel and nestle them into place. Then stack another level or two on top of them.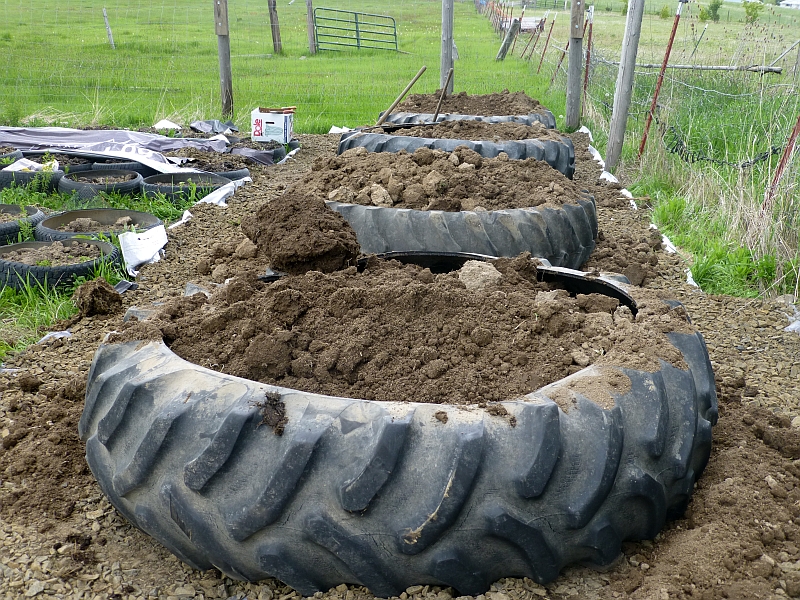
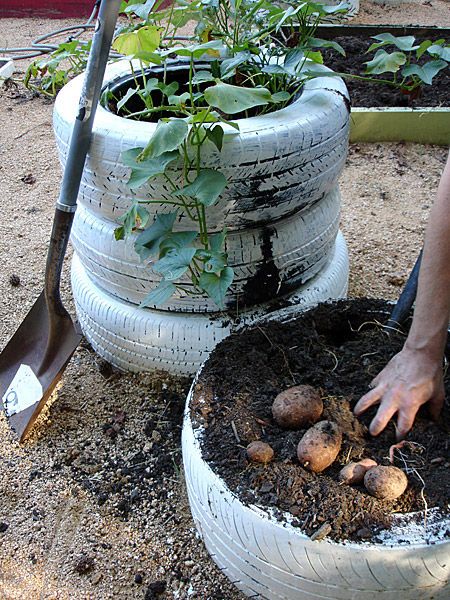
Pour in your compost-rich soil to a little over the halfway mark. If you’re using two tires to start with, then fill one up completely, followed by another inch or two. Similarly, if you’re using three tires, fill one and a half, and add a bit more for good measure. Water enough, so the soil is moistened but not saturated.
Next, take four medium or five small seed potatoes or slips. Nestle each of these into the soil about 1.5 to 2 inches deep. I like to use five of them so there’s one in the middle, with the others in the four cardinal directions. Once these are pushed in, cover them with another few inches of soil. Water lightly again.
As your potato plants grow, you’ll need to keep mounding soil around the base of each stalk. This keeps any of the potato roots from being exposed to sunlight. We need to keep them submerged in the soil because of the toxins they can produce.
Remember how potatoes are part of the nightshade (Solanaceae) family, along with tomatoes, peppers, and eggplant? Well, this is because all of these plants contain a toxin called solanine.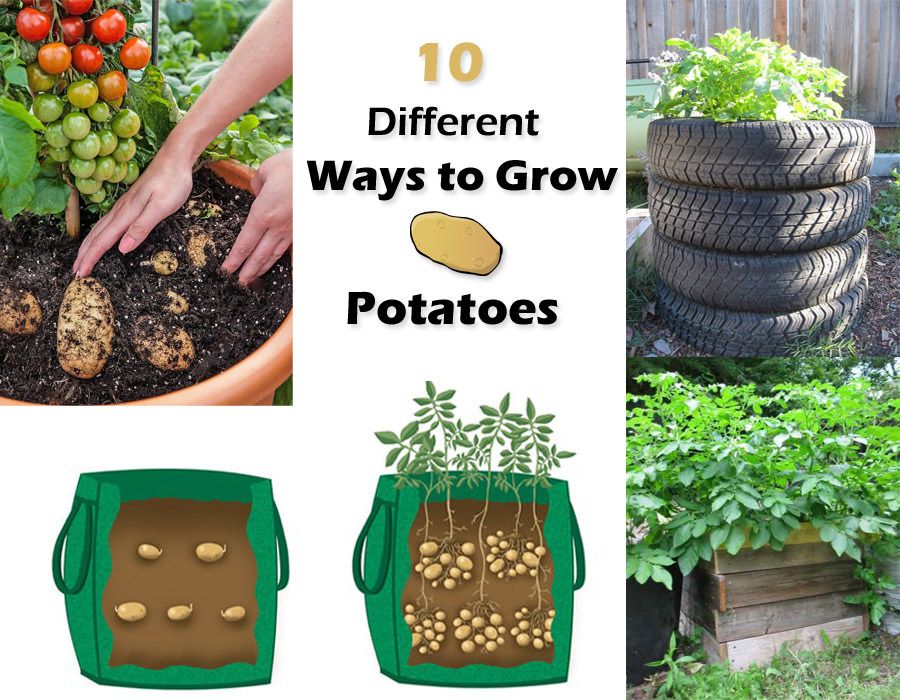 You’ll find it in green tomatoes: the solanine dissipates as the tomatoes ripen and redden. Similarly, you’ll find it in green potatoes.
Have you ever gotten a stomach ache after eating greenish potatoes? Yeah, that’s why. Furthermore, your potatoes will turn green if they’re exposed to sunlight while growing. This toxin is great to fend off bacteria and various insects, so they don’t prey on the tubers. It’s less awesome for human consumption, considering the gastrointestinal issues and breathing difficulties…
So, long story short, keep the soil piled well up the stalks on your potato plants. When they grow about four inches over the top of the tire they’re in, stack another tire on top. Lather, rinse, repeat. You can keep stacking these potato tire towers throughout the growing season. You’ll know it’s time to harvest when the plants’ foliage loses color and starts to die back.
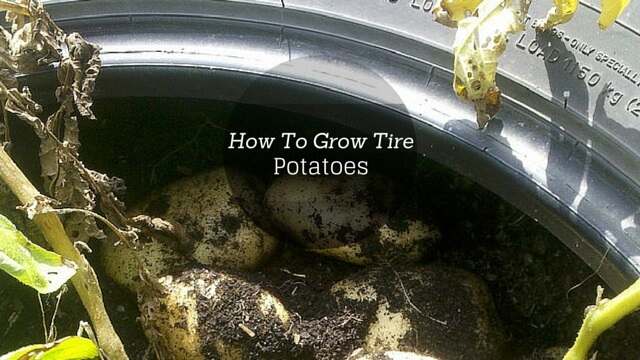
As mentioned, all you need at that point is to remove the tires one by one. Then, you can pull the soil mounds apart and remove the tantalizing tubers inside.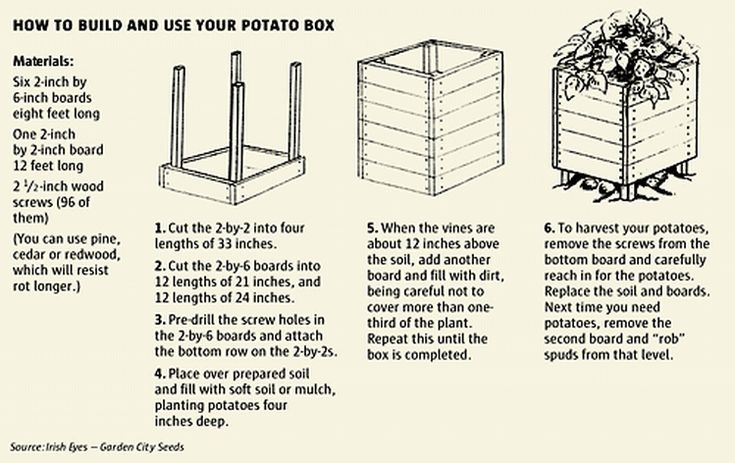
We have an amazing guide on here that covers everything you need to know about growing potatoes. Refer to that if you need help choosing varieties or troubleshooting issues with your plants.
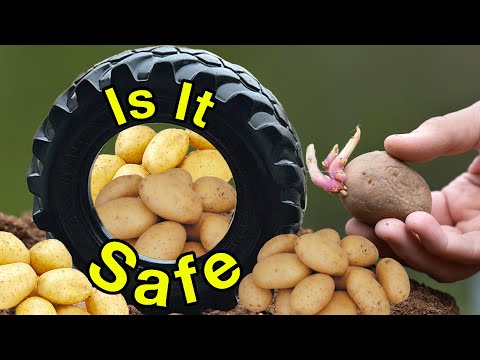
There are a lot of pros and cons to growing any kind of food in rubber or plastic. Some people prefer not to grow food in used tires or tire towers because of the chemicals inside them. So is growing potatoes in tire towers a bad idea?
This is a valid concern, of course. Yes, tires are made of materials that you don’t particularly want to ingest. They’re going to erode and off-gas over time, leaching a host of chemicals and metals into the environment. That means they’ll go into the foods we grow in them as well, and by extension, into our bodies.
That said, it takes a long time for tires to break down. Typically it takes somewhere between 50 and 80 years for a tire to break down. This means that the chemicals being released into food-growing soil within them are really negligible.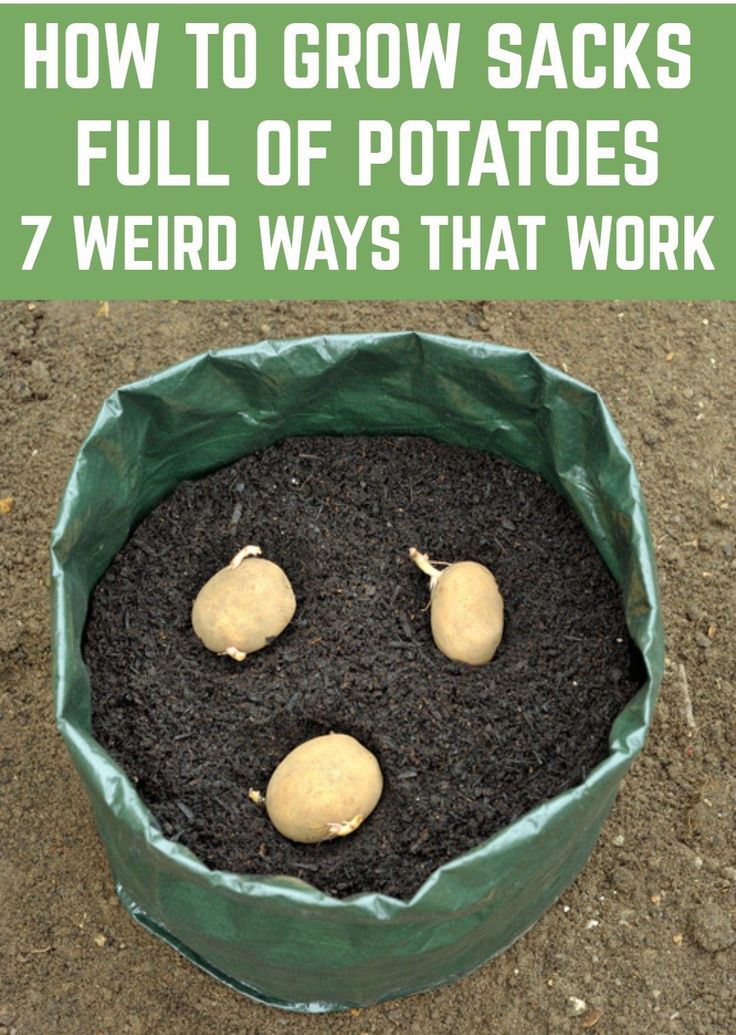 Chemicals tend to be released more with friction and wear, such as when they’re actually on cars.
Using tires to grow food means that there’s less landfill waste because of them. Furthermore, they can be convenient for growing large amounts of food in small areas, especially when the local soil isn’t great for digging down into.
A great deal of my own food-growing experience has been in seriously disadvantaged areas. When you have very little to work with from the beginning, you take advantage of everything you possibly can. Weighing the pros and cons of growing potatoes in tire towers is up to the individual, of course.
Generally, when people have to choose between feeding their families and worrying about extremely mild chemical exposure, the former wins out.
Do your research to determine whether you feel comfortable growing in this manner. Then, you can make an informed decision as to your own tire-based food-growing endeavors.
Potato tire tower photo by Bonzai Aphrodite
We've bemoaned the tragedy of eating non-organic potatoes (see: "The Seven Foods Safety Experts Won't Eat" and "Potato, Potahto") A pack of organic potato seeds will run you about $3.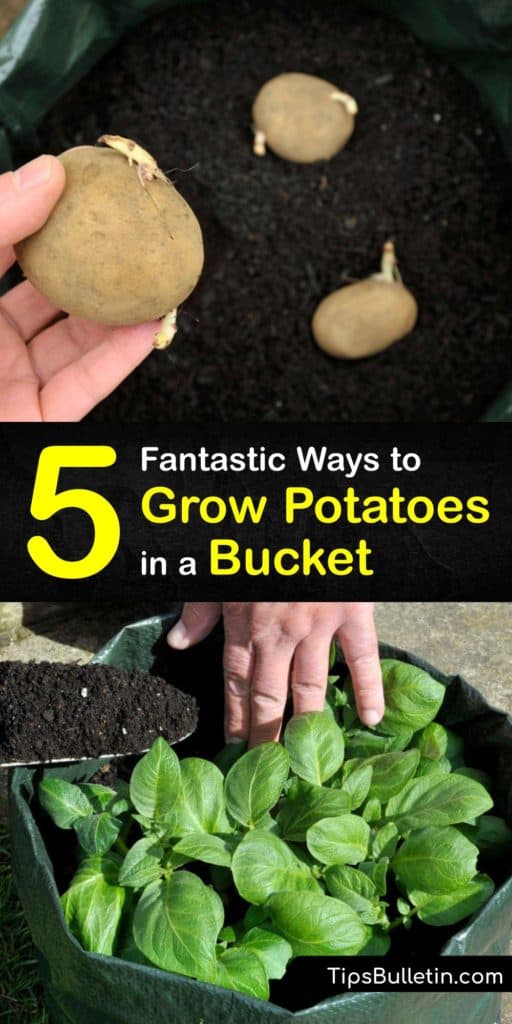 50 and will provide you with pounds upon pounds of this vegetable. But what if you're tight on space for growing your veggies? We've found a solution. Check out this Instructables entry on growing potatoes in old tires.
Chitting
means that when you receive your seed potatoes in around February, you place them in a light, dry environment, but out of direct sunlight (a north facing window sill is a good place) and wait for small shoots to grow from the eye of the potato, which should be facing up. When looking at a potato, you will notice that one end will usually have more eyes than the other end, this is called the rose end. Early potatoes need to be chitted before being planted, while maincrop varieties don't absolutely need it but will benefit from being chitted before being planted.
If growing potatoes in tires, first chose a sunny spot in your garden or balcony. Ensure there is drainage below the tire, as potatoes don't like getting water-logged, though they do need sufficient water for the tubers to form.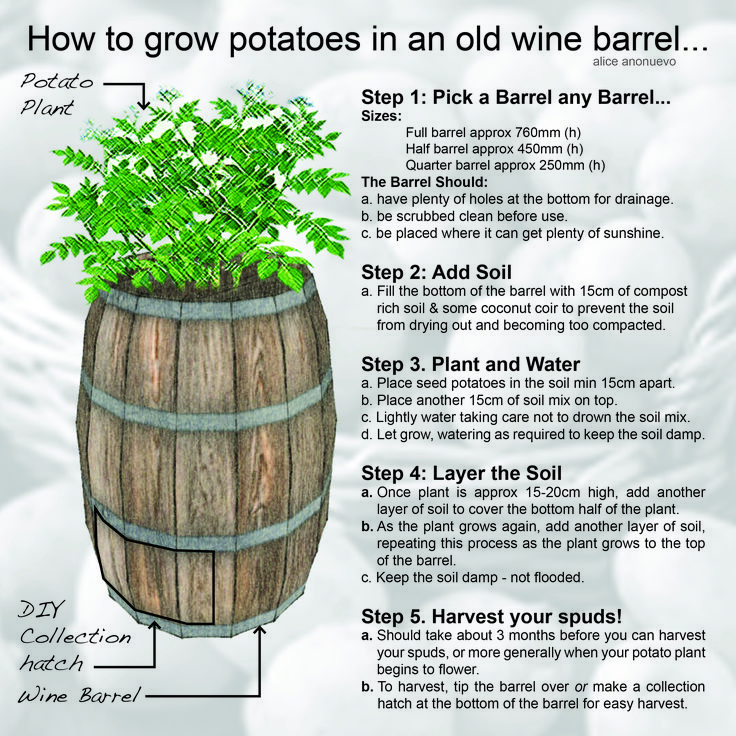
Early potatoes can be planted at the end of March, while maincrop potatoes are usually planted in April, at the latest at the beginning of May. The main aspect affecting planting time is frost. Potatoes are only half-hardy and any frost will kill off emerging plants.
Fill the tire with damp earth to just over half the depth and place 4 - 5 seed potatoes in it, with the eye or shoots facing up. Cover with a couple of inches of soil. In this example, we have used seed potatoes for a maincrop which have not been chitted.
Keep the soil moist but not wet and within about six weeks there should be several healthy potato plants growing. If your seed potatoes were chitted, the plants should appear sooner.
If there is any chance of a late frost, protect the young plants with straw or earth them up immediately as they appear.
When the young potato plants are two to three inches high, add a second tire to the stack and add more soil, almost but not quite covering them.
Continue covering the emerging plants with soil until your stack is 3 tires high. Tubers will be forming all the way up the stack of tires.
Early potatoes are ready to harvest when the flowers have opened or the buds fallen off. Dig a few tubers up and check—they should be about the size of a hen's egg. With maincrop potatoes, wait until the foliage has turned brown, cut off at the stems and wait a few days before lifting.
One of the cons of the traditional method of growing potatoes in long rows, is that you have to ensure you have dug up every single tuber each autumn. Growing potatoes in tires avoids the possibility of missing that one tiny potato which would ruin your carrot patch next year!
Vertical cultivation of potatoes in the West is a fairly common occurrence among gardeners.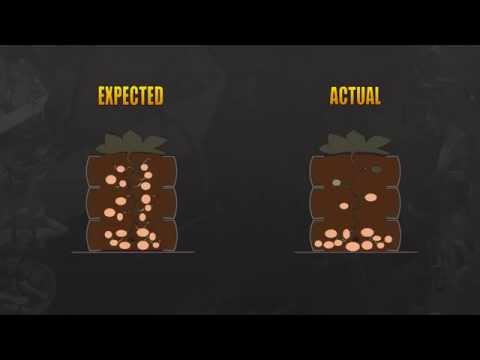 By planting a dozen tubers in several bags, large bags, boxes or barrels, you can end up with a crop of several buckets of potatoes. We are still new to this method. We are accustomed to calling potatoes the second bread and growing them in much larger quantities: so that we have enough for ourselves, our relatives, and for feeding animals. But today more and more summer residents refuse to grow potatoes in general, they say, it costs a penny, and there is enough trouble with it for the whole summer. If you also think so, but at the same time do not want to forget the incredible taste of your young potatoes, try growing it in a bag, box or barrel - the result will surely please you.
Read also our article 5 reasons why I no longer plant potatoes.
It is this method that allows you to get the fastest harvest (of course, when choosing early-ripening varieties), because the mobile "beds" warm up the fastest.
Eliminates the need for hilling potatoes and weed control - the dream of every lazy gardener! This method of growing potatoes is also suitable for those who have a small area. Barrels and boxes of potatoes will help give the site an original look.
When growing potatoes in bags and barrels, the root system of the plant grows much longer than when planting potatoes in the usual way. And since the number of roots depends on how many tubers are formed, the harvest will always be excellent.
And the most interesting - potatoes in buckets and large flower containers can be successfully grown not in the garden or in the garden, but at home - a sunny loggia or balcony will do.
In addition, vertical-bed potatoes:
And it's also a matter of reusing materials (waste containers, old bags, sacks, barrels), which means taking care of the environment. At the same time, vertical beds for potatoes can be very diverse. For example:
Over time, all barrels become unusable. It is no longer possible to pour water if, for example, the bottom of the barrel is leaky. Basically, this applies to metal containers. But plastic can suffer due to mechanical damage.
If the metal barrels are old and untidy, then it makes sense to paint them before planting the potatoes. At the same time, you can show creativity and imagination by creating beautiful pictures or original ornaments on the outside of this container.
If there are few holes in the bottom of the metal barrel, make them with a nail and a hammer. For such an impact on a plastic barrel, you can use a drill with a drill or heat a nail and carefully make holes in the bottom of the barrel with it.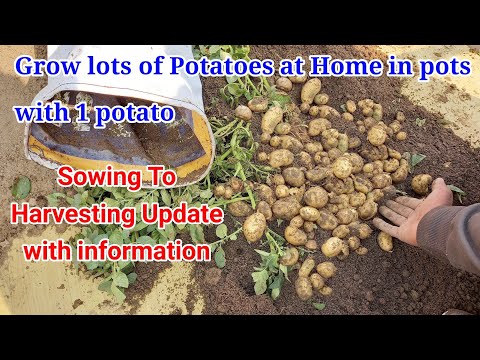 If for growing potatoes you will place the barrel horizontally, then make holes for water drainage on the side of the barrel, and on the other hand - larger ones to plant potatoes.
At the bottom of a vertical container, drainage is covered with a layer of 15-20 cm. These can be medium-sized stones, broken bricks (for horizontal "beds" this and subsequent layers should be of a lower height).
Grass cuttings, chopped straw, fallen leaves, compost can be placed on top of the drain to a height of 30-50 cm. Then light fertile soil is poured into the barrel with a layer of approximately 15 cm.
The soil is well watered from a watering can. For 5 liters of water, it would be good to add 1 tbsp. a spoonful of potassium humate. You can also spill this vertical bed with water and a universal liquid mineral fertilizer.
On the surface of this layer of soil lay the tubers eyes up at a distance of 15 cm from each other. From above, the potatoes are covered with earth - 15 cm.
When the shoots are 2 weeks old, the first "hilling" is performed. To do this, simply pour the earth under the bushes. Then they do the same two or three more times. As a result, the potatoes will be well covered with earth, which stimulates the formation of additional roots and tubers, while the roots do not turn green.
Since the barrels are limited in size, it is important to water them in time, because the earth here will dry out quickly. It is better to install such mobile beds in advance where something obscures them so that the soil does not overheat. In this case, the seedlings must be in the light.
Large oilcloth bags, bags of flour, sugar, large and dense garbage bags are suitable for growing potatoes. © Antonov Sad All recommendations for planting and growing potatoes in barrels are also relevant for potatoes in bags and bags. Large oilcloth bags, flour bags, sugar bags, large and dense garbage bags will do. These containers do not take up much space, they can be placed in a free area, where the summer resident wishes.
To make it easier to "dig" the potatoes planted in this way, you can cut a rectangular hole in the bottom of the bag or bag. Velcro is attached to this flap, paired elements are sewn around the cut hole. Then it will be possible sometimes to see if the crop is ripe, and if necessary, take a few large potatoes, leaving the bush to grow further.
See also our article Potatoes under straw.
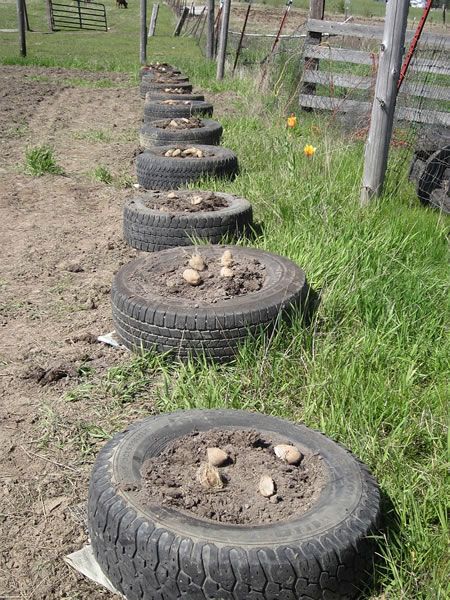
If it is possible to use tires from wheels, they will also make an excellent vertical bed for potatoes. You can immediately install several pieces one on top of the other, or build such a "Leaning Tower of Pisa" gradually, as the potatoes grow.
First you need to dig up the earth to the diameter of the wheel, add fertilizer or compost to the soil. Then plant the potatoes with their eyes up. Now you need to put a tire around it and fill it to the top with light soil.
When the seedlings have grown to a height of 15 cm, a second cover is placed on top of the first cover. The earth is also poured into it, this will also be “hilling up” at the same time.
You can stop there, but it is better to use 1-2 more tires and add more soil as the potatoes grow. Harvest will certainly please you.
If it is possible to use tires from wheels, then they will also make an excellent vertical bed for potatoesThis method will allow you to get your potatoes even in a city apartment. If you have two large plastic pots that are slightly different in size, then cut rectangular holes on the sides in a small one. Then it will be easier to collect potatoes as they ripen (large tubers are removed first, and small ones are left to grow further).
Potatoes can also be planted in ordinary large capacity flower pots.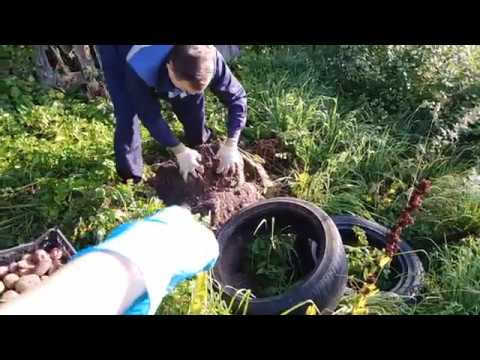 10 liter buckets are also suitable for this. Someone will be able to grow potatoes this way at home, others will use this idea in the country. The main thing is to provide the potatoes with as much sunlight as possible.
You can make a wooden box for growing potatoes with your own hands. You need to take four bars and arrange them vertically. They will be at the corners of the box. Outside, boards are stuffed on them. You can immediately provide a door at the bottom of the box, so that by opening it slightly, you can remove the grown tubers.
And if you have factory-made wooden boxes, for example, in which nails were sold, then you can use them or any others. Features of growing potatoes in boxes are the same as when planting them in barrels.
Straw is a wonderful material that is popular among gardeners and summer residents.
There are several ways to use it, we have described some of them, in particular, covering and mulching.
The main advantage of this raw material is due to the hollow structure of the stem, which absorbs and retains moisture while allowing air to reach the plant.
Straw remaining after harvesting or threshing is an excellent fertilizer that, when properly applied:
All this can and should be used when growing potatoes, because the use of straw eliminates the need for:
Next, we will tell you why this happens and how to properly plant and grow potatoes under straw or hay, and at the end of the article we will provide a video clip on this topic.
The influence of straw on the soil is based on those processes that occur annually in the wild, and therefore are as balanced as possible, therefore, an increase in fruiting occurs without deterioration in the quality of fruits .
This is very difficult to achieve when using fertilizers, because the increase in nitrogen in the soil not only improves fruiting, but leads to the filling of fruits with nitrates, after which they are no longer suitable as human food.
Straw, on the other hand, leads to an increase in fertility without increasing the nitrate content, which is achieved by excellent soil balance and other factors.
Straw is based on carbohydrates such as :
Once in a humid environment, they become food for humus-forming microorganisms, and humification, that is, transformation into humus, consists of many processes in which a huge number of participants are involved.
Hummification is a very long process, which is always associated with other processes of soil regeneration , that is:
Various microorganisms and worms are engaged in the transformation of organic matter into humic acids, and only the latter, eating dead plant remains, produce ready-made biohumus, the rest are already participants in a complex food chain .
In this chain, the waste products of some microorganisms become food for others, so that the humus they produce is more balanced and nutritious than that made by worms.

In any case, once in the soil, the straw will gradually turn into humus, which will make the soil on the site more fruitful.
Worms that feed on dead organic matter loosen the soil, which increases its ability to pass water.
In addition, the lignin contained in the straw is not processed by the worms, therefore, even after absorption by bacteria and other participants in the humification process, most of the cellulose remains in the ground lignin tubes.
These tubes rot for several years, being in the ground, they perform the same function as sand, that is, they pass and absorb water. And the higher the soil moisture, the more nutrients the plant roots, including potato roots, will receive, which means the more abundant the harvest will be.
Humic acids alone are not enough for the normal development of root crops, because they require various minerals, therefore, the longer the soil is used for growing plants, the less these substances are in it.
Straw contains almost the entire periodic table, so effectively compensates for the lack of trace elements , which means that the roots will receive them in sufficient volume, so that they will develop properly.
Above, we talked about how the straw introduced into the soil affects the soil, but the mulch is laid on top. Actually, the expression “grow potatoes under straw” came from her, that is, mulch plants, covering them with threshing waste.
When the soil around the plants is covered with straw, the following happens :

There are two ways to plant potatoes under straw:
We recommend using the second method, in which, unlike the first, there is no risk of an increase in nitrates in the fruit, and such tubers are very dangerous to health, so they should not be eaten.
In addition, the second method greatly facilitates the entire cultivation process , because:
This difference is due to the fact that no fertilizers and even repeated digging of the site can replace the process of natural soil regeneration, but if this process is spurred by the introduction of straw and combined with digging, then soil fertility will increase several times. Therefore, the correct cultivation of potatoes under straw does not begin with the planting of new seed material, but with the harvesting of the old crop.
Such cultivation can be divided into several stages :
If you plan to plant potatoes in the same place where they grew, then immediately after harvesting, sow the area with green manure , that is:
You can plant any one plant, but it is better to use all, mixing them all over the site. As soon as the green mass gains strength, trample it and dig up the area, then mulch it with partially rotted straw.
We described these processes in detail in articles :
If you have ready-made humus, fill it in before mulching, and cover with partially rotted material on top and water abundantly. The use of biodestructors gives good results, because they accelerate the processing of cellulose into humic acids and increase the efficiency of the soil regeneration process.
If you plan to plant potatoes in an area previously occupied by other crops, cover it with humus and mulch with straw. If the plot stood fallow for a year, then he does not need any preparation , because the earth has rested and is in optimal condition.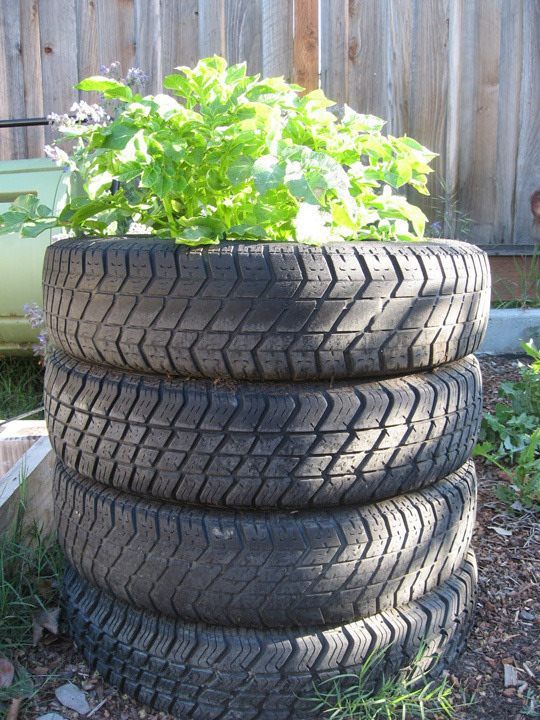
In warm regions, spring preparation of the soil is reduced to digging trenches and laying humus in them from manure and straw, well, or any other. In cold regions, soil heating is required, which will allow planting seed 2-3 weeks earlier.
To do this, either dig trenches about 80 cm deep for every 2 rows of potatoes, or dig a pit of the same depth, and beds and row spacings are formed after the introduction of heating material and insulating soil.
After preparing a pit or trench, fill it with straw and carefully trample down to make a pillow 40 cm thick. Ideally, under the weight of a person, it should not collapse more than 1-2 cm. one meter, this will increase the efficiency of heating, but it is impossible to make it thinner than 40 cm, otherwise it will not warm the soil above it.
Then pour abundantly heating material with warm water with biodegradants dissolved in it , for example:
Immediately after watering and applying biodestructors, cover the heating material with a layer of earth 30–40 cm thick and plant the seed material in 2–3 days.
Gardeners still cannot agree on whether it is better to plant whole potatoes or pieces, so you will have to decide on your own.
Before planting, make furrows 10 cm deep, into which a layer of humus 5 cm thick is poured, if this is not done, the yield will be worse. Arrange the furrows from north to south so the plants will get more sunlight and heat.
Some gardeners first form high beds that rise 5–10 cm above the row spacing, and then furrows are formed in them.
Deep furrows are not required for growing under straw, the main thing is that the potato is at least slightly covered with soil, and new tubers will form at the junction of soil and straw, so the optimal distance between the top of the tuber and the straw is 1–3 cm.
Among the gardeners growing potatoes, disputes about when to apply mineral fertilizers, that is, ash, do not subside. Some recommend pouring it on the bottom of the furrow, while others advise pouring it on top of the ground or mulch.
We recommend focusing on the autumn preparation - if you mulched the area in the winter with partially rotted straw, then it is advisable to bring the ash both into the furrow, where it will reduce the slightly increased soil acidity, and sprinkle it over the mulch. If you did not mulch the area in the winter, then there is not much difference where exactly to add the ash, the effect will still be the same.
Immediately after planting, cover beds and row spacings with straw, 20 cm thick in beds, 10–15 cm in row spacing .
Use only fresh (not rotted or discolored) straw that has been in a ventilated, dry place for less than a year.
Straws with an average length of 20 cm are best suited, they are quite flexible and pliable, and due to their relatively long length they will not be blown away by the wind. Do not compact the mulch, but on the contrary, loosen it a little with your fingers, this will not spoil the thermal insulation properties of the material, but it will facilitate the germination of potato seedlings.
In most cases, the entrances successfully break through the mulch, but sometimes they do not have enough strength to do so. In such cases the surface of the mulch rises slightly above the breaking greenery .
When you see a characteristic raised area that hasn't broken through in a couple of days, carefully dig it out to gain access to the sun, then gently spread the mulch so it wraps tightly around the ground and the young stem.
When the stem has risen 15–20 cm above the mulch, cover the entire area with another 10 cm thick layer of mulch instead of hilling.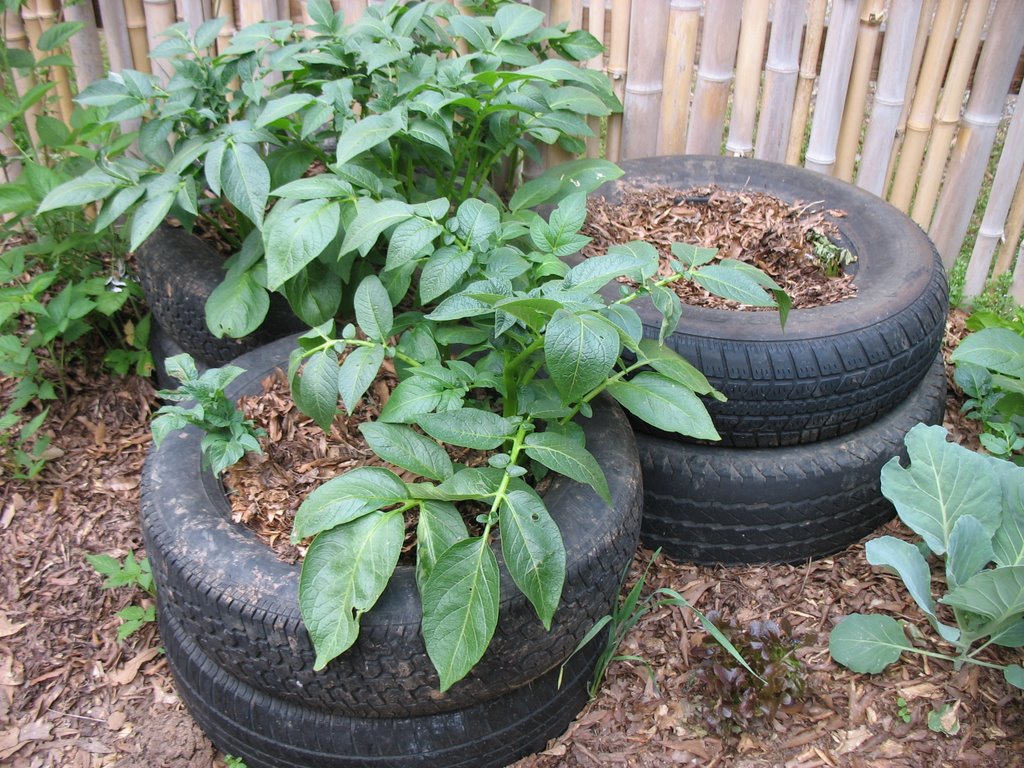 Use the same material as for the first mulching, i.e. to golden.
Do not press it to the ground to compact it, but lay it in bunches 5 cm thick, pressing them together.
These beds can be watered both with a watering can and drip irrigation. Depending on the weather and soil properties, watering is required 2-8 times a month, although if there was a snowy winter, and then after the snow melted it rained heavily, then you can do without watering until the heat starts.
In addition to the first and second mulches, intermediate mulches are also required, during which the optimal thickness of the protective layer is restored.
The need for this arises from :
This mulching is carried out every 3-4 weeks.
Before harvesting, all mulch is removed from the site and placed in a compost heap or pit until the material is completely rotted unsuitable for use on the site. Then most of the tubers are harvested from the soil surface, and the remains are dug up , after which the site is leveled and green manure is planted.
The best way to increase yields and protect potato beds is to plant green manure directly in the beds. White mustard and various legumes work well , they not only balance the chemical composition of the soil, but also drive away the wireworm, which is a serious threat to the tubers.
Lettuce also gives good results. Green manure can be planted instead of every fifth or tenth potato bush, then they will protect the area around them from pests and improve the soil throughout the area.
This video will show you how to plant and grow potatoes under straw or hay with step by step instructions:
