Published on October 26, 2018 Driven Products
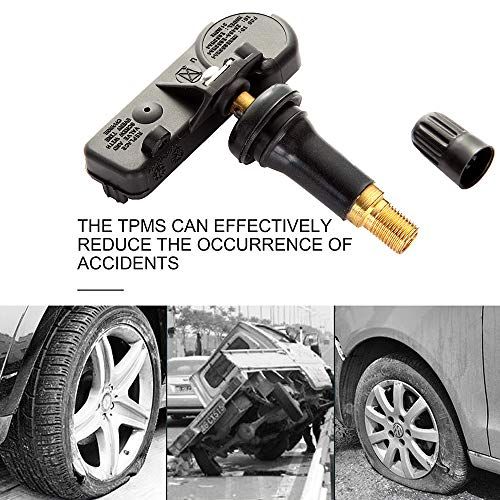
The goal of a Tire Pressure Monitoring System (TPMS) is to help avoid traffic accidents, poor fuel economy, and increased tire wear due to under-inflated tires. Due to the influence tire pressure has on vehicle safety and efficiency, TPMS is required on vehicles manufactured for sale within the United States after 2007.
You’ve probably noticed the TPMS warning light on your dashboard at some point. This is a warning to let you know that one or more of your tires is under-inflated. In most cases you can pull your vehicle into a gas station and fill your tires with air to reach the manufacturer recommended tire pressure. However, this can also be a warning that one or more of your TPMS sensors are failing and it’s time for a new sensor.
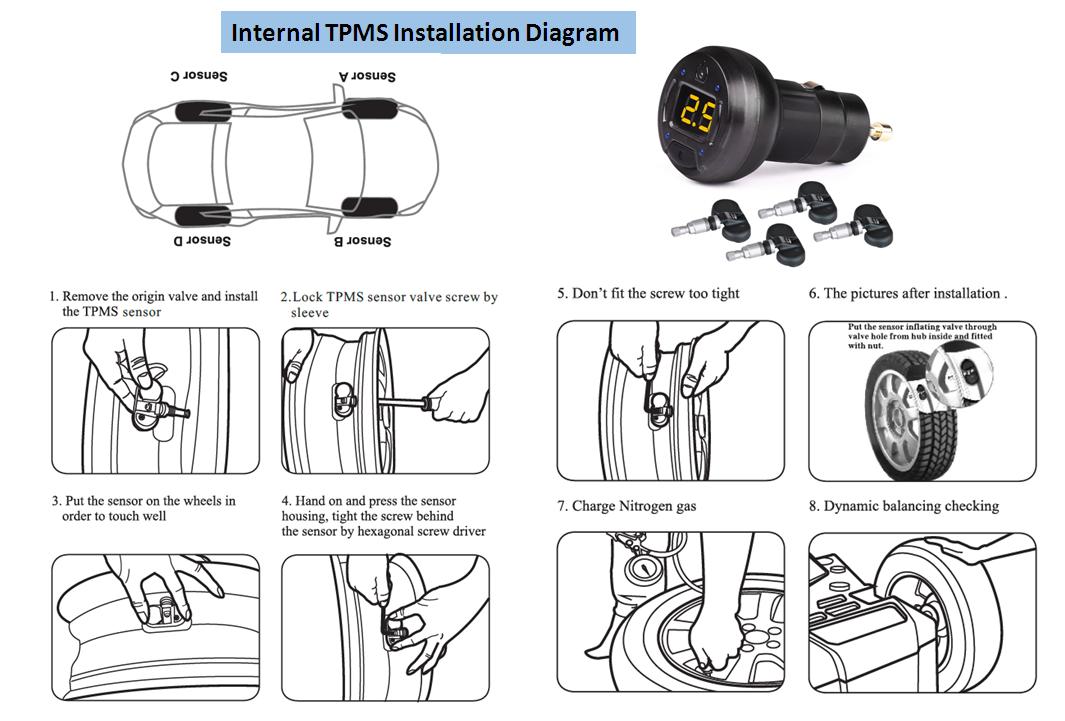
| 1. Break the bead of the tire ensuring the valve is located on the opposite side of the rim from the bead breaker blade. When the tire is dismounted the valve must be located at 1 o’clock to the tire fitting head. | |
| 2. Apply lubricant to the valve stem. | |
| 3. Place the valve stem through the valve hole, ensuring the rubber makes good contact with the valve hole all around. | |
| 4. Use the valve puller to pull the valve stem through the hole until it snaps into place, ensuring that the valve angle is perpendicular to the hole. If using a metal valve puller, protect the rim. | |
| 5. Please note: failure to pull the valve through at the correct angle can result in damage to the valve stem or prevent the rubber from creating an air-tight seal. | |
| 6. Attach the valve stem to the sensor using the nut. Place the anti-rotation pin provided through the base of the valve stem, to keep the valve stem in place. The nut must be tightened to 12.5 in-lbs (1.4 Nm) using a T15 Torx bit and torque tool. | |
| 7. When remounting the tire on to the rim ensure that the valve starts on the opposite side of the rim from the tire fitting head. | |
| 8. Now that your sensors are installed, they will need to be relearned to your vehicle. Contact a Driven Products Fitment Specialist for help identifying your vehicle’s TPMS relearn procedure. |
The cost of installing TPMS sensors will depend on the installer. Assuming you already have your snap-in TPMS sensors purchased and ready to install, you can expect to pay between $20-$50 per sensor installation.
DP-Accessories brand snap-in TPMS sensors are equipped with an advanced Maxell battery. The typical life expectancy is 7-years or 100,000 mile. Our sensors come with a 3 year / 36,000 mile limited warranty.
Don’t confuse TPMS relearning with TPMS programming. Your DP-Accessories TPMS sensors are preprogrammed for your vehicle before we send them to you.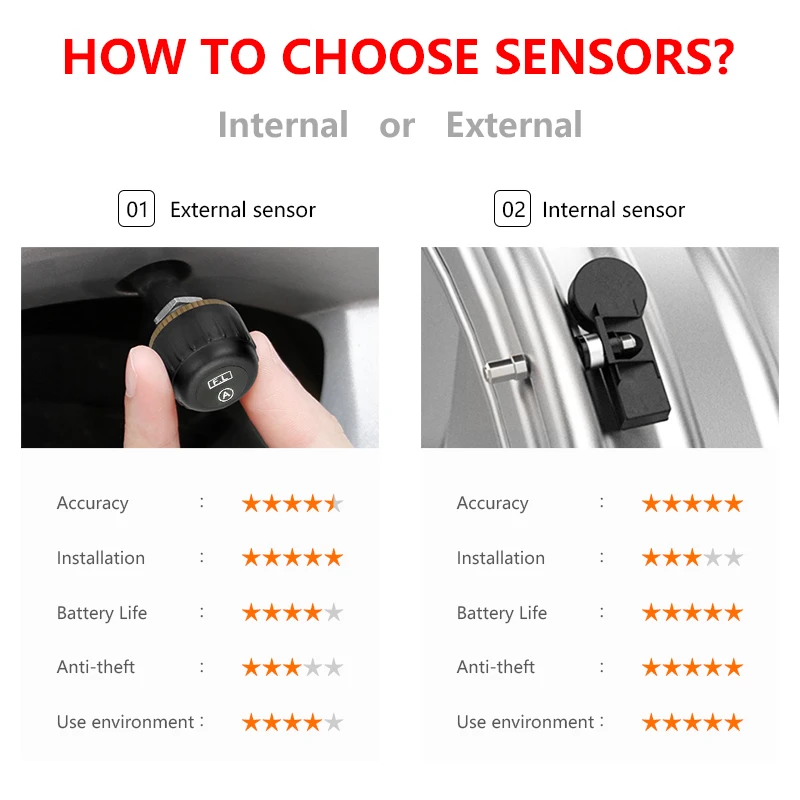 When installing new TPMS sensors replacing, your vehicle manufacturer has specific steps to put the vehicle in learn mode and program the sensors. There are some vehicles that will relearn sensors automatically when your tires are rotated. However, most TPMS sensors will require an action by you to relearn them.
Each vehicle manufacturer will have their own unique TPMS relearn procedure. Contact a Driven Products Fitment Specialist for help identifying your vehicle’s TPMS relearn procedure.
Filed in: installation tips, snap-in, snap-in tpms sensors, snap-in valve stems, tpms, tpms sensors
Share:Most TPMS sensors are held in using just a screw or a nut, but if not assembled or torqued properly, the results can be catastrophic. Carelessness can result in a broken sensor or even a customer being stranded with a flat tire.
Most TPMS sensors are held in using just a screw or a nut, but if not assembled or torqued properly, the results can be catastrophic. Carelessness can result in a broken sensor or even a customer being stranded with a flat tire.
The torque tools required to install TPMS sensors include:
Anytime a clamp-on TPMS sensor is reused or replaced on a wheel, it is necessary to install new seals and valve stem nuts to ensure proper sealing around the sensor valve stem.
1. Wipe the area clean around the sensor/valve stem mounting hole in the wheel. Make sure the surface of the wheel is not damaged. Pieces of the old seal can cause a slow leak. Do not lubricate or use a sealant in this area. This can change the torque values and cause you to snap the stem.
2. If the valve core is removed, it must be replaced with a new valve core in order to avoid galvanic corrosion issues, which may cause the valve core to fail.
3. Insert the sensor through the wheel, keeping pressure against the rear of the metal valve stem. The potted side of the sensor is to be positioned toward the wheel. Mounting the sensor upside down can cause relearn and transmission problems. The two grommets seal the sensor and nut to the wheel.
Grommets conform to the mating surface of the wheel. The instant the nut is torqued, the seal/grommet starts to take on the shape of the surfaces it is sealing against. This memory cannot be erased. If the seal is reused, it could cause a slow leak.
Never reuse these nuts. The nut is made of a softer metal than the stem, so it can be damaged or develop hairline cracks if it is over-tightened. The material of choice is typically aluminum. The new nut may have coatings on the threads that prevent corrosion and leaks.
Before tightening the sensor nut, push downward on the sensor housing in an attempt to make it flush with the interior contour of the wheel. Some clamp-in stems have the ability to change the angle of the sensor by loosening a fastener that holds the sensor on the stem. Other sensors should assume the correct position when the nut is torqued.
4. While holding the sensor in position, tighten the sensor nut with a torque wrench. Typical torque values for the base nuts on a TPMS valve stem range from as low as 35 in.-lbs. of torque to as much as 80 in.-lbs. of torque. That’s quite a range. This does not mean that any torque value within this range is acceptable. It means that the torque specifications for the base nut on one car might require 44 in.-lbs., another might require exactly 62 in.-lbs., another might specify exactly 71 in.-lbs., and so on. Don’t guess. Look up the torque specifications for the vehicle you are servicing to make sure you use the correct torque. Over-torquing the sensor nut by as little as 12 Nm (106 in.-lbs.) may result in sensor separation from the valve stem.
Leaks cannot be eliminated by tightening the nut more. Sealing grommets are engineered to work at a specific torque. Any torque above the specified value will cause the seal to leak. Extra force may also damage the nut or valve stem or fracture the sensor body.
5. Mount the tire on the wheel following the tire changer manufacturer’s instructions, paying special attention not to damage the tire pressure sensor.
Snap-in Sensor InstallationSnap-in sensors can look like regular rubber valve stems. The difference is that the molded rubber on the snap-in valve stem does not reach the threads and there is a tapered shoulder. These valves have a longer cap than a non-TPMS valve stem.
Behind the stem is a mounting point for a self-tapping screw that holds the sensor to the stem. There are two installation methods depending on the type of snap-in valve stem you are installing. Always check the instructions or the manufacturer’s recommendation.
The first method is installing the valve stem in the rim and then attaching the sensor. The second method is to attach the sensor to the valve stem and then insert it into the wheel. Why? On some stems, the sensor could come in contact with the wheel as the stem is pulled with the sensor attached.
When attaching a new valve to the sensor body, always use a preset torque screwdriver with the correct torx head or hex nut. Most tool suppliers package two preset torque drivers in a set. The torque settings may differ by manufacturer. The screw is self-tapping and can be used only once. The same applies to the stem.
When tightening the screw, be mindful of stress on the sensor and the alignment of the sensor. Start the screw for the first couple of threads and make sure the sensor and stem are aligned. When performing the final tightening sequence, stop when the tool clicks, which indicates that the proper torque has been reached.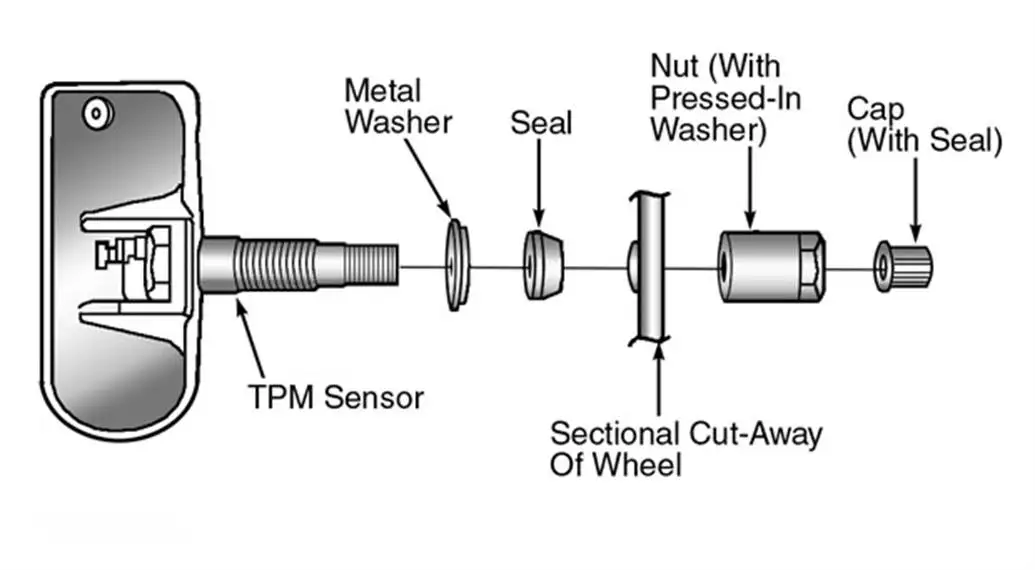
Before installing the valve stem, it is acceptable to lubricate the seating surfaces with an approved tire lubricant. Do not use chassis grease or a grease with petroleum distillates. These types of lubricants can degrade the stem over time and cause a leak. Lubricating the stem can help in the alignment of the sensor on the flats.
When using a tire valve stem installation tool, pull the valve stem straight through the valve hole rather than at an angle.
Some valve stems have a tab on the body of the valve that can help in the alignment of the sensor. For most applications, the rubber bulb of the valve should be resting against the rim and the sensor body should not be touching the rim.
In this article:service, torque, TPMS
0041
• The tire bead should be torn off at an angle of about 90° to the valve. The tire bead should be torn off at an angle of about 90° relative to the valve.
• When removing the wheel, do not let the tire or tool come into contact with the valve.
• Bead break must end near the valve.
3. Turn the wheel clockwise.
4. Check the valve position deviation (silver inlet) during transport and set the valve to the required position (metal brackets).
5. To prevent rotation and position deflection during tightening, the valve must be installed in the set position (inside the metal brackets). Tighten to the specified torque (8 Nm). Reuse of the nut is prohibited.
6. Install the valve in the hole so that the sealing washer and the metal surface are in contact.
7. Holding the body with two fingers, axially onto the valve with the other finger.
8. The laser mark on the housing must be visible.
9. When the valve is fully installed, tighten the nut a few turns by hand, provided the sensor is aligned with the bore.
10. Install the nut using a tool, keeping the valve and sensor in position.
11. The system automatically searches for the position of the sensor and memorizes new sensors.
• The bottom end of the TPMS sensor does not seal if the sensor is not fully inserted into the wheel, as shown in fig.
7. Remove the tire changer.
8. Inflate the tire until the beads are in the desired position.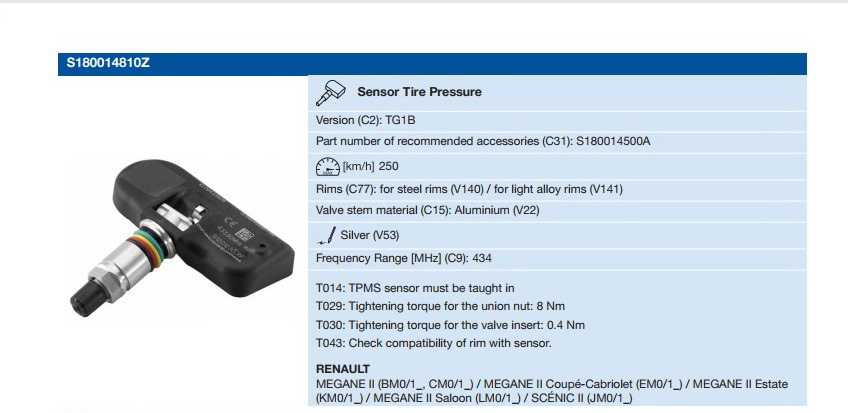
______________________________________________
Tire pressure: 2.3 kg/cm³ (33 psi)
______________________________________________
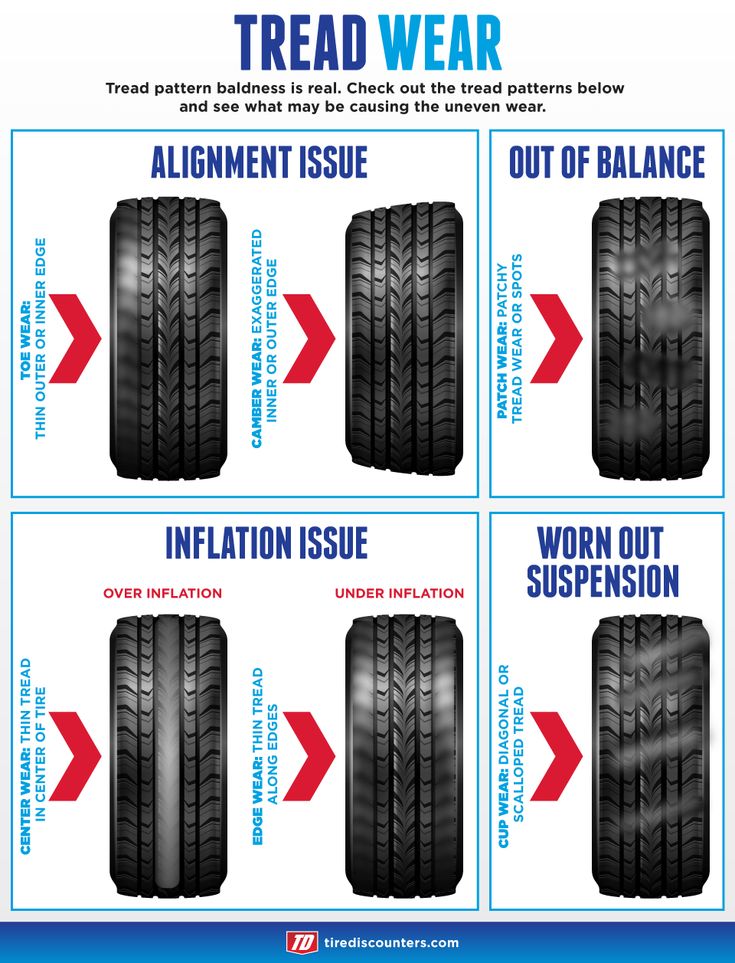
Insufficiently inflated tires experience increased stress, which leads to various problems:
increased fuel consumption;
braking distance increases, which can lead to an accident;
Handling deteriorates, especially when it rains;
tires heat up quickly, which leads to accelerated destruction of rubber: cracks appear, tires begin to delaminate.
In turn, excessive pressure also has a number of negative factors. Among them, it is worth highlighting the following points:
there is a risk of seriously damaging the tires;
the braking distance increases as the area of the contact patch with the road decreases;
reduced handling;
fuel consumption is increasing.
If there is too much pressure, there is a risk that the tire will explode when hitting an obstacle. In turn, this can damage the suspension and other elements of the car. That is why the installation of tire pressure sensors is not only the recommendations of automakers, but also your safety on the road.
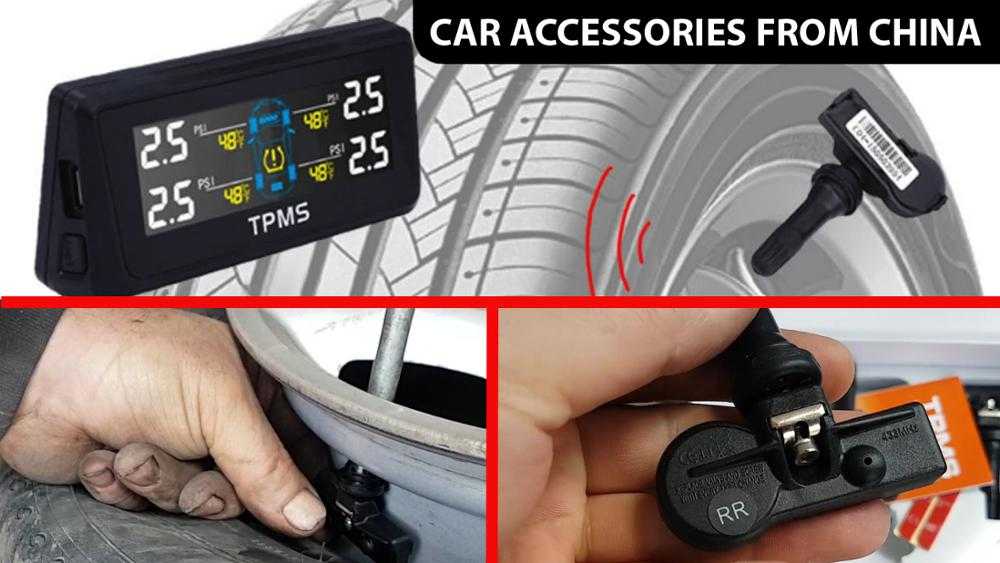
Tire pressure sensor mounted inside the wheel. It directly measures the tire pressure and transmits the signal to the receiving device, which is combined with the display. If the data starts to diverge, then the indicator lights up, or an error code appears on the dashboard, which is accompanied by a signal. Thus, you will always know at what level the tire pressure is.
Due to the fact that each sensor has its own data rate and other design features, it is necessary to install only the equipment that is recommended by the manufacturer.
Vehicle handling, braking distance and fuel consumption are directly related to tire pressure. That is why it is very important to monitor this indicator. This can be done with a sensor. It measures the pressure and when it changes, it immediately notifies the driver about it. Thanks to the sensors, you can avoid accidents and other troubles that occur while driving on a flat tire.
Our company carries out installation of tire pressure sensors on Range Rover . All our workshops are equipped with modern equipment that meets all JLR standards. For each client, a highly qualified master is assigned, who is fully responsible for the car. Our employees undergo training and mandatory internships abroad. Thanks to this approach, we provide quality service and perform all work at the highest level. Call, and the technical center staff will do everything to avoid unforeseen expenses and breakdowns on the road.
Under-inflated tires experience increased stress, which leads to various problems:
increased fuel consumption;
braking distance increases, which can lead to an accident;
Handling deteriorates, especially when it rains;
tires heat up quickly, which leads to accelerated destruction of rubber: cracks appear, tires begin to delaminate.
In turn, excessive pressure also has a number of negative factors. Among them, it is worth highlighting the following points:
there is a risk of severe tire damage;
the braking distance increases as the area of the contact patch with the road decreases;
reduced handling;
fuel consumption is increasing.
If there is too much pressure, there is a risk that the tire will explode when hitting an obstacle. In turn, this can damage the suspension and other elements of the car. That is why the installation of tire pressure sensors is not only the recommendations of automakers, but also your safety on the road.
Tire pressure sensor installed inside the wheel. It directly measures the tire pressure and transmits the signal to the receiving device, which is combined with the display. If the data starts to diverge, then the indicator lights up, or an error code appears on the dashboard, which is accompanied by a signal. Thus, you will always know at what level the tire pressure is.