So perhaps you were like me – afraid of the little cylinder. Perhaps you thought it would just simply explode on you, or that when you went to use it you’d end up putting more CO2 into the the sky than into your tube. Or perhaps you’ve just been perfectly content with pumping up your tube while sitting on the side of the road cursing whatever it was that just flatted you.
Whatever the reason is, it’s time to get over that fear of CO2 and start making your life much easier.
The parts:
First up, let’s talk about the pieces. A ‘proper’ CO2 setup has two pieces – the inflator (aka nozzle) and the cartridge. Here’s the inflators:
(With flow control lever on left, without on right)
Inflators come in two basic flavors. Those without flow control (ability to stop the pressure) and those with flow control. Obviously the pro to flow control is that you can stop/start it once you pop the seal on the cartridge. The con is they cost a bit more (although, as of this writing the flow control ones are on sale for less than those without). If you don’t have flow control – it’s sorta a one-shot deal. You either do it right all at once the first time, or you’re down and out a cartridge. Hint: Buy the one with the flow control. (Though technically you can control the non-flow control type by carefully tightening and un-tightening the cartridge from the inflator, seems a bit tricky and a bit risky)
Cartridges come in different sizes – 12g, 16g or 25g. The smaller ones are designed for filling tires up to about 90 PSI. The larger ones are designed for filling tires up to 120+ PSI. This corresponds to lower pressure tubes such as clinchers (typically 90-120PSI) and tubular’s (140-170 PSI) such as race wheels.
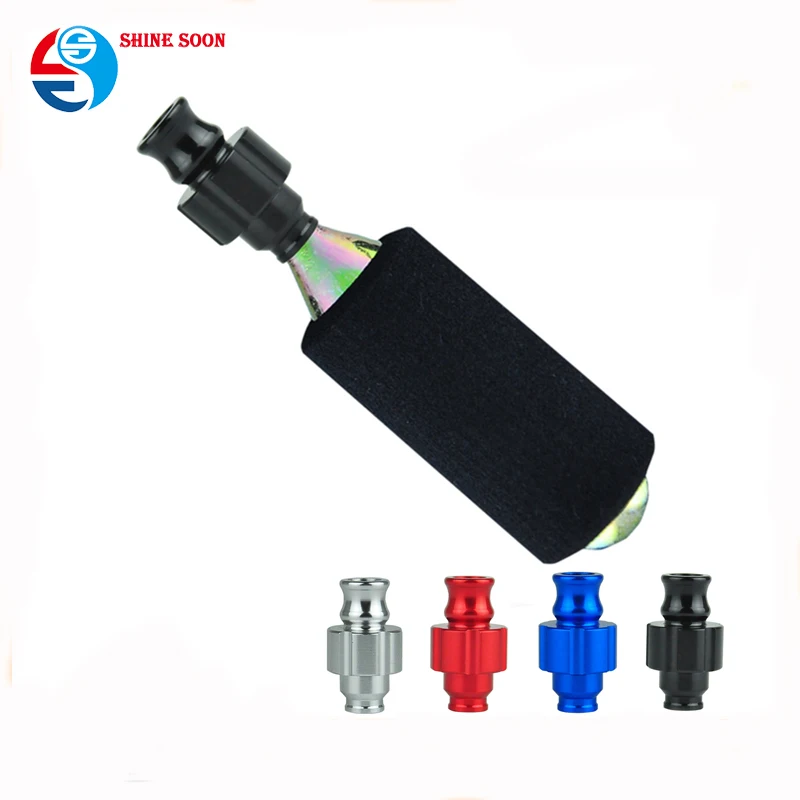
There are also two different types of cartridges – threaded and non threaded.
(Non-threaded on top, threaded on bottom)
What’s the difference? Well, simplicity (and a patent). The threaded ones you have a lower likelihood of screwing up, so I just use those. They only cost a few cents more. Make sure that if you buy a inflator and cartridges not in a little kit that you buy matching ones (threaded with threaded, and/or non-threaded with non-threaded).
Last but not least – think about how you want to carry the cartridges. If you have a seat bag, make sure you have room in there. If you have a tail system on your tri-bike you may be able to fashion something creative or purchase something. I actually use the bag that came with the little kit and found it fits PERFECTLY into my Hydrotail. From there, I just created a little zip-tie loop that connects to my Velcro straps for my extra tube. Works awesome!
(Note: If you get this kit like I have, toss the tire levers, they are garbage and will actually bend on their first use)
(Above: Side view of little bag inside Hydrotail, contains two tire levers, two cartridges, one valve/nozzle, and a bike wrench set. Below: Same thing view from above seat)
Ok, easy so far? Good. Now let’s get onto the action.
Putting the pressure on
Ok, so after you’ve deflated your tire (after wandering through the roadside gravel while distracted in a race by that ‘nice…something’ that just passed you from the M/F 20-29 age group) – it’s time to get air back into the tube.
The first part is no different than your normal tube changing procedure:
Release any remaining air out of bad tube (or tubular)
Check the tube and/or tire to figure out if something is embedded. Nothing worse than flatting a mile down the road again because a piece of glass is stuck in the tire.
Get the new tube with a touch of air in it* situated below the tire and onto the rim.
*Ok, now comes the change from usual. At this junction we need to get a bit of air into the tire to form it onto the rim.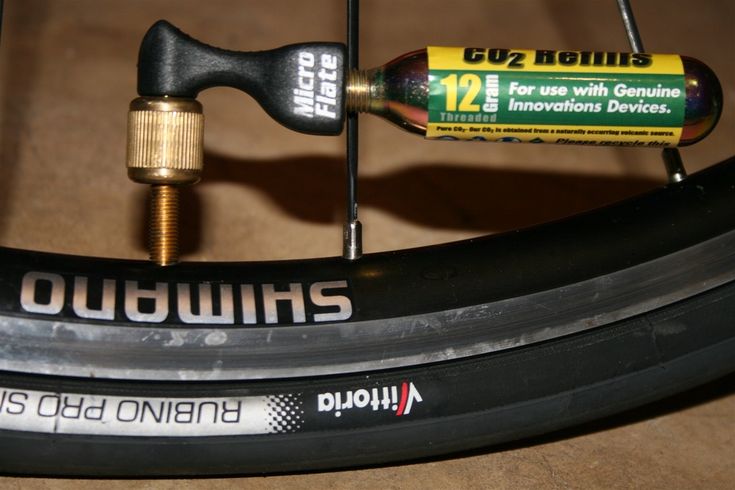 There are two ways to accomplish this. The right way…and the wrong way. Let’s start with the wrong way.
[The right way] – If you have an inflator that has flow control, then put just a tiny bit of air into it – a split second at most. Just enough to create a circular form.
However, if you didn’t buy a flow control unit – then using that nifty thing otherwise known as your mouth and tongue – press the top of the valve stem and blow a bit of air into it. It’s really not that hard. Seriously – try it. Go now into your pile of dead or new tubes and try it. You’ll note it inflates near instantly enough to form a tube like object.
[The wrong way] – Taking one of your two cartridges and holding it onto the tube valve for a few seconds and then yanking it off the valve while the cartridge releases the remainder of the gas into the air. This is the wrong way because now you’ve just wasted a cartridge and didn’t get any air into the tube with the first cartridge now requiring you to use your second cartridge.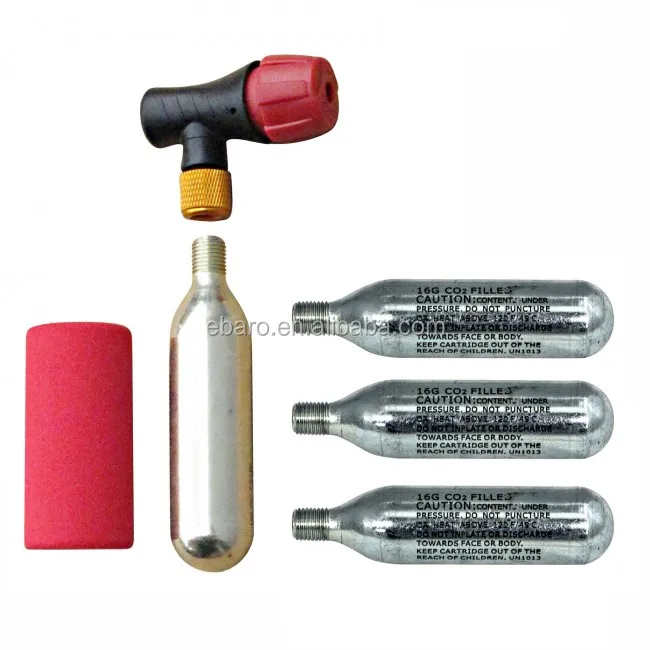 Murphy’s law dictates that should you do this, you’ll likely flat again exactly 500 yards down the road …and be 55 miles from your car…without any further way to inflate.
(Yes, I blew this one up using just my mouth with tongue depressing the valve, it just takes a few seconds)
So – we’ve got things to the point where the tube is inside the tire, and the tire and tube are roughly on the rim. Now, let’s get it all ‘cleaned up’ and ensure there aren’t any edges sticking out or other funkiness. Clean lines all the way around, no bumps or unevenness.
Blast off
Now that everything is ready for launch, let’s first do a Hail Mary. With that out of the way – it’s time to hope for the best.
First step: If you don’t have a control valve – then take the inflator and attach it to your tube’s valve first.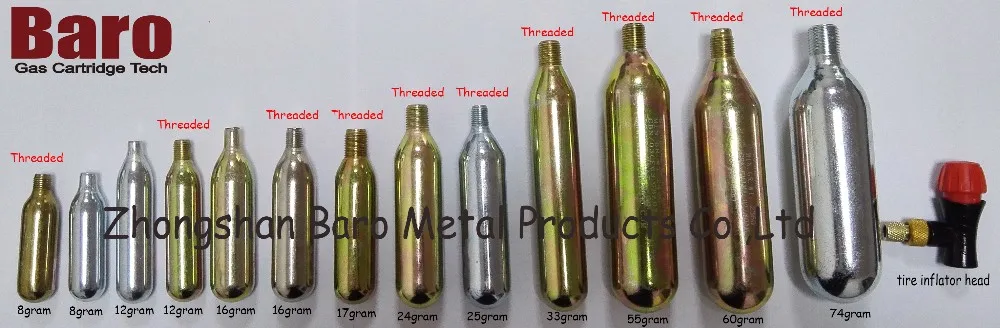 DO NOT attach it to the cartridge first (unless you have a control valve). You can certainly do this, but this increases the likelihood of premature ejection of your little friends valuable contents (just sayin’….).
Second Step: With the nozzle on the tube valve and ready to add air, it’s time to screw in the cartridge. It should screw in easily at first, and then come to a slight halt. It’s at this juncture that you will break the seal on the cartridge and release the CO2 into the wheel.
Once you do this – it will inflate your tire in about 1.5 seconds. It’s quick. Very quick.
Depending on if you have a higher pressure tire (such as a race wheel), you may need to do one more cartridge to get to full pressure. Remember that riding a low pressure wheel will likely only get you a flat again – so be sure to really get as much pressure as you can without exceeding the limits of the tube/tire.
With everything complete – inspect the tire.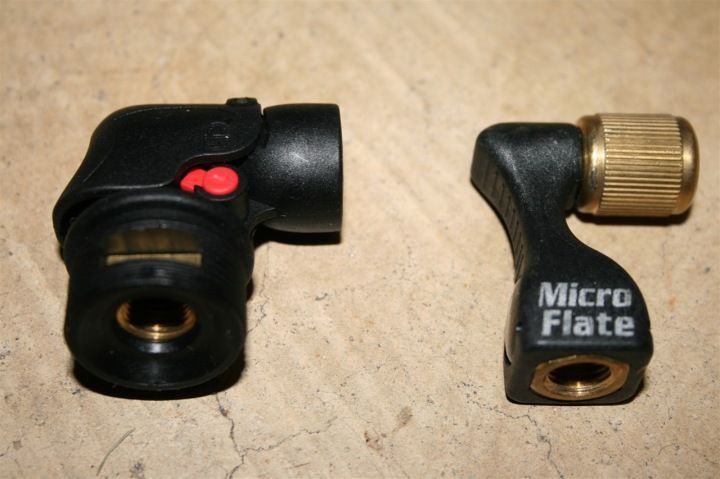 Make sure everything is still ‘clean’ – good even lines all the way around. You don’t want to flat a few yards down the road because of an uneven tire.
Pack up your little roadside work zone – cartridges, tubes, Dunkin Doughnuts leftovers, etc… and take it with you. Don’t be the cyclist who leaves their junk lying around. Plus, if you do leave stuff behind it will get you a well deserved penalty on the race course.
Wrap up
So there ya go – that’s all there is to it. I know I made it sound really long, but in reality it’s very quick. When you do it for real it will only take about 2-5 minutes tops end to end – even less if you really practice it. Here’s the 10 step version for you:
Undo old tire
Check old tire for intrusion
Blow small amount of air into tube to form tire
Get new tire situated on rim and under wheel
Validate clean lines
Attach inflator nozzle to tube valve
Attach cartridge to nozzle and tighten to pop seal
Tire inflates…use another cartridge if on high psi wheels
Check tire for ‘clean lines’ and no bumps
Clean up mess …finish ride.
But WAIT!!!!!
Now – one last REALLY IMPORTANT STEP! When you get home, you MUST deflate your tire out and refill it with regular air (just using a simple stand pump). CO2 as a gas quickly dissipates through the rubber and you’ll lose about half of your PSI by the next day. Here’s a post that explains it all really well in scientific terms. Just trust me on this – I learned this first hand as well. 😉
That’s it – there ya go! Now go buy yourself a little CO2 kit and save yourself the hassle of a pump on the frame.
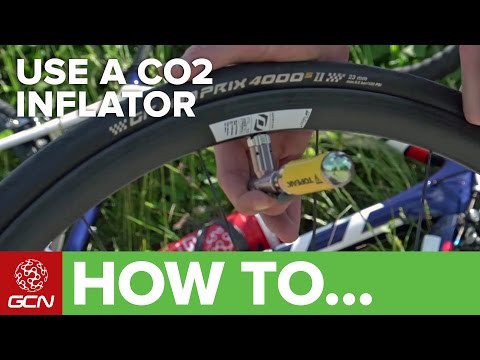
CO2 inflators are an extremely convenient way to inflate tyres, if speed of operation is the most important factor. A small metal canister contains compressed carbon dioxide gas that expands to fill your tyre when the top is punctured. It's a quick way to get back on the road, but if you're not careful it's easy to jet all the CO2 into the atmosphere and not the tyre.
Our guide below shows you what we believe is the best method to fit and use a CO2 inflator. If there are other methods that you prefer then feel free to let everybody know in the comments.
C02 inflator
Go through your usual tube replacement process, making sure there are no sharp objects left in the tyre and the tube isn't pinched by the tyre. The latter is very important. With a had pump, you might get a chance to see a tube popping out of the tyre and stop it, but when you use a gas canister you'll blow a hole in a pinched tube before you can react.
1 Make sure the valve is open
It's essential to have the valve in the open position. We've seen riders fit a fresh tube in a hurry and hit the CO2 trigger with the valve still closed, and so wasting a cartridge. You can avoid this by storing your spare tubes with the valves open.
2 Clear the valve
Once you've undone the valve, tap the small brass threaded chuck back towards the valve stem. Valves can be quite sticky when new, and while the power of the compressed gas is usually enough to hit the valve open it's still good practice to clear it first.
3 Make sure the inflator is closed
While each CO2 inflator is designed slightly differently, they mostly follow the same functional path. Most will have a switch, dial or trigger to allow you to control the moment of delivery. This version we're using is from Lezyne. It uses a twist dial. It's all the way open or all the way closed. Right now, you need to close the valve fully.
4 Put the cartridge in the inflator
The head unit and the cartridge are both threaded. They screw together. Some inflators allow you to store the cartridge inside a casing, primed and ready to go. You release a safety catch then pull a trigger to let the gas out. You could carry this Lezyne head with the cartridge screwed in too, but there's a slight risk of accidentally opening it.
5 Tighten the cartridge into place
Keep turning the head unit on to the cartridge. Inside the threaded port of the head unit is a small tube with a pointed end. This tube will pierce the end of the CO2 cartridge. You'll sense it in your hands as the gas escapes the confines of the cartridge and expands into the head unit. The valve trigger you closed before you started stops it from flowing out until you're ready.
6 Turn the wheel up
Bring the valve section of the wheel so that it is uppermost. Press the valve port of the head unit onto the valve stem. Make sure it's firmly on. Keep holding it.
7 Unleash the gas
Holding the inflator's head unit onto the valve stem, open the flow of gas from the inflator cartridge to the inner tube by operating the inflator's trigger, dial or button. The inflation will be very sudden, a bit noisy and it'll make the gas cartridge extremely cold; cold enough to burn skin, so wear gloves or, as we've done, take great care not to touch it.
8 Remove the inflator
When the tyre inflates you should hear the tyre beads pop to the rim signifying that the tyre has seated. It'll make a resounding snap sound. Next close the valve on the gas cartridge. Most allow you store unused gas in the cartridge. In most cases we use all the gas to ensure tyre seating. Pull the inflator off the inner tube valve and adjust to your favoured pressure, then close the inner tube valve.
We’ve noticed you’re using an ad blocker. If you like road.cc, but you don’t like ads, please consider subscribing to the site to support us directly. As a subscriber you can read road.cc ad-free, from as little as £1.99.
If you don’t want to subscribe, please turn your ad blocker off. The revenue from adverts helps to fund our site.
Subscribe
Continue Reading
CO2 pumps are an extremely convenient way to inflate tires. The small canister contains compressed carbon dioxide, which is fed into the chamber. This is a quick way to get back on track after a flat tire.
Our guide below will describe what we think is the best way to install and use a CO2 pump.
Make sure there are no sharp objects in the tire. Check that the tube does not come out of the tire bead. With a simple pump, you can see the chamber that has come out in time, with a CO2 cylinder, there is a chance that the chamber will burst if installed incorrectly. It takes about 2 minutes to work
It is important that the valve is in the open position. If you install the pump in a closed container, you will waste the cartridge. As an option, store the chambers with an open nipple.
Briefly press the nipple to release some air. Thus, you will purge the nipple from possible particles of sand and dirt.
Most pumps are similar in design. They usually have an on/off trigger for air supply. In the open position of the trigger, you bleed all the air from the cylinder when docking it with the pump.
Pump and cartridge are threaded. Some pumps allow you to store the cartridge for a long time, thereby remaining at the ready.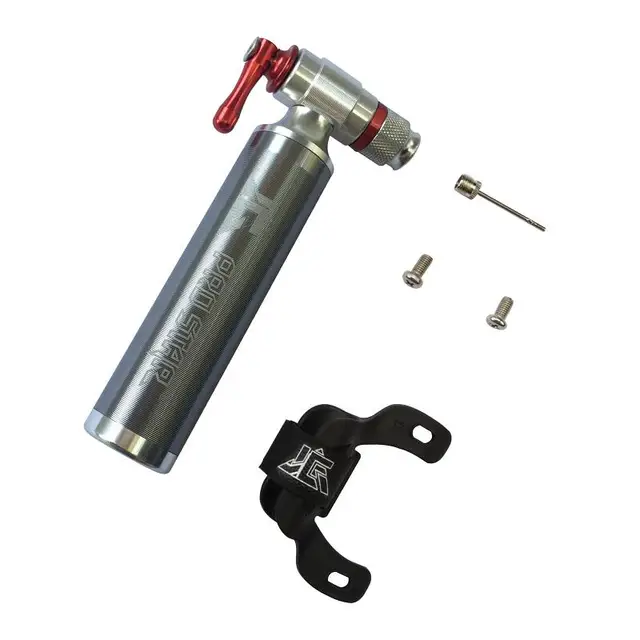 You release the safety, then pull the trigger to release the gas. When storing the pump together with the cylinder, do not forget - there is a risk of accidental opening.
Continue to screw the bottle into the pump. Inside the threaded hole of the pump is a small tube with a pointed end. This tube will pierce the end of the CO2 cartridge. As soon as the needle pierces the balloon, the gas will rush into the pump.
Then fit the pump firmly into the nipple. Make sure the valve is tight.
While holding the pump head on the nipple, open the valve using the trigger. The air supply will be very abrupt, perhaps with a pop. The cylinder can cool down quickly - it is better to use gloves.
When the gas is applied, the tire will inflate sharply and seat into the rim with a loud click. It is best to use all the air in the tank, and then bleed to the desired pressure.
Lezyne CO2 pumps are a small head for Presta or Schreder nipples, into which a cartridge of compressed carbon dioxide (CO2) is screwed. The advantages of CO2 over conventional pumps are low weight, convenience and speed of use. Lezyne CO2 pump heads weigh 16-26 grams plus cylinder weights of 45-60 grams depending on volume, 16 or 25 grams respectively. Portable pumps that can compete in weight with CO2 are not very user-friendly. If you take a normal pump, which is convenient to inflate the tire, then the difference in weight will already be noticeable.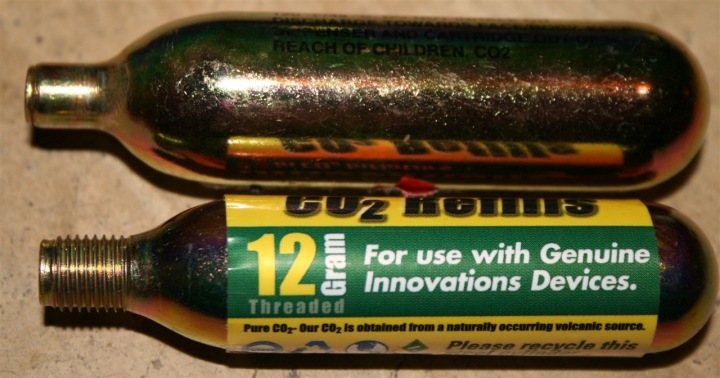 In terms of convenience and pumping speed, pumps powered by a CO2 cylinder bypass their standard counterparts at times. This is a portable compressor that fits in the palm of your hand. You just need to put the head on the nipple. Of the shortcomings, it can only be noted that the cylinders are disposable and need to be bought in addition from time to time. As for consumption, a 16 gram bottle is enough to inflate a 26 ″ x 2.1 wheel up to 3 atmospheres, 28 ″ x 32 mm - up to 4 atmospheres or a road wheel with a 23 mm wide tire to a pressure of 9atmospheres. A 25 gram balloon can inflate a tire 27.5 "x2.1 up to 3.5 atmospheres and 29" x 2.1 "up to a pressure of 3 atmospheres.
PRESSURE DRIVE CFH