Summary
Pedro’s tire levers are little more than an afterthought most of the time, which is great. They’re strong, quick and easy to store, withstand years of regular use, and deliver reliable performance when needed.
They’re also competitively priced and backed by a lifetime warranty, which—based on my long-term experience—you probably won’t need.
Pros
Cons
Like any cycling product, no single tire lever will meet everyone’s needs
Sending
Pedro’s tire levers have been available to cyclists since 1989, and remain a favorite to this day. I’ll walk you through their details, along with my firsthand experience, to help you decide if they’re right for you.
Pedro’s tire levers are molded from a refined composite plastic formula that resists breakage and bending, with a chisel tip at one end and a thicker overall shape that makes it easy to insert beneath the bead and also prevents slipping.
When you’re done, they’re shaped so that each pair snaps together for easy storage. In fact, the company advertises it’s this bold shape that makes it “one of the strongest levers available” and capable of “remove the tightest of tires.”
Combining these benefits with their $5 per-pair price tag and lifetime warranty, Pedro’s might seem like a no-brainer if you’re in the market for a pair of bike levers. But, is there anything about this brand that will deliver equal—or even better—value than competing tire levers?
By combining my firsthand experience with third-party details and insight into the competition, I’ll help you find some answers.
Let’s kick things off by taking a closer look at the tire levers’ functionality.
Available in bright yellow, pink, orange, and green colors for easy spotting on the trail or in the shop, Pedro’s tire levers feature dual spoke hooks at one end, which the company advertises “make removal of even the tightest tires a simple task.”
Pedro’s tire levers feature several useful features, including a thicker design for maximum durability, a spoke hook at one end and a chisel tip at the other, and a refined composite plastic construction. Credit: Pedro’s NATo use them, simply deflate your tire and inner tube (if applicable), unseat the bead by hand, and then insert the chisel tip of Pedro’s lever underneath the bead and push down to lift the bead upward. From there, slide forward along your rim to remove the remainder of the bead, and repeat the process on the opposite side.
Where to the hooks come into play? If sliding along your rim isn’t successful, you can push the lever’s opposite end all the way to your wheel and slide a spoke into the slot, which locks it into place with the bead still raised.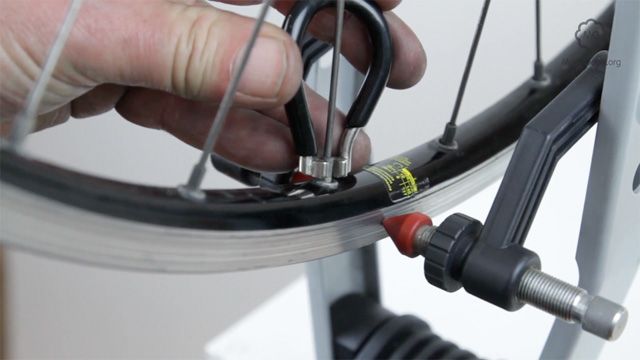
Then, you can insert a second lever a few inches farther down your rim to fully unseat the bead.
The spoke hook on each Pedro’s lever allows you to use more than to unseat especially fussy tire beads. Here’s a screenshot from our How to Install Tubeless Bike Tires outlining how this works.Pro tip: If you still experience difficulty, the Removal Guide on Pedro’s website recommends applying their super-slippery Bike Lust frame polish to the inner rim surfaces using a rag. You can even spray or pour it directly only your bead if you encounter a tire that’s especially stuck.
Combined with the right technique, Pedro’s says their bombproof levers will be the last ones you buy. And if you do happen to break them, they’re backed by a lifetime warranty against breakage, malfunction, or defect, so the company will repair or replace them at their discretion. Simply call 800-346-0004 to start the process.
I’m not sure exactly how many times I’ve pried a tire’s beads, slid along rims, or locked my Pedro’s levers onto spokes over the years, but it’s a lot. Like, a whole lot.
Because changing tires is dirty work, they’ve become stained with chain grease and other debris. And with on their soft, proprietary plastic, they’ve endured countless scratches, scuffs, and tiny notches.
However, despite all of the use to which they’ve been subjected, there’s no noticeable degradation. They’re perfectly functional.
My Pedro’s tire levers, which are well worn from years of regular use, but remain perfectly functional and 100% reliable.From a functionality perspective, I’ve found my Pedro’s levers are easy to maneuver and work with, even when wet (sweating, raining, etc.), feature a good hand feel, and the spoke holes snap easily and firmly into place.
When finished, they stow away discreetly, whether in my Topeak Aero Wedge pack or Camelbak Skyline LR 10.
Although they advertise a thicker design, Pedro’s tire levers stow away without incident, regardless of where I need them to go.Finally, Pedro’s levers are inexpensive and available at most bike shops, so I’ve found they’re quick and easy to pick up if I need an extra pair, even if I’m traveling and far away from my usual LBS.
You might think that a bike tire lever is just that—there’s little-to-no difference between designs and materials. However, a quick online search will reveal this isn’t the case. How do they stack up?
Here are some of Pedro’s closest competitors on Amazon, along with how their core criteria compare:
| Pedro’s Tire Levers vs. the Competition | |||
| Brand | Material | Warranty | Avg. Amazon Rating |
| Pedro’s Tire Levers | Proprietary refined composite plastic | Lifetime | 4.7 stars, 1,110 reviews |
| Park Tool TL-2 | Nylon w/ steel core | Lifetime | 4.6 stars, 133 reviews |
| Schwalbe Bike Tire Levers | High-quality plastic | Limited Lifetime | 4. 4 stars, 125 reviews 4 stars, 125 reviews |
| Gorilla Force | Self-lubricating plastic | Lifetime | 4.5 stars, 56 reviews |
| SILCA Premio | Reinforced nylon w/forged alloy blade | Lifetime | 4.3 stars, 3 reviews |
| Diamondback Steel Core Bicycle Tire Levers | Nylon w/steel core | N/A | 4.5 stars, 71 reviews |
| Dr. Roc Tire Spoon Lever Kit | Automotive grade drop forged steel w/polished chrome finish | Lifetime | 4.3 stars, 275 reviews |
The bottom line is that buying a set of tire levers is probably one of the least complicated bike-related purchases you’ll encounter. Still, there are some differences between models that could be meaningful, depending on which factors you place the most emphasis.
For example, price-wise, Pedro’s and Park Tool’s levers are the least expensive in the table above, whereas Dr. Roc’s and SILCA are the highest priced by a wide margin.
However, SILCA is also optimized for carbon rims, which are even more expensive to replace if you damage them when changing a tire, and they also come from a company with an ultra-premium reputation. And Dr. Roc’s is the only spoon-shaped option in the table above.
Along these same lines, although Pedro’s features a proprietary polymer blend, Gorilla Force levers are the only models offered in a self-lubricating plastic.
On the other hand, SILCA and Pedro’s levers only include two per set, whereas Park Tool, Schwalbe, Diamondback, and Gorilla Force levers come with three. Although these come with higher prices overall, this could decrease their cost-per-lever below Pedro’s.
Let’s pull all of these details together and wrap up.
Considering that Pedro’s has been in business since 1989 and their levers come with an almost wholly positive online reputation among cyclists (as evidenced by their ratings), along with a low price, quality construction, and my stellar firsthand experience, I’d say you can’t go wrong with them.
However, if you have high-end carbon rims, you might want to go with a similarly high-end option like SILCA. Or, if you have a habit of breaking levers, models with steel cores could deliver the added beefiness you need.
Just keep in mind that you could alter your budget and/or increase your carrying weight as a result—if these are important factors to you.
| Ready to buy? Consider clicking the link to the right. Why? As an Amazon Associate, TreadBikely earns from qualifying purchases, which helps support our mission. Learn more here. |
>> Keep rolling: Park Tool PCS-10 Review
Like Loading...
hands-onPedro'stire leverstirestools
Getting a flat tire is an inevitable part of cycling, and there’s only so many times you can get away with walking your bike into a shop or having a buddy on a group ride fix it for you. An essential part of knowing how to fix a flat is also knowing how to use tire levers, so there’s no time like the present to learn.
If you don’t have tire levers, don’t try using other available tools (like a flathead screwdriver) as substitutes. They could easily damage the tube, tire, or worse, the rim. Tire levers are designed specifically for removing and installing tires without damaging anything in the process, so stick with those to be safe.
Below, we explain how to use a tire lever, along with tips for dealing with tricky tires.
Join Bicycling All Access for more tips and tricks
Many tire levers are made out of hard plastic and sold in sets of two or three. You can also find levers made out of steel or with a steel core for tires that are harder to remove. All tire levers feature a curved end for slipping under the lip of the tire; depending on the brand, it could be fully rounded or squared. Many tire levers, though not all, come with a small hook on the other end so you can secure it to a spoke for leverage.
Trevor Raab
Start with the tire deflated. Pick a spot along the edge of the rim that lines up with a spoke. Pull back the tire away from the rim and fit the curved end of the lever under the edge of the tire. With the tip of the lever under the tire’s edge, press down on the lever using the rim for leverage and secure the hooked end onto the spoke. The lever should lift the edge of the tire up and over the outside of the rim and hold it in place.
Take a second tire lever and fit the curved end under the tire’s edge in the gap created by the first lever. Work the second lever along the edge of the rim by sliding it laterally with the end under the tire lip until the tire comes free of the rim on one side. This step can be hard to do with tight tires—try pushing on the second lever with both thumbs.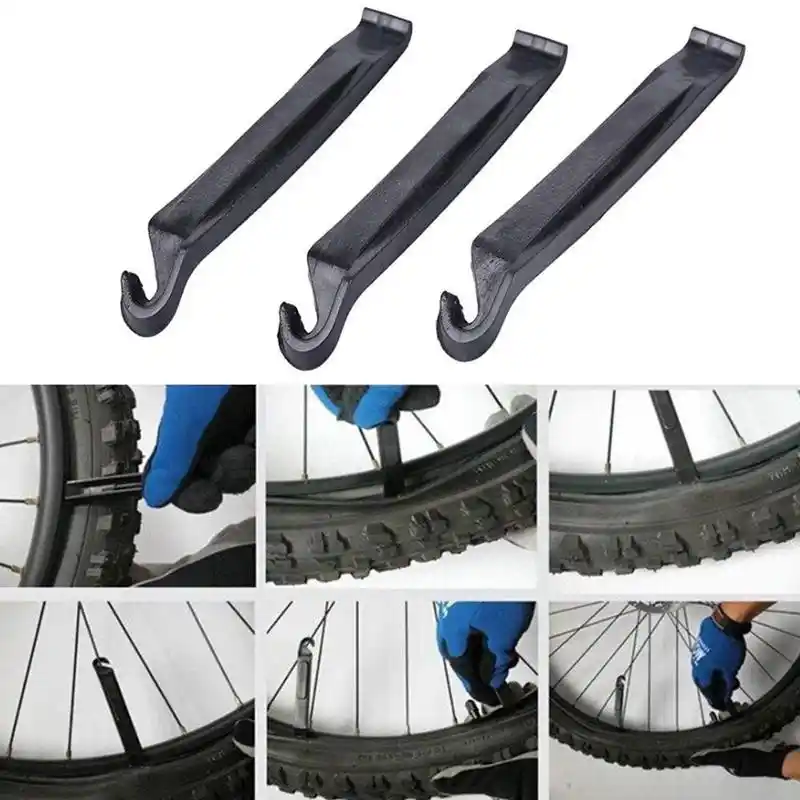
Trevor Raab
Trevor Raab
If the tire won’t budge using the second lever, check out our tips below. You don’t want to risk injuring yourself by using so much force that your hand slips off the lever. Alternatively, sometimes a tire can be removed using just one lever. If the tire seems loose enough after freeing the initial section with the first lever, go ahead and see if you can easily push the lever around the rim to remove the rest of the tire.
Putting a tire onto a rim is typically a bit easier than removing one, but using a tire lever might still be necessary. Fit one side of the tire onto the rim first. (If you’re using a tube, you’ll want to put that in next.) Now, start fitting the other side of the tire onto the rim. You’ll reach a point where this becomes difficult to do because the final section of tire is too tight, leaving a small section outside the rim. You should try to intentionally leave the final section of tire to be mounted on the rim by the valve if possible.
The next step is where your lever comes in. Place the curved end of the tire lever under the remaining section of tire with the curve facing down, hugging the inside of the rim. Lift the opposite end of the lever up while keeping the curved end planted firmly on the inside of the rim, pulling the rest of the tire onto the rim.
If there’s a larger section of tire stuck outside the rim after installing what you could with your hands, you’ll have to repeat this step on smaller sections.
$20 at Competitive Cyclist
Credit: Park ToolOur go-to for stubborn, tight fitting tires
$8 at Amazon
Credit: Pedro'sAn affordable and popular favorite
$26 at Competitive Cyclist
Credit: Park ToolThese 8-inch levers are for tough DH and Freestyle tires
$14 at REI
Credit: TopeakThese dual-purpose tire levers double as chain powerlink pliers
Still having trouble installing or removing a tire? Some tires are especially stubborn. To make it easier on yourself, here are some tricks you can try (or don’t try).
→ First, what you shouldn’t do: You may have heard of some weird tricks that supposedly help with stretching a tight tire, such as throwing it in the dryer for a few minutes or using another heat source. That can end up doing more harm than good.
“Unless you know at exactly what temperature the tire’s bonding agents, rubber, and nylon start to delaminate, etc., you should not do this,” says Bicycling mechanic Joël Nankman. Instead he suggests using a little soapy water to help slip the tire into place. Just don’t get it on your hands.
→ Another pro tip from former Bicycling test editor Dan Roe: “A mechanic once showed me that you should make sure the bead core is sitting deep into the rim, rather than just resting on the hook.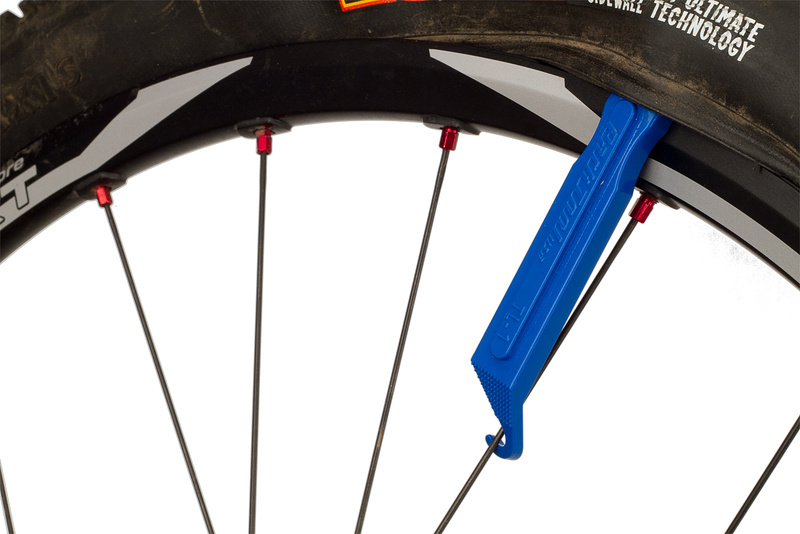 That makes the diameter of the rim slightly smaller and can make the difference with a really tight bead.”
→ Misplaced your tire levers? You can sometimes just use your hands with the right technique and practice, especially with tires that aren’t very tight. Seasoned pros like mechanics might hardly ever use tire levers. The trick here is to use the palms of your hands to work the tire off or on instead of your thumbs since they’re stronger, Nankman says.
Still, injuring yourself this way from slipping, especially with sweaty hands during a midride tire repair, is no fun. (Trust us, we’ve been there.) So it’s best to have a set of tire levers on hand anyway. Of all the bike tools out there, they’re one of the most affordable and easily portable options to keep in a saddle bag or in your toolbox.
Jessica Coulon
Service and News Editor
When she’s not out riding her mountain bike, Jessica is an editor for Popular Mechanics. She was previously an editor for Bicycling magazine.
This content is imported from OpenWeb. You may be able to find the same content in another format, or you may be able to find more information, at their web site.
Showroom 600 m², video from salon
+7 495 988 26 05
Call me back
Call back
Your name
Phone
By clicking the button, I give my consent to the processing of my personal data.
The active development of the construction industry dictates completely new requirements for the use of facing and other finishing materials to create an absolutely individual look of modern buildings. An important role in the construction of large facilities is played by the fast delivery and unloading of various building materials.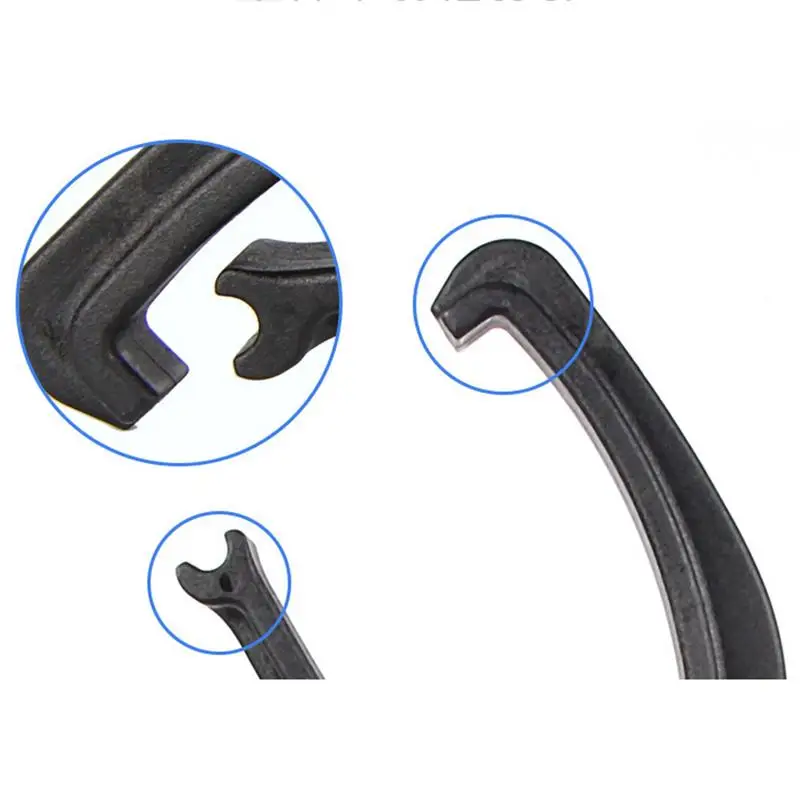 Until recently, the only way to avoid significant damage to transported goods was their manual loading and unloading through the use of a considerable amount of manual labor, which was extremely unprofitable financially due to the long downtime of vehicles and wages of workers. Today, this problem has practically lost its relevance due to the use of a manipulator crane.
In modern cargo transportation of large volumes of paving and ceramic tiles, porcelain stoneware, bricks and many other bulky goods, a car with a manipulator crane is increasingly taking part - a special device that moves the load using a lever. The machine, controlled by one operator, is able to lift and lower overall loads onto its own platform, and transport them. Today, transportation by a manipulator is the minimum time for moving goods, which increases the productivity of work at the construction site. Many construction companies use these machines with success because their high maneuverability ensures high productivity, quality and accuracy of loading and unloading. As a rule, manipulators presented on the modern market are distinguished by practical control, have small overall dimensions. The greatest demand is for vehicles with a carrying capacity of up to ten tons, which load and move heavy loads, transport construction trailers and change houses of various designs.
Manipulators are usually divided into two main types. The first is equipped with a hook placed at the end of the last section of the boom, the angle of which can be changed. The sections rotate at the articulations, so when moving the load, the movement of the boom is used entirely. On the second type of manipulators, a winch and a hook are installed: the movement of the load is realized using a hydraulically driven boom and a winch. The latter option is usually used for the transportation of construction cabins.
Both types of manipulators have their advantages and disadvantages. If you intend to rent or purchase this type of special equipment, then you should, first of all, start from the type of work, and in what conditions they will be carried out. In most cases, it is preferable to rent a manipulator, since such machines are not constantly used. The advantages of the first type of manipulators are large cargo capacity and a fairly high speed of loading and unloading. The advantages of the second type include the ability to rotate the column at any required angle, which eliminates "dead zones". Such special equipment allows you to work in depth without using a long sling. At the same time, thanks to the control of the speed of rotation of the winch, the cargo manipulator operates smoothly, both when lifting and lowering the load. Of the disadvantages of this type of construction, the relatively cumbersome folding of the crane boom can be mentioned.
Similar items
The use of artificial stone in the interior
The image of an old fireplace or hearth, which usually consists of boulders of rock, has been embedded in the human worldview since ancient times. Once these devices served a person to heat the home, allowed him to while away the evenings.
Products made of natural stone
Nowadays, natural stone and products made from it are very popular: this is due to the qualities and characteristics of this material and, of course, its natural beauty.
Narrow refrigerator - a solution for small-sized kitchens
What to do for those who are not lucky with the large layout of the apartment and place even a standard European refrigerator in the kitchen is very difficult because of the small size of the room.
Choosing an autonomous power plant for a country house
Uninterrupted power supply is one of the main tasks that the owner of the house must solve. The best choice in this case are autonomous power plants.
Feedback
Your name *
E-mail *
Phone *
By clicking the button, I give my consent to the processing of my personal data.
* Mandatory fields
Your name *
Phone *
By clicking the button, I give my consent to the processing of my personal data.
FLY RIGHE ACQUA INSERTO
Quantity: - + m 2
Price:
Continue Shopping
The product will be saved in the shopping cart
KERAMOGRANIT.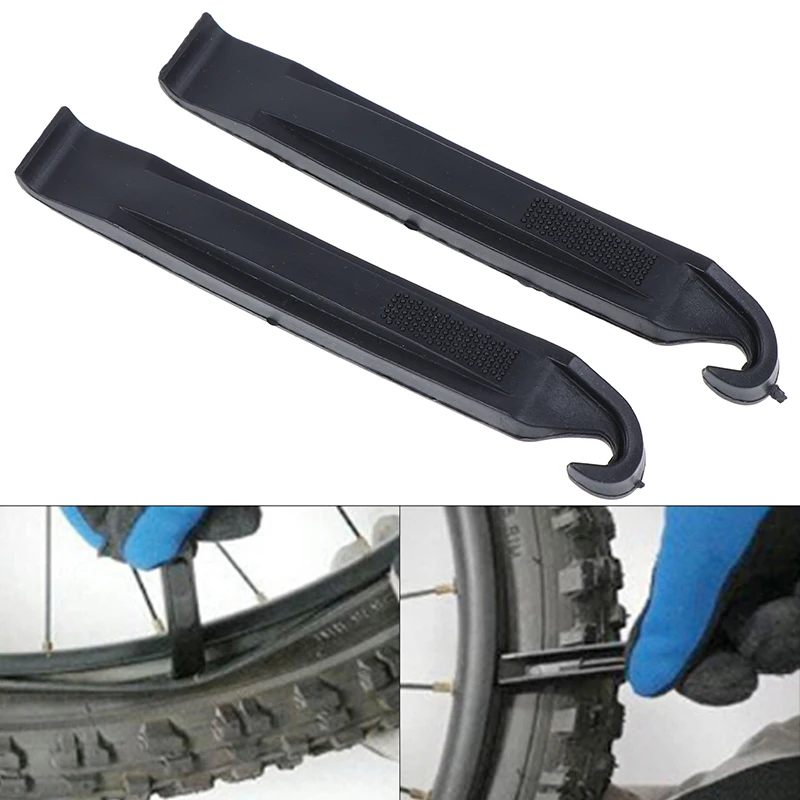 RU
RU
Moscow
st. Novogireevskaya, 10k1
+7 495 988 26 05
CranTruckService LLC recommends that you carefully study the operation manual of the manipulator crane before operating the CMU. When studying and operating the CMU, it is necessary to additionally use PB 10-257-98 “Rules for the design and safe operation of load-lifting cranes.
Proper operation ensures trouble-free and trouble-free operation of crane installations.
Inattention during adjustment (checking) operations can lead to malfunctions in the operation of the manipulator crane and emergency situations. Do not install and re-equip the CMU yourself.
If you decide to buy a manipulator crane from us, you will receive a full range of services, from competent consulting by experienced managers to checking the crane manipulator at the stand or installed on a car
construction and installation works.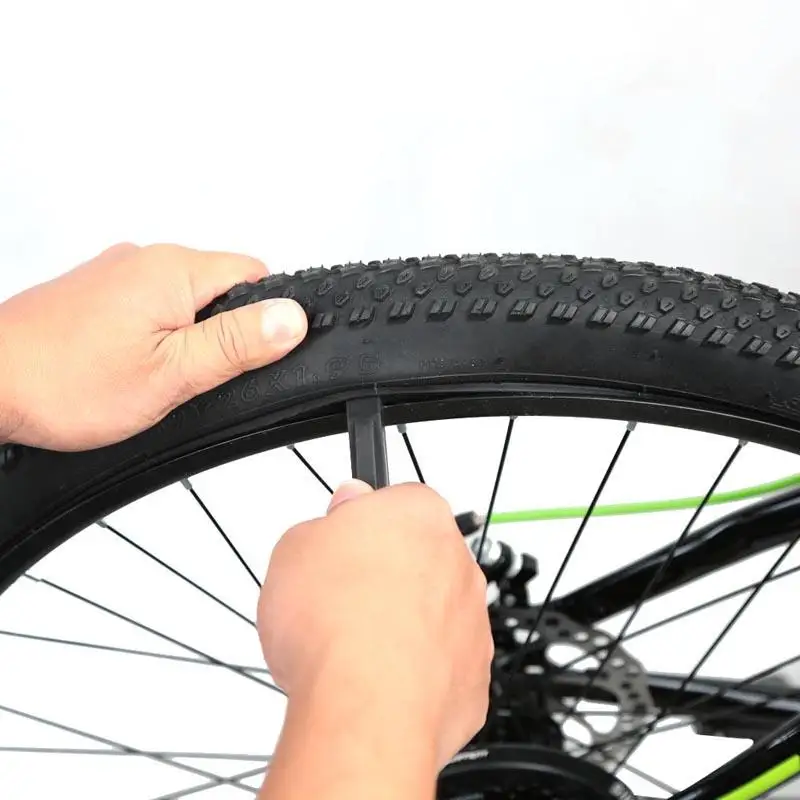 An example of a general view of the CMU is shown in Fig.1.
Do not operate the loader crane:
1.1. When extending the boom, it is necessary to increase the length of the cable with the hook.
1.2. When lifting a load that is close to the maximum mass for a given departure, the operator must check the stability of the loader crane and the correct slinging of the load by lifting it to a height of 0.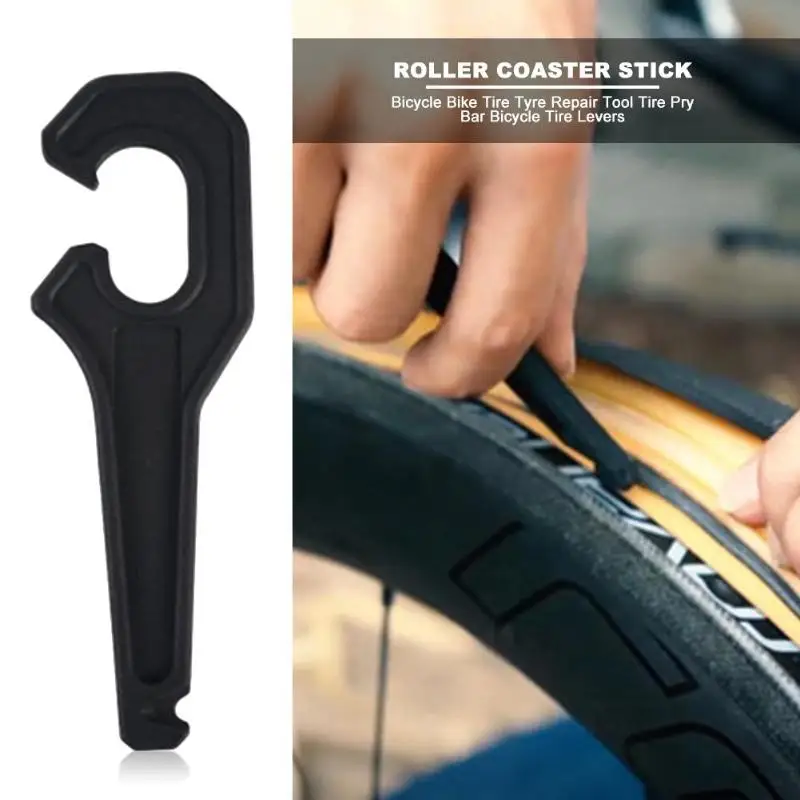 1-0.2 m. When the load is off the ground, stop lifting for a while, to make sure that the load is held horizontally, the vehicle is stable and the load suspended from the cable is positioned properly. Only then start lifting the load. When lowering the load, before contact with the ground, it is necessary to reduce the speed of lowering the load.
1.3. When turning the CMU column, do not use high speeds to avoid dynamic loads and increase the working radius.
1.4. Do not stand between the boom and the vehicle platform and do not put your hands or lean on the moving parts of the crane.
1.5. When lowering the hook below ground level, the speed is slower and it must be ensured that more than 3 turns (turns) of rope remain on the drum.
1.6. The cable should not be etched unnecessarily to avoid uneven winding of the cable around the drum. The winding of the first layer of cable around the drum must be reliable and tight.
1.7. Do not touch the oil tank of the hydraulic system during CMU operation, as the tank is heating up.
1.8. When the oil temperature of the hydraulic system reaches 80 degrees C, stop the operation of the CMU. An increase in hydraulic oil temperature can damage the high pressure line and seals.
It is forbidden to work CMU:
- With a faulty sound signal and safety devices.
- With weights when the boom equipment is positioned above the cab of the base vehicle.
- On a site with a slope of more than 3 degrees C, with a maximum load for this departure.
- In closed unventilated rooms (due to air pollution).
- At wind speeds over 10 m/s, during thunderstorms and heavy winds.
- At night and in the evening without electric lighting.
- If the air temperature is below -25 and above +40 degrees.
While operating the hydraulic arm, do not:
- Lift a load that exceeds the nominal weight for the given boom reach.
- Lift a load whose mass is unknown.
- Sudden braking of the load during work operations.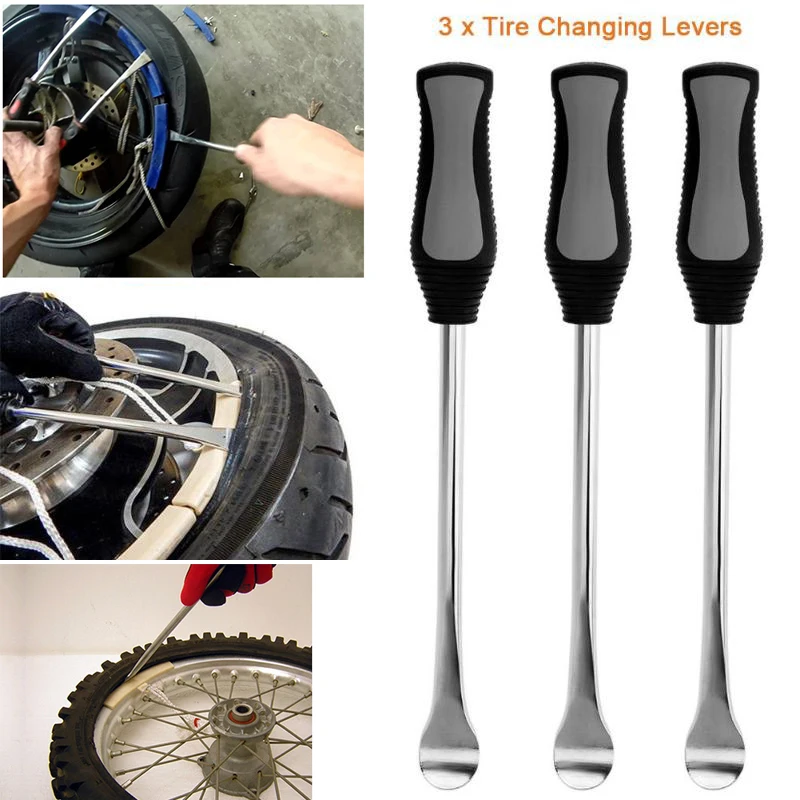
- To tear off, by means of the CMU, cargo covered with soil or other objects, as well as frozen cargo.
- It is strictly forbidden to pull the load.
- Standing on a load being lifted or clinging to a hook.
- Stand under the load being lifted.
- Repair and adjust the manipulator crane independently.
- Retract outriggers when load is up or boom is extended.
- Leave the place of work when the load is lifted.
- Allow unauthorized persons to sling the load.
Installation of CMU behind the cab of the car.
The instruction manual includes a description of how the is mounted behind the cab. When mounting in the middle position, in which the crane is mounted in the middle of the car body, and when mounting KMU at the rear of , when the crane installation is mounted in the rear of the car, the capabilities of each crane differ from those described in this manual.
2.2. Lifting the load with the boom pointing forward.
CMU operation in the area near the cab is schematically shown by lines leading from the center of rotation of the crane installation to the center of both supports (outriggers), as shown in the diagram.
2.3. Lifting a load by a manipulator crane with the boom pointing to the side - the operation of the CMU with the boom pointing to the side is schematically shown by lines leading from the center of the crane installation to the center of both rear wheels of the vehicle, as shown in the diagram.
2.4. Lifting load with a manipulator with the boom pointing backwards – the operation of the CMU directed towards the body is limited by lines drawn from the center of rotation of the CMU to the centers of the rear wheels of the vehicle, as shown in the diagram.
2.5. The nominal weight of the load of the crane installation is the weight that can be lifted by the pulling force of the KMU winch.
2.6. The lifting capacity of the hydraulic manipulator is the maximum weight of the load to be lifted, including the weight of the hook and slings, which can be lifted (according to the angle of the boom and the length of the boom), by the force of the crane installation.
2.7. The working radius of the CMU is the distance in the horizontal plane from the center of rotation of the CMU to the projection point of the hook on the horizontal plane.
2.8. The length of the boom of the manipulator crane is the distance from the boom lifting axis to the pulley axis at the boom head.
2.9. Lifting angle of the boom of the crane-manipulator - the angle of inclination of the boom of the crane-manipulator to the horizon.
2.10. Lifting height of manipulator is the vertical distance between the bottom of the hook and the ground.
2.11. Installation of outriggers (outriggers) of the crane manipulator - outriggers allow you to keep the crane-manipulator in a stable position during the operation of the CMU. They can be extended to three positions: minimum, medium, maximum. Outriggers consist of two parts, horizontal and vertical.
2.12. Boom sections KMU - a description of each boom section is shown in the figure. For simultaneous telescoping of the boom, intermediate sections of the boom are marked with marks, showing the capabilities of the crane installation with each section extended to its full length.
Point A refers to the boom angle. Point B refers to lifting the boom off the ground.
Work area does not include shear, movement resulting from boom deflection.
The actual working radius when lifting a load will increase as a result of boom deflection.
3.1. Purpose of control levers of CMU.
The typical location of the control levers of the crane is shown in the figure, using the UNIC crane as an example:
3. 2. Crane capacity scale (with tilt indicator).
The scale shows the relationship between boom reach, boom angle and load capacity. The lifting capacity scale shows the load, which is more calculated on the capacity of the crane installation than on its stability. The gradation on the load indicator scale changes according to the number of boom sections and the vehicle load.
For safety, when the boom is half extended, use the full extension scale reading.
- When the second section is extended from the first section, use the readings for 1+2 sections.
- When the 3rd section is extended from the 2nd, use the readings for 1+2+3 sections.
- When the mark appears on the side of the 3rd section pulled out of the second section, use the readings for 1+2+3+4 sections.
The working radius increases as a result of boom deflection, when the load starts to rise, set the angle of the boom so that the hook is as close as possible to the inside of the boom.
3. 3. Manipulator crane capacity indicator.
The indicator shows the weight of the lifted load only when the load is being lifted. Since the dial of the indicator rotates around its axis, by turning it, it is possible to provide readings from the set position.
The dial of the indicator has a scale of correspondence between positions A and B of the load indicator for the cable suspension system of the hydraulic manipulator hook:
- “B” scale for the suspension system on one cable;
- "A" scale for a four-wire suspension system.
To measure the weight of the lifted load, follow the recommendations below.
Compare the reading on the indicator with the reading on the capacity scale located on the boom. The scale has two arrows. Read the weight of the load on each arrow: scale "A" for the red arrow and scale "B" for the white arrow.
Recommendations for safe operation.
- If the CMU is loaded so that the indicator reaches the rated load, the crane installation may be damaged or overturned. In this case, move the vehicle towards the load being lifted to decrease the work address.
- When the indicator shows a value less than indicated in the nominal load diagram, the load can be lifted safely.
3.4. Automatic accelerator.
KMU is equipped with an automatic accelerator to control the speed of lifting the boom, winding / winding the hook cable, telescoping the boom and turning the column. The working speed can be freely changed from slow to high and adjusted by separate levers.
Accelerator lever:
Before starting and at the end of work operations, switch the accelerator lever to the low (low) speed position, this will avoid jerks during the operation of the CMU.
4.1. Preparing the crane-manipulator before starting work.
Before starting work on the manipulator crane, check:
- oil level in the hydraulic system (according to the level indicator on the oil tank). The amount of oil is checked in the transport position of the CMU. The oil level should be between the lower and upper edges of the oil gauge window;
- carefully check the condition of the hook, rope, lifting devices and their fastening.
Before starting work, perform the following preparatory operations:
a). Carry out shift maintenance of CMU (EO) before leaving the park.
b). Make sure that the platform is level, the slope does not exceed 3 degrees, and the platform surface can withstand the pressure of the outriggers and vehicle wheels during operation. Otherwise, prepare the necessary linings.
c). Perform operations related to fixing the vehicle (if the CMU is installed on a car chassis: make sure that the pressure in the tires of the wheels is correct, put the parking brake on the car).
g). Start the engine, adjust the speed, disengage the clutch, engage the power take-off (PTO), engage the clutch. ATTENTION! it is not allowed to turn on the power take-off without depressing the clutch.
e). Extend the outriggers and by moving the corresponding handles of the hydraulic distributor, install the outriggers until the thrust bearings come into contact with the supporting surface. If necessary (loose, weak soil), be sure to use linings.
Note:
Before starting work, several CMU manipulations should be performed without load at low speeds of working movements (raising and lowering the boom, turning, telescoping), in order to check the performance and heat the working fluid to the optimum temperature. The oil temperature should be + 45°C - +55°C. When the oil temperature drops, the speed of the working movements of the CMU decreases due to an increase in the viscosity of the oil. In the winter season, warming up the oil is especially important for the normal operation of the hydraulic system:
- at temperatures below -10 ° C, after turning on the hydraulic pump, warm up the working fluid in the system at idle for 5 - 10 minutes;
- alternately turn on the mechanisms of the crane-manipulator in both directions without load for 3-5 minutes;
- warming up can be accelerated by turning on any function. For example, set the telescoping control handle of the boom sections to retract and hold it for 2-3 minutes so that the liquid flows into the tank through the safety valve.
Note:
The viscosity of the oil in the CMU hydraulic system increases in winter or at low ambient temperatures. Under such operating conditions of the CMU, the functions of rewinding the hook or retracting the boom may not ensure the normal stop of moving parts. When the oil is cold, there is little movement after the limit switch is triggered. This is not a malfunction. Automation starts to work normally when the temperature of the oil in the hydraulic system reaches the required value.
4.2. The order of work and basic operations when working on a hydraulic manipulator.
KMU outrigger installation order:
1). Release the locking lever (stopper).
2). Keep the extend lever depressed while extending the outriggers.
3). The position of the first stop will be indicated by the first mark. When the legs are fully extended, a second mark appears on each side of the horizontal part of the outrigger.
4). Check the fixation of the extension of the supports.
5). Move the outrigger control levers to the "Extend" position to extend the vertical portions of the outriggers.
6). Move the outrigger control levers to the "Retract" position to retract the vertical portions of the outriggers.
7). Return the lever to the neutral "Stop" position to stop the outriggers from extending or retracting.
Note:
Install the outriggers according to the following rules:
- Stability during operation is determined by the degree of extension of the horizontal outrigger bars: if the outriggers are not fully extended, stability is reduced due to a decrease in the support contour.
- Carefully adjust the horizontal position on the roll indicator.
- Make sure that the wheels of the automobile chassis do not come off the ground, taking part of the load - when fully suspended on the supports, an uneven dynamic load on the hydraulic cylinders of the supports is possible, which can lead to their failure.
Attention! Extend the outriggers to their maximum length when the crane is operating.
Manipulator crane boom operation procedure.
The work cycle of the CMU includes the following work operations:
- lifting and lowering the boom;
- extension-retraction of the telescoping section(s);
- lifting and lowering the load with a winch;
- turn of the column.
Each of the above operations is performed by moving the corresponding hydraulic distributor control handle to one side or the other from the neutral position. The deflection angle of the lever determines the speed of movement of the actuator.
The movement of the mechanism stops when the control handle returns to the neutral position.
Areas of work with certain loads for boom equipment are limited by curves of the load-altitude characteristics of the CMU , shown on the CMU. In these areas, it is allowed to move any element of the boom equipment. The speed of performing work operations is regulated by the stroke of the distributor control handles. Work with the maximum load for a given departure should be carried out at a minimum speed.
Raising and lowering the boom of the manipulator crane.
Note:
A sharp jerk during the lifting operation causes an increased dynamic load on the CMU, which can damage the crane of the manipulator. Move the control levers slowly and smoothly. The boom, extended to a great distance, raises and lowers the load during operation at a greater speed than when folded. Therefore, move the control levers slowly. When lowering the boom with a load, the working radius increases and the lifting capacity decreases according to the capacity table. Read the load cell to confirm safe operation before lowering the boom.
Boom lift KMU : move the lever towards "RISE" to raise the boom.
Lowering the boom KMU : move the lever towards "LOWER" to lower the boom.
Boom stop CMU : return the lever to neutral to stop the boom.
Lifting-lowering the crane hook .
Check that the hook is not overloaded. Make sure the hook lift limiter alarm is on. Hitting the hook against the top sheave of the boom can damage the cable and pulley at the boom head and cause the load to fall.
Hydraulic arm hook lift: move the lever towards "UP" to raise the hook.
Lowering the hydraulic arm hook: move the lever towards "DOWN" to lower the hook.
Hydraulic arm hook stop: return the lever to neutral to stop the hook operation.
Note:
Lowering the hook unloaded or loaded to the ground loosens the rope winding, which can result in uneven winding and may shorten the life of the rope.
Do not unwind the cable completely, for example when lowering below ground level, make sure that at least 3 turns of the cable always remain on the drum.
If the first layer of cable is wound unevenly, the cable wound on top of this layer may get caught between the turns of the first layer, resulting in uneven winding and cable jerks during operation.
When the cable is unrolled to the first layer or wound on the first layer, slowly wind / unwind the cable so that the first layer lays evenly and tightly - coil to coil.
Extension / retraction (retraction, telescoping) of the CMU boom.
When extending the boom with the hook close to the boom head, the hook may hit the top of the boom, damaging the cable and spool in the boom head and causing the load to fall.
CMU boom extension : Move the lever to the right to extend the CMU boom.
Retraction (retraction) of the boom of the crane manipulator : Move the lever to the left to retract (retract) the crane arm.
Stop boom movement : Return the lever to neutral to stop the CMU boom telescoping process.
Note:
The hook is raised to the boom head when the boom is extended and lowered when the boom is retracted (retracted). When operating the boom in extension / retraction, it is necessary to carefully monitor the position of the hook.
Order of extension / retraction of boom sections depending on their number.
Boom section extension sequence.
Boom extension starts from the largest section.
The sequence of retraction (retraction) of the sections of the CMU boom.
Boom retraction (retraction) starts from the last section, the smallest cross section.
The diagrams below show the order of extension / retraction of the CMU boom sections, depending on their number.
Note:
If the telescoping speed of the boom decreases due to the high viscosity of the oil at low ambient temperatures, preheat the oil in the hydraulic system.
Manipulator crane boom swings.
Swing the boom at low vehicle speeds.
When starting and ending boom swing operations, slow down the column swing speed.
Sudden movement of the lever with the load raised can cause the load to sway and collide with nearby objects. Swinging of the lifted load increases the working radius of the CMU, which can lead to overload.
With a large boom reach and a small angle of elevation of the manipulator boom, the working radius of the CMU increases and the lifted load moves faster.
Turn slowly. Swinging the boom with the load raised above the vehicle in front or behind the machine, rear to side, or side to front or rear makes the vehicle unstable. In such cases - keep the load as close to the ground as possible when turning the boom.
CMU boom turn clockwise : Move the lever to the "clockwise" position to rotate the boom clockwise.
Turning the CMU boom counterclockwise : Move the lever to the “counterclockwise” position to rotate the boom counterclockwise.
Boom Swing Stop : Return the lever to normal position to stop the CMU boom swing. For clockwise rotation, the position is “right” and counterclockwise, respectively, “left”.
Installing the outriggers of the crane of the manipulator in the transport position.
Note:
The outriggers can only be removed after the crane arm has been removed.
Careless handling of the outriggers may cause your fingers to be pinched, so hold the lever with one hand and push the outrigger with the other hand.
Be sure to depress the prop extend lever and slowly retract the outrigger.
Lock the fully retracted (retracted) outrigger with the lock lever.
- move the outrigger control lever to the "right" position to retract the vertical parts of the outrigger.
- Keep the extension lever depressed to retract the horizontal outrigger sections on each side after the vertical outrigger sections are fully retracted.
- After all the outriggers are completely retracted, check that the horizontal parts of the outriggers (outriggers) are firmly fixed so that they do not extend out of the vehicle.
- turn locking lever - to lock outriggers.
Bringing the crane to the transport position.
Note:
Make sure boom, outriggers and hook are secured and locked.
Make sure the outrigger parts are completely retracted and secured.
Make sure the outrigger parts are secured with the lock lever.
Moving a loader crane with an insufficiently fastened boom, outriggers, or hook can lead to an accident, damage to the crane's parts, or impact on an oncoming vehicle.
Instructions for bringing the crane to the transport position.
To bring the manipulator into transport position, you need:
1). Retract (slide) the boom of the hydraulic manipulator.
2). Move the boom forward or backward. Stop the boom from swinging to a position where both yellow marks are aligned.