istockphoto.com
Experienced cyclists know punctures occur frequently, so it’s important to learn how to change a bike tire even if you are a more casual cyclist. When your bike tire is punctured, you may be able to repair it yourself. But if the damage is too extensive, or the tire is already severely worn, then replacing the tire may be necessary.
Typically, bike owners cannot repair large breaks, splits, or punctures with a tire patch kit. Similarly, any significant signs of tire wear, strain, or cracks should indicate it’s time to replace a bike tire. Most cyclists learn how to fix a bike tire to deal with minor punctures and replace one after more severe damage has occurred. If you need a refresher, are new to cycling, or are getting into bike maintenance, then follow the steps below to learn how to change a bicycle tire.
Tools & MaterialsTo access the bike tire, either put the bike on its side or stand it upside down, resting on the handlebars. However, some cyclists avoid placing the bicycle upside down because this position could damage the handlebars or seat. Choose the position with which you feel the most comfortable. Another option is to invest in an upright bike stand that can position the bicycle off the ground while you work. If you are laying the bike on its side, make sure the chain side faces up.
If you are replacing the back tire, then it’s important to adjust the gears to the smallest ring beforehand to make it easier to remove the tire. The smallest ring is the outer gear of the bike.
If the bike includes a quick-release lever, it will be located in the center of the bicycle wheel. Loosen and remove the lever by pulling up and turning the lever 180 degrees. Then set it aside for reinstallation. This should free the wheel to allow the damaged tire to be replaced. However, many bikes don’t come with a quick-release lever. If this is the case, then a wrench is needed to loosen the nut in the center of the wheel.
Typically, a 15 millimeter wrench will be the correct size to loosen and remove the wheel nut. Keep in mind that you can also check the bicycle manual or the manufacturer’s website for details on how to remove your specific bicycle tire. Additionally, if the nut is seized, WD-40 or a similar lubricant can be used to help loosen the threads and remove the nut.
RELATED: How to Change a Car Tire Like a Pro
istockphoto.com
If you attempt to remove the wheel without detaching the brake cables, the force can damage the cables. On some bikes, the brake cables will disconnect automatically when the quick-release lever is removed, but the brake calipers must be squeezed in order to release the cables in most cases.
Don’t forget to lift the chain off of the gears when replacing the rear wheel on a bike. Once the chain and brake cables are disconnected and the wheel nut or quick-release lever has been removed, you can lift or pull the tire out of the forked slot where it usually sits on a bicycle.
To remove the rubber tire from the metal wheel, the tire needs to be deflated completely. Take off the air valve cap and set it aside for reinstallation. Release the air from the tire with a wrench by pressing down on the plunger inside the air valve. Alternatively, your bike may have a Presta valve or a Dunlop valve; these need to be pulled up to release the air.
If the air valve has a retaining nut or lock ring securing it to the wheel’s rim, then loosen and remove the part, placing it with the air valve cap for reinstallation at a later stage in the process.
The deflated tire will still be difficult to remove from the rim of the wheel. First slide a tire lever between the rim and the tire, then use leverage to pop the edge of the tire up out of the rim. Secure the tire lever to the spokes of the wheel and use a second tire lever on another section of the tire. Work the second tire lever around the rim of the wheel until the entire side is free. This should give you enough space to reach inside the tire and pull out the inner tube.
Once you have removed the inner tube, you should be able to take the tire off the metal wheel by rolling or twisting the tire over the edge of the rim with your hands. Work your way around the outside of the wheel until the tire is free, and inspect it for any serious damage. In many cases, only the inner tube needs replacing, but if there is severe damage to the outer tire, then it will also need to be changed.
RELATED: 15 Clever Bicycle Storage Ideas for Any Space
Take the new tube out of the packaging, making sure to remove the dust cap, lock ring, and valve cover. Unfold the tube and check to make sure it has no pre-existing damage, then connect it to a bike pump or tire inflator to add air to the new tire tube. Do not fill the tube all the way just yet.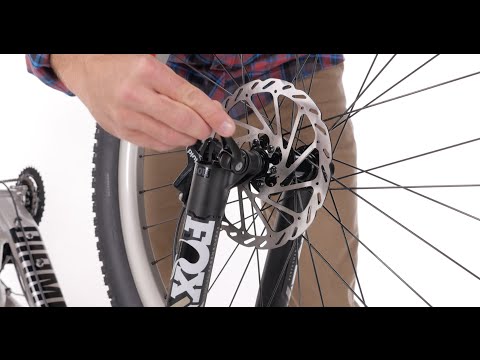
The purpose of adding air at this stage is to help the tube hold its shape and avoid damage caused by pinching, bending, or twisting the tube while reinstalling it. Put any small parts in a safe spot to make sure that they are not misplaced.
istockphoto.com
Whether installing a new tire or refitting an old tire with a new inner tube, it’s recommended to inspect the inside and outside walls of the tire for any existing damage, severe wear and tear, or sharp objects that could cause additional damage before installing the inner tube. Refit one side of the tire on the rim of the wheel, ensuring the tread is pointed in the correct direction.
Slide the air valve through the valve hole and feed the inner tube into the hollow space inside the tire and wheel rim. With the tube in place, twist the outer edge of the tire so that it slips into the wheel rim. Try to start near the valve and finish across from it—the tire will be looser in this position. If the tire resists too much, you may need to let some air out of the inner tube or use a tire lever to help position the last section, where the tire is the tightest. Also, remember to reinstall the lock ring or valve retaining nut if your bike has one.
RELATED: 5 Bike Racks to DIY on the Cheap
Use a bike pump or home air compressor to fully inflate the inner tube. If the PSI is not written on the tire, you can refer to the bicycle manual or manufacturer’s website for the appropriate air pressure. Don’t forget to put the cap back on the air valve to prevent accidental tire deflation during use.
Slide the wheel back onto the bike and secure it with the quick-release lever or wheel nut, as applicable. Reattach the brake cables and lift the chain back onto the gears if you replaced the rear tire. Rotate the wheel to ensure it spins freely, then place the bicycle upright and test the repair with a short ride. Make sure to clean up any old parts and dispose of old tires through local recycling facilities. Some bike and car shops also have programs for accepting old tubes and bike tires.
istockphoto.com
Regular bicycle maintenance and proper storage can help keep a bike in top condition over years of ownership. Always replace or repair any tire damage as soon as possible to avoid bending a bike’s wheel. Also, during the repair or replacement process, make sure to keep track of all small parts, like nuts, lock rings, or valve caps. While small in size, their purpose is essential to the bicycle’s function, and losing one during a repair can create another problem needing to be resolved before the bike can be used again.
Picture the scene: you’ve got a new tyre to mount on a wheel but, no matter how hard you try, you can’t get it on. It’s a scenario many cyclists have found themselves in.
In this article, we’ll run through the proper technique for changing a bike tyre (both installation and removal), explain why some tyres are so difficult to fit, and suggest what tools you can use when you need help with a particularly tight tyre and rim combination.
While installing a tyre on a wheel is something most riders can normally manage comfortably, even seasoned cyclists will experience combinations where muscling the last bit of tyre bead over the rim edge appears to require super-human strength and thumbs of steel.
The rise of tubeless tyres and rims across road, gravel and mountain bikes has increased the frequency of such issues too, as tubeless-ready tyres are made with stiffer beads and to tighter tolerances than equivalent clincher tyres.
To save yourself stress, sore thumbs and to prevent damage to delicate or expensive bicycle parts, proper technique when installing or changing tight bicycle tyres is crucial.
Beyond that, there are also now many useful tools to help ease tight tyres onto rims (as well as some tools you should avoid).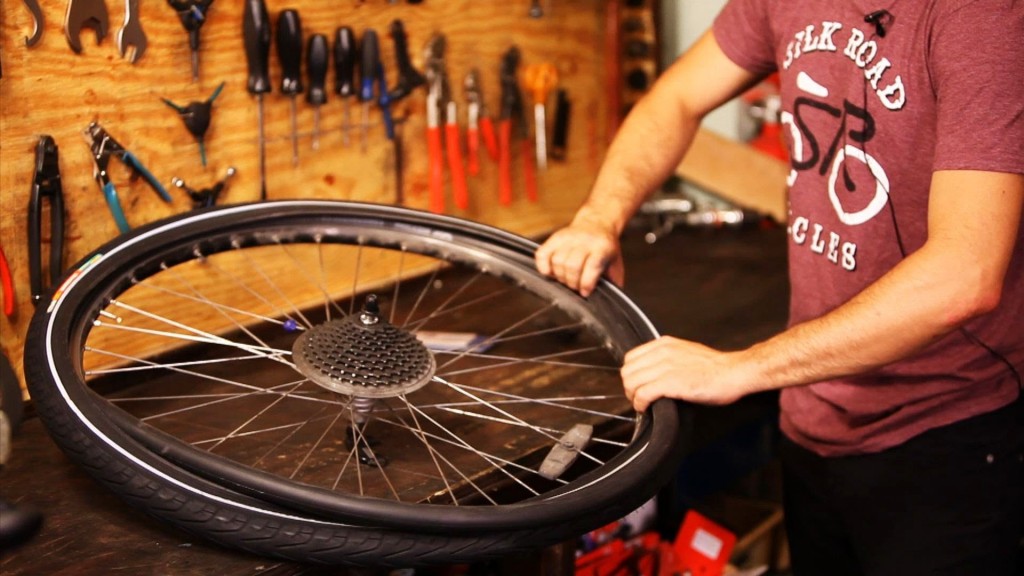
Before we get started, you can also use the links below to jump straight to the section you need:
Getting your tyre-mounting technique up to standard is the best way to ensure your tyres go on with the minimum amount of fuss.
The increasing prevalence of tubeless-ready tyre and wheel systems on bikes of all kinds means proper technique is more vital than ever.
The following steps apply equally to both clincher and tubeless-ready tyres, though it’s worth checking our guide on how to set up road tubeless tyres or our tips for understanding mountain bike tubeless setup, if you’re installing tubeless-ready tyres.
If you’ve come here looking for tips on how to install tubular tyres, we’ll direct you to our how to glue a tubular tyre guide.
Unfold the tyre and get the shape as round as possible before attempting to fit it.Yogamaya von Bromley / Our Media
If the tyre is not brand-new, now is a good time to check its condition and the condition of the rim.
Replacing a worn-out tyre or damaged rim tape is key to safe running and for preventing future punctures.
If you’re replacing a tyre after a puncture, ensure you find the culprit (the object that caused the puncture) and remove it before patching or replacing the tube and reinstalling the tyre.
If the tyre is brand-new, it’s a good idea to ‘massage’ the tyre into a vaguely round shape because this will make getting the first bead on much easier.
Once the tyre is properly shaped, you can begin installing it onto the rim.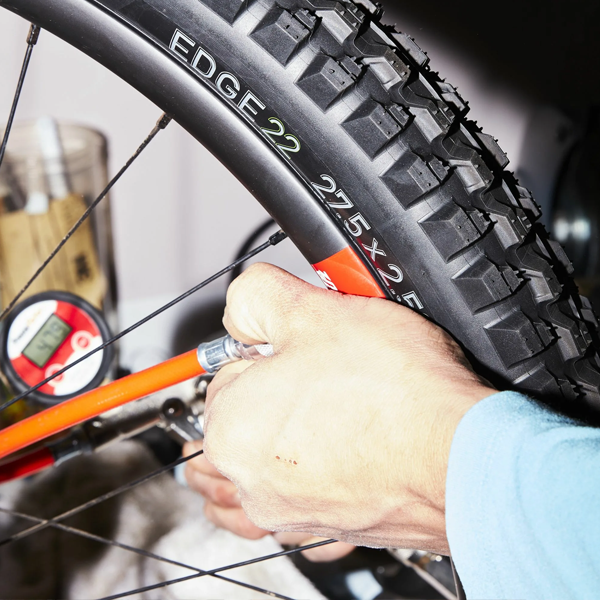 Yogamaya von Bromley / Our Media
If your tyre has a directional tread, be sure to install it in the correct orientation for optimum performance. This is usually marked on the tyre sidewalls.
It will usually be possible to get the first bead onto the rim without tools, using the palms of your hands (rather than your thumbs) to lift the whole tyre over the rim edge, though a tyre lever can be used to pull it over in exceptional circumstances.
Installing tyres with the name label located centrally above the valve not only looks good (in our opinion), but it also locates key information, such as tyre size and minimum/maximum inflation pressures, above the valve where it can be easily viewed while inflating the tyre.
With the first tyre bead on the rim, you can install the inner tube or tubeless valve.Yogamaya von Bromley / Our Media
If using an inner tube, add a little air before installing it. This will help prevent the tube being pinched by the tyre bead while installing the tyre.
Avoid adding too much air, however, because this will make the tube take up too much space inside the tyre and prevent the tyre beads from falling into the deepest part of the rim’s central channel. Enough air to give the inner tube some basic shape is plenty.
Bonus pro tip: if you’re using latex inner tubes, a light dusting of talcum powder on the inner tube will help prevent it from sticking to the tyre or rim walls, or getting caught under the tyre bead. This can further reduce the likelihood of pinching the tube during installation.
Start working the second bead onto the rim from opposite the valve stem.Yogamaya von Bromley / Our Media
Start opposite the valve and slowly work your way around each side of the rim, leaving the last bit of unmounted tyre located centrally around the valve.
As you go, ensure both beads of the tyre fall down into the central channel of the rim.
With tubeless tyres and rims, the newly installed bead will sometimes sit on the rim shelf, instead of falling into the central channel, decreasing the amount of slack in the bead. Simply push the tyre bead into the channel using your thumbs.
Installing the final part of the second bead is usually the most difficult.Yogamaya von Bromley / Our Media
This is where things will usually start getting difficult.
As you get to the final part of the bead, use the palms of your hands to pull the whole tyre up and roll both sides of the bead over the rim edge bit by bit.
While it can be tempting to use your thumbs to push the bead over the rim edge, if the combination is very tight you’ll likely just end up with sore thumbs.
If you’re using very thin or wide tyres, which make it difficult to grab the whole tyre in the palms of your hand, you may have to resort to using your thumbs to push the tyre sidewall over the edge. In these instances, it’s advisable to wear protective gloves.
If you’re struggling, go back around the rim and double-check all of the installed parts of the tyre beads (on both sides) have fallen into the rim’s central channel. This is absolutely crucial to getting the last part of the bead on with the minimum of fuss.
It’s best to install the remaining tyre bead without resorting to tools, if possible, as incorrect use of tyre levers and other similar tools can potentially damage the rim, inner tube or rim tape.
If it’s not possible to install the remaining tyre bead by hand, however, careful use of tools can help you pull the last bit of a tight tyre bead onto the rim. We’ll talk more about that soon.
Ensuring all parts of both tyre beads fall down into the deepest area of the rim is crucial to installing tight tyres.Yogamaya von Bromley / Our Media
Go around the rim and check the inner tube (if you’re using one) is not being pinched or squashed under the tyre bead. If it is, simply lift the tyre up in that area to release the tube and allow it to rebound back into the middle of the tyre.
If using tubeless valves, with tubeless-ready tyres, make sure the tyre beads are sat on either side of the valve, and be sure to add the valve stem retaining nut onto the other end of the valve.
Once you’ve double-checked everything is properly fitted, you can inflate the tyre.Yogamaya von Bromley / Our Media
Once you’re sure both tyre beads are correctly installed around the entire circumference of the wheel, you can pump up the tyre. We’ve got a guide to help you find the correct tyre pressure for your road bike, as well as advice on perfecting mountain bike tyre pressure.
Just as some tyres can be tricky to install, removing a bike tyre from a wheel can also be difficult.
Proper technique is key to making things as easy as possible, and while it’s sometimes possible to remove a bike tyre without tools, a couple of good tyre levers can often make life much easier.
If you’re removing the tyre because of a puncture, the inner tube (assuming your wheel has one) will already have lost some air, but you may still need to deflate it fully to aid removal.
Unscrew the head on the valve and press it down to remove any excess air, then remove the retaining nut that threads over the valve and sits against the rim (assuming you’re using one – many riders don’t). You’re now ready to start removing the tyre.
As with installing tyres, pushing both beads into the deeper central channel of the rim gives you the maximum amount of slack to work with.
Push all of the bead down into the middle of the rim, and firmly grab the tyre in both hands. You should be able to lift a supple tyre up and over the rim edge by hand.Simon von Bromley / Our Media
With supple clincher tyres, it will generally be possible to remove the tyre without resorting to using tyre levers.
Grab a section of the tyre opposite the valve stem firmly in both hands and lift up and over the rim edge.
With a small section of the tyre bead over the rim edge, the rest of the tyre should come away from the rim with ease.
This can be useful if you’re caught short on a ride without tyre levers, but also means you’re less likely to damage your rims, rim tape or inner tubes.
That said, tougher road or mountain bike tyres (particularly those in inflexible tubeless-ready beads) will likely require the use of tyre levers.
Insert the scooped edge of a tyre lever underneath the tyre bead and gently lever the bead over the rim edge
With a small section of the tyre bead off the rim, hold the tyre lever firmly in your hand and push it forward (away from you) around the rim edge to remove the tyre.
If the tyre is too tight to lift off using only one tyre lever, don’t resort to brute force.
Instead, insert a second tyre a few centimetres away from the first and use both to lift off a larger section of tyre.
This should then give you the required slack to slide the rest of the bead off using a tyre lever.
Leaning on the top of the wheel can help, as it means you aren’t working to stop the wheel from rolling away from you as you push the tyre lever forward.
With one full side of the bead off the rim, you can then pull the whole tyre away from and off the wheel.
Modern bicycle tyres and wheels are sized according to ISO standard 5775, set by the European Tyre and Rim Technical Organisation (ETRTO).
A size 28-622 tyre code, for example, indicates a tyre with a nominal 28mm width and a 622mm inner-bead diameter.
As you might have guessed, such tyres are compatible with wheels that have a 622mm rim diameter. In old money, that’s a 700c wheel.
However, as there are many different types of bicycle tyres and rims, made by countless different manufacturers, there can be a number of reasons why some bicycle tyres are harder to install than others.
In this section, we’ll explore some of the main culprits in greater detail.
To start with, anything that makes a tyre casing or its bead stiffer and less supple is likely to make it harder to install on any given rim.
It’s for this reason that high-end clincher tyres designed for road racing and time trials, such as those made with unvulcanised cotton casings and flexible tyre beads, are typically easier to install.
Supple, lightweight clincher tyres for road bikes are typically fairly easy to install because they have relatively flexible casings and beads.Matthew Loveridge / Immediate Media
In contrast, a burly tyre designed for durability, high mileage and low cost – perhaps a winter training tyre or a tyre intended for cycling to work – may prove a much tougher nut to crack.
On mountain bikes, lighter, fast-rolling tyres designed for cross-country racing are likely to be easier to install than tougher ones designed for enduro or downhill use. This is especially true of super-tough downhill tyres with heavy casings and wire beads.
Furthermore, the beads on tubeless-ready tyres are designed specifically to be unstretchable, both for performance and safety reasons. This typically means there is less margin for poor installation technique, and greater strength or specialist tools may be required.
In contrast, burly mountain bike tyres designed for enduro or downhill use can prove difficult to install, as they feature tough casings and stiff tubeless-ready beads.Dan Milner / Our Media
The size and shape of the rim you’re trying to install a tyre on can also make a significant difference to how easy the process is.
Modern, wide, tubeless-ready rims (either hookless or with traditional bead hooks) will likely feature a deep central channel. This helps because it reduces the effective diameter of the rim once the first side of the tyre bead is installed, which increases the amount of available slack in the second bead.
Pushing the second bead down into this channel as you work it onto the rim is key to making tyre installations as easy as possible.
Rims designed for use with clincher tyres only may lack such a deep central channel, and can therefore make the installation of tight tyres harder.
This can make installing a tubeless-ready tyre onto a clincher-only rim very difficult, and is generally something to avoid, even if the two may be technically compatible (providing you use an inner tube).
The three most common rim shapes available today.Enve
These days, non-tubeless compatible mountain bike wheels are virtually unheard of.
Thanks to a longer history of tubeless technology in mountain biking, even non-tubeless-specific legacy rims also may be convertible, with conversion systems available from many brands, such as Stan’s and Muc-Off.
Furthermore, the vast majority of modern mountain bike tyres will be tubeless compatible, even down to the most budget offerings from major manufacturers. Thus, ‘clincher only’ is a term largely reserved for road cyclists.
While the exact sizes of any wheels and tyres are supposed to precisely match the international standards, in reality, variations in the manufacturing process will mean any product’s dimensions will fall within what is deemed to be an acceptable degree of tolerance.
A wheel’s rim diameter may, for example, be a few tenths of a millimetre larger than specified, and a tyre’s bead diameter may be similarly undersized.
While each in isolation may not cause any noticeable issues, an unlucky combination of an oversized rim and an undersized tyre can lead to a particularly difficult installation process.
Some tyre-fitting tools can be incredibly helpful, but careful use is advised. Simon von Bromley / Our Media
The best tip we can give for installing tough tyres is that practice makes perfect.
The more familiar you are with the proper technique, the easier it will be when you’re outside, far away from home, trying to fix a puncture with cold hands.
Nevertheless, there will undoubtedly be times when you need to resort to using specialist tools, such as tyre levers or tyre bead seating tools.
There is, of course, no shame in this. After all, there are no prizes for being able to install tyres without tools.
All that matters is you are able to easily and safely set up your bike, whether doing so at home or by the side of the road or trail.
Some tough gloves can be invaluable in protecting your hands and getting a good grip on tyres during installation.Joe Norledge / Immediate Media
Tough workshop gloves can help protect your hands from strain and friction.
They can also make grabbing a handful of tyre securely a little easier, especially if you’re working in hot conditions or with sweaty palms.
Tyre levers can help with getting tight tyres on and off rims.Simon von Bromley / Our Media
Tyre levers can be invaluable in coaxing the final section of a tight tyre bead onto a rim, and are something every cyclist should carry with them while riding (often in a saddle bag). They are also very useful when removing a tyre.
While holding the opposite side of the tyre in place on the rim, use a single tyre lever to lift a small section of the bead onto the rim. Repeat until all of the remaining bead is installed.
Don’t start in the middle of the remaining bead and attempt to lift it all over in one go. That’s a recipe for a broken tyre lever and lots of swearing.
Likewise, be careful not to damage the rim tape while using tyre levers – especially ones that have seen heavy use and may have nicks or sharp edges.
Tyre levers can be used to carefully lift stubbornly tight tyres onto a rim.Yogamaya von Bromley / Our Media
The best tyre levers are typically made out of tough plastic, with a thin but strong and wide tip. Pedro’s tyre levers are favourites of ours, but anything similar should do the job.
Generally, metal tyre levers should be avoided, especially if you have carbon rims, as these can damage your rims.
There are also modern evolutions of the humble tyre lever, such as the Tyre Glider or the Crankbrothers Speedier Lever.
The Tyre Glider is a modern evolution of the standard tyre lever.Simon von Bromley / Our Media
These aim to continuously install the bead as you push it around the rim edge. Both tools also include a more traditional scooped edge to aid removal of tyres.
At a similar size and weight to traditional tyre levers, they are also suitable for carrying in a saddle bag or jersey pocket.
Tyre bead seating tools can be invaluable for quickly seating tight tyres without risking damage to delicate components.Simon von Bromley / Our Media
Specialist tyre-seating tools, such as Kool Stop’s Tyre Jack (and similar devices by other brands), can save you a great deal of hassle when installing tight tyres.
The rigid part of the tool rests on the rim edge, while the hinged part reaches over the tyre and hooks onto the tyre bead. The bead can then be pulled up and over the rim edge.
In our experience, these tools are fantastic at getting stubbornly tight tyres onto rims with minimum fuss.The only downside is they’re typically too big to carry in a saddle bag or jersey pocket for road-side use.
However, they are generally light enough to carry in bikepacking bags, a cycling backpack or a hydration pack.
A bead-seating tool could, therefore, be a sensible piece of kit to take on an adventure or long mountain bike ride, if you know you might have trouble reinstalling your tyres after a puncture.
If installing tubeless tyres, some soapy water can help lubricate the rim and tyre bead interface, easing the ability of the tyre bead to slip over the rim edge.
It’s not worth trying this trick when using inner tubes, however, as a wet tube can stick to the inside of a tyre, possibly causing a puncture.
BikeRadar’s technical editor, Tom Marvin, suggests tough, box-fresh mountain bike tyres can be made a little more pliable by heating them in warm water for a few minutes.
Once they’ve warmed up, the rubber and tyre carcass should have softened enough to allow you to more easily shape the tyre and install the first bead onto a rim.
Muc-Off’s Stealth Tubeless Puncture Plug set is a highly rated option.Andy Lloyd / Immediate Media
As already discussed, installing tubeless tyres can often be more difficult than installing equivalent clinchers.
For this reason, repairing a tubeless puncture using tyre plugs can often help you avoid needing to remove the tyre bead from the rim while away from home.
Stan’s NoTubes DART tubeless repair kit and Muc-Off’s Stealth Tubeless Puncture Plug set are two kits we rate highly.
We’d still recommend carrying a spare tube or two as a last resort, but tubeless tyre plugs are typically the BikeRadar team’s go-to flat-fixing solution, in the first instance.
Using too much rim tape can make tyre installation harder, so always follow the manufacturer’s instructions.Joe Norledge / Immediate Media
When installing rim tape (tubeless-specific or otherwise), it’s important to not use more layers or thicker tape than is required.
An overly thick rim tape, or one or two wraps too many, effectively increases the diameter of the wheel, meaning there will be less slack in the bead when you come to install a tyre.
Adding a tubeless tyre liner can make installing a tyre very difficult. Note: if your tyres look like this, it’s time to replace them.Oliver Woodman / Immediate Media
Tubeless tyre liners, such as the CushCore tyre protection system or Vitorria’s Air-Liner kits for road, gravel and mountain bikes, are great for offering increased rim and puncture protection, and the ability to safely run lower pressures in tubeless-ready tyres.
However, they also take up significant space within the tyre by design, which can prevent the tyre beads from dropping into the rim’s central channel during installation.
As we keep repeating, this reduces the available slack in the tyre bead, making tyre installation and removal harder.
For this reason, Vittoria includes a specific set of tyre bead pliers and bead retaining tabs with its Air-Liner road kit. You’ll almost certainly need them.
While tubeless-ready tyres are compatible with inner tubes, the inner tube can function somewhat like a tubeless tyre liner during installation.
Again, it takes up space within the tyre and prevents the tyre beads from falling into the deepest part of the rim channel.
This is especially true when installing narrow (sub-25mm) road bike tyres on relatively narrow rims (sub-19mm internal width), as there’s less room for the beads and the tube in the central channel of a narrow rim. Even a slightly inflated tube can push against the walls of a narrow tyre.
While we do advise slightly inflating the inner tube prior to installation to avoid it getting pinched by the tyre, it may be necessary to fully deflate the inner tube to allow the maximum amount of slack in the tyre beads.
Simon von Bromley is a senior technical writer for BikeRadar.com. Simon joined BikeRadar in 2020, but has been riding bikes all his life, and racing road and time trial bikes for over a decade. As a person of little physical talent, he has a keen interest in any tech which can help him ride faster and is obsessed with the tiniest details. Simon writes reviews and features on power meters, smart trainers, aerodynamic bikes and kit, and nerdy topics like chain lubricants, tyres and pro bike tech. Simon also makes regular appearances on the BikeRadar Podcast and BikeRadar’s YouTube channel. Before joining BikeRadar, Simon was a freelance writer and photographer, with work published on BikeRadar. com, Cyclingnews.com and in CyclingPlus magazine. You can follow Simon on Twitter or Instagram.
The rubber of a modern bicycle wheel in most cases consists of a tube and a tire (tire). The option of one-tubes is not considered. Let's talk about installing tires. More precisely about its correct orientation.
If the tread pattern is symmetrical, it can be installed on either side. But there are also unidirectional tires i.e. with a non-symmetrical tread pattern designed for installation and rotation in one direction. For such tires, installation orientation already matters.
Some manufacturers clearly and unambiguously draw an arrow according to which the wheel should rotate at the recommended setting.
If installed on the front wheel - see the arrow Front, on the rear - Rear. Sometimes a tire is specifically designed to run on the rear only, or only on the front. Then the manufacturer also makes a warning label:
Installing such a tire in the wrong orientation leads to worse grip, poorer bike handling, less rolling and faster tire wear.
If an arrow is drawn and it is written in letters on the rubber how to install, then everything is simple. But what to do when the tire is clearly unidirectional according to the tread pattern, and there are no arrows and other indications?
First of all: "clearly unidirectional" means that the tread pattern resembles a "V" when viewed from the front.
The recommended installation is such that the rear wheel leaves " >>>>> " and the front " <<<<< " when driving from left to right.
Reason for this recommendation. The rear wheel is responsible for traction and flotation, so the "V" should "rest" with its feet on the surface for better grip (" / \ "). The front wheel plays b o a major role in braking, so the figure is oriented in the opposite direction.
If you need maximum cross-country ability - put both tires ">".0003
The issue of grip/braking in relation to the orientation of the tread pattern is important when driving on dirt, sand. On asphalt, it doesn't matter.
And one more thing. If you look at the "Belarus" tractor or car tires, you will notice that the tires are installed exactly the opposite way: "<". It would seem that the tractor in the field needs maximum cross-country ability, and auto traction will not hurt. But here another factor plays a role - hydroplaning. At high speed, with a sufficient wheel width, water from the road surface can be collected in a "wave" in front of the wheel and the vehicle slides on a water cushion. The "<" oriented pattern allows water to be squeezed out the sides of the wheel and retain traction. In principle, aquaplaning does not threaten a bicycle due to the shape and size of the contact patch of the wheel with the road, high tire pressure and relatively low speed.
See also
TIRE SIDEWALL MARKING
Indicates the type of rim the tire is compatible with. Unless otherwise noted, should be used on rims with hooks.
Nominal profile width and suitable wheel diameter in millimeters according to ETRTO.
Country of manufacture.
Minimum and maximum pressure in bar and psi. inch.
Specifies the direction in which the tread pattern should be directed when the wheel is rotated forward.
Indicates that the tire should be installed with an inner tube only and not tubeless or otherwise.
TIRE TYPES
TUBE TYPE: A tire for use with an inner tube only.
TUBELESS: A tire for use on tubeless rims only, which can be fitted without an inner tube. Can be used with internal chamber.
TUBELESS READY: A special type of tubeless tire that requires a sealant inside to maintain pressure. Can be used with internal chamber.
TUBULAR: A fully enclosed, stitched or vulcanised, tire construction (tube) that requires a special tubular rim and is glued to it when mounted.
TIRE INFLATION RECOMMENDATIONS
Never exceed the recommended tire pressure.
Proper pressure affects the load, speed and handling of a bike and is vital to performance and safety performance such as braking, maximum traction and tire life.
Inflate tires "cold", that is, not warmed up on the road.
Do not exceed the maximum pressure indicated on the tire sidewall.
Insufficient tire pressure causes excessive creasing and rapid wear.
Excessive pressure causes discomfort when driving and reduces the contact area of the tire with the road surface, which impairs handling and traction.
Before every ride, it is essential to check and maintain the correct tire pressure (while the tires are “cold”), especially on tubeless systems, which are more prone to sudden pressure loss.
WARNING: Driving on tires with improper air pressure is dangerous! This can lead to an accident, accident, serious injury or even death.
TIRE CHECK
The condition of the tires and the air pressure in them should be checked before each trip, and also, and even more carefully, after hitting any object on the road. If the tread is worn and the body material (cord) becomes visible, bulges, cracks, cuts, holes, uneven wear appear on the tire, or the tire shows signs of any other damage, it is recommended to replace it immediately.
Over time, the condition of the tire will in any case deteriorate under the influence of external forces, such as contact with the road, punctures, improper repairs, mounting-dismantling, inflation-deflation, heating-cooling, excessive exposure to ozone, improper storage conditions, etc., etc. . To reduce the impact, tire manufacturers add anti-ozonants and antioxidants to their products.
Since it is not possible to accurately predict what external forces a tire will be subjected to, there are no scientifically based limits on the life that a tire can be given. It is recommended that the condition of the tires (as well as tubes and rim tapes) be checked regularly by a bicycle specialist who can assess their suitability for further use.
As for tubeless systems with liquid sealant inside, it is necessary to check the condition of the sealant itself and change it regularly in accordance with the instructions.
To avoid cosmetic damage, use low-pressure tap water to clean and wash the tire sidewalls. Never use cleaners to improve the appearance of the sidewall, otherwise you will remove antioxidants, which can degrade the quality of the rubber and lead to cracking of the sidewalls. Using hydraulic sprayers with high water pressure can also cause damage to the sidewall.
Avoid excessive mechanical stress on tires and tubes (for example, do not brake by blocking the wheel, do not run into sharp objects, do not drive with insufficient or excessive tire pressure, etc.).
If your bike has rim brakes, the rim is subject to constant wear and tear, which over time can lead to tube failure and puncture. In any case, if you have any doubts about the condition of the tires, consult a bicycle specialist.
High tire pressure can damage the rim, so check the maximum pressure allowed for the specific rim before installing the tire (check with the wheel dealer or rim manufacturer for information on whether the rim can withstand tire pressure).
TIRE CHANGER
PREPARATION
1. Before installing or removing a wheel, read the bike manufacturer's instructions and make sure you know how to handle the wheel mounting mechanism.
2. Verify that the rim, tire, and tube are compatible with each other by checking the instructions for each component manufacturer. A mismatch between tire and rim can cause the tire bead to come off the rim or damage to the inner tube, resulting in a rapid loss of air pressure. If you're unsure, be sure to check with a bike specialist.
3. Make sure that the mounting area of the tire is clean and that foreign objects do not get into the tire, as they can damage the tube, rim tape, the tire itself, or contaminate the sealant (in the case of a tubeless tire).
4. Make sure the rim is in good condition. If it is damaged, then it must be replaced.
5. Check the condition of the rim tape, if used. If it is damaged or does not completely cover the spoke holes in the rim, it must be replaced. Poor quality rim tape is very often the cause of a sudden loss of air pressure.
6. Check the maximum allowable pressure for the given rim type. It must be equal to or higher than the tire. Tires that allow a pressure reduction equal to or greater than 3 bar (43 psi) must be mounted on lug rims.
7. A tire capable of inflating more than 5 bar (73 psi) must be mounted on a lug rim. Hooked rims are marked with a "C" in the size label. If you have any questions, please contact a bicycle specialist.
8. In the case of installing a tire with a tube, talc helps to properly place it in the tire. For latex cameras, its use is mandatory, but it is also recommended for butyl cameras. It is also recommended to install a new inner tube each time a new tire is fitted or after a puncture.
9. When installing a tubeless tire, always check the condition of the valve (nipple) and replace it if it looks damaged or if air pressure is lost.
10. When installing a Tubeless Ready tire, always check the sealant and change it if it is dry. Also read the sealant manufacturer's instructions carefully to make sure it's right for your tire.
TIRE REMOVAL PROCEDURE
1. Unscrew the valve cap (nipple) and locknut, completely deflate the tire.
2. Peel off one side of the tire all around from the edge of the rim by applying pressure starting from the area opposite the valve. Tubeless tires may require more effort for this.
3. Position the tire pryer next to the valve and carefully insert it between the tire and rim, being careful not to pinch the inner tube (if any). Then, using a lever, lift the sidewall of the tire off the rim. To make the job easier, always make sure that the other bead is in the rim bed.
4. While holding the first rig in this position, insert the second rig about 10 cm from the first and repeat the above operation. Then run the pliers around the circumference of the tire to completely separate one bead from the rim.
5. Remove the inner tube, if present, or liquid sealant, if present and still liquid, and then remove the second tire bead from the rim with your hands.
TIRE INSTALLATION PROCEDURE
1. If installing a tubeless tyre, make sure the rim is sealed, tubeless tyre-compatible, or tubeless-compatible. If the rim is tubeless compatible, you will also need a tubeless rim tape that will completely cover the spoke holes. It is possible to lubricate the entire circumference of the rim with a special tubeless lubricant (do not use oil or grease) - this will facilitate the installation procedure and the correct positioning of the tire on the rim.
2. Insert the first bead of the tire into the rim, observing the direction of rotation of the tire indicated on its sidewall, starting opposite the valve.
3. If installing a tire with a tube, slightly inflate the tube, but only so that it becomes rounded, and gently insert into the tire, starting at the valve and completely carefully placing it in the rim.
4. Starting on the side opposite the valve, press the other bead of the tire into the rim and push it around the rim in both directions until it fits properly in the rim. For tubeless installations, add the recommended amount of sealant before inserting the last bead piece. If the tire bead becomes difficult to push into the rim, or the last part of the tire does not snap into place, make sure that the bead around the entire circumference of the rim is in place. If necessary, squeeze the sidewalls of the tire into the rim with your hands.
5. If fitted with a tube, make sure it is not pinched between the tire and the rim or valve, and then secure the valve to the rim with a locknut.
6. Inflate the tire to the maximum allowable pressure using a pressure gauge pump so that the beads are properly seated on the rim. Tubeless tires click into place with a characteristic popping sound. Rotate the wheel by hand at low speed and at an angle to check that the beads are correctly positioned and also that the liquid sealant is spread inside (if the installation is tubeless).
7. The tire is properly seated when the thin line above the side of the rim is equidistant from the edge of the rim all around. Then reduce the pressure to your preferred pressure (within the markings on the sidewall of the tire) and close the valve. Do not exceed the manufacturer's maximum pressure for tire, rim and rim tape.
8. When inflating a tubeless tire for the first time, a strong jet of air is required, so you may need a compressor.
9. Before each ride, check the air pressure, tire bead fit, wheel-to-hub attachment, and brake pads (disc or rim).
10. Before using newly installed tires, be sure to first brake test and do a few test maneuvers.
USING TIRES WITH FULLY SEALED CARBON AND ALUMINUM CLINCHER RIMS WITHOUT RIM TAPE
Fully sealed carbon and aluminum rims, such as tubeless rims, usually don't have spoke holes in the rim, so manufacturers don't mandate the use of rim tape.
However, be aware that in the case of bicycles equipped with rim brakes, the heat generated during braking directly enters the tire system, greatly increasing the thermal load on all components such as the tire, the inner tube (if any) and the rim itself. In the event of prolonged braking, riding without a rim tape can cause the tires to deflate quickly, with the risk of losing control of the bike.
This becomes even more relevant in the case of latex and lightweight tubes, as well as tubeless installations. In order to minimize the chance of failure due to overheating, it is recommended to use rim tape for any installation, and to avoid continuous, prolonged braking when descending a mountain, if possible.
USING CLINCHER TIRES WITH CARBON RIM
Carbon rims sometimes pose a risk of tire edge damage due to sharp rim edges. Therefore, before mounting the tire, it is recommended to make sure that there are no sharp edges on the rim hooks. To verify this, carefully run your finger along both edges of the rim - there should be no nicks, sharp protrusions or excessive roughness on it. If there are, then the rim needs to be replaced.
If in doubt, please consult a bicycle specialist.
TIRE STORAGE
Tires should be stored in a cool, dry place at 10°C - 21°C, avoiding contact with heaters.