My father-in-law and I made a 4' pull behind ATV Cultipacker. During my research I found a posting on the Michigan Sportsman page. Material cost was under $200. We probably have about 20 total hours into the project.
We used a double walled 10" culvert. It only comes in 20' rolls. Below are the pictures of the 4' cultipacker. Since we have extra culvert left over we are going to attempt a 10' one to pull behind the grain drill.
We figure total material cost for that one will be around $400.
The frame is made from one 20' stick of 2"X2" 1/4" thick angle iron. The bearings and steel were the most expensive pieces.
The shaft is a 5' piece of 1.25" round stock. We cut it down and added rebar to it. The rebar was added so the concrete had something else to adhere to. Due to the way the round stock was cut, we had to do some grinding to get our bearing to fit over the shaft.
This packer used 5-60lbs bags of concrete. We were a hair short so we stuffed a few rocks in at the end to make sure the whole culvert was filled. We found the 4' height was perfect to stand up and fill using 2 gallon plastic buckets. We also put the culvert in a split due to a slight curve it had. Maybe we didn't need to do it but with few old 2x6s and some ratchet straps we were able to straighten it up. The end caps are 3/4 plywood that I made laying around the house.
My father-in-law got excited and attached the frame and started pulling it behind his lawn mower. I have yet to use it but will be doing so this weekend. We found that due to the weight 350ish lbs, we're going to need to store it standing up so the slots don't get flattened over time.
While i'm still waiting to check it out, i'm extremely happy with the looks and how the soil looks after running over it.
Looks good!
That looks great!
Please keep us updated on how this works out longer term.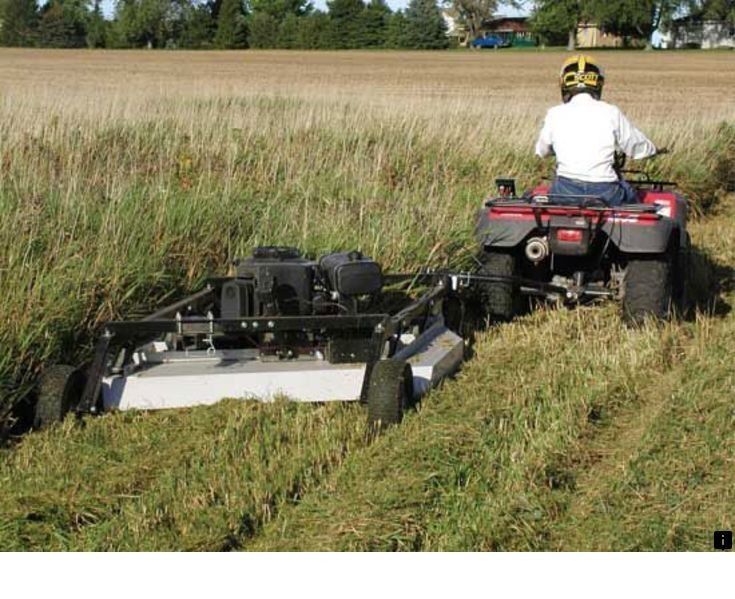 My neighbor made one from steel culvert but was very crude nothing like how nice yours appears. His axle was off center and it didn't rotate very smoothly. Concrete ended up breaking out in chunks as the ends weren't closed.
Spend any time at all watching DIY land managers on YouTube and you’ll see expert after expert touting the benefits of using a cultipacker when planting food plots. Cultipacking ensures proper seeding depth and good seed-to-soil contact.
Let’s back up a minute: What’s a cultipacker? It’s a heavy iron roller with cleats that you roll over the soil. You pull it behind an ATV, side by side, or tractor. This step is usually performed after a field has been disked. The cleats grab the soil and help the cultipacker rotate. The implement’s weight helps flatten and firm the soil evenly.
When planting small seeds such as brassica and clover in food plots, many experts recommend using a cultipacker prior to broadcasting seed, then cultipacking again after planting to ensure good seed-to-soil contact.
If you already own a cultipacker — great. There’s no reason not to use it. A cultipacker works as advertised.
But what if you don’t own a cultipacker? Should you spend the money to purchase one?
Maybe.
The reason for my wishy-washy answer is it depends on the size of food plots you’re planting, and whether your food plot plan involves a tractor and disking.
If you own an ATV and a sprayer, you can effectively kill weeds and then plant small seeds such as clover and brassica without working the soil. It takes up to two weeks for a complete weed kill. After broadcasting seed (below), you can use ATV tires much like a cultipacker to press the seed into the soil while driving back and forth over the field.
If you disk food plots with a tractor, or disk your fields using some type of an ATV-attached implement, then a cultipacker is necessary before planting. You don’t want to broadcast small seeds such as brassica and clover on a disked field because many seeds will fall too deep into soil crevices. These small seeds grow best when covered by no more than a 1/4-inch of soil. If you disk first, it pays to roll a field with a cultipacker, broadcast seed, then roll the field again with a cultipacker.
Let’s assume, however, you don’t own a tractor and a disk, and you don’t disk your fields with some other ATV-attached implement. Do you need a cultipacker? Not really.
The reason is your ATV (or side by side) tires work just like a cultipacker when you drive over a food plot. Sure, a cultipacker pulled behind an ATV will get the job done faster because of its width, but if you have the time to drive back and forth over a field, the tires themselves will press the seed into the soil to ensure good seed-to-soil contact.
Obviously, this would be a time-consuming project on a larger food plot. For example, to plant clover on a 1-acre plot (think football field without end zones), I’d want a cultipacker. However, to plant a tiny plot, say 15 yards by 20 yards (about 1/16 of an acre), you can drive back and forth with an ATV and watch the tire tracks to ensure you’ve pressed all the soil. In my opinion, hauling a heavy cultipacker back into the woods for tiny food plots is more trouble than it’s worth.
Please enable JavaScript to view the comments.
Today, ATVs are very popular in the modern world. This is a small vehicle that looks a bit like a motorcycle, but the ATV has more than 2 wheels. Trunk - the luggage compartment of an ATV, it is designed to carry the necessary things. Panniers can be front and rear, rear panniers are more popular. Such wardrobe trunks cost a lot separately, so now I will tell you how to make such a wardrobe trunk with your own hands, while saving a lot of money. nine0003
In order to create a homemade trunk you will need:
- Foamed plastic or hard foam, there is not much difference here, you can choose any one, the thickness of which will be at least 10 mm, 6 mm can be on the bottom
- Glue for plastic
- Self-tapping screws
- Metal ruler (approximately 1-1. 5 meters)
- Bulgarian
- Tools for fastening and fixing
- Screwdriver
If you do not have special tools for cutting plastic, you can take a regular clerical knife or blade. ATTENTION! if you cut plastic with a blade, wear a glove on your working hand, there are many cases when people cause mini-injuries to themselves by cutting themselves on the edge of the plastic. nine0003
To make your own ATV case, follow these steps:
1. The first step is to cut out the bottom for your future case. To do this, you need to measure the area where you want the trunk to be located, then all measurements must be transferred to foam or plastic and cut the bottom according to measurements using a grinder. All precautions should be observed, first of all, protect eyes, hands, clothes during work.
2. Once we have finished making the bottom, we need to make the side walls of the trunk. To do this, we measure again and, having received the necessary parameters, we transfer them to polystyrene or plastic and cut out the necessary pieces from polystyrene or plastic. Next, we fix them well to the bottom with screws and glue. nine0005 3. After gluing the side walls, it's starting to look like a trunk, the next step is to file all the edges so that we get smooth and even corners of the case.
4. Next, after processing the corners, we proceed to the lid of our trunk. In order to make the trunk lid, we again go to foam or plastic, measure the almost completed wardrobe trunk and transfer the resulting dimensions of the lid, cut it out with a grinder, observing all precautions. After we have received the desired piece of foam or plastic, we attach it to the already made wardrobe trunk with the help of hinges that are used in door structures, you can also use other materials for fastening at this stage, because the hinges can take up an amount of space in your case. nine0005 5. Now you have attached the case cover, at this stage you have already got a full-fledged case, but for the beauty and attractiveness of the trunk, as well as to match the color of your ATV, you should give the trunk a beautiful look. There are many options here on how to do this. You can paint it in the color of your ATV, you can paste over it with a film and there are many such options, but the choice is yours!
In addition to using hinges to secure the lid, other fastening materials can be used to secure the lid. nine0003
Also, for convenient storage and transportation of various substances and materials, the trunk can be divided into several parts, sections.
The most important thing in this business is not to be afraid to fantasize and experiment.
Do-it-yourself wardrobe trunk is suitable for unoccupied people at a certain point in time, because. for the manufacture of a high-quality trunk for an ATV, it is worth considering that a lot of time will be spent. But there is a plus in making a case with your own hands. The upside is that you will save a lot of money, which in the future can be used to develop your future or to fulfill your dreams. For manufacturing, you will need the ability to work with devices, patience and perseverance. But believe me, all this cannot be compared with the fact that in the future you will be proud of yourself, looking at him and saying to yourself "What a good fellow I am that I did it with my own hands!" And in the future it can become your paid hobby! nine0003
Good luck to everyone in this business, may you get the most luxurious trunks for your ATVs!!!
Although the season for ATVs and motorcycles does not depend on the season and may not be interrupted, many motorists prefer snowmobiles in the winter, storing ATVs and motorcycles until warmer weather.
Before long-term storage, it is not enough just to clean the ATV from dirt and put it in a warm, dry garage. Its service life and the quality of further operation depend on the correct preparation of transport for wintering. Below are some recommendations for preparing equipment for long-term parking. nine0003
Washing and cleaning the ATV and motorcycle before long-term parking
Before storing the motorcycle, thoroughly wash and then dry and cover all important components and mechanisms with conservation grease (you can use regular silicone grease in an aerosol can).
It is better to cover equipment for winter, but not with polyethylene, but with a special protective cover made of breathable material. The cover will protect from dust and moisture, while not interfering with natural ventilation
Preparing the ATV and Motorcycle Fuel System for Long-Term Parking
The ATV fuel system is susceptible to corrosion, so it is recommended to fill the fuel tank completely before wintering so that the fuel will force out the remaining moisture on the inner walls. Over time, the fuel loses its properties, so it is recommended to replace the fuel with a new one at the beginning of the season before operation. If a plastic tank is installed on an ATV or motorcycle, then it is better to remove the fuel from it before parking. nine0003
Before conservation, in order to ensure safety, it is necessary to check the fuel system for possible damage and leakage
Preparing the engine of an ATV and a motorcycle for a long stay
the crankcase and parts such as pistons, cylinders, and piston rings, due to the lack of a protective oil film on them, can also be subject to corrosion. Therefore, before a long-term parking, it is recommended to unscrew the spark plugs and fill in engine oil through the candle wells, while manually turning the engine crankshaft several revolutions. The holes in the candle wells should be closed with rags or special plugs to prevent foreign objects from getting inside the ATV engine while the vehicle is parked. nine0003
This operation will help create a reliable oil film on the parts of the cylinder-piston group during parking and protect them from possible corrosion.
Remove excess oil from ATV or motorcycle cylinders before use. To do this, it will be enough to turn the crankshaft with the help of an electric starter or a kickstarter for 3-5 seconds with the carburetor throttle fully open.
Motorcycle and ATV fluid replacement
Before "wintering" it is recommended to replace all technical fluids (engine oil, antifreeze, brake fluid), if they are, of course, used in your vehicle.
Old motor oil may contain contaminants that will cause it to thicken and cause unwanted deposits on parts walls and in oil passages.
At the beginning of the season, the fluids will have to be changed again, because. over time, they oxidize and lose their properties.
Motorcycle and ATV battery storage
The battery can be stored without removing it from the ATV, but be sure to disconnect it from the on-board network. Environmental parameters are important storage conditions for batteries. The optimum temperature for battery storage is from -10 to + 10 degrees Celsius. The humidity in the room should be as low as possible, this will slow down the self-discharge process. The battery must be fully charged before storage. Storage of a discharged battery is unacceptable. During storage, it is necessary to control the charge level and, if necessary, recharge the battery
Proper storage of ATV and motorcycle tires
Tires should not be exposed to freezing temperatures for extended periods of time. In the cold, rubber loses its properties and deteriorates.