Fire pits are an essential component of any outdoor living space, especially if you enjoy spending time outdoors at night. In addition to providing warmth and light, fire pits also create a focal point for social gatherings, making them the perfect addition to any backyard.
A tire rim fire pit made from a tractor tire rim is a great way to add a fire pit to your yard without spending a lot of money. If you’re looking for a cheap and easy way to add a fire pit to your backyard, consider making one from a tractor tire rim. This project is simple to do and only requires a few materials. Plus, it’s a great way to repurpose an old tire rim.
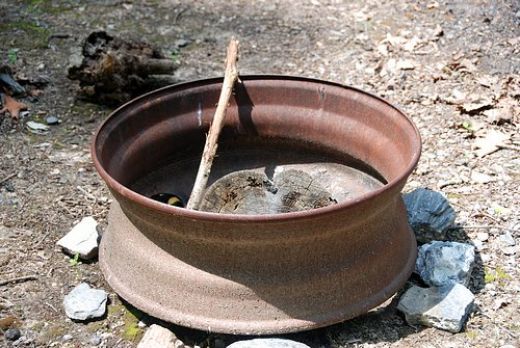
An old tractor tire rim makes an excellent fire pit because it is made of heavy-duty metal. The metal will hold up well to the heat of the fire, and the rim will contain the flames and prevent them from spreading. All you have to do is find an old tractor tire rim in your local area and have the centre cut out so that you only have the outer round metal.
Our Pick
Wood Burning Backyard Fire Pit with Cooking Grill
$139.99
The Black round fire pit is designed with an outer ledge around the central fire area allowing for convenient access to drinks and roasting supplies.
Buy on Amazon
We earn a commission if you make a purchase, at no additional cost to you.
11/27/2022 01:36 am GMT
Find a spot in your backyard where you can lay the tractor rim for your tire rim fire pit. If you have a shovel, use it to dig a hole that is a few inches deep. Place the rim in the hole and then fill the hole back up with dirt, making sure that the rim is level. If you want, you can use a level to make sure that the ground is level before you place the rim down.
Make sure to add some bricks around the perimeter to protect people from the hot metal while your tire rim fire pit is in use.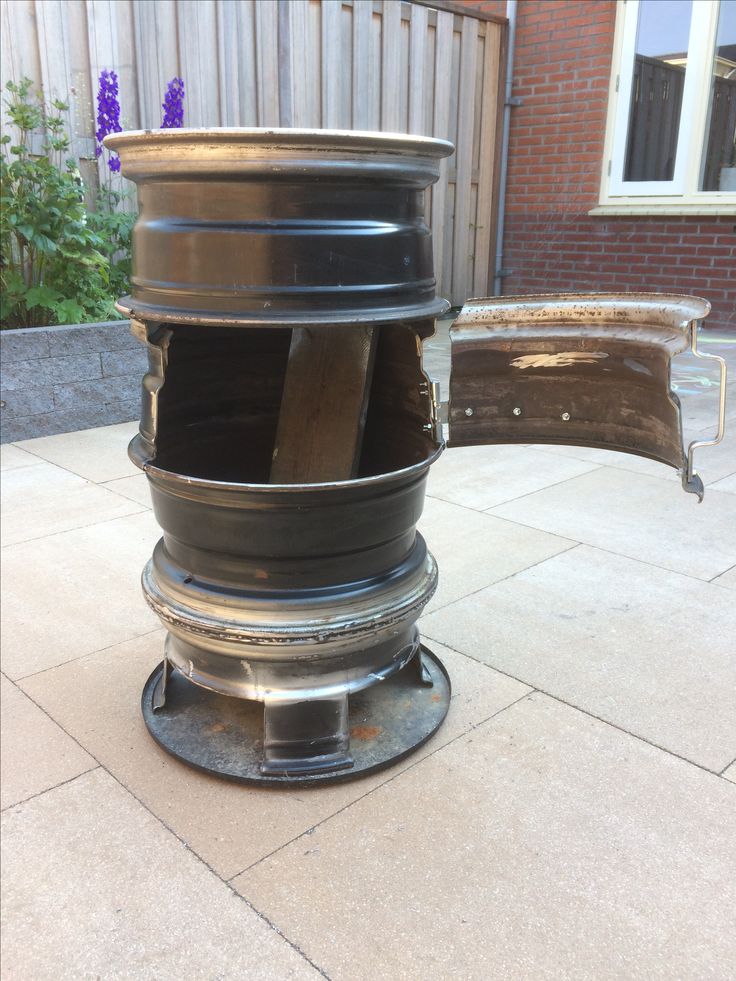 You may also want to consider adding a screen or lid to help contain the fire and prevent embers from escaping.
To install the bricks around your tire rim fire pit, you can use landscape adhesive for a more solid build. This will ensure that your brick wall is secure and will last for a long time. If you’re looking for a more permanent installation, you can use mortar to set the bricks in place. However, this will require more time and effort to complete.
If you want to make your tire rim fire pit even safer, leave a gap between the tractor rim and your brick wall as you are building it. Fill that gap with crushed gravel and sand until it’s level with the top of your brick wall. The gravel and sand will absorb heat first and your brick wall should stay cool to touch even after hours of using the tractor rim fire pit!
This will help to prevent accidental fires from spreading. Additionally, you may want to consider lining the inside of your fire pit with fire bricks to help contain the heat and prevent any damage to your tractor rim.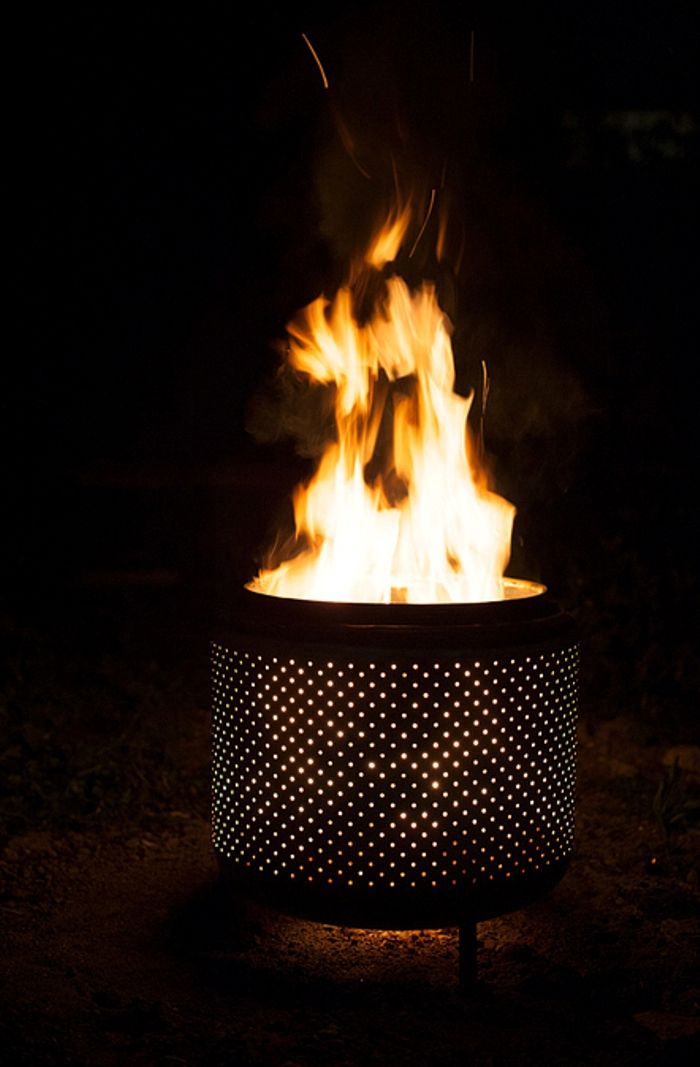
If you’re looking for some inspiration in building your own tire rim fire pit, then look no further. We’ve put together some tips and ideas to help you get started.
You’ll need these materials:
And these tools:
Click on any image to start the lightbox display. Use your Esc key to close the lightbox.
Thanks to Tractor By Net for this great project. You can get step-by-step instructions here…
Share this article
By: Lisa Magloff
●
17 July, 2017
Old tire rims can be used to make a cheap and practical fire pit for your backyard.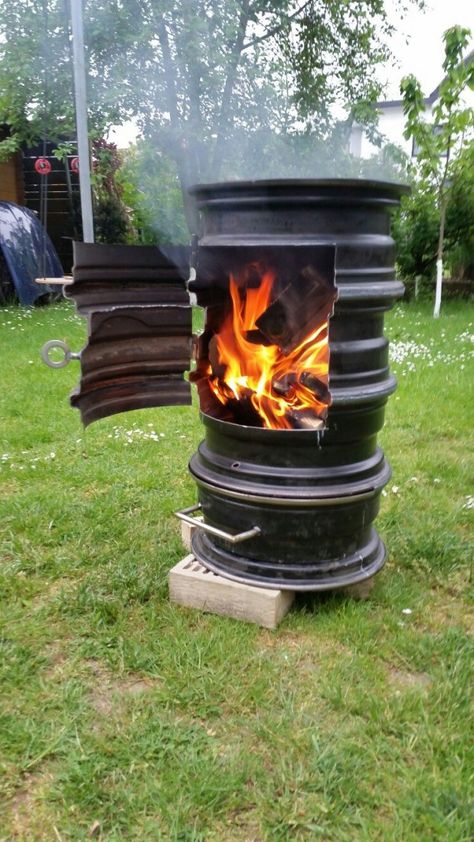 Best of all, a tire rim fire pit requires little or no expense and no construction skills, and it can be made in just a few minutes. With a bit more effort, the tire rim fire pit can also become an attractive permanent addition to your outdoor space.
To make a fire pit, you will need a large tire rim, such as a rim from a tractor or truck tire. These can sometimes be found very cheaply at wrecking yards or auto body shops. Do not use an aluminum rim, because they can melt at high temperatures. You will also need some fire bricks, rocks or stones to go around the rim. If you want to use the pit for cooking, you will also need some metal grating to go on top of it.
To make the most basic type of tire rim fire pit, simply place a tractor or truck tire rim on its side on a non-flammable surface, such as dirt or gravel. If you are building the fire on concrete or stone, you can place a piece of fire-resistant metal underneath the rim to protect the concrete from blackening.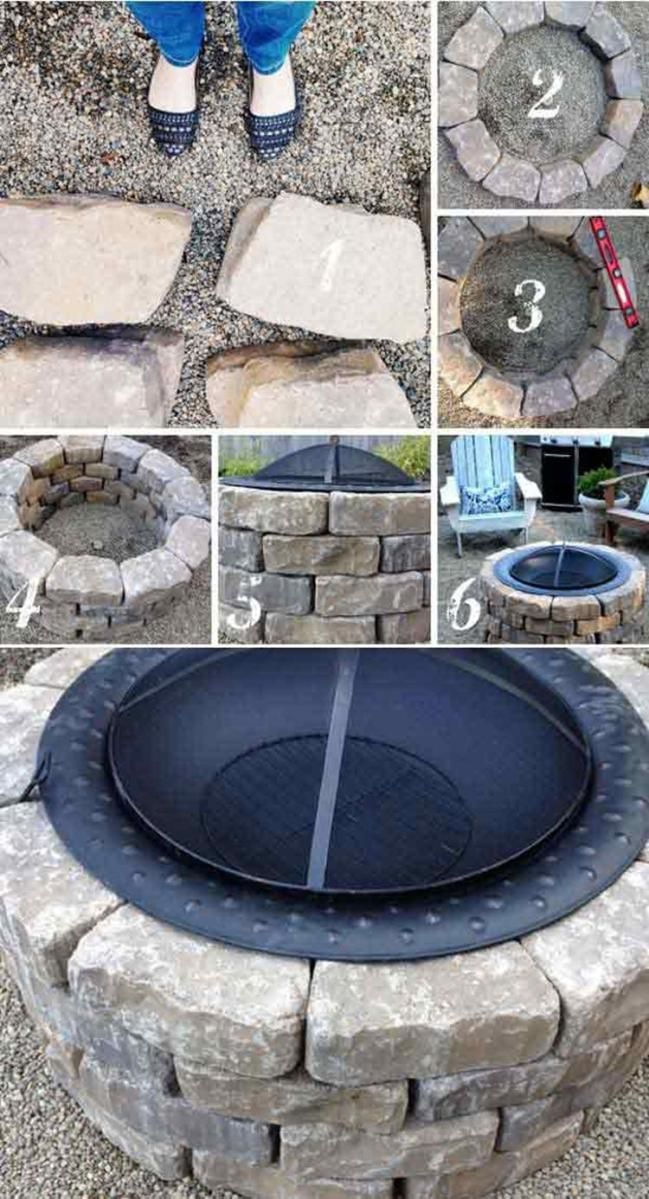 Place stones around the rim to hold it in place and for decorative purposes. Build your fire inside the rim. You can also place a grill on top for grilling food. When not cooking food, a piece of mesh placed on top will prevent embers from flying onto any nearby flammable surfaces.
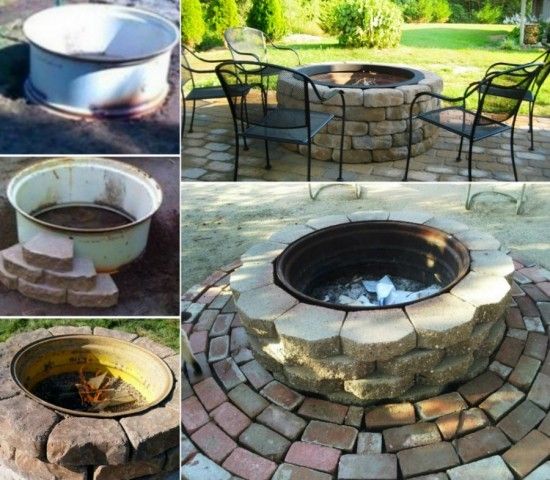
If you do not like the look of a tire rim in your yard, you can dig a pit first, and place the rim inside. The tire rim will prevent scorching of the earth and create a nice, even shape for the fire pit. Place decorative stones around the outside of the pit and build them up to create a safe area. You can also place railroad ties on the ground around the pit for rustic seating.
You can also turn a tire rim into a permanent backyard addition. Place your tire rim on the ground and lay wall blocks around it. Mark out a circle on the ground the same size as your tire rim and blocks. Dig out this circle to a depth of around 12 inches. Place six inches of gravel into the trench and then use masonry adhesive to attach two layers of wall blocks into place inside the trench, on top of the gravel.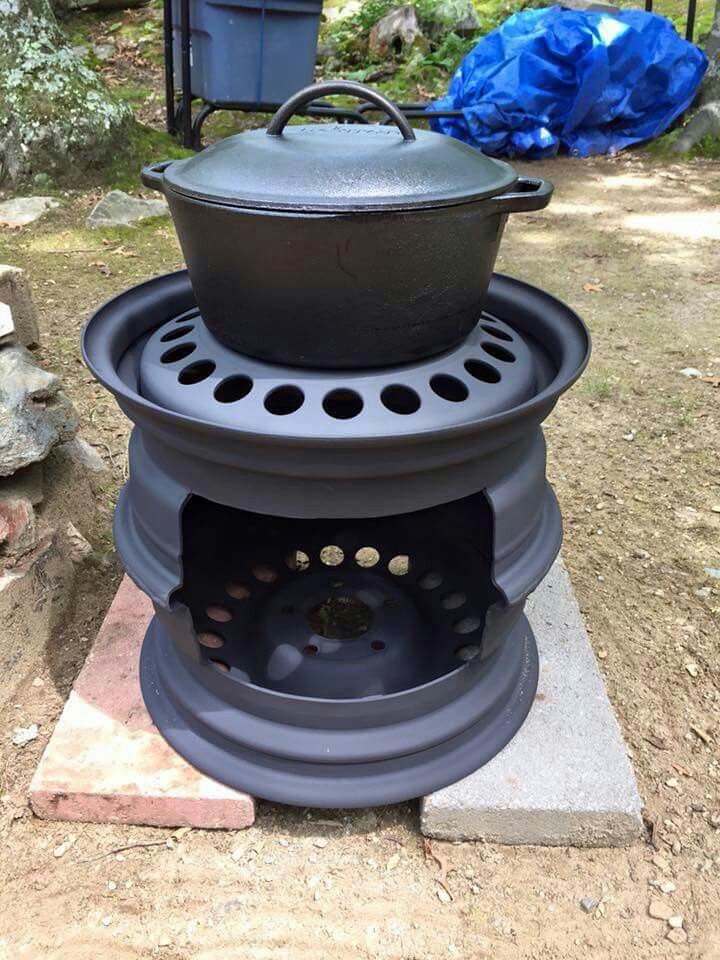 Add another six inches of gravel. Place the tire rim on top of the gravel, inside the ring of wall blocks. Build up the wall around the tire rim by adding two or three more layers of blocks, attaching them together with masonry adhesive. Surround the rim with wall blocks and mortar these together. Place capstones, such as flagstones, on top of the wall blocks and attach these using flexible mortar. Wait for the mortar to dry and your pit is ready.
References
Writer Bio
Since graduating with a degree in biology, Lisa Magloff has worked in many countries. Accordingly, she specializes in writing about science and travel and has written for publications as diverse as the "Snowmass Sun" and "Caterer Middle East." With numerous published books and newspaper and magazine articles to her credit, Magloff has an eclectic knowledge of everything from cooking to nuclear reactor maintenance.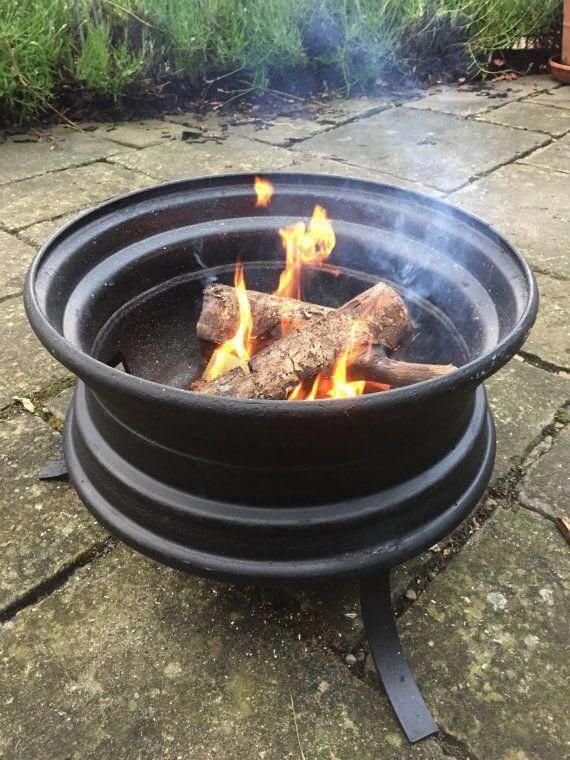
The recreation area equipped at the summer cottage will become your favorite place to spend time near the fire with friends and relatives.
If you like to spend time in the country, then undoubtedly, on your suburban area there should be an equipped campfire site . How to make a place for a fire in the country with our own hands, we will tell in this article. We share our experience in the arrangement and design of the hearth. In our master class we will tell, how to make a place for a fire in the country with your own hands .
Before us is a finished recreation area with a fire pit. Before you get started, you will need the following building materials and tools.
Before you start the main work, you need to choose the right place for a fire. Try to place a recreation area with a hearth away from residential buildings. Remember that the smoke from the fire should not enter the living quarters. If there are neighbors living around your property, keep in mind that they may also be uncomfortable with the smoke. The best solution would be to coordinate with your neighbors the future place for the fire.
Once a site has been selected, the dimensions of the campfire site must be determined. In our master class, a campfire site in the country (see example in the photo) has the following dimensions.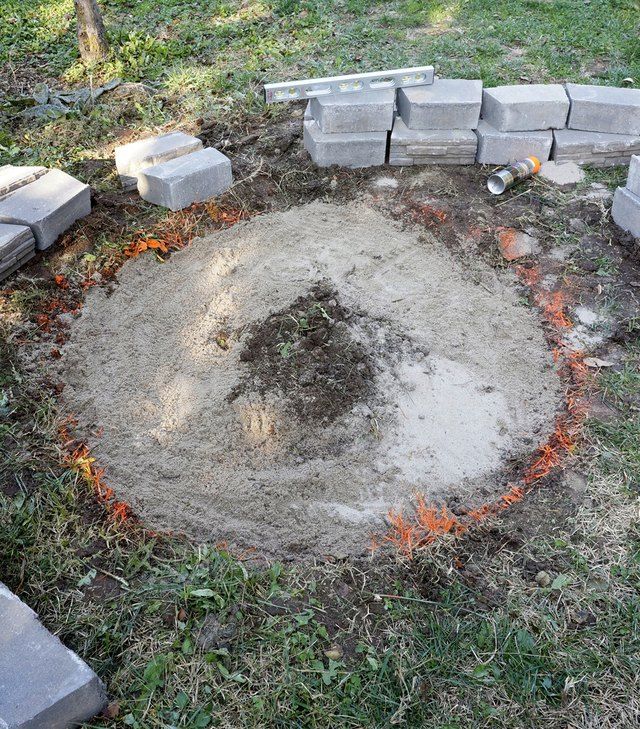
Hearth diameter 1.5 m.
Height 45 cm.
The dimensions of the hearth can be changed as desired. Before starting construction, you can make a preliminary calculation of the future hearth.
So, we chose a place for a fire in our summer cottage. They took measurements and made markings with the help of a simple device. To make an even circle, we will use a homemade compass, and for its manufacture you will need: a stick (you can use a pipe or fittings) and a rope.
Determine the center of the fire pit and drive in a stick to which a rope is tied. Everything, our compass is ready. Important! The size of the rope must be equal to the radius of the hearth.
Tip! To mark the area for the hole, use a paint spray can that can be tied to the end of a rope. .
Having made the markup, we determined the place for the foundation of the hearth. Armed with a shovel, we begin to dig a hole. In order for the campfire site to serve you for more than one summer season, we advise you to first determine the depth of soil freezing.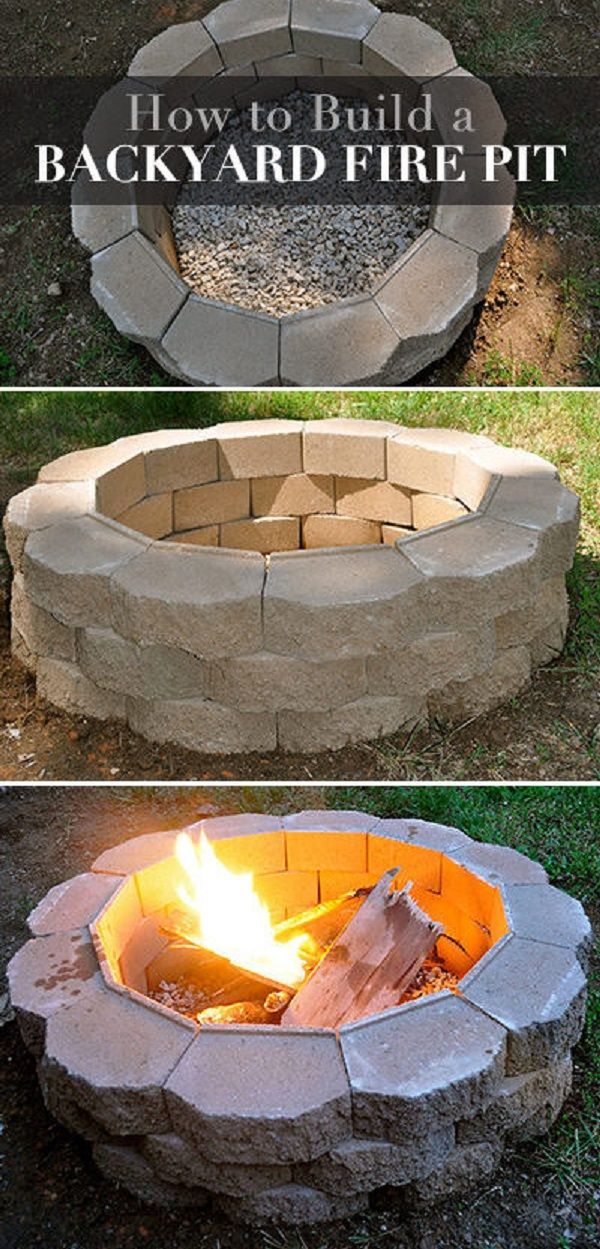 Professional builders advise digging a foundation hole at least 9 deep.0 cm. Also, you need to take into account climatic conditions and humidity.
After the foundation pit is ready, we proceed to reinforce the foundation and pour it with concrete.
The mixed concrete mortar must be poured into the prepared hole, this must be done slowly, let the mortar fill all the cavities. When the work on pouring the foundation is completed, it is necessary to level the surface with a wooden block or a special spatula. Make sure the concrete mix is even.
Wait for the mortar to dry completely. While the concrete mixture hardens, you can start sorting the stone. Distribute it in such a way that the big ones are in one pile, the flat ones in another. Decide which stones you will use to base the hearth.
Tip! Before you start laying stones on the glue, make a trial laying out of the first row. When choosing stones for the first row, give preference to an even and flat stone that does not have bumps and bends.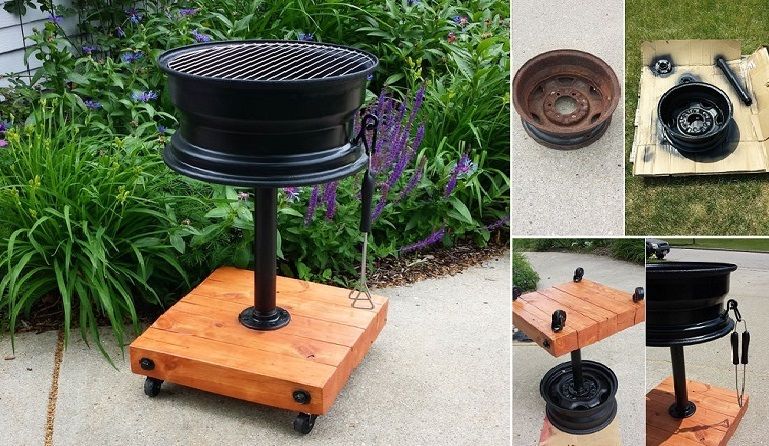 Experienced craftsmen, before laying out the stones, process them with a special tool. Giving the base a flat shape.
When foundation is dry, you can start laying the first row of stones using the Tetris principle. Important! Stone blocks should be in contact with each other as tightly as possible.
We admit that this is the most responsible and not demanding work, which can take a lot of time. Advice - be patient, it depends on this stage of work how the hearth will look like in a summer cottage made by yourself.
Mix the required amount of mortar for the job, laying out a new batch of stone. The main thing is to take your time and mix the required amount of mortar, this will help you avoid wasting expensive material.
Tip! To avoid damage to the lawn and the site, try to do all the work in one place.
The task of laying stone will become more difficult with the new level. Ideally, the upper edge of the laid out hearth should be at the same level, because such a hearth looks beautiful.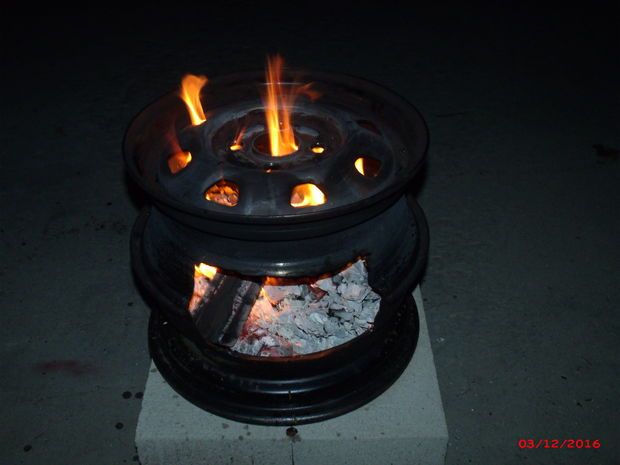 Aligning the last row of stone is not easy. Use a mallet and hammer, and if you have a power stone tool, the task of leveling the top edge of the fire pit will be much easier.
The photo above shows the penultimate row of the fire pit, inside which refractory bricks are laid out, fastened with a special mortar.
When laying stone and brick, craftsmen are advised to leave small gaps for ventilation. Based on my own experience, this can not be done, since the size of the fire pit already provides air access.
When the stone and brick work is completed, the bottom of the pit must be filled with fine gravel. As you use it, it can be easily washed or replaced with a new one.
So, the do-it-yourself hearth made in the country is ready, and the next step will be to check it.
As can be seen from the photo, the grass around the hearth is heavily trampled. The next step is to arrange the space around the fire pit.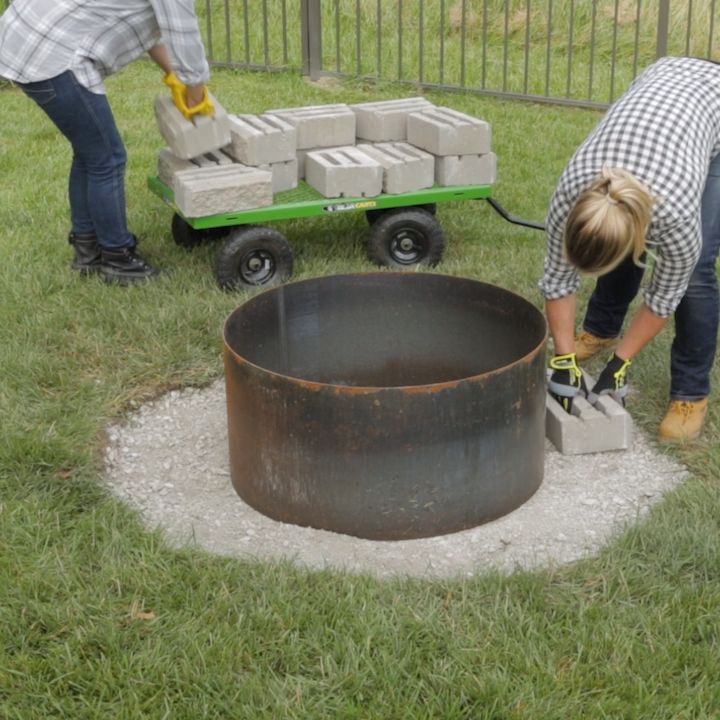
To do this, we take a homemade compass, and determine the size of the area around the hearth. When the markup is done, we take the shovel and remove the sod around the pit (see photo below).
Do not forget to prepare in advance the place where you will transfer the removed sod and earth. When the sod around the firepit has been removed, deepen the space to the required depth, but remember that the depth must be at least 8 cm.
Tip! When this stage of the site arrangement is completed, we recommend laying geotextile material on the bottom. Thus, you will avoid contact between soil and gravel. Do not forget about climatic features and rainy weather.
After the site preparation is completed, it must be backfilled with fine gravel. Try to choose the right combination of stone color and gravel area to be filled.
If you don't want to use gravel, it can be any other material.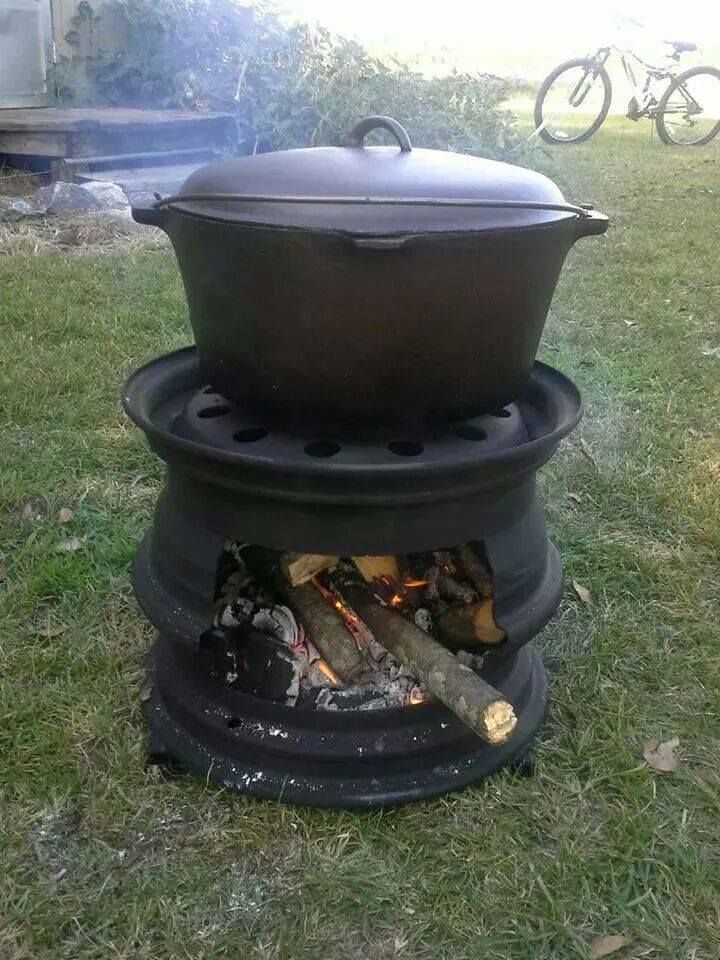 For example: garden tiles, small river stones, paving stones, etc. Gravel stone is one of the budget options for arranging a fire pit and can be replaced at any time with a more suitable one.
Fire place, hearth in the country house (photo)
So, when all the work on the construction of the campfire site and the surrounding area is ready, you can invite friends and have a party. Before that, do not forget to stack firewood next to the hearth so that they do not have to be carried from the back of the site.
If you want the fireside to look cozier, plant suitable plants and shrubs around it. Red, orange and yellow colors will look great.
As you can see from the photo, the stones left from the construction found their use and a small path was laid out with them. Now you can comfortably sit by the fire and spend unforgettable evenings to the sound of firewood crackling in the hearth.
In any case, in the countryside in the warm season there will be some garbage that needs to be burned, or it will simply be unnecessary things.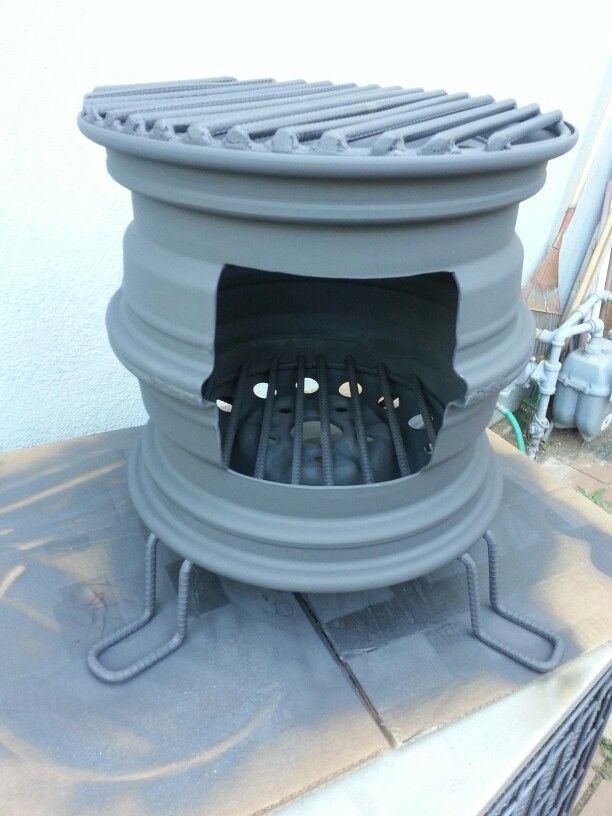 And here it becomes important how to equip a place for a fire in the country so that the wind cannot blow sparks, which can cause a fire.
This issue is most relevant in the area where wooden buildings prevail (even if not at home, but utility rooms), where open fire is a particular danger in windy weather. Making a protective structure in this case is not very difficult - we will talk about it below and show you a video in this article.
The word "bonfire" in most cases means a place for a fire in the country or in another place, made specifically for this purpose, or left after the combustion of fuel.
Also, this word can mean a large fire.
An open fire in a suburban area, as a rule, is bred for three reasons:
Of course, safety will come first and it does not matter at all whether there are country houses made of block containers, brick or wood around - there will always be a material that poses a fire hazard.
Of course, if you are barbecued, you will use only wood as fuel, and it is also more likely that you will use wood for the aesthetic enjoyment of fire. But when burning garbage, different materials can get there.
Therefore, you should make sure that explosive objects, such as spray cans and aerosols, do not get into the fire - the instruction warns of their explosiveness. You should also avoid burning rubber and plastic (bottles, bowls, toys, and so on) - rubber will smoke, settling soot flakes in neighbors' areas, and polymers emit toxins when burned.
For hearths, the round shape is most commonly used, but this is by no means a basic requirement - it can also be:
The main thing is that its cross section in the narrowest place where the firewood will burn is at least 40 cm. For a circle, a diameter of 80-100 cm is usually dispensed, although this is not something mandatory.
The recessed hearth that you see in the photo above is very similar in technological design - similar materials are used there, and the cross section of the fireplace itself does not differ from the above-ground version. The main difference is the aesthetic perception of the object and personal preferences.
For arranging a buried fire pit:
The hearth for a fire in the country is rightfully considered one of the most important accessories of the yard. Most owners of land allotments simply cannot imagine life without evening gatherings by an open fire, when all things are over, peace and grace reign on the street. A competently and thoughtfully designed open hearth is a practical multifunctional structure that can last for decades. Today, making a hearth in the garden, people pursue not only utilitarian goals. Country allotment is used to relax from the hustle and bustle of the city. The dacha hearth in such cases becomes a spectacular element of landscape design. Using modern technologies and non-standard solutions, hearths for cauldrons, barbecues and skewers can be made on the lawn, veranda and even in a closed gazebo. Consider how to make a hearth in the country with your own hands so that it is beautiful and safe.
When planning a building, keep in mind that an open hearth is a serious fire hazard. The fire can spread throughout the area. Based on this, the choice of the location and design of the fireplace on the street must be approached very responsibly.

To make camping by the fire even more pleasant and comfortable, it is advisable to arrange a platform around the fireplace.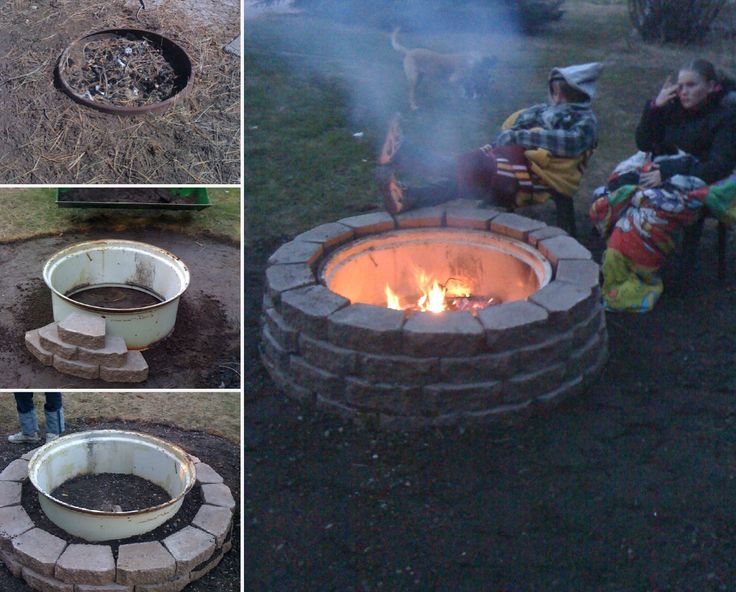 It will not be superfluous to carry out paving with tiles or stone, install comfortable furniture and a canopy.
Having decided on the construction site, you should choose the type of fireplace. According to the location relative to the ground level, the foci are divided into surface and deep. Each of these design solutions has its pros and cons.
Thus, surface bonfires do not require excavation of a foundation pit, they are not threatened by flooding with storm waters. This type of hearth can even be placed on the terrace, after taking measures to protect its floor from sparks. A barbecue hearth rising above the ground can be beautifully and interestingly arranged, making it the highlight of the courtyard landscape.
A recessed hearth is good because it does not need to be designed and adapted to the design style of the site. The only difficulty will arise with the provision of air supply for the fire. This problem can be solved by arranging an underground duct or by manipulating the laying of logs.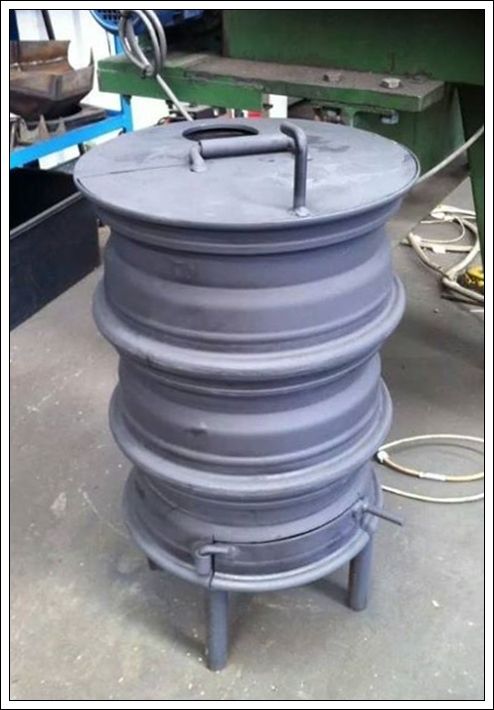
Let's dwell on some ideas with which you can build an original and practical hearth with your own hands.
It is advisable to use natural materials or their imitation for arranging a summer cottage. The brilliance of glass and steel is appropriate only in the office and city apartment. A hearth made of stone will organically look in any environment, without standing out against the background of greenery or snow-covered land. For work, you need to use only a special stone that is resistant to high temperatures. An ordinary cobblestone will immediately crack from the heat already at the first firebox. The choice is to stop on granite. It is better to purchase already chopped stones with which roads are laid.
The following tools and materials are required for work:
Making a stone fire is carried out in the following sequence:
Finished fire pit can be finished with stone tiles cut into straight or curved strips. This will not only decorate the hearth for the cauldron, but also expand its functionality. It will be possible to put mugs and plates on the shelf. Their contents will remain warm for a long time even in the winter cold.
Stone fireplace does not require any maintenance. After the first furnace, the clay hardens and crystallizes. She will no longer be afraid of moisture. Any, even the most stable dirt is easily washed off from granite. In order for the hearth to shine with cleanliness, it is enough to sometimes treat it with soapy water.
It must be noted right away that only fireclay (refractory) bricks should be used to create a firebox.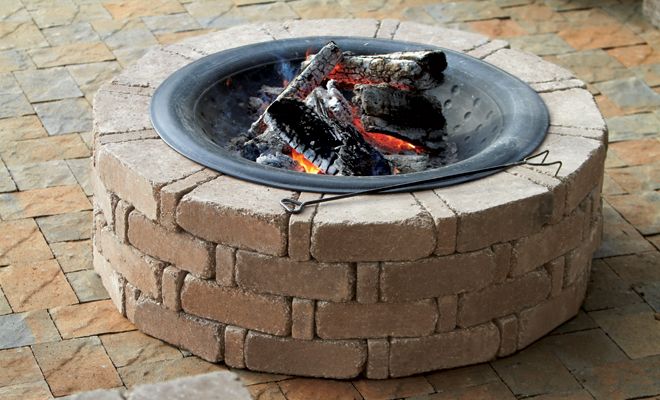 The usual material left after the construction of the house will withstand no more than one season. Under the influence of heat, a standard brick cracks, in autumn water enters the cracks, and in winter the masonry collapses from expansion in the ice grooves.
In order to build a brick fire pit for a cauldron, you will need:
A brick hearth is erected in the following sequence:
 If there are problems with its delivery, then you can cast the slab yourself using rebar, sand, crushed stone and cement.
 To give the brick hearth more strength, you can lay out stones around the perimeter of a pre-welded metal frame.
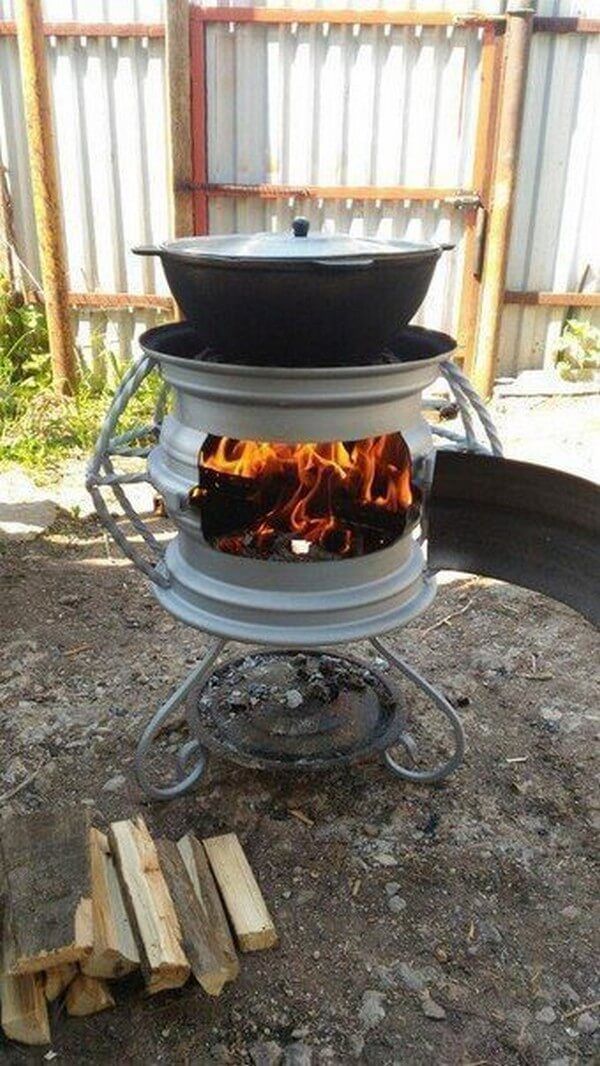
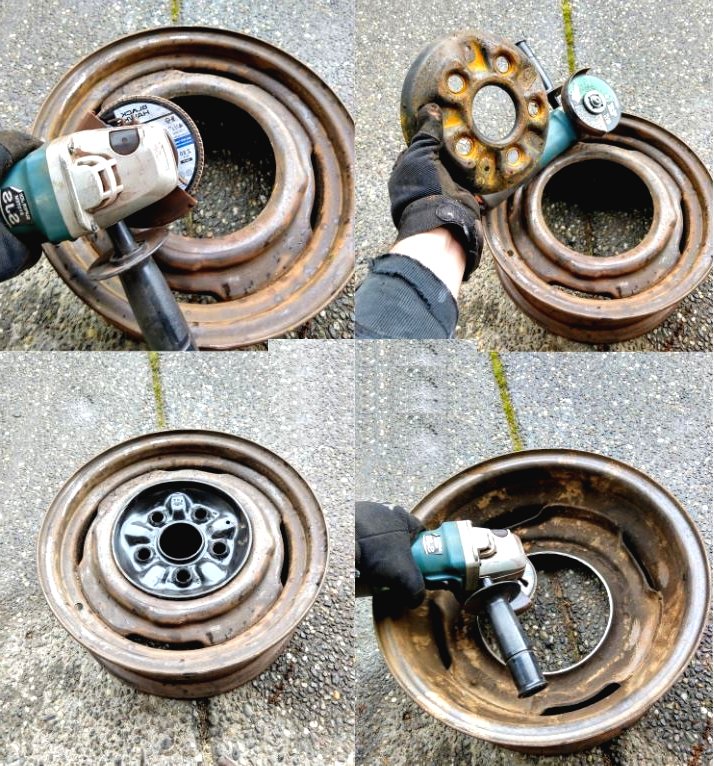
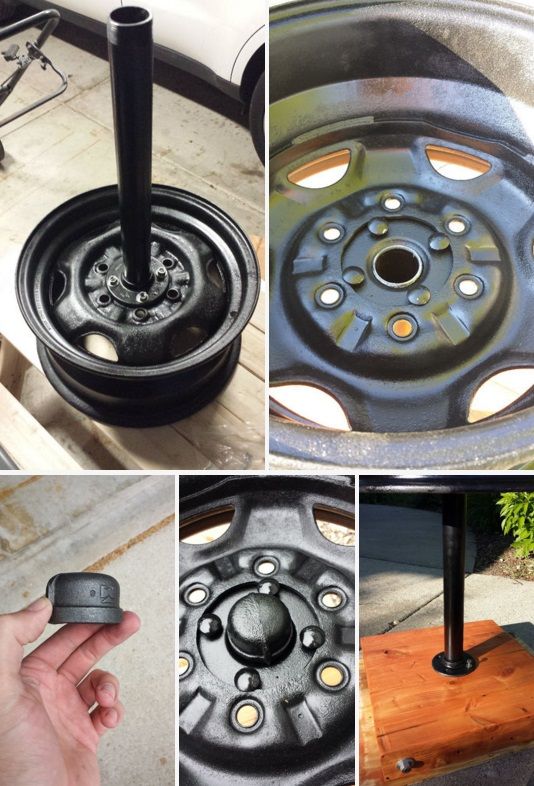
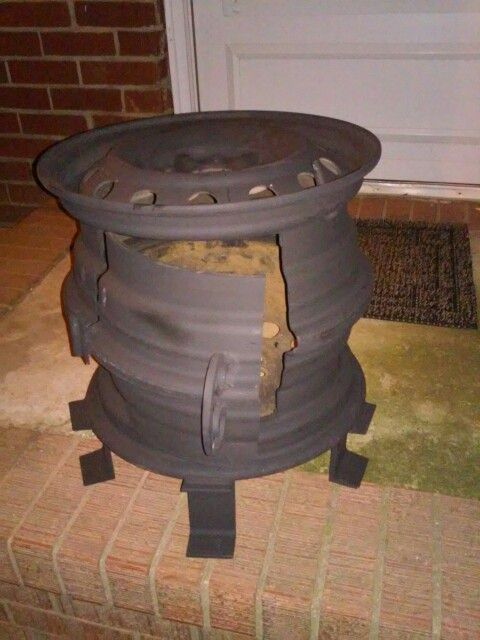
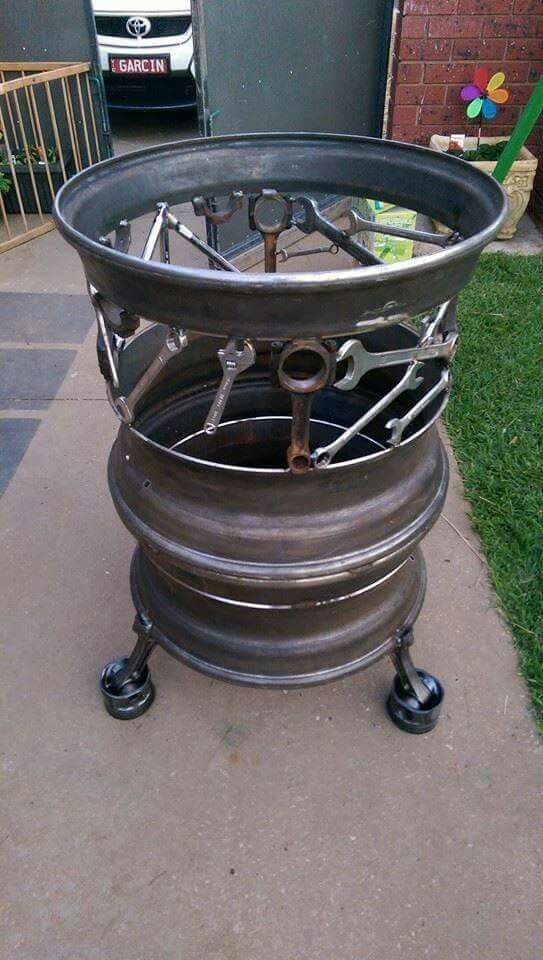
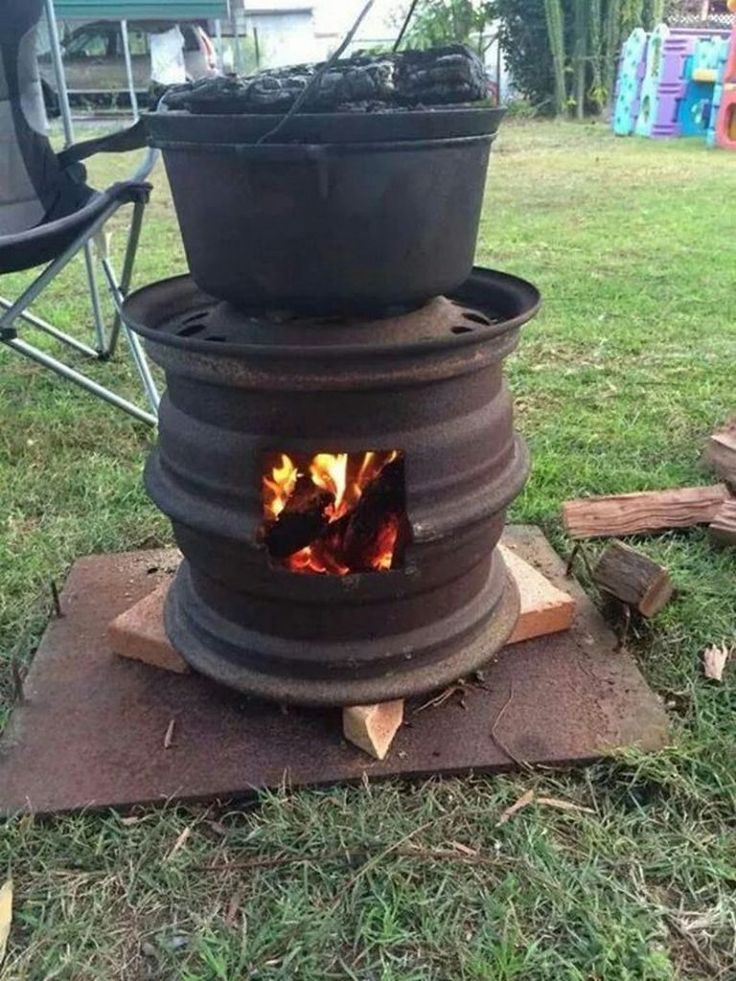
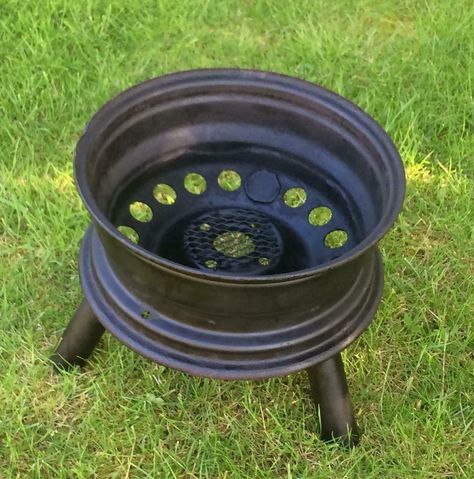
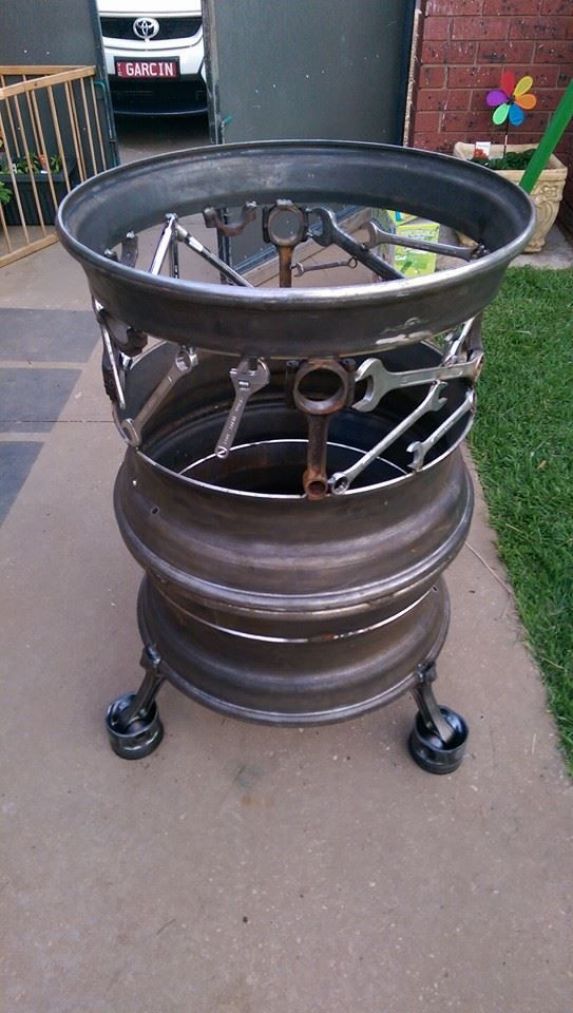
Every household always has a lot of improvised materials that can be used in the improvement of a summer cottage. The solution that lies on the surface is the construction of fire pits from discs of various origins. An excellent option is to use a rim from the wheels of heavy vehicles. These products are made of thick steel, which is resistant to mechanical and thermal stress.
Another interesting solution is a fireplace made from a washing machine drum. But its adoption must be treated quite carefully. The steel in the drum is very thin, it will quickly burn out from exposure to an open flame. The drum can only be used as a template for laying heat-resistant material.
To make a hearth out of a disk, you need the following:
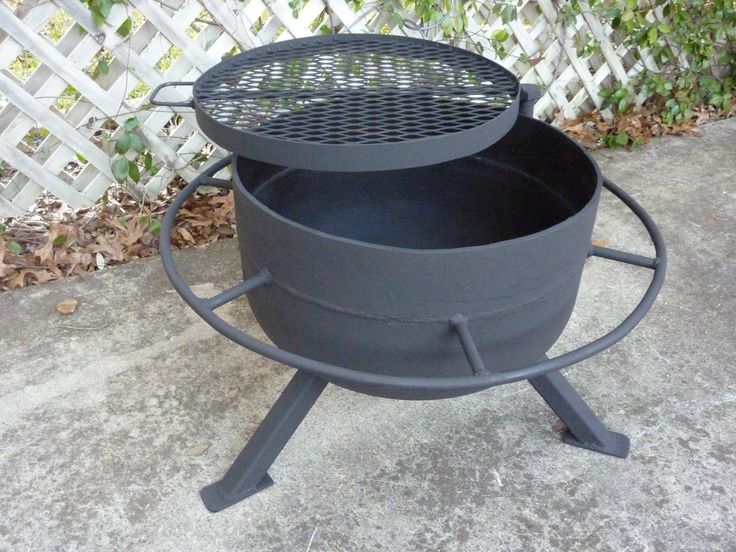
Steel rings are highly resistant to external pressure. Of these, it is advisable to make foci of a buried type. Iron is perfectly cleaned of soot and grime, and has been exposed to dampness for decades without visible damage.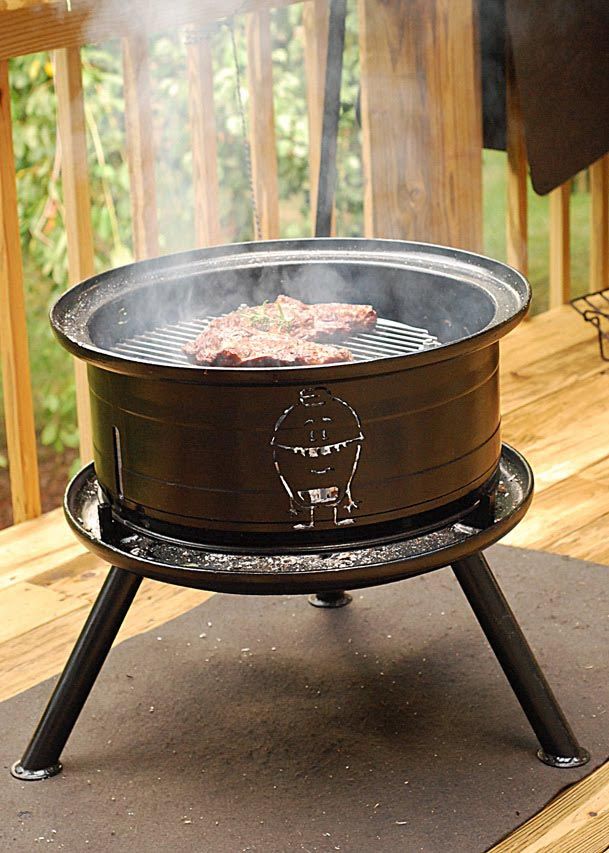
Construction of fire pits from steel rings is carried out in the following sequence:
The final step is to create a ledge along the top edge of the masonry. It will not only make the laying more convenient, but also hide the internal steel walls.
It is impossible to imagine a cozy house outside the city without barbecues or confidential gatherings with friends and relatives near a live fire. This is both relaxation and a kind of unity with nature. It is difficult to build a fireplace inside the premises, but it is not so difficult to arrange a hearth for a fire in the country house outside. It is enough to have primary skills in construction to make it not only convenient in practice, but also beautiful.
Having not managed to purchase a plot for a country house or just having built it, the happy owners are thinking about where to arrange a fire pit in the country so that it would be beautiful, with a conveniently equipped recreation area around, and at the same time comply with the rules of the fire department security.
The dacha is actually the heart of the house, where in the evening people gather to admire the sparks of fire and sing songs with a glass of wine, and in the daytime they grill kebabs and insist on delicious tea, so you need to choose a place for it very carefully, especially since it will be redone later difficult.
You can make a fireplace in the countryside either by plunging it deep into the ground, which is a more difficult option both in terms of finishing and providing oxygen supply, or by creating an above-ground structure. There are a lot of options, but first of all you need to make sure that the trees and the house, as well as any buildings, are at least 4-5 meters from the outer boundaries of the hearth.
You can not place it on a hill or below the level of the garden and the house, it is best to choose a site in the middle of the site or be guided by the rule of the golden section - two thirds from the main entrance. You also need to consider which side of the site the wind most often blows, and how close to the fire the furniture will be for relaxation. It is best to put it in 70-90 cm from the outer circle of the focus. Materials needed:
It is better to immediately clean up the area: uproot the roots of trees, remove large bushes, stones, level the surface. Having decided on the place, you need to draw the contours of the future bonfire. Usually it is made about a meter in diameter and the top layer of turf is removed from the site, so that later masonry or tile can be laid there without any problems for beauty and safety.
Summerhouse Tricks: Helpful Tips for DIY
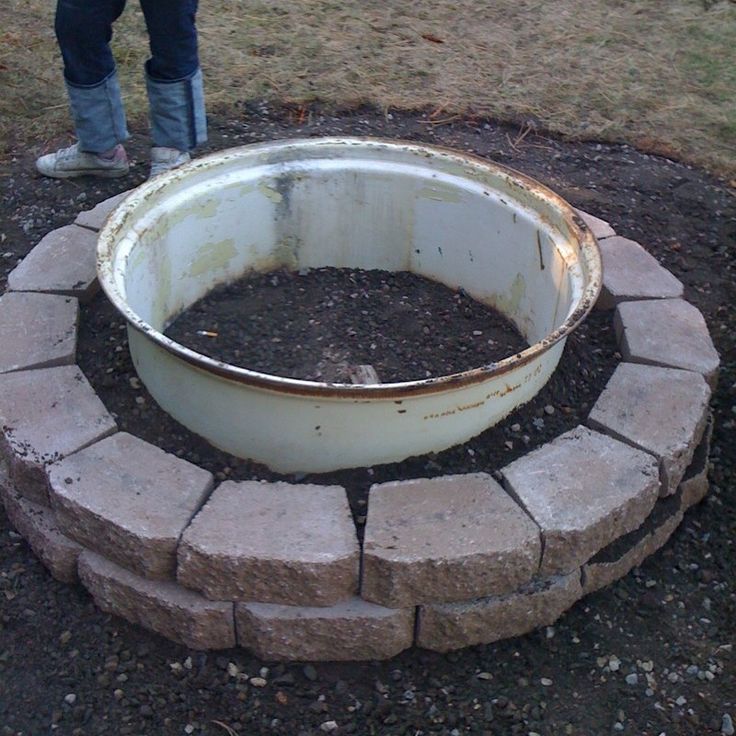
An old metal rim from a tractor or a large aluminum basin with high sides, from which the bottom must be cut, will serve as a frame. Cast concrete blocks or flat stones with a thickness of at least 15 cm are laid out along its outer line, in four blocks. To fix the upper row of masonry, a special mortar with refractory components is used, and cement is used to fill the gaps between the bricks. You can also use special glue for the fireplace. The most commonly used materials are:
If natural stones are used, with the exception of shell rock and limestone, clay mortar is also acceptable. Homemade bricks work well. A metal or steel base will protect them from overheating. Fine-grained gravel is poured to the bottom for drainage. Thus, the depth for the fire pit is 30-40 cm, and the gravel will take at least 15 cm. The last layer of masonry can be made from decoratively decorated stones to create a unique stylized exterior object.
The shape is most often chosen round, it is most convenient, and in order not to get a small pond instead of an open hearth in the country after heavy rains, it is worth building a metal cover. If you make it to order, an interesting shape with stylized ornaments or decorations, then this will add beauty to the design.
There are many options for creating different types of fire in the country with your own hands. It doesn't have to be round.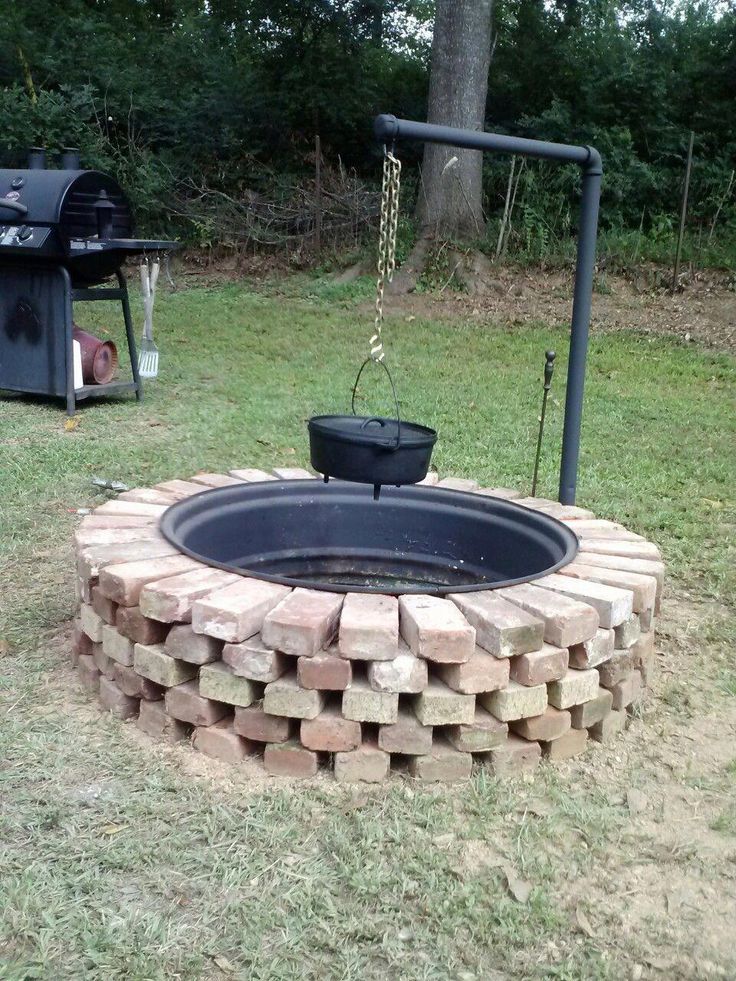 It will be even easier for beginners to create a square outline, ordinary concrete blocks and special glue are suitable for this. You can use concrete pouring or get by with gravel, but in any case, everything will work out. So the shape and appearance is a matter of personal taste and choice:
The use of shrubs in garden planning
Any carefully designed fire pit can be ordered with a stone top that frames it around the perimeter. On such a fire table, you can put plates with food and cups of coffee and tea, providing constant heating, besides, it's just beautiful and convenient. You can also order beautiful forged hemispheres for the top decoration of the fire. Cups or spheres with carved drawings are popular: the globe, the ocean with dolphins, or the forest with wild animals. Illuminated by tongues of fire, they look like holograms or animated paintings.
It is very important not only to create a hearth, but also to design the area around it, arranging everything nice and cozy.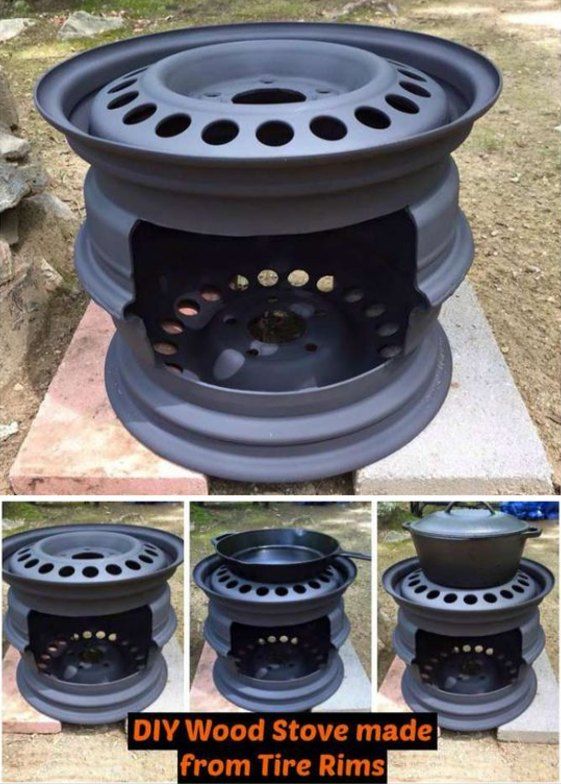 Of course, it's easiest to just fill it with concrete or fill it with gravel for fire safety reasons, but you should get more creative and decorate the fire pit as follows:
Campfire in the country is a special pleasure that is not available to us in a city apartment. Having made an outdoor hearth with your own hands, you can enjoy the play of fire more often, cook something tasty on the grate by the hearth, or just soak up the warmth on cold evenings.
In order for the fire to look harmonious in the garden, it is better to arrange a permanent place for it, which would provide for proper fire regulations and provide comfort.
And, although the outdoor hearth in the photo may look absolutely luxurious, its construction does not require a significant investment of time or materials.
You may well choose for yourself an option that you can implement in a couple of days off.
In order to make an outdoor hearth with natural stone trim, first mark out the hearth kennels and pour a small concrete cushion under the masonry.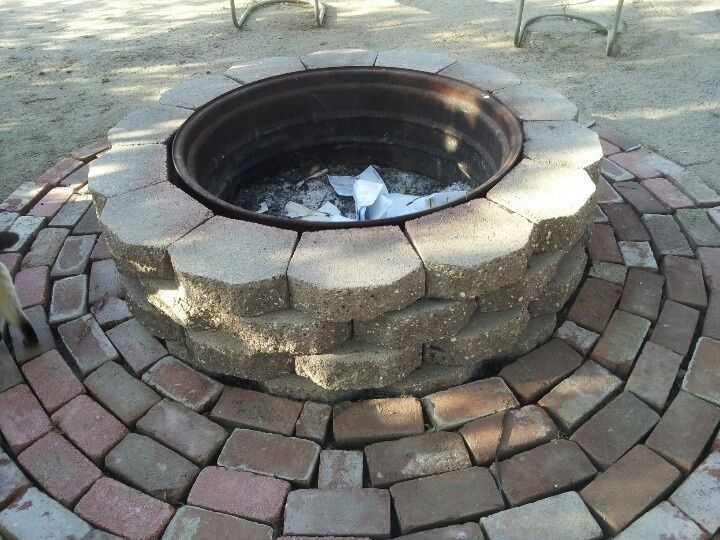
Masonry will consist of two layers. The inner layer is brick and the outer layer is made of natural stone.
The top of the hearth can also be finished with stone.
In order to use the fireplace as a brazier, provide a grate for it in accordance with the size of the hearth.
Such a beautiful place for a fire can be placed on the terrace in front of the house, where you can spend really unforgettable evenings in the country.
In fact, the simplest outdoor hearth can be built from ordinary concrete blocks.
In order to protect the soil from fire as much as possible and to make it easier to clean the hearth, it is better to place concrete blocks on a brick platform.
If the top of such a hearth is decorated with natural stone, it will look quite respectable.
By placing the fire pit next to the summer kitchen and gazebo, you will have another wonderful seating area in the garden.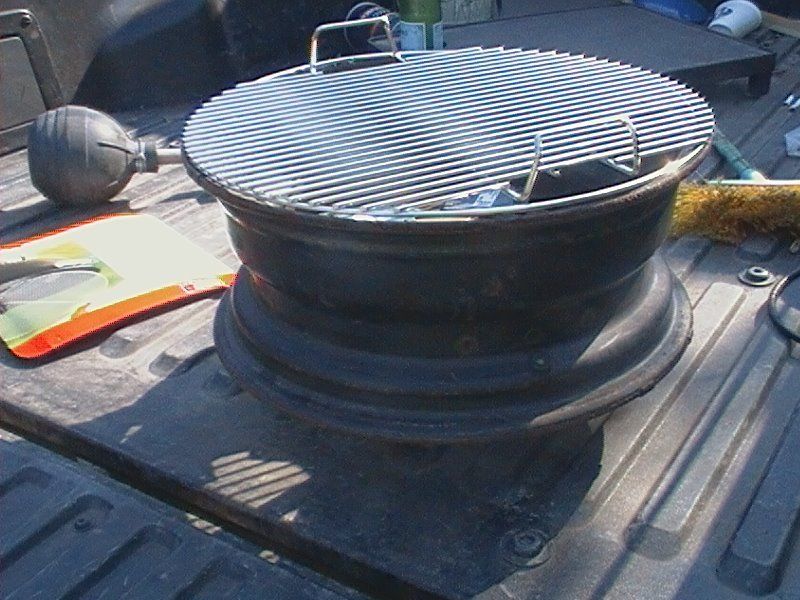
Concrete blocks are produced not only in the form of rectangles - semi-circular concrete curbs are usually used to protect trees.
These concrete blocks are perfect for creating a small outdoor hearth.
If you can't find semi-circular blocks, pay attention to paving slabs. It turns out that using it as bricks, you can also make a fire pit for a summer residence.
For those who are not in favor of excessive creativity, it is easiest to use bricks to create a hearth.
We lay out the required size of the fireplace from bricks, mark the contours and dig a hole to the height of the brick. We cover the contours of the hearth, pouring gravel to the bottom. Tip: if the walls at the pit are made slightly tilted outward, then the structure will turn out to be more stable.
Having minimally decorated the upper part of the hearth, you will get a cozy and beautiful fireplace in the country.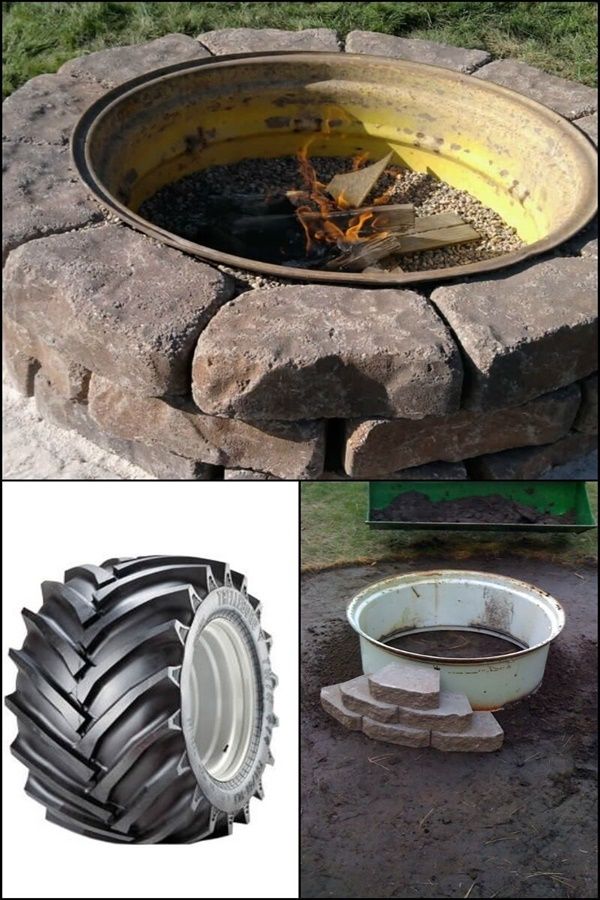 You can put a metal tripod in the hearth and cook kulesh. For meat lovers, you can install a simple spit and cook the whole bird on a spit.
To fit the fireplace into the overall design of the garden, you can make a special platform for it.
Such a place for a fire will be more cozy and comfortable. the stone border can be used as a bench, and the smooth shape of the platform will add an elegant touch to the landscaping of the entire garden.
For those who like to use improvised materials, there are also beautiful options for an outdoor hearth.
For example, you can make such a beautiful hearth out of an old basin and the remains of stone and metal.
In fact, any solid metal will do for the inside of the hearth.
This metal can be a tank from a washing machine.
It is enough to weld the legs to it for its functioning.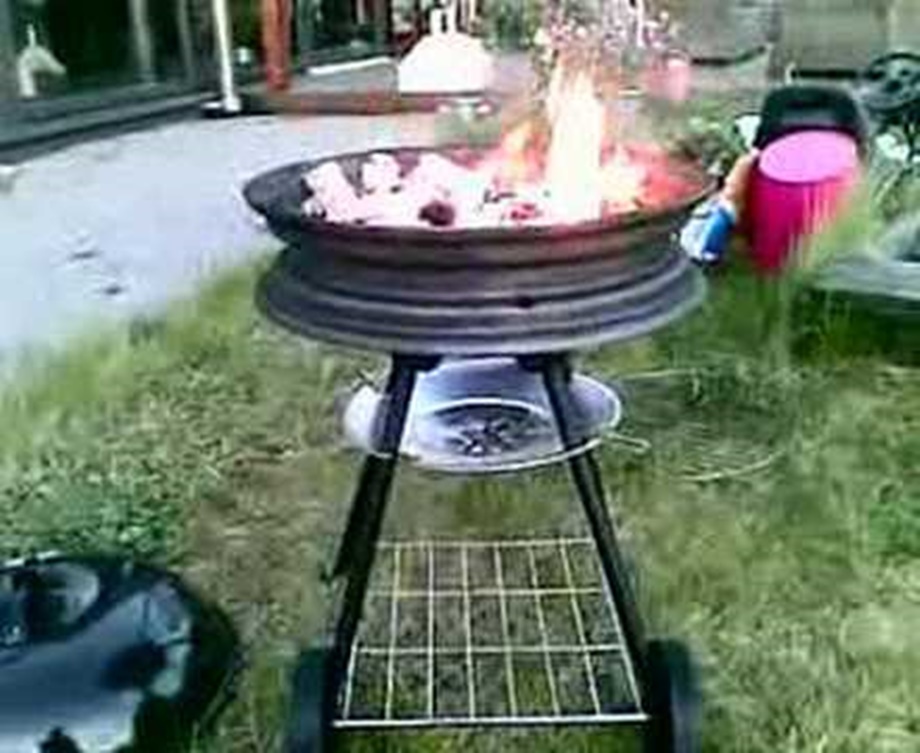
And you can add a minimum brickwork. A little work, but a noticeable difference.
Sometimes a fire pit is placed in a recess on the site - this technique is used for a windy or noisy area, this creates a calmer and quieter atmosphere around the fire.
It is not necessary to use the remains of household appliances for the fire bowl.
You can simply buy a sheet of galvanized metal and weld a simple structure for the hearth out of it.
The only disadvantage of this design is that its walls are seriously heated and it is necessary to isolate the hearth from flammable surfaces.
Therefore, it is better to cover the metal hearth with bricks or decorative stone from the outside.
A disk from a tractor wheel was taken as the basis for this hearth.
For an outdoor fireplace made of concrete, it is necessary to make a formwork in accordance with the dimensions of the fireplace you have chosen. For structural strength, additionally put metal reinforcement in the formwork.
After the concrete has set, remove the formwork and clean the outside of the hearth.
Pour fine gravel inside the hearth, place a metal fire pit and add pebbles or coarser gravel on top.
Concrete hearth can be decorated with stone or simply left as it is for a more modern and laconic look.
It is convenient to place the outdoor hearth in an open gazebo - such a place can become the center of attraction for all country life.
If you are not a big fan of campfire evenings and open fire meals, then a small mobile fire bowl is more suitable for you.
It, like the hearth, can be used both for decorative purposes and for cooking on a grill or tripod.
Round or square, stone or concrete blocks, no matter what style you choose, there's always an outdoor hearth to suit your dacha.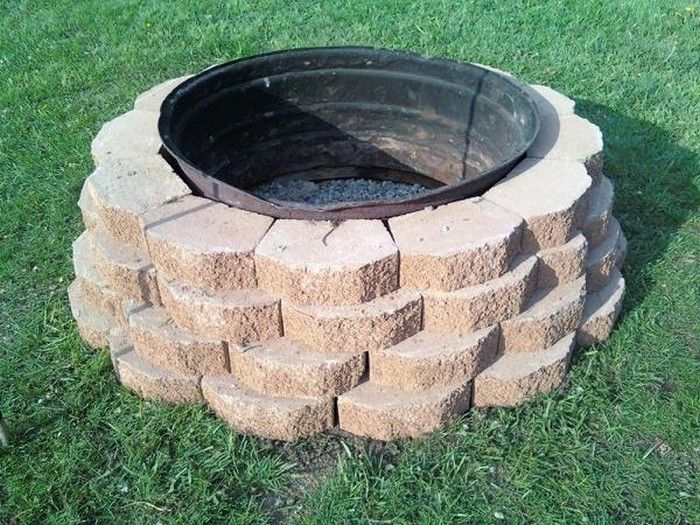
Small or large, nearly every one of these fireplaces is a budget option that can add a touch of true luxury to your garden!
In any case, in the countryside in the warm season there will be some garbage that needs to be burned, or it will simply be unnecessary things. And here it becomes important how to equip a place for a fire in the country so that the wind cannot blow sparks, which can cause a fire.
This issue is most relevant in the area where wooden buildings prevail (even if not at home, but utility rooms), where open fire is a particular danger in windy weather. Making a protective structure in this case is not very difficult - we will talk about it below and show you a video in this article.
This is how you can arrange a fire pit in the country with your own hands
The word "bonfire" in most cases means a place for a fire in the country or in another place, made specifically for this purpose, or left after the combustion of fuel.
Also, this word can mean a large fire.
Firepit for barbecue
An open fire in a suburban area is usually made for three reasons:
Of course, safety will come first and it does not matter at all whether there are country houses made of block containers, brick or wood around - there will always be a material that poses a fire hazard.
Of course, if you are barbecued, you will use only wood as fuel, and it is also more likely that you will use wood for the aesthetic enjoyment of fire. But when burning garbage, different materials can get there.
Therefore, you should make sure that explosive objects, such as spray cans and aerosols, do not get into the fire - the instruction warns of their explosiveness.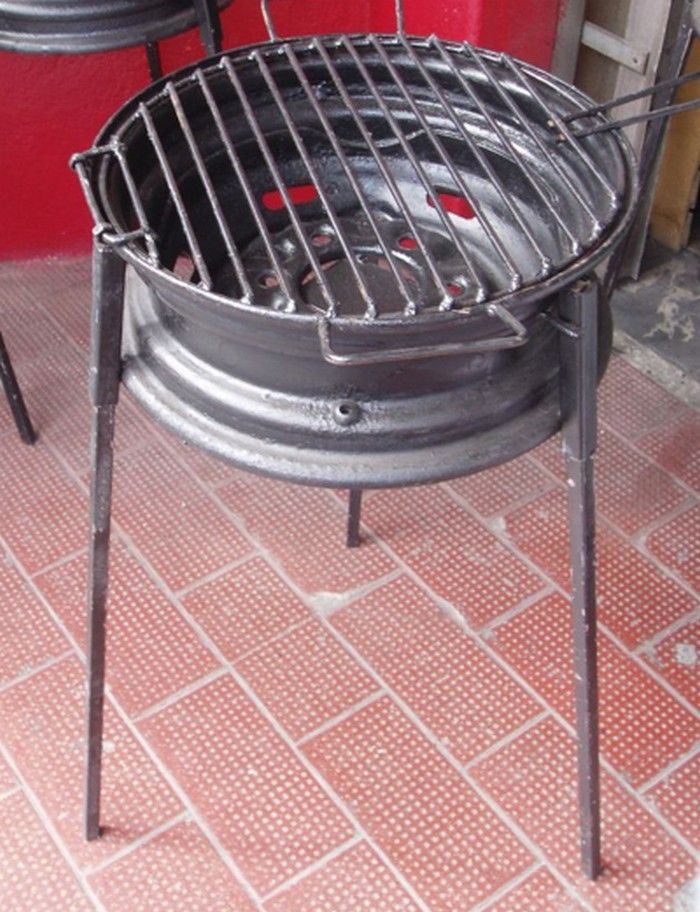 You should also avoid burning rubber and plastic (bottles, bowls, toys, and so on) - rubber will smoke, settling soot flakes in neighbors' areas, and polymers emit toxins when burned.
Open hearth above ground
Place of rest
For the arrangement of such suburban areas, a round shape is most often used, but this is by no means the main requirement - it can also be:
The main thing is that its cross section in the narrowest place where the firewood will burn is at least 40 cm.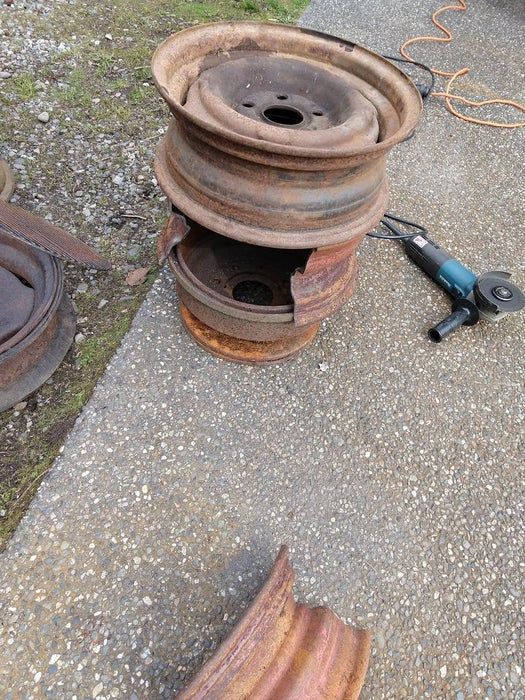 For a circle, a diameter of 80-100 cm is usually dispensed, although this is not something mandatory.
Fashionable hearth

Buried hearth
The recessed hearth that you see in the photo above is very similar in technological design - similar materials are used there, and the cross section of the fireplace itself does not differ from the above-ground version. The main difference is the aesthetic perception of the object and personal preferences.
Buried hearth in section
For setting up a buried fire pit:
Steel barrel grill
The easiest way to make a campfire in the country is to use an old steel barrel.