Published: · Modified: by Allison · This post may contain affiliate links · This blog generates income via ads
So, it’s that time of the year when every nook and cranny is covered with snow, to create a path for yourself, you need a snowplow, in this article I have compiled a list of 20 homemade snow plow projects completed by various persons.
Here you will find homemade snow plow plans for SUVs, tractors, bicycles, and more. At the end of this guide, your snowplow needs would most likely be met.
Click for more details
If you have a tractor I would highly recommend making this homemade snow plow. The plow is wide enough to get a good amount of snow out of the way. In this DIY guide, you will learn how to make this low-budget snowplow, it is way cheaper than spending 500 dollars on a snowplow. For the making process, you are going to need wood, a rod, and a couple of other tools.
Click for more details
While doing my research, I found yet another amazing homemade snow plow, the making process involves the use of welding tools. This snow is made of metal, the making process will require you to build the blade frame and thereafter attach the plate. This homemade snow plow can be used for years without getting bad.
Click for more details
Here’s another snowplow I found, this one is ideal for a 4-wheel drive car. In this DIY tutorial, you will learn how to make a homemade snow plow and attach it to your 4-wheel drive car. Although this tutorial doesn’t go in-depth in explaining the process of putting this plow together, if you are a handyman, you would not have a hard time understanding the instructions.
Click for more details
I found this cute idea and thought I’d share it. It is a great hack for people that live in areas where the snow is unbearable.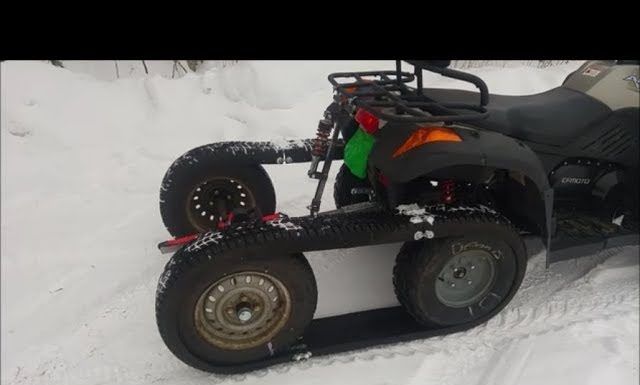 With this plow, you can walk with your heels or shoes and create a path for yourself. After reading this DIY guide, you should be able to make a toe plow for your shoes. The making process is quite easy to understand.
Click for more details
Here’s another homemade wooden snow plow I was able to find in the course of my research. With this wooden snowplow, you will be plowing backward, so you will need a vehicle with a Class III back hitch. The vehicle also needs to have a backup camera. This tutorial would not require using a pickup truck.
Click for more details
This guide is for people who own tractors and are looking for tips on how to have a homemade snow plow. The tips in the guide will show you all you need to know to have a homemade snow plow, from mounting the blade to tightening the parts.
Click for more details
I love the build of this DIY snow plow, the plow is built narrowly to save weight and keep it from taking up a lot of snow when lifted.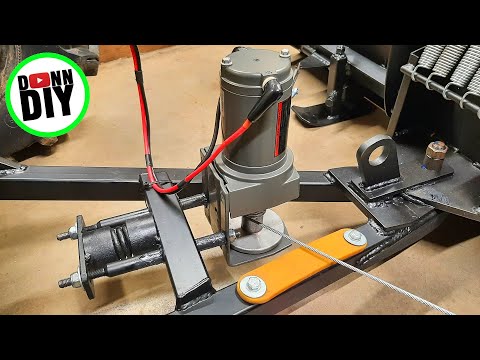 This guide is ideal for people who are looking at building a snow plow for their tractor. This is one that would cost less than $10 to build. If you are a handyman, building this shouldn’t be a difficult task.
Click for more details
This is ideal for people who have amazingly outstanding reverse driving skills. You should make this homemade snow plow if your reverse driving isn’t up to par. For the making, you will need an old bench press, roof sheets, old planks, and a few other materials.
Click for more details
I found this ideal to be pretty fantastic. You do not need to have a tractor or car to make a homemade snow plow. This guide will show you how to make a homemade snow plow using a bicycle and a few other materials. The making process will take a while to complete but it will be worth it in the end.
Click for more details
While doing my research, I also stumbled upon this remote-controlled snowplow.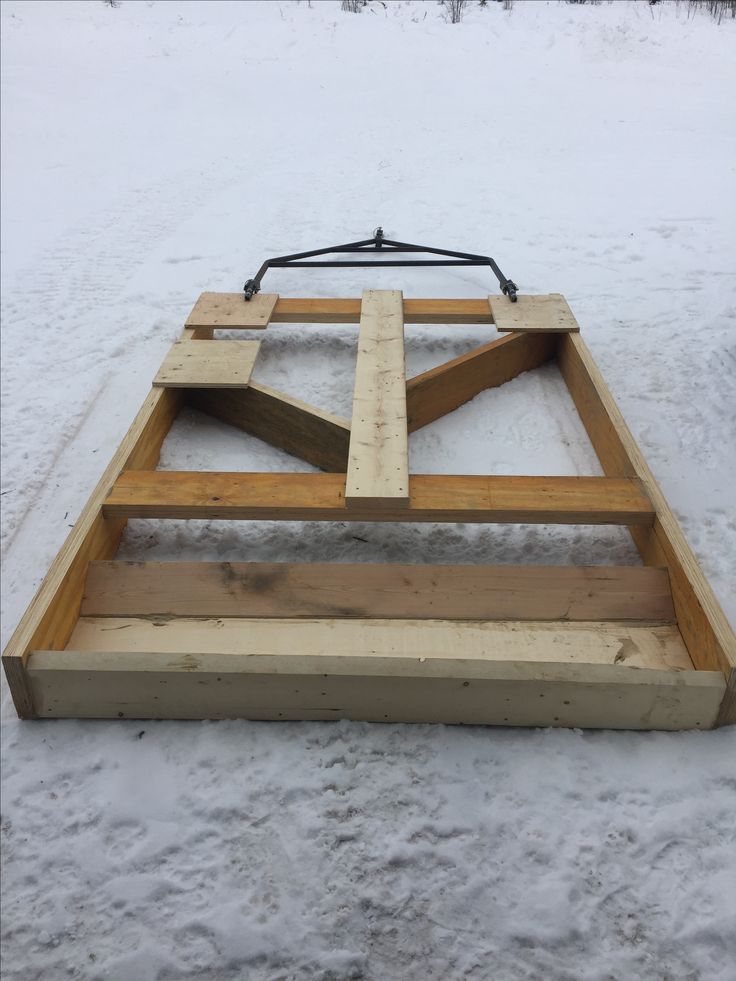 The cost of making this mini snow plow is about $389. This is ideal for people who do not want to go through the stress of using a shovel to clear the sidewalk. The making process is not so easy, it is time consuming but will most definitely be worth it in the end.
Do you have a Toyota corolla 4x4? Then this guide is for you. Here, you will see how the creator was able to build a wooden snow plow on his Toyota Corolla. This is one strong snowplow, however, the process will require you to take off the bumper of your car.
Here the creator was able to make a $12 homemade snow plow for his lawnmower using wood. Unfortunately, he doesn’t show the whole making process, however, if you are into woodworking, you’ll get the hang of how he was able to make this low-budget homemade snow plow using wood.
Source: laughingsquid.com
You can create this idea from items that are probably in your home right now. I know this homemade snow plow looks funny, but it works. For the making process, you will need to get an old LED TV case, and then attach it to the front of your tractor. It works like magic. This idea is ideal for people who are looking for a cost-saving snowplow.
Source: 9gag.com
Another thing you can do is to attach wood to your bicycle as seen in the image above. If you are into woodworking, making this shouldn’t be a difficult task to accomplish. It might not get as much snow out of the way as an ATV would but it works, however.
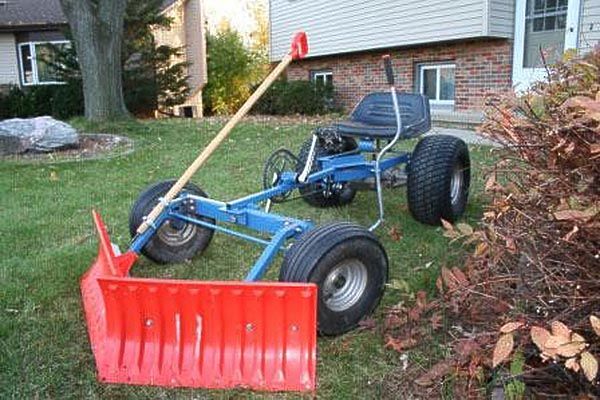
One unique feature that I love about this snowplow is that it can be rotated left/right.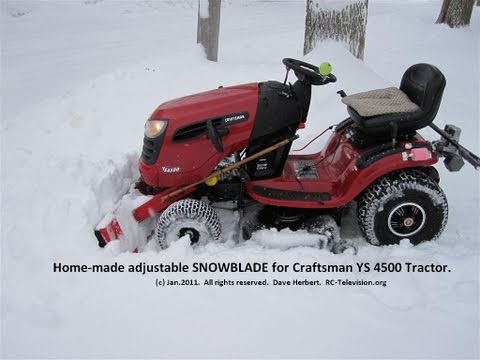 The snowplow is made of metal. In this DIY guide, the creator takes time to explain how he was able to put this snowplow together. It might take a while to complete, but it will be worth it in the end. You shouldn’t have a hard time making this if your handyman skills are top-notch snow plow Homemade Snowplow
Source: carthrottle.com
While this isn’t the best homemade snow plow in the world, it still gets the job done. If you are not planning on ripping apart the bumper of your car, you can consider this homemade snow plow idea. Somehow the creator was able to use a board and some rope to piece this together. I think this is a pretty cool idea.
Source: pinterest.com
This is a homemade snow plow made from a TPO roofing membrane and some wood. I love how the creator used the roofing membrane to cover up the wood. This is a great idea for those looking at having a “one of a kind” snowplow.
Save yourself from the trouble of building a snow plow from the scratch by getting one of these for your snow plowing needs. This machine is easy to use and also quite affordable if you ask me. I recommend this for people who have zero skill in crafting stuff.
Check Current Price on Amazon
If the previous snow thrower seems a bit too expensive for you, here’s one that would fit your budget. This is a snowplow that would require effort from you, it is not a machine, it is like a shovel that can be used to get snow out of the way.
Check Current Price on Amazon
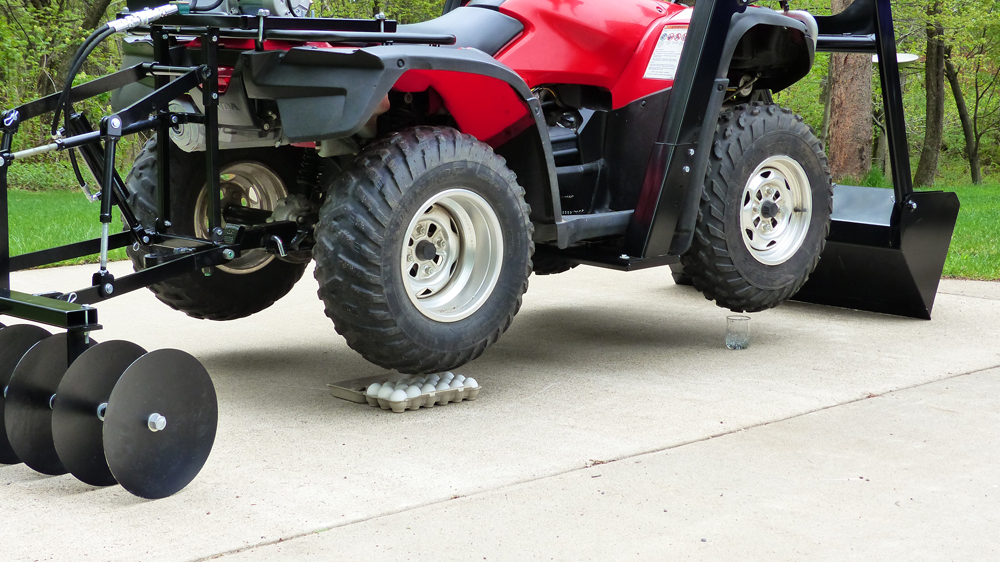
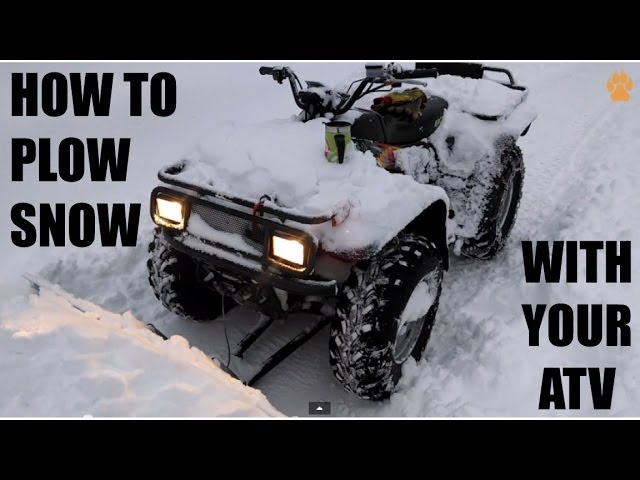
No, you are not buying the complete ATV, what you will be buying is the plow blade attached to the front of this ATV. I decided to include this for people who want to attach a plow to their ATV but do not know how to build one from scratch. This standard ATV plow is quite affordable. The blade comes in three different sizes. Make your pick!
Check Current Price on Amazon
by Steve Smith
Small All Terrain Vehicle on a beach 2 image by Sergey Sukhorukov from Fotolia.com
Building your own ATV snowplow involves getting the right tools, steel and welding equipment. You'll need to choose a design and style that is right for your needs. Do you want a curved blade that throws snow to one side, or one that throws snow to both sides? You'll also need to buy a raising mechanism and mounting attachment kit, because building one is very involved, and they aren't as expensive as the blade. If you build your own, you are likely to break a brace and give yourself several more wasted hours of repair on the attachment, plow blade and ATV.
Buy several sections of 4-by-4 inch 12-gauge steel that is at least 1/4 inch thick, or one section of 12-gauge steel that is the thickness of the plow blade. You can bend one thick section or bend and layer several sections. Either way, you need enough sheets to match the blade thickness you desire. Steel is sold in sheets at hardware stores, Home Depot and online at various outlets, and can be bought in small quantities.
Cut out the shape of the plow (accounting for the bend curve) from your steel sheet using a metal saw. Be precise on the bottom edge and top edge. A straight-curved blade will simply have a straight edge on the top and bottom, but a shaped blade that throws snow to the side will be much wider on one end.
Build a steel press. Use a large steel roller and the inside of an oil barrel, or anything else that is large enough to form the curve with your blade. Place the steel on the form and apply a heat source, then bend the steel around the form with a heavy iron weight or steel bars. You can also buy a steel press at a hardware supplier.
Cut bracing from your steel sheets for the back side of the plow. Trace the curve of the blade on the metal and cut them out using a metal saw. Then weld them to the back of the snowplow.
Weld on the attachments for your mounting system and lifting mechanism to the the back of the blade. You will have to consult your mounting mechanism diagrams to see what size and thickness these mounts need to be.
Prime your large blade with a solid, very rust-proof paint. Use several coats of primer until you're satisfied with the rust-proofing. Paint with a final coat of water- and rust-proof paint (usually in yellow, red or orange).
Cut a section from your iron sheet that is as long as the plow and about 4 inches wide. This will be the blade. Sharpen one edge slightly into a dull point. Lay this on the end of the snowplow and drill holes in both about 5 inches apart to prepare to rivet the two together.
Hot rivet the iron blade to the larger steel snowplow blade and let the rivets set.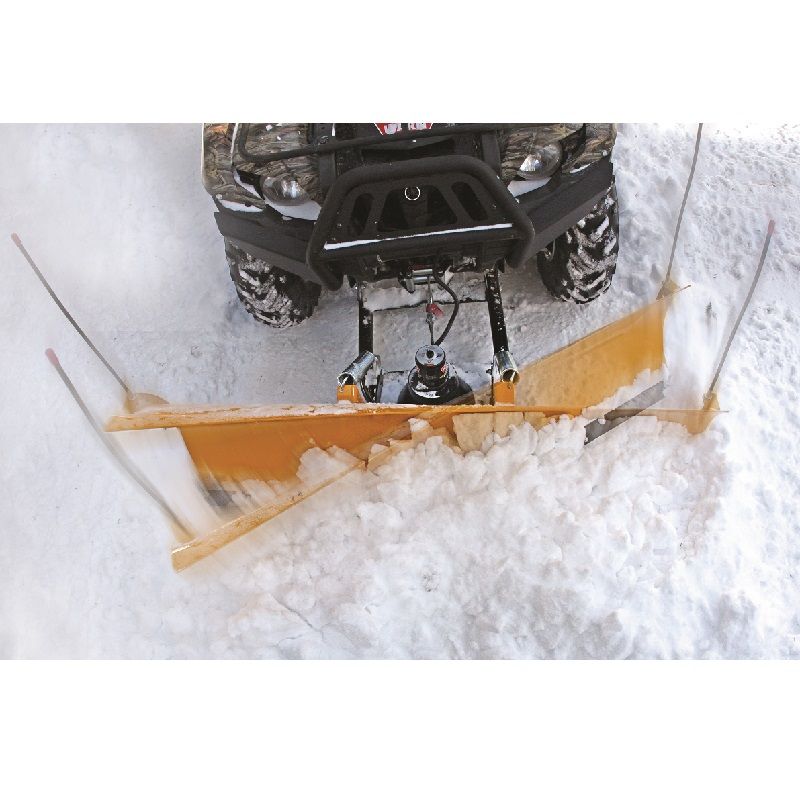 Your snowplow is now ready for use.
Tips
Things You'll Need
Writer Bio
Steve Smith has published articles on a wide range of topics including cars, travel, lifestyle, business, golf, weddings and careers. His articles, features and news stories have appeared in newspapers, consumer magazines and on various websites. Smith holds a Bachelor of Arts in English and journalism from University of New Hampshire Durham.
Removing snow with a shovel is a rather laborious process. To facilitate it, a homemade snow blower can come to the rescue. Having made it, you will not only free yourself from the hard work of clearing the snow, but also save a lot of money by not spending money on expensive models of units in the factory.
Contents
The main task of a snow blower is to capture and throw snow masses from the place of their accumulation, for example, from the sidewalk. Snow blowers made by craftsmen have a different design. But according to the type of snow capture, the models differ in screw and rotary.
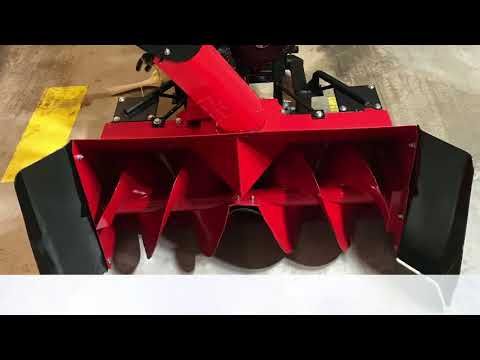
The main part of the snow plow unit is the auger, which resembles a meat grinder screw.
There are two types of screw units.
 Blades with a smooth edge are used for clearing fresh snow, and are often made from a conveyor belt. A toothed auger is used when it is required to remove icy and packed snow.
The rotary type snow blower is the simplest design and consists of a round volute body and guide vanes . In the upper part of the body there is a sleeve through which snow is thrown out.
Rotor with blades is installed in the central part of the volute. This impeller is driven by an engine (petrol or electric). The rotor, rotating at high speeds, captures the snow, crushes it in the body of the snail and throws it out through the sleeve.
Homemade snow throwers can be of two types.
Before you make a manual snow blower, you need to understand what type of engine is better to choose - electric or gasoline.
Electric units are quiet and very easy to maintain . They also do not require any consumables. The only inconvenience of electric devices is the electric cable that constantly interferes with movement. Of course, you can use the engine running from batteries, but the operating time of such a cleaner will be limited by the battery charge level. Therefore, if you are going to make an electric snow blower, be aware that it can only work within the yard, that is, the range of movement of the unit will be limited by the length of the power cable.
Petrol snow blowers are powerful and rather noisy units. They cope with thick snow covers, including icy ones. Gasoline devices have an advantage over electric ones, not only in terms of power, but also in mobility, since they do not depend on the electrical network. Due to this, the units can be used for cleaning snow drifts in large areas, for example, near private sector yards, in high-rise building yards, on sidewalks, on separate sections of the road, etc. But despite the listed advantages of gasoline devices, they also have disadvantages:
Based on the above, you can understand that if you need to clear the yard of a summer house or a small private property from drifts, then it is better to stop at the manufacture of an electric snow blower. If you intend to regularly clear large areas of snow, then a gasoline drive will cope with this task better than an electric one.
To make a snow blower with your own hands, you will need to choose an engine that will rotate either the auger or the rotor of the unit. If you are going to make an apparatus with an electric motor, then any asynchronous type electric motor with a power of at least 2 kW and a rotation speed of 1500 to 3000 rpm is suitable as a drive component. If you take an engine with less power, then it will not cope with thick layers of snow and will stop all the time. In this case, cleaning drifts with a shovel will be much more effective.
As a drive component, some craftsmen use motors from electric trimmers and chain saws.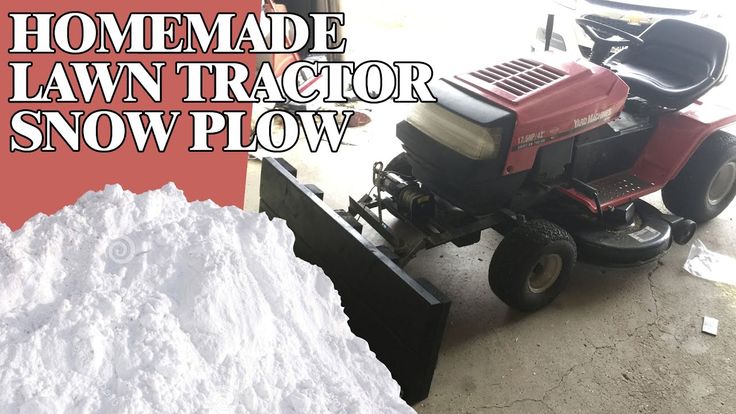 It is not uncommon to find homemade snow plows made from a lawn mower. But the power of these units is only enough for cleaning freshly fallen and loose snow.
A more powerful variant of the driving part for the snow thrower is the Internal Combustion Engine (ICE). It can be taken from a chainsaw or petrol trimmer. Also, a snow removal unit can be made from a motor cultivator or a motor block.
The snow blower auger is the main moving part of the machine and is easy to manufacture. It is best to use a rubber belt from a conveyor 10 mm thick and 1.5 m long for the manufacture of the auger . From the rubber strip, it is necessary to cut out rings in the amount of 4 pieces with a diameter of 28 cm. The details are easily cut using an electric jigsaw.
Tip! To cut rings from the tape, you can do without a jigsaw. Screw 2 sharp screws into a small board and use this device as a compass. After a few full turns of the cutter, the ring will be cut.
Below are drawings of all auger parts.
Shaft is taken as metal pipe with a diameter of 27 mm . Adapters are fixed to its ends, on which bearings are installed. A cut 120 mm long is made in the central part of the pipe, into which a central plate will be installed, designed to throw snow. Also, 4 plates are put on and welded onto the pipe. Rubber rings will be attached to them and to the central plate. How this is done can be clearly seen in the next photo.
Metal strip can also be used to make the auger. But it is preferable to use rubber, because it does not scratch the paving slabs and is not damaged when it comes into contact with a hard obstacle, such as a curb or a fence.
It's also easy to make a bucket that will serve as a housing for the auger. For this purpose, roofing iron is usually used. The drawing below shows the dimensions of the bucket.
For bucket sides, plywood or 10 mm thick OSB can be used. The latter option is more suitable for this purpose, since it is more moisture resistant than plywood. Bearings are installed on the sidewalls of the housing (you can use the 205th, closed), and the screw shaft is already inserted into them. Bearings must be closed with glasses.
Important! When assembling the snowplow assembly, it is necessary to make a small gap, about 2 mm, between the bucket and the auger so that the latter does not touch the body.
To remove snow from the bucket, a hole is cut in its upper part. As a drain, you can use sewer plastic pipe with a diameter of 150 mm or another. The main thing is that the diameter of the chute exceeds the width of the folding blades of the auger.
In order to direct the snow ejected by the shovel to the side, a plastic bend can be put on the pipe.
The bucket with auger is mounted on a pre-made of metal corners (50 x 50 mm) frame (see drawing above).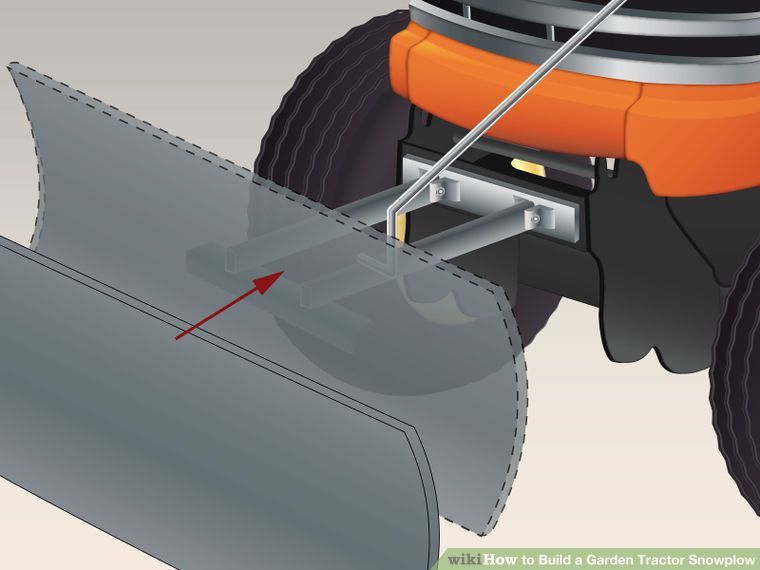 To fix the engine on it, corners of 25 x 25 mm are used.
Tip! If you attach a slightly curved sled to the frame, as shown in the following figures, then working with a snow thrower becomes much more convenient, since it becomes possible to tilt the mechanism for better gripping of snow.
But this unit can be further improved. The modification of the snow blower is to add small wheels to the rear of the skid . In this case, the snow blower will be more convenient to pull back and transport.
Snow blowers based on the auger are the most powerful and capable of handling even icy snow. In addition, the auger is most often used in self-propelled snowplows.
This snowplow is made by hand quite simply. Since it will be powered by a chainsaw engine, a few additional parts for the chain drive will be required. For these purposes, you can use front and rear sprockets from a motorcycle, as well as a chain from it.
How the frame and auger are made has been described above. A long handle is attached to the frame. A large sprocket from a motorcycle is installed on the auger shaft on the right side, and a small sprocket is installed on the chainsaw engine shaft. Next, the chainsaw is mounted on the frame, after which the chain is put on and pulled on the sprockets. To control the engine, the gas cable is brought to the handle attached to the frame.
Below are homemade drawings on a chassis, where a chainsaw is used as the main part of the drive.
To make an auger snow blower from an electric trimmer or a lawn mower, you will need to install a gearbox: it will serve to transfer rotational motion from the trimmer shaft to the auger shaft.
But there is one caveat. The gearbox for this type of unit is quite expensive, and it is not advisable to buy it for the manufacture of attachments to the trimmer.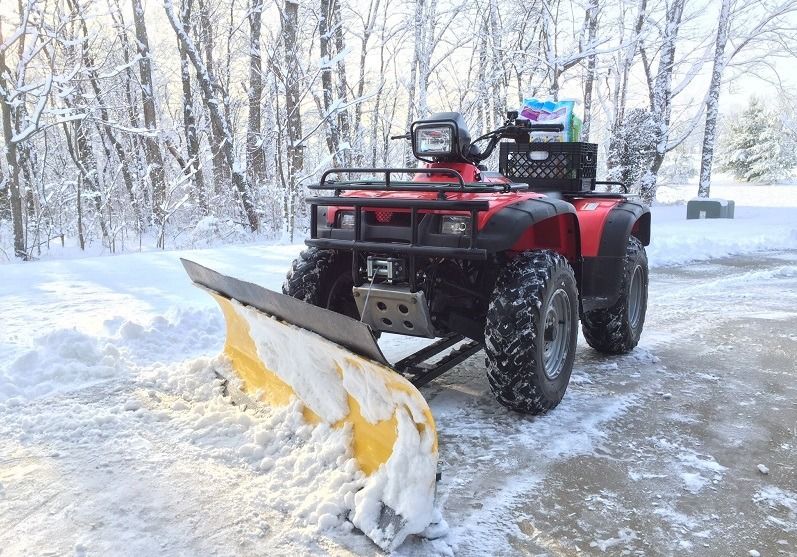 Therefore, on the basis of the latter, rotary-type snow blowers are made, which will be discussed later.
The simplest addition to the motoblock is snow plow.
A self-made snow plow attachment (shovel) on a walk-behind tractor is screwed to the frame of the unit, after which it turns into a small bulldozer.
Tip! Instead of a blade, an auger can be attached to the front of the frame of a walk-behind tractor or a motor-cultivator, as a result of which you will get a self-propelled snowplow. This attachment for a walk-behind tractor, if not needed, can be easily disconnected from the main unit.
Below is a diagram that clearly shows the design of a snow blower based on a cultivator.
The scheme is decoded as follows.
The self-propelled snow blower makes clearing snow much easier, especially in large areas where the use of a device on skis, pushed by the operator, requires a lot of the latter's physical strength.
You can use the drawings below to make a snow blower.
The material for the manufacture of the rotor and its blades is sheet steel 2 mm thick. Rotor housing is made of roof iron or sheet steel thinner than 2 mm. All dimensions of parts are indicated on the drawing.
The power transmission from the motor to the rotor shaft can be done using the belt or the chain. It is also possible to connect the gearbox shaft of an electric trimmer or lawn mower to the rotor shaft. Fortunately, these units already have an angular gearbox. The whole structure is mounted on a frame with a chassis. The result is a lightweight handheld snow blower on wheels.
Remember that the electric snowblower based on the trimmer should not be subjected to heavy loads, as its gearbox may fail. The same recommendation applies to the lawn mower if you decide to assemble a snow thrower on its base.
A simpler design of the unit mounted on a frame with skids can be assembled according to the diagram from an old magazine.
Thanks to the above drawings, the assembly of a snow blower cannot be difficult for any home craftsman.
Often there are situations when you need to remove snow at night: in this case, the snow blower headlight will be a useful addition to . If installing a headlight on an electric snow blower is quite simple, then with units powered by internal combustion engines, things are more complicated: you need to connect to the electrical circuit of the device using special relays and electronic boards. But still there is a way out of this situation. You can buy regular diode lamp and screw it to the unit.
Many of our compatriots dream of such a vehicle as an ATV. This hybrid of a tractor and a motorcycle combines the best of their qualities. It is applicable for cross-country driving, nature trips or picnics, fishing, etc. The all-terrain vehicle is also actively used in various household tasks. An ATV is a rather expensive vehicle, so many people decide to assemble it on their own. To do this, you will need to prepare the appropriate equipment and components. One of the popular options is to assemble an ATV from Oka with your own hands.
Many of our compatriots have an old but working car gathering dust in their garage. Oka is ideal for assembling an ATV. To do this, you will have to spend a certain amount of time and buy the necessary parts.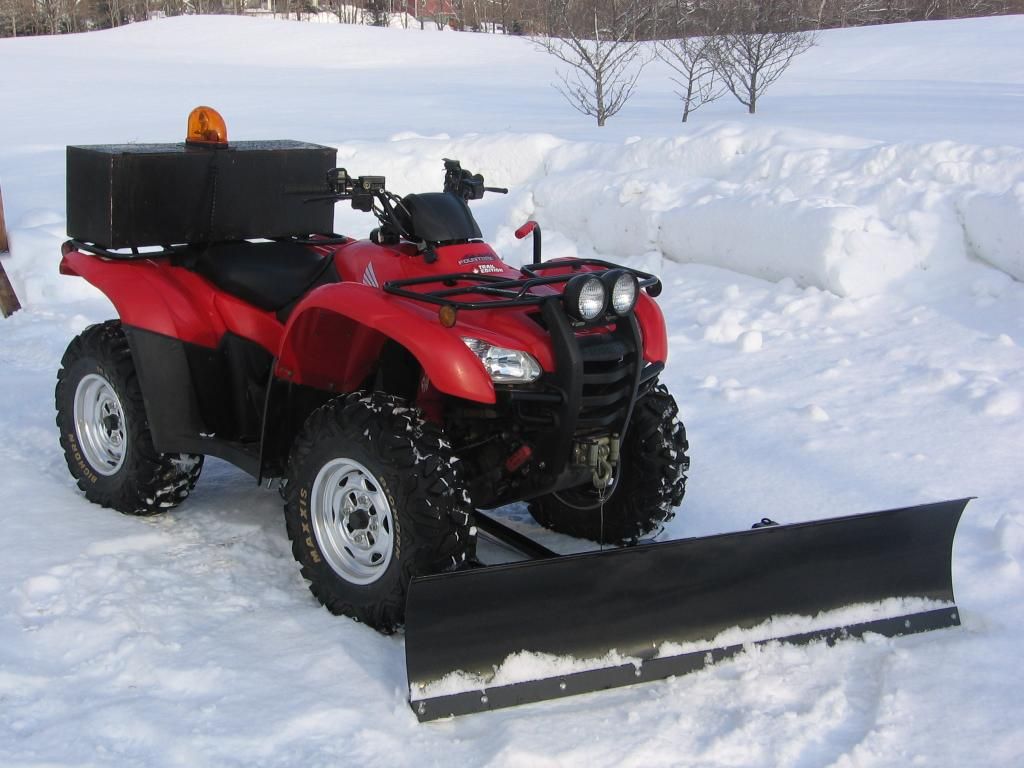 You will also need a welding machine and a grinder, a set of keys, screwdrivers, and other hand tools. This is a fascinating process during which the master will acquire new skills. If desired, the specialist will be able to assemble a homemade ATV from Oka with all-wheel drive.
At the initial stage, a drawing of the future vehicle is being developed. You can use a ready-made scheme, but it is much more effective to create your own. When developing drawings for an ATV from Oka, you need to take into account that most of the parts can be removed from an old car.
ATV assembled from Oka parts has a lot of advantages over factory-made models. One of the positive qualities is the efficiency of such an ATV. Since most of the parts will be taken from the donor car, no significant financial investment will be required. If you have to buy more parts, then you need a very small amount.
The weight of the ATV will be relatively light compared to factory-made ATV models, but the power will be much higher.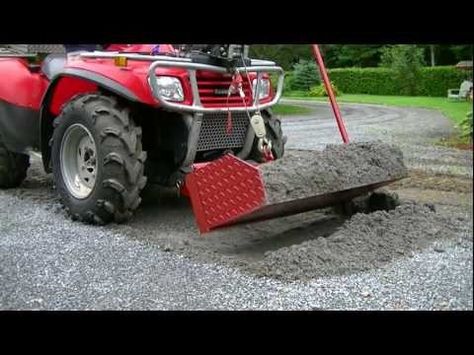 The Oka has a two-cylinder liquid-cooled engine. For a car, this may not be such a high figure, but for an ATV this is more than enough.
At the same time, you can make a 4x4 ATV with an Oka engine with your own hands. An all-wheel drive ATV will be functional as well as versatile. He will be able to overcome significant obstacles on the road, cultivate gardens and vegetable gardens, and transport significant loads.
To make a quad bike from Oka, you must first make the base. Work should be in a heated room with good ventilation or outdoors under a canopy. At the first stage, you need to assemble the frame, which is created by welding from the following parts:

To mount the various components on the frame, you need to purchase the appropriate number of metal brackets and other small parts.
Most motorists began to comprehend the science of driving with the Oka car. But over time, all motorists change old wheels for new ones, and it turns out that a working, albeit relatively “age” car just gathers dust in the garage.
But if you're wondering how to make an oki ATV, then you've already decided to give your trusty old car a chance at a new life. The assembly process itself will take a certain amount of time, and some parts will need to be purchased, but in the end you can still save a lot on buying a new ATV. In addition, during the transformation of an oki into an ATV, you will acquire a lot of useful skills and knowledge.
After assembling the frame, take care of the transmission, which will be unique in this system.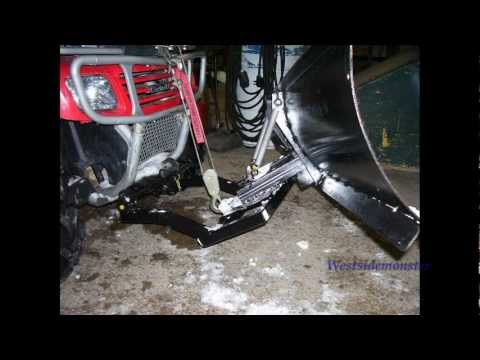 Despite the fact that the engine is all-wheel drive, there is no gearbox in the system. At the same time, the engine is installed along, which allows you to shift gears and synchronize the transmission with the output shafts. If the right and left wheels worked together in the Oka, then a different type of drive needs to be created in the ATV. Two front and two rear wheels will work synchronously. This modification is necessary to ensure that the ATV performs appropriately for rough off-road riding.
The mechanic needs to move the units on the frame to the left, as the horizontal unit of the transmission shafts will decrease. Otherwise, the system will not function correctly. The gearbox from Oka needs to be improved accordingly. A gear pair is removed from it, instead of which a chain drive will be installed. This will balance the speed as well as increase the torque at the same time.
The gear shift must be lengthened and the shift lever mounted on the left. There are 4 gears in this design: two in front and two in the back.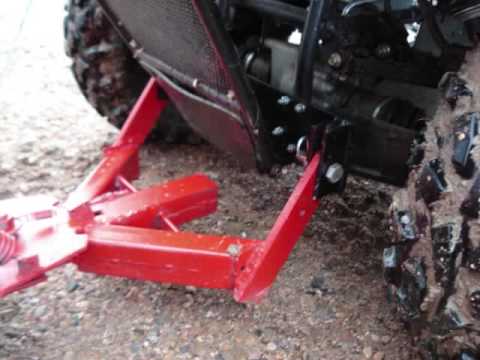 When the system is running, the speed position of the lever will change.
It is recommended to remove the gearboxes that are installed between the wheels. This is a characteristic feature for cars manufactured by VAZ. The axles are removed, as is the stocking, and shafts designed for front-wheel drive vehicles are installed instead.
Transmission conversion is the most difficult part of building an ATV system from an old vehicle.
Pretty easy and cheap to assemble
ATV
based on the Oka was made by Leonid from the city of Nyagan. The all-terrain vehicle is capable of reaching speeds of about 50 kilometers per hour, as well as swimming through water obstacles. the machine was made mainly for sorties into remote areas of the forest for gathering.
To assemble such an all-terrain vehicle, the following parts and materials were required: 1) Body from the Oka car 2) profile pipe for frame assembly 3) VAZ 1111 internal combustion engine 4) most of the chassis from the field 2121 5) SHAINA tires 6) Steering from the VAZ 2109
Let's take a closer look at the work done on the all-terrain vehicle.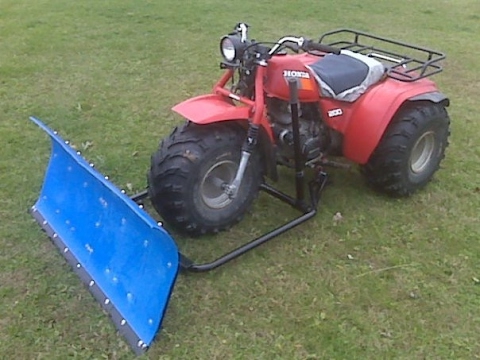
To begin with, the author decided to make a frame for the future all-terrain vehicle. the frame was made independently from a profile pipe available from the author.
The frame manufacturing scheme is shown below:
This is how the front axle of the assembled all-terrain vehicle looks like:
The transfer box is installed:
Mountings from the axle from the Muscovite were cut off to install the springs. springs were installed from a Muscovite 412 with stepladders, for this they were pre-sized and overcooked. Initially, the author planned to make a spring suspension, as is customary to do on all-terrain vehicles with a small mass like an oki, but decided that the springs are still more reliable, since for the springs it was necessary to complicate the frame for the springs and put more salenbloks for fastening. That is, the main factor in favor of the spring suspension was simplicity and reliability.
After the main assembly, the author started testing the car. In the course of testing, minor improvements are also being made, in particular, shortcomings are identified and eliminated, work continues on the appearance of the machine, and the suspension system is being improved.
The weight of the all-terrain vehicle turned out to be about 800 kilograms. The all-terrain vehicle has the following dimensions: the length of the base is 210 centimeters, the width is 208 centimeters, the length of the entire all-terrain vehicle is 360 centimeters, the height is about two meters, and the ground clearance is 40 centimeters.
Paint work was done, and foam was installed under the bottom for greater buoyancy:
For the same purpose, a camera can be fixed on two straps in the front of the all-terrain vehicle, with this approach, you can not worry about the stability of the machine on the water.
During a short period of operation, several problem areas of the all-terrain vehicle were revealed. In particular, the upper plates of the front springs were bent, so the scarves will be installed.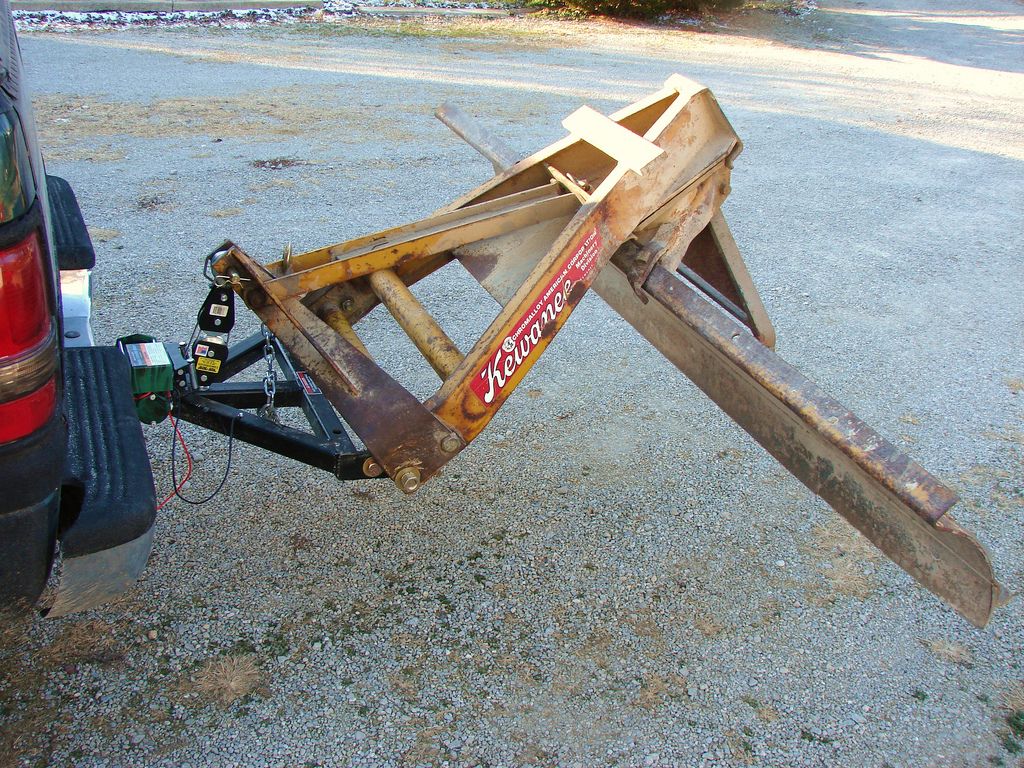 Problems with oil were also revealed, for 50 kilometers the oil level dropped significantly, since the engine was purchased in excellent condition, then most likely this is not the case. In addition, no oil leaks were found anywhere. the reason lies in the wet filter after overcoming water barriers. the holes in the top cover on the body were soldered to prevent the filter from getting wet. Running did not reveal any problems.
Chassis has no breakdowns, mainly due to the low load coming from the wheels. such wheels fit perfectly into the concept of the Nivovsky suspension. however, for the all-terrain vehicle itself, it is desirable to install larger wheels, since the small diameter of the wheel, in turn, is a small amount of air in the tires, and therefore you have to use tricks in the form of foam and additional chambers to overcome water obstacles. Also, the installed wheels have a too weak tread, which actually does not work in the mud. for 350 kilometers of the way, all the spikes on the wheels were shot, the rubber will wear out pretty quickly. A fallen log becomes a difficult obstacle to overcome.
But there are also advantages to such a design:
The suspension travel is very soft, since the wheels are still wide, then the all-terrain vehicle does not sit on the bridges and walks confidently on clay. These wheels eliminate heavy loads on the axles, which increases their service life. Well, the most important plus is the price, since the axles of the running cornfield are quite cheap, but they are suitable only for this type of wheels.
If, for example, you install wheels with a diameter of 1300 or more, you will have to redo the chassis, in particular, install bridges from UAZ. Therefore, 1300 autoros available to the author are still idle, but in the future it is planned to replace bridges with UAZ and, accordingly, rubber.
In the meantime, in order to increase traction, it is possible to attach belts from oil pumps to SHAIN wheels, but it is not a fact that the transmission will withstand such loads. Therefore, the author drives as is, as he fears for the bridges and the front gearbox. It will be possible to install some kind of compensating clutch on the all-terrain vehicle before its complete modernization.
And more interesting: For visitors | Zolotaya Niva 2022 - Agricultural Exhibition
Weaknesses of the all-terrain vehicle suspension were also identified, after hitting a log at a speed of 10 km / h, the steering rod was bent, which subsequently failed. The rod was replaced and reinforced with a rod f 10 on both sides for reliability.
As for driving the all-terrain vehicle through the swamps, it unfortunately fails, but it's not about the wheels, it's more about the terrain. in any case, the all-terrain vehicle is able to independently leave such situations when the lock is turned on.
The gearbox is enough from the oki, even a downshift is not required. Steering rods, by the way, were installed from the nine fret, but the author plans to redo and replace them with Nivovsky ones. the steering is quite light, but there was an error in the angles relative to the bipod.
Below is the connection of the oki engine and steering column from the cornfield. The flange is processed under the cardan shaft of the vase, for this the intermediate cardan shaft of the field is taken, a small CV joint is removed from it, which is with studs. Under the flange there is an RKP, the spline of this CV joint is the same as that of the axle shaft from the Oka. A cardan shaft is made from the inner joint of the oka, using a half shaft and a small joint of the field.
It turns out something like this, do not forget about the bearing, it is necessary to reduce the load on the transfer case.
From the transfer case it is already transferred to the bridges as usual:
Photos of the finished all-terrain vehicle:
The author of the all-terrain vehicle: Leonid from the city of Nyagan.
Appropriate attachments, controls, gas tank are mounted on the frame.