You are here: Home / Knowledge & Skills / How to Make A Paracord Survival Bracelet: Tire Tread
By Contributor 12 Comments
A paracord survival bracelet is a versatile tool that can come in handy for a number of emergency situations. Whether you are a survivalist, frequent hunter, outdoors person or just value the need to be prepared at all times, knowing how to tie a paracord bracelets is an important skill. A paracord bracelet is a good thing to have on hand at all times.
In this tutorial, you will learn how to make the Tire Tread Survival Bracelet.
For this tutorial, we are going to start with the green paracord. First, fold the green paracord in half to find the center. Take that loop and feed it through the slot on the female side of the buckle.
Pull the ends through and firmly tighten around the buckle.
Fold the green paracord in half and pull the loop through the buckle.Pull the ends all the way through the loop and tighten.Pull until the paracord is snug around the buckle.
Let’s go ahead and do the same thing with the black paracord to attach it to the male side of the buckle.
Take the black strand of paracord and attach it the same way to the other end of the buckle.Pull it snug around the buckle.
Now let’s prep our black paracord to attach it to the green paracord by making some bunny ear loops.
• First, you’ll want to measure the length of your bracelet using your measuring tape. Keep in mind that you want to include half of the buckle in this measurement. For this tutorial we are making a 7 inch bracelet.
• Using your finger to keep the length of the bracelet in tact, fold the two ends down to create two loops.
• Then take the right strand and pull it over the center and under the left strand.
• To finish it off, take the left strand under the center and up through the right loop. (See photos below)
Measure the paracord to the length you want your bracelet.Take your green paracord and fold the ends down to make two loops at the length you measured for your bracelet.Take the right strand and pull it over the center pieces and under the left strand.Take the left strand and pull it under the center pieces and up and over the right loop. )
)
Do the same thing you did in Step 5, but use the black paracord:
Now take the right black strand and pull it over the center piece and under the left strand.Pull the left strand under the center piece and up and through the right loop.Pull to tighten.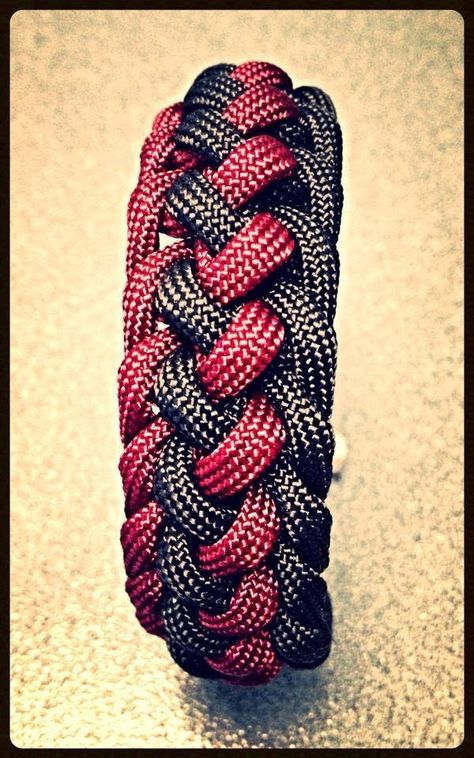 Repeat Step 5 with the green paracord and continue on down the bracelet alternating between black and green.
Once you get down to the end of the bracelet, you’ll need to finish it off.
Continue down until you reach the end of your bracelet.To finish it off, take the last cord you ended with and pull it over the center and under the left piece.Then take the left piece and pull it under the center and up and through the right loop.Pull to tighten.
Using your scissors and lighter, cut and burn the ends about 1/4″ from the base to seal them off.
550 Paracord – Five Colors 100 Feet Total
Rothco Type III Commercial Paracord (Black, 550-Pound/100-Feet)
50 – 1/2″ Side Release Plastic Buckles
Filed Under: Knowledge & Skills, Tools, Uncategorized Tagged With: how to make a paracord bracelet, make paracord bracelets, paracord bracelet, paracord bracelets, paracord braclet, paracord projects
Search by keyword / Author
Search by keyword :
?
Looking for a specific craft tutorial or tutorials? It's the right place! Search bars on this site (at the top bar or here) allows you to search for what you want to find. For example: an "unicorn costume".
?
Looking for craft tutorials from a specific author / publisher ? It's the right place! Start typing a name, and our system will provide a few suggestions with the given name. If you have found who you were looking for, please choose him/her from the suggestion list.
Filter options / order
Order :
?
Here you can determine the crafts' listing order.
RandomizedFresh firstOldest first
Tutorial type:
?
Here you can choose from different craft tutorial formats. Written craft tutorials usually come with automatic translations, easy to browse, and print friendly. Video tutorials are more visual, which makes them much easier to understand.
AllWritten tutorialsVideo tutorials
Difficulty:
?
Here you can choose from different difficulties. Difficulty indicates how easy (or difficult) the craft tutorial/craft is. Choose one which suits you the best.
All difficulty levelsAbsolute beginner ★Beginner ★★Intermediate ★★★Challenging ★★★★Insane ★★★★★
Category :
?
Categories: Craft categories will help you discover new crafts to fit your needs.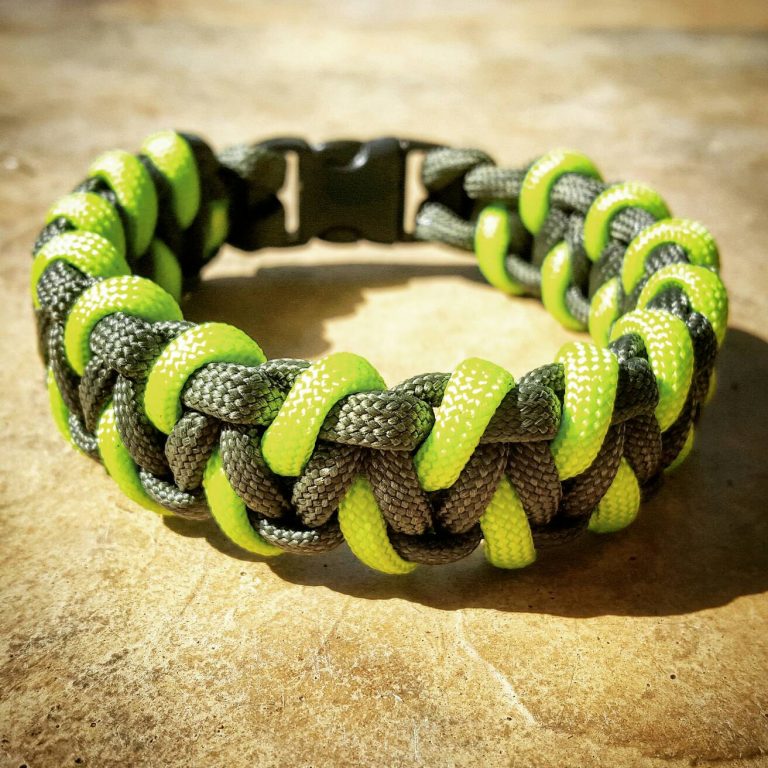 Categories are usually large groups with one main topic, but not as exact and useful as sub-categories if you are looking for something specific.
From every category Crafts for kids and kid's craftsRecycling crafts | Upcycling crafts | RepurposeDIY Home decor, garden decor and furnitureHoliday crafts & party craftsYarn craftsFabric craftsPaper craftsNature craftsDrawing, painting & design tutorialsFood crafts & drink craftsSeasonal decorations & craftsOther crafts
Sub-category :
?
Sub-Categories: Sub-categories will help you discover new crafts to fit your needs in specific topics. Sub-categories are just perfect if your are searching for specific crafts & DIY tutorials.
From every sub-category
Mindy is an enormous, hand-picked, quality checked, and categorized craft / DIY tutorial collection. Our mission is to help you discover the world's best free craft tutorials, patterns, and printables! We have fantastic crafts, helpful tips, and step-by-step tutorials from talented and passionate craft bloggers all around the world. Our library consists of thousands of in-depth craft tutorials and covers an immense variety of crafts and hobbies. Whether you want to see specific crafts or just collect a few fun ideas, our team will be here for you every step of the way! Browse through our craft tutorial collection and transform the everyday things around you into fun and useful things! Whether you’re looking to master a new-to-you hobby, improve your skills, or simply get inspired, Mindy is here to help.
Join us to learn crafts, share the joy of creating new things, and learn more each day! Here's a little help on how to use our features:
Click on the craft's photo! This will lead you to the inside view/details view. There you will find a blurb / short review, useful information about the selected craft and a link to the tutorial,pattern or printable.
After registering, you will be able to save your favorite crafts by clicking on the heart icons on them.
It's simple: create organizers/folders! After logging in, go to the "favorites/collections" page and create a PUBLIC folder. Place your most cherished favorites into this public folder, and simply share the folder's link with others!
It's also super simple! Just click on the big pink "Submit tutorial" button at the top of the page, fill up the submission form, and click on "submit"!
Mindy collects crafts and DIY tutorials from all around the world, so presumably, you will find tutorials that are not English. For non-English tutorials, we provide an automatic translation. This automatic translation is generated by Google Translator (an artificial intelligence), which often causes gibberish. We apologize for that! Unfortunately, we cannot fix this, but this is the reason why we collect only photo-rich, detailed tutorials. Feel free to contact us if you need help with a craft.
At Mindy, we take great pride in the quality of our collection and services. If you ever come across something that you think needs to be improved, please reach out by using our contact form.
| I need more help! | Terms,Conditions & Policies | Contact |
Have a nice, creative day!
Mindy
Most often, the word "bracelet" evokes the usual association with a sophisticated and sophisticated accessory that emphasizes the subtlety and grace of a woman's wrist.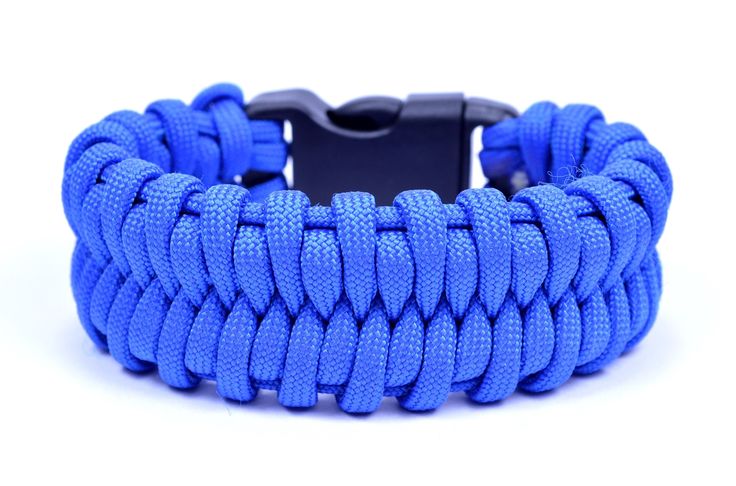 However, there are other hand decorations that are not so much decorative as functional - these are woven paracord bracelets. They bear little resemblance to exquisite women's jewelry, and they can be seen on the hands of the military, extreme travelers, hikers or survivalists. But it is not at all necessary to be an extreme sportsman in order to use such a universal accessory. It can be recommended to representatives of both sexes who like to wear clothes in a sports or denim style, as well as adherents of grunge, country, casual, gaucho, military, safari and other similar styles. And if the accessory is, moreover, woven from laces of bright colors, it will perfectly suit ethnic-style outfits.
This article is a step by step tutorial on how to weave a paracord bracelet. With it, you can easily learn how to make such an original accessory yourself, using simple diagrams in the form of photo illustrations. This lesson will be understandable and accessible even for the most inexperienced beginners or children in weaving and needlework.
Paracord is a braided complex synthetic cord made of nylon fibers and threads. Initially, it was used to make lines for parachutes, and now it has found application in many areas of human activity due to its strength and practicality. The structure of the paracord is a set of braided and core threads intertwined with each other, which, in turn, also consists of nylon threads. Due to its exceptional strength, the cord is widely used for successfully solving fairly serious problems: securing equipment, tents, insurance, shoe laces, for repairing clothes, as well as in various extreme situations - in a word, wherever a rope is needed, especially a strong rope.
The cord is also smooth and elastic, and comes in a variety of colors, making it a comfortable and very attractive material for many types of needlework.
So, in this master class we will weave a paracord bracelet without fastex or, in other words, without a clasp. This will not be a survival bracelet, but rather an interesting decoration in a minimalist style. Moreover, it can be easily modified into a neck piece or weave a nice set of bracelet and necklace.
We all often tie our shoelaces and other footwear. But have you noticed anything interesting about the first knot you tie? Not? This is called a straight knot or simple knot, and most people tie it every day. So the weaving technique of our bracelet will be based on tying simple knots. Anyone can tie them, even if you have never worked with knots - this is the knot from which you can start learning to weave. It's amazingly simple. And we call this decoration minimalistic because of its simplicity and elegance in design.
How to weave a paracord bracelet: step by step instructions
Step 1 . Materials necessary for the manufacture of a bracelet in a minimalist style of
for needlework you will need:
Step 2 : we tie the main decorative nodes
Place 3 cords on a flat surface in parallel that each other's cord. was in the middle between two identical ones, and trim all their edges.
Leave equal tails about 25 cm long on each cord.
Hold one end of the lace bundle with one hand and pull the other end of the lace bundle from below towards above the thumb as shown in the photo.
Insert this end from below the cords on the right. In short, tie a simple knot at the top.
Pull the cords evenly to make a tight knot. If you did everything right, the knot will have the shape of a pentagon, as shown in the photo.
Move to the left, step back about 2 cm from the knot you just tied, and tie another straight knot at the top.
NOTE: Remember to follow the same weave pattern each time, the knot can be easily reversed but we don't need to.
Repeat the above steps to make 5 more straight knots. As you progress, you will notice that the bracelet will bend and randomly take shape on its own.
IMPORTANT: It is very easy to tie a straight top knot, but to achieve the desired look, you just need to be careful that all three cords remain parallel to each other while you tie the knot.
When the weave is long enough, we just need to carefully remove the extra laces hanging from both ends.
Step 3: cut off and singe the extra laces and tie the adjustable length mechanism
We will use a contrasting color cord located in the middle as a cord to tie the decoration clasp.
Close a knot at each end of the paracord bundle, carefully cut and singe the ends of the laces on the sides, but leave the lace in the middle intact.
We will make the bracelet adjustable in length, and for this we will weave a special adjustable mechanism:
Measure the remaining cord to the desired length and cut.
Let's say you have chosen a length of 15 cm. Arrange the cords on both sides parallel to each other with the ends pointing in opposite directions.
Exactly 15 cm from the last large knot on the right lace, make a loop on top of the left cord so that the working end passes from below under both laces.
Insert the running end into the loop formed on the right.
Adjust the cord tension to make a strong knot.
Repeat the above steps to secure the left end of the cord.
Cut the access cord and burn the ends of all cords with a lighter.
That's it - a simple, quick and easy to make minimalist bracelet is ready!
Once you've learned how to make this simple model, get creative and use large beads between the knots to make other accessories. By adding additional decor, you can come up with an infinite number of new models based on the one described in this master class. Paracord Bracelets0120 About this ebook
An original bright decoration and at the same time surprisingly practical thing that will become simply indispensable on trips and travels. This book will teach you how to weave beautiful and extremely durable paracord bracelets. Such decoration will surprise the most skillful connoisseurs of beauty! Various types of knitting, unusual weaving, interesting combinations of colors and techniques.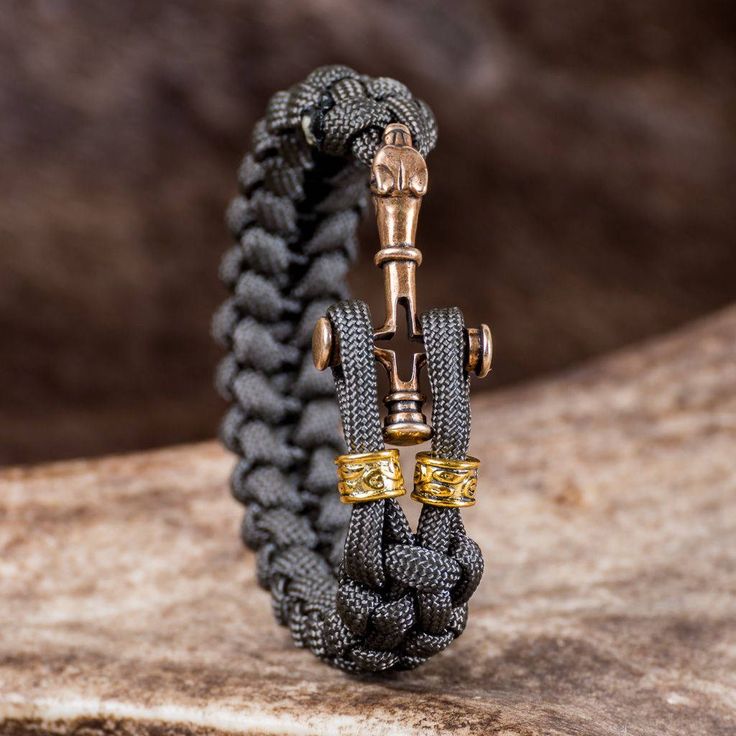 You will learn how to make men's, women's and children's jewelry that will make their owners stand out from the crowd! Original'noe jarkoe ukrashenie i odnovremenno udivitel'no praktichnaja veshh', kotoraja stanet prosto nezamenimoj v poezdkah i puteshestvijah. Jeta kniga nauchit vas plesti krasivye i neobyknovenno prochnye braslety iz parakorda. Takoe ukrashenie udivit samyh iskusnyh cenitelej prekrasnogo! Razlichnye tipy vjazki, neobychnye pletenija, interesnye kombinacii cveta i tehnik. Vy nauchites' delat' muzhskie, zhenskie, a takzhe detskie ukrashenija, kotorye cangut vydelit' ih obladatelej sredi tolpy!
Family Leisure Club Book Club
2016
ISBN 978-617-12-3007-1 (epub)
No part of this publication may be
copied or reproduced in any form without the written permission of the publisher
The electronic version was created according to the edition:
UDC 745/749
BBK 85.12
M41
Cover designer Alexander Shukalovich 90 ISBN
78-617-12-2492-6 (Ukraine)ISBN 978-5-9910-3867-6 (Russia)
© DepositPhotos. com / Heinschlebusch, Plus69, mayboro, sever180, Fourleaflovers, place4design, cover, 2017
© Shutterstock.com: OR PHOTOGRAPHY, Lifestyle_Studio, Kiyota, PowerUp, Cat Act Art, arkanto, Glen Jones, warat42, Su Justen, Kitiphong Pho, cover, 2017
© DepositPhotos.com / Heinschlebusch, Plus69, sever180, volgariver, mrivserg, mayboro, sticker photos, 2017
© Shutterstock.com: igor kisselev, Glen Jones, PowerUp, arkanto, OR PHOTOGRAPHY, ilostmyslipper, Angela N Perryman, Cat Act Art, vvital, Kiyota, Yupa Watchanakit, Kitiphong Pho, warat42, Sokolova Maryna, anucha sirivisansuwan, Su Justen, Lifestyle_Studio, Eddie H S Cho, Elizaveta Galitckaia, photos on insert, 2017
© Book Club Family Leisure Club, Russian edition, 2017
© Book Club Family Leisure Club, artwork, 2017
© OOO Book Club Family Leisure Club
, Belgorod, 2017
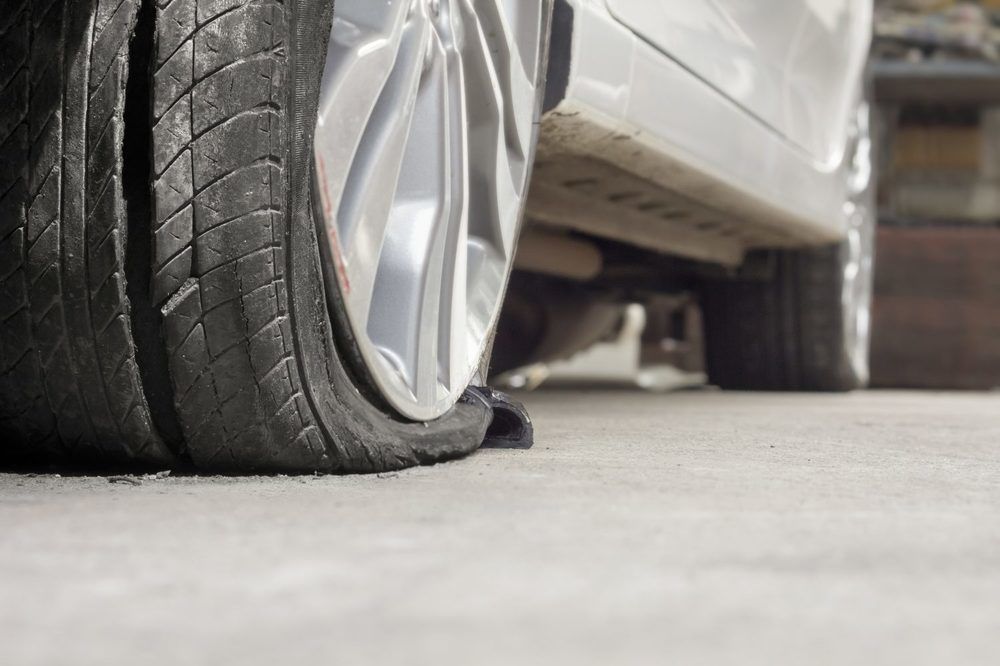
Any car, as usual, has four wheels, and each of them needs “shoes”.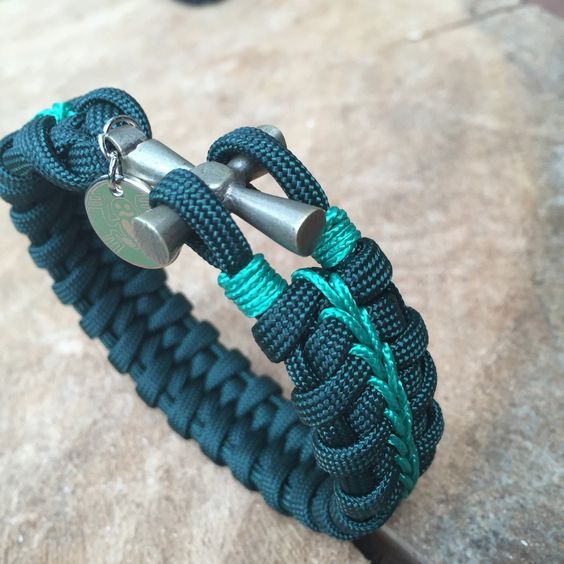 You usually change your own shoes, sneakers, boots, boots every few years or even more often. How often do you change car tires? After all, she is experiencing much more serious stress!
The life of your tires depends greatly on how you drive, moderate or sporty. Sharp starts and accelerations, frequent and intense braking, turns at a relatively high speed reduce the overall life of the tires. With a moderate driving style and satisfactory adherence to the operating rules, branded imported tires serve at least 120-130 thousand kilometers, provided that the tread depth of 1.8 mm is maintained. The resource of radial tires produced by the CIS usually does not exceed 70 thousand kilometers, which means that a car on a set of five tires will cover approximately 80 thousand kilometers. A set of five imported tires will provide a mileage of about 130-150 thousand kilometers.
How far does your car cover in a year? And what is the total car fleet of your locality? Try to count how many tubes and tires break down every year in your area alone, and you will get astronomical numbers.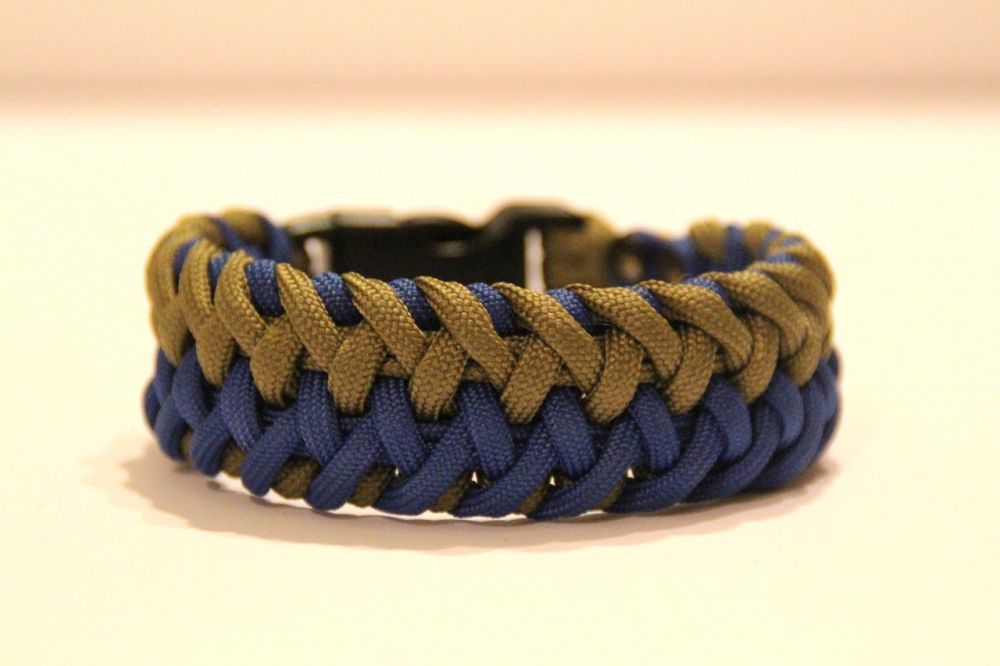 Abroad, thousands of tons of waste rubber are recycled - there are technologies that make it possible to obtain elastic coatings for sports grounds, ingredients for the roadway, black paint and much more from it. Unfortunately, a significant part of our tires and tubes are still sent to a landfill, where they burn, releasing toxic sulfur compounds and heavy metals into the air we breathe. And until we are sure that worn-out tires will not poison our existence, the best solution to the problem will be their use in the yard, in the garden or in the farmstead, where the familiar landscape will be enlivened by unusual elements.
Now let's take a fresh look at the car tire. This is a wonderful object of perfectly round shape, resistant to all the vagaries of the weather, waterproof, not requiring additional protection from decay, resilient, warm to the touch. The same size and shape of tires allow them to be used as a building module, setting a certain rhythm and ornament. They can be used in the construction of fences, retaining walls and even residential buildings, children's and sports grounds, steps and mini-bridges.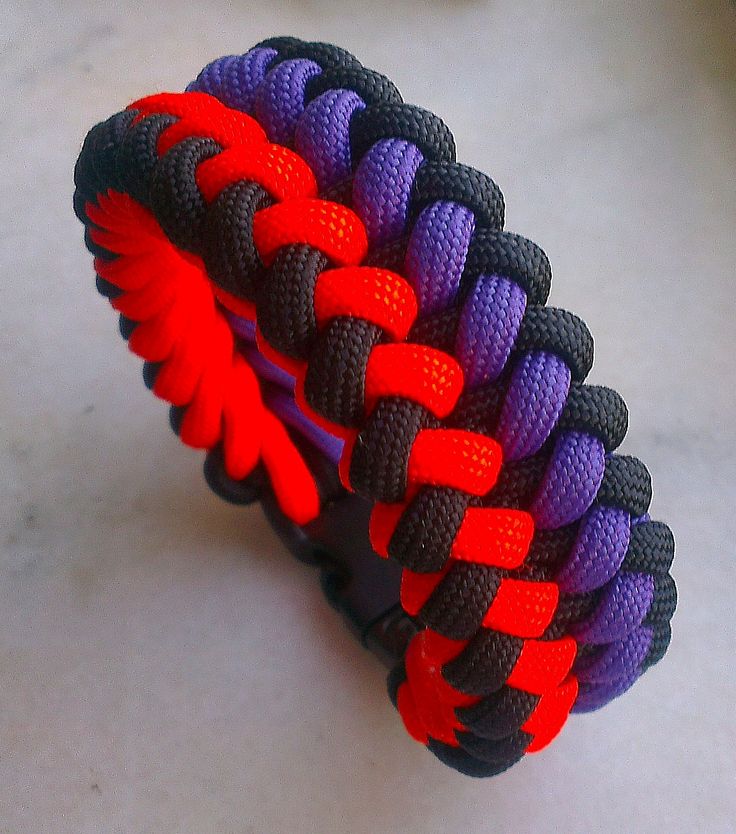 Worn-out tires can become the basis for creating decorative elements of a summer cottage - flower beds, flower beds, figures of beautiful birds, hanging planters, original garden paths. With their help, you can both make a full-fledged fence, and visually divide a personal plot into different zones, create a pool or country furniture. And they won't cost a dime! Thousands of used tires are lying around in landfills and on roadsides, and how many of them are near service stations! Car service workers will only be grateful to you if you take away unnecessary trash from their territory. And in any case, you simply cannot find cheaper ornamental material!
In this book, we will look at alternative ways to use tires in the home, in the garden, in the workshop, in the courtyard, and analyze the main stages of work on creating exclusive crafts. Show your imagination, put in a little effort, and old tires will benefit you for a long time to come.
Automotive wheels are an excellent source of a variety of handicraft materials.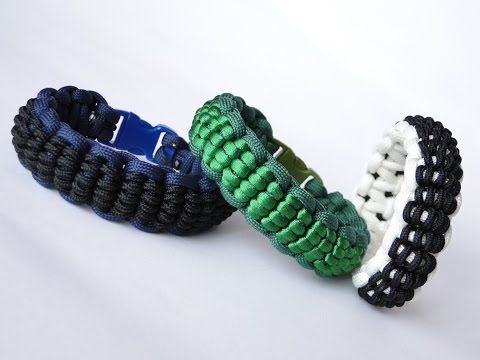 Tire rubber is a very plastic and durable material, so it is ideal for creating sculptures and unusual garden furniture: stools, armchairs, tables. Cut-out tapes with protectors can serve as both a garden path and roofing material. The cutting process is time consuming, but the cost and originality will pay off your efforts. The tubes that are used in some types of wheels will give you the opportunity to use them as inflatable products for various water activities and get a flat elastic material for a variety of household needs. And metal rims can successfully serve not only in a car, but also at a construction site, and in a garden, and even in a bathhouse!
At the same time, automobile wheels are modern high-tech products, each component of which has a number of important parameters. These values describe not only the geometric dimensions of tires, chambers, disks, but also determine the operating conditions, allowable loads, etc. Such information may seem redundant, but only at first glance. One of the commandments of any master says: you need to know the properties of the material with which you are going to work. And given that most of the crafts offered in this book are made from tires - the most complex parts of car wheels, obviously, their device should be properly understood.
All major types of car tires are identical in structure to their construction. Most modern car tires consist of a rubber-cord shell, an airtight closed toroidal chamber, and a rim tape (Fig. 1).
Fig. 1. Tube tire:
1 - bead tape; 2 - sidewall; 3 - layers of cord; 4 - breaker; 5 - protector; 6 - treadmill; 7 - frame; 8 - heel; 9 — tire bead; 10 - sock; 11 - wire ring; 12 - wing straps
In operation, the chamber is filled with air at a certain pressure. For tubeless tires, instead of a tube, there is a special sealing layer on the inside of the tire. The damping capacity of a car tire is determined by the air pressure in the tire and its elasticity.
Car tire operating under extremely difficult and often harsh conditions. The tire must have great elasticity, strength and wear resistance, as it perceives normal, tangential and lateral loads, softens shocks and impacts. Tires must resist tread wear and withstand repeated complex deformations.
The design and material of the elements differ for different types of tires. Thus, passenger car tires differ from truck tires in terms of the design of individual elements, dimensions, dimensions and quality of the materials used. They have a more elastic carcass, lower height and greater tread pattern dissection, smaller outer and landing diameters. Due to the larger allowable relative deformation, the greater number of loads per unit of distance traveled, and the higher speeds, passenger car tires have a shorter service life than truck tires. Passenger tires are designed mainly for operation on roads of the highest technical categories.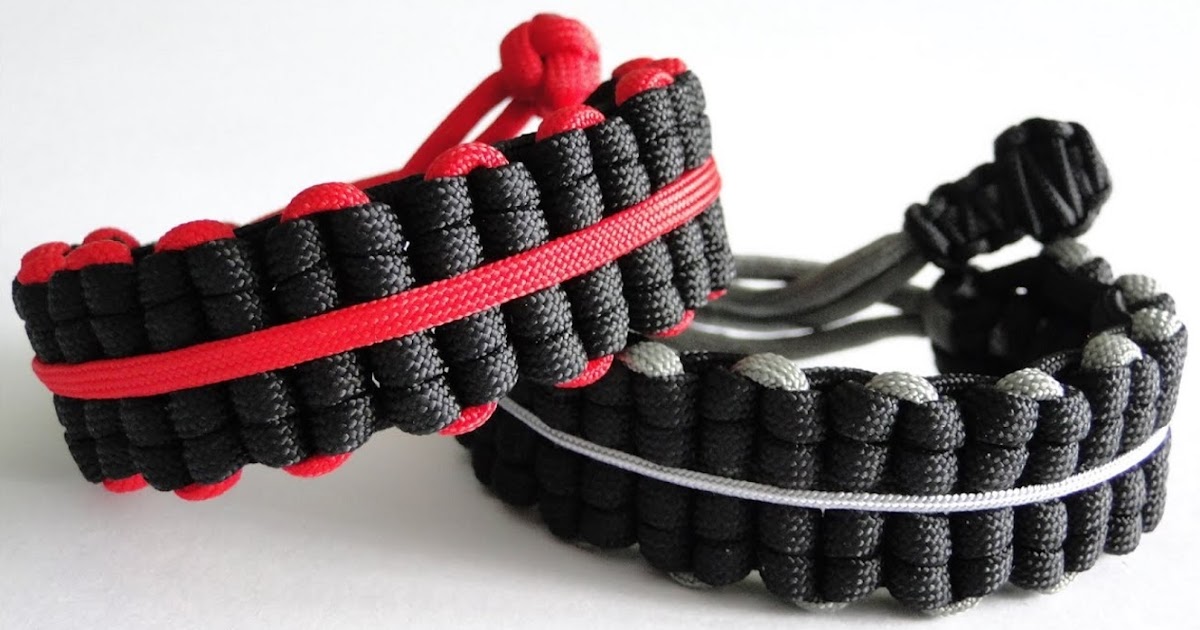
In bias tires , the cords in adjacent carcass plies cross, i.e., they are located at a certain angle. The angle of inclination of the cord threads along the tread tread ¹ to the meridional sectional plane of the tire profile is 52-54°. Such a direction of the cord threads in the carcass provides a good distribution of forces during tire deformation and its greatest strength with sufficient cushioning. In the carcass of a diagonal tire there is always an even number of cord layers (2, 4, 6, 8, etc.).
A design feature of radial tires type R is, first of all, that the cords in the carcass plies are arranged radially along the tire profile in the direction from one bead to the other, i.e. in all carcass plies, the cords are parallel to each other friend. Thus, each layer of the cord in the carcass of this type of tire works as if independently (not paired with the adjacent layer). As a result of this, the stresses that occur during operation in the carcass cord threads of this type R are approximately two times less than in diagonal tires, which makes it possible to reduce the number of cord layers accordingly. Since the carcass of R-type tires is thinner and the cords in its layers are parallel, it is more elastic, deforms more easily, and, consequently, heat generation is less than that of diagonal tires.
To reduce tire sidewall deformation, the air pressure in R-type tires should be slightly higher (up to 30-50%) than in diagonal tires, but the radial deformation of R-type tires is still 10-20% higher due to for their greater elasticity.
Tire has a complex configuration and consists of several structural elements.
Carcass , being the main power part of the tire, limits the volume of the inflated chamber and perceives the loads acting on the tire. The main load on the tire is the dead weight of the car and the weight of the cargo or passengers being transported. The frame must have considerable strength, as well as a certain elasticity. It consists of several superimposed layers of rubberized cord and rubber layers - squeegees .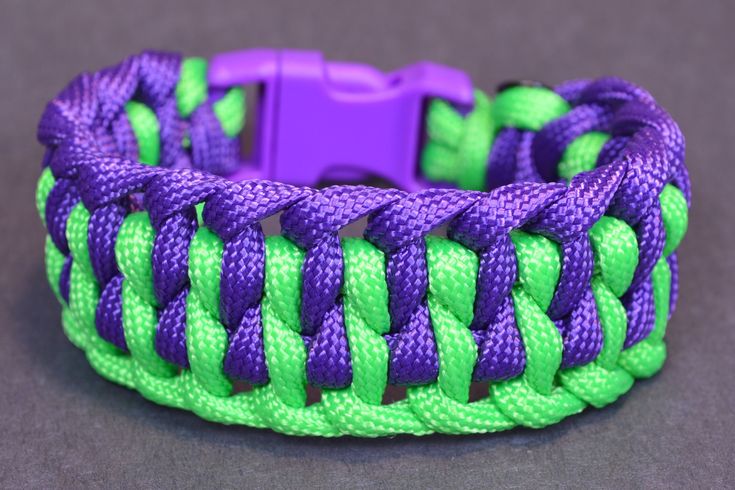 The cord material can be threads made of polymer fibers (nylon, lavsan, etc.), as well as a cable made of brass-plated steel wire (metal cord). The strength of a tire is determined by the strength of the carcass and depends mainly on the strength of the cord, since its elastic modulus is several orders of magnitude greater than the elastic modulus of rubber.
Each cord is isolated from the neighboring ones and at the same time connected with them by rubber. Rubber protects cord threads from moisture, chafing and promotes even distribution of loads between them.
The shape of the carcass and the number of cord layers in it are determined by calculation, based on the specified air pressure, load, type and purpose of the tire. Cord threads carry the main load during tire operation, providing the latter with strength, elasticity, wear resistance and maintaining a given shape. The cord thread in the tire works mainly in tension and repeated bending. These stresses arise, as a rule, as a result of air pressure and the action of centrifugal forces, which create tensile stresses in the cord.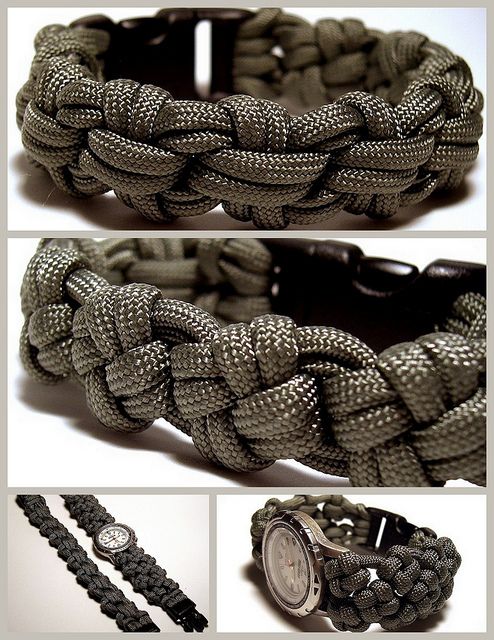
The thickness of the cord, its density, heat resistance and other physical and mechanical properties have a significant impact on the operation of the carcass. Under the action of the forces applied to the wheel, the tire is deformed only in a certain section of the circle - in the working zone located in the area of contact between the tire and the road and equal to approximately one third of the circumference for both cars and trucks.
The tire breaker is a rubber-cord layer located between the carcass and tread. It consists of two or more layers of sparse cord, interspersed with thickened layers of rubber. The most common material for the breaker cord is steel wire. Thickened rubber layers provide the ability to move the breaker cord threads during tire operation. The design of the breaker depends on the type and purpose of the tire. The breaker is needed to strengthen the carcass and improve the connection between the carcass and the tread, which should be as high as possible.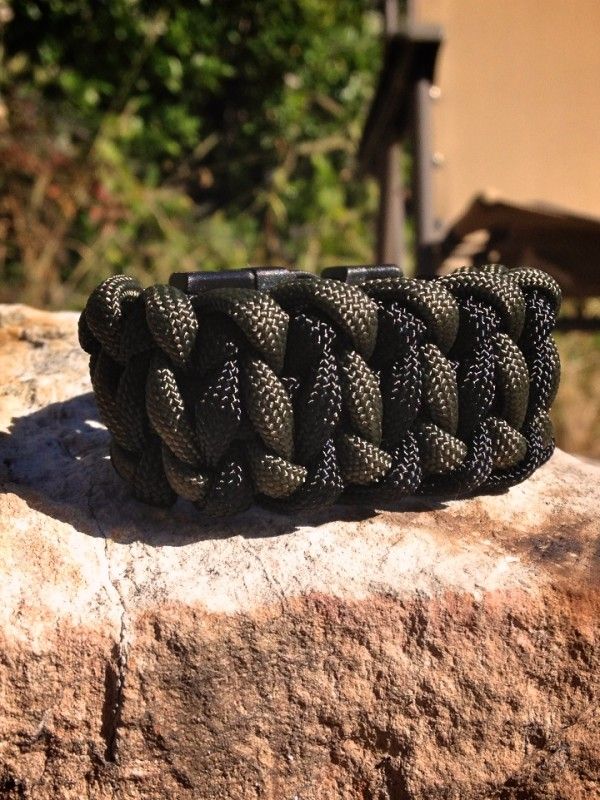 The necessary connection is achieved by the correct selection of the breaker material. The breaker rubber must provide a smooth transition of stiffness from the carcass to the tread, which has a serious impact on the wear rate of the tire tread. The breaker also softens the impact of impact loads on the tire carcass and contributes to a more even distribution of them over the surface of the tire. The breaker perceives multiple tensile, compressive and shear deformations, which leads to significant heat generation due to insufficient thermal conductivity of rubber. Therefore, the belt layer, as a rule, has a higher temperature compared to other tire elements (up to 120 ° C).
The tread is a thick profiled rubber located on the outer side of the tire and comes into direct contact with the road when the wheel rolls. The tread provides the necessary service life of the tire, proper grip, softens the impact of shocks and impacts on the tire carcass, reduces vibrations (primarily torsional) in the car's transmission, and also protects the carcass from mechanical damage. During the rolling of the wheel, the tread elements work on bilateral compression and shear, as well as on tension. These deformations are greater in absolute value than those of the frame and breaker.
The tread consists of a dissected part - relief pattern - and base layer , which is usually 20-30% of the tread thickness. Too thin under-groove layer contributes to tread cracking, increased deformation of the cord threads of the first carcass layer, and a decrease in carcass strength when exposed to a concentrated load. An excessively thick layer worsens the tire cooling conditions, increases hysteresis losses, leads to overheating and delamination of the tire. The tread has an unequal thickness for tires of various designs and purposes. The thicker the tread, the greater the tire mileage until it is completely abraded, the better it protects the carcass from external influences. However, a thick tread makes the tire heavier, leads to its overheating and delamination, increases the initial wear rate, increases the moment of inertia of the wheel and its rolling resistance. A thick tread causes an increase in heat generation at high speeds, when additional tread deformations appear due to a significant increase in inertial forces. The tread thickness for passenger car tires ranges from 7 to 12 mm, for conventional truck tires from 14 to 22 mm, and for arched tires from 40 to 60 mm.
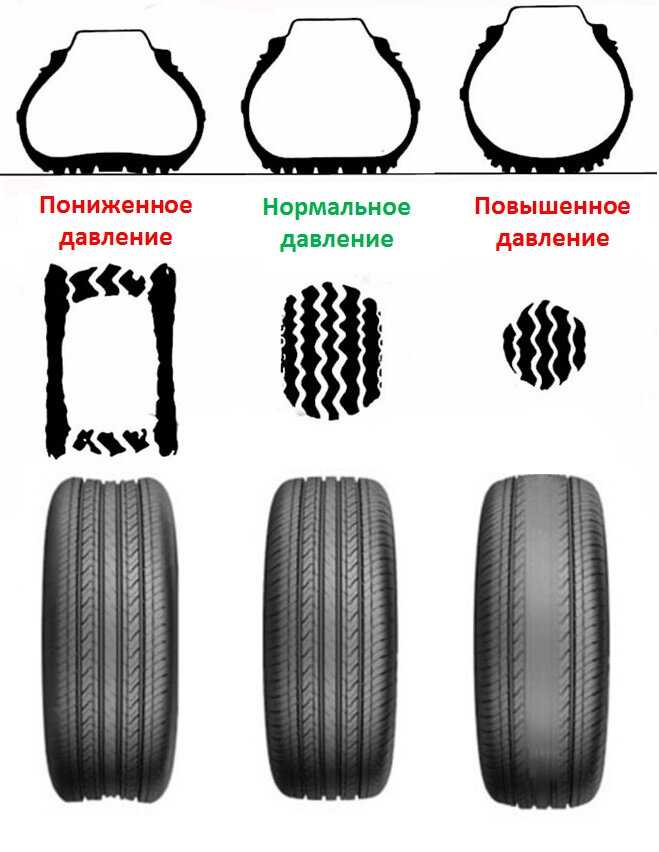
On the surface, the tread has a relief pattern, the variety of which depends on the type and purpose of the tire. The choice of the appropriate pattern depth and the thickness of the under-groove layer is made taking into account the operating conditions of the tire (the nature of the road surface, rolling speed, climatic conditions, the nature of the tire operation), as well as the characteristics of the materials used in the tire. The tread width is approximately 70-80% of the tire profile width.
Car tires are made with different tread patterns. With regard to passenger cars, they can be divided into three types.
1. Tires with summer (or road) tread pattern. The tread has many constituent elements that form longitudinal grooves and ribs. As a rule, there is no micrograph on them. Such tires are designed for asphalt concrete roads with dry and wet surfaces and are not suitable for driving on country roads, especially when wet. Moreover, they are unsuitable for snowy roads in any condition.
2. Tires with universal tread pattern (all season). The grooves between the constituent elements are wide enough in the longitudinal and transverse directions. The tread also has a micro-pattern - narrow ("knife") slots. The universal pattern gives good grip on soft ground. Universal tires behave on winter roads much better than summer ones. However, on a hard surface (asphalt concrete), the universal tread wears out 10-15% faster than the summer one.
3. Tires with winter tread pattern , which is formed by separate blocks separated by wide grooves. The grooves account for 25-40% of the total tread area.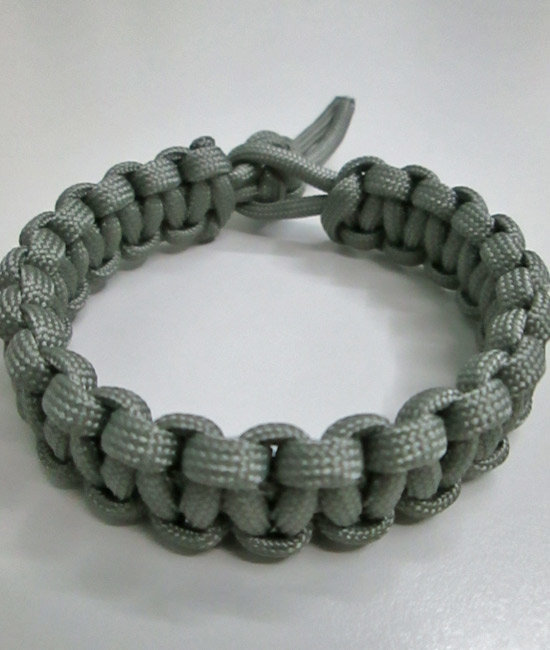 Winter tires have a wide range of tread types and shapes - from relatively smooth universal use (for cleared winter roads) to rough with developed lugs designed for snowy roads with ice.
Winter tires are often fitted with studs. On asphalt concrete surfaces in the summer, such tires wear out very intensively and are very noisy. Lamellar tires equipped with thin metal lamellas look more successful. They not only provide a quiet ride in winter, but can also successfully compete with summer ones when driving on dry surfaces, and besides, they make much less noise than studded ones.
Longitudinal groove tread pattern has good grip in the lateral direction and poor grip on wet and slippery roads in the longitudinal direction. The tread pattern with transverse grooves has the opposite performance, so tread patterns that have longitudinal-transverse grooves are widely used.
Tires must not make noise when driving, especially on improved roads.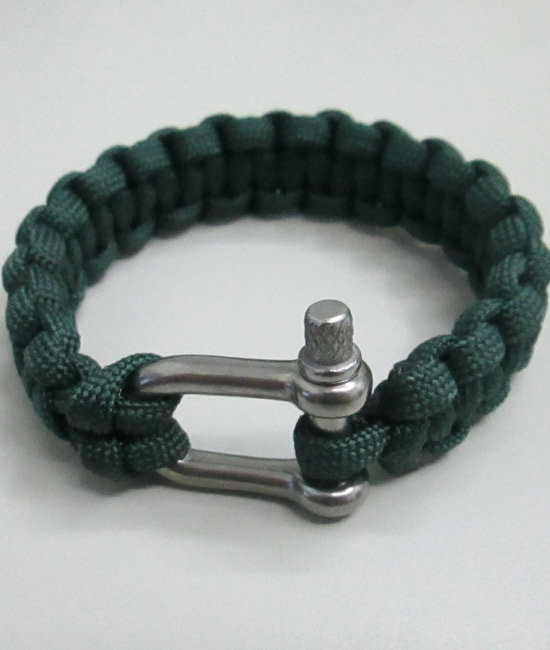 Tire noiselessness is achieved by choosing a specific tread pattern and applying the principle of variable pitch of pattern elements along the wheel circumference.
The tread pattern has a great influence on the rolling resistance coefficient of the wheel, tire wear and tire grip. Ensuring high wear resistance, as well as tire grip, which is necessary for traffic safety and economy, is the main task of the tread pattern. Tread rubber must have high physical and mechanical properties, be strong, elastic, resist abrasion, cuts, tears and repeated deformations, and be resistant to aging. The listed qualities of tread rubber are ensured by the appropriate choice of composition and rubber compound processing technology.
Sidewall is considered to be a rubber layer covering the frame walls and protecting it from mechanical damage and moisture. The sidewalls must be flexible enough, and therefore thin enough to withstand repeated bending for a long time and have little effect on the rigidity of the frame. The sidewalls are made as one piece with the tread and from tread rubber compounds, although cheaper compounds can be used for them, according to the working conditions. For the most part, the tire designation, its number, the manufacturer's trademark, the date of manufacture, etc., i.e. the tire marking, are applied to the sidewalls.
The rigid part of the tire, which serves to attach it to the wheel rim, is called the bead and is formed from the wings. The tire wing consists of a bead ring made of steel wire, a solid profiled rubber band (filler), a bead ring wrapper and reinforcing ribbons. A metal ring is necessary to give the board the necessary strength, and a rubber band contributes to the design of the board and its solidity. The side ring and the rubber band are wrapped with a rubberized wrapper. The shape of the bead ring affects the correctness and reliability of the overall installation of the tire on the wheel rim. The number of metal wires in the bead ring and their diameter are determined by calculation.
In the tube tire , the air cavity is formed by the sealing chamber.
The chamber is an annular tube made of airtight elastic rubber. It has a valve that serves to pump, hold and bleed air. The size of the chamber must strictly correspond to the size and shape of the tire. The wall thickness across the cross section of the chamber is usually not the same. It is larger at the treadmill compared to the rim part. The chamber itself could not withstand the internal pressure if it were not limited by the tire. When the wheel rolls in the zone of contact between the tire and the road, the chamber experiences alternating deformation and operates under severe temperature conditions. Rubber for chambers must be airtight, elastic, durable, resist punctures and tears well, be resistant to thermal aging, not change its dimensions and physical and mechanical properties in a wide range of ambient temperatures.
Tubeless tire - pneumatic tire in which the air cavity is formed by the tire and wheel rim; sealing is achieved through a special sealing rubber layer applied to the inner surface of the tire and having increased gas impermeability.
Tubeless tires for passenger cars are mounted on deep rims of the same design as for tube tires. The presence of a 5° rim flange on deep rims for tubeless tires ensures a tighter bead fit.
Tubeless tires with a sealing layer have the following main advantages compared to tube tires:
• increased driving safety due to the absence of a sharp drop in tire pressure during punctures;
• increased tightness, since the air pressure in them decreases more slowly than in tube tyres;
• less heat during operation due to better heat dissipation through the open part of the rim;
• Fewer mounting and demounting times of a tire during its lifetime, as in the event of a puncture a tubeless tire (up to 10 mm in diameter) can be repaired without removing it from the rim;
• lower labor intensity of tubeless tire repair compared to tubeless one;
• Easier and more secure valve mounting (on the rim, not on the tube).
Each tire has a number of designations and indices that describe its physical, structural and operational characteristics.