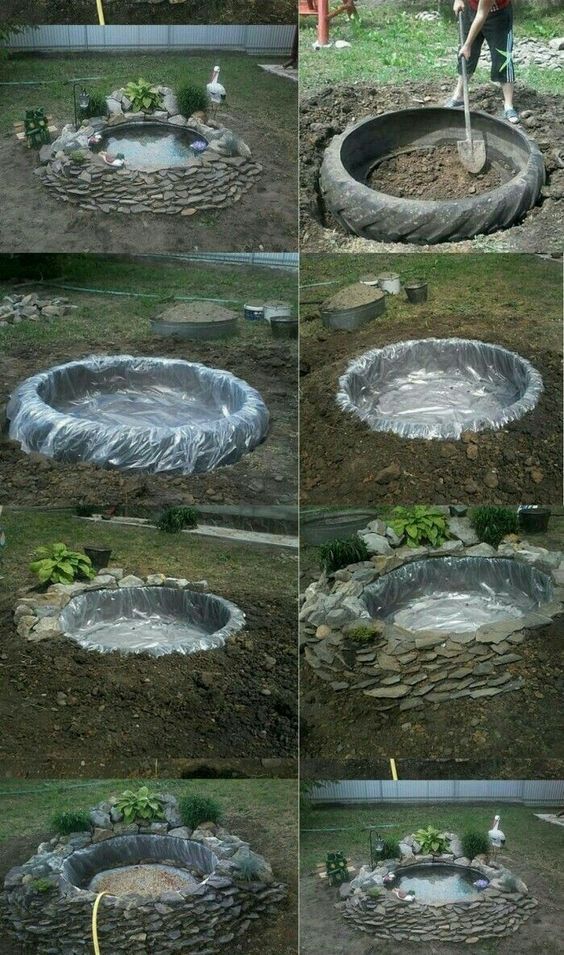
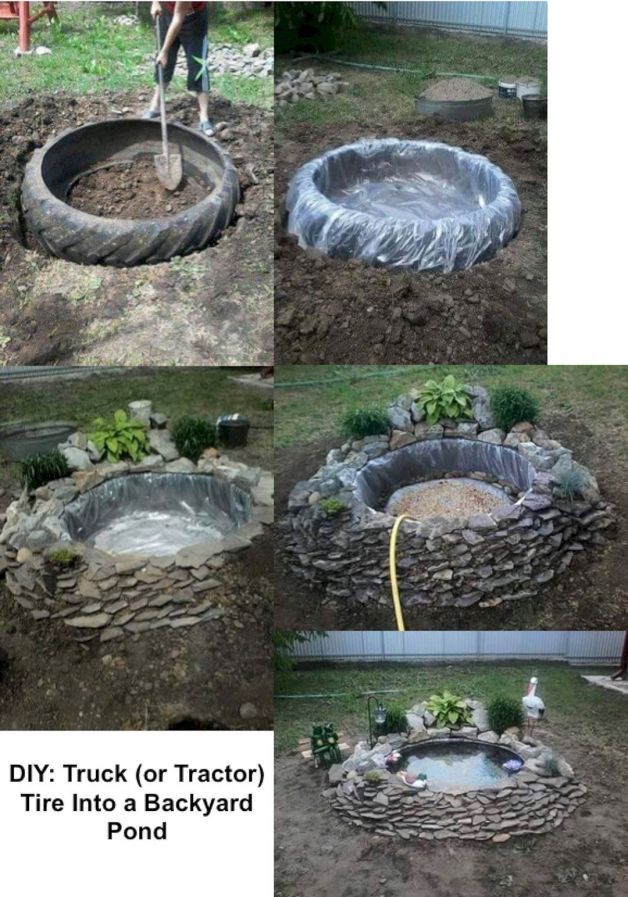
In this video, we’re working with a landowner in southeast Kansas. He keeps some cattle in a pasture, but it doesn’t have a water source for them. So, we’re going to install a self-filling livestock water tank, also known as a tire tank.
To do this, we’ll need to dig a trench and lay a waterline from a spigot to the pasture fence, which is about 350 feet (106.7 m) away. Then we’ll use that waterline to install the self-filling livestock water tank.
We’ll do that using a John Deere 1025R Compact Utility Tractor (US CA) with a factory installed 260 Backhoe. We’ve also added an h260 loader (US CA) and a Frontier AP10F Pallet Fork (US CA) for ballast on the front of our tractor.
Step #1 – Plan your work.First, we spray-painted an orange line from the spigot to the spot where we want to install the self-filling water tank. We also called 811 Call Before You Dig to make sure we were clear of any underground utilities.
When ready to dig the trench, Caitlin positioned the backhoe to maximize the boom reach. After following all the operator’s manual start-up procedures, she’s ready to get started.
This backhoe has a reach of 8-feet, 8-inches (2.7 m) from its pivot point, a swing arc of 150-degrees, and a flat digging depth of 24-inches (61 cm). In this part of Kansas, the frost line is 20-inches (50.8 cm). So, we’re good to go.
Once she digs a length of trench, she’ll reposition the tractor to give the backhoe its maximum reach, and continue digging.
350 feet. This will take a while. But it’s a great idea, and it’s worth doing it right.
Read this carefully and commit it to memory.Before she reaches the fence line where we’ll install the livestock water tank, Caitlin turned around to face the end point and began digging back toward the trench she’s already dug.
Now – here’s the tip you really need to know. Before she got too close to where the two trench lines would come together, she positioned the backhoe at a 90-degree angle to the trench lines to finish connecting them. If she didn’t, she’d end up straddling the trench with the tractor. And then she’d really have a problem.
Once the trench was complete, we laid and connected the PVC water pipe from the spigot to the livestock water tank site.
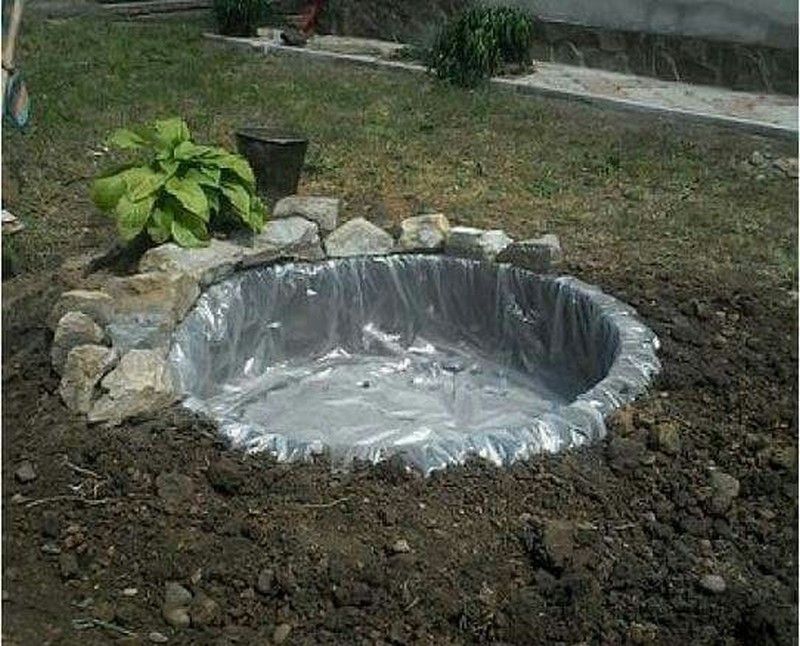
Time to put it all together.For this self-filling water tank, we used an old motor scraper tire with the bead removed from one side, some quick setting concrete, a rubberized sealant, some more PVC pipe, and a valve and buoy system that works just like your home toilet’s refill tank.
After making the site level, we used 2-inch (5 cm) gravel to build a pad for the tire tank. The coarser gravel formed a good base for the tire tank and will keep the livestock from loafing on the gravel pad. Then we connected the final supply line to the water line, installed a drain pipe, placed the tire over the plumbing, and made sure the tire was level.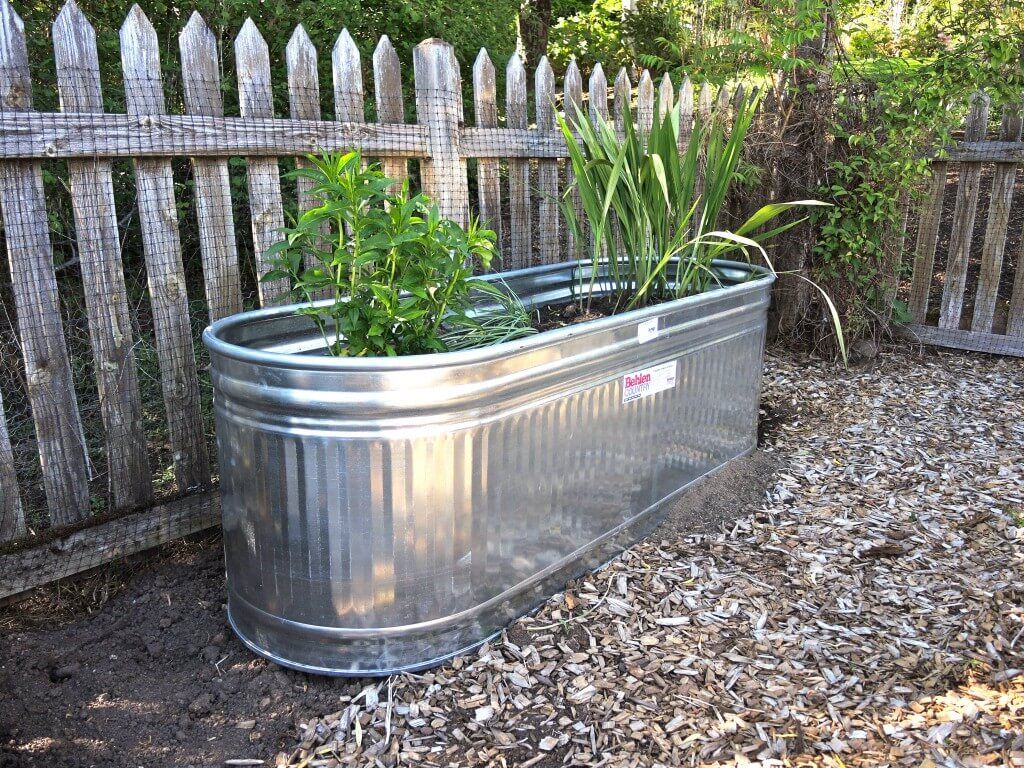
We placed PVC caps over the supply line and drain pipe to protect them from the concrete, and lightly greased each just enough so they’d be easy to remove.
And we used 12 bags of quick setting concrete to form the solid base in the tire.
We removed the PVC cap that protected the supply line and attached an elbowed pipe with a shut-off valve for adding water just up to the level of the wet, smoothed concrete. This way, we sprayed water into the inside edge of the tire so it would rise smoothly and not distort the surface of the concrete.
As soon as the water level had covered the top of the concrete base by about 2 inches (5 cm), we shut off the water to the elbowed pipe, and let the concrete set. The water will also help keep the concrete from shrinking away from the rubber.
When the surface water evaporated and the concrete was smooth and dry, we used a rubberized sealant spray to seal the edge where the concrete and tire rubber met, as well as where the PVC supply line came through the concrete.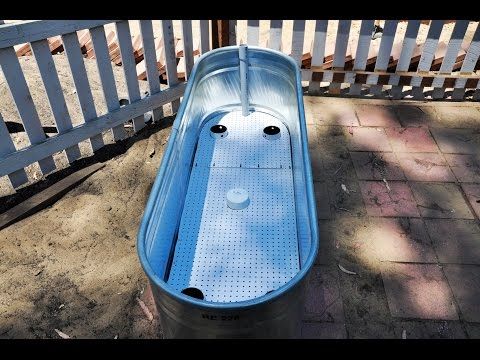
To assemble the plumbing, we added a threaded brass connector to the supply line. Using galvanized fittings would not be a good idea here as it would eventually corrode from the minerals in the water and the concrete.
Finally, we attached the open/close valve and float, and turned on the water.
Now, imagine your toilet tank filling.As the water level rises, the float rises. It’s attached to the fill valve with a cord. When the float reaches the proper height, the fill valve closes.
As water is consumed and evaporates, the water level and float fall. Eventually, the valve opens and the tank refills. When the float reaches the proper height, the valve closes. Automatically. Just like the fill tank on your home toilet.
Frontier offers nearly 600 implements that are available only from your John Deere dealer, the place to go for advice and equipment.
So, remember, for implements that help turn your tractor into the workhorse it was built to be, think Frontier and your John Deere dealer.
And remember, always read the Operator’s Manual before operating any piece of equipment and follow all operating and safety instructions.
Helpful Links:
John Deere Tractors (US CA)
Frontier Pallet Forks (US CA)
John Deere Backhoes For CUTS (US CA)
How To Remove A Tree Stump
Get Downspout Drainage Away From Your Foundation
How To Install A Drywell
How To Build A Retaining Wall
Find Your Dealer (US CA)
Tire tanks are one of the easiest tanks to seal and install, and yet there is tons of bad information and advice out there, much of it from people educated beyond their abilities at universities and government agencies. A prime example of this is the University of Kentucky Department of Agriculture, in cooperation with the Kentucky Beef Network and the Kentucky Cattlemen's Association. They have changed their installation recommendations multiple times from one failed method to the next, to the the current point where they tell people to fill the tank half full with an entire pallet of concrete. ..and then they wonder why they freeze!? The problem is that they teach others these moronic ideas that don't work. If you have considered using their advice, run the opposite direction!
We've been installing tire water tanks successfully in a variety of climates for 40 years. If you follow our simple instructions without deviation, you will have success too. There are lots of other compatible installation plans out there, mostly from western US states' NRCS programs who have decades of experience. States like Wyoming, Nebraska, South Dakota and Texas all have decent plans.
Before we get started, I've learned over the years that not everyone knows tire jargon, and specifically one term we use a lot: the bead. The bead of the tire is the inside edge of the tire that the wheel seals against. It is the edge of the donut hole, if you will. In a classic tire tank, this is what the concrete seals to.
Water line installation: When you install your water line, obviously it needs to be buried below frost. You want to be sure to consider historical frost, keeping in mind winters in the 40's and 70's were quite a bit colder for many areas, and they may well be again. It doesn't matter a whole lot what material you use for your water line, PEX or PVC both work well. However, it is essential that you transition to a stainless steel or heavy brass pipe nipple for the entire thickness of the concrete! PVC can break off in the concrete. PEX allows too much flex in the pipe for many float valves to function properly. Galvanized pipe can react with concrete and corrode quickly. If you don't use stainless or brass, you will regret it. The top of the pipe nipple should extend 3"-4" above the tire bead or the top of your concrete, whichever is lower. If your concrete is lower than the bead (this is fine, as long as it is 4"-6" thick), you need to make sure there is enough space for your valve arm to function.
Water Supply Pipe placement: It is instinct to put the water supply pipe dead center in the tire. This is fine if you are using a valve that doesn't really have an extended arm, or if you are using a larger (10'+) diameter tank. However, if you are using a float valve with a longer arm, like the Best Float Valve that we recommend, offset your pipe closer to the edge of the bead, so that your float will be more in the center of the tank, and more out of reach of livestock wanting to play with it.
Shut-off valve placement: It is always good to have a shut-off valve in your water supply line to each tank. It is easiest to install it inside the tank below the float valve. However, we do not recommend this for a couple of reasons. First, in most tanks that puts your float valve up way too high, making it more prone to freeze and making it more accessible to livestock to mess with. Second, you really want to be able to shut off the water before it gets into your tank, especially in colder climates. We recommend installing a gate valve away from the heavy use area, on your supply line below frost.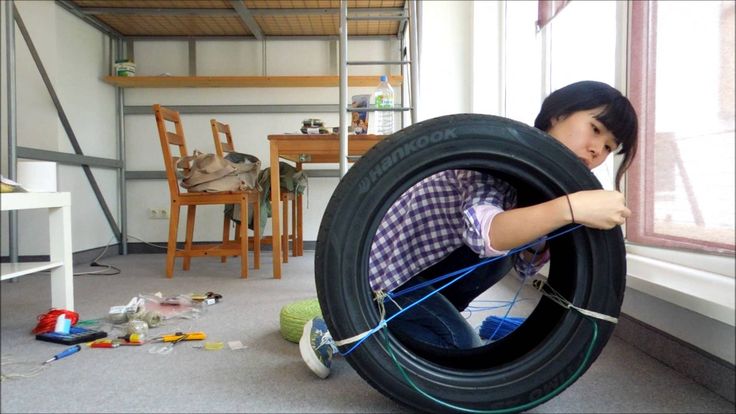 A plastic tile can be placed over it and capped, so that you have easy access with a notched pipe to turn it on and off.
Earth tube installation: An earth tube, or geothermal tube, is an easy way to passively heat your tank in colder climates. Burying a solid tile or culvert vertically from below frost up to just below the bottom of the tire bead will creates a dead air space that allows the earth's heat to rise and warm the concrete plug and your water. Your water supply and overflow pipe can also come through the earth tube, although they don't have to. You do want the top of the tube to be above ground level slightly, or up to the bottom of your concrete plug, whichever is higher. A thin piece of galvanized steel, copper, tin or aluminum should be used to cover the tube while the concrete sets. Plywood can be used, but since it doesn't conduct heat, it is not recommended.
Overflow/drain pipe: If you have a place to run an overflow or drain pipe, like a ditch away from the tank or a drain tile, we always recommend doing so. This will prevent potential messes if a valve malfunctions, and it gives you flexibility to clean and drain tanks easily. I always use PVC for the standpipe, and I prefer 3" pipe to help prevent clogging. I install a sleeve or slip joint level with the concrete so that I can easily pull out the standpipe and drain the tank. Of course, this only will drain down to the concrete level and not the bottom of the trough. If you don't want to bail the bottom with a bucket, you can install a "T" fitting at the concrete level. The vertical outlet is for your overflow standpipe. The horizontal outlet allows you to run a pipe with a gate valve over to the deepest part of the trough and elbow it down to within about 1/2" from the bottom. If you cover the overflow standpipe and open the gate valve, you will create a siphon that will drain virtually the entire tank.
Preparing the pad: The first task is to make sure that when you install your water line (and overflow), compact the backfill soil where the tank will be.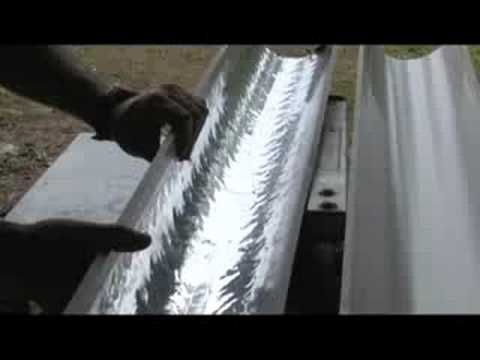 This will prevent settling or washing out of the tank foundation. Many people will install an aggregate heavy use pad under the tank. This is a great idea to do around the tank, but it is unnecessary to do under the tank, and in fact might allow cold air infiltration. If your tank is taller than you prefer, just putting a pad around it is a great way to compensate. On the other hand, if your tank is close to being too short, you'll want to avoid making it shorter by only installing aggregate around it. If you do put aggregate under the tank, make sure there are enough "fines" to fill in between the larger aggregate. Dense grade, crusher run, or crushed road base (our favorite) make good materials for your pad. Only using larger stone without fines creates voids that can cause you problems with settling.
Under Construction
If you need further assistance while we finish this webpage,
call us at 800-365-5850
Placing the tank:
Sealing the tank:
Protecting the tank:
Before you start breeding poultry, you need to understand in detail the intricacies of caring for them.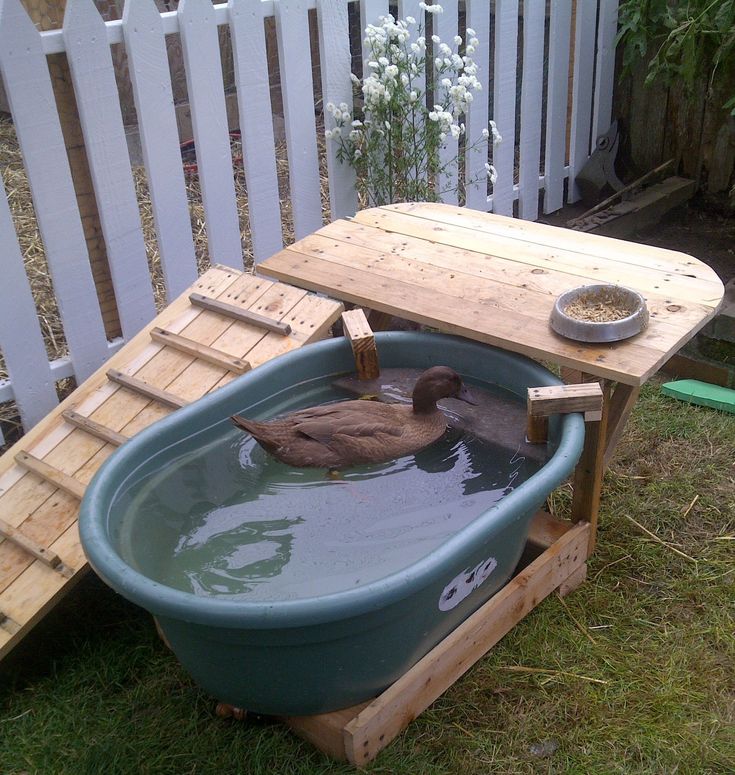 If you decide to deal with ducks, then this article will be useful to you. In it, you will learn about the types of drinkers, you can choose the right model and learn how you can build a duck drinker yourself.
When breeding ducks, keep in mind that they consume a lot of fluids due to their high metabolic rate, so it is important that fresh and clean water is freely available around the clock.
Fluid intake is influenced by factors such as the age of the bird, the amount of food and temperature. About 1.65 liters of water is used per adult per day.
The drinker must be made of good quality materials that do not rot and are resistant to temperature changes. It should also be easy to clean and durable enough.
Most often it is made of high quality plastic with well finished edges. The edge must be absolutely smooth, or it is necessary to put a special rubber rim on it.
You can either make a duck drinker yourself from the materials you have at hand, or buy a ready-made one in a specialized store.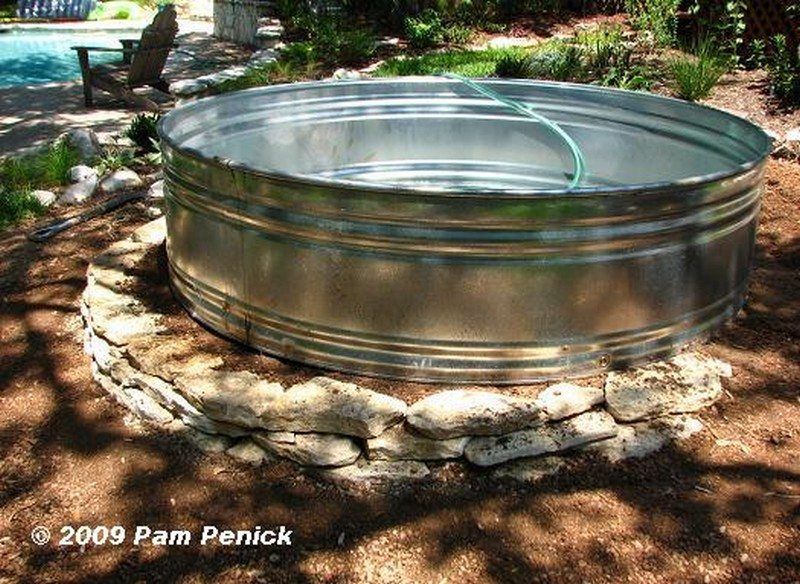
It is especially important for babies to keep the water clean and avoid spillage, because if they get wet, they can very easily catch an infection. Duckling drinkers must comply with the following rules:
It is very important that water is freely available for ducklings at any time of the day. Babies up to 5 days old need water at room temperature. At 10 days of age, you can already use a metal drinker.
In winter, ducklings need to warm up their drinking water a little.
The average length of the drinking structure is about 20 cm, and the width of the walls is no more than 3 cm, so that babies can comfortably reach the water.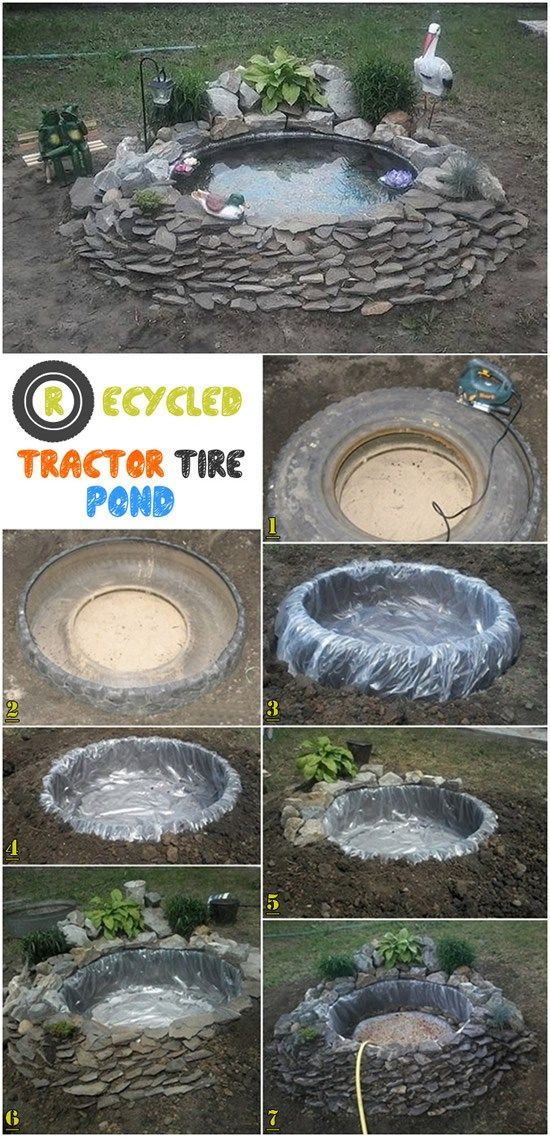 Little ducklings like to splash and spill water on the floor, so you can put a wide container with a net on top under the bottom of the container. They grow very quickly, so it is better to choose the most economical drinker option.
When choosing a drinking bowl for ducks, it is important to correctly calculate the number of containers and their position. For adult birds, they should be shallower and wider than those used in young birds.
Basic requirements for drinkers:
For adults, it is important to fasten the drinkers very firmly so that it is not possible to drop the containers and splash water. In addition, adults like to climb directly into drinking water, swim, while polluting it, so it is better for them to choose closed nipple containers.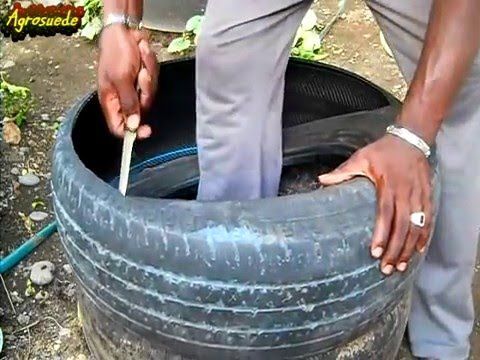
There are different types of drinkers, each with its own advantages and disadvantages. You will learn more about the pros and cons of different drinkers below.
This is the simplest drinker available to everyone. You can use any bowl or bowl of water as it. The advantages of such a drinker include its lightness, simplicity and cheapness.
But still, it has more shortcomings, of which the following can be noted:
The main advantage of this drinker can be called a very economical water consumption, as it maintains one water level for a long time. In addition, it will always have fresh water due to the self-filling of the tray, the main thing is to always monitor the presence of water in the bottle.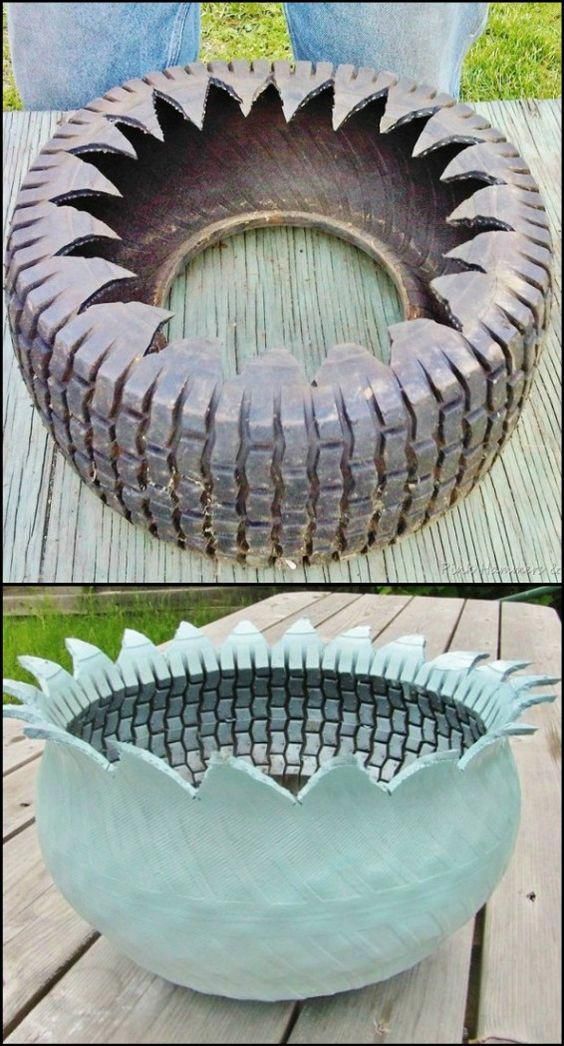
Like the nipple, this is a closed drinker, which means that various garbage and droppings will not get into it, the water will always remain clean. This is necessary to avoid diseases in ducks.
The disadvantages include the very light weight of the structure, due to which it can be overturned. But still, it has much more advantages, so this model is especially popular with farmers.
Is one of the simplest and most convenient drinkers. It is very easy to wash, but you need to fill it with water manually. In stores you can find a more modern model that connects to a water supply or water tank.
In this type of cups, it is very important to correctly calculate the number of nipples. The optimal number is 10 ducks per drinking hole.
The liquid supply is dosed, which means that the water in the drinker always remains clean and fresh. The main thing is to fill the main tank on time. For ducks, nipples with large nipples and good feed are best.
There is no need to accustom it to it, the birds quickly understand that to get water you just need to press the nipple.
Has the following advantages:
The disadvantage of this drinker is its heavy weight, which can be traumatic for birds if the pipe is not well reinforced. Also, in such a drinker, water is often polluted, and it must be changed periodically. Due to the heavy weight of the pipe, the help of a second person will be needed each time to change the water.
Making your own drinker does not take much time and effort. Each of the designs is convenient to use, it does not require constant monitoring of the amount of water, because when consumed, it is independently replenished in the tank due to the weight of the birds.
This drinker is especially suitable for adult birds. In order to make such a drinker, put a bottle of the required volume in a regular basin. In its lower part, make a hole with a diameter of 1.5 cm, the finger should completely cover the hole.
When pouring water into a bottle, close the hole with your finger, then put it in a basin and you can remove your finger. The drinker is ready. Now water is poured through the hole into the pan, and when it is consumed, it will be replenished on its own.
How it looks in practice is shown in the following video:
It will be the most durable and suitable for ducks of any age. The trough bowl is easy to use and very easy to make. In order to make a groove drinker, take a part of the sewer pipe of the required length.
Then make the required number of holes in it and fix it on a special stand. A plug is placed at one end of the pipe, and an angle is attached at the other, along which water is poured.
How to make such a drinker is shown in the video below:
An important point in using such a drinker is its reliable strengthening. Care must be taken to ensure that the pipe does not fall on the birds in any case, otherwise they will be severely injured.
From the sewer pipe, you can make a stand-alone version of the drinker, which will save time on servicing poultry. The design of such a drinker is shown in the following video:
This type is best suited for young animals. Its use is similar to getting milk from the breast of animals, which is why it is also called nipple.
It is this type of drinker that is widely used in industrial production, as it saves water well and prevents splashing. In addition, such a closed drinker prevents debris from entering the water, which in turn protects birds from various diseases.
To make it yourself, you will need the following items:
You will also need an electric drill with a 9 mm tip and a cone tap.
Step-by-step instructions:
How blogger and handyman Dmitry Izyumov assembled a nipple drinker, see below:
This is the simplest type of drinker. Pour a sufficient amount of water into the container, cover with a small bowl, and press it well against the bottle. Now turn the structure upside down so that the bowl is at the bottom.
Place the drinker in the house and place a small wooden support under the bottle to allow the liquid to flow freely into the bowl. For very small ducklings, a drinker made from an ordinary three-liter jar and a plastic bowl is suitable.
How to make an improved vacuum drinker, see the following video:
For the main tank, you can take a container of any volume, even 50 liters. But still, it would be better to install several smaller drinkers so that the water does not stagnate and sediment does not appear. The main thing is to strengthen the bottle well so that it does not fall and injure the birds.
With this cup, water does not spill on the floor, the birds remain dry, which prevents the death of ducks from hypothermia. In winter, in order to prevent the water in the nipple drinker from freezing, you can put a heater in it, which is usually used to heat aquariums.
Another idea for a drinker is a burdock leaf or other plant with large leaves. To do this, it must be dipped in a solution of cement and left to dry for several days. Such a drinker will not be practical, but well suited for decorating the site.
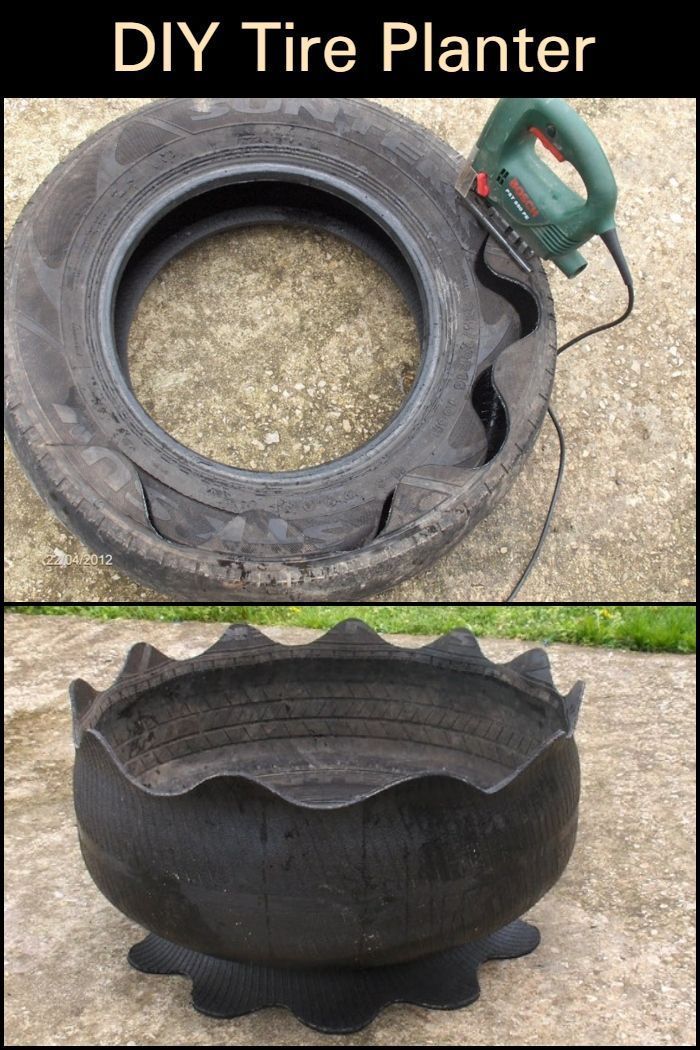
Another original material can be a car tire. It needs to be cut in half, pour purified water inside, and it is ready for use. Only first you need to remove the unpleasant odor with a soda solution.
Such a drinker will look unusual and interesting, but will not be suitable for use by a large number of birds.
Attaching drinkers is an important consideration for anyone starting duck breeding. These are active birds, they move a lot and can easily drop even a heavy drinker made from a sewer pipe.
Try to strengthen the drinker as securely as possible, you need to approach this issue with all responsibility, because the health of your duck population depends on it. For ducklings, the attachment can be made a little easier, but it's still better not to risk it.
Drinking bowls, like feeders, can be bought without any problems in any specialized store, where they are presented in a wide range. But it is much more interesting and exciting to come up with and make a design with your own hands, using improvised materials. In addition, this option is well suited for those who live far from stores with similar products.
Content
 2 with heating
 The drinker for bees is an indispensable thing in the care of these insects. After all, they are thirsty every day - especially during the appearance of bee brood.
In spring and winter, the beekeeper installs such a device in a stationary apiary. It is worth considering the features and types of bee structures, as well as the rules for their installation and pay attention to the photo of the drinking bowls for bees with your own hands.
As you know, honey bees always want to drink a lot of water. Therefore, in the absence of a natural source near the bee apiary (stream, river, lake or pond), an apiary drinker with a volume of 0.7-3 liters is built in this place.
Such structures must have a certain amount of water every day. Their volume is increased or decreased depending on the season:
When installing a do-it-yourself bee drinker from a plastic bottle, the beekeeper ensures the correct water supply to this device. This product is installed outdoors. Thus, the sun's rays maintain the desired temperature of the water.
When installing this design, the following advantages are obtained:
When installing a similar structure for bees, the beekeeper chooses a place that is quickly heated by the sun. In order not to be blown away by the wind, it is installed on a special stand, the height of which is 70 cm. The first structures are containers that are filled with water, and all the bees flock to them.
The second products are installed only in small apiaries. Water is supplied directly to each family of these insects.
According to the method of water supply, there are two types of drinkers:
In winter, the beekeeper builds a heated drinker. Indeed, at the beginning of spring, insects, when in contact with cold water, freeze, freeze and die. If the sun shines for a long time on the street, then the water quickly heats up in a bee structure made of plastic or glass.
Depending on the season, beekeepers install 2 types of drinkers - winter and spring. It is worth considering their main characteristics.
In winter, to provide the bees with the necessary amount of water, intra-hive drinkers are used. In this case, vacuum containers are more often used.
Important! Beekeepers fill them with water and do not open the hive. Due to this, when installing vacuum drinkers in the entrance, beekeepers do not disturb insects and do not harm the bee brood.
In this case, access to water is possible only from the hive. Since this design is transparent, it is easy to maintain the required liquid level in it.
In the spring, when the bees leave the hive, beekeepers install external drinkers. In this case, in the place where the sun shines, they put a barrel with a half-open tap, which is filled with water.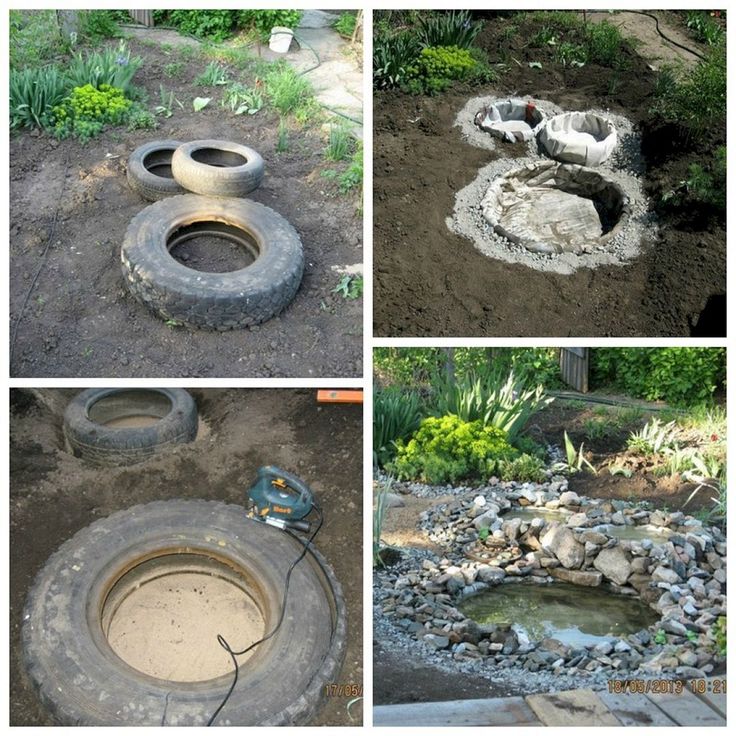
A similar structure is placed near the hive. Thus, the bees quickly and independently take as much water as they need.
At the beginning of spring, the temperature of the water in the bee trough is still cold. In contact with it, sleepy bees are subject to great stress. In this case, there is a significant reduction in the number of bees.
To ensure that the water is always warm, beekeepers install small heated drinking bowls. In this case, an aquarium water heater is more often used. This device does not boil ice water, but slightly heats it.
A vacuum drinker for bees is considered an indispensable container in winter, when the bees themselves often freeze and their brood is reduced. This design has the following advantages:
The vacuum assembly is filled with water before being installed in the tray. Such a product is made of transparent plastic, through which the liquid level is clearly visible.
When building a drinking bowl on your own, use the following tools and building materials:
As soon as spring comes, the bees fly out of the hive even in cold weather and, when in contact with ice water, become stiff. In this case, the beekeeper installs a drinking bowl under the glass case, and as a result, the water in it is kept warm for a long time. If the stationary apiary is located at a far distance from the house, in this case similar structures are installed without valves.
Also, the beekeepers make their own bee drinkers made of car tires and large heated outdoor structures. The first structures are constructed from tires, which are pre-cut along the circumference.
Attention! In black car tires, the water heats up quickly. When going down the inside of the tires, the bees drink only warm water.
Outdoor large drinkers are equipped with a special heating device - a water heater for an aquarium. Below, under the gutter through which water flows, they put a container with stones or gravel.
This is where all the water from the board is collected. Such a spare tank is used if the plastic bottle runs out of water.
The simplest drinker is made from a plastic bottle. This design is very convenient and compact. Then it is installed near the bee hive.
When manufacturing and installing such a drinker, perform the following steps: