From changing tubes to preventative measures to reduce the risk of punctures happening in the first place, here’s our survival guide for one of life’s deflating scenarios.
Reduce the risk of a puncture
A pinch flat is caused by tyre pressure being too low, causing the tyre to compress when hitting a bump and pinching the tube against the rim. One way of avoiding such punctures is by ensuring you maintain correct tyre pressure.
The other major cause of punctures is something working its way through the tyre, pricking the tube and causing it to deflate. This can either be instantaneous, or a delayed process presenting itself some way down the track
Fixing a flat tyre
1. Removing the tube
Insert tyre leaver
Leaver tyre over the rim
Repeat process
2. Locate the cause
Check tyre casing
3. Replacing the tube
Insert new tube
Work way around tyre
Use thumbs to replace
1. Locate the puncture
2. Repair the puncture
 Hold for a couple of minutes to be on the safe side.
3. Install tube and inflate
WATCH THIS VIDEO
Troy from Pedal Power Garage shows you how to change a punctured tube to get you back on your bike in no time.
Happy riding!
(Image credit: Getty)
Getting a flat tyre anywhere or anytime is annoying, but if you don't know how to fix it, it can be a scary predicament.
Not knowing how to get your wheel re-inflated and back on the road can make riding solo an un-nerving and ride limiting.
Even with a pair of the best road bike tyres, ideal gravel bike tyres or even best puncture-proof tyres, you can never guarantee against a flat wheel.
It's not just tyres either, take some time to get to know your rubber and Schrader vs presta valves in our guide on bike inner tubes which explains all about them.
However, with our guide for how to fix a puncture and mend an innertube, you'll soon be super confident in your own abilities to keep safe and get home from any bike ride.
We've explained the easy steps in the video above, and there's a picture guide that takes you through the steps underneath. However, as with everything in life, practice makes perfect. Once you've watched or read, make sure you spend some time having a go yourself.
Always make sure you try out your new skills at home in the warm and dry before setting off on your next adventure where the added elements of weather, light and time may be against you.
Step 1: remove the wheel from the frame
Make sure you are in your smallest sprocket before removing removing your rear wheel.
(Image credit: Getty)
Front wheel removal
Once you realise you have a flat, the first job for fixing a bike puncture is to remove the wheel.
It's a simple job of pulling down and unscrewing your quick release until you have enough slack to remove the wheel. If you are using Thru Axles, you'll need to either just unwind the leaver and remove the bolt entirely.
Some bike's don't have a tool free quick wheel release, so it's really important to check what system your bike is using. You might discover that it requires you to carry the correct size allen key for some Thru Axels
Some commuter bikes uses wheel nuts - if this is the case, you'll need a spanner - often 15mm - to loosen these off before you can remove the wheel.
If you have disc brakes you can simply pop the front wheel out and gently lower the bike down on it's forks.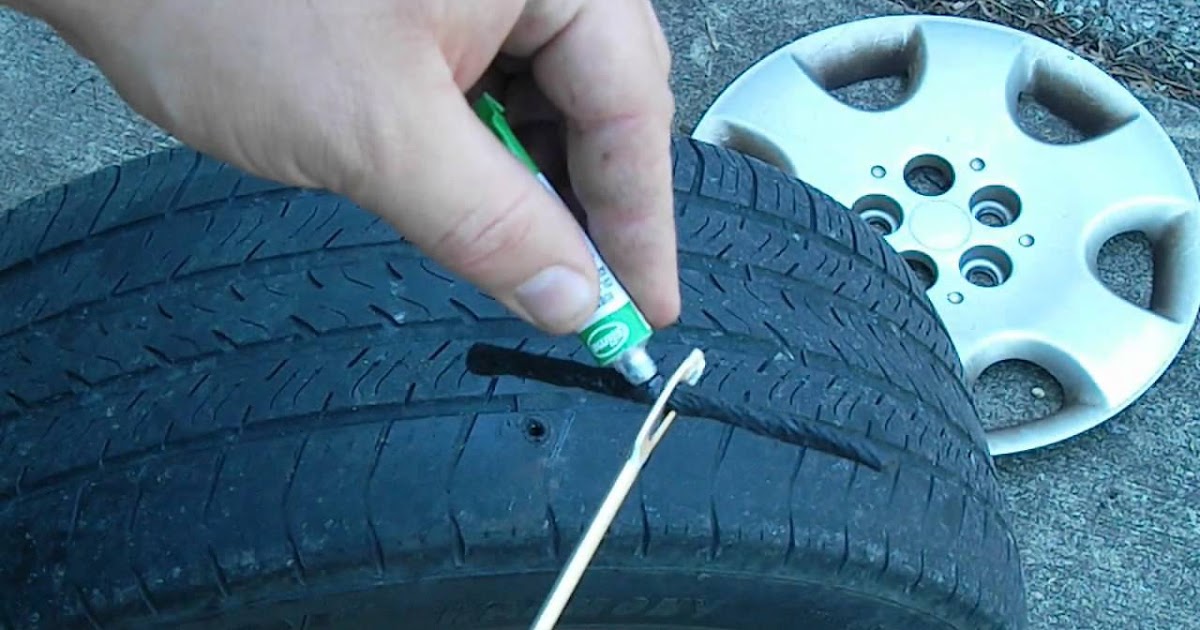
To let off a caliper brake, lift the leaver, on the left hand side in this image from down to up.
(Image credit: Future)
If you are using rim brakes, you'll need to let off the brakes.
On caliper brakes, like the one above you can just lift the little leaver from down to up, which will slacken the cable to open the brakes enough to allow the wheel and tyre to come out.
How to fix a puncture: remove the wheel
If you have cantilever or V-brakes, as in the image above, you will just need to squeeze the brakes together and pop the cable out of it's housing, again to allow the brakes to open wide enough to allow the wheel and tyre to pass through.
Rear wheel removal
If it is a rear wheel puncture, you need to take all the above steps, but ensure you have adjusted the bike gears so that the chain is on the smallest chainring on the crankset and the smallest sprocket on the rear cassette. This makes rear wheel removal easier as the chain is at it's slackest.
Step 2: remove the valve cap and retaining nut
Take the dust cover off the valve
Take off the valve cap (the little piece of black plastic over the valve) and unscrew the valve retaining nut (the round ring siting against the rim) if there is one. Push the end of the valve to fully deflate the tube if it's not already empty of air.
Step 3: use tyre levers to loosen the tyre
Use tyre levers to prize the tyre from the rim
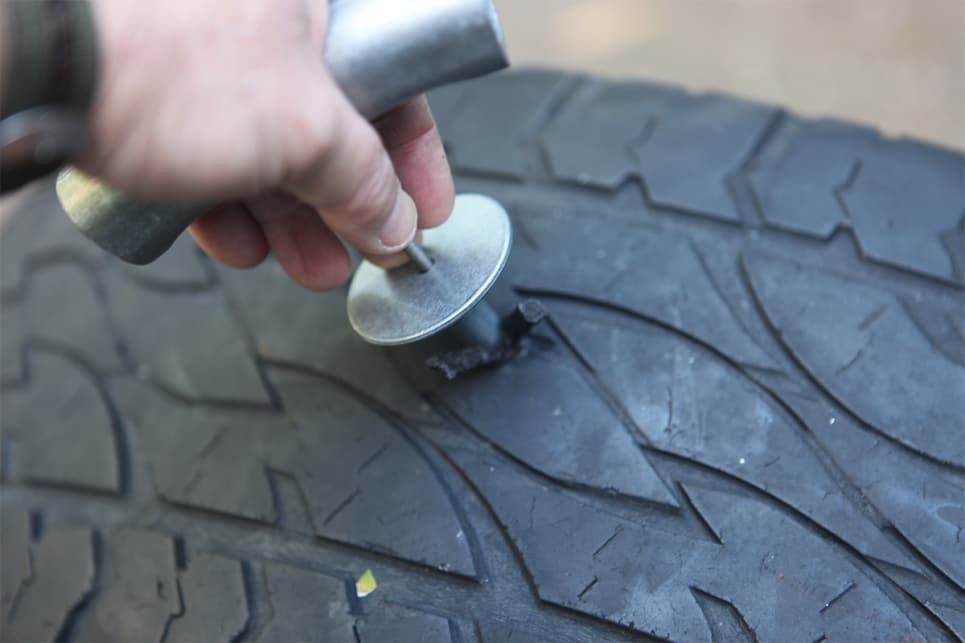
Check the outside of the tyre for any clear causes of the puncture. If you see any debris stuck in the outside of the rubber, remove it and make a mental note of where it is in relation to the valve.
Bear in mind you might not find anything, but DON'T check by rubbing the palm of your hand on the tyre as it could be glass or metal, and the last thing you need when trying to repair a puncture is a cut on your hand!
Gently insert two tyre levers between the tyre and the wheel rim - directly opposite the valve (you can start anywhere but the further you are from the valve the easier it'll be).
Pull the tyre away from the rim using the tyre levers, one at a time. If you have three levers, hook the first two under the spokes and remove some more of the tyre with the third lever.
By now the tyre should be loose enough to simply run a tyre lever around the wheel rim to remove the rest of the tyre. With experience, you may only need one tyre lever.
It's worth noting here that this can be easier said than done, and that some tyres and wheel combinations are notoriously tight.
The ease to which a tyre pops of a wheel rim can also depend on the rubber compound. In general, the more robust a tyre, the harder it will be to remove.
The key here is to find the sweet spot of a tyre that you can remove, while limiting the chances of puncturing in the first place.
Ask around as most local riders will have their go to brands of tyres, as the kinds of roads and terrain will play a part in what works for your style of riding.
If in doubt, opt for a all/ four season tyre.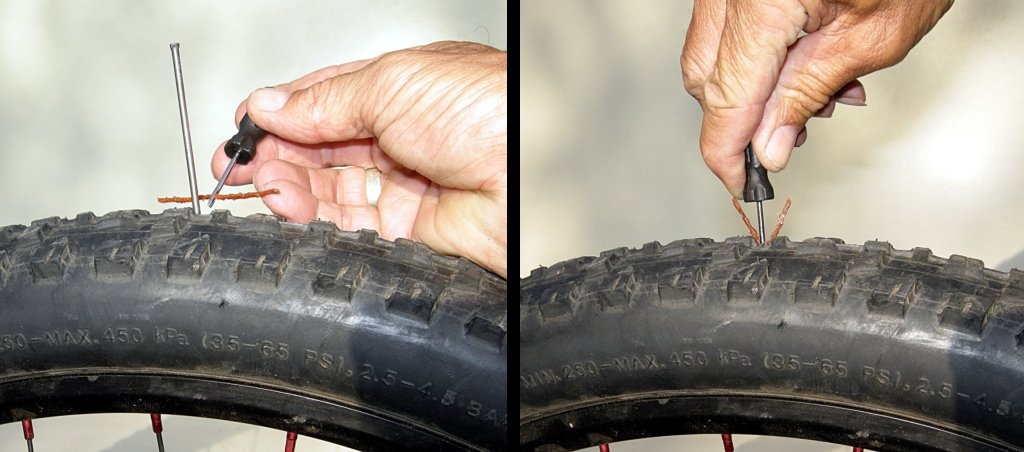 This should be mailable enough to pop off the rim with a bit of encouragement, but will limit the risk of puncturing as much as possible.
Remember, if you can't remove it at home without assistance, you won't be able to remove it on your own out on the bike in all weather, times of the day and temperatures. So if you need to swop tyres, swop them!
Step 4: remove the tyre if you need too
Take the tyre off the rim if you need too.
Pull out the inner tube, and, if you need too, take the tyre off the wheel completely.
If the cause of the puncture was obvious, a thorn for example, you can probably leave one side of the tyre seated on the rim of the wheel, remove the object and then continue to the decision on new tube or or repair the tube below.
If it's not quite as clear why you have a bike puncture, then it's worth removing the tyre completely, as per step 5 below.
Step 5: check the tyre for debris
Gently and carefully run your fingers along the tyre, checking for thorns or glass
If the perpetrator is unclear, turn the tyre inside out and having a good inspection before attempting to insert another tube.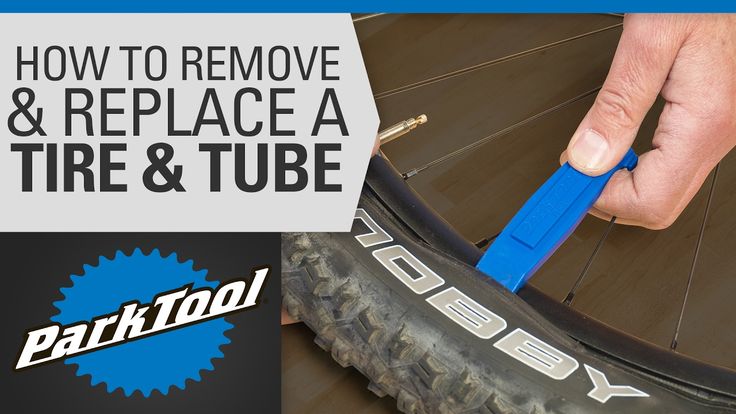
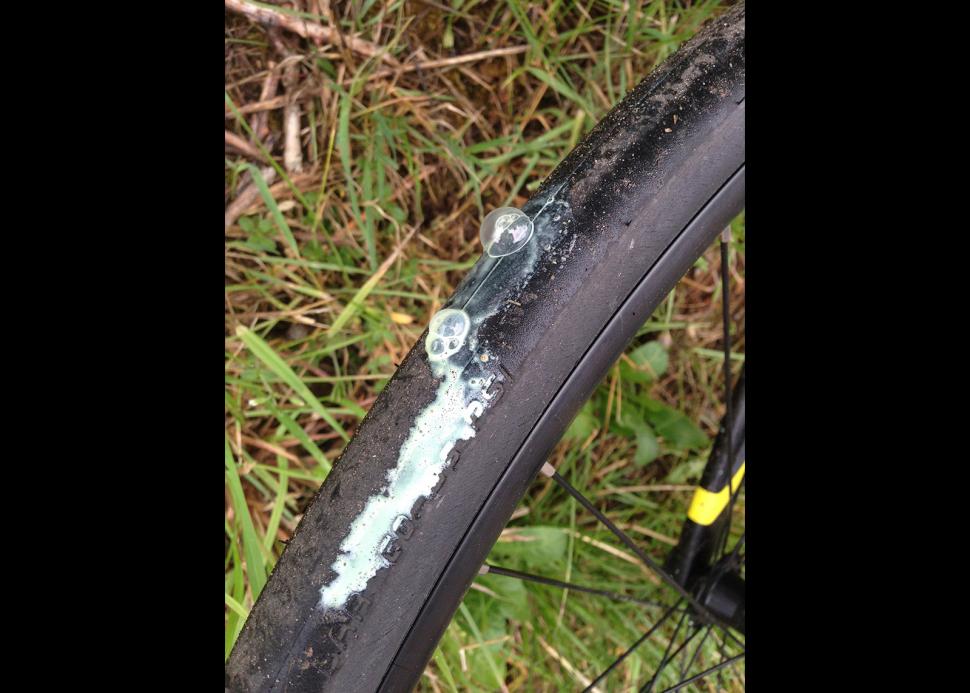
If there is a puddle close to hand, you could always re-inflate the old tube and submerge each section looking for the bubbles of escaping air to help locate the site of the puncture. You can then cross reference this to the tyre and focus on finding the cause.
Check that there are no further holes in your inner tube. Then carefully run your fingers around the inside of the tyre to check there is nothing else penetrating the tyre - if you find anything (small pieces of glass, thorns, gravel), remove it. Not doing so can result in the dreaded double puncture. It’s usually possible to make a visual check of the tread while doing this.
Step 6: decide on replace or repair
At this point you've got two choices - to mend the inner tube and replace it, or simply use a brand new one/ a pre-mended tube.
It's usually easier to use a new or pre-mended tube out on the road. This cuts the time of the roadside down and gets you back rolling as swiftly as possible.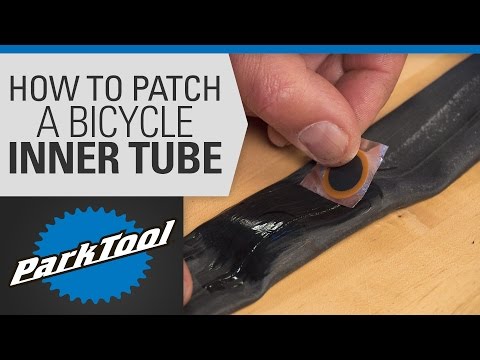
We cover how to mend the punctured inner tube below for when you get home and can do an unrushed job.
Always ensure that the spare tubes you carry have a valve long enough for the depth of the wheels you are rolling on and a valve type that is compatible with one of the best bike pump or best Co2 inflators that you should be carrying.
Step 7: put a little air in the tube
Add a little air to the tube
Inflate the (patched or replacement) inner tube slightly so it just becomes round in shape. This helps stop it pinching against the rim when you put it back in.
Step 7: refit the tyre on one side and insert the tube
Refit the tyre
If you did remove the tyre completely, it's now time to refit on one side. Make sure the tread is pointing the right way.
Some tyres have arrows on the sidewall indicating the ‘direction of travel’, other's are unidirectional and can be fitted in any direction.
Put the valve in the valve hole, and tuck the inner tube into the space between the tyre and the wheel rim.
Step 8: refit the tyre completely
Seat the tyre back into the rim by pushing with your thumbs
When the inner tube is all in, ease the tyre back into place.
Starting at the valve, grip the rim of the wheel and push the tyre on to the rim, lifting at the same time to prevent the semi inflated tube getting pinched.
Try to finish directly across from the valve as the tyre will be looser there. If it gets difficult, let a little air out of the inner tube. Check there are no inner tube bulges from under the tyre, or that the tube isn't pinching under the tyre bead.
You can use tyre levers to help with the last section, where the tyre is tightest - but if possible avoid this as they can pinch the tube and cause you to have to start all over again.
The tougher and newer the tyre, the harder this will be - by contrast well used, supple summer tyres are usually much easier to get back on the rim.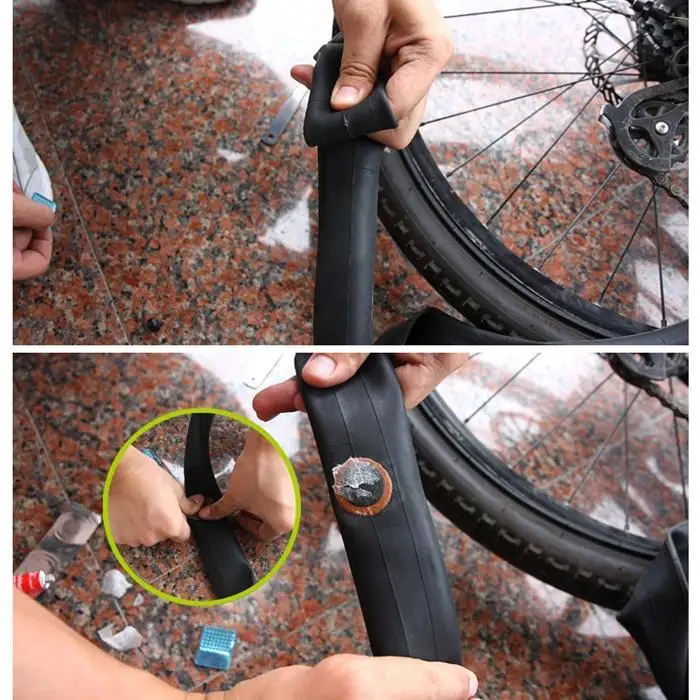
Step 9: fully re-inflate the tube
Attach the pump to the valve and pump it up
(Image credit: Getty )
Pump up the tyre to as close to the you ideal pressure, it's worth checking our guide to what's the correct road bike tyre pressure if you are unsure.
Ideally this would be done before you reinsert and refit the wheel into the bike securely, this just allows you to double check it's seated properly before full inflation.
If you are using a mini pump, you are unlikely to be able to inflate to full pressure, and even with CO2, you'll have to make a rough guestimate at the pressure. So be comfortable with getting the squish feel of your tyres at different pressures, so you can adjust your riding accordingly.
Once the wheel is back on the bike, close the brake quick release lever or reattach the brake cable if needed. If you have mended a rear wheel puncture, get someone to hold the bike up, and go through the gears. Check that the wheel spins freely and the brakes work correctly.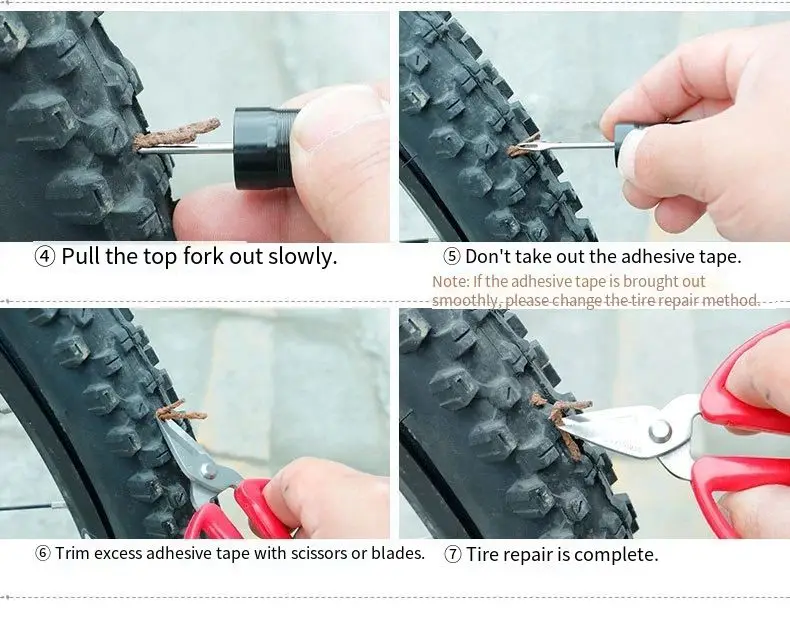
Apply a patch to the inner tube if you're mending it
Inner tubes can be quite expensive, and they're easy to fix so it's a good idea to mend them instead of simply replacing one and chucking the old rubber.
If the puncture is not obvious, pump up the inner tube. Once inflated, it is usually easy to hear the air escaping. If not, run the inner tube past your lips to sense the escaping air.
If you are still struggling to find the culprit, you can always submerge a re-inflated tube in a bucket or sink of water, and (like the puddle approach mentioned above) you should see the tell tale signs of bubbles where air is escaping.
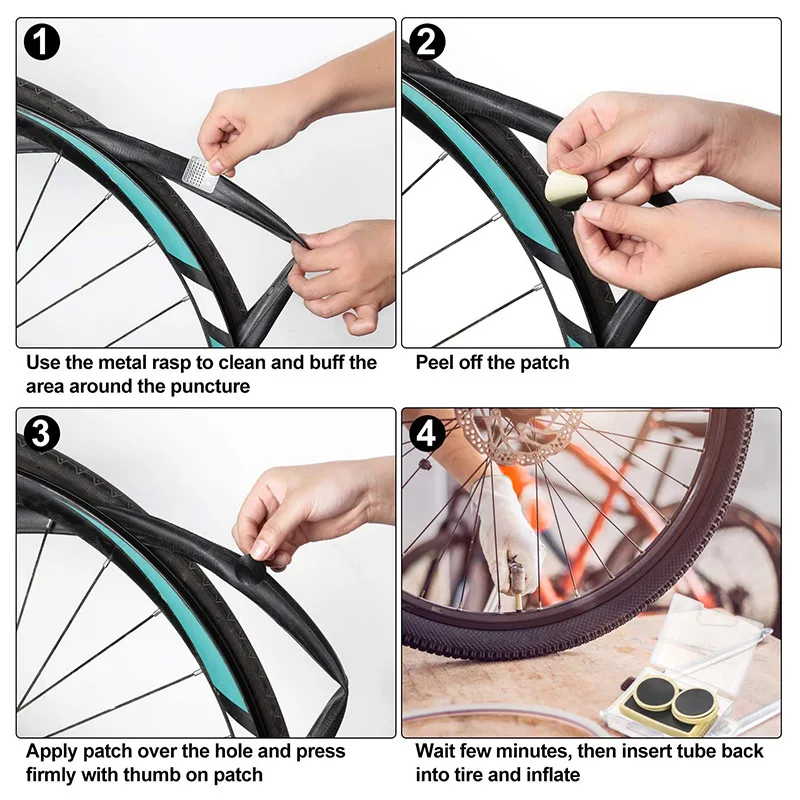
Once located, roughen the area around the hole thoroughly with the emery paper in your puncture outfit.
Remove any excess emery or tyre dust and apply enough glue to cover an area a little bigger than the repair patch that you’ll use.
Do this a couple of times, allowing the glue to dry between applications. After the last application of glue, take a patch, remove the backing, and stick it on the inner tube. Press it home, working from the centre outwards. When you are confident that the glue is dry, carefully remove any further film attached to the patch.
There are patches that are self adhesive, which negates the glue faff so if you're time poor, these do speed things up a little, and are also a good option for a road side repair emergency.
What are the different tubes and valve types?
In general there are two types of valve, Presta and Shrader Valve.
A Shrader valve is the same as you’ll find on a car tyre and to inflate it you simply have to use a pump with a compatible adapter. To deflate it you have to push a little pin found inside the valve.
Presta valves are thinner with a small captive nut found near the top. To inflate you need to unscrew the captive nut fully before using a pump with a suitable adapter. To deflate you unscrew the captive nut, then push it ‘in’ towards the base of the valve.
There are several different types of tubes on the market, which vary in material, rubber or latex for example, or in puncture protection level.
Check your spare tubes have the correct valves and that they're long enough for your rims. People often upgrade wheels to deep section rims, but forget to get new spare tubes with longer valves.
Finally, also check you have a compatible pump or inflator. Most will cater for both presta valves and shrader valves, but it's better to be safe than sorry.
We mentioned it above, but do check out our guide on bike inner tubes to help you navigate to the correct choice for you.
How can I stop getting flat tyres on the bike?
If you find you're getting regular punctures, it's a good idea to check your tyres are still in good condition and appropriate for the type of riding you're doing.
Choice of tyres is almost as important as the wheels or frame. First of all your tyres need to be the correct size to fit your wheels. They need to be pumped up the appropriate pressure, as mentioned above.
Too much pressure could blow the tyre off the rim and too low a pressure will allow pinch punctures and tyre wall, or rim damage.
It’s also best if they are the right tread for the surface that you are riding on, the time of year and what riding you'll be doing.
Tyres that are smooth because they are worn out are useless and dangerous. Tyres that have a series of tiny cracks in the sidewalls or between the tread blocks need replacing too.
From time to time, a tyre may have some internal damage which results in a bulge somewhere around its circumference; this is another occasion when the only remedy is a new tyre.
Finally, the inner tube: make sure any replacement inner tube is the right size for the tyre, and you have the right type of valve to fit through the hole in the wheel rim.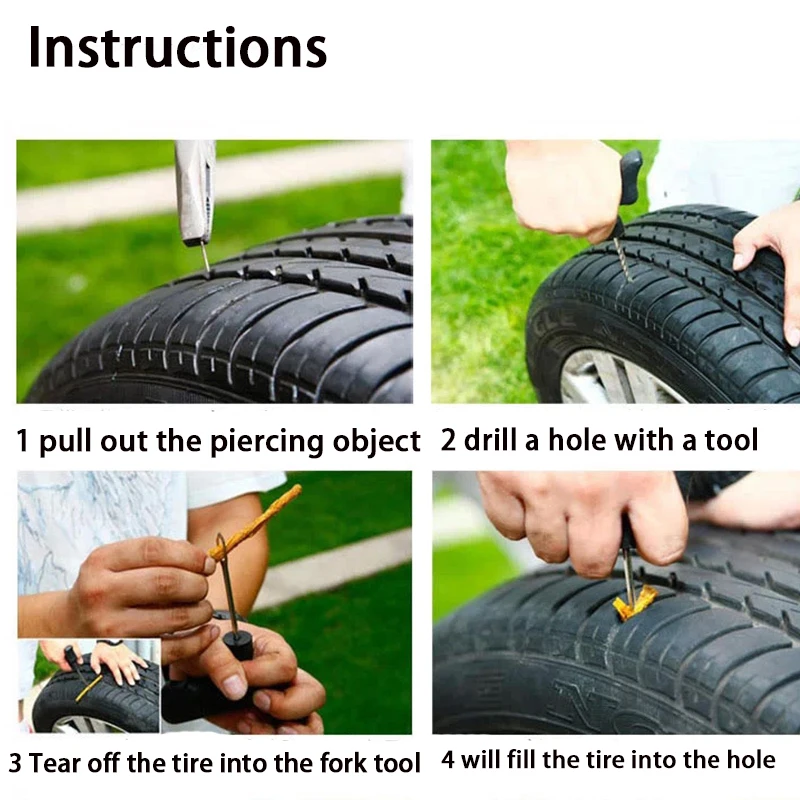 See below for valve types.
Can I ride a bike tyre with a hole in it?
If the hole in the tyre is large, this may cause the inner tube to bulge through the gap, like a hernia. If this is the case, replacing the tube will just result in another puncture.
The solution is to reinforce the hole, with an old piece of tyre from the inside. In desperate situations we have even seen energy gel wrappers used for this purpose. This solution is an emergency fix however, and should only be used to get you home or to your nearest bike shop.
Don't ride on determined to hit your mileage target only to get more stranded when the tyre completely fails.
Hannah is Cycling Weekly’s longest-serving tech writer, having started with the magazine back in 2011.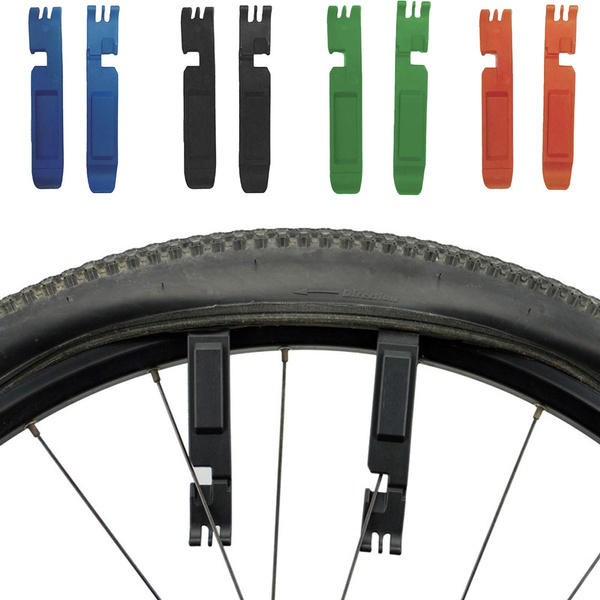 She has covered all things technical for both print and digital over multiple seasons representing CW at spring Classics, and Grand Tours and all races in between.
Hannah was a successful road and track racer herself, competing in UCI races all over Europe as well as in China, Pakistan and New Zealand.
For fun, she's ridden LEJOG unaided, a lap of Majorca in a day, won a 24-hour mountain bike race and tackled famous mountain passes in the French Alps, Pyrenees, Dolomites and Himalayas.
She lives just outside the Peak District National Park near Manchester UK with her partner, daughter and a small but beautifully formed bike collection.
Here are some simple, clear instructions on how to repair a bicycle inner tube quickly and correctly.
1. Locate a tire puncture
Starting at the valve, check all sides of the bike tire to find the cause of the puncture. Remove any shards of glass or sand that you notice.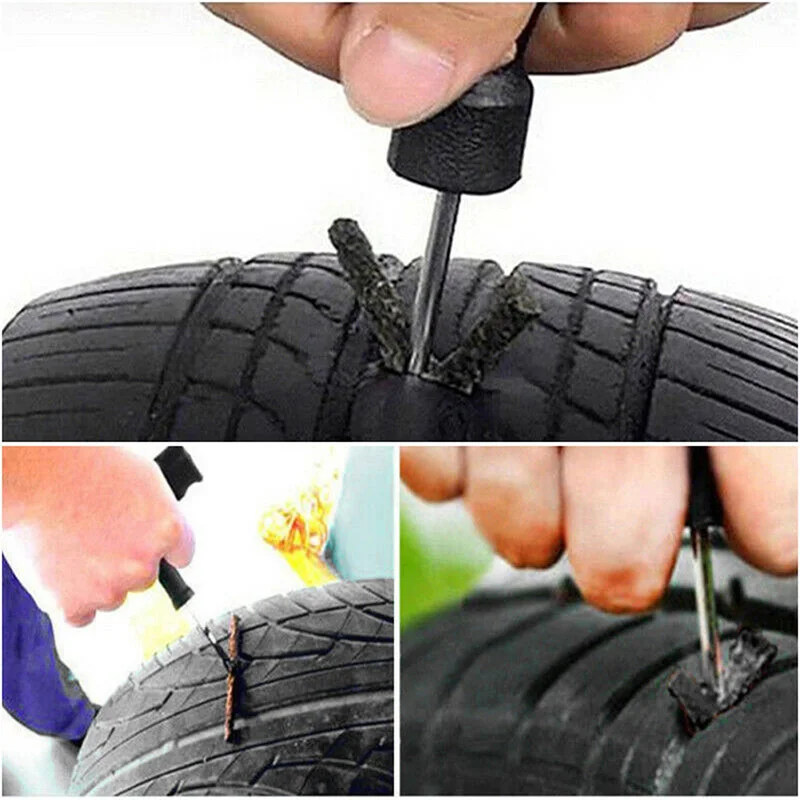 Even if you find one of the possible causes, keep checking the tire until you get back to the nipple.
2. Remove the tire
Vent the chamber. On the side of the wheel opposite the nipple, using a special tool (available at all good bike shops) or a similar handy tool, loosen about 5 cm of the tire as shown in the picture. Alternately rearranging the special tool along the entire diameter of the wheel, remove one side of the tire from the rim.
Pull out the chamber. Remove the tire completely, this can be done by manually moving the entire tire in one place from the wheel rim.
3. Inflate the punctured chamber
Inflate the chamber and listen for air to pass through. Examine the camera from all sides. If the hole cannot be found, re-inflate the camera and place it in a container of water. After finding the puncture site, dry the chamber before moving on to the next step.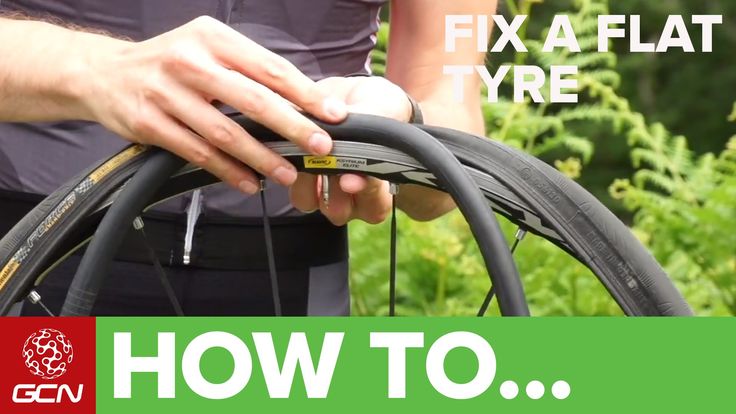
Be careful: When inflating the chamber, do not twist the pump so as not to pull the nipple out of the chamber.
4. Prepare chamber
Choose the correct rubber patch size - use a larger rather than a smaller patch size if in doubt. Roughen the surface of the camera around the hole with sandpaper. Make sure all molding marks on the camera are completely erased and the surface is flat.
Apply one drop of rubber adhesive and spread around the puncture 2 cm larger in circumference than . Let dry - the rubber adhesive will change from glossy to matte. Apply a second thin layer in the same way as
5 Tape the puncture site
Inflate the bladder a little to help highlight the position of the hole. Press the patch firmly onto the puncture site after removing the foil. If there is a thin cellophane on top of the patch, then it can be left.
Sprinkle chalk, talcum powder, or road dust around the patch to prevent the camera from sticking to the tire.
6. Check tire
Before installing the tube, check the inside of the tire to find the cause of your puncture. The location of the puncture on the camera will help you find the cause of the puncture. Run your fingers into the tire and carefully feel around the inside to find the source of the puncture and remove it.
7. Install tire
After repairing the tube and checking the tire for glass, spikes, or any other sharp debris, reinstall one bead on the rim. Inflate the tube a little and install it on the rim, first by inserting the nipple into the hole in the rim.
Start installing the second side of the tire from the opposite side of the rim to the nipple, use your fingers to lift the tire beads (the part of the tire that connects the wheel rim) over the edge. Install the entire tire on the rim in this way.
8. Make a final check
Check that the tube is not pinched between the rim and tire bead.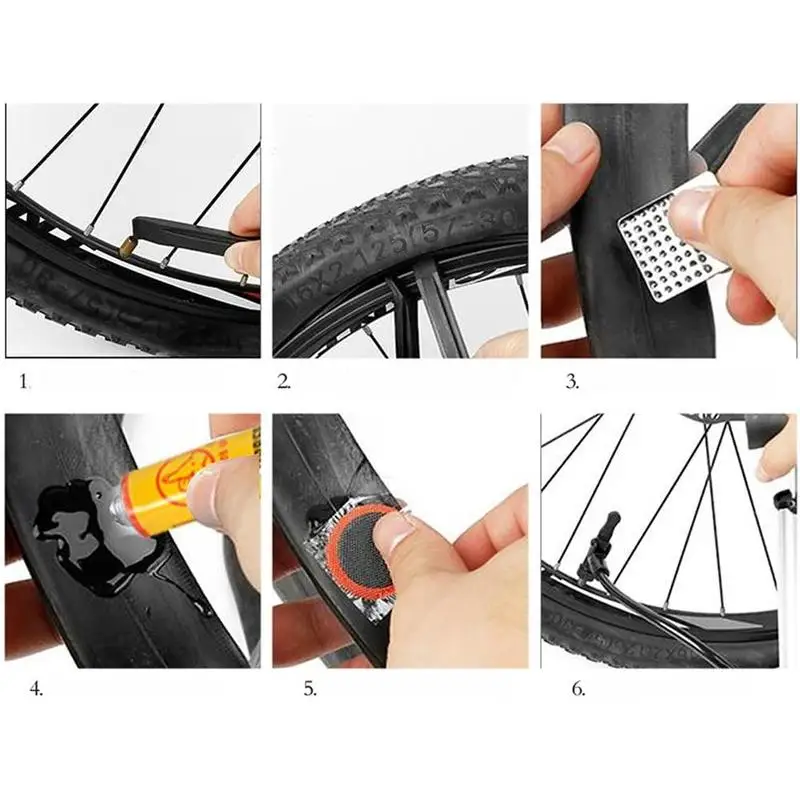 Inflate the tube until the tire is still soft, but has already taken its shape. Make sure that the tire beads are evenly placed in the rim around the entire perimeter. If not, bleed some air out of the chamber and evenly position the tire against the rim.
Pressurize the chamber to the recommended pressure and check again that the tire beads are still sitting flat and that the chamber is not visible anywhere from under the tire. Finally, make sure the tire tread is placed fairly evenly by spinning the wheel. If not, then lower the camera and start again from the beginning of this step.
Puncture Repair Tips
When removing the inner tube from the tire, pay attention to which way the inner tube was installed in the wheel. This will help determine the position of the hole in the chamber and the position of the target in the rim.
Mark the puncture site with a ballpoint pen so you don't lose it.
If you do not have sandpaper with you, you can roughen the chamber around the puncture by rubbing the chamber against a rock or pavement.
Carefully remove and replace the inner tube with the rim. To prevent repeated puncture, do not use sharp tools such as screwdrivers, etc. when installing or removing. Use special if necessary. rim removal tool or other tool with blunt edges
Identification of a puncture
Two small holes in the chamber placed fairly close together indicate a double puncture. This is because the puncture object can get stuck between the tire and the rim when driving over a sharp object. Make sure the sidewall of the tire is not cut. A hole on the inside of the chamber indicates that the puncture was caused by a pin. Check the inside of the rim to make sure the edges of the tape are properly covering the spoke holes and that there are no protruding spoke ends protruding above the inside of the rim. If this happens, you will have to cut off the protruding part of the spoke with a file.
A less common cause of puncture is the rough edges of the hole in the nipple rim. The puncture in this case will be near the nipple and such a chamber can no longer be restored.
Create your own puncture repair kit:
Weekly inspection
Check your tires by inspecting the tread for damage or severe wear. Tires with slits that show abrasions through which the camera is visible should be replaced. Remove any sand or glass stuck in the tread. Check tire pressure. Tubes that are inflated to the correct pressure will last longer and you will have fewer punctures.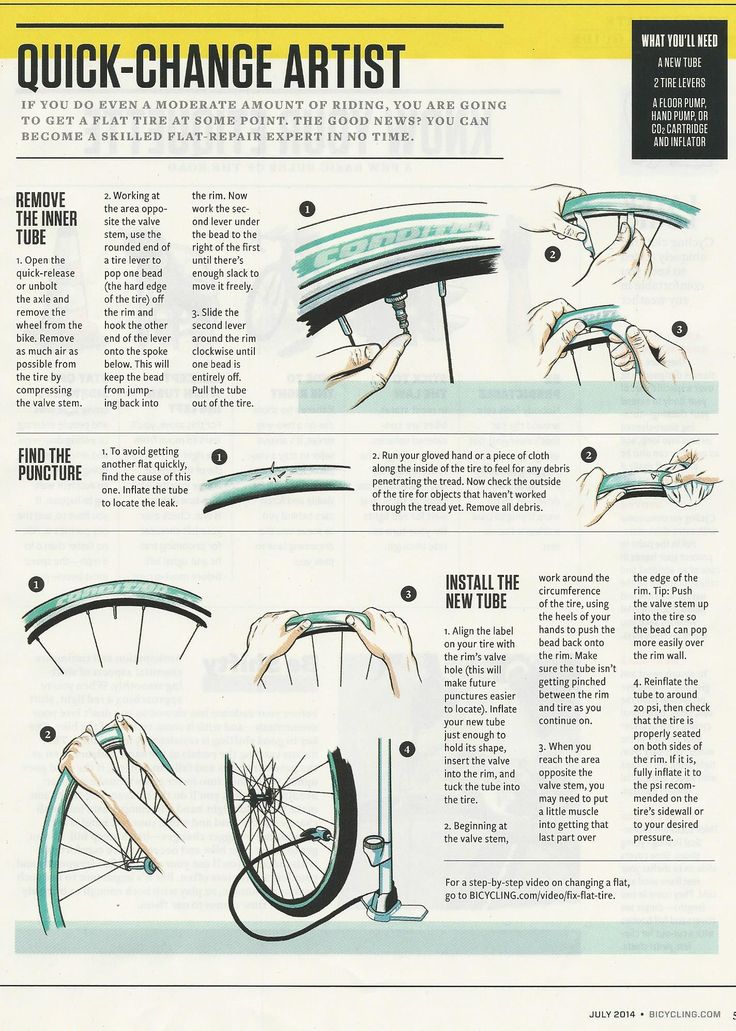 The recommended pressure is usually indicated on the side of the chamber.
Use a replacement tube
Repairing a puncture is more difficult in the rain as the patch will not stick to the tube. In this case, a spare camera will come in handy. A spare tube will also come in handy if the tire goes flat for a short time.
Detailed video on how to fix a punctured bike tube:
June 9, 2017
A puncture of a wheel (more precisely, its chamber) always happens suddenly. If trouble has overtaken you near the house or any other housing, it is not so difficult to find tools and seal the puncture site. If there is a bike service or shop nearby, they will always tell you how to change the camera on the rear or front wheel of the bike, and for a fee, they will do everything themselves.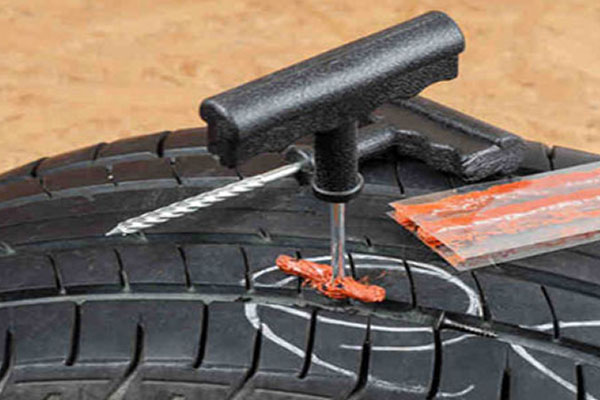 But if the puncture occurred in nature, far from any benefits of civilization, you will have to rely only on your own strength and the available repair kit.
When traveling far from civilization, your own repair kit is the only thing that will help with a puncture. You need to select it carefully.
 In this case, you need to focus on what fasteners are used in each individual case. For example, hex nuts are often used, for which a hex wrench is needed.
And then an unpleasant moment came - the bicycle wheel was punctured. You should start with a visual inspection of the tire. In some cases, if the hole is very large, it helps to immediately determine the puncture site. For convenience, this place can be immediately marked with a pen, marker, piece of charcoal, chalk, or in any other suitable way. Even if the intended location of the hole is found, it is still recommended to fully check the entire wheel, clearing it of debris. It may well be that there are several punctures.
After inspection, remove the wheel (using the appropriate wrench from the repair kit). Now you need to remove the tire from the rim and get the camera out of it. It will be difficult to do this without the side rails included in the repair kit described above. It is necessary to insert the beads between the tire and the rim and pull them, gradually removing the tire. Removing the inner tube is usually easy, but if the tire is too stiff, it may be necessary to re-use the beads in the same way, only now they will need to be inserted not between the rim and the tire, but between the tire and the inner tube. If at the previous step the alleged puncture site has already been found and marked, it is recommended to additionally mark the same area on the camera. More clearly, how to remove or change a tire with a camera on a bicycle, is shown in this video:
Once the camera is removed, find the puncture site on the camera. If it is already checked, it will be easier to search, but you still need to check the camera completely. To do this, you need to pump it up and by ear determine where the air comes from. If the hole is large enough, then this is not difficult to do, but if it is very small, you will have to act differently. You will need a container of water. It is most convenient to use a basin, but it is difficult to find it in the field. In this case, any body of water is suitable: a river, a lake, a reservoir, etc. You need to place an inflated chamber in the water and check where the air bubbles come from. This is the puncture site. It is important to remember that for repairs, you must first allow the camera to dry. But that's not all. While the chamber dries, it is recommended to carefully check the inner surface of the tire. There may be glass particles, thorns, and other similar elements that made a hole in the chamber and can make a new one. They need to be removed.
Once the hole is found, there is no other option but to patch or change the bike tube. With the replacement, everything is simple: we take out the broken camera, change it to a new one and install it back. But with a patch, the situation is more complicated. First of all, it is necessary to carefully process the puncture site and everything around it with sandpaper. A rough surface will allow you to better fix the patch. Now dripping glue. One drop is enough, which should be rubbed with a thin layer around the hole in a radius of about 2 cm. Then the glue should be allowed to dry a little and repeat the same procedure several times until the glossy glue layer becomes matte. Only now you can glue the patch. If they are available in different sizes and it is not clear what the actual size of the puncture is, it is better to take a larger patch. After the glue has dried, it is recommended to pump up the chamber to check if there are any other holes and if the patch is not letting air through. If everything is fine, you can install the camera in the tire and put the latter on the wheel rim.
There are a few tricks to make repairing a bicycle tube puncture more comfortable.
Tire repair not possible. They can only be replaced with new ones. On the other hand, they rarely break through enough to require replacement. Usually tires are changed as they wear out, when the tread is completely worn out. Less often, replacement is required in cases where tires are badly damaged due to punctures, impacts, exposure to chemicals and other factors.