Learn More Create a Guide
Learn to fix just about anything.
You got this.
What do you need to fix?
Mac
Tablet
Phone
Car and Truck
PC Desktop
Game Console
PC Laptop
Camera
Thousands more step-by-step guides for every thing
543 Apparel
2097 Appliance
1298 Camera
1190 Car and Truck
931 Computer Hardware
2491 Electronics
609 Game Console
1949 Household
1277 Mac
5068 Medical Device
5810 PC
3475 Phone
180 Skills
1248 Tablet
242 Vehicle
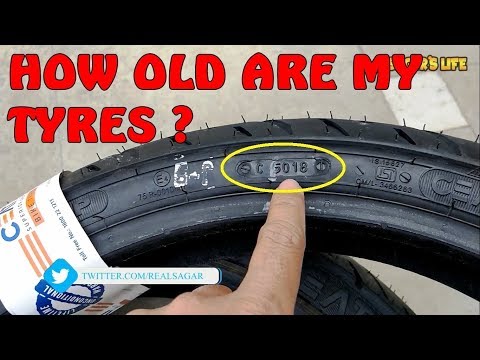
Use the First Aid feature of Disk Utility to find and repair disk errors.
Disk Utility can find and repair errors related to the formatting and directory structure of a Mac disk. Errors can lead to unexpected behavior when using your Mac, and significant errors might even prevent your Mac from starting up completely.
Before proceeding, make sure that you have a current backup of your Mac, in case you need to recover damaged files or Disk Utility finds errors that it can't repair.
In general, you can just open Disk Utility from the Utilities folder of your Applications folder. However, if your Mac doesn't start up all the way, or you want to repair the disk your Mac starts up from, open Disk Utility from macOS Recovery:

Choose View > Show All Devices (if available) from the menu bar or toolbar in Disk Utility.
The sidebar in Disk Utility should now show each available disk or other storage device, beginning with your startup disk. And beneath each disk you should see any containers and volumes on that disk. Don't see your disk?
In this example, the startup disk (APPLE SSD) has one container and two volumes (Macintosh HD, Macintosh HD - Data). Your disk might not have a container, and it might have a different number of volumes.
For each disk that you're repairing, start by selecting the last volume on that disk, then click the First Aid button or tab.
In this example, the last volume on the disk is Macintosh HD - Data.
Click Run to begin checking the selected volume for errors.
After Disk Utility is done checking the volume, select the next item above it in the sidebar, then run First Aid again. Keep moving up the list, running First Aid for each volume on the disk, then each container on the disk, then finally the disk itself.
The order of repair in this example was Macintosh HD - Data, then Macintosh HD, then Container disk4, then APPLE SSD.
When done, quit Disk Utility. If you used Disk Utility from macOS Recovery, you can now restart your Mac: choose Apple menu > Restart.
If Disk Utility can't see your disk, it also can't see any containers or volumes on that disk. In that case, follow these steps:
Published Date:
LADA
UAZ
KIA
Hyundai
Renault
Toyota
Volkswagen
Skoda
NISSANA
NISSAN Mercedes-Benz
Mitsubishi
Mazda
Ford
All brands
We wish you never need our advice! But we strongly recommend stocking up with a suitable repair kit. nine0003
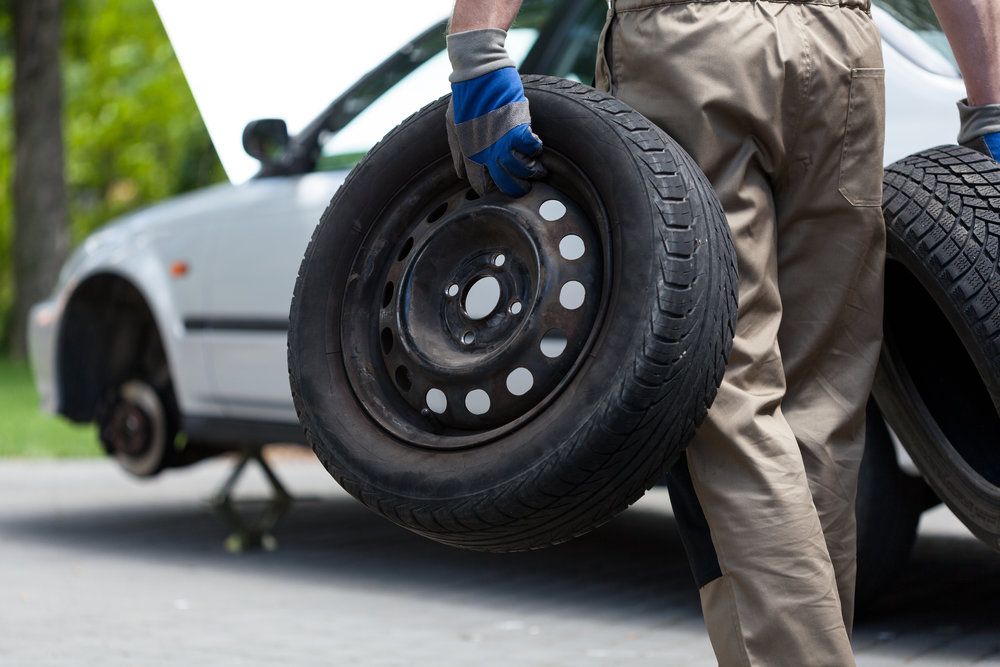
A tire repair kit is a must have in the trunk - you never know when you might need it. Our test of 14 repair kits will help you choose the one that suits you, and to repair a cut or puncture - the advice of experts "Behind the wheel".
Related materials
Tire repair kits - expertise "Behind the wheel"
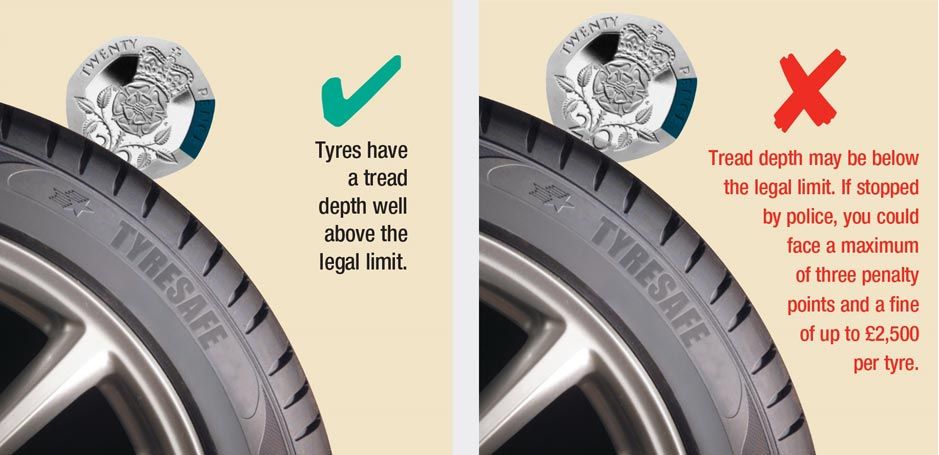
 As long as it is in place, the tire will not deflate as quickly. It is better, when getting to a tire fitting, to pump up a punctured wheel from time to time. nine0046
 Related content
Roads in your area are finally getting repaired - all the details Penalties will be linked to the minimum wage (or other calculated indicator) New fee for drivers in 2022
Related materials
Punctured a tire: 6 solutions (without removing the wheel)
All kits are sold either in a blister pack or in a plastic bag. However, even in the store you can inspect the working surfaces of the tools and make the right choice. The kit for installing flagella usually includes two tools: cleaning tool , which cleans a hole in the tire, and an awl with a hole - actually for inserting the tourniquet.
Cleaning, it is also a cleaning or, even more simply, a picker, there are three types. A multifaceted workpiece curled in a spiral cleans the hole from dirt quite well and does not injure the metal cord at all. Cleaning with an oblique notch resembles a rasp. If its teeth are not too sharp, then it can also be used, but the supply of glue into the hole will be worse. nine0003
Cleaning with sharp aggressive teeth is strongly discouraged. It is very difficult to use it, and something constantly crunches, but this is the cord of your tire!
Related materials
If you want to pump up a wheel, jack up the car! Debunking the Myth
From cleaning to awl with slotted needle eye.
The forked tip must be sufficiently sharp, and the gap between the halves minimal, otherwise it will be difficult to insert into the hole. There is a risk that the metal cord thread will fall into the slot. The hole for threading the flagellum should have non-sharp edges. And, most importantly, see if it will be easy for the flagellum to exit through the slot already inside the tire. For convenience, you can file the exit from the ear with a needle file, getting the perfect profile. nine0003
The most comfortable tools are those with a T-handle.
Related materials
How to inflate a tire without a pump? 5 myths and 2 risky ways
It is better to take thicker flagella. To the touch, even through polyethylene, they should be soft.
With glue, the installation of flagella is easier and more reliable - when pulling out the awl, it works like a lubricant, facilitating movement. The tube should feel heavy, indicating that the contents have not dried out. nine0003
In extreme cases, any flagella can be installed without glue, moistening them with gasoline.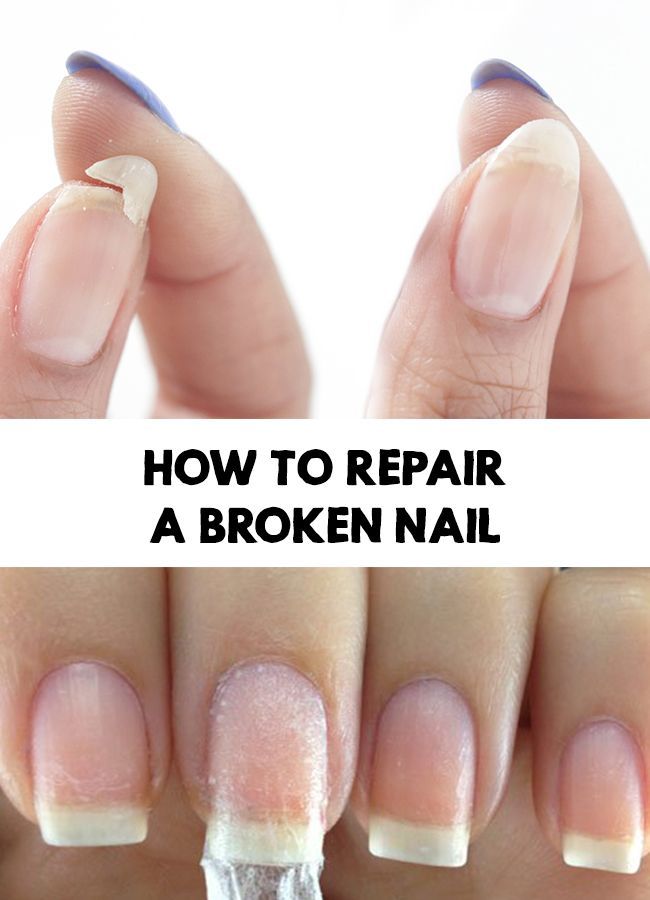
Related materials
Repaired a tire - does it drive differently now? Expert Answer
Without compressor there is no point in starting work. Find a hole if it was left by a nail in the board, and not by a self-tapping screw left in the tire, water, preferably soapy , will help. It is sometimes very difficult to remove a self-tapping screw, so pliers . When the flagellum is already installed, the tails protruding outward should be cut flush with the protector. And knife , as it turned out, is rarely included in the kit.
 The rear usually needs to be removed. nine0046
What secrets are the most reliable, we told here.
"Behind the wheel" can also be read on VKontakte.
Photo: depositphotos and "Driving"
How to repair a tire - detailed instructions "Driving"
How to Repair a Tire - Detailed Guide "Driving"
How to Repair a Tire - Detailed Guide "Driving"
How to repair a tire - detailed instructions "Behind the wheel"
Our new video
Moskvich 3: all the details and the first test!
2 Russian novelties that will replace Ford
Which is better off-road: Lada Vesta Cross or UAZ Patriot?
Did you like the note? Subscribe and you will always be in the know!
Driving in Zen
News smi2. ru
ru
The use of many types of clothes, shoes and accessories is facilitated by a zipper. A couple of seconds - and everything is securely fastened. But sometimes the mechanism breaks down, and this happens, as a rule, at the most inconvenient moment. We figure out what to do if lightning diverges, how to fix the lock and what are the ways to prevent breakage. nine0003
Types of breakdowns
Lightning broke: what to do
How to fix a "dog"
How to repair a lock from below
Tips for repairing fasteners
— On jeans
— On backpacks and bags
— On jackets
Breakage prevention and maintenance
Before reanimating an item and starting to repair the lock, it is important to understand exactly where the breakdown occurred. Further actions and their complexity will depend on this. nine0003
 If the element does not fit snugly against the teeth, then the lock will constantly diverge. It happens that his tongue completely comes off. Any of these problems can be easily solved by yourself, either by repairing the element or by replacing it. We will tell you more about possible ways to fix a zipper lock below.
 There are several ways to repair a lock. Choose it depending on the cause of the breakdown.
 The work is rather delicate, but justified if it is difficult to change the entire fittings. nine0046
ShutterStock
Now let's figure out how to fix the lightning if the slider has fallen off. Using pliers, carefully remove a few teeth at the end of the row to expose a little more of the base fabric. It is important to remove an equal number of elements on both halves of the fastener. Also, in many cases, it is necessary to remove only the limiters (with the one-piece type - the lower one, with the detachable type - the upper one). It is enough to pry these stoppers from the inside out and unbend with a tool. After removing the teeth or the limiter, “put” the slider on the canvas and pull on its halves - so the “dog” will be on the teeth. When it is in the right place, you will hear a soft click. To prevent the part from flying off again, install the upper and lower stoppers on the fastener. nine0003
There is another way to return the torn part to its place - using a fork. Put the “dog” on two adjacent teeth with the narrow side towards the front of the device. Next, insert the two parts of the fastener into the corresponding slots until it stops, fasten the mechanism and remove it from the fork.
How to fix a zipper pawl if it remains, but the “tongue” is lost? A temporary solution will be a paper clip - surely everyone at least once in their life had to use this method. For a thorough repair, just buy a new “tongue” or remove a suitable one from old clothes. nine0003
However, the slider may one day break completely. For a correct replacement, pay attention to the number on the back of the old part - you will need a similar one. To put it in place, you need to take the same steps.
ShutterStock
We figured out how to deal with a broken snake or a flying "dog", but how to fix a detachable zipper that is broken at the bottom? The main problem is when the lower part, which is inserted into the groove of the lock, is disheveled, has lost its hardness and therefore does not fit into the groove. Lubricate this part with superglue or quick-drying PVA so that it becomes a whole again without protruding elements. nine0003
If the latch is completely broken, then a straw will help! Consider how to fix a zipper with a straw - this is the very unusual, but simple life hack that we mentioned above. The broken latch should be removed, and the protruding threads should be cut off. We cut off a part about 1 cm long from the tube, cut it lengthwise and try it on in place of the latch. To make the plastic soft and pliable, bring the flame of a lighter, give the new part the desired shape, pressing down with pliers, and cool.
Unsplash
As a rule, the zipper on jeans or trousers breaks at the most inopportune moment, when you need to solve the problem especially quickly. It is better to think about a full-fledged repair later, and for temporary troubleshooting, fasten the lock by manually connecting the teeth. Then drag the slider up and down the row of links to make sure the elements fit together.
If this does not help, secure the lock halves with a pin on the wrong side. Although the solution is temporary, almost nothing will be visible from the outside. Just make sure it doesn't accidentally unzip. nine0003
The result will not last long, so when the opportunity arises, immediately take on the repair of things. Often it is enough just to tighten the "dog" so that it fits snugly against the mechanism.
If the problem is that the slider, on the contrary, constantly gets stuck when fastening the trousers, check if something has got inside it: the fabric of the base of the hardware, a thread or a speck. It happens that on iron links the element does not move well on its own, then grease the teeth with wax or paraffin. nine0003
When tearing off the pawl from the lock, open it even more, put it on a row of teeth and tighten it back. Move the mechanism in different directions so that the slider is in the desired position.
ShutterStock
Let's move on to how to fix the zipper on a backpack or bag so that the contents do not fall out or be stolen. Due to the weight of things inside, a large load is placed on the slider when fastening and unfastening. Therefore, the most common problem with these accessories is the relaxation of the mechanism. Tighten it with pliers or pliers. It is worth being careful: since the work of the zipper is often carried out under the weight of a backpack or bag with contents, it is also impossible to press the element too tightly. Otherwise, applying too much force, pulling the "tongue", you can either tear it off or damage the entire leaf of the lock. nine0003
And now let's figure out how to fix the zipper on the bag, if the teeth have parted due to the load. You just need to put them in place with tweezers. The advice is relevant for large models of backpacks and bags, to a lesser extent for miniature ones - the locks in them will also be too small, it is much more difficult to repair them.
ShutterStock
Most often, problems with jacket zippers occur in children. So that the kids do not suffer once again, provide the clasp with proper care, the rules of which we will talk about a little later. So the lock will break less often. nine0003
It happens that the links on the jacket do not just diverge, but at the same time half of the slider remains on the zipper. Then, in the area of \u200b\u200bthe lower part of the “dog”, make a horizontal incision between the teeth. Return the flown half to the zipper at the cut and fasten the lock.
Don't know how to fix a zipper on a jacket when it doesn't fasten at all? Make sure the links are not deformed and that the slider is not too tight or too loose on the blade. If in general everything is in order, lubricate the links for smooth operation of the mechanism. If the problem lies in the inability to insert the lock into the groove at the beginning of the fastener, then the lower latch must be repaired. Use the life hack with a straw, which is described above. nine0003
Also jacket zippers often “chew” neighboring threads and fabric fragments. It is important to remove them carefully, smoothly moving the slider, and not pull the stuck element with force.
ShutterStock
It is much easier to properly care for a thing with a zipper from the very beginning than to repair the lock later. So, here are some simple tips to help prevent damage.