Tires are prone to going flat over time. In most cases, all you have to do is pump the tire with air. however, sometimes the tire bead will come off the rim. To fill up your tire again, you’ll have to seat it on the rim.
A tire bead is the inner edge of the tire that is fitted to the rim when the tire is inflated. When it comes loose, the tire deflates and your tractor becomes a burden. Below, you’ll find out how to seat a tire bead on a regular lawn more or a garden tractor.
There are two main methods for reseating a tire bead. The first one involves the use of fire. I wouldn’t recommend this method for smaller tires or inexperienced individuals. The next method involves increasing the pressure using an air compressor and a rope or string.
I don’t recommend using this method because of how dangerous the outcomes could be. This mainly works for larger tires, try not to take the risk with smaller ones.
All you’ll need to use is starter fluid and a way to set it on fire. You’re going to spray the fluid in the gap between the tire bead and the rim then ignite it. The pressure from the fire will bounce the bead back into place.
After making sure that the fires are out, proceed to fill your tire with air before it deflates. Be careful the air emanating from the tire is really hot! When inflating the tire, don’t exceed the PSI limit. You’ll find the maximum PSI written on the side of the tire.
Should you choose to go through with this method, you should take great care. Keep a fire extinguisher nearby for any emergencies.
This method requires some muscle power. The smaller the tire you’re handling the less power you’ll need to carry out these steps.
https://www.youtube.com/watch?v=5mfJIOkvVRMVideo can’t be loaded because JavaScript is disabled: How To Seat The Beads on a New Riding Lawn Mower Tractor Tire (https://www. youtube.com/watch?v=5mfJIOkvVRM)
You’re going to need something to tie around the length of the tire. It should be elastic enough to be able to tie it and sturdy enough to handle the tire’s pressure. You have several options.
Take your rope, or whatever you chose to use, and run it along the length of the tire, making sure it’s centered. If it’s not centered, the rope could slip off when you’re pumping air into the tire.
You don’t need to tie the rope very tightly, you’ll do that in the next step.
Grab a screwdriver or any metal appliance that resembles it. Wedge it under the knot you just made and twist it. That will make the rope tight over the tire, and increase the pressure inside.
You may struggle a little bit with this step. The first twist is always the hardest one. If you get it done, then the rest of the work will be a walk in the park.
This step is optional but still recommended. Removing the valve stems will allow the air to flow easily with no restrictions.
When you’re not limited by anything when filling the tire with air, it makes it much quicker to do so.
Fill the tire with air until the tire bead is pushed outwards and seated on the rim. Don’t over-inflate it, you’re still applying pressure to the tire.
The valve stem will prevent the pressure from escaping the tire. If pressure does escape, the tire bead will loosen around the rims again. You don’t want to go through all of that again, do you?
Now that there’s no external pressure being applied, you can fill the tire to the maximum PSI level, and you’re done!
Overfilling the tire with pressure could cause it to burst. You should know the maximum PSI of your tire beforehand and fill your tire accordingly.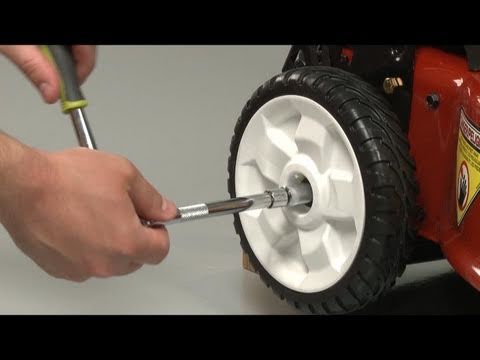 If you’re unlucky enough, you’ll get in the way of the exploding tire which could cause severe injuries and sometimes death.
So be really careful when adding pressure to your tire.
Each method has its time and place. It all just depends on the tire you have and the situation you’re facing.
If you’re dealing with one of the tractor’s bigger tires and can’t easily use the wrap around the circumference method, go for the fire method. With bigger tires, it’ll be hard to tie a rope around it, especially if you’re working alone.
Squashed tires and the explosive method go hand in hand. Because there’s no pressure in the tire, you won’t be able to wrap the rope around the tire. So you’ll have to turn to the other method.
Contrary to the fire method, this method is perfect for small, more manageable tires. Assuming you only have limited space to fix your tire, you should go for this method.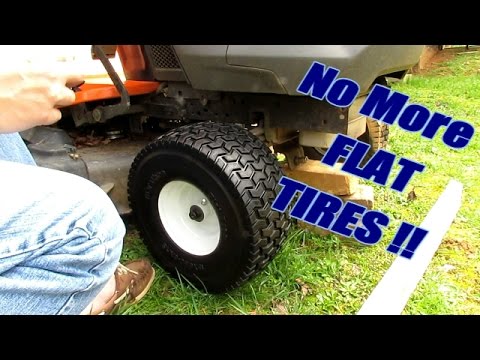 It doesn’t require much space and won’t set your garage on fire.
It’s best for cases where the gap between the tire bead and the rim is narrow. This indicates that there’s pressure inside, which you’ll need for this to work.
If the tire bead or the related cords are cut or damaged then the wheel is shot and cannot be repaired. In this case, you need to purchase and replace the damaged tire. There is no way to make a damaged tire bead airtight again.
How do you know if your tire is losing air abnormally? A normal tire will lose about 1-3 PSI a month, so if you’re losing more than that you should get it checked.
There are four reasons behind the loss of air.
Air condenses in cool weather and expands in warm weather. You probably know this from your chemistry classes. In wintertime, your car will detect lower PSI inside the tire.
When you start driving the PSI will increase as you begin to heat the air particles inside the tire. This will keep happening for about 10 minutes, the air will then stop expanding.
Again, your chemistry class. Naturally, the air wants to escape the tire because of the high concentration there. It wants to be let out into the vast world outside the tire. Thus, any chance the air will get to escape, you’ll find your tire losing its pressure.
There could be a problem with the valves inside the wheels which release more air than they should. These deteriorate through the years due to weather conditions or bumpy roads.
Another problem with the wheels is that they could be bent or damaged. When part of the wheel is bent, the tire won’t be fitted tightly around the wheel, causing pressure to escape through the ill-fitted parts.
We get tire damage because the roads aren’t as clean as we’d like to think they are. Sometimes, a loose nail or other sharp objects may slash the tires. Small tears will be enough to cause the tire to lose air slowly.
If there is any damage done to the beads, air could escape from the small opening between the bead and the rim.
The bead doesn’t even need to be damaged, it could just loosen around the rim and still cause the tire to lose air. We’ll tell you how to bounce it back in position.
Good luck trying to steer a car with only a steering wheel. Similar to how our body and mind work in sync, the steering wheel, and tires do too.
Tires aren’t in sync only with the steering wheel, but also with the engine. They translate the engine’s power into movement.
The pressure inside them makes them keep the vehicles moving and support their weight. If it wasn’t for its bouncy quality, tires wouldn’t have held up the vehicle or absorbed shocks on the road while driving.
It’s fascinating how one small aspect of a vehicle can make a huge difference to it.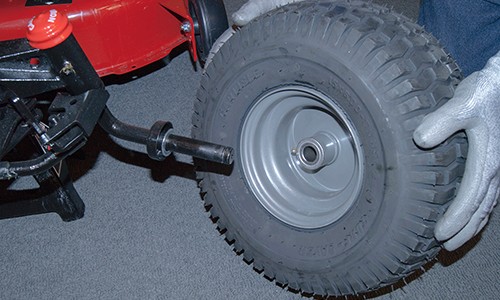
You may be wondering ‘why would I repair the tire myself?’. Well, do you really want to go through the trouble of taking the tire to a mechanic? A small tractor tire could easily be repaired in your own garage.
For larger tires, you should weigh out the advantages and disadvantages of going to a mechanic or using the fire method. If you’re a natural handyman with some experience, fixing your tire may be your best option. It’ll save you some money, and time. After you fix the tire, your garden tractor will be up and running right away.
I can’t stress enough the importance of safety precautions when dealing with the tires yourself, especially if you choose to work with flammable fluid. Don’t work alone, always have someone there with you in case something goes wrong.
Lawnmowers will encounter all kinds of circumstances, tough, tall grass that may be full of weeds, twigs, and stones.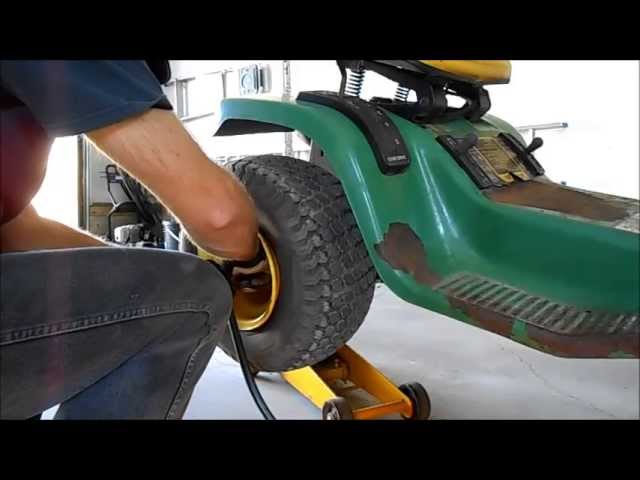 In all this, the blade and tire rubber are the ones that face the hostility of the working environment. Therefore, at times, a lawnmower’s tire may get punctured or damaged. Then, repairing the tire becomes necessary because a mower can’t run on a flat tire. The most important part of fixing the tire is breaking the bead on it. Depending on the brand of the lawnmower, the tire sizes vary. But the common thing across the brands in the highly pressurized and tight tires. Hence, breaking the bead on a lawnmower tire can get a bit intimidating for someone who has no experience. Do not worry! In this article, we will explain different techniques to do the job using common tools and equipment.
How to break a bead on a lawnmower tire, these are your 5 different options:
These five options are all different techniques to break loose the connection between the tire and rim. Before you can use them, the tire first needs to be removed and deflated. These will now be discussed in more detail.
Contents
 1 1. Should I deflate the tire before breaking the bead?
Lawnmowers have to run through rough terrains full of dirt and debris. Their tires make them heave through tall, dry, or even wet grass. So, at times, they may need replacement or repair. Breaking the bead on a lawnmower’s tire is something a passionate gardener should know about how to do.
Before removing the tire, you have to remove the tire from the mower, inspect it for errors and then carry on with the task. Follow this guideline to get a better insight.
For all methods, the first step is to remove and deflate the tire. In small lawnmowers, they are fixed by a single bolt at the center. In larger tires of some riding mowers, they may have up to 4 bolts. Simple untwist them using a socket wrench to remove the tire. It would be best to use a scissor jack to lift the mower body by supporting the mower’s frame.
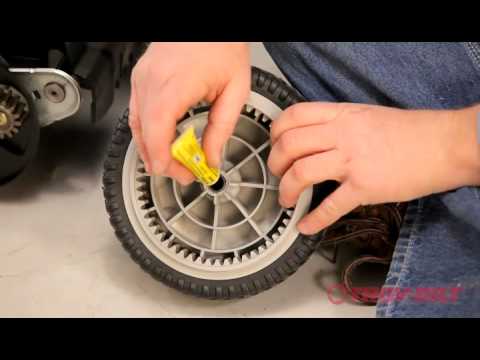
Then, remove the valve cap completely present on the tire’s rim. It passes through the hole to the tube. Remove it to remove the air out of the tire completely. You can deflate the tire using a valve core removal tool. This step can make your work a lot easier because the inflated tire demands double energy to break the bead. So it is recommended to deflate the tire first to save your time and energy.
After the tire is removed and deflated, we can look at the various methods to break the bad.
Place your wheel on a flat surface. Apply your body weight at different parts of the tire along the rim edges, not on the metal rim itself. Just put one foot on each side of your rim and press your foot. This will make the rim come off easily. This technique mostly works as the size and the weight are comparably small for a lawnmower tire. This is the most commonly used technique so far if you have no tools and want to get your work done immediately.
If you have tried to break the bead with your body weight, and it did not work. Then do not worry. There is another useful technique.
The first step is to place your wheel on the hard, plane, and smooth surface. Place the wooden block on the wheel’s edge try not to make contact with the metallic portion, i.e., the rim. Using the wood, make a ramp. Use any vehicle that you have and drive over the board slightly. Then place it on the opposite edge and repeat the same process. In this way, the rubber portion of the tire will pop off immediately. Note that this process is for those tires that are stuck too bad with rust and debris. Also, note that your car’s tire starts rolling on the wooden board and not at all goes over the mower’s tire.
You can also get the same results with tools like a pry bar, tire spoon, or a big and long flathead screwdriver. This method is also quite efficient.
Place the mower tire on the flat and hard surface to avoid it sinking the tire into the surface. Place one of your feet on the rubber portion to support your effort. Place the tool at the point where the rim and the rubber part are connected on the opposite side of your foot. Try not to push your tool forcefully into it. It will damage your rim part. With a wooden hammer, give the tiresome beating along the rim. There, try inserting the pry bar gently between the tire and the rim’s contact. Use it as a lever to break the connection.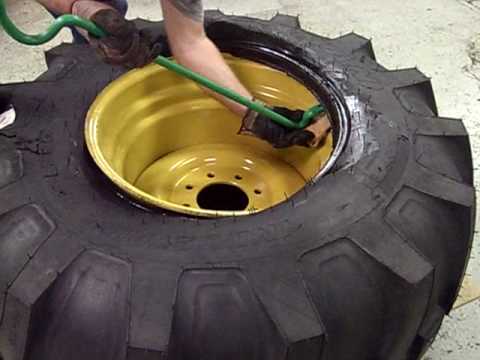 Repeat the process along the circumference of the tire.
Another effective way to use such tools is to use a bench vise and a metal rod. Use the bench vise to press the tire’s inside edges as it lies perpendicularly between the vise. Use the metal rod to spread the gap created by the vise throughout the ring. As the bead breaks, you can si ply remove the tire from the rim.
Breaking the bead can be done with a scissor jack. The tools required are the wooden slab, a scissor jack, and a power drill with a suitable socket.
Place the rubber tire on a flat surface. Place a wooden board beneath it and the scissor jack beneath the board. The process is simple. You have to raise the tire, and it will contact some hard surface that pushes the bead to open. You can use the mower’s back frame or some strong metal support. Press the tire with the support and raise the jack either manually or by a power drill. This will require a few attempts, but the tire gets opened easily.
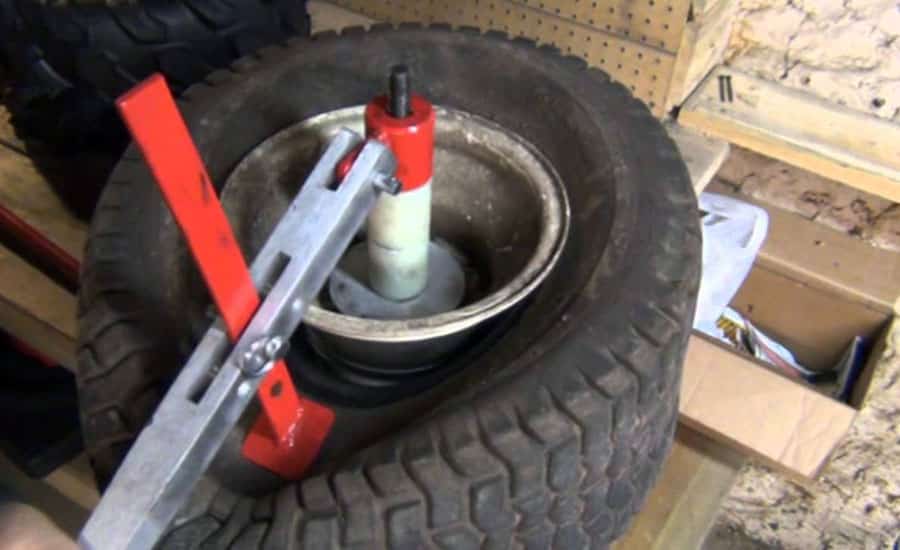
One of the professional ways of breaking the bead is to use the bead breaker tool. This tool mostly lies with the experts. However, if you have access to such a tool, this step is for you.
Place the mower tire on a flat surface. Then, strap the tire and the rim using some rope or straps. The straps should pass through the rim and go over the tires; clamp them onto a scissor jack. Next, by stretching the jack, tighten the straps. Use the bead breaker tool on the tire. This tool has a head that vibrates and kicks on at this end. Use it around the circumference of the tire near the rim and on the other side too. It takes some time, but it is the best method to keep the tire free from damage. In the end, simply push the jack-up; it pulls the strap, breaking the bead.
It is recommended to deflate your tire so that it requires less effort in breaking the bead because the inflated tire has much pressure stored in itself. The pressure keeps the tire inflated and its edges tight. Therefore, it will demand double energy and make your work more challenging.
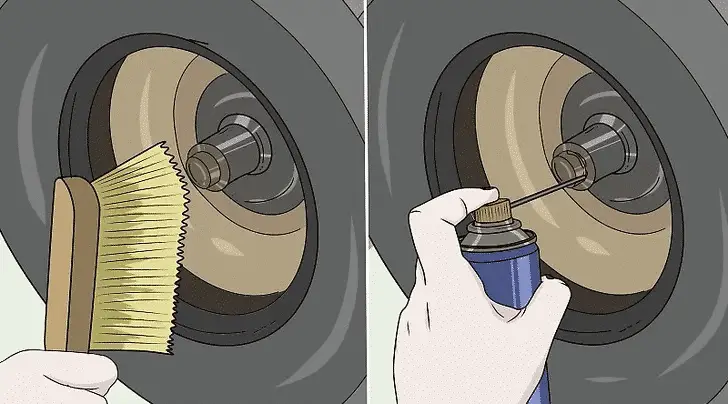
Firstly, place the tire over the rim, and it’s best to grease the top tire edge with some adhesive or gel. This keeps the connection tight. Fix the rim onto the tire’s topside using some blunt tools like the metal scale to fix it. Repeat the process on the other side of the tire. Fix the valve core. Inflate the tire and close the valve cap; the pressure will tighten the connections.
Lawnmower tire may be tubeless or with a tube. In any case, they are tightly concealed along the rim edges. This tight connection is due to both the tire and the bead’s geometry, the pressure, and the work requirement. This is called the bead of the tire. Breaking the bead means breaking this connection using some tools. This will make it possible to remove the tire from the rim.
Tire care when maintaining your lawnmower is not something you should forget. It is recommended to inspect your tires at the start and after every mowing season. In case they are punctured or worn-out, you will have to break the bead to repair or replace them. The task can be performed relatively simply, as explained in this article. One of the various methods should help you do it. If you still do not succeed, ask a professional for help.
No one wants tires to damage the grass while landscaping. In other words, garden tires should have minimal impact on the soil. For this purpose, BKT specialists have developed a line of tires for garden and lawn equipment.
When choosing tires for lawn and garden work, you should pay attention to parameters such as maneuverability, strength and handling. Compact tractors and lawn tractors equipped with tires with these qualities will be able to perform at their best. nine0003
Tires built for performance
Among agricultural tires, the range of tires for garden and lawn equipment stands out, first of all, for its minimal impact on the soil. In addition, it is characterized by a long service life, excellent maneuverability and excellent puncture resistance. It is on these characteristics that the efficiency of compact tractors and lawn tractors depends.
Lawn tractors are rarely overloaded, but the tires fitted to them must still have a high load capacity. Why? The fact is that tires with high load capacity have a thicker and stronger carcass, so they resist punctures better. This is especially important when operating the lawn tractor on uneven terrain with lots of spikes, or when using the tractor for other tasks other than mowing grass. nine0003
Which tread pattern should I choose?
It all depends on the soil and the type of work, so this question is best asked by someone who is well versed in tires. Our consultants are always at your service.
In general, the BKT range of tires for garden and lawn equipment includes models with different tread patterns to suit different working situations.
Mixed use dirt tires are the most popular choice for compact tractors and lawn mowers. The tread pattern of these tires provides excellent traction on slippery grass while preventing tire penetration and ground damage. nine0003
Find out more about our tires LG 306, LG 307 and LG 408.
The All Terrain Tires are a great choice for dirt, sand or soil. Large blocks and deep tread grooves provide excellent traction on loose surfaces. And thanks to the increased voids between the blocks, they have an excellent ability to self-clean.
Maybe the AT 119 is right for you?
Tires with longitudinal ribs are mainly designed for easy rolling and long service life. This projector pattern provides excellent lateral stability, preventing the tractor from slipping sideways. These tires are recommended for applications where the need for free rolling is greater than for traction.
If this is your situation, you can check out our LG RIB and LG RIB PLUS tires.
The slick tires are treadless tires ideal for lawn tractors that can turn on the spot. There is no friction between the smooth tire and the grass, so there are no marks left on the lawn. This is how our LG SMOOTH tire works. nine0003
Expert answers to questions about garden and lawn tires
Landscaping is diverse, so there are many questions to answer when choosing the best tire for your compact tractor or lawn tractor. Among them - "Which tires to choose to replace on a garden tractor?" or “How do I install tires on a lawn tractor?”.
There are no wrong questions. Our experts will be happy to help you and answer all your questions about tires for garden and lawn equipment. nine0003
Return to list
The lawn mower is a popular gardener's assistant. With it, your lawn will always be well-groomed and will be able to grow healthy.
Nothing helps with long stems like a well-run lawnmower. With our lawn mower attachments, you will always cut nicely with freshly sharpened blades. We also provide information about your lawn mower's winter capabilities: for example, you can leave it well packed in a shed or basement for the winter. You can also equip your lawnmower with a snow blower and use it for snow removal. nine0003
Well-maintained lawn mower blades are essential for a beautiful lawn: they should be sharpened regularly.
No lawn lover wants to find uneven cuts and plucked stems after mowing - so you should sharpen your lawnmower blade regularly. Our lawn mower blade sharpening checklist has everything you need to know.
Don't wait for your mowing results to deteriorate: you should check your blades regularly to make sure your lawn mower blade needs sharpening. nine0003
If you find a crack in your lawnmower blade, do not try to sharpen it. In this case, the replacement of the knife is inevitable.
If all goes well so far, you should still visit your specialist dealer every 20-25 hours of mowing to sharpen the mower blade.
A lot is required of a lawn mower. The lawn is mowed from spring to autumn, and the lawn mower is often used for several hours. During operation, dirt and plant residues settle on the body and stick to the mower blade.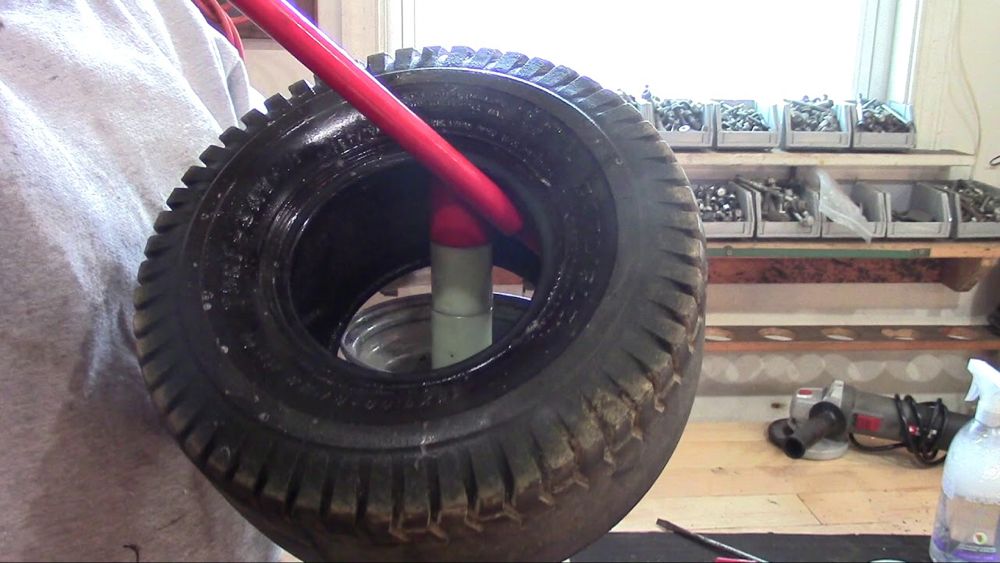 You must clean your lawnmower after every use to get good results in the long run. You should also schedule regular maintenance. nine0003
Optimum mower performance begins with fuel.
If you have a lawn mower, it is best to winterize it before the start of the cold season.
Once your lawn goes into hibernation at the end of the season, your lawn mower is also in danger of a longer winter break.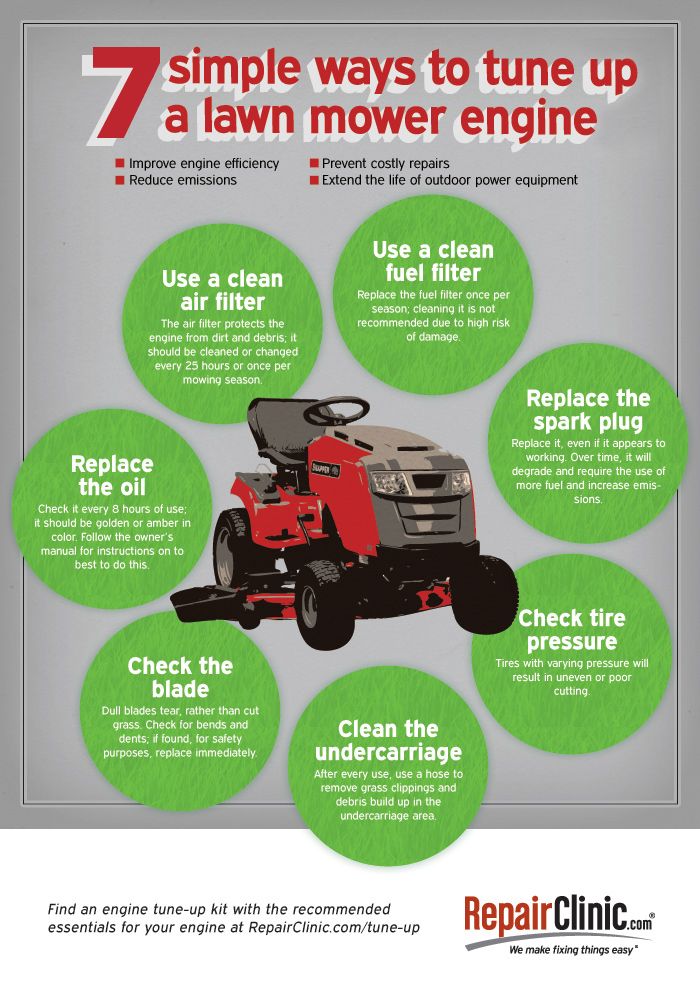 However, this cannot be dealt with without proper care, otherwise accumulated dirt and fuel residues can cause damage. Antidote: Before winter sets in, you should winterize your lawn mower. A little maintenance in the fall ensures that your device is back in top shape after the winter and that you start the next gardening season with you. nine0003
We've rounded up the most important tips and show you how to quickly winterize your lawn mower.
For your safety: Disconnect the spark plug cable before starting any work on the petrol machine. For electric mowers, pull on the power cord, and for cordless mowers, remove the battery.
If you want your lawn mower to work in winter, you must clean it especially thoroughly after the last mowing. Grass residues adhering to the body of the mower can be removed with a wooden or plastic spatula. There is nowhere to look for the remains of sod in the cooling fins and in the exhaust zone.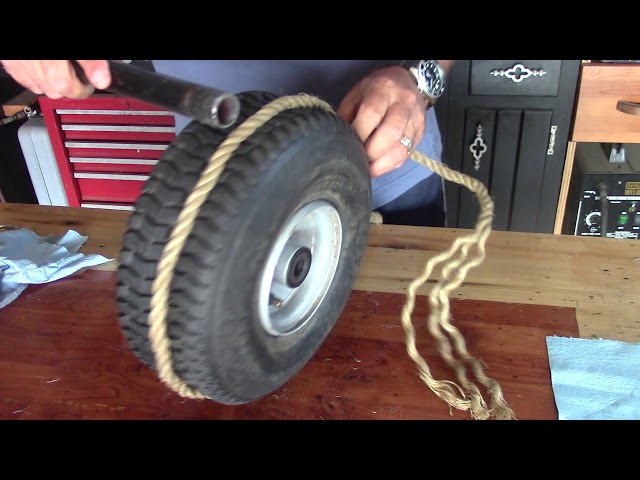 It is best to clean the device with a brush and water. A garden hose can also be used to help if it's particularly dirty. nine0003
However, you have to be careful here - after all, the lawn mower needs to be winterized and not damaged. Therefore, do not direct excessive water jets at bearings, seals or engine parts. If you want to remove dirt from the underside of the body, the mower should be tilted back so that the spark plug protrudes upwards. If the mower is tilted to the side, oil can get into the air filter or exhaust pipe - there is a risk of more damage.
Lubricate well and lubricate all moving parts. Your lawnmower will thank you for the coming season.
In order for the lawn mower to work in winter, you must also carefully examine the lawn mower blade. It must be intact before the first use in the spring. If cracks or nicks are visible, they must be replaced immediately by a trusted STIHL dealer.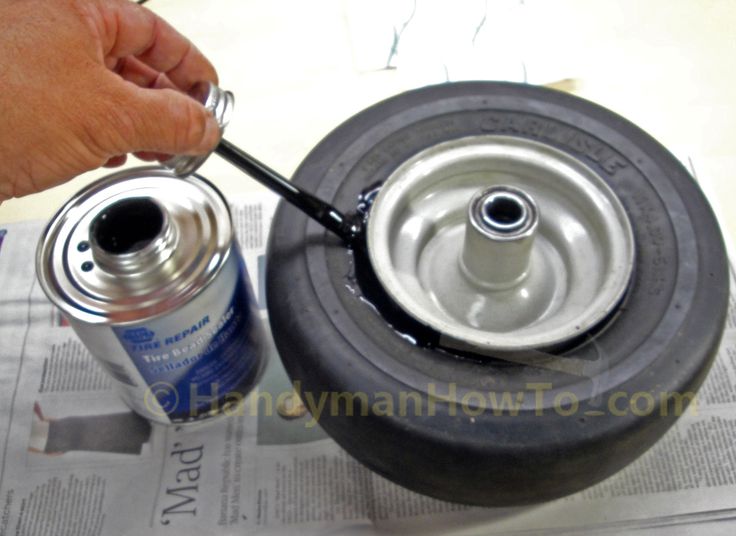 As a rule, it is recommended to completely disassemble and sharpen the knife or have it sharpened and adjusted by a specialist. By the way, not only when you want to winterize your lawn mower, but preferably regularly, after about 25 hours of operation. In this way, optimum mowing performance is always achieved. nine0003
Remove the spark plug and pour approximately 3 cc of engine oil into the internal combustion engine through the spark plug hole. Finally, crank the engine several times without a spark plug by pulling on the starter cord.
After all maintenance work has been done, your lawn mower will be winterized. Now all he needs is a good place to store things in the cold season. It is best to place the machine well covered in a dry, dust-free area. The storage position should be normal. nine0003
Your lawnmower tank should be empty before the winter holidays. Cause: Gasoline loses its ability to ignite in winter - if you leave it in the tank during the cold season, you may have trouble starting in the spring. If there is little fuel left in the tank after the last mowing, we advise you to let the mower idle until the engine stops on its own.
In order for your petrol lawn mower to work in winter, the oil level must also be correct during the winter holidays. Your machine must always be in good working order - even during winter storage. If an oil change is needed before the end-of-season break in late fall, that too should be done and not put off until the next season.
Winterizing is much like winterizing a lawn mower with a combustion engine or an electric lawn mower. When using battery lawnmowers, you should also thoroughly clean the machine and then lubricate the moving parts. But first: remove the batteries from your cordless lawn mower and mask the contact points before cleaning. Your cordless lawn mower batteries that have been removed should be about 40 to 60 percent charged and stored at 10 to 15 degrees in a dry area. In this way, the batteries remain intact, retain their capacity and are fully operational again next season. If batteries are permanently installed in your cordless lawnmower, you must make the whole unit winterproof. In this case, store the mower in a warm and dry place. nine0003
With a lawn tractor, you are not only the hero of your garden in summer. The STIHL snowblower turns your lawn mower into a practical snow blower in no time and clears the snow easily and efficiently.
Equipping your lawn tractor with a snow blower is easy. However, the mower must first be dismantled and the mounting frame attached to the tractor. Thanks to this bracket, the sliding blade can be mounted on a lawn tractor. Important functional parts such as the lifting arm and swing arm as well as the snow thrower suspension (connection triangle) are located on the mounting frame.