You’ve planned a motorcycle road trip for weeks, but when you open the garage door, you see it. Your motorcycle has a flat. For an experienced rider who knows how to change a motorcycle tire, this might be a simple fix. If you’re not sure, it helps to learn what to do to replace your bike’s tire.
To get you on the road again, here’s how to change a motorcycle tire[1] in eight steps .
Raise the end of the bike to lift the wheel off the ground. Use a socket to loosen and remove the axle. Release the chain and remove the brake caliper. Put your axle back in place to hold the caliper’s position.[2] It’s a good idea to consult your owner’s manual to learn any steps to take that are unique to your bike’s make and model.
To deflate the tire[3], unscrew the cap on the valve and remove the valve stem core with a special tool. Some valve stems come with built-in caps instead of separate pieces.
When you wondered how to change a motorcycle tire, you might not have realized that you need motorcycle tire changing tools. However, you don’t want to damage your valve stem by trying to remove it with something random from the garage. If you don’t have one already, pause the project and head to your local auto supply store to get a valve core remover.
The bead is the inner edge of the tire where it meets the rim. At the auto parts store, you can also purchase a bead breaker tool to make the job easier. Try to find one with tire spoons, which you’ll use to wedge the tire off the rim.
Insert the tool between the tire and wheel rim and move the tool around the bead. Flip the tire over and repeat this process on the other side. You can use a spray silicone lubricant or glass cleaner to prevent the bead from re-sticking as you move the tool around.[4]
Carefully insert a tire spoon under the bead and push down to pull the tire up.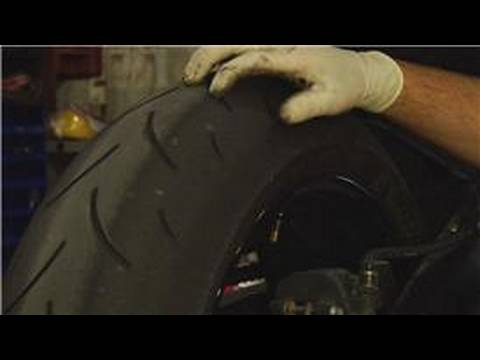 Leave a tire spoon in the spot where you pulled up the tire in order to hold it in place.
Use a second tire spoon to pry the tire away from the rim several inches from the first tire spoon. Leave the second spoon in that spot. Retrieve the first spoon and move it a couple inches. Repeat this until the entire tire separates from the rim. Then flip the wheel and repeat the process on the other side.
Alternative step: If your tire has a tube, you’ll need to unbolt the valve stem from the rim and remove the old tube.
Wipe out the inside of the rim and the inside of the new tire to ensure there’s no debris. Coat the edges of the new tire with bead lube. Hand sanitizer or hand soap work in a pinch too.[5]
Alternative step: If your tire has a tube, insert the new, uninflated tube into the tire. Be sure to insert the valve stem into the hole in the rim.
Use the tire spoons to carefully wedge the entire tire under the rim on one side. Flip the wheel over and repeat this process on the other side.
Fill the tire until it’s completely sitting along the rim. Be sure to check the air pressure. You might have to inflate the tire past the recommended riding pressure number.[6]
Follow your user manual’s instructions to remount the wheel. Check the air pressure again and adjust the alignment of the rear wheel and chain tension.[7] Ensure that all the fasteners are tight before you head out.
Owning a motorcycle offers great recreational opportunities, but it also comes with responsibilities. From insuring your motorcycle to maintaining it, remember to set aside time to properly care for your bike and learn motorcycle riding safety tips. Before you head out on your next adventure, talk to an insurance agent to make sure your motorcycle has the level of insurance coverage you need.
[1] https://www.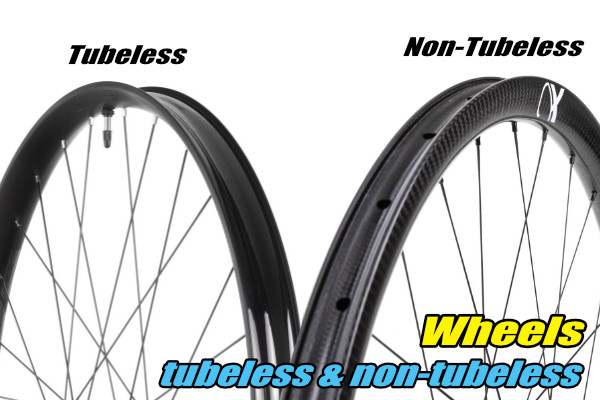 cycleworld.com/how-to-change-a-motorcycle-tire/
[2] “How to Remove Rear Motorcycle Wheel,” YouTube (September 4, 2016).
[3] https://www.rideapart.com/articles/245897/how-to-change-motorcycle-tires/
[4] https://www.cycleworld.com/how-to-change-a-motorcycle-tire/
[5] https://www.rideapart.com/articles/245897/how-to-change-motorcycle-tires/
[6] https://www.rideapart.com/articles/245897/how-to-change-motorcycle-tires/
[7] https://www.motorcyclistonline.com/how-to/how-to-check-front-and-rear-motorcycle-wheel-alignment-mc-garage-tech-tips/
Common Tread Supreme Ruler Lance made one of his regular sojourns to ZLA headquarters in Philly from his lair in Ohio in early fall. Although he was up for the trip, his tires were not. His rear Dunlop had seen better days, so he took a little detour up the hill to Lemmy Mountain for some tire attention before making the ride home.
Our first order of business was to eat the doughnuts Lance brought, washing them down with coffee.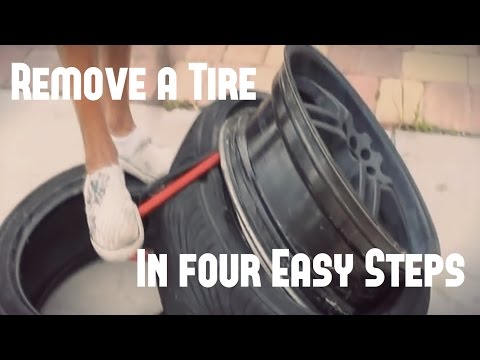 If you’re swapping tires before 9 a.m., we recommend you do the same. (If it is after 9, please swill beer instead.)
For some reason, we don't always feel comfortable handing off our tire-changing jobs to the "professionals." Photo by Lance Oliver.
Lance's editorial comment #1: Lemmy likes to dive right into a job, but I like to think about the meaning of it all. Such as why do I always change my own tires? There are a couple of good reasons. First, you can save money by buying your motorcycle tires from RevZilla at a good price, probably better than what your local shop charges. Plus, you'll save the fee for changing them. With shops charging $20 to $40 per wheel, the equipment you buy to do it yourself will pay for itself before long. The second reason is that you'll save yourself some time, and that's even more valuable to me than money. I can change my own tires faster than I can make an appointment, take the wheels off the bike, take them to the shop and wait for someone to do the work.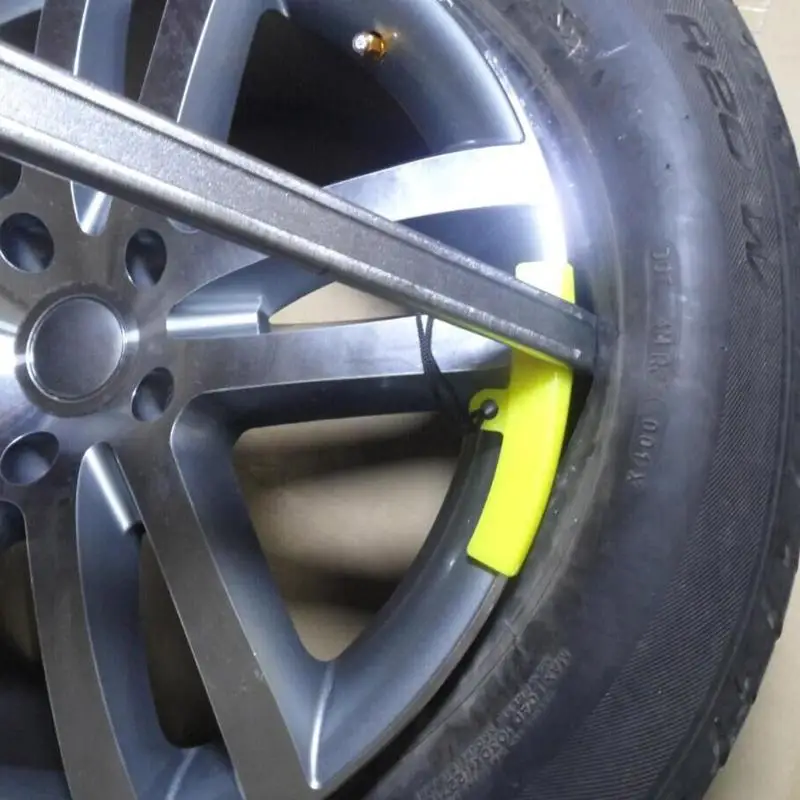 I do it on my own schedule, when it's convenient for me.
I should also specify that everything here is about changing tubeless tires. If Lemmy ever gets out and rides his neglected Honda XR650L enough to wear out the OEM tires, maybe I'll be able to get him to do a how-to on changing tube-type tires. Now I'll hand the mic back to Lemmy...
Too many trips across Pennsylvania flat-spotted this rear tire. Before making the 475-mile trip home, Lance wanted a new one. We used jack stands to raise the bike. Photo by Lance Oliver.Our first task was to get the rear end of the bike up in the air. There’s lots of methods for lifting a scooter: bike jacks, ratchet straps to overhead rafters, centerstands, wheelstands, you name it. I’ve even changed tires with a bike frame up on a log before, and I’ve laid them on their sides as well. Be creative, but be careful. Lance set his bike up with a pair of swingarm spools at some point, so we just picked up the machine and put it on some plain old automotive jackstands. We did loosen the axle nut slightly while the bike was still solidly on the ground. No need to torque on it after it's raised.
Lance's editorial comment #2: I have the swingarm spools because at home in my own garage, I'd quickly and easily raise my Versys on my rear stand. Since Lemmy only rides Shovelheads, choppers of muttly lineage and other odd junk, to which no one has ever fitted swingarm spools, he didn't have a rear stand. The jackstands worked just fine.
Next, we loosened the chain adjusters so we could slip the chain off the sprocket, and then slid out the axle. Keep track of the order of the axle hardware, especially wheel spacers. If you fail at this step, you have to put together a little jigsaw puzzle when you reassemble everything.
Lance's editorial comment #3: My tip: I like to put the spacers back on the axle in the proper order and put the nut on loosely. That keeps me from forgetting what goes where and misplacing any pieces.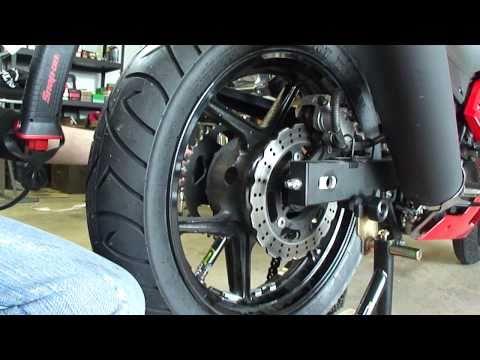 Plus, make a note of where the brake caliper mounting bracket fits into the scheme.
Lemmy uses a drift to coax out the axle. Photo by Lance Oliver.
Rather than let the brake caliper's weight dangle on the brake line, Lemmy suspends it using a bungee cord. Photo by Lance Oliver.Before sliding the axle out, I like to put a little chock of wood under the tire being removed to hold it up. Then I use a drift punch to drive the axle out of the wheel. If you’re doing a front wheel, the process is the same (don't forget to loosen the pinch bolts at the bottom of most fork legs), but you will probably have to remove both brake calipers to remove the wheel. Wire the calipers up out of the way. Don’t let them dangle by the brake hoses.
If you’re so inclined, now is the time to check those wheel bearings. If they feel gritty, repack or replace ‘em! Don’t forget to check the brakes while you’ve got them off, as well.
Deflate the tire by removing the valve core with a valve core tool.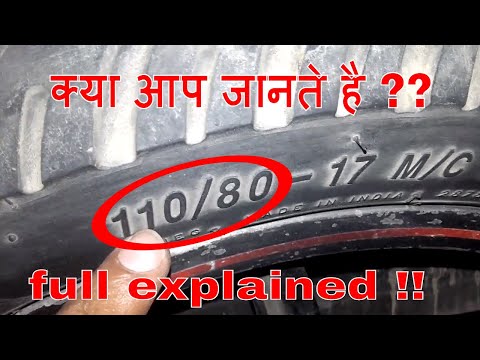 After the air has made its exit, it's time to break the beads. There are a multitude of ways to do this, but we elected to use a manual bead breaker. It makes quick work of an otherwise-difficult job.
This bead breaker tool Lemmy has works well. A variety of tools, from clamps to levers and wedges, are available for the job. Photo by Lance Oliver.
Lance's editorial comment #4: Breaking the bead can be the hardest part of the job, in some cases. The tool Lemmy has worked like a charm. At home, I have a Harbor Freight changing stand I bought years ago. It has its drawbacks and doesn't get much respect from tool aficionados, but it has a bead breaker that works well, and that alone makes it worth its cost, to me. There are some other nifty tools that don't cost a fortune.
After the beads are broken on both sides, it's time to begin pulling the tire off the wheel. This part of the job is more of an art than a science. Everyone seems to find their own way of doing things. I like to work on old squares of carpet to keep from beating the tar out of the finish on the wheels.
Lemmy gets down there with the wheel, like an old-style wrassler. Photo by Lance Oliver.
Lance's editorial comment #5: Although it was mildly alarming to watch Lemmy battling my wheel and tire on his knees like an Everglades 'gator wrestler, I have to admit his methods got the job done. Personally, my knees have a lot more miles on them than Lemmy's and I prefer to work standing up. Plus, having the wheel clamped to a stand makes it easier to avoid the possibility of putting pressure on a brake rotor. If you do use the Lemmy method, keep the rotor side up to avoid leaning on it.
There are ways to make your own tire-changing stand, if you're lacking funds to buy one. I've seen some good homemade tire-changing setups created with a few dollars of materials: A discarded car wheel with a section of old garden hose sliced lengthwise and put on the wheel's rim for rubber protection, and a threaded rod in the center to clamp your motorcycle wheel to the car wheel. My store-bought tire-changing stand is another option. If you're ready to pay more, I've seen people change tires in a flash without breaking a sweat using one of those fancy (and pricey) No-Mar changers.
The job will go easier with the right tools. Use tire lube. They make this stuff for a reason — it works! It helps with de-mounts as well as mounting, and protects the bead from rips or tears from the tire irons.
Use dedicated tire spoons. I’m not going to kid you and say I’ve never fudged it with the wrong tool, but I’ve also ruined some wheels half-assing the job alongside the road in the middle of East Jabip. Rim protectors are a great idea if you want to keep your wheels looking good. If you think I’m just pitching stuff we sell, let me dispel that notion: You can easily cut up old milk jugs, or you can use College Lemmy’s impromptu rim-saver: heater hose scraps filched from the auto parts joint.
Removing the tire is prolly the trickiest step. Use the spoons, take your time, and as Lance kept reminding me, “Take small bites!” He’s got a great point. I have a habit of getting greedy. I try to de-mount the whole dang tire at once, and it never works. It bends the spoons, makes my arms sore, and puts the delicate beads at risk. Work smart, not hard. Do little sections of bead at a time and don't forget the tire lube.
With one bead off the wheel, it's easy to see the drop-center and understand how it makes this whole process possible. Photo by Lance Oliver.Here's the most important thing to remember. The act of levering the bead over the rim lip only can happen if the bead is in the “drop-center” on the opposite side of the tire. The drop-center is the shallow channel that runs the circumference of the wheel at the center and it makes the whole process possible. If you're having to use excessive force and still can't get the bead of the tire over the lip of the rim, your problem is that the tire bead is not in the drop-center.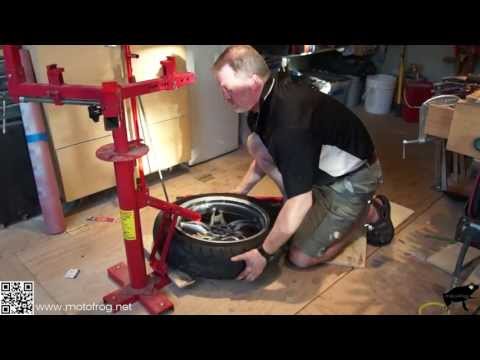
It can be difficult because the tire doesn't want to stay in the drop-center. I typically kneel on the tire to keep it where I want it. At this point, after a few bad words, you should have one bead free of the tire. Repeat the process on the other bead, but the same side of the wheel.
Lance's editorial comment #6: I find that having a couple of different shapes of tire irons makes the job much easier. I have one long iron with a nice bend in it that's almost indispensable for that first grip on the second bead, which is harder to access than the first.
With the tire off, I give the wheel a visual inspection, and then replace the valve stem. You can either pull the old one out with a tool or just cut it out. Lance didn't have a replacement valve stem ready, so we reused the same one. You can do that, but replacing it is cheap protection.
Almost done. Rim protectors keep wheels from getting marred by tire irons. Photo by Lance Oliver.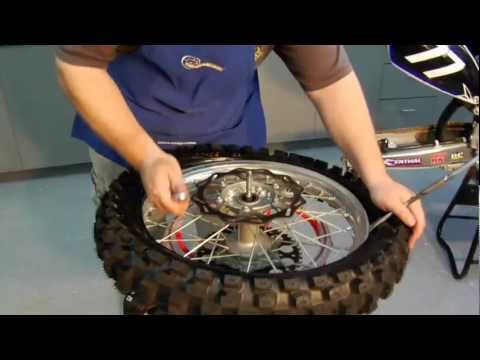 Using the directional arrows on the sidewall, check and double-check the direction of the new tire relative to the wheel. Nothing is worse than mounting it backwards and having to do the job twice. Be generous with the lube and slather the new tire’s beads. Installation of the new tire is much the same as removing the old one. Again, “take small bites” and be sure the opposite bead is in the drop-center of the wheel. If there's a small dot of paint on the sidewall, that's the balancing mark. Line it up with the heaviest part of the wheel, typically where the valve stem bolts in (see balancing section below).
Once the tire is mounted onto the wheel, you need to seat the beads. Remove the valve core from the new stem so you can inflate it faster. A large air compressor will have enough oomph! to blow the beads of most tires onto the wheel, but there are always kludgy exceptions. If your compressor’s not doing the job, there are a number of redneck ways to make the tire assume its new home. I’m not going to claim that I’ve never used ether to blow a bead onto a wheel, but I sure am not recommending anyone else do it. Bead seating tools (also known as Cheetahs) are much less dangerous. Watch your fingers during this step! I have pinched the ever-livin’ bejesus out of myself by getting my finger too close to a bead that was about to seat.
Lance's editorial comment #7: Lube is again your friend when trying to seat the beads. It encourages the bead to slide into its home and, because it is liquid, it will create tell-tale bubbles to show you where air is escaping, instead of inflating your tire. Sometimes pressing on the tread next to the spot where air is escaping past the bead will be enough to get that satisfying and loud "pop!" you're seeking.
With the bead set, replace the valve core and adjust the inflation to the correct pressure. If you are the balancing kind of fellow, now is the time to do so. (Lance and I have similar views on balancing tires. We don’t.) Please don’t leave murderous comments about balancing. I encourage everyone to do what they feel is best with regard to tire balancing.
Lance's editorial comment #8: Uh, actually I've been known to balance tires, especially front ones and especially on a bike I'm going to take to the track and ride at higher speeds, where a vibration can show up that I never felt at street speeds.
Static balancing isn't hard. One of these balancing stands (or a homemade alternative), some stick-on wheel weights and some patience are all you need. The good news is that quality control keeps getting better, and more often these days I find tires need little or no weights to be in balance. You can also use your balancing stand on your wheel alone to determine if the valve stem area really is the heaviest spot on the wheel. That lets you know where to line up the balancing spot on the tire.
With the chain back on the sprocket and the spacers and brake caliper bracket lined up in place, it's time to slide in the axle. Photo by Lance Oliver.
Lemmy's editorial comment #1: This guy sure has a lot of advice to dole out for a guy with clean hands, doesn't he?
At this stage of the game, you ought to be ready to reinstall your wheel. I put that chock of wood back in place to hold the wheel up. Reinstall your caliper (or brake assembly, if your bike has a drum brake), get all your spacers lined up in the right spots and slide the axle back in. Leave the axle nut slightly loose while you adjust the tension on the chain. Snug everything up, check the chain tension again (the chain on Lance's Versys gets tighter when you torque that axle nut), check to make sure the rear wheel is straight by sighting down the chain, lubricate the chain, put a new cotter pin in the castellated axle nut, and go ride! (Carefully, of course, so you can scrub in that new tire and make sure you have everything snugged down right. And don't forget to pump up the brakes before you ride.)
As a parting thought, keep your head about you if this is the first time you’re changin' tars. Even thousands of tires later, these things still get me riled up. Beads don’t seat, tires won’t get onto their rims. It's always something. Patient and methodical work gets the job done, so don't get discouraged!
Hello.
Owners of motorcycles with rims have to go to a tire shop to get new tires on their motorcycle. When replacing tires on such motorcycles with your own hands, the disc may bend and lose its presentation. On the other hand, if you have an enduro or any other bike with spoked wheels, it is quite possible to change the tires yourself. Moreover, any normal endurist simply must be able to change tires in the field with a pair of mounts, since off-road trips are often associated with long hauls on asphalt. In this case, it is advisable to go to the place of drowning in mud on road tires, take a set of "evil" rubber with you and put it on a motorcycle in an open field immediately before off-road. Today we will talk about changing the tires of a motorcycle with spoked wheels on your own. nine0003
We will talk about the types of motorcycle tires and indices in the names of rubber models, since this topic is worthy of a separate article, and maybe more than one. Today, within the framework of this article, I will give only one of the simplest classifications. Tires for motorcycles are chambered and tubeless. Tubeless tires are convenient, used everywhere on motorcycles with disc wheels. The disk inside is hermetically sealed, so it is enough to put new tires on, smearing the joints with a special sealant, pump up - and you can ride. Spoked wheels are not airtight inside, since the spokes pass through the wheel rim at one end. On spoked wheels, tires with tubes inside are used - it’s clear why. nine0003
Is it possible to put tubeless tires on a spoked motorcycle wheel by simply sticking a conventional tube inside? Yes, easily! Now I will just put tubeless tires with cameras on my motorcycle.
What is the difference between tube and tubeless tires? Everything is very simple. Tubeless tires have a special groove on the inside that acts like a "hook" and increases tightness.
Chamber rubber has no such "hook".
Also, many manufacturers claim that tubeless tires have a reinforced cord. I don’t see anything wrong if we ride a motorcycle with tubes in tires, and even with a reinforced cord 🙂 Especially since there is no difference at all between installing tubed and tubeless tires on a motorcycle 🙂
Let's go!
What you need to change tires on your motorcycle.
To change tires on a motorcycle, we need the following materials and tools:
1) New tires. In my case, the BMW F650GS is the Metzeller Tourance. By default, the Metzeller official website gives the tire sizes specified in the manual for the BMW F650GS motorcycle. Front - 110/90 - R19, rear - 130/80 R17. In principle, there is a lot of space left in front and behind, so I will put 120/9 on the front wheel0 with 19 radius, and I'll leave everything as it should be behind.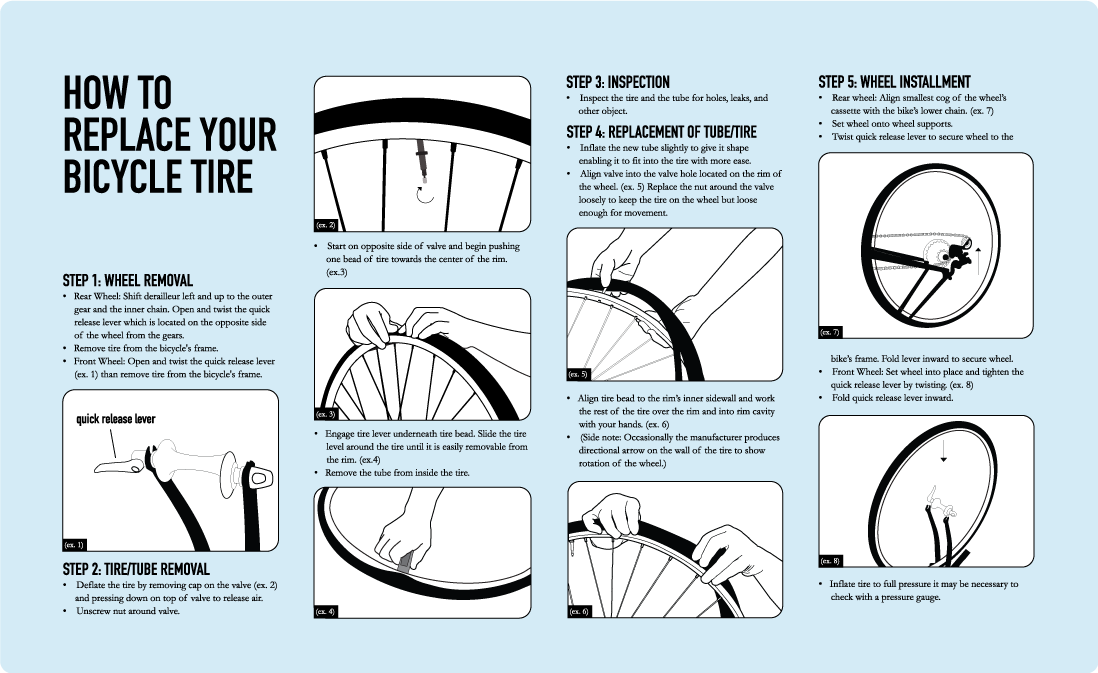
2) Crowbars (or crowbars, whatever they call it). I manage alone, but I have experience since Java. Better to use two.
3) Soap solution. It will be needed when putting on new tires, and when removing the old one, it can also come in handy. Without it, you can accidentally break a tire. I know that many people use Vaseline and other neutral lubricants. I don't even know where to buy Vaseline now, so I use soapy water. Soap in water should ideally not dissolve completely and be similar in consistency to snot 🙂
4) Metal cap on the nipple with hooks for unscrewing the nipple.
5) A set of tools to turn the screw nuts.
Do-it-yourself motorcycle tire replacement.
Front wheel example.
1) Loosen the wheel axle while the bike is firmly on the ground.
2) Hang the motorcycle on a stand or put it on the center stand and remove the wheel.
3) Unscrew the nipple and let the air out of the wheel. Then we need to "separate" the rubber from the wheel rim. To do this, you need to stomp her feet. You don't need to jump on it, there is a chance to bend the rim. nine0013
There is a little trick here. Sometimes the rubber sticks to the rim tightly. In your garage you can dance shamanic dances with a tambourine, jump on a wheel and separate, but what if you have to change tires in an open field, with a limited number of tools and time?
If you are traveling with a group, the easiest way is to use the side stand of the second motorcycle. Just put the wheel on the ground, fold down the side stand of the second motorcycle and put it on the camera near the wheel rim. Jump like a cutie! 🙂
4) Pry the tire on one side with a pry bar. Be careful not to push the crowbar too deep to avoid tearing the camera.
5) Insert the second mount.
And so on in a circle.
6) Pull out the camera.
And finally disassemble the wheel.
7) Check the condition of the rubber that protects the camera from the spokes.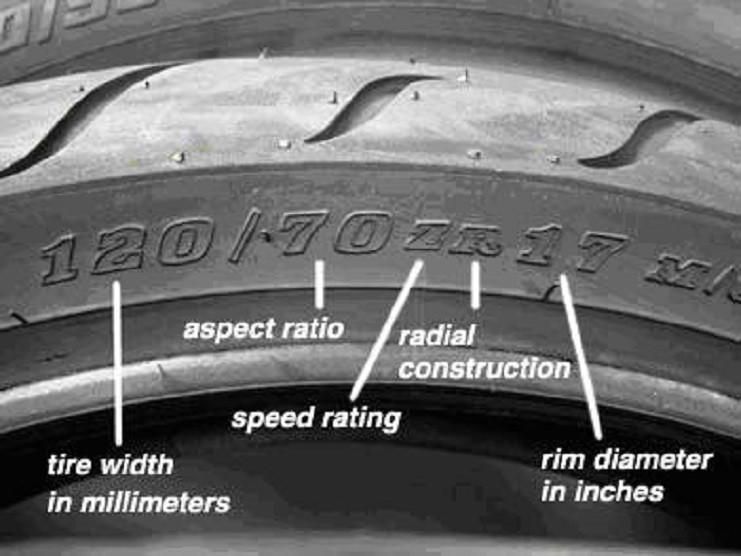 If it is worn or frayed, it must be replaced.
8) Now let's take a closer look at the new tires. We are interested in two markers that are indicated on any rubber. This is an arrow indicating the direction of rotation of the wheel. nine0013
And the marker against which the nipple should eventually be placed. Either two dots or one bold.
9) Then grease the new tire with soapy water.
10) First we push in one bead, then we push the tube inside, aligning the marker against the nipple, then we fence the second tire bead. The camera must be pushed in so that it is not twisted anywhere, otherwise there is a possibility that it will fray itself after a certain number of kilometers. nine0013
11) Done. Put the wheel back on the bike.
With rear wheel by analogy.
How many atmospheres to drive into tires, usually indicated on the pendulum.
Wheel balancing on enduras and choppers is not as important as on sportbikes and other high-speed motorcycles - endurists and choppers usually ride like old grandmas 🙂 But later I will show how to do wheel balancing in handicraft conditions with your own hands. This process is not difficult, and with due patience and experience, you can achieve the same results as with professional equipment. nine0003
A couple more moments!
1) Please note that, as in any repair, cleanliness is the key to health! The inside of the tire must be kept clean, because in case any solid particles remain between the tire and the chamber, you have a chance to repeat my Rear Wheel Saga 🙂 I usually blow the inside of the chamber with a compressor and wipe it with a damp cloth.
2) In order not to pinch the camera with the mount, you can pump it up a little. It helps me, and you yourself think. nine0003
All.
This entry was posted in repair and maintenance and tagged BMW F 650 GS, motorcycle, report, repair, photo. Bookmark the permalink.
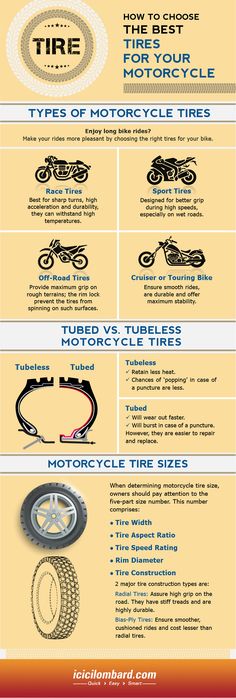
Tires are the only thing that connects a motorcycle to the road. Handling, dynamics, comfort, motorcycle cross-country ability . .. and the safety of the driver himself depend on their design and condition. And his concern is to monitor the health of tires and be able to repair them, often in the field. nine0003
THREE SIDES OF THE ONE MEDAL. Any tire is a more or less successful attempt to combine the incompatible. Or, in other words, the conscious deterioration of some tire properties for the benefit of others. This is precisely the difficulty for designers when creating a tire. This is also the difficulty of choice for the consumer. Here are the three main properties that a road tire should have.
The first thing is to provide reliable traction. On asphalt, soft rubber has the best grip (which is especially important in corners). But it quickly wears out, losing its properties. Moreover, tires with a soft compound are very demanding on their own temperature and seriously lose in a cold state. nine0003
The second (for the rear wheel) is to realize a large moment.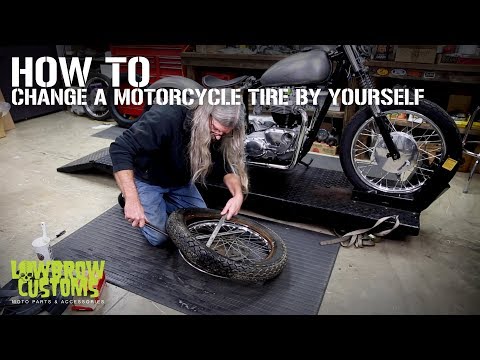 It is because of this that the rear tires on modern motorcycles are at least thirty percent wider than, say, motorcycles twenty years ago. But again there was a minus - due to the increased width, the maneuverability of the motorcycle worsened.
Third (more for the front wheel) - informative. The tire should “inform” the driver about the state of the roadway, which is especially important for those who like to drive fast. The disadvantages of "detailed information" are an excess of vibrations transmitted from the road and discomfort. The choice of a specific tire for a particular motorcycle depends on many factors - the rider's riding style, his skills, and finally, the budget. Practice shows that the more experienced and skillful the driver is, the less attention he pays to a specific brand (all world-famous manufacturers mainly offer products of a similar level) and more to the condition of the tire and the pressure in it. Of course, if you are the owner of a sportbike, you should not install purely tourist tires on it, but sports pseudo-slicks for driving on wet city streets are not suitable either.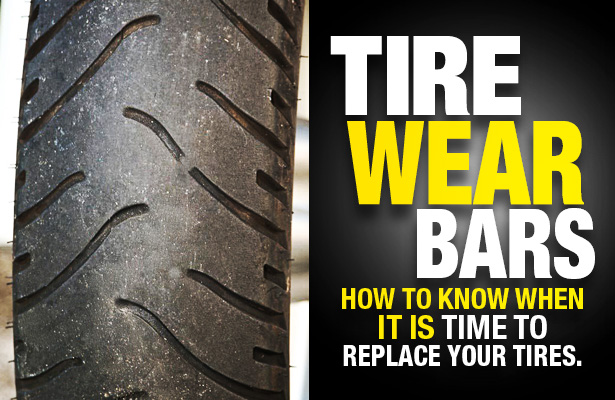 nine0003
MOTORCYCLE TIRE CONSTRUCTION. By design, motorcycle tires are radial and diagonal. Radial tires are marked with the letter "R" (for example, 180/55 R17), diagonal tires with a "-" sign (100/90 - 19), and diagonal tires with a stiffening belt with the letter "B" (150/70 B17).
Road and sport bikes mainly use radial (RADIAL TYPE) tires. They are the most resistant to deformations that occur at high speeds and loads, provide a more regular contact patch and lower internal rolling losses. The carcass threads of a radial tire are located in planes passing through the axis of rotation of the wheel and, accordingly, do not cross. Above the frame is a strong, usually multi-layer breaker with a base of steel or synthetic threads, which perceives and distributes loads. A radial tire has less internal friction, hence less heat.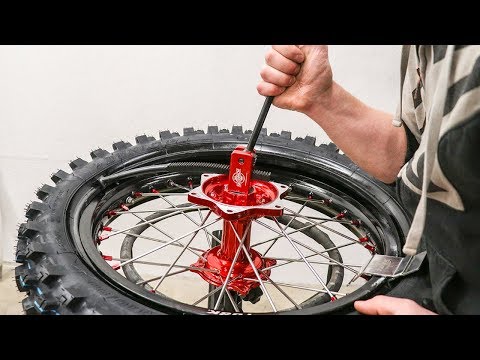 nine0003
Bias (BIAS TYPE) tires are much simpler and therefore cheaper to manufacture than radial tires. They are more durable on bad roads, but heavier and have greater internal friction losses compared to radial ones. "Diagonals" have proven themselves well on enduro and motocross bikes.
In a diagonal tire, the carcass threads are at an angle to the direction of travel and cross, in contrast to a radial tire. The number of plies in a carcass is often indicated on the tire label (usually 2 to 6). The larger it is, the more load the tire can withstand. There are also BIAS-BELTED tires. They have an additional reinforcing belt on top of the carcass, just like radial tires. nine0003
The first two digits in the oval indicate the week, the last two indicate the year the tire was manufactured.
The first two digits in the oval indicate the week, the last two indicate the year the tire was manufactured.
TIRE FIT AND DIMENSIONS. It is believed that rubber stored for more than a year loses its hermetic properties. In fact, this layer is not. Thomas Bischoff, Market Development Manager for Eastern Europe at Metzeler, explained that in the past, rubber did crack quite quickly when exposed to sunlight. But for more than twenty years, thanks to special additives, the tire can be stored without loss of properties for at least five years. Even on the street. The only type of tires that this does not apply to are racing slicks. It is believed that they do not stand on a motorcycle for a long time, and there is no sunlight in the warehouse. Therefore, “extra” components are not added to their compound. nine0003
Each tire has tread wear indicators. As a rule, these are visible “bulges” (bridges) in the tread grooves. On the sidewall opposite these indicators are the letters TWI (Tread Wear Indicator). If the indicator has begun to wear out at least in one place, the tire must be replaced immediately. Without regret!
Each tire has tread wear indicators. As a rule, these are visible “bulges” (bridges) in the tread grooves. On the sidewall opposite these indicators are the letters TWI (Tread Wear Indicator). If the indicator has begun to wear out at least in one place, the tire must be replaced immediately. Without regret! nine0003
HOW MUCH TO DOWNLOAD? On any production motorcycle you will find a plate that will indicate the pressure when driving alone and with a passenger. In everyday life, you can safely follow these instructions. But in some cases, recommendations will have to be deviated from. First of all, this applies to multifunctional motorcycles - enduro. Typically, indications on them refer to road tires. When replacing tires with off-road tires, the pressure is usually lowered. As a rule, it should not exceed 1.8–2 atm (for light enduro there are hard tires in which it is recommended to maintain 1 atm).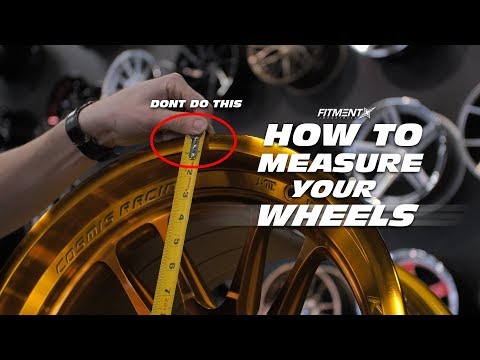 Off-road tires with a pressure above 2 atm behave disgustingly both on asphalt and on a country road! But on them you can carefully get to the place of repair and in case of a puncture - if the tire does not turn on the rim. nine0003
When using sports bikes on the track, the pressure must also be reduced. A "stove" for light vehicles can be considered 2.0 atm in the front and 1.8 atm in the rear wheel. Reducing the pressure allows you to increase the contact patch of the tire with the road, which is especially important in corners. And don't forget to inflate the wheel after training on the track! Driving with low pressure on the motorway will lead to increased tire wear and may be unsafe (after all, the tire heats up on the track, due to which the pressure still rises). When traveling on a loaded road bike, to increase the life of the rear tire, the pressure in it can be increased to 3 atm. But don't do this if your route is through winding mountain roads or if you are traveling in cold weather. nine0003
Replace tires that are unevenly worn from long freeway driving. Tires that are flat in the middle and virgin along the edges behave very insidiously in turns and on uneven roads (especially in ruts and on longitudinal sections of asphalt), and in the rain they generally cease to hold.
Replace tires that are unevenly worn from long freeway driving. Tires that are flat in the middle and virgin along the edges behave very insidiously in turns and on uneven roads (especially in ruts and on longitudinal sections of asphalt), and in the rain they generally cease to hold. nine0003
REPAIRING A TUBELESS TIRE. Flat tire. If this happened while driving at high speed on the highway, you will not notice that the pressure has dropped. Centrifugal force at speeds over 160 km/h will prevent the tire from being pressed to the rim. (On the other hand, the same force can release air from the wheel by “squeezing” the valve of the nipple inward. Make sure that the cap with a sealing rubber gasket is always screwed on the nipple!) Trouble will show up at the most inopportune moment - during braking. Most often, the culprit of a puncture - a nail, a screw, or a piece of glass - gets stuck in the tire. If you do not have a special kit for repairing tubeless tires with you, it's bad, but do not rush to remove the self-tapping screw from the wheel. All is not yet lost. You can try to ask a good car enthusiast for a pump, pump up the wheel to the maximum pressure and rush to the nearest tire service. (You need to find out about his whereabouts before you start pumping a leaky tire, because you will have no more than seven minutes on the road.) Focus failed? We call a tow truck. nine0003
Tubeless tire repair kit.
Tubeless tire repair kit.
If you did not hope for a chance and stocked up on a repair kit, there is a chance to leave on your own.
Carefully remove the self-tapping screw (nail, glass) from the hole. We take a special hook from the set - a needle file and insert it through the hole into the tire cavity. We process the inner surface of the hole with reciprocating movements. We don't get carried away! The tool should pass into the hole with a slight but perceptible resistance. Squeeze out the glue from the kit into the hole. nine0003
Carefully remove the self-tapping screw (nail, glass) from the hole. We take a special hook from the set - a needle file and insert it through the hole into the tire cavity. We process the inner surface of the hole with reciprocating movements. We don't get carried away! The tool should pass into the hole with a slight but perceptible resistance. Squeeze out the glue from the kit into the hole.
We take a rubber band (they are both round and in the form of a figure eight), also coat it with glue, hook it onto the hook of a universal tool and insert it into the hole with a confident movement. nine0003
We take a rubber band (they are both round and in the form of a figure eight), also coat it with glue, hook it onto the hook of a universal tool and insert it into the hole with a confident movement.
The further process is a real art, the culmination of the whole action, and each master performs it in his own way. Someone pulls smoothly, gently swaying, someone drags boldly and sharply. The point is to remove the tool from the hole so that the inserted tourniquet remains inside. A few crampon workouts in the garage will help a lot, and on the road you will effortlessly handle repairs. nine0003
The further process is a real art, the culmination of the whole action, and each master performs it in his own way. Someone pulls smoothly, gently swaying, someone drags boldly and sharply. The point is to remove the tool from the hole so that the inserted tourniquet remains inside. A few crampon workouts in the garage will help a lot, and on the road you will effortlessly handle repairs.
After removing the tool, cut off the protruding residue of the flagellum.
After removing the instrument, cut off the protruding remnant of the flagellum.
Now it remains to inflate the wheel from cylinders with compressed gas. You need to carry at least two of them, since one is not enough for the rear wheel. Remember, when inflating a tire, the balloon cools down - do not touch it with bare hands. In Europe, it is generally accepted that a repair with a flagellum does not give a 100% guarantee, since under the action of centrifugal force at high speeds, the flagellum can leave the tire. And despite the fact that I have not seen this in practice, I advise everyone to listen to the opinion of European colleagues. Look into the service and ask to change the tourniquet for a more securely fixed “fungus” or patch from the inside of the tire. But it is useless to repair a puncture with a diameter of more than 5 mm either in the side part of the tire, or a “hernia”.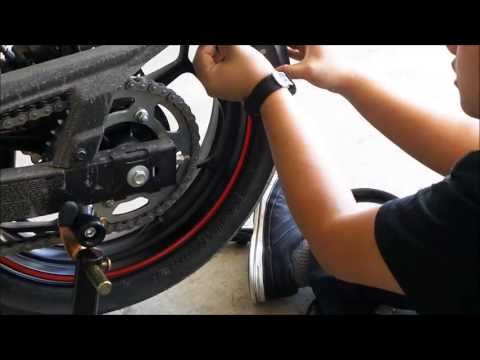 It's a shame, you will have to part with such a tire. nine0003
HOW TO BALANCE? When picking up a motorcycle from a tire shop, it is worth checking the work of the master. First of all, make sure that the arrow drawn on the side of the tire corresponds to the direction of rotation of the wheel. At the same time, the type and shape of the tread should not confuse you in any way. It is also important that the marking of the lightest part of the tire (usually a bright circle painted on the sidewall of the tire) is near the valve. Otherwise, the wheel will have to be weighted with additional balancing weights that spoil the look of the motorcycle. nine0003
Too many motorcyclists torment tire workers in an effort to achieve perfect dynamic wheel balance. In vain! First of all, the width of the motorcycle rim (even the rear one) is relatively small, as is the possible dynamic imbalance. Moreover, it has been experimentally verified that a motorcyclist cannot feel a weight less than 50 g on the rear and 25 g on the front wheel.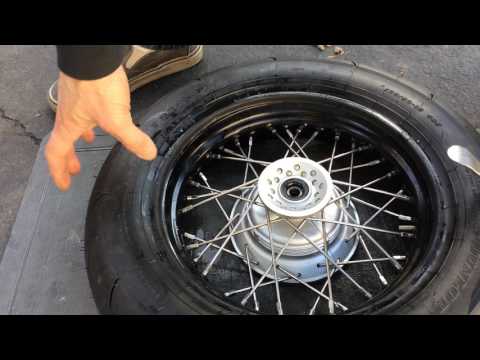 That is why, in many motorcycle factories, regular weights are attached to the middle of the rim, and not to the rim, like in cars. Moreover, even in world-class competitions such as WSBK, tires are manually balanced by rotating the wheel in special cones and gluing a weight against the rim that is below. An imbalance of 10–15 g can be considered normal and the balancing should be stopped at this point. nine0003
REPAIRING A TUBE TIRE. A tire puncture should not embarrass a true endurist. After all, he has with him everything necessary "for autonomous navigation", including the tool needed to remove the wheel and tire fitting, as well as strength, dexterity and experience. In the absence of the latter, this article will be of help. In addition to the tool, you will need a spare chamber (if you take one, it is better to take the front one - it can also be used in the rear wheel, but the opposite will not work) and a pump. On a long trip, it is better to take patches and glue, and now special patches are sold that are designed for a long service life (cut out from the chamber are considered temporary, that is, not very reliable, especially at high loads and temperatures). There are also special cans for tire repair, including tube ones, on sale. Their advantage is that they seal the damage and inflate the tire at the same time. Cons - "disposability", the inability to repair a large puncture and the price. Sometimes you can do without tire fitting by pouring water into the chamber (50–100 ml is enough). With luck, you can drive this way for several hours. And if a rigid diagonal tire is installed on the rear wheel, then on a flat road it allows you to move with a puncture, especially for one driver on a light motorcycle. You just need to balance the speed with the heating of the tire - otherwise it can exfoliate from overheating. Such a trick will not work from the front - the motorcycle will be uncontrollable. nine0003
It is very important to have the right mounts - not too long, "hooky", but also without sharp edges. Experienced travelers sometimes make their own mounts from wrenches for axle nuts.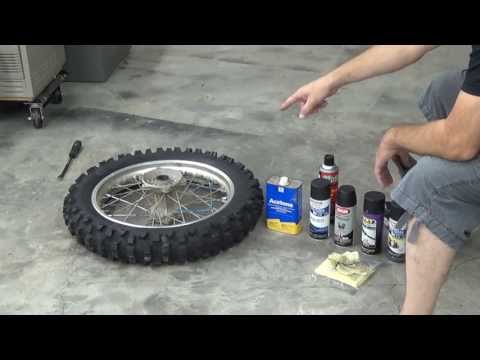
It is very important to have the right mounts - not too long, "hooky", but also without sharp edges. Experienced travelers sometimes make their own mounts from wrenches for axle nuts.
To remove the rear wheel, we need a wrench for the rear axle nut; the second key (to hold the axis) is usually not needed. Sometimes the nut sticks to the thread or is simply tightened with a long wrench, and it cannot be touched with a frail regular tool. When tightening the axle, do not overdo it - a torque of 8–10 kgcm is sufficient. By dragging, instead of getting a reliable connection, you will simply ruin both parts. To remove the rear wheel on an off-road motorcycle, it is not necessary to loosen the chain, but it is still good to have keys with you to tension it (on some motorcycles, the chain is tensioned by a “snail” that does not require keys). When collecting a set of tools for the road, try in the garage to do the procedures for which you take them. After all, in an open field (or a dirty swamp) there is nowhere to wait for help! nine0003
Remember to loosen the pinch screws on one of the fork legs before removing the front axle. On some motorcycles (where there are two brake discs) you will also have to unscrew the brake calipers, otherwise the wheel cannot be removed. It is advisable to place a set of tools not on the ground, but on a spread cloth.
Be sure to loosen the pinch screws on one of the fork legs before removing the front wheel axle. On some motorcycles (where there are two brake discs) you will also have to unscrew the brake calipers, otherwise the wheel cannot be removed. It is advisable to place a set of tools not on the ground, but on a spread cloth. nine0003
Loosen the rear axle nut...
Loosen the rear axle nut...
... and remove the chain from the sprocket.
...and remove the chain from the sprocket.
Light enduros do not have center stands. Therefore, to remove the wheel, you can lean the motorcycle on a stump or bump. If they don't, no problem. We find a clearing more evenly, close the gas valve and lay the motorcycle on its side so that the axle is pulled up. If you're looking after a motorcycle, the axle comes out easily. But woe to those who are lazy! If the axle is rusted to the spacer bushings (or inner rings of bearings), you can't get it out of there without kerosene (WD-40) and a decent-sized mallet. nine0003
Light enduros do not have center stands. Therefore, to remove the wheel, you can lean the motorcycle on a stump or bump. If they don't, no problem. We find a clearing more evenly, close the gas valve and lay the motorcycle on its side so that the axle is pulled up. If you're looking after a motorcycle, the axle comes out easily. But woe to those who are lazy! If the axle is rusted to the spacer bushings (or inner rings of bearings), you can't get it out of there without kerosene (WD-40) and a decent-sized mallet.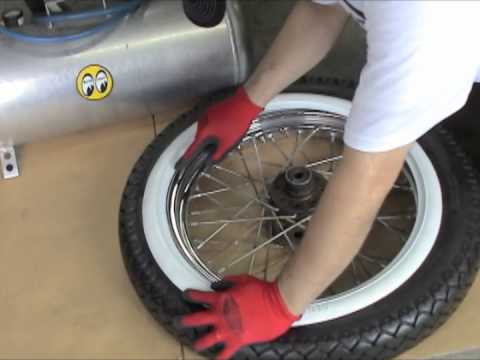
It is important not to mix up the bushings (they are not the same everywhere) and not to stain them.
It is important not to mix up the bushings (they are not the same everywhere) and not to stain them.
If a large nail does not stick out of the wheel, the search for a puncture should be postponed. We put the wheel with an asterisk on the underlying fabric (or with a rim - but not with knitting needles! - on two logs) so that dirt and sand do not get into the bearings. We unscrew the “shoe” fastening nut (if any), press on the bolt so that the “shoe” moves away from the edges, loosen the nipple. Now you need to press the tire from the rim. The longer a tire has not been changed, the harder it is to do so. We boldly step with the heel of the motorboat on the sidewall closer to the rim and ... bounce. nine0003
If a large nail is not sticking out of the wheel, the search for a puncture should be postponed. We put the wheel with an asterisk on the underlying fabric (or with a rim - but not with knitting needles! - on two logs) so that dirt and sand do not get into the bearings. We unscrew the “shoe” fastening nut (if any), press on the bolt so that the “shoe” moves away from the edges, loosen the nipple. Now you need to press the tire from the rim. The longer a tire has not been changed, the harder it is to do so. We boldly step with the heel of the motorboat on the sidewall closer to the rim and ... bounce. nine0003
Sooner or later the tire will come off. (Sometimes the sprocket is far enough away from the edge of the rim and does not allow you to firmly press the wheel to the ground. In this case, you can put the edge of the wheel on the motorcycle swingarm, using it as a stop.) Now we need to squeeze both tire beads so that they dive into the recess in rim. This makes it much easier to remove the opposite side of the bead from the rim.
Here and below, in the green frame - the correct position, in the red - incorrect.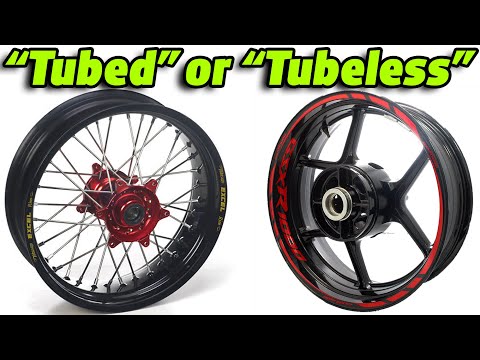 nine0003
Here and below in the green frame - the correct position, in the red - incorrect.
We begin to remove the tire bead from the nipple so as not to damage the rubber around it by the tire bead (yes, it will not drown properly at the nipple). If the edge of the tire cannot be pulled over the bead, then the opposite edges have not fully entered the recess.
We start the first mount under the tire, hook the edge, turn it out.
We start the first pry bar under the tire, hook the edge, turn it out. nine0003
Now, if the length of the mount allows, we bring its rear part under the brake disc. If the mount is short, you will have to hold it with your knee.
Now, if the length of the mount allows, we bring its rear part under the brake disc. If the mount is short, you will have to hold it with your knee.
Then, with the second mount, we sequentially pull out the edge of the tire.
Then, using the second pry bar, pull out the edge of the tire in sequence. nine0003
After one side of the tire is completely removed from the rim, you can remove the tube. It is worth noting which side it was installed inside the tire.
Once one side of the tire has been completely removed from the rim, the inner tube can be removed. It is worth noting which side it was installed inside the tire.
After examining the chamber, we find a puncture.
After examining the chamber, we find a puncture.
When removing a nail or a screw from a tire, it is important not to injure yourself.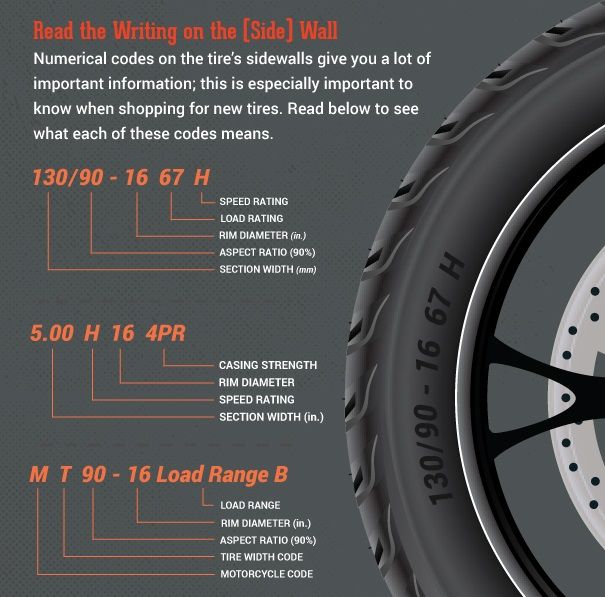 To make it easier to find tire damage, we combine the chamber nipple with the hole in the rim.
When removing a nail or a screw from a tire, it is important not to injure yourself. To make it easier to find tire damage, we combine the chamber nipple with the hole in the rim.
Sometimes sticking out ends of the spokes or burrs on their nipples are the culprit for a puncture. This usually happens when the special rubber seal is torn or dislodged, exposing the spokes. If we put a regular patch on rubber glue, we cut it out with an allowance of 15–20 mm from a puncture. We sand the camera and the patch, degrease it (with gasoline or glue, removing the dried layer), apply a thin layer of glue, dry for 5-10 minutes, and then press with all our might (you can even wash it with a motorboat) - you're done! If the camera is rubbed against a defect in the tire, during installation we put a piece of an unnecessary camera there. It’s enough to get home, but it’s better to throw away such a tire. nine0003
Before inserting the tube into the wheel, it must be slightly inflated.
Before inserting the inner tube into the wheel, it must be slightly inflated.
This will help the camera to correctly orient itself inside the tire and reduce the likelihood of hooking and tearing it with a mount or squeezing it with a “shoe”.
This will help the tube to properly orient itself inside the tire and reduce the chances of it getting caught and torn by the pry bar or squeezed by the “shoe”. nine0003
Having installed the nipple in the hole, screw the outer nut onto it without tightening it.
After installing the nipple in the hole, screw the outer nut onto it without tightening it.
Let's help the camera lie down inside the rim by adjusting it with your fingers. The edges of the chamber must not stick out.
Let's help the camera lie down inside the rim by adjusting it with your fingers. The edges of the chamber must not stick out.
Now you can insert the tire bead - first with your knee, then with a pry bar, with a small step.
The tire bead can now be inserted, first with the knee, then with the pry bar, in small increments.
It is very important not to “bite” the camera when working with mounts. To do this, only grip the edge of the tire and never raise the mount more than 90°.
It is very important not to “bite” the camera when working with mounts. To do this, you need to grab only the edge of the tire and never raise the mount more than 90°.
We finish the installation again at the nipple.