HOW TO HAUL YOUR MACHINE
1. Ron Murphy hauls his quads with a trailer that can load from either side. The gates fold down and become ramps. He pulls it with a mid-size SUV.
2. A stylish way to haul your quad is in a classic Chevy El Camino with a V-8, custom paint, and chrome mag wheels. This is how Andre Kok does it.
3. You don’t need a big truck to pull an ATV trailer. An Econo car-like Brandon Hardin has here will work just fine as long as it has a strong trailer hitch mounted to the chassis.
4. A four-door pickup truck is considered the dream tow vehicle by most people. Chris Bodkin’s Chevy Avalanch here has plenty of room for crew with gear in the back. His double axle trailer is able to haul plenty of weight.
HOW TO HAUL YOUR MACHINE
5. David Pinnock has a trailer here big enough to carry the whole family’s quads and UTV. The number one rule is Big family, big trailer.
6. I don’t need no stinking trailer, says Bryan Welch. He can get his YFZ450 flat-track racer to fit in the back of his family van. For taller quads, you can use a tie-down to compress the suspension and also rotate the handlebars down.
7. Michael Macauley here has a trailer just big enough to fit his RZR on it. That means he can keep it parked in his garage. Having a place to stow a trailer can be a problem for some people.
8. Steve Harrison’s single axle trailer is okay for hauling lightweight three-wheelers. However, if he was hauling two UTVs he’d probably want a dual axle set up.
9. Derek Mission keeps it simple and low-budget with his rig here. This is fine as long as you don’t have to drive down muddy roads to park and unload.
HOW TO HAUL YOUR MACHINE
10. A couple of sport 450s and a Raptor 700 is the perfect formula for a fun day. This is what it looks like when Guero Torres and his buddies go riding.
11. Leave no rider behind: A school bus and a long trailer are one way to get everyone to the riding park. It can also be used as a camper. This one belongs to Jonathan Love.
12. This is how Ryan Volk gets his machines to the riding areas. With this much weight, you’d want the trailer to have brakes. They’re usually electrically operated, but some use surge brakes which are typical of boat trailers.
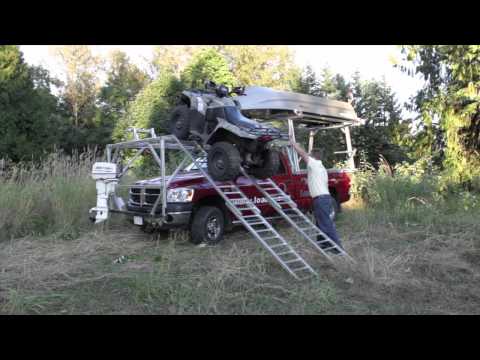
13. Adam Potts likes to bring his pop-up camper for extended weekend rides. He just needs to have long loading ramps to get his DS450 up on top.
14. Anthony Bradford doesn’t believe in having a tow vehicle that’s worth more than his Raptor and trailer. He goes fast on the trails, but not necessarily on the way there.
HOW TO HAUL YOUR MACHINE
15. The dunes is a fun place to go when you have a few quads and a dirt bike loaded up. This is how Barry Burkey does it.
16. Jason Harper can keep his quad on the trailer in the garage and simply back his car up to it, hook up, and be on his way riding very quickly.
17. Charlie Given has the option of putting a quad on the trailer along with his RZR.
18. Josh Mecham set up his truck to carry his RZR so that he can also tow his big camper trailer. All the comforts of home even when spending a week out in the middle of nowhere.
19. You can buy trailers of different lengths and Ole Spiering has one here that just barely gets the family machines to fit.
HOW TO HAUL YOUR MACHINE
20. Some people don’t want to drive a big pickup truck around town all the time just to tow a trailer a couple of times a month. As Mike Thompson shows here, even a small sports car can tow a sports quad and trailer.
21. Tony Scott rents a trailer to go riding. In the long run, this can actually be cheaper than buying a truck for 40 grand.
22. Scott O’Brien hauls his Grizzly on this small trailer you can get from a Home Depot-type store without spending much. However, the little tires are more likely to go flat, so you certainly want to carry a spare (or two. ) Also, the wheel bearings are worked harder and need to be replaced more often.
23. Sport quads allow you more options on how to arrange them on a trailer. As Demetrios Benetos illustrates here you can stand three up and haul them on a shorter trailer.
24. Fernandez Lopez pulls his Ranger with his family van. For long weekend rides it’s good to have a buddy with a nice camper trailer.
HOW TO HAUL YOUR MACHINE
25. Side-loading trailers have wider beds so that you can haul three 4×4 quads as Harry Matz show here.
26. UTV racing doesn’t have to be expensive. The first rule is don’t blow a ton of money on your tow rig. Keep it simple like Scott Townsend here.
27. Glenn Burkey has a good rig here to get a couple of quads to the riding park. Just need to stop for some ice and drinks to put in the cooler.
28. Jonathon James worked at it for a while, but he did manage to get his Honda 400EX loaded inside his minivan and close the rear door.
29. A Ram truck is what Justin Goldsmith uses to pull his Can-Am X3. It has enough power to tow the rig up into the mountains.
HOW TO HAUL YOUR MACHINE
30. Here is what many people might call the ultimate towing setup. Your machine is hauled in a luxury garage while you stay in a luxury motorhome. Trevor Peoples is the lucky owner of this.
31. Gilles Begin uses a Camaro muscle car to haul his machine. He can’t do donuts though when the trailer is hooked up.
32. This is the simple rig Matt Dizzle uses to get his YFZ450 to the riding area. Afterward, he can leave it on the trailer when he stops at the car wash.
33. Chris Trach has plenty of room to haul his Banshee. In fact, he could probably fit five more on there as well.
34. It’s important to position your machine on the trailer to have the proper tongue weight on the hitch. Looks like William Brobst has it figured out here.
HOW TO HAUL YOUR MACHINE
35. “Hey, it looks like my ATC250 should fit up there just fine.” Devin Cantrell just had to go riding.
36. Frankie Whitt’s car suddenly had fender flares when he started cranking down on the ratchet tie straps.
GET YOUR $25 GIFT CARD > https://hi-torque.com/product/dirt-wheels-holiday/
To subscribe to Dirt Wheels Magazine in print or digital form click here https://hi-torque.com/product/dirtwheels.
.
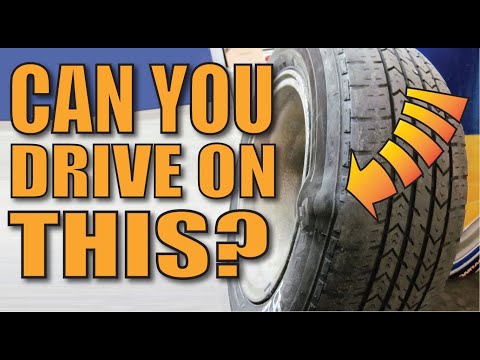
Riding ATVs and UTVs can be a super fun way to spend the day. Some people have trails right near their property or even a track or riding pit. If you’re not lucky enough to have a place to ride nearby, or you want to try some new trails, you’re going to have to transport your quads.
There are a few ways to go about hauling your ATV or UTV, and what you’re hauling will determine the best option for you. For example, if you have only a small quad to bring, you should be fine with a truck, some ramps, and some ratchet straps. But if you’re hauling a large UTV and a couple quads, you’ll need more than just the bed of your truck.
Lets start by looking at just a truck bed and some of the things you’ll need to haul your ATV or UTV. This method is great if you own a truck and have only one machine you want to haul. Simply load it into the bed of your truck. You’ll need some ramps and some tie downs like ratchet straps or something similar.
The ramps I recommend are these Black Widow ATV Ramps (link to Amazon). These ramps hold up to 1500 lbs and fold up for easy storage. The thing I like the most about these ramps though, is that they stay connected to my truck while loading and unloading. I’ve seen people have accidents while loading their quads before because the ramp slipped out from the truck while the ATV was on it. The Black Widow ramps have rubber grips where it rests on the tailgate, and straps you can hook from the ramp to your truck. The ramp doesn’t go anywhere while loading or unloading the ATV.
If the bed of your truck isn’t big enough for your ATV, or you just want more room. You could buy these Ramp Extenders On Amazon. They double as ramps for loading and unloading, and they will extend the bed of your truck about 2 feet. They do cost more than the Black Widow ramps, or most regular ramps for that matter. But if you need the extra space, it’s an option to look at. They do look good for adding space for extra fuel and stuff like that.
As for securing the ATV or UTV in the bed of the truck during transport, any heavy duty ratchet straps will do the trick. I use these Rhino Ratchet Straps (link to Amazon) because they come with soft loops to protect the ATV handle bars. It’s not really necessary, any way you can tie down your machine so it doesn’t move will work. I just like the ease of it, and to keep my toys looking nice.
There are things you can do to your truck to allow more space for your toys. One of them is rizerback from rizerback.com, or something similar to this. You do have to modify your truck to mount it. So if you don’t like drilling holes in your truck bed, then skip this one.
It basically mounts to the front of the bed of your truck and allows you to drive the front tires of your ATV up onto it. It’s a neat way to add more space to your truck for other things like gas cans, or even another smaller machine depending on how big your truck is.
Another option to consider is getting a rigid truck cover or a trail rack. You may have seen these before, it goes on top of your truck bed and you can drive
the ATVs or UTVs right on top of them. They mount to your trucks bed rails, and act like a heavy duty tonneau cover. They allow you to load the ATVs side ways to the bed, so you can fit two full size ATVs on one truck bed.
You can find them at diamondbackcovers.com or discountramps.com. They are pretty cool, but very expensive. You could just get a trailer for that kind of money. But if you don’t want a trailer or don’t have room for one, these hard covers are a good option to consider.
If you’re hauling more than two ATVs or UTVs, then getting a trailer is a must. One well known trailer company is Aluma Trailers found at alumaklm.com. They specialize in making trailers specifically for hauling ATVs, UTVs, dirtbikes, and other machines like that. They come in different sizes so you can get the one to fit you, depending on how many toys you’re hauling.
The biggest ones they make can carry two full size, 4 seater, UTVs easily. They use lightweight aluminum for a durable trailer that’s relatively low maintenance. Not everyone can afford to go out and buy a brand new trailer though. If you’re like me, and want to get the job done on a budget, I suggest looking around on craigslist, offerup, and other online marketplaces like that. You’d be surprised what you can find people selling trailers for. If you have the time, spend a few weeks looking, and you’re bound to find a good deal.
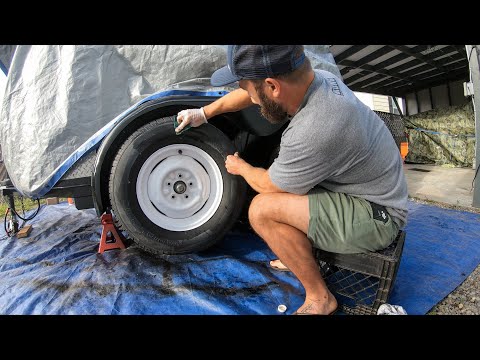
When transporting your toys on a trailer it’s very important to make sure everything is strapped down and secured. There’s a few ways to go about doing this. The cheapest, but least secure, is to just Ratchet Strap the machine into place on the trailer. I’ve been fine doing this for short trips, but if you have a long haul, or you’re going through bumpy areas, I suggest something a little more secure.
Things move around and shift during transport, and you want to make sure you don’t have an expensive accident. So take the extra time to secure everything nicely, and you’ll be glad you did in the long run.
I recommend using these Wheel Chock Tie Down Kits (link to Amazon) to hold your precious toys in place. I just love how easy these are to use, and how secure the ATVs are when they’re strapped in. This tie down kit has plates you bolt to your trailer, and then you align the ATV tires right in between the two plates, and strap the wheels in using the included 2″ webbing wraps. The metal brackets prevent the wheel from moving, and the straps adjust for 10″ to 30″ tire sizes. Nothings better than strapping in your toys, shaking them back a forth a little, and saying “This baby ain’t going anywhere”.
Some people prefer the more traditional wheel chock. The kind you drive the ATV tire into and strap it down that way. An example is this Yutrax ATV/UTV Wheel Chock. You would also mount this to the trailer, but it doesn’t come with straps to hold your ATV in place. Either way you go, make sure you secure your cargo. It can get expensive not to, and is sure to ruin your day.
Quick Tip: We’ve lost pieces of our ATVs before because we didn’t strap everything down properly. It may seem like going overboard, but make sure you use bungee cords or something to hold loose seats and fenders into place.
 When you load the ATV you can push right up against the tire without your quad hitting the rear window of your truck. I’ve seen people break their rear window out, even though the ATV was strapped down. All you need is a little play in the strap, and you hit the brakes and brake a window.
Sharing is caring!
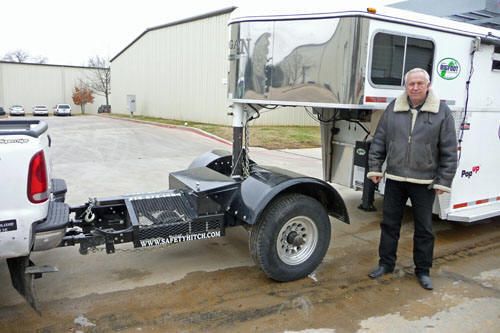
The cable in the trunk is the closest relative of the first aid kit and fire extinguisher, for all their dissimilarity ... When everything is in order, they annoy with their obvious uselessness. But if you suddenly “lock in”, the picture changes to the opposite: the “loafer” is called for help - save!
What's the difference? At least the price: the so-called jerk cables are much more expensive than their "ordinary" counterparts. Of course, they can also be used for habitual towing, but this is irrational: after all, they were created for something else. When the towing vehicle starts to move, the jerk cable first stretches, then to “shoot” sharply, shrinking in size. An experienced tug driver, sensing this moment, usually presses the brakes: in this case, the energy of the compressing cable almost completely goes to the towed car, pulling it out of the impassable area. In practice, if a jerk cable is used for towing, then it is folded in half.
Towing with a belt 4.5 tons 5 meters with flags
Towing with a belt 4.5 tons 5 meters with flags
weighing up to 1.5 tons. The width of the tape used is 5.5 cm. The hitch type is “loop / loop”.
Dynamic sling (4.5 t, 5 m) from the Ufa company "Takelazh +" is optimal for vehicles weighing up to 1.5 tons. The width of the tape used is 5.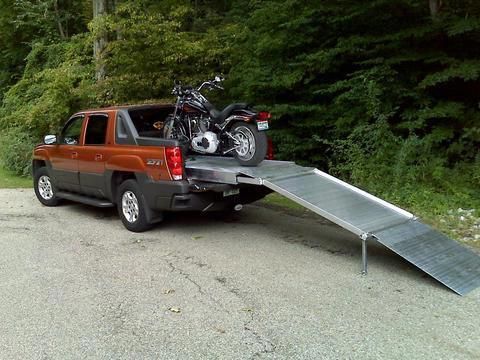 5 cm. The hitch type is “loop / loop”.
Reflective flags: at least two must be placed. Fixation type: double-sided Velcro. Flag size: visible - 200x200 mm, full - 400x200 mm.
Reflective flags: a minimum of two must be placed. Fixation type: double-sided Velcro. Flag size: visible - 200x200 mm, full - 400x200 mm.
Dynamic lanyard (4.5 t, 5 meters) “Standard”, Rigging +
Flag set with reflective tape for towing strap/rope
You don't need to bother with the length of the towing cable: its value is indicated in the traffic rules. It should be from 4 to 6 meters. Another thing is worse: the cable must be marked with flags or shields of the established sample, which for some reason the cable manufacturers forget about ... It may very well be that such flags-shields will have to be purchased separately: otherwise you have the right to be punished. As for the force indicated on the cable packaging, in practice the most common are 5-ton cables, which are suitable for towing almost any passenger car.
Pay special attention to the length. If the cable is too short, then at the first sharp braking, the towing vehicle will regret his kindness: the towed person will drive into his loin part of the body. But too long a cable is not a gift: think about how you will turn into an alley or, even worse, into a gateway? The tugboat will calmly drive around the corner, but a long cable will drag you to the side, exacerbating the trouble.
Example of a towing strap with a working load of 4 tons and a minimum breaking of 6 tons. Ideal for a vehicle with a curb weight of up to 2 tons. Tape material — polyester, execution: "hook/hook".
Example of a tow strap with a payload of 4 tons and a minimum breaking of 6 tons. Ideal for a vehicle with a curb weight of up to 2 tons. Tape material — polyester, execution: "hook/hook".
DorNabor dynamic cable (12 tons, 9 meters) is designed for vehicles weighing from 2000 to 3500 kg. This should cope with almost any SUV stuck in the mud. By the way, the sling is made in Russia.
Dynamic rope "DorNabor" (12 tons, 9meters) is designed for vehicles weighing from 2000 to 3500 kg. This should cope with almost any SUV stuck in the mud. By the way, the sling is made in Russia.
Towing strap with a working load of 4 tons
Dynamic sling (12 tons, 9 meters), DorSet
The jerk cable requires a slightly different approach. Products with a specified load of 4.5-4.6 tons can be used to pull out stuck snowmobiles, ATVs and cars. For cars weighing no more than two tons (and these are almost all cars), cables with a load of 8–9 are suitabletons. And if we are talking about such "rogues" as the Land Rover Defender 110, Land Cruiser 100/110, etc., then cables with a load of 11-14 tons will be required. As for the product with a declared load of 15-18 tons, they are suitable for Hummers and their counterparts.
The jerk cables are typically 5 to 12 meters long. In the average case, it is better to focus on a length of 9 meters. As for the price, cheaper products are suitable, in general, for anyone who is not going to specifically climb into some kind of jungle. But expensive ones are needed just for those who climb somewhere on purpose.
Related materials
Boxing on a car: everything you need to know (+ bonus)
Here, too, everything is simple: the cables are metal and non-metal. Steel certainly deserves respect, but not everyone can use such a cable. Yes, it is strong, but almost does not soften the jerks that are inevitable when towing. At the same time, you are almost certainly guaranteed splinters and abrasions due to thin steel wires that make up the body of such a cable. Such a cable will also not stand on ceremony with the body: it was ideal for the ZIL-130, but not so much for soft-bodied modern cars. It is very problematic to compactly place such a product in the trunk: a large rusty bay is not a gift. Finally, due to the same rust, the cable can simply burst under load.
With non-metallic cables, everything is simpler: compact, light, aesthetic, do not rust. It is these cables that are mainly sold today. However, here you cannot miss the load: it must be chosen, focusing on the mass of the towed vehicle, and at least with a double margin. Let's say if your car weighs about two tons, then the cable should be rated for about 5 tons.
When it comes to fastening, there are two main types - loop and hook. And here you need to remember about the troubles that poorly chosen fasteners can give rise to.
Let's start with the hook. It is convenient to use: hooked and went ... But there is a serious danger: an unbent or poorly hooked hook turns into a weapon: the released cable is compressed like a spring, and the hook is ready to break anything - from a car glass to someone's head ... Just in case, to all owners cables with hooks, we give advice: when attaching to the towing eye, first thread the cable into it, folded in half near the hook, and then insert the hook into the formed loop. It will turn out to be a kind of chain hoist, which, firstly, will reduce the load on the hook, and secondly, even if it breaks, it will not allow it to “fire” at the brothers in mind.
The loop is a priori free from such horror stories. But an unsuccessfully tied knot can become stubborn when trying to release the cable: it will be tightened so that something cutting will call for help. In such cases, it is rational to use the so-called shackles - these are metal brackets, made, as a rule, in the form of semi-rings with thickenings at the ends and threaded holes into which a powerful “finger” is screwed. A pair of such shackles will take up a minimum of space in the trunk, and any "nerd" who is far from technology can fix them properly, as well as release them. You can choose the required shackle in online store "Behind the wheel" .
And one more "experienced advice" for those who need a cable only for a single jerk - pull someone out of a snowdrift, muddy ground, etc. If you don’t know how to properly fasten hooks, and you don’t know the word “shuckle” at all, then before the final jerk, throw a jacket, rug, or something like that on the cable. If the cable does not withstand the jerk, then its end will simply fall to the ground, and will not go to destroy everything. By the way, just in case, ask all the "spectators" to move away - you never know what ...
Weighted Rope Damper is a special product used as a weight that absorbs most of the energy from a broken sling or cable when using a winch or dynamic sling during vehicle recovery. This reduces the risk of personal injury or damage to the vehicle. The product is fixed on a sling or cable with the help of a "contact" tape - Velcro, located on the inside of the absorber.
However, instead of a jacket, it is advisable to throw on a special rope damper. It is fixed on a sling or cable with Velcro. As a weighting agent, a dense textile tape is used, sewn along the entire length of the product; There is also a pocket for extra weight. Sewn-in reflective strips on both sides of the product will ensure the visibility of the cable or sling in low light conditions.
The towed one is harder to ride. In the film "Morning Detour", the hero of Andrey Myagkov, whom a Muscovite took some truck in tow, tries in vain to stop him, because he simply ... forgot about him! Therefore, the driver of the tug needs to look in the mirror more often: did he lose the poor fellow somewhere along the road ...
The steering and brakes must work on the towed car. Before driving, do not forget to unlock the steering wheel.

5 principles of towing: choosing the right cable
5 principles of towing: choosing the right cable
Photo: manufacturers, depositphotos
02 Dec
Any wheeled vehicle - from a bicycle to a multi-ton truck - has a transmission in its device: a system that transmits rotation from the engine to the wheels. The operation of the transmission - and therefore the speed of driving - can be controlled by shifting gears.
Gear shifting is organized differently in each mode of transport. In the article below, we will tell you exactly how to shift gears on ATVs, and what gearboxes are found on such equipment.
Gearboxes for ATVs can be of two types:
Rare and mostly found in older models, but other variations can be found. For example - "automatic" with the ability to manually shift gears.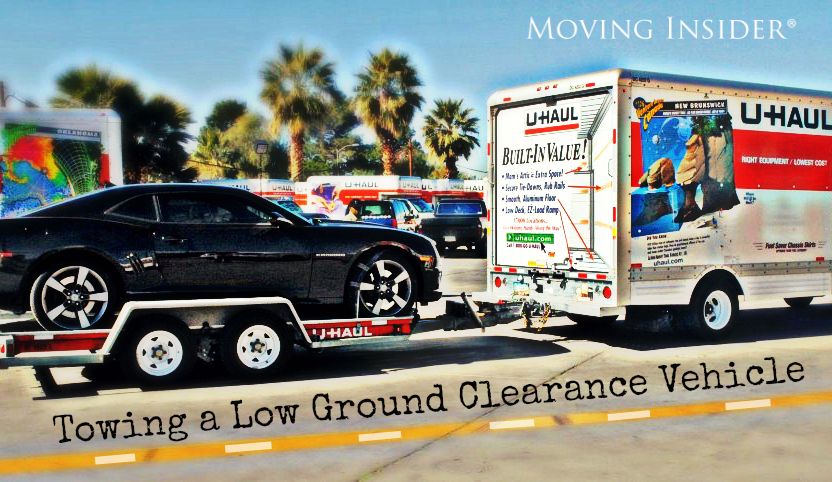
Manual ATVs are a little more difficult to drive (at least at first, until you get used to it), but you can more accurately select the appropriate mode. And vice versa: CVT "boxes" are much easier to operate, they are easy to master for a beginner who gets behind the wheel of an ATV for the first time. But on the other hand, with active driving along a route with variable difficulty, riding a CVT will be a little less convenient.
For example: you are driving on a flat packed dirt road on H and you see a large stretch of muddy road ahead with deep mud (or a steep hill, or bumps, or stones). You will have to come to a complete stop and shift to L, drive through mud, and when you get back on a dry road, come to a complete stop again and shift back to H. , like motorcycles, and a manual clutch lever on the handlebar on the left.
The foot lever device can be of two types:
The shift itself is carried out in the same way as on motorcycles: