Maintaining proper tire inflation is relatively simple and essential to the overall tire performance of your vehicle. A properly inflated tire will provide longer life, quicker steering response, better fuel efficiency and a smoother ride than an improperly inflated tire. Both underinflation and overinflation can cause headaches like premature treadwear and possible tire failure. The best way to ensure you're getting the most out of your tires is to check your tire pressure on a monthly basis.
Knowing how to use a tire pressure gauge is very simple. Here’s how to check tire pressure and refill your tires.
Items You Need When Checking Tire Pressure
Tire pressure gauge
Air compressor
Pen and paper
Your tire pressure gauge can be digital or standard. Auto parts stores typically carry both. Many auto parts stores sell portable air compressors that run from your car battery or 12v power port. Alternatively, you can use the air compressor found at most gas stations. They usually cost $0.50 or $1.00 to use.
Vehicle manufacturers specify PSI – literally “pounds per square inch” of pressure – assuming tires are cold. Tires are considered cold when the vehicle has been parked for three hours or more, or if the vehicle has been driven less than a mile (1.6 km) at moderate speed. PSI is the unit your pressure gauge uses to provide readings.
Look on the driver’s side door jamb or your owner’s manual to find the recommended cold tire PSI for your front and rear tires. If you cannot find it, you should consult your vehicle dealer, manufacturer, or a qualified tire professional.
If your front and rear tires require different pressure levels, write down the correct PSI for each to avoid getting confused as you move around your vehicle checking tire pressure.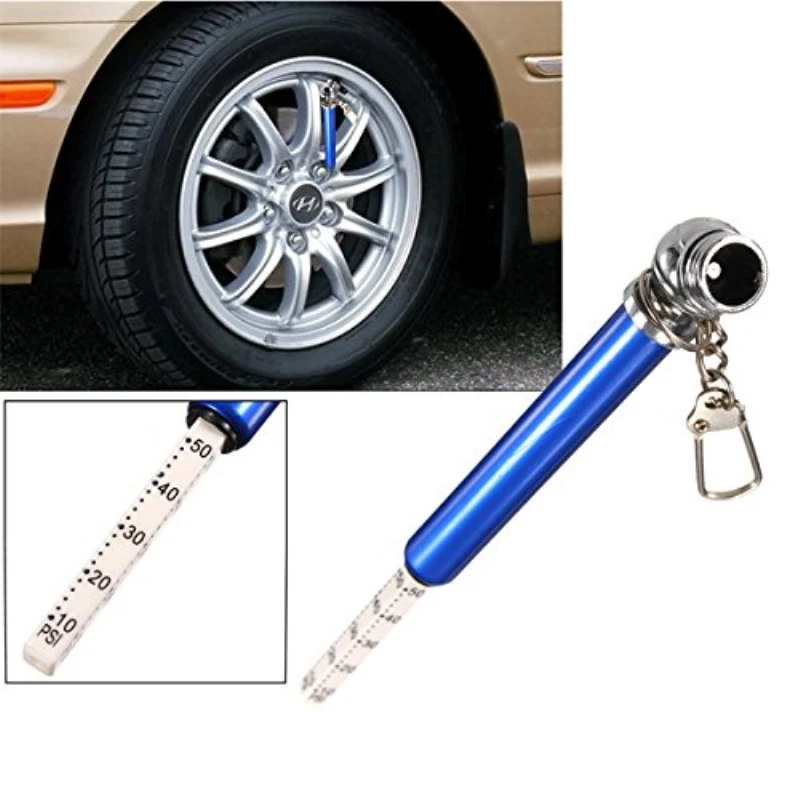
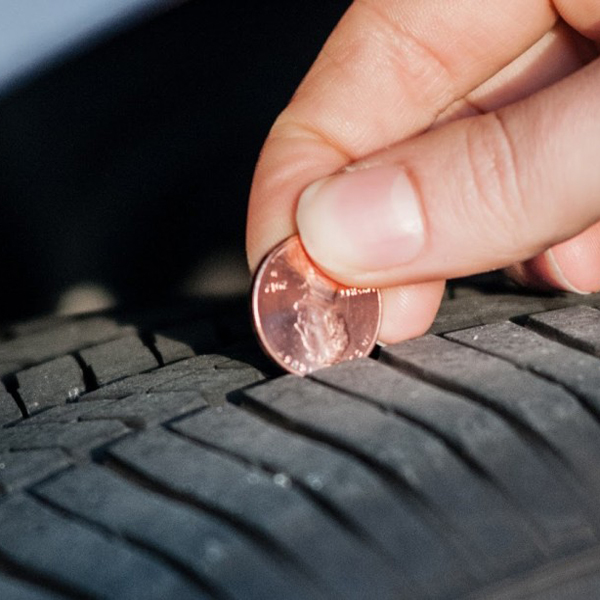
Remove the valve cap from one of your tires. Then place the pressure gauge on the valve stem and press down hard enough so the hiss sound disappears and your gauge provides a reading. With a standard gauge, the air pressure will push a small bar out from the bottom of the gauge. Measurement units are etched into the bar. A digital gauge will show you the reading on a screen.
Write down the reading and repeat this process for all four tires.
Use an air compressor to refill any tires with low pressure. Many air compressors are different, so read directions carefully to be sure you’re using it correctly.
If you’re using the air compressor at a gas station, be sure to park so that the hose will reach all four tires. Insert change into the machine until you hear the motor running. Fill each tire by placing the end of the hose over the valve stem and pressing on the lever.
Using a gas station air compressor means your tires might be “hot. ” If it is necessary to adjust inflation pressure when tires are “hot”, set their pressure to 4 psi (14 kPa) above the recommended cold inflation pressure. Recheck the inflation pressure when the tires are cold.
After filling your tires, use the gauge to check pressure again. At this point, it’s ok if you overfilled the tires because you can always let some air back out. Never drive on overinflated tires. Overinflation can result in decreased traction, premature wear, and decreased impact absorption.
Make the above procedure a monthly ritual. Regularly checking your tire pressure is the best way to ensure your tires never dip far below the optimal PSI.
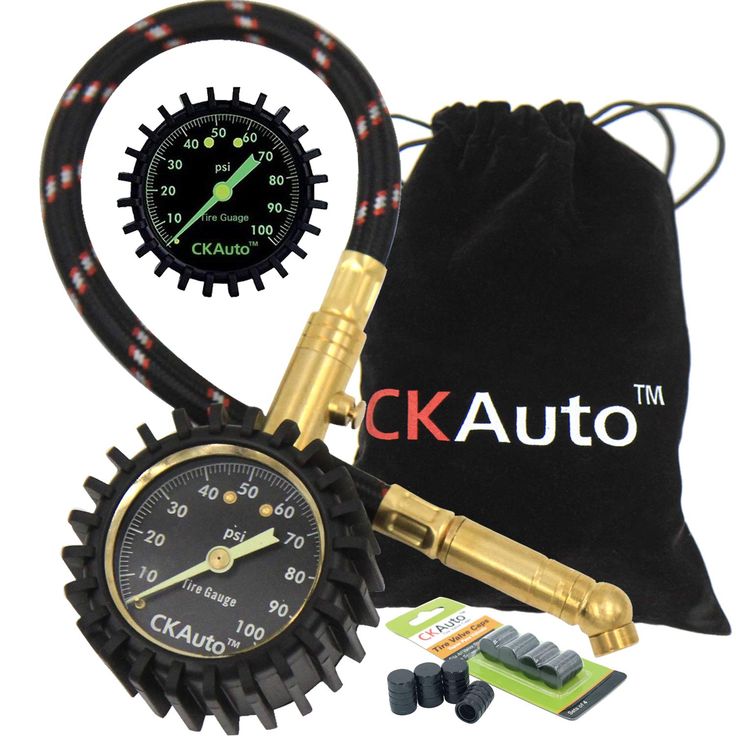
Accuracy matters and you should keep that in mind when choosing a gauge. For just a few dollars, you can find a quality, accurate tire pressure gauge that gives accurate readings. If you’re not sure which one to purchase, ask a professional technician which he or she prefers.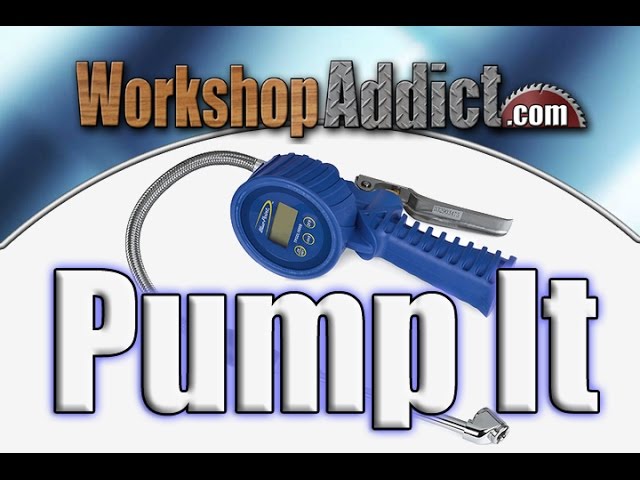
A digital tire pressure gauge will provide accurate readings, but don’t forget that it operates on a battery. If you think having to replace the battery will prevent you from using it, it’s best to go with a standard gauge.
It’s best to use your personal tire gauge versus those available attached to air hoses at service stations. Of all the pressure gauges out there, they’re the most likely to be weathered, and possibly inaccurate.
There’s never a good time for a flat. That’s why Bridgestone DriveGuard tires are masterfully engineered to keep you moving for up to 50 miles at speeds up to 50 MPH without disruption.
There’s never a good time for a flat. That’s why Bridgestone DriveGuard tires are masterfully engineered to keep you moving for up to 50 miles at speeds up to 50 MPH without disruption.
See Details Find Your Fit
Photo: istockphoto. com
com
Driving is a luxury that many people across the country enjoy, but if proper care isn’t taken to maintain a vehicle, it can result in rapid wear, part failure, and poor control. Tires are one of the features of a car that can sometimes be overlooked, but it’s important to ensure that you know how to use a gauge to check tire pressure. Underinflated tires increase braking distance, reduce steering control, and accelerate tire wear, which can result in complete tire failure. Overinflated tires are not as hazardous, but they can still increase tire wear, affect the wear pattern of the treads, and reduce control. To ensure that your tires are not under- or overinflated, it’s necessary to understand how to use a tire pressure gauge.
Tools & MaterialsIt’s best to check the tire pressure when the tires are cold, such as first thing in the morning or after the vehicle has been parked in the shade for several hours.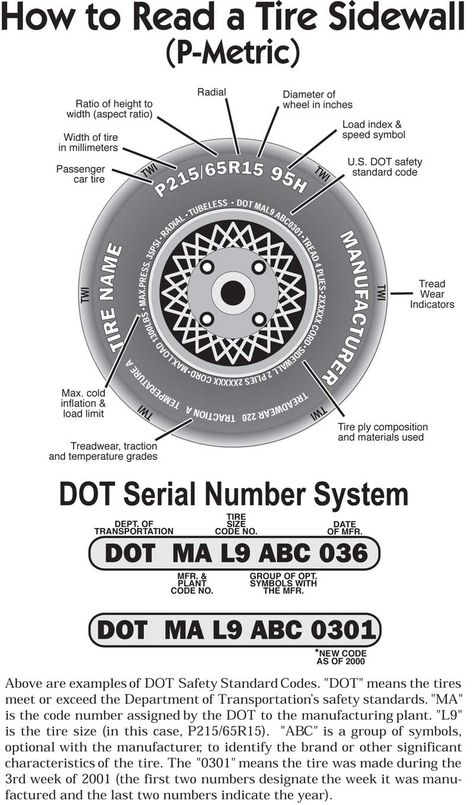 This helps to increase the accuracy of the readings. In order to test tire pressure, you’ll need to purchase a viable tool such as this tire pressure gauge—a favorite in our researched guide to the best tire pressure gauges.
Advertisement
Learning how to use a low-pressure tire gauge is relatively simple, though you will need to find the manufacturer’s recommended PSI before you can begin. While it may seem like the first thing to do is take out the tire pressure gauge, that wouldn’t get you very far unless you already knew the manufacturer’s recommended PSI for the tires. Given that most people don’t typically memorize this information, it’s a good idea to check and verify before using the tire pressure gauge.
Tire and loading information is commonly included in the owner’s manual, though you may also be able to find it on a sticker on the driver’s side door, near the trunk lid, inside the fuel door, or even inside the console. Look for a two-digit number, like 35, followed by PSI, which means pounds per square inch.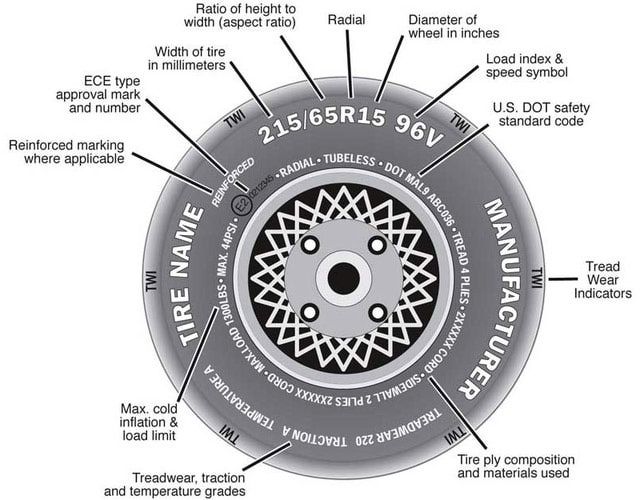
Related: The Best Jump Starters With Air Compressors for Your Car
Photo: istockphoto.com
STEP 2: Locate the tire valve and remove the cap.Each tire has a valve used to inflate or deflate it, depending on the suggested PSI and the current tire pressure. The tire valve is typically a small, black tube about an inch long with a threaded cap. It can commonly be found on the inside of the rubber wheel, protruding through a gap in the hubcap. Locate this valve, then remove the threaded cap so that the tire pressure gauge can fit over the top of the valve. Make sure to keep track of the tire valve cap because it’s very small and easy to lose.
STEP 3: Press the gauge onto the tire valve.The next step to learning how to use a tire pressure gauge is to simply press the gauge down onto the tire valve after the threaded cap has been removed. Each tire valve contains a spring-loaded valve core that automatically seals itself using air pressure from inside the tire. By pressing the gauge against the valve core, the gauge opens the valve to the internal air pressure of the tire and allows the gauge to act as the seal while simultaneously measuring the tire’s PSI rating.
Advertisement
STEP 4: Check the reading on the tire pressure gauge.The tire pressure gauge should be held firmly against the open tire valve so that no air is escaping. If the tire pressure gauge is making a hissing sound, you need to adjust the angle of the gauge inside the tire valve until it is silent. This indicates that the tire pressure gauge is measuring the full tire pressure instead of getting a partial reading due to escaping air. To check the reading on the tire pressure gauge, simply read the slide ruler for manual pen gauges, the dial for dial pressure gauges, or the digital screen for digital pressure gauges. The ruler, dial, or screen should display the current tire pressure in PSI.
Photo: istockphoto.com
After taking the tire pressure measurement, write down the current pressure for each tire so that you don’t forget and need to check again.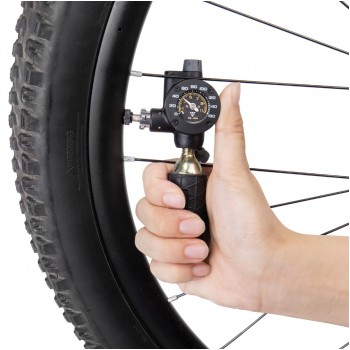 If the pressure within each tire is too high, you can easily drain some air by holding the tire pressure gauge against the tire valve at an angle, listening for the hiss of escaping air. Periodically check the tire pressure to ensure that you don’t drain too much air and stop once you reach the desired PSI.
If the pressure within the tire is too low, connect an air compressor such as this portable inflator—a favorite in our researched guide to the best tire inflators—to the tire valve to inflate it. After inflating the tire, use the tire pressure gauge to check the PSI and make sure it is now at the correct level according to the manufacturer’s recommendations.
It’s advised to check the tire pressure on your vehicle at least once per month to ensure that you are safe while driving and not doing any unexpected damage to your tires.
Advertisement
RELATED: I Tried a Cordless Tire Inflator―Did It Work?
Final ThoughtsEffectively using a tire pressure gauge is a necessary skill for a driver to have in order to be certain that their vehicle is properly maintained.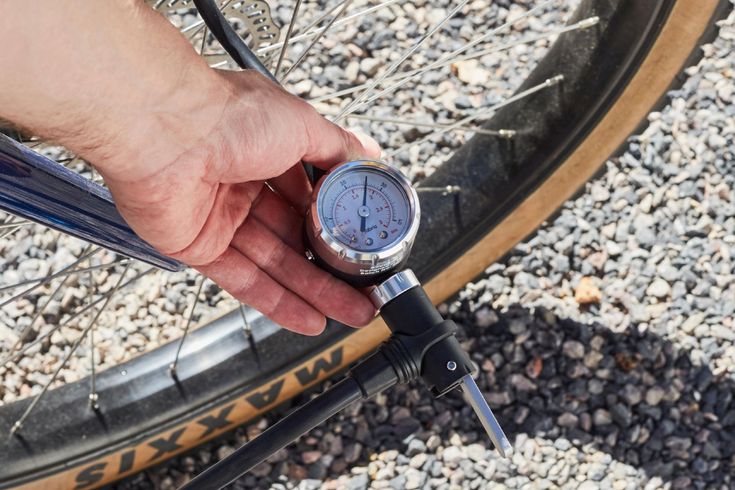 Additionally, by checking the tire pressure of the vehicle, drivers can ensure that they are getting the most out of each tire, instead of accidentally causing premature wear and tear due to overinflated or underinflated tires. Also, keep in mind that you can deflate a car tire with only a tire pressure gauge, but to fill the tire you will need access to an air compressor and a suitable attachment for filling tires. Consider investing in a home air compressor or find a local gas station that has one available for use.
Advertisement
Contents
The tire changer is a professional tool for regular tire changes. However, it is also available for people who want to perform this maneuver on their own, right from home.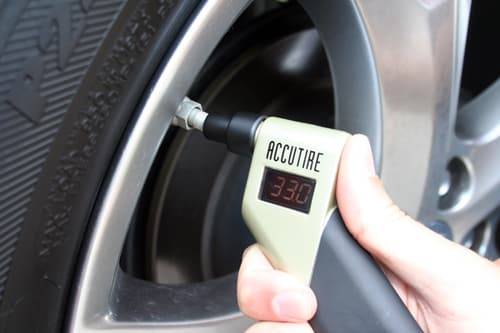
The tire changer makes it easy to remove and install new tires on your vehicle. Its operation is based on leverage between the tire and Jante car to remove it safely and effortlessly.
In fact, it will block the rim, putting pressure on it, allowing you to remove the tire. Currently, the automotive market offers 6 types of tire fitting works with more or less similar functions:
Whether you choose a hydraulic or automatic tire changer, everything works the same way. Check out our step-by-step guide to using a tire changer.
Material required:
He will remove the board of the dalves of your wheel, combining it with a blade. Then press the unload pedal, which will hold the rim in place for maneuvers.
For this step, you will need to press the clamp pedal, which is distinguished by the presence of claws. It is necessary to position the wheel and tire to easily remove them at the same time.
Start by lubricating the rim and tire so they are easy to install and will not resist installation. Install them using the removal head.
In order to choose the most suitable tire changer for your needs, it is necessary to consider regular use of equipment, Tire size of your car and your budget dedicated to this purchase.
If you want to use it in professional or even industrial environments, you will have to turn to an automatic tire changer for optimum time savings and simplicity.
In addition, these models will allow the processing of tires up to size From 12 to 25 inches is used on various types of vehicles (SUVs, 4x4s, sedans, city cars, trucks, etc.). Hydraulic models are also the most efficient in terms of volume as they are capable of removing around 100 tires per hour.
For a private person, the best option is to contact the electric tire changer because it is very powerful and affordable models.
The prices of tire changers will vary widely as they are very efficient equipment. Hydraulic, electric and automatic tire changers are often more expensive. Their prices will range from 1 euro and 000 euro . A manual tire changer will not be very expensive: its cost is between 130 € and 200 € .
The tire changer is a piece of equipment that is more commonly used by professionals, but is also intended for people who change the tire on their car themselves. If you want to change your tires in a reliable garage, use our online tire comparator to find the one closest to you and offer you a price accurate to the euro!
Home » Uncategorized » How to use the tire changer?
2022-05-26
By: Pavel seo
On:
In: Uncategorized
Auto service and garage equipment We have everything in our warehouse
+7 -863-525-78-79
+7 -918-510-73-92
Electro-hydraulic tire changer SICE S52 for mounting and dismounting wheels of trucks and buses with a disc diameter of 14.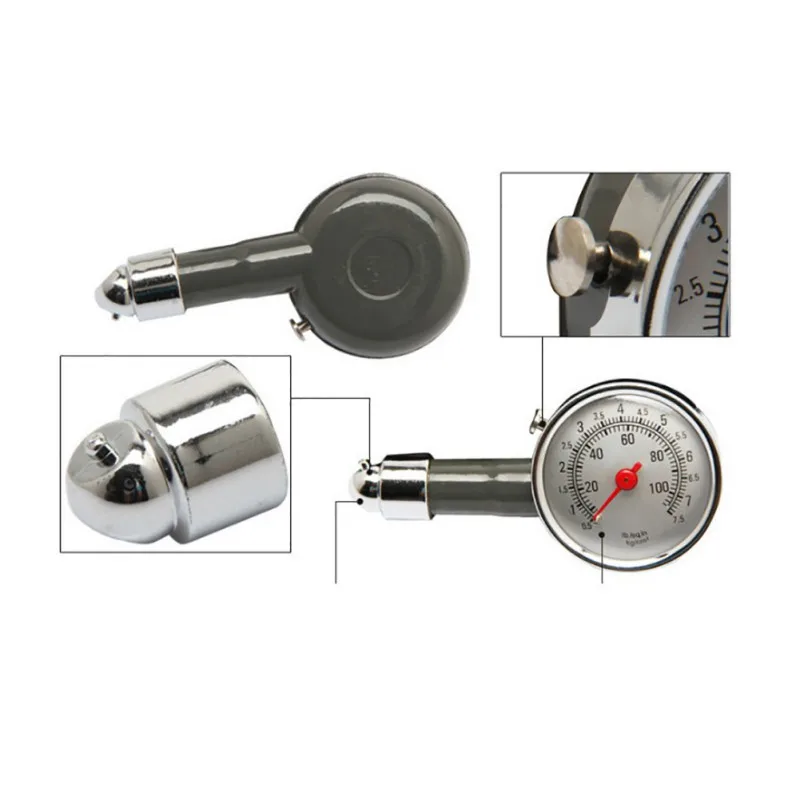 5-24.5 inches, a wheel diameter of 1400 mm and a width of 695 mm .The wheel is securely and quickly installed thanks to the rollers
PRICE
Buy in 1 click
Ask a question about this product
Truck tire changer SICE S 52.
Wheel size 14.5-24.5 inches. Maximum wheel weight 1200 kg.
SICE (SICHE) S52 (ITALY) electro-hydraulic load stand is designed for mounting and dismounting of wheels of trucks and buses with a rim diameter of 14.5 to 24.5 inches, a wheel diameter of 1400 mm and a width of 695 mm. The standard equipment of the tire changer includes two clamps: one for wheels with a diameter of 14.5 to 17.5" (CF1), the other for wheels with a diameter of 19.5 to 24.5" (CF2). Clips are made of aluminum alloy for a more accurate installation. Each clamp has a cone for centering discs and a guide rod for fast, safe and reliable clamping of all types of wheels. The reliable squeezing roller allows to work with any types of wheels. For quick work at the request of the client, a second roller can be installed on the inside or outside of the wheel, which greatly facilitates the work. The wheel is securely and quickly installed thanks to the guide rollers. The control panel on the movable handle allows the operator to carry out any kind of work without much difficulty.
The S52 tire changer is equipped with a built-in non-return valve that prevents the wheel from falling off in the event of a loss of pressure in the hydraulic system, as well as a thermal sensor that protects the motor from overheating.
With a wide range of accessories, the S520 can be used with all types of tires.
Specifications :
Internal grip 14.5-24.5'
External grip 14.5-24.5'
Max. wheel diameter 1400 mm (55')
Max. wheel width 695 mm (27')
Max. Wheel weight 1200 kg
Dimensional dimensions, MAX (DHSHHV) 1860x1880x1260 mm
The weight of the machine 430 kg
Power supply 400V - 3 phases - 50/60 Hz
Bar
Additional information Electro -hydraulic stand
There are no reviews for this product yet.