If you travel to the mountains or snowy areas regularly, sooner or later you’re going to have to use tire chains. Start by getting the right set for your vehicle at your local Les Schwab.
Quick-fit chains are not your grandpa’s tire chains. They are MUCH simpler to put on and take off. Here are a video, step-by-step instructions, and driving safety tips for installing quick-fit tire chains on your vehicle.
When you need chains, driving conditions are nasty. Snow is coming down, passing traffic is spraying slush, dirty water is dripping off your wheel wells, the road is slick, and it may be dark. Don’t make this the first time you put on your chains.
Practice installing your new chains once BEFORE you travel. Take advantage of a dry garage or driveway to make sure your winter tire chains are the right size and you’re comfortable putting them on. If needed, the professionals at Les Schwab Tire Centers can help.
Put together a simple winter road trip safety kit with warm gloves, waterproof layers, and other items to make your winter driving more safe and comfortable. In the winter, always carry this emergency kit and tire chains in your vehicle.
Once you’re comfortable installing your chains, you’re ready to hit the snow.
Be Safe. If you’re on the road, pull off as far as possible onto a safe shoulder. Flip on your hazard lights. Put on your waterproof layers, hat, headlamp, and gloves from your winter road trip kit.
Identify the Correct Tires. If your vehicle is front-wheel drive, the chains go on the front. If it’s rear-wheel drive, chains go on the back. If it’s all-wheel drive, please check your owner’s manual. If you’re not sure, you can ask the experts at Les Schwab for help.
Pull Out Chains & Instructions. With your vehicle parked, open the bag and pull out your instructions and your first chain. Each bag comes with two chains. The plastic instruction mat that comes with your chains can be used as a barrier between you and the snow to keep you dry.
Untangle Your Chains. Holding them from the plastic-covered cable, make sure everything is straight and the chains are not looped over one another. Hold up your chains so the yellow end is in your left hand and the blue end is in your right.
The chains should hang loosely and the metal hooks seen along the yellow and blue sections should be facing away from you so they don’t damage your tires.
Place Chains onto Your Tire and Connect the Cable. Lay your chains on the ground and push them behind the tire, yellow cable end first, from the right side to the left.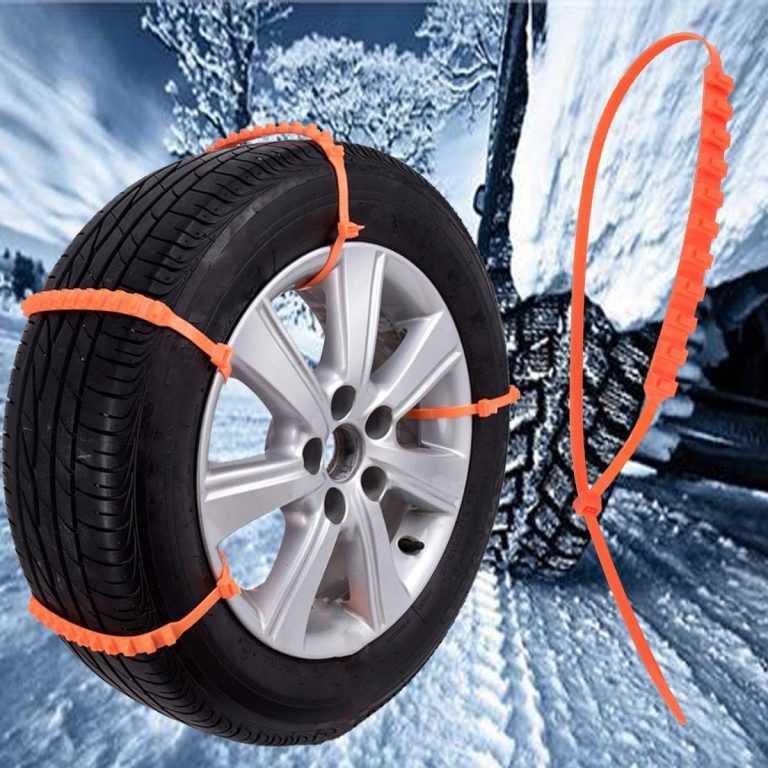
Once the chains are centered behind the wheel, grab both ends and pull them up over the top of the tire. You should feel the chains against your axle.
This will allow you to easily connect the yellow and blue ends of the cable by slipping one end into the other and pulling them into place.
Connect the Red Hook. Now that the cable is connected on top, look for the red hook directly opposite the cable connection. Connect the red hook on the right to the first available gold link on the left.
Check the Diamond Shape. Push the connected chain over the top of the tire. You should see the diamond shape in the chains against your tire. Between each of those diamonds is the center rail, which should be placed down the middle of the tire tread.
Connect the Red Chain Along the Bottom. Now that the cable is connected on top, look for the red hook directly opposite the cable connection. Connect the red hook on the right to the first available gold link on the left. Push the connected chain over the top of the tire.
The bottom of the chains includes a red draw chain with bungee on your right, and a chain guide on the left. Pull these out towards yourself.
Take the long red chain and run it through the chain guide and pull as tight as you can with both hands. Don’t pull using the bungee. As you pull, one of the chain links will find its way into the notch on the red chain guide, locking it into place.
Using the bungee end of the red chain, pull it through one or both of the red loops and secure it to a gold-side chain opposite the red loops. If you can’t get it through both loops, that’s ok, pull tight through one and attach it to a side chain to the left of the loop.
Repeat on Second Tire. Repeat these steps to install chains on the other side of your vehicle.
Drive Forward Slightly. The next step is to drive forward about 15 feet, or a full car length. This gives the chains a chance to relax and settle on your tires.
Re-tighten Chains. To take up any slack, unhook the rubber end of the red draw chain and pull it tight again. Once it’s tight, guide the red chain through the loops and, again, securely latch the bungee end to the gold-side chain.
The chains should be tight on the tire. And, be sure to stop if you hear them making any contact with your vehicle. If your chains are still loose, unhook the bungee and adjust the red hook straight across from the chain guide. Unhook and reattach to the tightest position on one of the three gold chain links. It’s okay if the extra links are hanging loosely. Now, you’re ready to reattach your bungee.
While driving with tire chains, listen for a loud sound of slapping, or metal on metal. If you hear any indication that a chain may be broken or hitting your car, STOP as soon as safely possible. Loose or broken chains that flap can wrap around a strut or shock component, causing big damage to your vehicle. To help prevent damage, here are a few tips for driving when you have winter chains installed on your vehicle.
Pull over in a safe location and remove the chains. Start by unhooking the bungee and chain from the guide, removing them from the tensioner. Unlatch the red hook, and then undo the blue and yellow cable connection. Once all of your chains are off and lying flat on the ground, pull backward or forward slowly a few feet so you can safely pick them up.
At the end of your trip, lay your chains out in the garage and let them dry. If you pack them wet, they can rust.
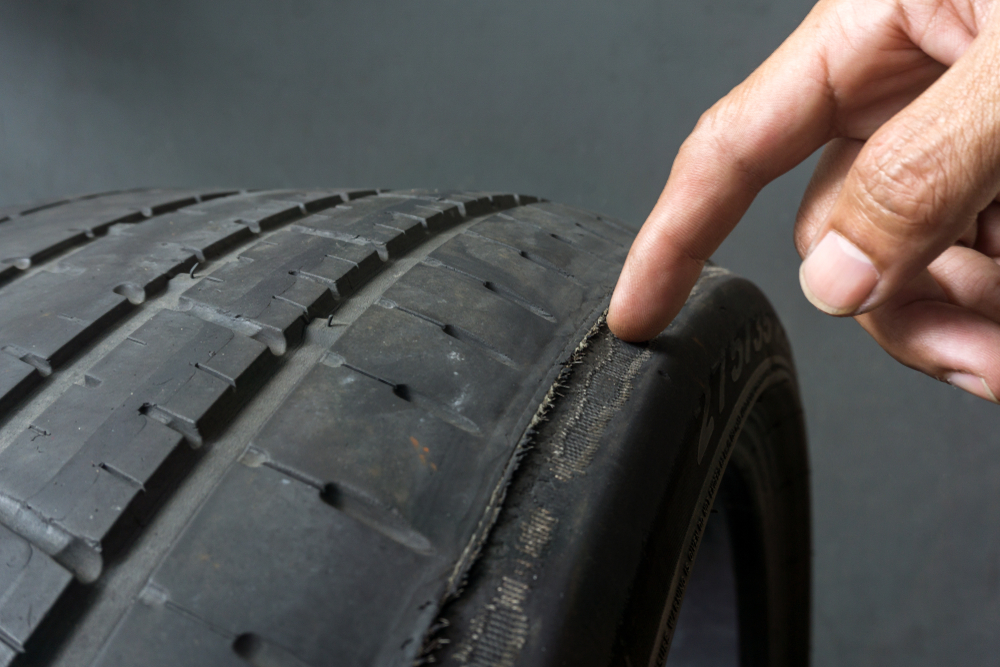
Also check them for wear, especially if you’ve driven them on asphalt for any distance. Look for flat spots, and replace the chains if you find some.
Link at left shows flattening from wear. Link in center shows sharp edge from wear that can damage a tire.
Remember, if you don’t use your chains all winter long, you can return them with proof of purchase to any Les Schwab for a full refund in the spring.
Get your next set of Quick-Fit chains, along with a few tips on how to install them, at your local Les Schwab, where doing the right thing matters.
Want more tips on winter road safety? See 19 Winter Driving Resources You Can’t Do Without.
Get More Winter Tips
By Pam Mandel Published November 30, 2021
Tire chains improve traction on snow- and ice-covered roads.Sundry Photography / Shutterstock
Driving in the snow can be challenging and stressful, but practice, proper gear, and advanced preparation can increase your safety and comfort. With the right traction devices on hand, and knowing both when you need them and how to install them, driving on winter roads will feel a lot less daunting.
Snow or winter tires are specifically designed for better traction and performance in freezing temperatures and on snow and ice than all-season tires. While some all-season tires may have “M+S” stamped on the sidewall to show they have deeper treads for mud and snow, a true winter tire will also have a mountain symbol with a snowflake inside. In many cases, snow tires are sufficient for driving on snow-covered roads and will not require additional traction devices, such as chains or cables. Winter tires are ideal for drivers who need to navigate freezing temperatures and snow all season long.
Cables work much like chains in that they wrap around your tires and help your vehicle grip the road when conditions make it difficult for standard tires to maintain traction. Cables are lighter and can be easier to install than chains. They are less likely to damage your vehicle if they break, a rare but not impossible scenario. While they won’t last as long as a set of chains, cables are a good choice if you don’t need them very often.
Chains are a tougher product all around, but they can be harder to install and heavier. However, if you need to frequently drive in the snow or you want a product that will last longer, they can be an excellent choice.
Tire socks are a newer traction solution where a fabric sleeve wraps around the tire and is secured with elastic bands. They’re easy to install and can help if your wheels are spinning, but they’re not universally approved for use where chains are required. If you have socks, check with the department of transportation along your route to make sure they’re acceptable when chains are required.
ADVERTISEMENT
Find a safe place away from traffic to install tire chains.
cherryandbees / Shutterstock
Once you have your chains or cables, read through the instructions and install them at home or another safe place so you know how they work. You’ll be more prepared—and spend less time in the cold—when conditions arise that require chains if you’ve already practiced getting them on and off.
Chains and cables go on your “drive” wheels, so if your vehicle is front-wheel drive, you will put chains on both of your front tires. Check your car’s manual if you are unsure which are your drive wheels. Using four wheel drive? You need chains for all four tires when 4WD is engaged and conditions require chains for 4WD vehicles.
While every chain or cable will be installed similarly—you will wrap the traction device around the wheel and tighten the fasteners to ensure a snug fit—always follow the instructions included with your chosen device to get a safe and secure fit.
Smart Tip: Put the instructions in a waterproof sleeve or bag and store them with your chains so you can easily read them in wet conditions on the side of the road.
Every fall, give yourself a refresher course on how to install your chains or cables, and check your gear over for wear and tear to see if it needs updating. Don’t assume your old chains will work on a new vehicle, either. Double check well before you hit the road that they actually fit.
Read More: How to Pack a Car Emergency KitThe local department of transportation will tell you when chains are required; check websites for current road conditions in mountain passes and other areas before you hit the road. But chains or cables are helpful anywhere there’s compacted snow or ice covering the roads—covering being the key attribute here. A patch of snow here and there isn’t cause to break out the chains; extensive coverage is.
When highway signs indicate tire chains are required, you will usually have about a mile to stop and install your chains or cables. Often there’s a designated area to do so. But control areas can shift rapidly from place to place because of changing weather and road conditions. Your safety is paramount; stop and install your chains as soon as it’s safe to do so.
Don’t rush the process. Install your chains or cables, roll the car forward a length or two and tighten them. Drive a half mile or so and stop once more to make sure the chains or cables are secure, tightening them again if needed. Then you can hit the road.
Read More: 7 Driving Techniques to Reduce Your Risk of a CollisionDrive slowly and mindfully when using tire chains.
Jaroslav Moravcik / Shutterstock
Once your chains or cables are securely installed, drive slowly: 20 to 30 miles an hour is typically the maximum speed, but follow posted signs in chain control areas and be prepared for slower traffic ahead. You may have to drive short distances on bare pavement, but if the road is clear, stop the vehicle as soon as it’s safe to do so and take the chains off. Follow any posted instructions and keep your radio tuned to a local station for up-to-date information—conditions can change rapidly.
If you hear any banging or slapping noises, stop immediately to ensure your chains are sufficiently tight and that nothing is broken. A broken snow chain can cause significant damage to your vehicle. If your chain or cable breaks, treat it as an emergency. Pull off the road as soon as it’s safe and contact roadside assistance.
As in all winter driving conditions, leave additional space between the car in front of you and avoid sudden moves, such as slamming on the brakes, turning hard on the wheel, or accelerating quickly. Slick surfaces combined with abrupt movements can cause you to lose traction and control. Slow, steady, and intentional is your best approach for winter driving, with or without chains.
Don’t drive with chains on bare pavement; as soon as you see signs saying “End Chain Control” and you are on plowed and/or salted roads, pull over when safe to do so and remove them. Find a parking lot or roadside turnout with plenty of space and visibility to remove your chains.
Done for the winter? Make sure your chains are clean and dry before you pack them away for the year. Spray your chains with a water based lubricant like WD-40 before you put them away. If you’ve got the space to do so, hang them up in a dry garage, basement, or workshop. That way, they’ll be easy to inspect in advance of next season’s snow driving.
Up Next: 11 Simple Steps to Prepare Your Car for WinterGet legendary road service—and so much more—for as little as $56 a year.
Join AAA
This article was first published in February 2021 and last updated in November 2021.
 .
.
Armstrong or grillato ceiling
 It is desirable that the self-tapping screw be with a hidden hat.
  nine0006
  If the power is in the busbar on the wrong side where the supply cable is intended to enter it, simply turn the busbar 180 degrees, removing it from the mounting plates and then re-securing. nine0006
 Plasterboard ceiling (If the fixing will be to the main ceiling)
 Only in this case the busbar will hang perfectly straight.
  There are 5 terminal blocks inside the power supply: 3 phases, zero and ground. Depending on the connection scheme of this busbar, connect 220V to the required
 For gypsum plasterboard ceilings, hangers can be attached directly to the false ceiling itself. To do this, perform the following steps:
 If the power is in the busbar on the wrong side where the power cable is supposed to enter, simply turn the busbar 180 degrees. nine0006
 Concrete ceiling
 Maximum cable length 1.5 m Cut off excess cable.
STK supplies spotlights for tracks (busbar) of its own production with adapters already installed on the luminaire. So do many European lighting manufacturers.
If you were sold a luminaire and a busbar adapter separately, do the following:
1 hanger designed for luminaire weight 3. 5 – 4.5 kg, max. Accordingly, if 5 metal halide spotlights weighing 4 kg each are installed on a busbar trunking 3 m long, then you will need 5 hangers to fix the busbar trunking to the ceiling.
You can install spotlights on the busbar trunking by attaching them to the wall of the room. The procedure for installing fixtures will be the same as when installing on the ceiling. You can be sure that spotlights (even 150W models with electromagnetic ballasts weighing about 5 kg.) will not slide down the busbar. nine0027
 When tilted about 60 degrees, the adapter should pop out of the busbar. Attention! It is undesirable to move the lamp along the track, because this would be quite heavy and inconvenient and could damage the busbar mount to the ceiling or the hanger busbar mount, or damage the grounding metal bar of the adapter. nine0006
 Attention! In order to turn the floodlight mounted on the busbar, to direct the floodlights already mounted on the busbar, it is necessary to turn off their 220V power supply by turning the wheels on their adapters to the 0 or OFF position. It is not recommended to perform operations on projectors connected to the power supply. The angle of rotation of the spotlights around its axis is 350 degrees. Do not try to rotate the luminaire around its axis to a greater angle - you may break the adapter.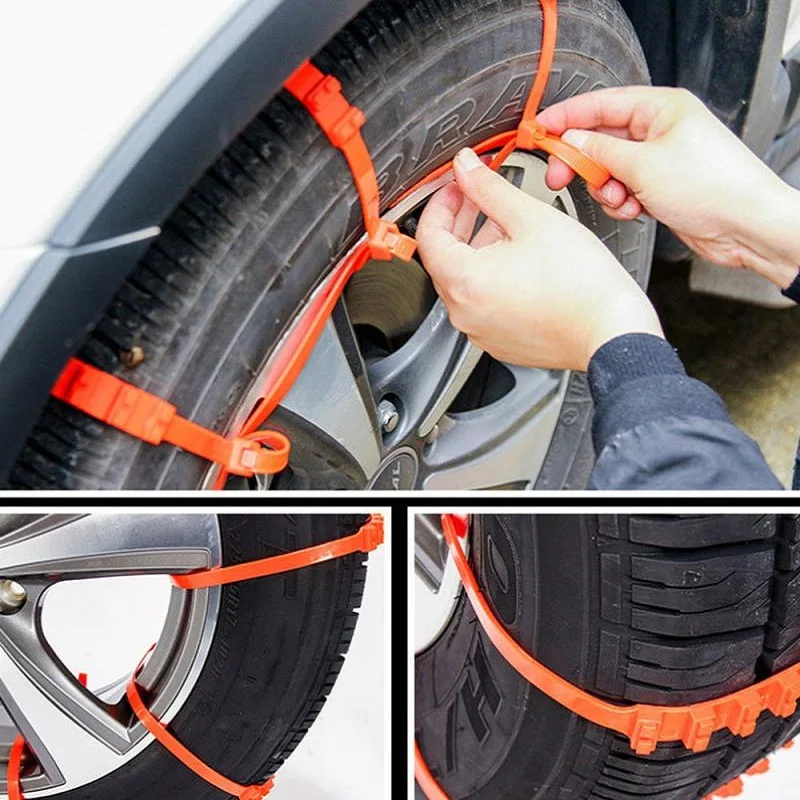 nine0008 Spotlight tilt can be limited by the length of the cable from the spotlight to the adapter. Be careful not to rip the cable out of the terminal block in the adapter or spotlight!
Wall mount is a device for attaching the spotlight to the ceiling, wall, floor or any structures. Wall mount is also called ceiling mount.
Wall mount consists of 2 parts: rear and front. The first part (rear part) is installed on the surface (wall, floor, ceiling, structure). There are 3 holes in this part of the wall mount: two for surface mounting, one for power cable output. nine0027
To install the wall mount:

In order to connect 2 pieces of busbar trunking, you will need additional elements: a corner or an electrical connection.
The corner is divided into 2 parts: the visible part and the part that is recessed into the busbar. The corner may or may not be a power supply. If the corner is not a power supply, then power will be required from one of the ends of the structure (two pieces of busbar connected by a corner).
Attention! It is enough to connect the structure only at one end to the mains! nine0027
Attention! It is forbidden to install floodlights with a total power of more than 2. 8 kW on a line of several pieces of busbar trunking.
You can install a corner in the busbar as follows:

End cap is a universal decorative termination for busbar trunking. And it can be installed both from the right and from the left end of the track. nine0027
If the corners are not a power supply, and the busbar design assumes a closed rectangle, then instead of one of the corners you can supply power to one piece of the busbar and a plug to the other piece of the busbar.
Attach the busbar first, then install the spotlights on it.
A cable or rope clamp is a rigging product that fixes loops on steel ropes or splices ropes. It would seem that everything is very simple, but: nine0027
These and other details are laid out on the shelves in the article.
what is the beast, briefly - by the pros and cons
For simplicity, we divide the clamps conditionally into three categories, and in each category we denote the most important subspecies:
Traditional, used for splicing ropes and creating loops on them: nine0027
Flat, used as traditional:
Special, the range of use of which is narrow and makes them indispensable:
nine0358 Short cylinders made of aluminum or other soft metal.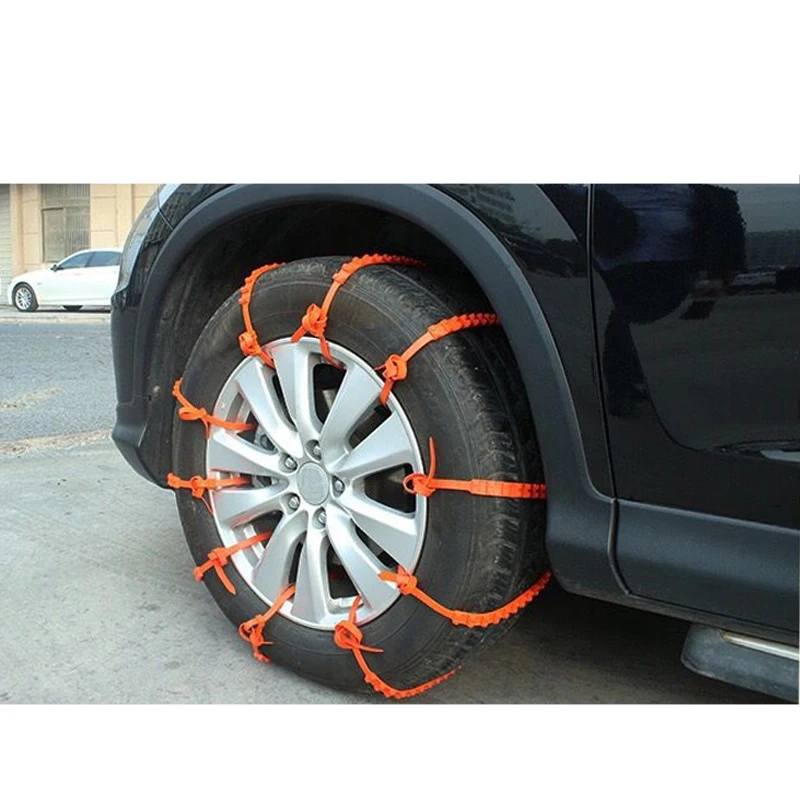 It splashes along with the threaded ends of the rope, squeezing it tightly. Least reliable and cheapest design.
| Plus | Cons nine0403 |
| + Cheap | -Unreliability |
| +Quick installation | - Disposable |
The most common traditional type of clips in the form of a U-bracket. Easy to install and dismantle, reusable, no loss of performance.
The nuance of use is almost complete unsuitability for high loads. A small contact patch with the rope causes cutting deformation - a break or damage to the rope at the attachment point. nine0027
| Plus | Cons |
| + Cheap | -Small contact patch |
| +Quick installation | - |
| + Reusable | - |
Bracket analogs, two mirrored seats with integrated threaded bushings. More convenient than the U-shaped, rarely found on the Russian market.
Like the older brother, it has a small contact patch with the cable.
| Plus | Cons |
| + Cheap | nine0400 -Small mounting spot|
| +Quick installation | - |
| + Reusable | - |
A clamp, the cross section of which is a Latin W. The counterpart is similar to a pipe spread along. Places of adjoining to a cable - corrugated, provide good fixing. nine0027
With such a clamp, cutting deformations can not be feared.
| Plus | Cons |
| + Reliability | - Expensive |
| +Easy to install | - |
| + Reusable nine0403 | - |
It is also a ring in Africa - a ring (well, or two half-cylinders with coupling screws).
It is produced in small sizes (cable 3-4 mm), i.e. you can fasten cables up to the thickness of the wire (within reasonable limits). Stainless steel - as the main material of manufacture - allows the use of the ring in tandem with ropes made of non-ferrous metals, stainless steel. Harsh environments, in short, do not threaten your designs. nine0027
| Plus | Cons |
| + Reliability | - Expensive |
| + Reusable | - |
In the common people - a barrel. Two embossed plates with cylindrical grooves for laying the cable, which are tightened with a screw. We can say the king of elevators and other lifting mechanisms. nine0027
It is produced both from non-ferrous metals and from steel, depending on the purpose.
| Plus | Cons |
| + Reliability | - Expensive |
| +Easy to install | - |
| + Reusable nine0403 | - |
As mentioned above, the larger the contact patch with the cable, the more secure the mount, this clamp is a direct confirmation of this.
At its core, two plates (with and without sides), fixed with a bolt and nut. The presence of the sides prevents the cable from slipping sideways under load, which also has a positive effect on the maximum allowable loads. nine0027
| Plus | Cons |
| + Reliability | - Relative high cost |
| + Reusable | - |
Two spliced single (SIMPLEX) products. nine0027
As Ellochka the Ogre would say, ironically! Installation of stretch marks on high-voltage poles of power lines and TV antennas - time to spit. To fix the load when it is lifted to a great height - too. And it's not a figure of speech.
| Plus | Cons |
| + Reliability | - Relative high cost |
| + Reusable | - |
Let's say you need to connect two lines at right angles. You need a cross! Not Orthodox, of course, but we advise you to pray, because such a fastener cannot be called ultra-reliable. However, there is enough reliability for the rope mesh. As they say, who studied for whom.
It is made in the form of a cylinder in which steel ropes are stacked on top of each other and fixed with a screw. nine0027
| Plus | Cons |
| + Indispensable when creating intersecting structures | - Expensive |
| +Easy to install | -Small range of applications |
| + Reusable | nine0400 -
Just a stopper - that's all. Doesn't splice anything, doesn't support anything. Its task is to tightly grasp the cable and prevent the movement of loads suspended on it, roughly speaking, it thickens the line at a selected point.
| Plus | Cons |
| + Indispensable when creating a stopper nine0403 | - Narrow range of applications |
| +Easy to install | - |
| + Reusable | - |
A tip whose task is to accurately dock the rope with the structural elements to which it is attached. It does not provide 100% reliability. I'll tell you a secret, it's better to make a loop. nine0027
| Plus | Cons |
| +Easy to install | -Unreliability |
| + Reusable | - Narrow range of applications |
A typical industrial climber's quick release. They hang all sorts of loads for him. The product consists of levers that fix it on the line when a load is applied to the mounting ring. nine0027
| Plus | Cons |
| +Easy to install | - Expensive |
| + Reusable | - |
what is your saddle made of, wanderer? nine0352
The three main materials from which cable clamps are made are (very predictably!): stainless steel, hot dip galvanized and zinc coated mild steel. Consider the example of a saddle.
Stainless steel A2 and A4. Your choice for outdoor and harsh environments. Corrosion resistance out of the box.
Hot dip galvanized steel. Feel free to take it if you want to save money. Use in adverse environments is limited, but more than meets the required loads. Corrosion resistance is less than that of stainless steel. nine0027
Soft galvanized steel. According to deshman, that means, according to deshman. The material is not resistant to corrosion (however, you cannot pick off the galvanization with your finger). If you need something for everyday life, the best option.
However, remember that when building highly loaded structures, it will be necessary to check the attachment point at least once every three months for complete eating by rust. Hehe. Joke.
Size matters! Everyone needs a reliable and safe design, but how to ensure it? nine0027
Rope without sheath? This means that the clamp is selected according to the diameter of the cable.
Cable in a braid? Nuance! The workload limit of an assembly or trunk will be reduced by 30-35% if the braid is not removed because the clip body will be in contact with soft and pliable vinyl.
The use of such a connection on heavily loaded cables is unsafe!
As a result: fasteners to the braided rope are selected according to its diameter without braiding. From the points of the highway where the clamps will be located, I will remove the braid. That is life? No, technology nine0027
 nine0006
 The DIN 741 standard is fasteners with two hex nuts. This product is widely used in all industries.
Features:
Made of steel or A4 stainless steel. Products with a protective zinc coating applied by galvanic or hot method are common. The reinforced analogue of DIN 741 is marked DIN 1142.

Features:
The product DIN 1142 is a critical structural element, and strict requirements are imposed on the material from which it is made. These clamps are produced from galvanized steels or A2 and A4 stainless steels.
The DIN 3093 standard is an aluminum sleeve. It is a flattened hollow cylinder. It is used for splicing steel ropes together, as well as for making loops at the ends of the rope. nine0027
Features:
As mentioned above, clamps are widely used for creating loops and splicing cables. When carrying out such work, it is required to comply with technological standards, since improper installation can reduce the maximum working load of the backbone node by 40%. nine0027
First you need to make sure that:
Step one. The first fastener element is located at a small distance from the free end of the loop. Nuts or bolts are tightened alternately until the required torque is reached.
Step three. The third is positioned exactly between the first two. This takes into account that the mating parts of the clamps (those from which the nuts or bolts are tightened) must be directed upwards.
Step four. A section of the highway is loaded with a load equal to or greater than the required one. The tightening of nuts or bolts is checked and, if necessary, increased. nine0027
When splicing, the algorithm for installing clamps will be the same.
They are used in the same cases as traditional ones, but they have a different design. Consider below their installation on the example of DUPLEX.
Step one. Make sure that the product is complete, the parts are in good order, the nuts do not go tight on the thread.
Step two. When creating a loop, place the product closer to its beginning, when creating a loop or splicing, position the cable inside the clamp as shown in the figure. nine0027
Step three. Install the mating part and tighten with nuts. Apply a load to the structure equal to or greater than necessary. Check the tightness of the nuts, tighten if necessary.
Installation of the SIMPLEX clamp
Installing the DUPLEX clamp
With regard to special types of clamps, it is impossible to give a general algorithm of actions, however, since it is not possible to position them except for their intended purpose, tight tightening of the fasteners solves the issue of their reliable installation. nine0027
- Is it possible to fasten a rope with a clamp?
- No, we get the same situation as with the braid. The rope is made of easily deformable material, and therefore it is almost impossible to carry out high-quality fastening.
- If I want to install a cable to protect my parking space, does it make sense to buy expensive clamps? nine0402
- The need for expensive products arises when high tension or displacement loads are applied to the cable. It makes no sense to buy expensive clamps to build an unloaded cable structure.
- Is a special tool required to install this fastener?
- Depending on its type, the following set of tools may be needed: a hammer, a sledgehammer, a screwdriver of the required size (flat, Phillips or hex), pliers or a wrench of the required size. nine0352
- Can traditional clamps be used with a steel cable to tow a car?
- In 80% of cases it is impossible, and it is good if such an experiment does not end in failure.
- Why doesn't increasing the number of weak clamps increase the working load of the cable structure?
- The main load that is applied to the rope is longitudinal tension. Consequently, under critical loads, the cable either bursts if the clamps are designed for the load, or slips out of any number of weak fasteners. nine0352
Chains, slings, rigging Updated: 14.07.2022 15:35:01
Maxim
Specialist in the field of fasteners and rigging products.