The wheels that came installed on your vehicle are designed to perfectly fit your vehicle’s suspension, gearing, and bodywork which can affect ride quality and vehicle performance. But that doesn’t mean you can’t have different wheels or rims installed on your car or truck. To understand what wheels will work for your vehicle, we’ll take a look at rim sizes and some basic measurements.
There are many reasons you might want to switch out your rims. Maybe you want an extra set of wheels and tires for easy installation every winter, or you’re looking for added performance and handling. You might even be going for a specific look, including sleek and stylish or rugged and cool. Whatever your reason, it’s important to note that getting the wrong wheel setup could cause a vibration, or some rubbing on suspension components or vehicle body parts.
Les Schwab Tip: Before you change the tire sidewall height, tread width, or rim size on your vehicle, talk to the experts first. We’ll help translate the difference in RPM, tire speed, load index, and speed rating and how it will or will not fit with your vehicle’s suspension, gearing, and bodywork.
First, start with the wheel size for your vehicle. You can find that on the sidewall of the tires on your original wheels or the inside frame of the driver’s door. Check out Tire Size Explained (Reading the Sidewall) for more.
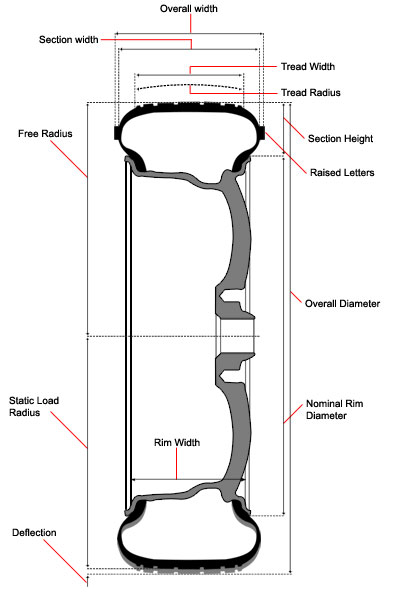
The wheel diameter (in inches or millimeters) is the fifth set of numbers and letters. What do rim size numbers mean? This number represents the distance between the two bead seat areas where the tire is sealed onto the wheel.
The wheel size also includes its width and offset. The width is the distance from each bead seat (from inside to the outside). The offset determines how the wheel and tire set aligns with the wheel well.
The offset is how far inward or outward the mounting surface is in reference to the center-line of the wheel. The center-line is calculated by simply dividing the wheel into two equal halves. Les Schwab has the tools to accurately measure your center-line.
The offset is how far inward or outward the mounting surface is in reference to the center-line of the wheel.
Here's how offset determines the look of your rims. If the hub mounting surface is in front of the center-line, your rims and tire will be pulled inward. This is called positive offset.
If they are behind the centerline, your rims and tire will stick out from the body of the vehicle. This is negative offset.
Les Schwab Tip: Measuring the offset on your vehicle is difficult without removing the tire and wheel. Consult the pros to get the right fit.
To ensure a set of rims fit properly on your vehicle, you’ll need the hub size on your car or truck as well as the wheel center bore measurement and number of wheel studs (as well as the distance between those studs). Les Schwab has those measurements for your vehicle, including bolt patterns.
Most vehicles come with a 4-, 5-, 6-, or 8-lug pattern. These bolt patterns, which are specifically spaced, help narrow your wheel or rim choices. While counting the number of bolts on your vehicle is important before buying a set of rims, it’s vital the wheels you choose match the spacing between the wheel studs on your vehicle.
To measure a 4-lug pattern on a set of rims, measure from the center of two holes across from each other. For a 5-lug pattern, measure from the outside of one wheel stud hole and the center of the opposite. And for 6- and 8-lug patterns, measure from the center of one hole to the center of the opposite wheel stud hole. You’ll either need this measurement in inches or millimeters, depending on the wheel manufacturer.
Remember, there’s no need to take these measurements on your own. The pros at Les Schwab do it every day and can ensure you get the right rims for your vehicle.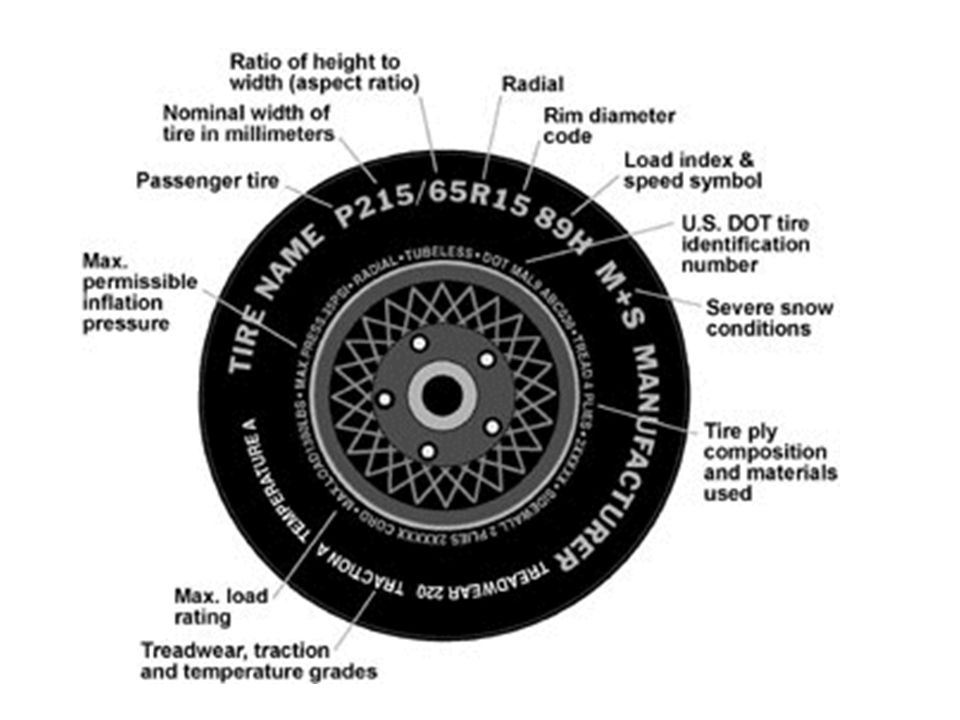
At Les Schwab, we take pride in our custom wheel expertise. Stop by and ask about new wheels for your vehicle. We’ll show you all of your options, whether you’re going for a new look, a boost in performance, a new set of wheels for your winter tires, or simply as a replacement of your current set.
Find A Store Near You
Easily the most challenging cosmetic issue facing your car building project is wheel and tire selection, along with proper fitment. Few things are more discouraging than spending a fortune for new wheels and tires only to discover they do not fit, or perhaps they just don’t look right on your vehicle. Wheels that look sharp on a Camaro may not hold water on a Chevelle. Wheel sizing is also critical. Some enthusiasts want as much wheel and tire as they can stuff in a wheelwell. However, sometimes too big is just too big, making your Camaro look like something of a circus wagon instead of a fierce muscle car.
Chris Plump of American Racing is here to set the record straight on how to measure and select a wheel for a perfect fit. Chris says to never to guess, but know exactly what wheel and tire combo is going to fit your Chevy and be user friendly where the rubber meets the road. You shouldn’t go at wheel and tire selection willy-nilly because this is one of the largest investments you’ll make for your car next to engine and driveline upgrades, and perhaps suspension.
The first order of business is wheel size. There’s wheel width and there’s advertised wheel width. A popular misconception according to Chris is the belief advertised wheel width is wheel width. It isn’t. Advertised wheel width is from bead seat to bead seat. The bead seat is where the tire meets the rim. Actual wheel width is from face to face, meaning from the outermost part of the wheel from side to side.
If you order a wheel based on a manufacturer’s specifications of 8.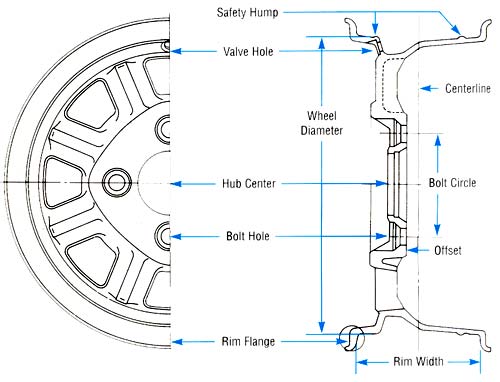 00 inches wide, you’re actually ordering a 9.00-inch wide wheel. In other words, an advertised wheel width of 8.00 inches is actually 9.00 inches wide. If you’re cutting wheel fitment close, ordering an 8.00-inch wheel width could get you into trouble when it’s time for mounting. Another issue is sidewall tire bulge beyond the 9.00-inch actual wheel width.
Backspacing is where wheel fitment and selection gets tricky because everyone has a different interpretation of backspacing and where measurements take place.
Here’s how it is done: Lay a straightedge across the back of the wheel at the lip. Measure from the straightedge to the flange (wheel center and lug holes). This is the wheel’s backspace.
Another hot button item that trips up a lot of us is hub diameter. Take a pair of calipers and measure the hub at its largest point. You want the wheel to fit on the hub nice and snug, but not an interference fit where you feel like you need to force the wheel.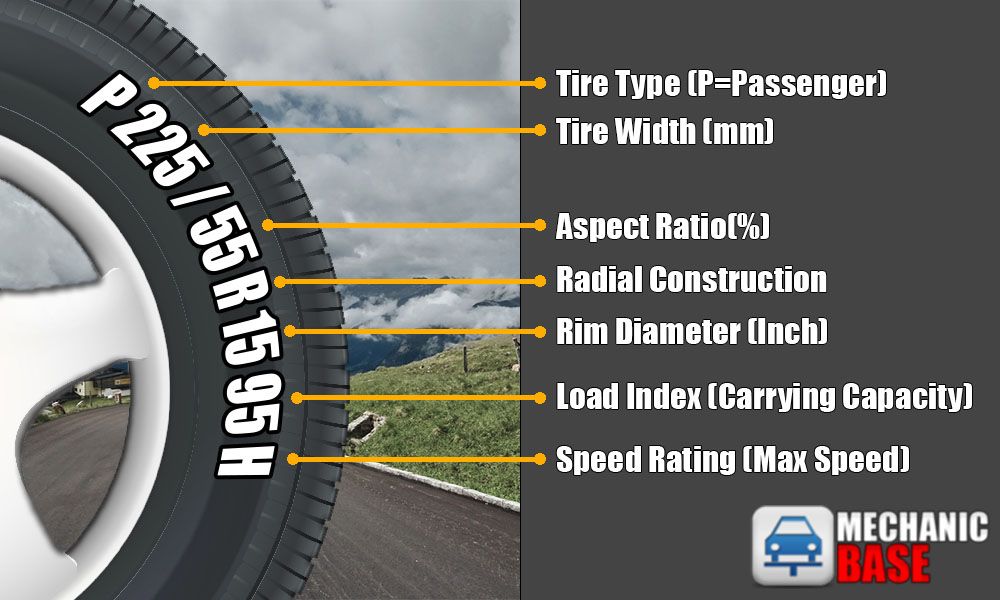 The wheel should glide right onto the hub and stay there. Once you have hub diameter sorted out, check hub length. How far does the hub stick out? It has to be able to fit inside the wheel center cap.
The bottom line with wheel fitment is you must know the overall size of a wheelwell by the time you sit down to place an order with American Racing. The vehicle must be sitting at proper ride height when you begin measuring all dimensions. You must also allow for suspension movement, which can be significant as you cruise down the road and encounter the many irregularities. If you’re going road racing or autocrossing there’s another consideration in the measuring process. How much will your suspension move sideways as you cut the apexes?
Getting Started
There are tools of the trade you’re going to need to properly measure a wheelwell for proper wheel and tire fitment. Here’s what you’ll need:
Straightedge
Yardstick (ideally steel)
Tape measure
Fine thread nuts that fit your lug studs (you may also use lug nuts)
Flat washers of the same size
1. The sheer number of wheel and center combinations at American Racing is stunning because there are so many that can be custom-ordered and made to your backspace and offset in any style you desire.
2. Chris Plump at American Racing tells us there is a real difference between advertised wheel width and actual wheel width. Advertised wheel width is from bead seat to bead seat inside the rim. Actual wheel width is from lip to lip, which adds at least 1-inch to the advertised wheel width. Also, keep sidewall bulge (width) in mind, which goes beyond actual width by as much as 1 inch depending upon the tire and inflation.
3. Wheel diameter is measured from lip to lip across the wheel’s diameter.
4. Wheelhouse height comes into play as shown from inside the trunk or outside of the wheelhouse. Wheelhouse modifications, such as tubs, will change everything.
5. Using a yardstick fastened to the brake rotor hub as shown, measure the distance from the hub to the top of the wheelwell. To get an accurate measurement and proper clearance, put vehicle weight on the axle to get true vehicle ride height. Measure from the center of the wheelwell as well as to each side—three measurement points.
6. Here, Chris Plump measures brake caliper clearance. This can be a slippery slope because there are variations in disc brake packages. You want 0.060-0.100-inch clearance between the wheel and caliper due to thermal expansion of the brake caliper when it is hot. It is strongly suggested you go even greater than 0.100-inch to be safe.
7. Next, measure from the brake hub with a straightedge to the inside of the wheelwell in front or wheelhouse in back. In this case, we’re talking 10 inches.
8. We’re measuring from the hub to the brake rotor flange here.
9. Here’s another way of looking at a wheelhouse. In back, measure with a yardstick/straightedge from the lugs to the top of the wheelhouse at three locations just to make sure you are covered. Make sure you have supported the axle to achieve true vehicle ride height.
10. When it’s time to build a wheel at American Racing, these wheels are precision-checked for runout, which checks the rim for irregularities.
11. This is the wheel assembly turntable. These are shims designed to hold the wheel stationary and on spec in the jig.
12. The wheel is heated as shown to achieve expansion for wheel center installation. The wheel expands, which makes room for installation. The center is positioned and welded.
13. American Racing can produce nearly any wheel size/center combination imaginable.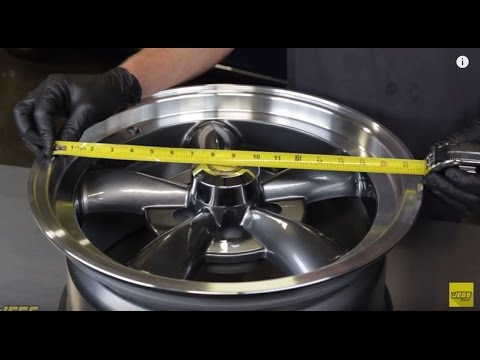 When you visit American Racing, it’s like being a kid in a toy store. Endless selection with great-looking centers.
14. Here’s a wheel center along with the corresponding order. Once you’ve established exactly what you want in terms of size and style, American Racing builds the wheel to your order. This is why you must measure the wheelwells in great detail as they relate to the axles and brakes. Before you is the birth of a VF502 wheel.
15. A custom-ordered wheel center is placed inside the wheel as shown and readied for welding.
16. The wheel and center are set up in this special jig for welding. Welding is automatic and spot-on perfect.
17. Check it out. This precision-welded wheel and center are good to go for our 1969 Camaro project.
18. How wide do you want? Here’s a custom wheel born for drag racing.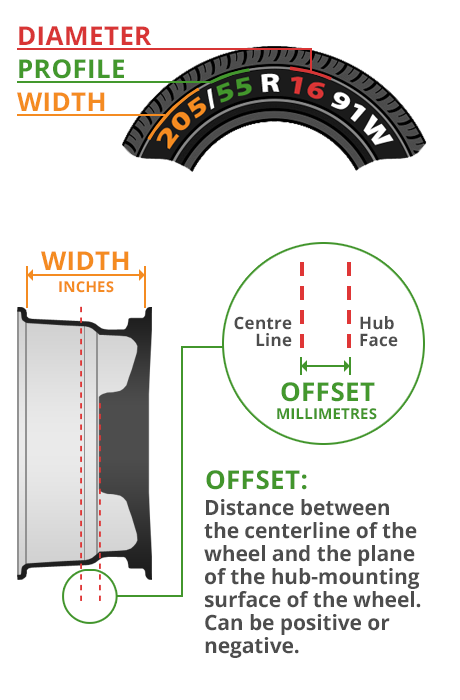
19. All American Racing wheels are dynamic balanced for smoothness. When you receive your set, you can know with great confidence the wheels are true and have been balanced.
20. Our American Racing VF502 Forged wheels are a perfect fit thanks to Chris Plump’s close attention to detail during the measuring process. Measure thrice, build once. This is where you must take your time and check measurements at least three times and write them down. We stress three times because this is too important to screw up.
21. Before you mount tires to the wheels, install the wheels and check the lip-to-chassis clearance to be sure it’s acceptable. In short, check all dimensions when your wheels arrive.
Photos: Steven Rupp
All over the world, motorists often face the difficulty of changing rims. This happens due to forced circumstances - with their defects, wear, malfunction, or at the request of the owner himself because of their not very presentable appearance, inappropriate dimensions, or on other grounds.
The automotive market is always happy to offer its customers a wide range of accessories for different tastes and budgets. Consider how to find out the size of a car wheel disk in order to select the appropriate configurations and avoid selection difficulties. nine0003
The basic size of the disks is a specific set of wheel configurations that are put on the vehicle at the automobile factory in accordance with all the conditions of the technology, the class of the car, as well as the strength studies carried out by the engineers of the concern.
When leaving the factory, the machine acquires the following regular characteristics of rims:
The dimensions of the edge of the rim, necessary for reliable mounting of the tire, are indicated by the letter symbols J or JJ.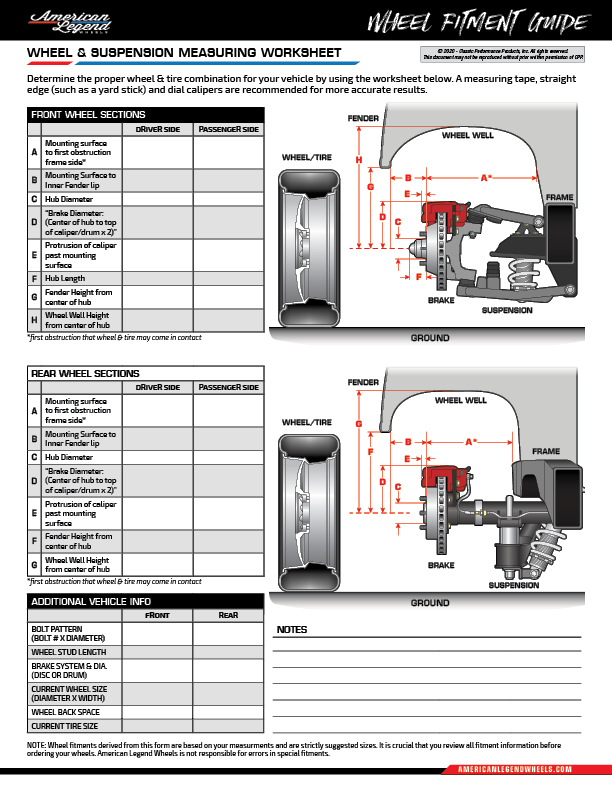 This marking is suitable for wheels of all passenger cars, regardless of make and model.
The thickness of the rim of the product is calculated in inches with a distance of 0.5 units. The final dimension of the rubber depends on it. In standard vehicle modifications, this size is from 4 to 12 inches, which corresponds to a tire with a offset of 145-345 mm.
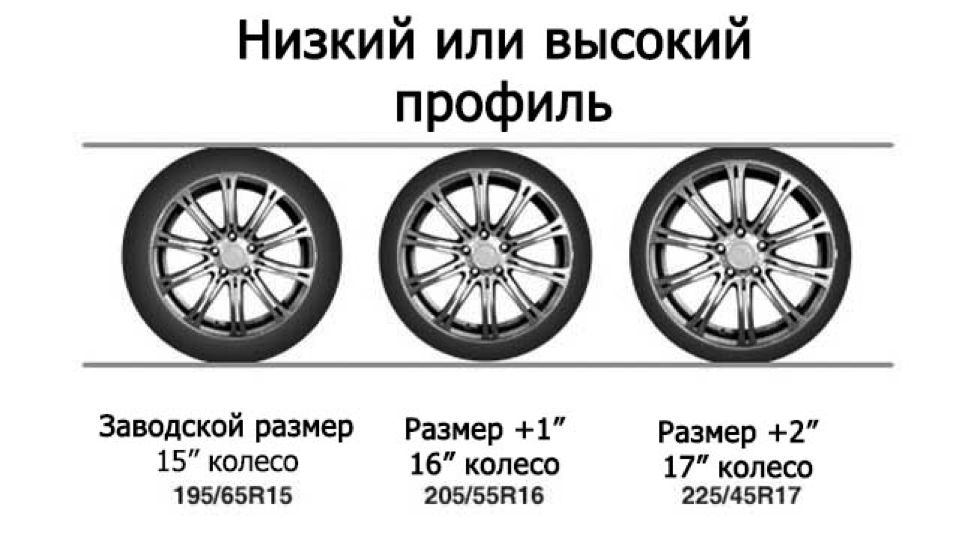
nine0021The most significant value is the radiality of the disk, which is determined without taking into account the edges of the rim diameter and is calculated in inches from 12 to 24. It is written as R12, R13 ... R21, R22, R23, etc. The radiality of the tire depends on this value, which must correspond to this parameter, as well as its profile, which depends on the configuration of the wheel arch and the technical parameters of the manufacturer.
Also, the factory takes into account the range of wheel offsets necessary for a certain brand, that is, the value of the ET disk offset, which will indicate the distance from the place where the disk is attached to the hub to its internal mating plane of the disk. The longer the offset ET, the deeper the tire will be fixed under the wheel arch. nine0003
If the above indicators allow you to indicate a small variation in the dimensions of the wheels, then parameters such as disc bolt pattern and drilling should remain the same, otherwise the rubber will not be put on the hub. So:
disc bolt pattern is a value that calculates the number and length of the studs on the hub. Designed to fix the wheel. For example, in small cars, studs are usually made with a 4 * 9 offset8, 4 * 100, that is, the disk is fixed to 4 anchors, each 98 or 100 mm long. In business class cars or SUVs, the number of fasteners is from 4 to 10 pieces, and their length expands to 140 mm.
drilling (PCD) - an indicator of the mounting hole of the disk, thanks to which it is installed on the axle. Its dimensions range from 50 to 120 mm, depending on the brand, model and class of car.
Each factory disk on the machine is, of course, marked, and upon visual inspection, you can find a line with the indicators listed above on it.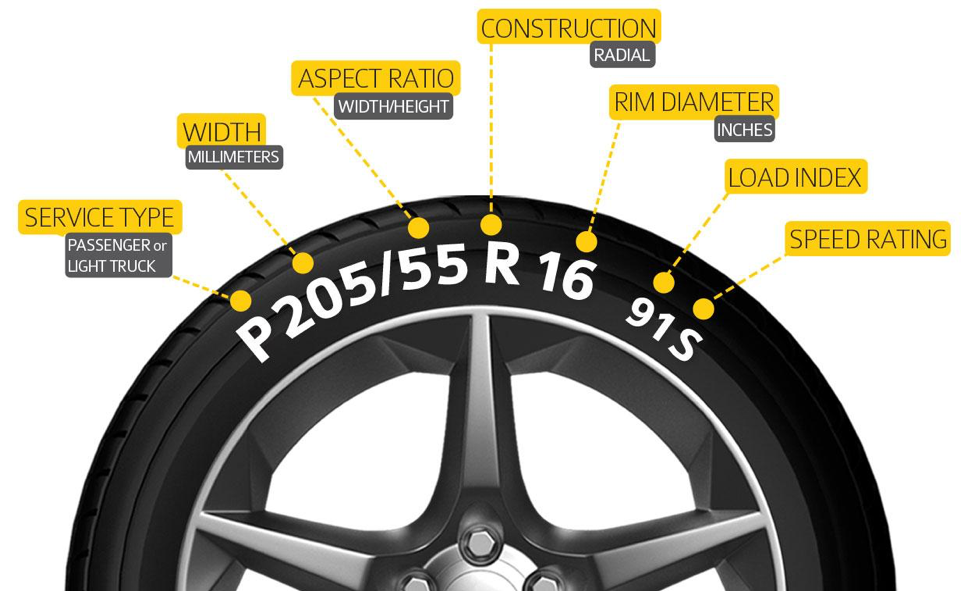 If due to circumstances, for example, in case of wear of the disk, these parameters are not visible, then the wheel can be measured independently and its marking can be set. Proceed as follows:
To determine the width of the disk, it is measured with a tape measure or ruler, the rim of the product in millimeters, and then the resulting distance is divided by 25.4 mm to convert to inches. nine0003
In a similar way, the radiality of the disks is determined, only here their diameter is measured. Some people think that the R symbol means the radius of the rim, but this is incorrect, as this is the necessary distance between two distances on the wheel rim from the center of the rim. The resulting data should be divided by 25.4 mm to get the result in inches.
The greatest difficulty is the measurement of wheel offset, that is, the ET indicator. To do this, you need to remove the wheel, lay it flat on the ground, put a wooden rail on it, equal to the diameter of the metal part of the disk. Then measure the gap to the mating plane of the product in mm. Turn the wheel 180° and repeat the procedure on the reverse side. Substitute the data into the formula for finding ET \u003d (X + Y): 2, where X is the first indicator, Y is the second indicator, and ET is the desired departure size. All results will be in millimeters. nine0003
To determine the PCD or the diameter of the central hole of the disk (DIA), the motorist only needs to measure the maximum distance between the edges of the perforations, and then find the nearest value from the table of deviations and correspondences. The indicator of the holes of the wheel disc depends on the structure of the hub for a particular brand of machine
.
On all original factory wheels, the car owner has access to a marking where the dimension of this product is written. For the correctness of actions, it is worth familiarizing yourself with some illustrative examples:
When changing wheels to more attractive ones, the owner of the Lada sees the inscription on the disk 5. 5J * 15 ET 42 d56.1 4 * 98, which means: a rim rim 5.5 inches wide, edge configuration J, not disassembled (marking "x"), 15 inch radius, 42 mm wheel offset, 56.1 mm drilling (drill hole diameter), bolt pattern for 4 studs of 98 mm each.
The designation J depends on the class, model and weight of the car, it can be replaced by JJ, K, JK, B, P and D, which corresponds to the marking of the purchased disk.
Also on the wheel are hampa or H markings, for example 6.0J * 17 h3 ET38 d65.1 5 * 112. This hump consists of special protrusions along the sides that increase the strength of the attachment to the rubber disk. This parameter can be marked as H - single, on one wheel side, H2 - double, from edge wallpaper or X - truncated. nine0003
For drivers of pickups, minivans and other vehicles intended for the transport of goods, the values \u200b\u200bof the greatest load are indicated, which are marked as follows - Max Load 2000Lb.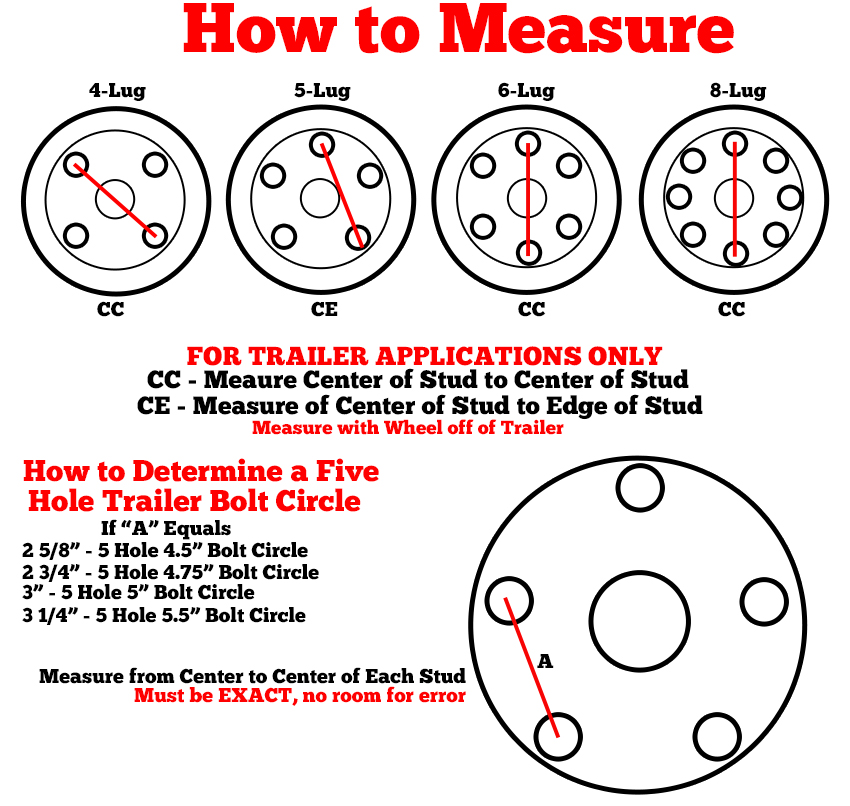 This figure will indicate the largest load of 2000 pounds (910 kg when translated).
An important strength parameter is the tire and rim pressure marking, which is expressed as Max PSI 50 Cold, where the highest tire pressure should not exceed 3.5 kg per cm². nine0003
The last thing that can be found on the rim is the SAE lettering. TUV, ISO or Rostest, indicating that the product has passed the necessary certification after a series of tests and fully meets the requirements of international and Russian standards.
Quite often, the car owner does not seek to deviate from the disk configuration prescribed by the automobile manufacturer. Then it is enough for him to purchase rims according to the same parameters that the manufacturer set. It is important to note that an erroneously selected size of products often leads to rapid wear of hubs, calipers, brake systems and other parts of the suspension, which contributes to the expenditure of significant amounts during repairs.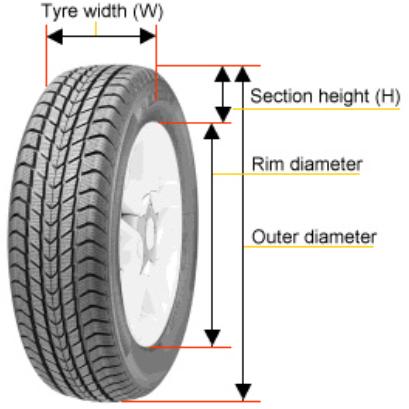 nine0003
The most preferable and competent choice of rims for a particular car model is a purchase at a dealership from a brand distributor. For example, official auto enterprises often provide rims not only of their own production, but also accredited analogues.
In most large sales centers, consultants have special software installed to help you easily determine the given disk sizes. When contacting the center manager, who will fill in the appropriate fields in the program on the computer - the brand, model and variation of the vehicle, year of manufacture, and other data, you can get a whole list of suitable disks that correspond to the geometric characteristics of the client's car. nine0003
Typically, such software is associated with a warehouse system and also allows you to inform the client about the availability of goods in the warehouse, about the brands that produce these rims, as well as about the price and appearance. Based on this information, the buyer can decide on the design of the disc grille, standard size, material, and also calculate his budget.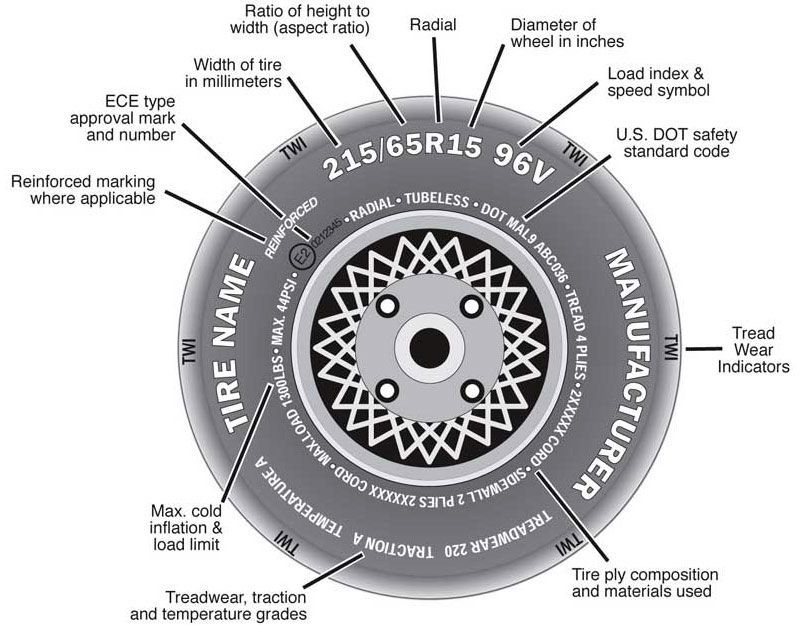
In this way, the client can be sure of the quality of the wheels, as well as the correct selection of the dimensions of the disks, moreover, the warranty obligation will not be removed from his vehicle. Many car owners may not be satisfied with the rigid pricing policy of dealers, but the received guarantee of a long, reliable and safe service life more than justifies possible overpayments. nine0003
To choose wheels for your car, it is not enough to know the required diameter and number of bolts for fastening. The disk must meet a number of parameters. The full size of the disk looks like this: 6.5x16 5/100 ET48 d56.1. The ability to decipher the symbols on the disks will help to avoid mistakes when buying and disappointments when installing on a car.
So:
 54 (1 inch).
 j (can be replaced by "H2") - for ordinary consumers, these values \u200b\u200bare not important, because they are service designations for manufacturers and sellers.
J is a value that encodes data on the design features of the flanges of the rim flanges, such as their angles of inclination, radius / radii of curvature, etc. nine0003
H2 (short for Hump) - the presence of this designation indicates that there are annular protrusions (humps) on the rim shelves that keep the tubeless tire from slipping off the disk. The letter designation H means a single (simple) hump. H2 stands for double hump. There is also a flat hump (Flat Hump) - FH, combined (Combi Hump) - CH, asymmetric (Asymmetric Hump) - AH. If there is an x sign between the designations for the width of the disk and its bore (as in this case), this means that the rim of the disk is one-piece, without humps. nine0003
5/100 - indicate the PCD value of the wheel (Pitch Circle Diameter). The number "5" is the number of mounting holes for nuts (bolts) on the disk, and in millimeters "100" is the diameter along which the mounting holes are located. If necessary, and there are no special devices at hand, measurement can be done with a regular clerical ruler.
IMPORTANT: wheel mounting holes can be located at different diameters, which have a very tight tolerance relative to the center hole. nine0003
Warning! Mounting holes may have a small positive tolerance in diameter, which visually makes it difficult to accurately determine the PCD if it differs from the standard one by only 2 millimeters. For example, it is not uncommon for a wheel with a PCD of 4/98 to be mounted on a hub with a PCD value of 4/100. IT IS DANGEROUS!!! Only one nut (bolt) will be fully tightened. The mounting holes of the remaining 3 nuts will be "taken away", as a result they will be undertightened or tightened with a bias. As a result, the wheel will not be fully seated on the hub. When driving, it will “beat”, there is a high risk that the nuts will gradually unscrew by themselves. nine0003
d - (example: d 66.6) - in millimeters, this is the diameter of the hub, or the value of the diameter of the central hole of the wheel. It is important that this parameter exactly matches the diameter of the landing cylinder of the vehicle hub. Matching the dimensions will provide a pre-centering on the wheel hub, which will facilitate the installation of the bolts.
ET is the letter designation of the disk offset, i.e. the distance in millimeters from the mating plane of the wheel disk mounted on the automobile hub, and the conditional plane that runs in the middle of the wheel rim. nine0003
ET "positive" - the mating plane does not protrude beyond the conditional boundary.
ET "negative" - the mating plane is behind the imaginary plane.
In some countries, there is another ET designation - OFFSET or DEPORT.
ET 46 - positive offset, 46 mm.
ET-20 - negative departure, 20 millimeters.
ET 0 - departure "zero".
Warning! It is dangerous to install wheels on the car, the disc offset of which differs from the regular one recommended by the manufacturer of the car. In an effort to give the car a sporty look, some car owners put discs on it with a reduced reach. The car becomes a little more stable on the track, because the wheel track becomes wider. But at the same time, the load on the vehicle suspension and wheel bearings increases. And vice versa, it is impossible to increase the wheel offset - its rim will rest against the brake disc. All this can lead not only to a breakdown of the car, but also to an emergency on the road. nine0003
Also on the wheel you can find:
Date of manufacture - (example: 0309) - means that the release date of the disc is the third week of 2009.
ISO, SAE, TUV - the stigma that puts the regulatory body. This marking is a confirmation that the wheel complies with international standards/rules.
MAX LOAD 2000LB - value of the maximum wheel load (in pounds or kilograms). In this example, the maximum allowable load limit is 2000 pounds, i.e. 908 kilograms.
PCD 4/100 - connection dimensions.
MAX PSI50 COLD - the maximum air pressure in the tire. In this example, no more than 50 pounds per square inch (3.5 kgf/square cm). nine0003
"COLD" - translated as "cold" - a reminder that pressure measurement must be done in a cold tire.
Even if there is a feeling that the technical terms are not completely clear to you, it is still better to choose disks by consulting with a specialist right at the time of purchase.